18180001 - Blender Gastronoma - Free user manual and instructions
Find the device manual for free 18180001 Gastronoma in PDF.

User questions about 18180001 Gastronoma
0 question about this device. Answer the ones you know or ask your own.
Ask a new question about this device
Download the instructions for your Blender in PDF format for free! Find your manual 18180001 - Gastronoma and take your electronic device back in hand. On this page are published all the documents necessary for the use of your device. 18180001 by Gastronoma.
USER MANUAL 18180001 Gastronoma
text_image
Diagram illustrating a mechanical assembly process with labeled components and directional arrows indicating movement or transformation.OPLYSNINGER OM BORT- SKAFFELSE OG GENBRUG AF DETTE PRODUKT
text_image
Diagram illustrating a mechanical assembly process with labeled components and directional arrows indicating movement or assembly.INFORMATION OM KASSERING OCH ÅTERVINNING AV DENNA PRODUKT
text_image
Diagram illustrating a mechanical assembly process with labeled components and directional arrows indicating movement or assembly.FI
TIETOJA TUOTTEEN HÄVITTÄMISESTÄ JA KIERRÄTTÄMISESTÄ
To get the best out of your new blender, please read through these instructions carefully before using it for the first time. Take particular note of the safety precautions. We also recommend that you keep the instructions for future reference.
GENERAL SAFETY INSTRUCTIONS
- This appliance may only be used by children aged from 8 years and above and persons with reduced physical, sensory or mental capabilities or lack of experience and knowledge if they are supervised or have been given instructions concerning use of the appliance in a safe way and understand the hazards involved. Children must not play with
UK
the appliance.
Cleaning and user maintenance must not be performed by children without supervision.
- Never leave unattended when in use. Keep an eye on any children in the vicinity of the appliance when it is in use. The appliance is not a toy.
- Incorrect use of this appliance may cause personal injury or damage the appliance.
- Use for the intended purpose only. The manufacturer is not responsible for any injury or damage resulting from incorrect use or handling (see also
UK
Warranty Terms).
- For domestic use only. Not for outdoor or commercial use.
- Remove all packaging and transport materials from the inside and outside of the appliance.
- Check that the appliance has no visible damage and that no parts are missing.
- Do not use with any cords other than that supplied.
- Check that it is not possible to pull or trip over the cord or any extension cord.
- The appliance must not be used together with a timer switch or a separate remote
control system.
- Turn off the appliance and remove the plug from the socket when cleaning or when not in use.
- Avoid pulling the cord when removing the plug from the socket. Instead, hold the plug.
- Keep the cord and appliance away from heat sources, hot objects and naked flames.
- Ensure that the cord is fully extended.
- The cord must not be twisted or wound around the appliance.
- Check regularly that neither the cord nor plug is damaged
UK
and do not use the appliance if there is any damage, or if it has been dropped on the floor, dropped in water or damaged in any other way.
- If the appliance, cord or plug have been damaged, have the appliance inspected and if necessary repaired by an authorised repairer.
- Connect to 230 V, 50 Hz only. The warranty is not valid if the appliance is connected to incorrect voltage.
- Never try to repair the appliance yourself. Please contact the store where you bought the appliance for repairs under
warranty.
- Unauthorised repairs or modifications will invalidate the warranty.
SPECIAL SAFETY INSTRUCTIONS
• Always place the appliance on a dry, level and firm surface well away from any edges.
- The appliance must only be switched on when the blender jug with lid has been attached and it contains liquid and/or food.
- Never pour boiling liquid or very hot food into the blender jug. Make sure that the food has a sufficiently low temperature to avoid
UK
burning/scalding in case of skin contact.
- Liquid ingredients must be no hotter than 50 °C and the blender jug must be no more than 1,200 ml full.
- Never add liquid or food above the maximum mark on the blender jug.
- Do not use the appliance if the blender jug is cracked or damaged in any way.
- Never put utensils or your hands into the blender jug while the appliance is switched on.
- Please note that the blades may still rotate for a moment after you switch off
the appliance.
- Be careful not to touch the sharp edges of the blades during use and cleaning!
- Do not lift the blender jug off the motor unit until the blades have stopped completely.
- NOTE! Do not try to remove the base and the blade unit from the blender jug! These parts must not be dismantled, as the blender jug will then not be sealed.
• NOTE! The appliance is equipped with a safety switch to avoid accidental starts. The safety switch is only switched on if the appliance has
UK
been assembled as described in the instructions. If otherwise, the appliance will not operate! If the appliance does not start, we recommend you check the appliance assembly thoroughly.
- NOTE! This appliance is equipped with a thermal switch which switches the appliance off if the motor overheats. If this occurs, allow the appliance to cool down for half an hour so that the thermal switch can reset. If the same thing happens again immediately, this is probably because
the blender jug is too full or contains ingredients that are too hard/tough. Pour more liquid into the blender jug or empty the jug and start again with a smaller amount in smaller pieces.
- Don’t allow the appliance continuously work for more than 5 minutes when the appliance works at “Own program”, or “Pulse”. let the appliance cool before the next use
- Before using for the first time, or after prolonged storage without use, wash any parts that will come into contact with food.

UK
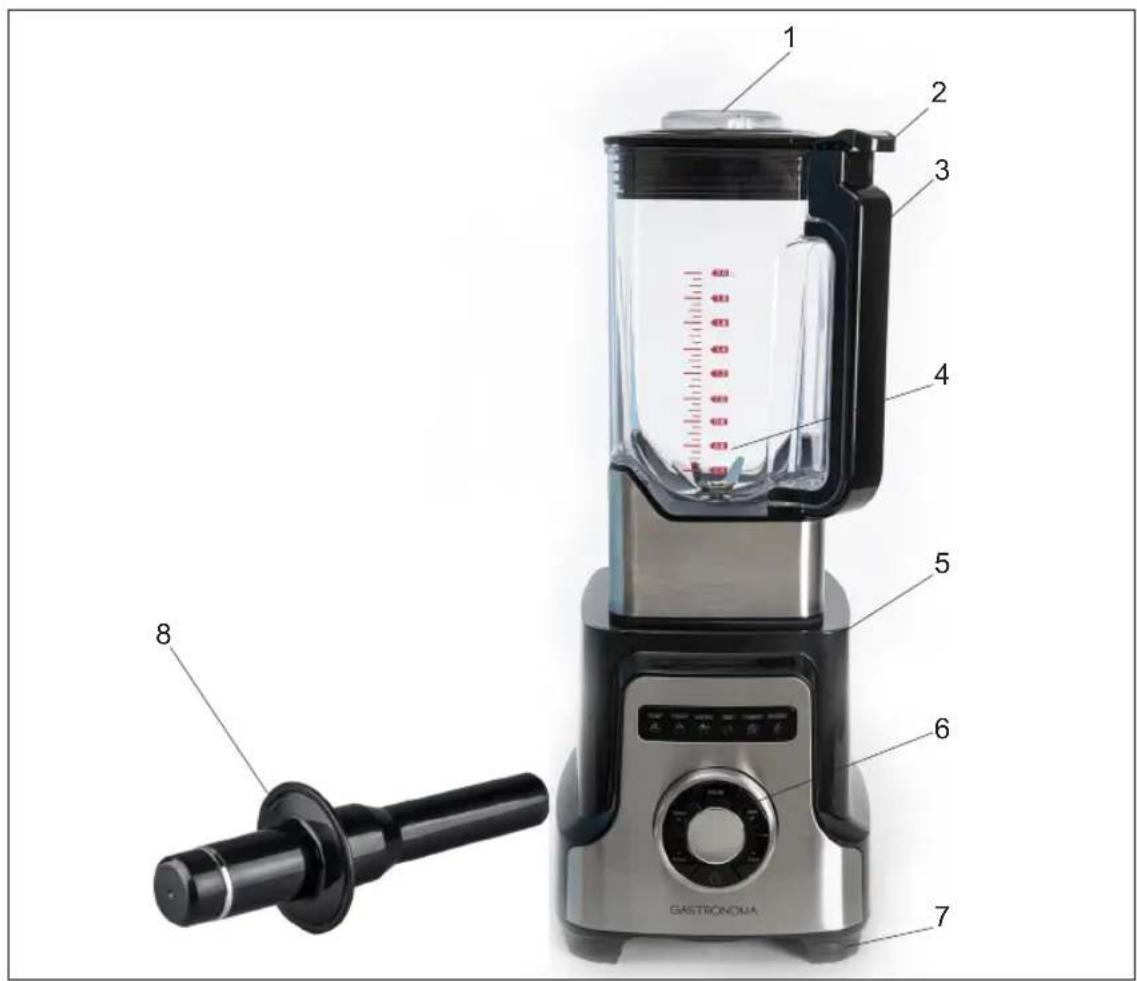
MAIN COMPONENTS
- Measuring cup
- Lid
- Blender jug
- Blade unit
- Motor unit
- Control panel
- Feet
- Tamper
Control panel:
A. Panel with indicators for the 6 programs: Soup, Sauce, Vegetable (vegetable purée/smoothie), Reset (own program), Crusher (crushed ice) and Smoothie (fruit smoothie)
B. Pulse function button
C. Dial for selecting program
D. On/Off button
Timer +/-: Set time
Speed +/-: Set speed
Display: Shows time and speed
- Place the motor unit (5) on a flat surface and make sure it is standing firmly.
- Place the blender jug (3) on the motor unit.
- Attach the lid (2) to the blender jug (3) and make sure it is lying completely flat against the edge of the blender jug.
- Place the measuring cup (1) in the hole in the lid (2) and turn it to lock it in place.
USE
- Lift the lid off the blender jug (may be a bit tight).
- Pour food into the blender jug. First put in the solid ingredients, followed by the liquid ingredients. Solid food such as fruit and vegetables must be cut into squares no bigger than 20×20 mm. Check that the blender jug is not filled above the maximum mark.
- Place the lid on the blender jug and press it firmly so that the safety switch engages. Check that the measuring cup is correctly positioned in the lid.
Remove the measuring cup if you want to use the plunger (8) to press down solid food close to the blade unit. The plunger must never be used when blending hot liquid ingredients.
- Plug in. The display lights up and a signal sounds for 1 second. The on/off button lights up red.
- Then continue with one of the following procedures.
UK
Fixed programs
-
Turn the dial (C) until the symbol for the required program is lit on the panel (A).
-
You can choose from these programs, which (except for the Reset program) have fixed settings for speed and time:
Soup: For preparing soup. The appliance runs for 6 minutes at the highest speed while the soup is heated. It is possible to make hot soup directly in the blender jug.
Sauce: For making tomato sauce, basil sauce, pesto, etc.
Vegetable: For making smoothies with vegetables, including leaves.
Crusher: For preparing crushed ice. The ice cubes must be no larger than about 20 × 20 mm when poured into the blender jug.
Smoothie: For preparing fruit smoothies.
- Place one hand on the lid. Press the on/off button (D) to switch the appliance on with the required program. The on/off button lights up green. Once the program is complete, the appliance will automatically turn off and the on/off button will light up red.
Own program
- Select the Reset program as described above.
- Press the Speed +/- buttons to set the speed to 1, 2, 3, 4, 5, 6, 7, 8, 9 or H.
- Press the Timer +/- buttons to set the cooking time. The interval is 5 seconds for the first minute and then 10 seconds. If you press and hold one of the buttons for 2 seconds, the cooking time changes on its own.
- Place one hand on the lid. Press the on/off button (D) to switch the appliance on with the required settings. The on/off button lights up green. Once the cooking time has passed, the appliance will automatically turn off and the on/off button will light up red.
UK
Pulse function
- Press and hold the pulse function button (B) to blend in short intervals. The appliance stops once you release the button.
After blending
• Always switch off the appliance and wait until the blade unit has stopped completely before taking the measuring cup or lid off the blender jug and filling it with food.
- Wait until the blade unit has stopped completely before lifting the blender jug off the motor unit, as the drive may be damaged otherwise.
- If the motor overheats and stops running, unplug the appliance and allow it cool down for 30 minutes before using it again.
CLEANING
- Unless clearly specified in the cleaning instructions below, please note that none of the parts of this appliance are dishwasher safe.
• Always clean the appliance immediately after use. - Fill the blender jug with 800 ml of water and a few drops of washing-up liquid. Place the lid and measuring cup on the blender jug and place the jug on the motor unit.
- Switch on the appliance at the lowest speed and allow it to run for 30 seconds. Rinse the blender jug under running water. Dry the parts thoroughly. Repeat if necessary.
- Any residues stuck in the blender jug can be removed with a washing-up brush or wooden spatula. Never use metal utensils!
• Take care not to touch the blades at the base of the blender jug during cleaning! - Clean the motor unit by wiping it with a damp cloth. A little washing-up liquid can be added if the appliance is heavily soiled. Do not immerse the motor unit of the appliance in water and make sure no water gets into the motor unit.
- The lid and measuring jug can be cleaned in ordinary washing-up water. Both parts must be completely dry before replacing them.
- Ensure the appliance is clean and dry before storage.
- Never use abrasive detergents or solvents.
UK
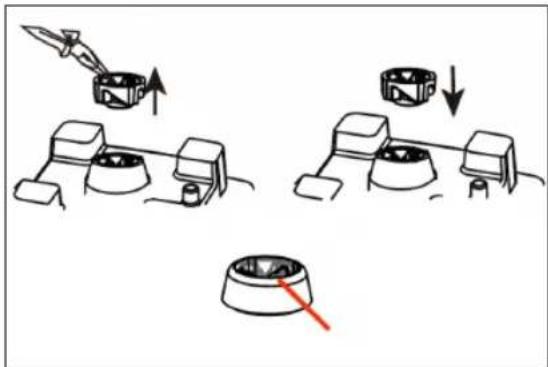
Replacing the drive
The drive between the motor shaft and the blade unit wears down over time and so 1 extra drive is included.
- Lift the fitted drive off the motor unit using a pair of pliers or similar.
- Place the new drive on the motor unit and press down.
- Ensure that the drive does not protrude over the edge of the motor unit.
text_image
Diagram illustrating a mechanical assembly process with labeled components and directional arrows indicating movement or assembly.INFORMATION ON DISPOSAL AND RECYCLING OF THIS PRODUCT
Please note that this product is marked with this symbol:
This means that this product must not be disposed of along with ordinary household waste, as electrical and electronic waste must be disposed of separately.
According to the WEEE directive, every member state must ensure correct collection, recovery, handling and recycling of electrical and electronic waste. Private households in the EU can take used equipment to special recycling stations free of charge. In some member states you can in certain cases return the used equipment to the retailer from whom you purchased it, if you are purchasing new equipment. Contact your retailer, distributor or the municipal authorities for further information on what to do with electrical and electronic waste.
WARRANTY TERMS
The warranty does not apply:
- if the above instructions have not been followed
- if the appliance has been interfered with
- if the appliance has been mishandled, subjected to rough treatment, or has suffered any other form of damage
- if the appliance is faulty due to faults in the electricity supply.
Due to the constant development of our products in terms of function and design, we reserve the right to make changes to the product without prior warning.
UK
FREQUENTLY ASKED QUESTIONS
If you have any questions regarding the use of the appliance and cannot find the answer in this user guide, please try our website at www.commaxx.nl.
You can also see contact details on our website if you need to contact us for technical questions, repairs, accessories or spare parts.
IMPORTER
Commaxx B.V.
Wiebachstraat 37,
NL-6466 NG Kerkrade
Netherlands
www.commaxx.nl
We cannot be held responsible for any printing errors.