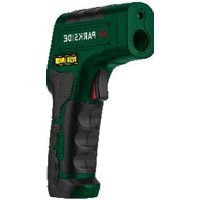
PTI 380 C2 - Measuring equipment PARKSIDE - Free user manual and instructions
Find the device manual for free PTI 380 C2 PARKSIDE in PDF.


| Product Type | Infrared Thermometer |
| Brand | Parkside |
| Model | PTI 380 C2 |
| Category | Measuring Equipment |
| Measurement Range | -50°C to +380°C (-58°F to +716°F) |
| Measurement Accuracy (T > 0°C) | ±1.5°C or ±1.5% of reading |
| Measurement Accuracy (T < 0°C) | ±3°C or ±3% of reading |
| Power Supply | 9V block battery (type 6F22 or 6LR61) |
| Dimensions | Approx. 17.4 x 11.2 x 4.2 cm |
| Weight (without battery) | Approx. 189 g |
| Main Functions | Infrared measurement, comparison with reference value, color display and audible alarm, 8-point laser pointer |
| Laser | Class 2, wavelength 650 nm, power <1 mW |
| Operating Temperature | 0°C to 40°C |
| Air Humidity | ≤ 75% |
| Power On/Off | By measurement button or ON/OFF key; automatic shutdown after 60 seconds |
| Temperature Unit | °C or °F (selectable) |
| Adjustable Tolerance Ranges | Normal, 0.5°C/1°F, 3°C/5°F, 5.5°C/10°F |
| Care and Cleaning | Dry or slightly damp cloth with dish soap; compressed air for the IR sensor |
| Safety | Do not look into the laser beam; keep out of reach of children; avoid reflective surfaces |
| Warranty | 3 years from date of purchase |
| Spare Parts | Available during warranty period; contact customer service |
| Article Number (IAN) | 465690_2404 |
Frequently Asked Questions - PTI 380 C2 PARKSIDE
User questions about PTI 380 C2 PARKSIDE
0 question about this device. Answer the ones you know or ask your own.
Ask a new question about this device
Download the instructions for your Measuring equipment in PDF format for free! Find your manual PTI 380 C2 - PARKSIDE and take your electronic device back in hand. On this page are published all the documents necessary for the use of your device. PTI 380 C2 by PARKSIDE.
USER MANUAL PTI 380 C2 PARKSIDE
natural_image
Digital thermometer device with digital display and control buttons (no visible text or symbols)INFRAROT-TEMPERATURMESSGERÄT/INFRARED THERMOMETER/THERMOMÈTRE INFRAROUGE PTI 380 C2
DE AT CH
INFRAROT- TEMPERATURMESSGERÄT
INFRARED THERMOMETER
Operation and safety notes
NL BE
INFRAROOD TEMPERATUURMEETAPPARAAT
natural_image
Diagram of a firearm with three black oval shapes emitting beams from a targeting gun (no text or symbols)Bitte beachten Sie:
Intended use Page 27
Functionality......Page 27
Description of parts ......Page 28
Scope of delivery Page 28
Technical data......Page 28
Safety instructions ......Page 29
Safety instructions for batteries/ rechargeable batteries ....Page 30
Before use......Page 31
Inserting/changing the battery ......Page 31
Start-up Page 32
Switching on and off......Page 32
Selecting the temperature unit......Page 32
Measuring temperature......Page 33
Show temperature deviation......Page 34
Determine reference value ......Page 34
Select tolerance range ......Page 34
Scan temperature deviation......Page 35
Example of use ......Page 36
Battery state display ......Page 36
Troubleshooting......Page 36
Maintenance and cleaning ......Page 38
Disposal Page 38
Warranty......Page 39
Warranty claim procedure......Page 40
Service Page 41
| List of pictograms used | |
 | Please read the instructions for use. |
 | Danger of explosion! |
 | Wear safety gloves! |
 | Attention! |
 | Protect yourself from laser radiation! |
 | Do not stare into the laser beam! |
 | Direct current/voltage |
 | Including battery |
| [2A0Y] | Safety informationInstructions for use |
 | CE mark indicates conformity with relevant EU directives applicable for this product. |
Infrared thermometer
- Introduction
We congratulate you on the purchase of your new product. You have chosen a high quality product. The instructions for use are
part of the product. They contain important information concerning safety, use and disposal. Before using the product, please familiarise yourself with all of the safety information and instructions for use. Only use the product as described and for the specified applications. If you pass the product on to anyone else, please ensure that you also pass on all the documentation with it.
- Intended use
The product is used to measure surface temperatures ranging from -50°C to +380°C ( -58°F to +716°F ) as well as comparing temperatures with a previously recorded reference value. The surfaces of several objects may be measured successively and the temperature deviations compared visually, by colour and acoustically. Only use the built-in laser pointer with 8 dot circle for measuring temperature to locate a measuring area on the product under test.
The product is only intended for private use and may not be used for commercial or industrial purposes. Only use the product in dry environments, resp. indoors. Any use of the product for other or additional purposes is considered improper use. Any claims for damages resulting from improper use are excluded. The user is solely responsible for any and all damages or injuries due to risks of improper use.
Functionality
The infrared sensor 2 acquires and measures the infrared radiation emitted by the surface it is aimed at. The product determines the temperature of the surface from this infrared radiation.
The product features a laser pointer with 8 dot circle 1, pointing at the middle of the measuring range, to visualise the area of the surface the infrared sensor is acquiring the radiation from. The measuring range is a circular area around this laser pointer with 8 dot circle which increases as the distance to the
measuring distance increases. For details, please refer to chapter "Measuring temperature".
• Description of parts (Fig. A, B, C)
1 Laser pointer with 8 dot circle
2 Infrared sensor
3 Measure button
4 Battery cover
5 Display
6 Reference value display
7 Temperature unit
8 Measurement
9 Tolerance range selection
10 button
11 °C/°F/SET button
12 button
13 ON/OFF button
14 9V block battery
- Scope of delivery
1 Infrared thermometer
1 9V block battery
1 Set of instructions for use
- Technical data
Power supply: 9V (1 x 9V block bat- ===
tery type 6F22 or 6LR61)
Measuring range: -50°C to +380°C
(-58°F to +716°F)
Measurement accuracy for T > 0°C:
±1.5°C or ±1.5%
of the measurement
Measurement accuracy for T < 0°C:
±3°C or ±3%
of the measurement
Laser class: 2
Laser wavelength: 650nm
Laser output power: <1 mW
Operating temperature: 0°C to 40°C
Humidity:
≤ 75%

Safety instructions
Before using the product, please familiarise yourself with all of the safety information and instructions for use! When passing this product on to others, please also include all the documents!
Danger from laser radiation

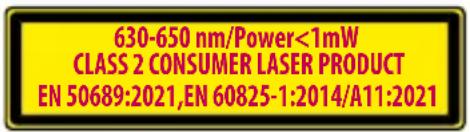

This product features a Class 2 laser.
■ Never direct the laser beam at persons or animals.
- Never look directly into the beam. Even a weak laser beam can cause eye damage.
■ Never point the laser beam at reflective surfaces or materials. Even a reflected laser beam can cause eye damage.
■ Any adjustment intensifying the laser beam is prohibited. Risk of injury!
We assume no liability for damages arising from manipulating the laser product and for failure to observe the safety notices.
This product may be used by children age 8 years and up, as well as by persons with reduced physical, sensory or mental capacities, or lacking experience and knowledge, so long as they are supervised or instructed in the safe use of the appliance and understand the associated risks. Do not allow children to play with the product. Cleaning and user maintenance should not be performed by children without supervision.

- Do not use this product if you notice any damage.
- Keep away from open flames!
- Protect the product from moisture and from liquids entering the product.
- Avoid direct sunlight.
- Do not modify the product.
CAUTION! EXPLOSION HAZARD! Do not use the product in locations with a fire hazard or explosion hazard, for example near flammable liquids or gasses.

CAUTION! EXPLOSION HAZARD! Do not use the
product in locations with a fire hazard or explosion hazard, for example near flammable liquids or gasses.

Safety instructions for batteries/rechargeable batteries
■ DANGER TO LIFE! Keep batteries/rechargeable batteries out of reach of children. If accidentally swallowed seek immediate medical attention.
■ Swallowing may lead to burns, perforation of soft tissue and death. Severe burns can occur within 2 hours of ingestion.
DANGER OF EXPLOSION! Never recharge non-rechargeable batteries. Do not short-circuit batteries/rechargeable batteries and/or open them.
Overheating, fire or bursting can be the result.
■ Never throw batteries/rechargeable batteries into fire or water.
- Do not exert mechanical loads to batteries/rechargeable batteries.
Risk of leakage of batteries/rechargeable batteries
- Avoid extreme environmental conditions and temperatures, which could affect batteries/rechargeable batteries, e.g. radiators/directsunlight.
If batteries/rechargeable batteries have leaked, avoid contact with skin, eyes and mucous membranes with the chemicals! Flush immediately the affected areas with fresh water and seek medical attention!
WEAR PROTECTIVE GLOVES! Leaked or damaged batteries/rechargeable batteries can cause burns on contact with the skin. Wear suitable protective gloves at all times if such an event occurs.
In the event of a leakage of batteries/rechargeable batteries, immediately remove them from the product to prevent damage.
■ Only use the same type of batteries/rechargeable batteries. Do not mix used and new batteries/rechargeable batteries.
■ Remove batteries/rechargeable batteries if the product will not be used for a longer period.
Risk of damage of the product
■ Only use the specified type of battery/rechargeable battery!
- Insert batteries/rechargeable batteries according to polarity marks (+) and (-) on the battery/rechargeable battery and the product.
■ Use a dry, lint-free cloth or cotton swab to clean the contacts on the battery/rechargeable battery and in the battery compartment before inserting!
■ Remove exhausted batteries/rechargeable batteries from the product immediately.
- Before use
Remove the protective film from the display.
Note: To operate the product, insert the included battery (9V block). Proceed as described below:
- Inserting/changing the battery
☐ To insert/change the 9V block battery, open the battery cover 4. To do so, slide the battery cover in the direction of the arrow and flip open.
☐ If applicable, remove the old 9V block battery and insert a new one. If necessary, clean the contacts of the battery compartment and the 9V block battery. Only use a 9V block battery type 6F22 or 6LR61.
☐ Ensure the correct polarity when inserting the 9V block battery. This is indicated on the battery cover (Fig. C).
☐ Close the battery cover.
Your infrared thermometer is now ready for use.
- Start-up
☐ Hold the handle of the product so the index finger can operate the measure button 3 and the thumb buttons 10 to 12.
- Switching on and off
Press measure button or the ON/OFF button 13 to switch on the product. The display 5 will light up and a brief tone will sound.
☐ Press and hold the ON/OFF button to switch off the product. Two brief tones will sound.
When the product is no longer being used, the backlight of the display will switch off after approx. 16 seconds. After approx. 60 seconds the product will automatically switch off; this is indicated by two brief tones.
- Selecting the temperature unit
After switching on, the last temperature unit used will initially be selected.
Briefly press the °C/°F/SET button to change the temperature unit 7 (°C or °F).
The official temperature unit in Europe is ° C.
- Measuring temperature
Allow about 30 minutes for the product to acclimate to the conditions of the environment.
Hold the measure button whilst aiming the laser pointer with 8 dot circle 1 at the surface you wish to measure.
☐ The temperature is measured whilst pressing the measure button; the display 5 will read "SCAN".
After releasing the measure button the last temperature measured will appear in the display and the laser pointer with 8 dot circle will be deactivated.
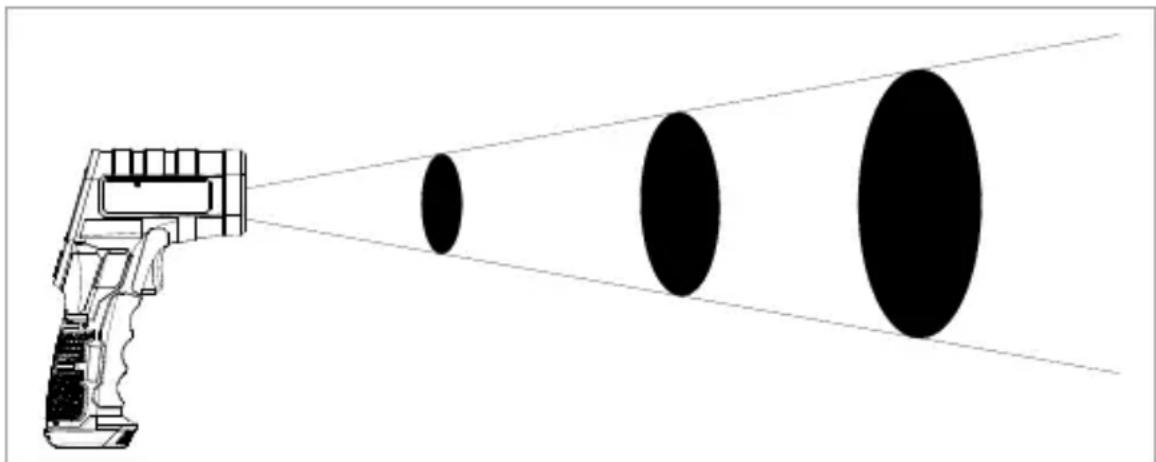
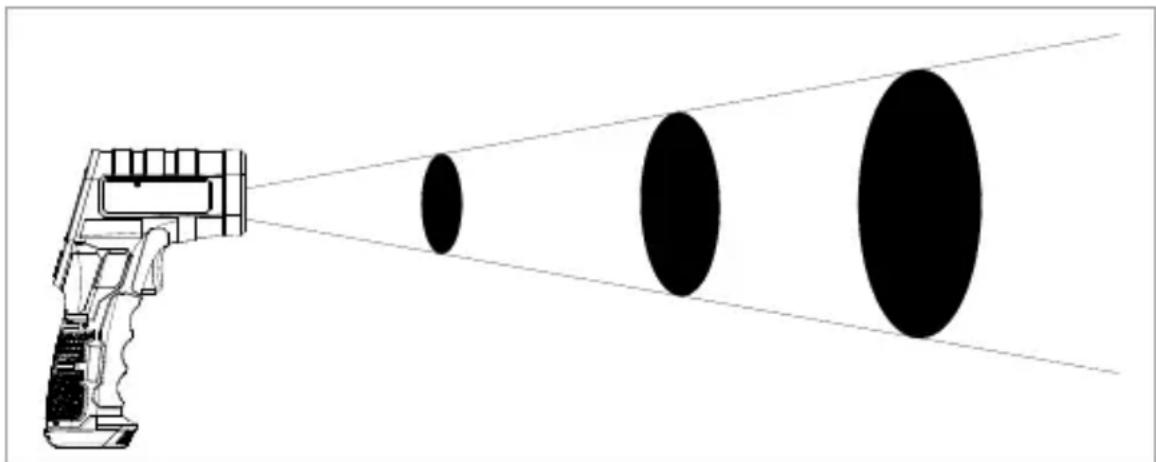
The temperature determined is the average temperature of the area measured. The area measured is circular. The diameter of the area measured "S" is one twelfth of the distance between the surface and the infrared sensor 2 "D".
Below you will find some values as a guide:
| S (for surface diameter): 10mm 20mm 30mm | |
| D (for distance): 120mm 240mm 360mm |
natural_image
Diagram of a firearm with three black ellipses projecting through a pointed beam (no text or symbols)Please note:
☐ The surface of the target object must be significantly larger than the measuring diameter of the product. Otherwise the measurement will not be reliable.
□ Always measure at the closest possible distance to the measuring surface.
☐ Aim the product as vertical to the measuring surface as possible.
Do not measure in dusty, steaming or smoky atmospheres.
Do not measure through transparent materials such as glass or plastic.
● Show temperature deviation
The temperature deviation is the difference between a previously established reference value and a temperature measurement. The display 5 indicates the deviations as numeric values and displays them in colour. An acoustic signal also sounds.
- Determine reference value
Press the measure button and aim the laser pointer with 8 dot circle 1 at the area of which you wish to use the temperature as the reference. The temperature is indicated in the display 5.
Whilst holding the measure button, press the °C/°F/SET button 11 to use the temperature value as the reference value. This temperature is indicated in the display next to "REF" on the reference value display 6.
- Select tolerance range
You can set the temperature deviation from the reference value as of which the product will respond with a visual and acoustic signal.
To do so, whilst the reference value appears in the display 5, press the button 10 or the button 12. Using this
button the ▼ symbol will move to the right (▶) or to the left (◀) above the tolerance range selection 9 in the display.
Use this method to select the tolerance range indicated below the display:
| Normal | 0.5°C1°F | 3°C5°F | 5.5°C10°F |
Note: Under “Normal” mode, the tolerance range for temperature deviation function is turned-off. So, no display color change/acoustic signal will be observed for any amount of temperature deviation from reference value under “Normal” mode.
- Scan temperature deviation
Select a reference temperature as described above.
Press the measure button and aim the laser pointer with 8 dot circle 1 at the area you wish to measure. The temperature is indicated in the display 5.
Hold the measure button whilst scanning, and slowly and steadily move the laser pointer with 8 dot circle across the surface you wish to measure. The temperature deviations between the reference value and the measurement are indicated as follows:
| Visual indication | Acoustic indication | Cause |
| Red display background | Rapid tone series | The upper temperature threshold has been exceeded. |
| Green display background | No tone Within the temperature range setting. | |
| Blue display background | Slow tone series | The value is below the lower threshold. |
Example of use
To e.g. test cold air entering the space between a window frame and brickwork, first scan the temperature along the entire frame, next to the closed window. Select the warmest area of the frame as the reference temperature, then e.g. a temperature variation of 3° C/ 5° F.
Now steadily scan again, along all sides of the window, next to the frame. The blue colour display and a slow tone series indicates a possible influx of cold air with a difference of 3° C/ 5° F.
- Battery state display
The battery symbol 1 appears in the display 5 as soon as the battery voltage is too low.
Insert a new battery as described in chapter "Inserting/ changing the battery" when this symbol appears.
A drained battery may leak. In addition, the measurement may not be accurate as specified in “Technical data” if the battery voltage is low.
- Troubleshooting
Note: The product contains sensitive electronic components. For this reason it is possible that it can be disrupted by radio transmitting equipment in the immediate vicinity. If you notice that the product is malfunctioning, remove any sources of interference from the area around the product.
Note: Electrostatic discharge can cause malfunctions. In the event of such malfunctions, briefly remove and replace the battery.
The following table will help you locate and correct minor malfunctions:
| Fault Possible cause Solution | ||
| The display 5 is blank. | The 9V block battery 14 is inserted incorrectly. | Insert the battery as shown on the battery cover 4 (Fig. C). |
| The battery is drained. | Insert a new battery. | |
| When the product is turned on, the display shows “----” for 5 seconds (approx.) & shows OFF for next 3 seconds (approx.) and then the display turns off. | The ambient temperature is too low or too high. | Turn-off the product. Move to the place, where the ambient temperature can be reached within the mentioned range. Allow the product to stabilize in the working ambient temperature range for minimum 30 minutes. Then, turn on the product. The product should function normally. |
| Incorrect temperature value is shown on the display. | Low battery. Replace with new battery. | |
| Did not allow about 30 minutes for the product to acclimate to the environmental condition after an ambient condition has been changed drastically. | Allow about 30 minutes for the product to acclimate to the environmental condition. | |
| Not suitable measuring surface. | Change the measuring surface. | |
● Maintenance and cleaning
■ Ensure that no water enters the product during cleaning!
☐ Regularly clean the product with a dry, lint-free cloth.
☐ If the product is very dirty, use a slightly damp cloth with a detergent.
☐ Ensure no objects enter the opening for the infrared sensor. If necessary, only clean the opening with light compressed air.
●Disposal
The packaging is made entirely of recyclable materials, which you may dispose of at local recycling facilities.
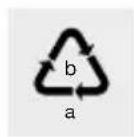
Observe the marking of the packaging materials for waste separation, which are marked with abbreviations (a) and numbers (b) with following meaning: 1–7: plastics/20–22: paper and fibreboard/80–98: composite materials.

Contact your local refuse disposal authority for more details of how to dispose of your worn-out product.

To help protect the environment, please dispose of the product properly when it has reached the end of its useful life and not in the household waste. Information on collection points and their opening hours can be obtained from your local authority.

flowchart
graph LR
    A["FR"] --> B["+"]
    B --> C["+"]
    C --> D["Recycle"]
    D --> E["FR"]
    E --> F["Cet appareil et ses plies se recycient"]
    F --> G["A déposer en MARGAIN"]
    F --> H["A déposer en DECHETURE"]
    G --> I["DU"]
    H --> J["OU"]
    style A fill:#f9f,stroke:#333
    style E fill:#ccf,stroke:#333
    style F fill:#cfc,stroke:#333
    style G fill:#fcc,stroke:#333
    style H fill:#fcc,stroke:#333
    style I fill:#ffc,stroke:#333
    style J fill:#ffc,stroke:#333
The product incl. accessories and packaging materials are recyclable and are subject to extended producer responsibility. Dispose them separately, following the illustrated Info-tri (sorting information), for better waste treatment. The Triman logo is valid in France only.
Faulty or used batteries/rechargeable batteries must be recycled. Return the batteries/rechargeable batteries and the product to the available collection points.

Environmental damage through incorrect disposal of the batteries/rechargeable batteries!
Batteries/rechargeable batteries may not be disposed of with the usual domestic waste. They may contain toxic heavy metals and are subject to hazardous waste treatment rules and regulations. The chemical symbols for heavy metals are as follows: Cd = cadmium, Hg = mercury, Pb = lead. That is why you should dispose of used batteries/rechargeable batteries at a local collection point.
- Warranty
The product has been manufactured to strict quality guidelines and meticulously examined before delivery. In the event of material or manufacturing defects you have legal rights against the retailer of this product. Your legal rights are not limited in any way by our warranty detailed below.
The warranty for this product is 3 years from the date of purchase. The warranty period begins on the date of purchase. Keep the original sales receipt in a safe location as this document is required as proof of purchase.
Any damage or defects already present at the time of purchase must be reported without delay after unpacking the product.
Should the product show any fault in materials or manufacture within 3 years from the date of purchase, we will repair or replace it – at our choice – free of charge to you. The warranty period is not extended as a result of a claim being granted. This also applies to replaced and repaired parts.
This warranty becomes void if the product has been damaged, or used or maintained improperly.
The warranty covers material or manufacturing defects. This warranty does not cover product parts subject to normal wear and tear, thus considered consumables (e.g. batteries, rechargeable batteries, tubes, cartridges), nor damage to fragile parts, e.g. switches or glass parts.
Additional information:
Imported by OWIM GmbH & Co. KG Stiftsbergstraße 1, 74167 Neckarsulm, Email: battery-service@lidl.com, homepage: www.owim.com
- Warranty claim procedure
So that your request can be processed quickly, please observe the following instructions:
o For all inquiries, please have the receipt and item number (IAN 465690_2404) ready as proof of purchase.
The article number can be taken from the identification label on the product, engraving on the product, the front cover of your manual (at the bottom left), or the sticker on the back or bottom of the product.
o If malfunctions or other defects arise, first contact the service department indicated below by phone or email.
- You can then send a product recorded as defective to the communicated service address postage-free, making sure to enclose proof of purchase (receipt) and information on the details of the defect and when it occurred.
0

You can download and view this and numerous other manuals at parkside-diy.com. This QR code takes you directly to parkside-diy.com. Choose your country and use the search screen to search for the operating instructions. Entering the item number (IAN) 465690_2404 takes you to the operating instructions for your item.
Service
GB Service Great Britain
Tel.: 0800 0569216
E-Mail: owim@lidl.co.uk
IE Service Ireland
Tel.:1800200736
E-Mail: owim@lidl.ie
CE
natural_image
Diagram of a firearm with three black oval shapes emitting beams from a targeting gun (no text or symbols)Veuillez noter :
natural_image
Diagram of a firearm with three black oval shapes emitting beams from a targeting gun (no text or symbols)Homepage: www.owim.com
natural_image
Diagram of a handgun emitting three black ellipses from a target, with no text or symbols present.Uwaga:
natural_image
Warning symbol with black triangular triangle and radiating lines, no text or numbers presentnatural_image
Diagram of a firearm with three black ellipses projecting through a pointed beam (no text or symbols)Nezapomeňte:
natural_image
Diagram of a firearm with three black ellipses projecting through a diagonal line, no text or symbols presentDbajte prosím na:
natural_image
Diagram of a firearm with three black ellipses projecting onto a target, showing perspective projection (no text or symbols)Tenga en cuenta:
| S (for surface-diameter = fladedia-meter): | 10mm | 20mm 30mm | |
| D (for distance = afstand): 120mm | 240mm | 360mm |
natural_image
Diagram of a firearm with three black ellipses projecting through a pointed beam (no text or symbols)natural_image
Diagram of a firearm with three black oval shapes emitting beams, no text or symbols presentHomepage: www.owim.com
natural_image
Diagram of a firearm with three black oval shapes emitting beams from a targeting gun (no text or symbols)PDF ONLINE
parkside-diy.com


- INFRAROT-TEMPERATURMESSGERÄT/INFRARED THERMOMETER/THERMOMÈTRE INFRAROUGE PTI 380 C2
- Bitte beachten Sie:
- Safety instructions ......Page 29
- Before use......Page 31
- Start-up Page 32
- Troubleshooting......Page 36
- Maintenance and cleaning ......Page 38
- Disposal Page 38
- Warranty......Page 39
- Infrared thermometer
- - Introduction
- - Intended use
- Functionality
- • Description of parts (Fig. A, B, C)
- - Scope of delivery
- - Technical data
- Safety instructions
- Danger from laser radiation
- CAUTION! EXPLOSION HAZARD! Do not use the
- Safety instructions for batteries/rechargeable batteries
- Risk of leakage of batteries/rechargeable batteries
- Risk of damage of the product
- - Before use
- - Inserting/changing the battery
- - Start-up
- - Switching on and off
- - Selecting the temperature unit
- - Measuring temperature
- Please note:
- ● Show temperature deviation
- - Determine reference value
- - Select tolerance range
- - Scan temperature deviation
- Example of use
- - Battery state display
- - Troubleshooting
- ● Maintenance and cleaning
- ●Disposal
- Environmental damage through incorrect disposal of the batteries/rechargeable batteries!
- - Warranty
- Additional information:
- - Warranty claim procedure
- Service
- Veuillez noter :
- Uwaga:
- Nezapomeňte:
- Dbajte prosím na:
- Tenga en cuenta:
Brand : PARKSIDE
Model : PTI 380 C2
Category : Measuring equipment