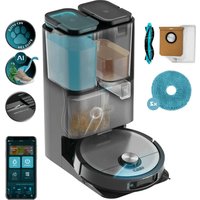
Conga 14090 Twice Roller Home&Fill - Robot vacuum CECOTEC - Free user manual and instructions
Find the device manual for free Conga 14090 Twice Roller Home&Fill CECOTEC in PDF.

| Product type | Robot vacuum with automatic emptying station |
| Model | Conga 14090 Twice Roller Home&Fill |
| Reference | EU01_100829 |
| Power supply (robot) | 24 V - 1.2 A |
| Battery (robot) | Rechargeable lithium-ion, 14.4 V, 5200 mAh |
| Power supply (base) | 220-240 V~, 50/60 Hz, output 24 V - 1.2 A |
| Power (base) | 1000 W |
| Connectivity | Wi-Fi IEEE 802.11 b/g/n 2.4 GHz, Bluetooth |
| Cleaning functions | Sweeping, floor washing, simultaneous sweeping + washing |
| Tanks (base) | Clean water tank and dirty water tank, capacity not specified |
| Dust bag capacity | Not specified, recommended replacement every 6 to 8 weeks |
| Cleaning modes | Sweeping, washing, sweeping+washing; scheduling via app |
| Automatic emptying function | Yes, the base automatically empties the robot's dust bin |
| Self-cleaning function of the roller brush | Yes, with drying |
| Sensors | ToF, anti-collision, laser, front/rear infrared, anti-drop, ultrasonic |
| Brushes | Main brush, side brush, roller brush (for washing) |
| Do Not Disturb mode | Yes, default 22:00-08:00, adjustable |
| Noise level | Not specified |
| Recommended maintenance | Clean brushes and sensors regularly; replace filters every 3-6 months, side brushes every 3-6 months, main brush every 6-12 months, roller brush every 3-5 months |
| Safety | Do not vacuum liquids, do not use on rough surfaces; automatic stop in case of anomaly |
| Warranty | Legal compliance; contact Cecotec technical support at +34 9 63 21 07 28 |
Frequently Asked Questions - Conga 14090 Twice Roller Home&Fill CECOTEC
User questions about Conga 14090 Twice Roller Home&Fill CECOTEC
0 question about this device. Answer the ones you know or ask your own.
Ask a new question about this device
Download the instructions for your Robot vacuum in PDF format for free! Find your manual Conga 14090 Twice Roller Home&Fill - CECOTEC and take your electronic device back in hand. On this page are published all the documents necessary for the use of your device. Conga 14090 Twice Roller Home&Fill by CECOTEC.
USER MANUAL Conga 14090 Twice Roller Home&Fill CECOTEC
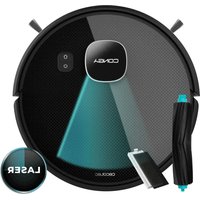
natural_image
Exterior view of a modern black robotic vacuum cleaner with control panel and display screen (no visible text or symbols)| SOMMAIRE | ÍNDICE | |||
| 1. Pièces et composants | 75 | 1. Peças e componentes 132 | ||
| Instrucciones de seguridad | 4 | 2. Avant utilisation | 78 | 2. Antes de usar 134 |
| Safety instructions 8 | 3. Funcionnement | 79 | 3. Funcionamento 135 | |
| Instructions de sécurité | 12 | 4. Nettoyage et entretien | 84 | 4. Limpeza e manutenção 140 |
| Sicherheitshinweise | 16 | 5. Résolution de problèmes | 87 | 5. Resolução de problemas 143 |
| Istruzioni di sicurezza | 20 | 6. Spécifications techniques | 93 | 6. Especificações técnicas 148 |
| Instruções de segurança | 24 | 7. Recyclage des équipements électricques et électroniques | 93 | 7. Reciclagarn de produtos elétricos e eletrónicos 149 |
| Veiligheidsinstructics | 28 | |||
| Instrukcje bezpieczefistwa 32 | 8. Garantie et SAV 93 | 8. Garantia e SAT 149 | ||
| Bezpečnostni pokyny | 36 | 9. Copyright | 94 | 9. Copyright 149 |
| 10. Déclaration de conformité simplifiée de l'UE | 94 | 10. Déclaration de conformidade simplificada da UE 150 | ||
| ÍNDICE | INHALT | INHOUD | ||
| 1. Piezas y componentes | 40 | 1. Teile und Componenten | 95 | 1. Onderdelen en componenten 151 |
| 2. Antes de usar | 42 | 2. Vor dem Gebrauch | 97 | 2. Voõr u het apparaat gebruikt 153 |
| 3. Funcionamiento | 43 | 3. Bedienung 96 | 3. Werking 154 | |
| 4. Limpieza y manzenimiento | 48 | 4. Reinigung und Wartung 103 | 4. Schoonmaak en onderhoud 158 | |
| 5. Resolución de problemas | 51 | 5. Problembehöhung | 107 | 5. Problecmoplossing 162 |
| 6. Especificaciones técnicos | 56 | 6. Technische Spezifikationen | 112 | 6. Technische specificales 167 |
| 7. Reciclaje de aparatos eléctricos y electrónicos | 57 | 7. Recycling von Elektro- und Elektronikgeräten | 112 | 7. Recycling van elektrische en elektronische apparatuur 168 |
| 8. Garantia y SAT | 57 | 8. Garantie und Kundendienst | 113 | 8. Garantie en technische ondersteuning 169 |
| 9. Copyright | 57 | 9. Copyright | 113 | 9. Copyright 168 |
| 10. Declaración UE de conformidad simplificada | 58 | 10. Vereinfachte FU-Konformitätserklärung | 113 | 10. Vereenvoudige FU-Verklaring van Overeenstemming. 169 |
| INDEX | INDICE | SPIS TRESCI | ||
| 1. Parts and components | 59 | 1. Parte e componenti | 114 | 1. Crzęci i komponenty 170 |
| 2. Before use | 61 | 2. Prima dell'uso | 116 | 2. Przed użyciem 172 |
| 3. Operation | 62 | 3. Funzionamento | 117 | |
| 4. Cleaning and maintenance | 66 | 4. Pulizia e manutenzione | 122 | 3. Funkcjowanie 173 |
| 5. Troubleshooting | 70 | 5. Risolutione dei problemi | 125 | 4. Czyszczenie i konserwacja 179 |
| 6. Technical specifications | 74 | 6. Specifiche tecniche | 130 | 5. Rozwiązowanie problemów 181 |
| 7. Riciclaggio di apparecchiature | 6. Specyfikacja techniczna 186 | |||
| 7. Disposal of old electrical and electronic appliances | 74 | eletriche ed elettroniche | 130 | 7. Recykling urządzeń elektrycznych i elektronicznych 187 |
| 8. Technical support and warranty | 74 | 8. Garanzia e supporta tecnica | 131 | |
| 9. Copyright | 75 | 9. Copyright | 131 | 8. Govarança i Senwis techniczny 187 |
| 10. Simplified EU Declaration of Conformity | 75 | 10. Dichiarazione di conformità | 9. Copyright 187 | |
| UE semplificata | 131 | 10. Uaroszczona deklaracja zgodności UE 188 | ||
Read these instructions thoroughly before using the appliance. Keep this instruction manual for future reference or new users.
- This appliance must be used in accordance with these operating instructions. Cecotec will not be held liable or responsible for any damages or injuries caused by improper use.
- Make sure that the mains voltage matches the voltage stated on the rating label of the appliance and that the wall outlet is earthed.
- Check the power cable regularly for visible damage. If the cable is damaged, it must be repaired by the official Cecotec Technical Support Service to avoid any type of danger.
- This appliance is exclusively designed for household use.
- Do not try to repair the appliance by yourself. Contact the official Cecotec Technical Support Service for advice.
- Do not use the appliance to vacuum liquids, lit matches, cigarette ends, hot ash, or on wet surfaces.
- Do not use this appliance on concrete, asphalt, or other rough surfaces.
- Stop using the appliance if you notice an abnormal sound or sense a temperature higher than usual.
- Do not block the appliance openings or airflow. Keep openings free of any objects, and do not block them with clothes or your fingers.
- Turn off and unplug the appliance from the mains supply when it is not going to be used for a long period of time, before cleaning or repairing, before attaching components, and before removing the battery. Pull from the plug, not the cable, to disconnect it from the outlet.
-
WARNING: the appliance has rotating parts which may pose a risk of entrapment. Exercise extreme caution.
-
Do not immerse the cable, plug, or any other part of the appliance in water or any other liquid or expose electrical connections to water. Make sure your hands are dry before handling the plug or switching on the appliance.
This appliance can be used by children aged 8 years and above and persons with reduced physical, sensory, or mental capabilities or lack of experience and knowledge if they have been given supervision or instruction concerning use of the appliance in a safe way and understand the hazards involved. Children must not play with the appliance. Cleaning and user maintenance should not be carried out by unsupervised children. - Unplug the power cable of the charging base before cleaning or maintenance.
- The appliance can only be used with the supply unit provided with it.
- The appliance must only be supplied with a very low safety voltage as indicated.
- Never touch the cable or the power socket with wet hands.
- Do not expose the appliance to direct sunlight, fire, water, or moisture.
- Do not sit or place sharp or heavy objects on top of the appliance.
- Before operating the robot vacuum cleaner, prepare the room and supervise it. To do so, remove any objects and cables that may affect its operation.
- Keep the appliance away from clothing, curtains, and similar materials.
- Always place the appliance on a flat and stable surface. Avoid placing it on unstable surfaces it could fall from (such as tables or chairs).
- Before operation, make sure all the robot vacuum cleaner
and charging base connections are in good condition.
- Avoid operating the robot vacuum cleaner under extremely high or low temperatures.
- The appliance must only be used with the battery supplied with the appliance or with compatible charging units approved by Cecotec.
- Non-rechargeable batteries should not be recharged.
- Make sure the appliance is not plugged to a mains socket before cleaning it or carrying out maintenance on it.
- Make sure the charging base is not plugged to a power outlet before cleaning it.
Battery instructions
- The appliance includes a Li-ion battery. Do not incinerate or expose it to high temperatures, as it may explode.
- Batteries may leak under extreme conditions. Should that be the case, do not touch the liquid. If the liquid gets into contact with skin, wash immediately with soap and water. If the liquid gets into the eyes, wash them immediately with clean water for a minimum of 10 minutes and seek medical attention. Wear gloves when handling the battery or cells and dispose of it immediately in accordance with local regulations.
- Avoid contact between batteries and small metal objects such as paper clips, coins, keys, nails, or screws.
- Never modify the charger in any way.
- Batteries must be removed from the appliance for safe disposal.
- Keep batteries out of the reach of children if they can be swallowed.
-
Battery ingestion can cause burns, perforation of soft tissue, and death. It can cause severe burns within two hours of the ingestion.
-
In case of battery ingestion, please seek medical help immediately.
- WARNING: to recharge the battery, use only the charging base supplied with the appliance.
- The batteries' supply terminals must not be short-circuited.
- If the appliance is to be stored for a long period of time, it is advisable to remove the batteries.
- Batteries must be inserted in the correct position. Pay attention to polarity when inserting it.
INSTRUCTIONS DE SÉCURITÉ
- Robot vacuum cleaner
- Self-emptying base
- Power cable
- Self-cleaning brush
- Dirt-disposal bag
Fig. 2
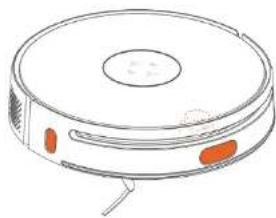
- Recharge/Wi-Fi button
Long press ( ≥ 3 s) to start Wi-Fi connection.
Short press (<3 s) to recharge. During recharge, short press to pause. - Sweeping button
Short press (<3 s) to start or stop sweeping. - Scrubbing button
Short press (<3 s) to start or stop scrubbing. - Power/cleaning button
Long press ( ≥ 3 s) to turn the appliance on/off.
Short press (<3 s) to start or pause sweeping and scrubbing. - Indicator light ring
White light: normal operation.
Orange light: alert. - Reset button: forced switch-off button
Short press (<3s) to switch off. - Speaker
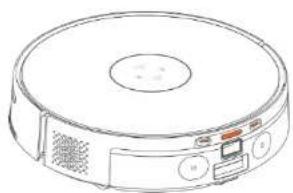
- ToF sensor
- Anti-collision sensor
- Laser sensor
- Front infrared sensor
- Cover
- Ventilation holes
- Rear infrared sensor
- Charging terminals
- Mixed tank
- Fall-detection sensor
- Ultrasonic sensor
- Omnidirectional wheel
- Drive wheels
- Map roller
- Side brush
ENGLISHENGLISH
- Main brush
- Main brush bracket
- Guide wheel
Mixed tank. Fig. 3
- Filter cover
- Water valve
- Dirt tank release tab
- Waste-water tank drain outlet
- Dirt tank
- Waste-water tank release tab
- Filtering module
- Dirt tank
- Cap
- Clean-water tank
- Clean-water tank filling inlet
- Dirt-tank emptying outlet
Self-cleaning base. Fig. 4
- Dirt-tank emptying outlet
- Clean-water tank filling inlet
- Top cover
- Indicator lights
- Charging terminals
- Infrared
- Waste-water tank drain outlet
- Alignment guide
- Water tank
- Dirt-disposal bag
- Ventilation holes
- Cable cover
- Ventilation holes
- Charging port
- Ventilation holes
- Clean-water tank sealing ring
- Waste-water tank sealing ring
- Filter cover
- Pump air inlet
Water tank. Fig. 5
-
Handle
-
Lock tab
- Clean-water tank
- Waste-water tank
- Waste water valve
Note:
The graphics in this manual are schematic representations and may not exactly match the appliance.
2. BEFORE USE
- This appliance is packaged in a way as to protect it during transport. Take the appliance out of its box and remove all packaging materials. You can keep the original box and other packaging elements in a safe place. This will help you prevent damage to the appliance when transporting it in the future. In case the original packaging is disposed of, make sure all packaging materials are recycled accordingly.
- Make sure all parts and components are included and in good conditions. If there is any piece missing or in bad conditions, contact the official Cecotec Technical Support Service immediately.
- Do not remove the serial number of the appliance in order to keep a correct traceability of it in case of assistance.
Warnings
- Remove all objects around the robot vacuum cleaner such as clothing, papers, cables, curtains, or other fragile objects which may block or slow down the operation of the robot vacuum cleaner.
- If the room to be cleaned is near a balcony or stairs, a physical barrier should be placed to prevent the robot vacuum cleaner from falling and getting damaged, thus ensuring safe operation.
- Direct exposure to sunlight or heavy light contrasts may affect the correct operation of the sensors. If this happens, the robot vacuum cleaner will cease operation. Move it to a new location for it to start running again.
Installing the self-emptying base
- Firmly insert the cable into the charging port of the self-emptying base as shown in Figure 6, and store the remaining cable in the corresponding storage compartment.
- Place the self-emptying base against the wall on a hard, level floor leaving a free space of 0.5 metres on both sides, 1.5 metres in front, and over 1 metre on top. Fig. 7
- Ensure good Wi-Fi coverage for a better App user experience. Then turn on the self-emptying base and check that the indicator lights turn on as well.
ENGLISHENGLISH
- If the self-emptying base malfunctions, the indicator lights light up orange. For specific troubleshooting methods, please refer to the Troubleshooting section.
- Do not use the self-emptying base without the water tank, dirt-disposal bag, etc. installed. Be sure to place the water tank inside the self-emptying base. The self-emptying base has a factory-fitted dirt-disposal bag.
- Self-emptying bases undergo a water test before leaving the factory. It is normal for a small amount of water to remain in the water tank.
- Do not expose the self-emptying base to direct sunlight or block the infrared sensors with any objects, otherwise the robot vacuum cleaner may not be able to automatically return to the base.
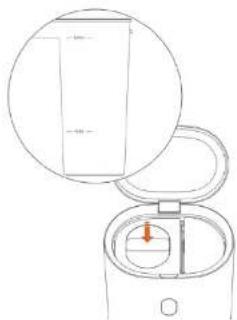
Filling up the water tank
- Open the top cover of the self-emptying base and remove the water tank.
- Open the top cover of the water tank and fill it up. Do not fill up the water tank above the MAX mark and below the MIN mark. Fig. B
- After adding water, close the top cover and secure the water tank release tab.
- Refit the water tank in the self-emptying base and press down the top cover to secure it in place.
Note:
- Do not add hot water to the water tank to avoid deformation of the tank.
- If you notice water stains on the outside of the water tank, wipe them with a soft, dry cloth before use.
3. OPERATION
Charging and switching the robot vacuum cleaner on
- Place the robot vacuum cleaner on the floor, with the rear facing the self-emptying base, then centre it.
- Push the robot vacuum cleaner all the way to the back of the base. Make sure the guide wheel of the robot vacuum cleaner's dirt tank fits into the alignment guide of the self-emptying base, and that the robot vacuum cleaner is recharging. The robot vacuum cleaner will automatically start recharging once its charging terminals touch the charging terminals of the self-emptying base. After about 5 seconds, the light of the robot vacuum cleaner will turn on accompanied by an acoustic signal, indicating proper switch-on.
- If the robot vacuum cleaner leaves the self-emptying base, hold down ⏻ until the indicator light turns steady white and manually place the robot vacuum cleaner in the self-emptying base for charge following the steps above.
Note:
- If the battery is low, it may not be possible to switch the robot vacuum cleaner on. Manually
take the robot vacuum cleaner to the self-emptying base. During recharge, the ⏻ button and the indicator light ring will light up orange.
- The robot vacuum cleaner is equipped with a rechargeable high-performance lithium-ion battery. To maintain battery performance, keep the robot vacuum cleaner charged for daily use.
Pairing the self-emptying base to the robot vacuum cleaner
- After switching the robot vacuum cleaner on and placing it in the self-emptying base, the Bluetooth Indicator light will change from orange to white, signalling that Bluetooth pairing between the base and the robot vacuum cleaner has been successful.
- Once the robot vacuum cleaner has been successfully paired with the self-emptying base for the first time, the base will be linked to the robot vacuum cleaner, and the latter will only be able to communicate with the paired base.
Note:
If you replace the robot vacuum cleaner for after-sales maintenance or other reasons, unpair it from the self-emptying base first.
Unpairing the robot vacuum cleaner from the self-emptying base
- Unplug the self-emptying base from the power supply: the robot vacuum cleaner will automatically be unpaired from the base.
- After switching the self-emptying base back on, switch on the new robot vacuum cleaner and place it in the base: both will automatically start Bluetooth pairing.
- After pairing, the Bluetooth indicator light on the self-emptying base turns from orange to white, indicating that Bluetooth pairing between the self-emptying base and the robot vacuum cleaner has been successful.
Smartphone App
- To use all available functions, it is recommended to control the robot vacuum cleaner via the dedicated app.
- Before you start, make sure your smartphone is connected to a working Wi-Fi network.
- Turn the self-emptying base on: the robot vacuum cleaner will start charging. Once the robot vacuum cleaner is charged, hold down ( ≥ 3s) the button: the ring indicator light will light up white and flash slowly, indicating that the robot vacuum cleaner is trying to connect to the Wi-Fi.
- Enter the Wi-Fi password on the smartphone app, tap on 'Next', and follow the instructions shown on the app.
Note:
- Due to the improvement and update of the app, operation may differ slightly from the above description. Follow the instructions shown on the app.
ENGLISHENGLISH
- The robot vacuum cleaner supports only 2.4 GHz WI-FI networks, and the WI-FI name cannot contain double quotes.
Restarting the WI-FI
If you change the router settings, forget the WI-FI password, or connection between your smartphone and the robot vacuum cleaner cannot be achieved for any other reason, hold down the 📊 button until the robot vacuum cleaner beeps, then refer to the above instructions to re-establish WI-FI connection.
Cleaning start
This robot vacuum cleaner features three cleaning functions: sweeping, scrubbing, and both simultaneously.
- Short press the button to start cleaning in Sweeping mode: the robot vacuum cleaner will directly leave the self-emptying base and start cleaning. You can use the app to adjust the suction power.
- Short press the button to start cleaning in Scrubbing mode: the robot vacuum cleaner will first wet the mop roller in the self-emptying base for about three minutes, then leave the base and start cleaning. You can use the app to adjust the suction power, but you cannot adjust water volume.
- Short press the button to start cleaning in Sweeping & Scrubbing mode: the robot vacuum cleaner will first wet the mop roller in the self-emptying base for about three minutes, then leave the base and start cleaning.
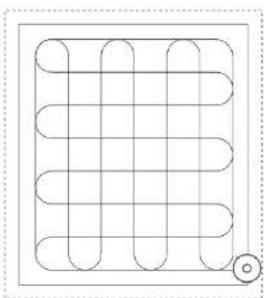
- During any of the above cleaning modes, the robot vacuum cleaner will plan out the cleaning route based on the scan-generated map and clean room by room by cleaning along the walls first and then performing and 5-shaped motion, orderly and efficiently covering the entire surface as shown in Figure 9.
Note:
- If the clean-water tank becomes empty or the waste-water tank becomes full during the cleaning the process, the robot vacuum cleaner will automatically return to the self-emptying base to refill the clean-water tank or empty the waste-water tank to ensure good cleaning.
- If the robot vacuum cleaner runs out of battery during the cleaning process, it will automatically return to the self-emptying base for recharge. After recharge, it will resume cleaning where it left off.
- If you change cleaning modes during the process, the robot vacuum cleaner will automatically return to the self-emptying base to fill the water tank and wet the mop roller.
- If the area to be cleaned is smaller than 10 m ^2 , the robot vacuum cleaner will automatically clean the area twice following a cross-sectional pattern as shown in Figure 10.
Information on the self-emptying base
- Once the robot vacuum cleaner is done sweeping, it will return to the self-emptying base to empty and recharge itself.
- After the robot vacuum cleaner cleans in Scrubbing mode and returns to the self-emptying base, the mop roller will automatically be cleaned and dried while the robot recharges.
- After the robot vacuum cleaner cleans in Sweeping & Scrubbing mode and returns to the self-emptying base, the mop roller will automatically be cleaned and dried while the robot recharges.
- If during the cleaning process you manually change cleaning modes, the robot vacuum cleaner will return to the self-emptying base and automatically clean and dry the mop roller while it recharges during the process.
Functions
Pause
- Press any button to pause the robot vacuum cleaner during operation.
- Press (to resume operation)
Note:
If you manually place the robot vacuum cleaner in the self-emptying base while paused, it will not resume the cleaning process after recharge.
Sleep
- If no operation is performed for more than 20 minutes, the robot vacuum cleaner will automatically enter Sleep mode.
- After the light goes out in Sleep mode, press any button to start the robot vacuum cleaner.
Note:
- The robot vacuum cleaner will not enter Sleep mode during recharge.
- The robot will automatically switch off if Sleep mode exceeds 12 hours.
Do Not Disturb
- The default schedule for Do Not Disturb mode is 22:00-08:00. You can use the app to modify the Do Not Disturb schedule or disable it.
- During the Do Not Disturb schedule, the robot vacuum cleaner will interrupt any ongoing cleaning process, and all indicator lights will be dimmed.
Recharge
Automatic:
After cleaning, the robot vacuum cleaner will automatically return to the self-emptying base to recharge.
ENGLISHENGLISH
Manual:
- While paused, short press the ⏻ button to send the robot to the base for recharge.
- When the robot vacuum cleaner is charging, slowly flashes white, and the ring indicator light lights up steady orange.
- After recharge, will stay on, and ring indicator light will light up steady white.
Note:
If the robot vacuum cleaner cannot find the self-emptying base, it will automatically return to the starting position. Please manually place the robot vacuum cleaner back in the self-emptying base for recharge.
Malfunction
If a malfunction occurs during operation, the robot vacuum cleaner ring indicator light or the corresponding self-emptying base indicator light will rapidly flash orange and the robot vacuum cleaner will beep. Please refer to the Troubleshooting section.
Note:
- If the robot vacuum cleaner isn't in the self-emptying base and no action is performed for 10 minutes during a malfunction, the robot vacuum cleaner will automatically enter Sleep mode.
- If a malfunction occurs, the robot vacuum cleaner will return to the self-emptying base for recharge, and cleaning will end.
Resetting to factory settings
If the robot vacuum cleaner does not respond to any button presses, first press the Reset button to force it to switch off, then press the Power button to restart it. If it still malfunctions, hold down the □ and the buttons simultaneously for 15 seconds: the robot vacuum cleaner will be restored to factory default.
4. CLEANING AND MAINTENANCE
Warning
Be sure to remove the mixed tank before turning the robot vacuum cleaner upside down.
Dirt tank
- Press the tank release tab downwards and remove the tank as shown in Figure 11.
- Open the dirt-tank cover and pull up the filter module.
-
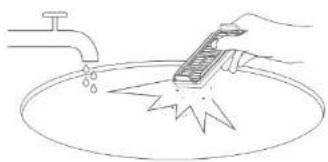
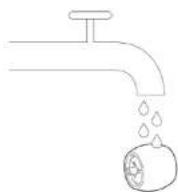
Dirt can be removed with a small brush or by shaking carefully against a hard surface for dust to fall off. You can also use warm water without detergents to get a better result. Fig. 12
-
If you wish to wash the filter, make sure it is completely dry before refitting it to prevent moisture from getting into the motor and damaging the robot vacuum cleaner. Fig. 13
Note:
It is recommended to replace the filter every 3-6 months.
5. Open the filter cover, empty the inside, and rinse it repeatedly. If dirt is present, wipe the dirt container with a dry cloth and refit the assembly. Fig. 14
Note:
- Do not use sharp objects to clean the surface of the tank.
- Wash it with clean water without adding detergent.
Omnidirectional wheel
- Remove the mixed tank from the robot vacuum cleaner and turn it upside down. Use tools such as a small screwdriver to pry the axle and remove the wheel as shown in Figure 15. Note: do not remove the omnidirectional-wheel bracket.
- Remove hair or dirt from the wheel and axle. Fig. 16
- If you decide to use water to clean the wheel, make sure it's dry before refitting it.
- Refit the wheel and securely tighten it.
Slide brush
- Remove the mixed tank from the robot vacuum cleaner and turn it upside down.
- Pull the side brush out as shown in Figure 17 to remove it.
- Clean the side brush and refit it in position.
Note:
It is recommended to replace the side brush every 3-6 months.
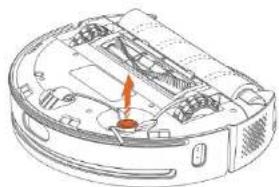
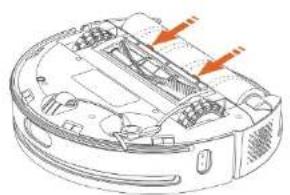
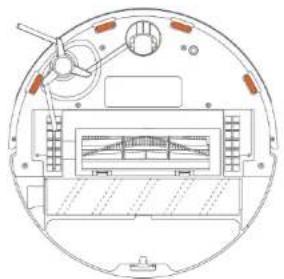
Main brush
- Remove the mixed tank from the robot vacuum cleaner and turn it upside down.
- Slightly press the main-brush frame's tabs to open the main-brush compartment and remove it as shown in Figure 18.
- Pull the mop roller upwards and clean the main-brush frame.
- Use the self-cleaning brush to remove hair tangled on the main brush as shown in Figure 19.
- Refit the main brush, firmly press down the brush frame, and secure the clip.
Note:
- Weekly cleaning is recommended.
- It is recommended to clean the main brush with a damp cloth. If you decide to use water to clean it make sure it's dry before refitting it.
ENGLISHENGLISH
- Do not use corrosive cleaning liquids or disinfectants to clean the main brush.
- It is recommended to replace the main brush every 6-12 months.
Mop roller
- Remove the mixed tank from the robot vacuum cleaner and turn it upside down.
- Pull the handle on the right side of the roller mop to remove the mop roller as shown in Figure 20.
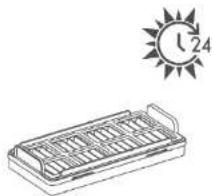
- Use the self-cleaning brush to remove tangled hair. To remove surface stains, wash with clean water. Make sure it is completely dry before refitting it.
- Refit the mop roller.
Note:
It is recommended to replace the mop roller every 3-6 months for best cleaning results.
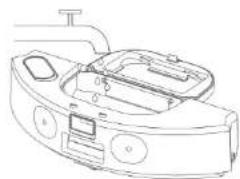
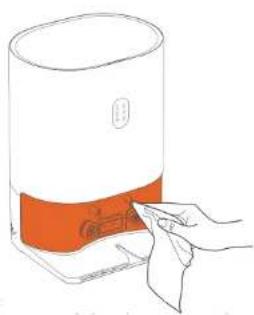
Robot vacuum cleaner sensors
Clean the sensors of the robot vacuum cleaner with a soft, dry cloth, including:
1. The four fall-detection sensors on the underside of the robot vacuum cleaner. Fig. 21
2. The ToF sensors, the laser sensor, and the front infrared sensors shown in Figure 22.
3. The charging and docking terminals on the rear of the robot vacuum cleaner. Fig. 23
Replacing the dirt-disposal bag
If the dirt-disposal bag is full, the 📋 indicator light will flash slowly. Replace the old bag with a new one following the below instructions:
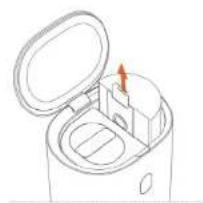
- Open the top cover of the self-emptying base, pull up the handle of the dirt-disposal bag and remove the bag. Fig. 24
Note: Remove the mixed tank from the robot vacuum cleaner before turning it upside down. - Discard the used dirt-disposal bag. Fig. 25
Note: it is recommended to change the dirt-disposal bag every 6-8 weeks. - Insert a new dirt-disposal bag into the self-emptying base as shown in Figure 26 and make sure the handle is locked.
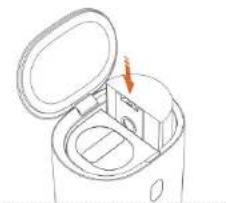
- If the 📄 indicator light changes to white, close the top cover of the self-emptying base.
- If the 📋 indicator light does not change to white, please re-insert the dirt-disposal bag all the way.
Cleaning the water tank of the self-emptying base
- Open the top cover of the self-emptying base and remove the water tank. Fig. 27
- Open the top cover of the water tank and empty the waste and clean-water tank.
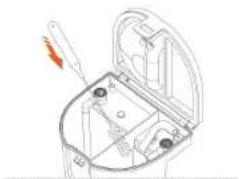
- Clean the inside of both tanks and use the self-cleaning brush to remove stubborn stains. Fig. 28
Note:
It is recommended to clean the water tank weekly to avoid bacterial growth or bad odours.
- Add clean water to the clean-water tank. Do not fill up the water tank above the MAX mark and below the MIN mark. Fig. B
If you clean the water tank regularly every day, and the cleaning surface is smaller than 60 m ^2 , it is enough to add water up to the MIN mark each time. - After adding water, close the top cover of the water tank, secure the water-tank lock tab, and place the water tank back in the self-emptying base.
Note:
- Do not add hot water to the clean-water tank to avoid deformation of the tank.
- If you notice water stains on the outside of the water tank, wipe them with a soft, dry cloth before resuming use.
- Do not use cleaning agents to prevent damage to the robot vacuum cleaner and self-emptying base.
Self-emptying base
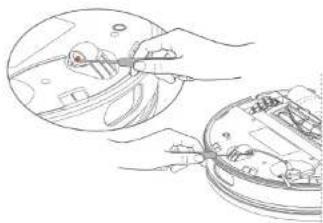
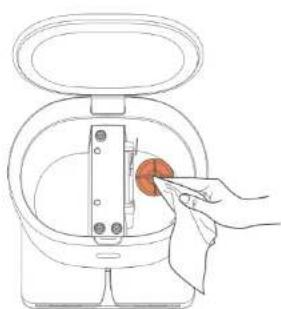
Infrared sensors
Check if the infrared lens and the charging terminals of the self- emptying base are dirty, and wipe them with a clean, dry cloth to clean them if necessary. Fig. 29
Note:
It is recommended to clean both at least once a month.
Filter holder
Check the filter holder for lint or dirt build-up and remove it by wiping it with a clean, dry cloth. Fig. 30
Note:
It is recommended to clean both at least once a month.
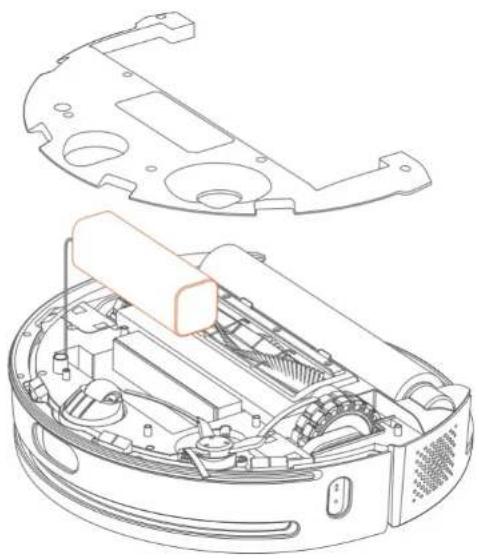
Removing the battery
Chemical substances contained in the battery of the appliance may pollute the environment: remove it before disposing of the robot vacuum cleaner and take it to a collection point designated by local authorities.
- Let the robot vacuum cleaner run until the battery is low and it can no longer clean. Turn the self-emptying base off to prevent the robot to return to it.
- Hold down the power button to turn the robot vacuum cleaner off.
- Remove the mixed tank from the robot vacuum cleaner and turn it upside down.
- Remove the side brush and remove the screws from the cover on the body.
- Remove the cover from the body. Fig. 31
- Unplug the battery connector and remove the battery.
ENGLISHENGLISH
5. TROUBLESHOOTING
If a malfunction occurs during operation, the robot vacuum cleaner ring indicator light or the corresponding self-emptying base indicator light will rapidly flash orange and the robot vacuum cleaner will beep. Refer to the below table for troubleshooting.
| Troubleshooting Solutions | |
| The laser sensor malfunctions. | Contact the official Cecotec Technical Support Service. |
| The mop roller is entangled or jammed. | Properly clean the mop roller and resume cleaning. |
| Mop roller not installed. Insta | the mop roller before use. |
| Mop-roller motor malfunction. | Contact the official Cecotec Technical Support Service. |
| Sensor(s) malfunction. Conta | the official Cecotec Technical Support Service. |
| The robot vacuum cleaner scrubs on carpets. | When the robot vacuum cleaner is on a carpet, an error is shown when selecting Scrubbing mode in the app. Move the robot away from the carpet to resume cleaning in Scrubbing mode. |
| Pump malfunction. Contact the | official Cecotec Technical Support Service. |
| The water tank of the robot vacuum cleaner is too full. | Constant full-tank detection during cleaning. Contact the official Cecotec Technical Support Service. |
If the self-emptying base malfunctions, the corresponding indicator light flashes orange rapidly. Refer to the table below for troubleshooting. Refer to the below table for troubleshooting.
| Error indicator | Possible cause and solution |
| The dirt-disposal bag is out of place. | |
| The dirt-disposal bag is full. Please replace it with a new one. | |
| The dirt collection channel is blocked: remove what's causing the blockage. If the robot vacuum cleaner's dirt tank is clogged, clean it. | |
| The fan of the self-emptying base has entered overheating protection mode; wait 30 minutes before resuming use. | |
| Dirt-collection malfunction of the self-emptying base. Contact the official Cecotec Technical Support Service. |
| The water tank is out of place. | |
| The clean-water tank is empty or the waste-water tank is full. | |
| The waste-water inlet of the self-emptying base is obstructed: remove any foreign body from the waste-water inlet of the base. If the robot vacuum cleaner's waste-water outlet is blocked, remove foreign bodies from the waste-water outlet and clean-water inlet. | |
| The pump or the water pump of the self-emptying base malfunctions. Contact the official Cecotec Technical Support Service. | |
| The water tank is out of place. | |
| The clean-water tank is empty or the waste-water tank is full. | |
| The water inlet/outlet of the self-emptying base and the mixed tank of the robot vacuum cleaner is blocked: remove any foreign body. | |
| The pump or the water pump of the self-emptying base malfunctions. Contact the official Cecotec Technical Support Service. | |
| The drying function of the self-emptying base malfunctions. Contact the official Cecotec Technical Support Service. | |
| The indicator light flashes rapidly in orange to indicate that Bluetooth pairing has failed.For correct Bluetooth pairing, place the robot vacuum cleaner firmly in the self-emptying base: the robot must be switched on and charging. | |
| The indicator light remains orange, indicating that Bluetooth pairing has succeeded, but that there is no connection. When the robot vacuum cleaner moves away from the self-emptying base, if the distance between the robot and the base exceeds the range of the Bluetooth connection, the corresponding indicator will light up. When the robot vacuum cleaner finishes cleaning and returns to the self-emptying base, the connection will be made automatically. Once pairing is successful, the orange light will turn white. If not, please contact the official Cecotec Technical Support Service. |
FAQs
| Problem Possible cause and solution | |
| The robot does not switch on. | Low battery. Manually place the robot vacuum cleaner in the self-emptying base for recharge. |
| The battery temperature is too low or too high: use it in an environment between 0 and 40 °C. | |
ENGLISHENGLISH
| Unable to charge battery. | The self-emptying base is not switched on: check that both ends of the power cable are connected and check that the indicator lights are on. |
| Check that the charging terminals of the self-emptying base and the robot vacuum cleaner are not dirty and clean them with a dry cloth if necessary. | |
| Make sure that the charging terminals of the robot vacuum cleaner touch the charging terminals of the self-emptying base. | |
| Slow recharge. | In high or low temperature environments, the robot vacuum cleaner automatically reduces charging speed to prolong battery life. |
| The charging terminals may be dirty: clean them with a dry cloth. | |
| The robot does not return to the base for recharging. | There are too many obstacles near the self-emptying base: move the base to an accessible area. |
| The robot vacuum cleaner is too far away from the self-emptying base: manually take the robot to the self-emptying base. | |
| Abnormal noise during cleaning. | The main brush, mop roller, side brush, or drive wheels may be clogged or blocked by foreign objects; switch off the robot and remove the obstruction. |
| If the omnidirectional wheel becomes dusty or entangled during cleaning, clean it. | |
| Unable to connect to Wi-Fi. | The Wi-Fi function is not active: reset the Wi-Fi and try again. |
| Poor Wi-Fi signal: make sure the robot vacuum cleaner is in an area with good Wi-Fi reception. | |
| Wi-Fi connection is abnormal: reset the Wi-Fi and download the smartphone app for reconnection. | |
| The Wi-Fi connection is interrupted. Check that the home router is well configured. | |
| Contact the customer service of your Wi-Fi network provider to solve the problem. |
| The robot vacuum cleaner consumes energy inside the self-emptying base. | The power consumption of the robot vacuum cleaner is extremely low when inside the self-emptying base, which helps keeping the battery at peak performance. |
| The robot vacuum cleaner does not pick up cleaning where it left off after charging. | Make sure the robot vacuum cleaner is not in Do Not Disturb mode, as it will not resume cleaning with this mode enabled. |
| If forced recharging is performed or the robot vacuum cleaner is manually placed in the self-emptying base, it will not resume cleaning once recharge is complete. | |
| Sensor detection is inaccurate. | One or more sensors may be dirty; clean them with a soft, dry cloth as indicated in the Cleaning and Maintenance section. |
| Poor suction or abnormal suction noise. | Clean the mixed tank thoroughly as described in the Cleaning and Maintenance section. |
| Some parts of the dirt tank are blocked: thoroughly clean the mixed tank as described in the Cleaning and Maintenance section. | |
| No suction. | The dirt-disposal bag is full or not installed; install or replace the bag. |
| If the robot vacuum cleaner has not performed the cleaning task, the self-emptying base will not collect the dirt when the robot returns. | |
| During the Do Not Disturb schedule, when the robot vacuum cleaner automatically returns to the self-emptying base, the latter does not actively collect the dirt. We recommend adjusting cleaning time. Do Not Disturb mode, or directly operating the function buttons of the robot vacuum cleaner. | |
| Poor self-cleaning of the mop roller. | The mop roller is very dirty; perform self-cleaning again. |
| The mop roller is worn out; replace it with a new one. | |
| The mop roller cannot self-clean. | If the robot vacuum cleaner has not cleaned the floor, the self-emptying base will not clean the mop roller. |
| If the robot vacuum cleaner does not leave the self-emptying base and there is no base on the app's map, the robot will not be able to return to the base to clean the mop roller. | |
| The clean-water tank is empty or the dirty-water tank is full or the water tank is out of place. |
ENGLISHENGLISH
6. TECHNICAL SPECIFICATIONS
Product: Conga 14090 Twice Roller Home&Fill
Product reference: EU01_100829
Input: 24 V - 1.2 A
Rechargeable Li-ion battery
Rated capacity: 14.4 V = 5200 mAh
Wi-Fi connection: Wi-Fi IEEE 802.11 b/g/n 2.4 GHz
Maximum Transmission Power: 20 dBm
Product: Self-emptying base
Input: 220-240 V\~, 50/60 Hz
Output: 24 V = 1.2 A
Power: 1000 W
Technical specifications may change without prior notice to improve product quality.
Made in China | Designed in Spain
7. DISPOSAL OF OLD ELECTRICAL AND ELECTRONIC APPLIANCES

This symbol indicates that, according to the applicable regulations, the product and/or batteries must be disposed of separately from household waste. When this product reaches the end of its shelf life, you should dispose of the cells/batteries/accumulators and take them to a collection point designated by the local authorities.
Consumers must contact their local authorities or retailer for information concerning the correct disposal of old appliances and/or their batteries.
Compliance with the above guidelines will help protecting the environment.
8. TECHNICAL SUPPORT AND WARRANTY
Cecotec shall be liable to the end user or consumer for any lack of conformity that exists at the time of delivery of the product under the terms, conditions, and deadlines established by the applicable regulations.
It is recommended that repairs are carried out by qualified personnel.
If at any moment you detect any problem with your product or have any doubt, do not hesitate to contact the official Cecotec Technical Support Service at +34 963 210 728.
9. COPYRIGHT
The intellectual property rights over the texts in this manual belong to CECOTEC INNOVACIONES, S.L. All rights reserved. The contents of this publication may not, in whole or in part, be reproduced, stored in a retrieval system, transmitted or distributed by any means (electronic, mechanical, photocopying, recording or similar) without the prior authorization of CECOTEC INNOVACIONES, S.L.
10. SIMPLIFIED EU DECLARATION OF CONFORMITY
CE Cecotec Innovations hereby declares that the robot vacuum cleaner model EU01_100829_Conga 14090 Twice Roller HomeEFill is in conformity with the Radio Equipment Directive 2014/53/EU. The full text of the EU Declaration of Conformity can be found on the following website: www.cecotec.es
FRANÇAISFRANÇAIS
1. PIÈCES ET COMPOSANTS
5. PROBLEEMOPLOSSING
Product: Conga 14090 Twice Roller Home&Fill
Productreferentie: EU01_100829
Ingang: 24 V - 1.2 A
Oplaadbare Li-ion accu
Nominaal vermogen: 14.4 V =5200 mAh
Wi-Fi verbinding: Wi-Fi IEEE 802.11 b/g/n 2.4 GHz
Krachtoverbrenging: 20 dBm
NEDERLANDSNEDERLANDS
Product: Zelflozende basis
Ingang: 220-240 V-, 50/60 Hz
Fig./img./Abb./Afb./Rys.2
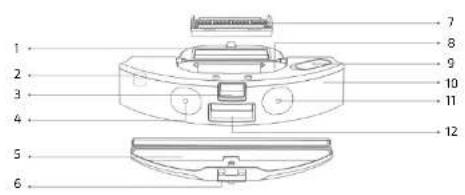
Fig./img./Abb./Afb./Rys.3
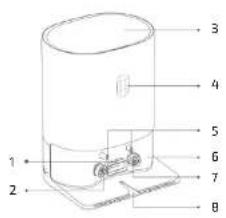
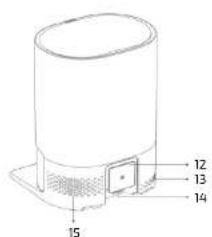
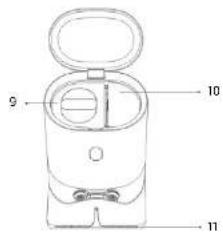
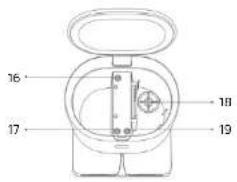

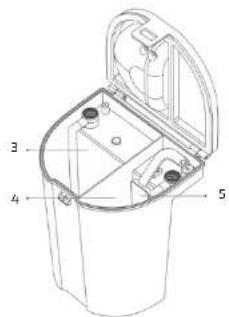
Fig./Img./Abb./Afb./Rys. 5
natural_image
Line drawing of a cylindrical container with a side-mounted outlet (no text or symbols)Fig./Img./Abb./Afb./Rys. 6
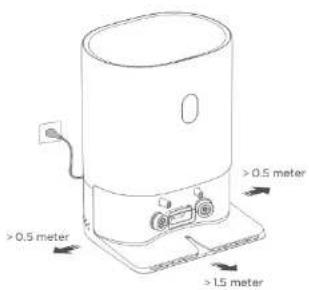
Fig./Img./Abb./Afb./Rys. 7Fig./Img./Abb./Afb./Ry.
natural_image
Line drawing of a device with an open lid and internal components, no text or symbols presentArea 1 completed, Area 2 completed

Fig./Img./Abb./Afb./Rys. 8 Fig./Img./Abb./Afb./Rys. 9
natural_image
Pure diagram of a coiled spring or coil structure without any text, numbers, or symbols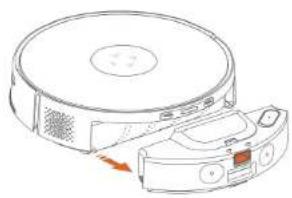
natural_image
Line drawing of a robotic vacuum cleaner with a sensor attached, showing no text or symbolsFig./img./Abb./Afb./Rys. 10 Fig./img./Abb./Afb./Rys. 17
natural_image
Line drawing of a hand using a tool to clean or wash a surface, with a faucet and water nearby (no text or symbols)Fig./Img./Abb./Afb./Rys.12
natural_image
Simple line drawing of a rectangular tray with internal compartments, under a sun labeled '1/24' (no text or symbols on the tray itself)Fig./Img./Abb./Afb./Rys.13
natural_image
Line drawing of a robotic device with control panel and buttons (no text or symbols)Fig./Img./Abb./Afb./Rys.14
natural_image
Illustration of hands using a tool to inspect or install electronic components (no text or symbols visible)Fig./Img./Abb./Afb./Rys.15
natural_image
Technical line drawing of a robotic vacuum cleaner with internal components and a highlighted orange section (no text or symbols)Fig./Img./Abb./Afb./Rys. 16 Fig./Img./Abb./Afb./Rys. 17
natural_image
Technical line drawing of a mechanical component with no visible text or symbolsFig./Img./Abb./Afb./Rys.18
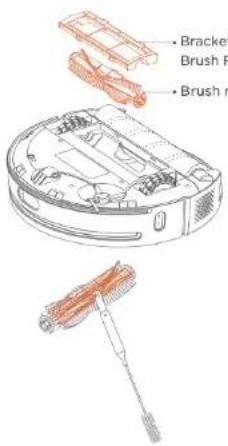
Fig./img./Abb./Afb./Rys. 19
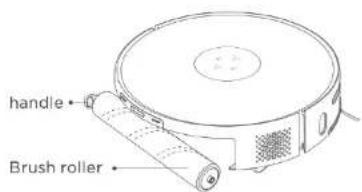
Fig./img./Abb./Afb./Rys. 20
natural_image
Technical line drawing of a circular mechanical or electrical component with internal components and no visible text or symbolsFig./Img./Abb./Afb./Rys. 21
natural_image
Line drawing of a circular vacuum cleaner with orange buttons and ventilation slots (no text or symbols)Fig./img./Abb./Afb./Rys. 22
natural_image
Line drawing of a circular vacuum cleaner with control panel and ventilation grille (no text or symbols)Fig./Img./Abb./Afb./Rys. 23
natural_image
Line drawing of a microwave oven with lid open and internal compartments, no text or symbols presentFig./Img./Abb./Afb./Rys. 24
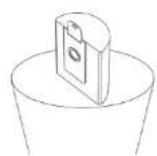
Fig./Img./Abb./Afb./Rys. 25
natural_image
Line drawing of a microwave oven with an open lid and internal compartments, showing no text or symbols.Fig./img./Abb./Afb./Rys. 26

natural_image
Line drawing of a mechanical device with an open lid and internal compartments (no text or symbols)Fig./Img./Abb./Afb./Rys.27
natural_image
Technical line drawing of a mechanical component with no visible text or symbolsFig./img./Abb./Afb./Rys. 28
natural_image
Line drawing of a hand inserting a device into a container (no text or symbols)Fig./Img./Abb./Afb./Rys. 29
natural_image
Line drawing of a hand inserting a red circular object into a device (no text or symbols)Fig./Img./Abb./Afb./Rys. 30
natural_image
Technical line drawing of a robotic vacuum cleaner internal components (no text or symbols)Fig./Img./Abb./Afb./Rys. 31
www.cecotec.es