
Ergomaxx BSG81885 - Vacuum Cleaner BOSCH - Free user manual and instructions
Find the device manual for free Ergomaxx BSG81885 BOSCH in PDF.

User questions about Ergomaxx BSG81885 BOSCH
0 question about this device. Answer the ones you know or ask your own.
Ask a new question about this device
Download the instructions for your Vacuum Cleaner in PDF format for free! Find your manual Ergomaxx BSG81885 - BOSCH and take your electronic device back in hand. On this page are published all the documents necessary for the use of your device. Ergomaxx BSG81885 by BOSCH.
USER MANUAL Ergomaxx BSG81885 BOSCH
BSG8.... dual filtration technology
de Gebrauchsanweisung en Instructions for use
fr Mode d'emploi
natural_image
Group of children gathered around a table with food and drinks, one child seated at the table (no visible text or symbols)
■ Gedruckt auf Recyclingpapier
■ Printed on recycled paper
■ Imprimé sur papier recyclé
■ Stampato su carta riciclata
■ Gedrukt op recyclingpapier
■ Trykt på genbrugspapir
■ Trykket på resirkulert papir
■ Tryckt på återvunnet papper
■ Painettu uusiopaperille
■ Impreso sobre papel reciclable
Internet:
http://www.
natural_image
Close-up of a mechanical component with a tool and arrow indicating movement (no text or symbols)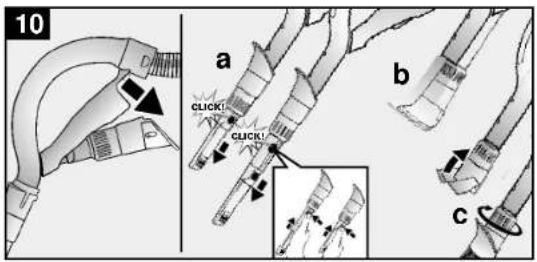
text_image
10 a CLICK! CLICK! b c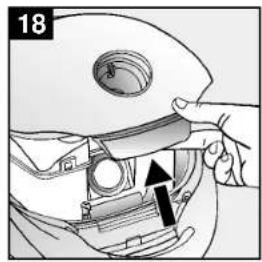
natural_image
Close-up of a hand holding a mechanical component with an arrow indicating direction (no text or symbols visible)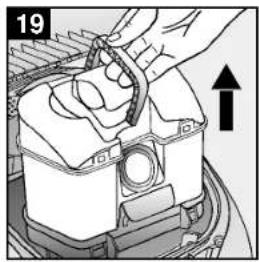
natural_image
Close-up of hands installing or adjusting a mechanical component with an upward arrow (no text or symbols visible)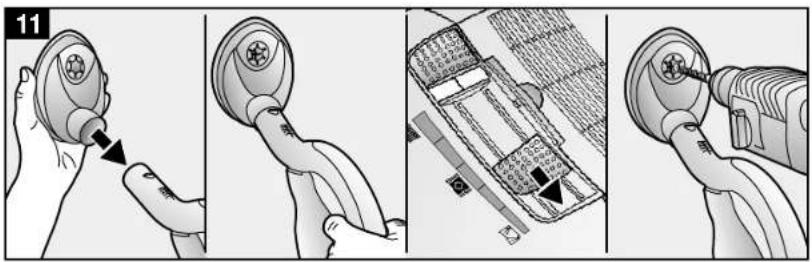
text_image
11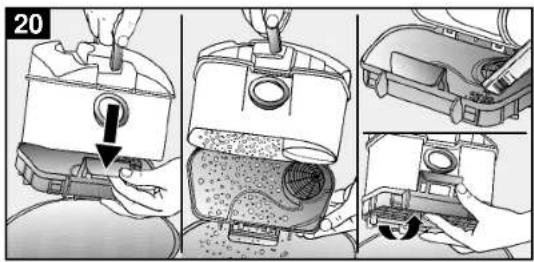
text_image
20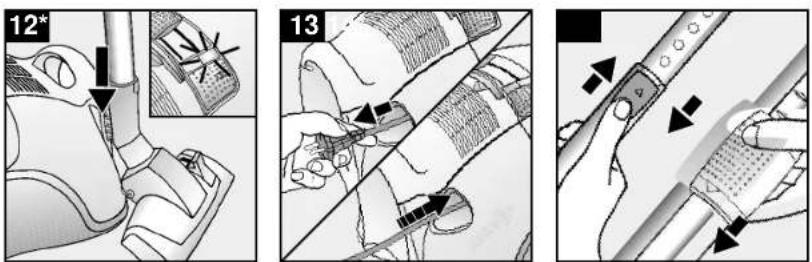
text_image
12* 13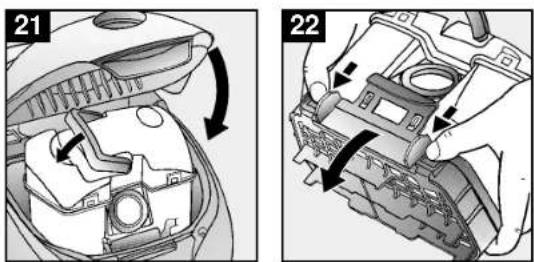
text_image
Technical diagram showing two mechanical assembly steps labeled 21 and 22, with arrows indicating rotation or adjustment.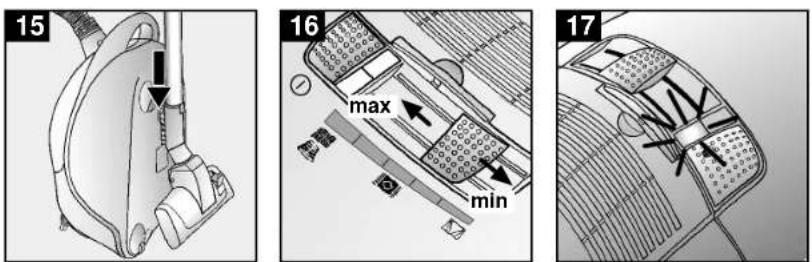
text_image
15 16 max min 17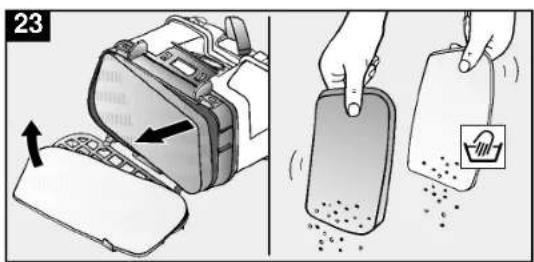
text_image
23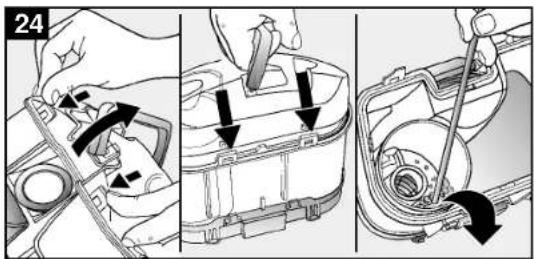
text_image
24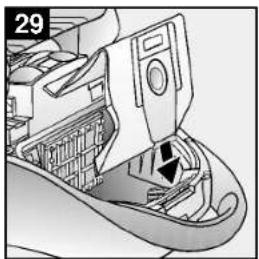
natural_image
Mechanical component diagram showing a valve inserted into a housing (no text or symbols visible)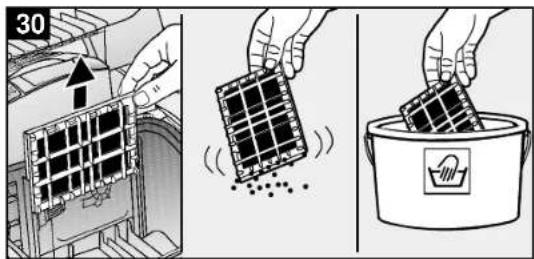
text_image
30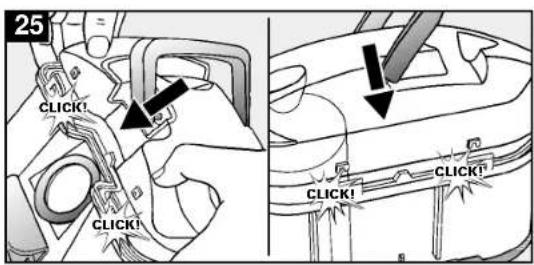
text_image
25 CLICK! CLICK! CLICK! CLICK!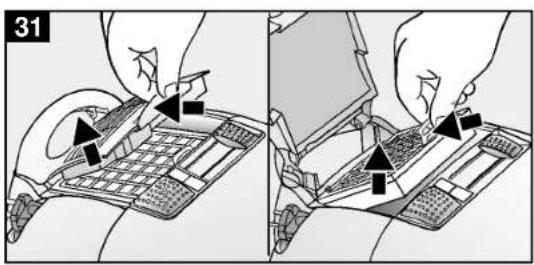
text_image
31
text_image
26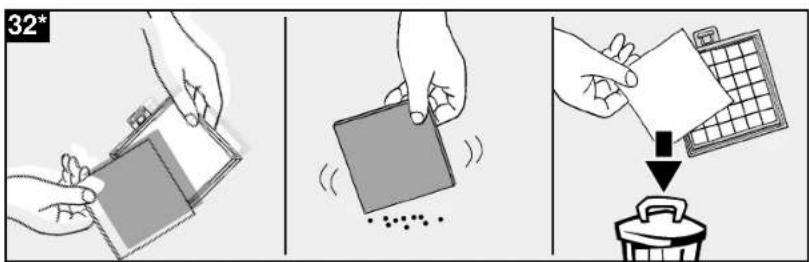
text_image
32°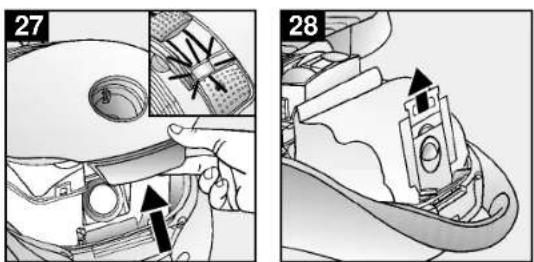
text_image
27 28
text_image
33*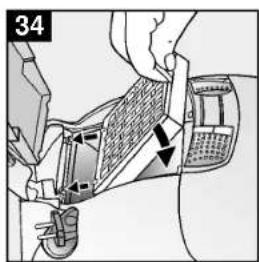
text_image
34Your vacuum cleaner 16
Intended use 17
Safety information 17
Disposal information 18
Using your vacuum cleaner 19
Vacuuming 19
When the work is done .20
Using the dust collector ....21
Cleaning the permanent filters and microfilters in the dust collector . . . . . . . . . . . . . . . . . . . 21
Blockages in the dust filter 22
Using MEGAfilt®plus dust bags . . . . . . . . . . . . . . . . . . . . . . . . . . . . . . . . . . . . . . . . . . . . . . . . . . . . . . . . . . . 22
Replacing the motor protection filter/exhaust filter . . . . . . . . . . . . . . . . . . . . . . . . . . . . . . . . . . . . . . . . . . . . . . . . 24
Looking after your vacuum cleaner . . . . . . . . . . . . . . . . . . . . . . . . . . . . . . . . . . . . . . . . . . . . . . . . . . . . . . . . . . . . . . . 25
Optional accessories / replacement parts . . . . . . . . . . . . . . . . . . . . . . . . . . . . . . . . . . . . . . . . . . . . . . . . . . . . 26/27
text_image
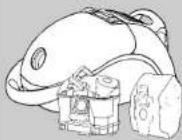
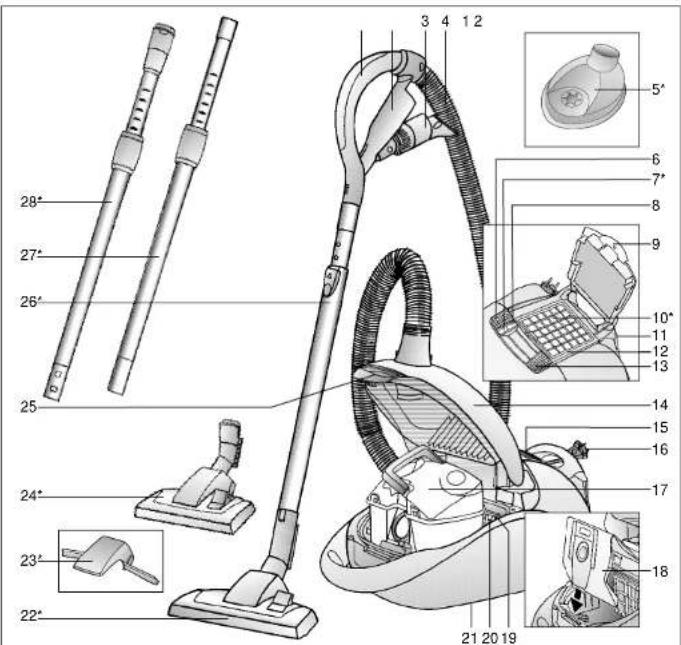
Technical diagram of a vacuum cleaner with numbered parts and exploded view, including handlebars, covers, and accessories.1 Schlauchhandgriff
2 Zubehörhalter
3 Kombi-Zubehör
4 Saugschlauch
5 Bohrdüse*
natural_image
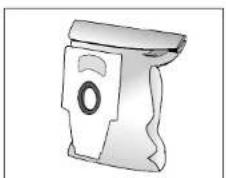
Illustration of a mechanical component with a circular opening and flanged base (no text or symbols)Textilfilter (Dauerfilter) BBZ10TFP
natural_image
Simple line drawing of a solar panel with grid layout and mounting bracket (no text or symbols)HEPA-Filter (Klasse H12) BBZ151HF
natural_image
3D-rendered gray rectangular block with black edges, no text or symbols visiblenatural_image
3D rendering of a mechanical component with no visible text or symbolsTURBO-UNIVERSAL®-Bürste BBZ102TBB
natural_image
Simple line drawing of a mechanical lever or clamp device (no text or symbols)Bodendüse BBZ082BD
natural_image
Two 3D-rendered objects with numbered labels (4 and 5) shown in different orientations (no text or symbols beyond labels)text_image
Illustration showing two hand-drawn steps of inserting a card into a paper, labeled with numbers 6 and 7.text_image
Technical diagram of a vacuum cleaner with numbered parts and exploded view, including handlebars, clamps, and accessories.1 Handle
2 Accessories holder
3 Combination tool
4 Hose
5 Drill dust nozzle*
6 ON/OFF button
7 Power on indicator*
8 Filter change indicator
9 Locking tab
10 Exhaust filter*
1 Parking aid (automatic switch off*)
12 Carrier for exhaust filter
13 Suction regulation button
14 Dust bag compartment lid
15 Exhaust filter cover
16 Power cord
17 Dust collector or alternatively
18 MEGAfilt®SuperTEX dust bag
19 Filter holder
20 Motor protection filter
21 Storage aid (on underside of unit)
22 Adjustable floor nozzle*
23 Carpet lifter*
24 Adjustable floor tool* with locking collar *
25 Dust bag compartment latch
26 Telescopic tube with adjusting button
27 Telescopic tube with adjusting sleeve *
28 Telescopic tube with adjusting sleeve
and locking collar*
*Depending on equipment
Please keep this instruction manual. When passing the vacuum cleaner on to a third party, please also pass on this instruction manual.
Intended use
This vacuum cleaner is intended for domestic use only, not for commercial use. This vacuum cleaner should only be used in accordance with the instructions in this manual.
The manufacturer will not accept any responsibility for damage caused by improper use or incorrect operation. Therefore, please note the following points.
The vacuum cleaner must only be operated with:
■ original MEGAfilt® SuperTEX dust bags
■ Manufacturer's original replacement parts, accessories and optional accessories
The vacuum cleaner is not to be used for:
■ vacuuming persons or animals
■ vacuuming up:
- Insects and spiders
– Hazardous, sharp-edged, hot or burning substances. - Damp or liquid substances.
– Highly flammable or explosive
substances and gases. - ash and rust from tiled stoves and central heating systems
Safety information
This vacuum cleaner complies with the recognised rules of technology and the relevant safety regulations. We confirm compliance with the following European directives: 89/336/EEC (amended by Directives 91/263/EEC, 92/31/EEC and 93/68/EEC) 73/23/EEC (amended by Directive 93/68/EEC).
■ Only connect to a power supply and operate the vacuum cleaner in accordance with the rating plate.
■ Never use the vacuum cleaner without the dust collector or MEGAfilt ^2 SuperTEX dust bag. => This can damage the vacuum cleaner.
■ Only allow children to use the vacuum cleaner under strict supervision.
- Keep the vacuum cleaner away from the face when using tools and tubes. => Risk of injury.
■ Do not carry/transport the vacuum cleaner by the power cord.
■ Fully extend the power cord if the appliance is to be used continuously for several hours
■ When disconnecting the appliance from the mains, pull the plug, not the power cord.
■ Do not pull the power cord around sharp corners or allow it to become trapped.
■ Unplug the power cord from the mains before carrying out any work on the vacuum cleaner or its accessories.
■ Do not use the vacuum cleaner if it is damaged. Unplug the power cord from the mains if a fault is detected.
en
en
■ For safety reasons, only authorised after-sales service personnel are permitted to carry out repairs and fit replacement parts to the vacuum cleaner.
■ Protect the vacuum cleaner from moisture and sources of heat.
■ Switch off the vacuum cleaner when it is not in use.
■ At the end of its life, the vacuum cleaner should be rendered unusable and then disposed of in an appropriate manner.
■ For safety, the vacuum cleaner is fitted with a temperature safety switch, which automatically switches the vacuum cleaner off if it is blocked and overheating. Unplug the power cord from the mains and make sure that the nozzle, tube and hose are not blocked. Also check whether the filter needs changing.
Having cleared the blockage, leave the vacuum cleaner to cool down for at least an hour. It can then be switched back on again.
Disposal information
■ Packaging
The packaging is designed to protect the vacuum cleaner against damage during transportation. It is made of environment-friendly materials and can be recycled. Dispose of unneeded packaging at the appropriate recycling stations.
■ Used vacuum cleaners
Old appliances still contain many recyclable materials. Please take your old cleaner to your retailer or recycling centre so that it can be recycled. For current disposal methods, please enquire at your appliance dealership or local council.
Please note
Only connect the appliance to a socket that is protected by at least a 16 amp fuse. If a fuse should blow when you switch on the vacuum cleaner, this may be because other electrical appliances which have a high current draw are connected to the same power circuit. To prevent the fuse tripping, select the lowest power setting before switching the vacuum cleaner on, and increase the power only once it is running.
Fold out picture pages.
Setting up
Figure 1
a) Push the hose connector into the opening on the vacuum cleaner until it engages.
b) To remove the hose, press the two lugs together and pull the hose out.
Figure 2\*
a) Connect the handle and the telescopic tube together.
b) Push the handle into the telescopic tube until it engages.
To release the connection, squeeze the collar sleeve and pull the handle out.
Figure 3\*
■ Attach the carpet lifter to the nozzle.
■ Press the carpet lifter sideways to engage.
Figure 4\*
a) Connect the floor tool and the telescopic tube together.
b) Push the telescopic tube into the connecting piece of the floor tool until it engages.
Press on the locking collar and pull out the telescopic tube to disconnect.
Figure 5\*
To adjust the length of the telescopic tube, press the adjusting button/adjusting sleeve in the direction of the arrow and adjust the tube to the required length.
*Depending on equipment
Figure 6
a) Take the mains plug, pull the mains cable to the required length and insert the plug into a wall socket.
b) If your unit has electronically actuated cable rewind, the ready indicator will now light up green.
Figure 7
To switch your vacuum cleaner on and off, press the On/Off key in direction of the arrow.
Vacuuming
Figure 8
Adjusting the floor tool:
■ For cleaning rugs and carpets =>

■ For cleaning hard floors =>

Floor nozzle with carpet lifter\*
Figure 9\*
When you pull the floor tool backwards, the rug is lifted, allowing you to clean underneath its edge.
For notes on the use and maintenance of the ELECTROMATIC® brush and the TURBO UNIVERSAL brush®, see the instruction manual provided. (depending on equipment).
en
Vacuuming with accessories
Figure 10
Pull the combination tool in the direction of the arrow to remove it from the tool holder.
a) Crevice nozzle
For vacuuming in crevices and corners.
For difficult to get to places, the combination tool can be extended in two stages by pulling out the crevice nozzle.
■ Extend the crevice nozzle to the second stop until you can hear it engage.
■ The crevice nozzle can be pushed back in again by releasing the telescopic locking mechanism (pressing it in the direction of the arrow).
b) Upholstery nozzle
For cleaning upholstery, curtains, etc.
c) Furniture brush. For window frames, cabinets, profiles etc.
■ Fold the upholstery nozzle over in the direction of the arrow.
■ To extend the brush ring, turn in the direction of the arrow.
■ Before replacing combination tool in the tool holder, retract the bush ring and fold the upholstery nozzle back.
Figure 11
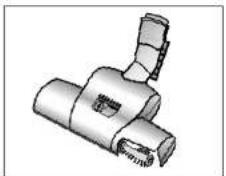
- Secure the drill dust nozzle to the handle and then place against the wall, so that the nozzle drill hole opening sits directly over the hole to be drilled.
■ Select the lowest power setting and then switch on the vacuum cleaner.
■ Suction holds the drill dust nozzle in the required position. Depending on the surface of the wall to be drilled it may be necessary to readjust the
power to a higher setting to ensure the drill dust nozzle is firmly attached. Any fine particles are automatically vacuumed up.
! Caution: The drill dust nozzle should only be used in conjunction with the dust collector since fine drill dust can impair the function of the dust bag.
Figure 12\*
When stopping cleaning for a moment, you can use the parking aid at the back of the vacuum cleaner. Slide the plastic lug on the tool connector into the groove at the back of the vacuum cleaner. If your cleaner has the automatic standby function, it will now switch itself off.
=> Power indicator lights up "green".
*Depending on equipment
en
When the work is done
Figure 13
■ Switch the vacuum cleaner off and unplug the power cord from the mains.
■ Tug the power cord and let go. The cable then rewinds automatically.
■ To reactivate or deactivate the cable brake, quickly tug the power cord.
■ On vacuum cleaners with an electronically actuated cable rewind, the power cord automatically rewinds when the machine is unplugged at the socket.
■ If you do not want the power cord to rewind completely (e.g. when changing the plug), you can apply the cable brake by pulling the power cord.
Figure 14
Press the adjusting button/sleeve in the direction of the arrow to unlock and collapse the telescopic tube.
Figure 15
To store or transport the vacuum cleaner, use the storage aid on the underside of the cleaner. Stand the vacuum cleaner up on its end. Slide the plastic lug on the floor into the groove on the underside of the unit.
You have purchased a floor vacuum cleaner which can vacuum up any type of dry dirt and uses a dust collector and MEGAfilt*SuperTEX dust bags.
We recommend that you use
– the dust collector for dirt generated by DIY in particular, such as sawdust.
- the MEGAfiltSuperTEX dust bags mainly for everyday household cleaning.
Using the dust collector
Figure 16
Set the power setting to maximum for the best results when vacuuming. We recommend that you reduce the setting only when vacuuming very delicate materials.
Emptying the dust filter
Figure 17
The dust collector should be emptied every time the vacuum cleaner is used. It must be emptied, however, as soon as the dust indicator constantly lights up bright red when the nozzle is lifted from the floor and the setting is at its highest.
Figure 18
Open the dust bag compartment lid by turning the locking lever in the direction of the arrow.
en
en
Figure 19
Grip the dust collector by the carrying handle and remove it.
Figure 20
- Press the latch in the direction of the arrow to open the base and empty the dust collector by pressing the lid lock in the direction of the arrow. - If the base is very dirty (thick dirt) clean this first e.g. by vacuuming using the crevice tool.
(Fit dust bag in the vacuum cleaner when you do this - see illustration 29)
■ Close the base.
Figure 21
Refit the dust collector into the vacuum cleaner, position the carrying handle at the side and close the dust bag compartment lid.
! Caution: The inside of the dirt container may become scratched with use and start to look opaque. This does not, however, affect the performance of the vacuum cleaner in any way, i.e. it will continue to function as normal.
Cleaning the permanent filters and microfilters
When must the filters be cleaned:
■ If the vacuum cleaner is used until the dust indicator lights up.
■ After any operating problem, i.e. after a blockage is cleared.
■ At least every six months.
Figure 22
■ Unlock the filter holder by pressing in the two lugs and open in the direction of the arrow.
Figure 23
■ Remove the microfilters and permanent filters and shake them clean.
! Caution: The washable white fleece filter should be handwashed every six months or after every time the dust collector becomes completely full, and should only be put back after drying for about 24 hours.
Blockages
Removing a blockage in the dust collector.
Figure 24
■ Unfasten the 4 snaplocks by pushing them in the direction of the arrow and remove the dust collector cover. Loosen the blockage e.g. with a screwdriver, and tap it out. (Please fit dust bag into the vacuum cleaner before vacuuming it out - see Figure 29)
Figure 25
■ Put the dust collector cover back on and push in the direction of the arrow until you hear the 4 clasps lock into place.
■ Caution: The microfilters and
- permanent filters must be cleaned after every blockage. (see Figures 22 and 23).
Using MEGAfilt®SuperTEX filter bags
If necessary, a MEGAfill®SuperTEX filter bag can be used instead of the dust collector.
Figure 26
■ Open the dust bag compartment cover (see Figure 18)
■ Remove the dust collector and fit thel MEGAfilt®SuperTEX dust bag.
■ Close the dust bag compartment cover.
You have bought an extremely powerful device. The highest suction setting is therefore only recommended for heavily soiled, short-pile carpets and hard floors.
The desired level of suction can be adjusted to any level using the suction regulator switch (see Figure 16).
■ Low suction range: For vacuuming delicate fabrics, e.g. curtains.
■ Middle suction range: For daily vacuuming of lightly soiled floors.
■ High suction range: For vacuuming durable floor coverings, hard floors and for heavily soiled surfaces.
Replacing the MEGAfilt®SuperTEX dust bag
Figure 27
- If the dust bag change indicator lights up brightly and uniformly when the nozzle is lifted from the floor and the vacuum is on its highest setting, you should change the dust bag, even if it is not yet full. In this case it is essential to change the dust bag due to the type of material it contains.
■ Turn the dust compartment locking lever in the direction of the arrow to open the dust compartment cover.
Figure 28
Seal the MEGAfilt®SuperTEX dust bag by pulling the locking tab and then remove it.
Figure 29
Place a new MEGAfilt®SuperTEX dust bag in the holder and close the dust bag compartment cover.
! Caution: The dust bag compartment cover will only close when the MEGAfilt ^3 SuperTEX dust bag, textile filter or dust collector has been inserted.
If the dust bag change indicator continues to light up after the dust bag has been changed, please check whether the nozzle, pipe or vacuum hose are obstructed.
en
Replacing the motor protection filter / exhaust filter
When vacuuming using the dust collector
Cleaning the motor protection filter The motor protection filter should be cleaned at regular intervals by tapping it or washing it out.
Figure 30
■ Open the dust compartment cover (see figure 18).
■ Remove the motor protection filter in the direction of the arrow.
■ Empty the motor protection filter by tapping it.
■ If the motor protection filter is very dirty, wash it out.
Leave the filter to dry for at least 24 hours.
■ After cleaning, insert the motor protection filter in the machine and close the dust compartment cover.
Microsan exhaust filter\*
The Microsan exhaust filter should be replaced once a year. You can obtain a replacement Microsan exhaust filter from our after-sales service (see replacement parts p.27).
Figure 31
■ Unlock and open the exhaust filter cover by pushing the locking tab in the direction of the arrow.
■ Unlock and remove the filter holder by pressing the latch in the direction of the arrow.
Figure 32 ^4
■ Remove the foam filter and Microsan exhaust filter from the filter holder.
■ Dispose of the Microsan exhaust filter and fit a new one.
■ Clean the foam filter, e.g. by tapping it out, and put it, too, back in the filter holder.
When vacuuming using a MEGAfilt®SuperTEX dust bag
Cleaning the motor protection filter The motor protection filter should be cleaned at regular intervals by tapping it or washing it out.
Figure 30
■ Open the dust compartment cover (see figure 18).
■ Remove the motor protection filter in the direction of the arrow.
■ Empty the motor protection filter by tapping it.
■ If the motor protection filter is very dirty, wash it out.
Leave the filter to dry for at least 24 hours.
■ After cleaning, insert the motor protection filter in the machine and close the dust compartment cover.
Replacing the Microsan exhaust filter\*
The motor protection filter should be changed when starting a newpack of bags (no later than after 5 filter bags, the Microsan exhaust filter is included in the pack of filter bags).
*Depending on equipment
en
Figure 31
■ Unlatch and open the exhaust filter cover by pulling the locking tab in the direction of the arrow.
■ Unlatch and remove the filter frame by pressing the latch in the direction of the arrow.
Figure 32\*
■ Remove the foam filter and micro-hygiene filter from the filter frame.
■ Dispose of the micro-hygiene filter and fit a new micro-hygiene filter.
■ Clean the foam filter, e.g. by tapping it out, and put it back in the filter frame also.
If you have used the vacuum cleaner for fine dust particles (such as plaster or cement), clean the motor protection filter by tapping it and, if necessary, replace the motor protection filter and the micro-hygiene filter.
When vacuuming using the dust collector or a MEGAfilt®SuperTEX dust bag
Replacing the activated carbon filter*
Figure 33\*
■ Remove the activated carbon filter and dispose of it as normal waste.
■ Fit a new activated carbon filter.
Figure 34
■ Slide the filter frame under the two retaining ribs and push in the direction of the arrow until it engages.
■ Close the exhaust grille.
Replacing the Hepa filter\*
If your vacuum cleaner is equipped with a Hepa filter, this should be replaced once a year. (See figures 31 and 33 for changing the filter)
HEPA activated carbon filter system If your vacuum cleaner is equipped with a Hepa activated carbon filter system, the Hepa filter and the activated carbon filter should be replaced once a year. (see Figures 31, 32, 33 for changing the filters)
Care
Always switch the vacuum cleaner off and disconnect the power cord from the mains before cleaning the vacuum cleaner. The vacuum cleaner and plastic accessories can be cleaned with a commercial plastic cleaner.
Do not use abrasive, glass or all-purpose cleaners. Never immerse the vacuum cleaner in water.
The dust compartment can, if necessary, be cleaned with a second vacuum cleaner or simply wiped with a dry cloth or dusting brush.
*Depending on equipment
Subject to technical changes.
Optional accessories en
text_image
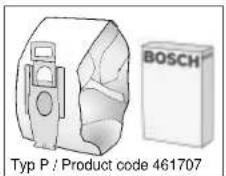
BOSCH Typ P / Product code 461707Replacement filter pack BBZ52AFP1
Contains:
5 MEGAfilt®SuperTEX dust bags self sealing bags
1 Microsan exhaust filter
natural_image
Simple line drawing of a mechanical component with a circular opening and flanged ends (no text or symbols)Textile bag (permanent bag) BBZ10TFP
Reusable bag with Velcro(R) fastener.

natural_image
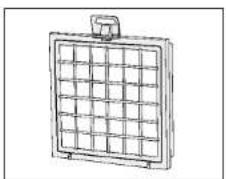
Simple line drawing of a solar panel with grid layout and mounting bracket (no text or symbols)HEPA filter (Class H12) BBZ151HF
Recommended for allergy sufferers.
Ensures very clean exhaust air.
Replace once a year.
natural_image
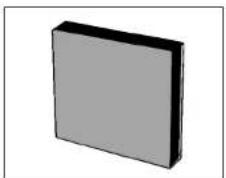
3D-rendered gray rectangular block with black edges, no text or symbols visibleActivated carbon filter BBZ190AF
Extra thick activated carbon pad. Combats unpleasant odours. Replace once a year.
Can only be used in combination with HEPA-Filter (BBZ151HF) or Microsan exhaust filter.
If used with Microsan exhaust filter, remove foam from filter holder and replace with activated carbon filter.
Please note
Combination of Hepa filter and activated carbon filter not possible on cleaners with motor protection grille.
(= standard Microsan exhaust filter)
Optional accessories en
natural_image
Mechanical component diagram showing a T-junction with a handle and base (no text or symbols)TURBO-UNIVERSAL® brush BBZ102TBB
All in one brushing and vacuuming of short-pile rugs and carpets and all hard floor coverings. Especially suitable for picking up pet hair. The brush roller is driven by the suction air flow.
No separate electrical connection is needed.
natural_image
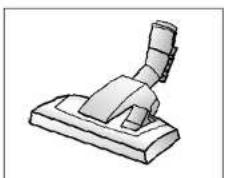
Simple line drawing of a mechanical lever or pivot (no text or symbols)Floor nozzle BBZ082BD
Adjustable floor tool, suitable for carpets and hard floors.
Replacement parts (can if necessary be obtained from our after-sales service.) en
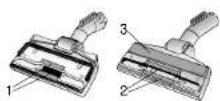
Pile lifter (1/2) and polishing attachment (3)
Pile lifter (1): Product code 188565
Pile lifter (2): Product code 184773
Polishing insert (3): Product code 482209
natural_image
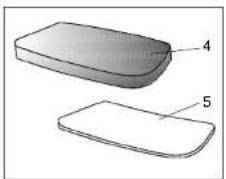
Two 3D-rendered objects with numbered labels (4 and 5) shown in different orientations (no text or symbols beyond labels)Permanent filters (4) and microfilters (5)
for dust collector
Permanent filter for dust collector (4):
Product code 489502
Microfilter for dust collector (5):
Product code 418714
text_image
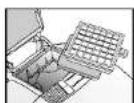
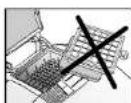
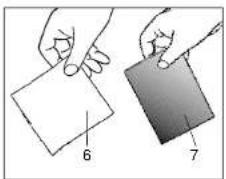
Illustration showing two hand-drawn cards labeled 6 and 7, with the card being held by a pen.Microsan exhaust filters (6) and
motor protection filters (7)
Microsan exhaust filter (6):
Product code 483332
Motor protection filter (7):
Product code 187622
text_image
Technical diagram of a vacuum cleaner with numbered parts and component labelsnatural_image
Simple line drawing of a mechanical component with a circular opening and flanged ends (no text or symbols)Sac textile (permanent) BBZ10TFP
natural_image
Line drawing of a solar panel with grid layout and mounting bracket (no text or symbols)Filtre HEPA (classe H12) BBZ151HF
natural_image
3D-rendered gray rectangular block with black edges, no text or symbols visiblenatural_image
Mechanical component diagram showing a T-shaped assembly with a handle and two cylindrical parts (no text or symbols)Brosse UNIVERSELLE TURBO BBZ102TBB
natural_image
Simple line drawing of a mechanical lever or clamp device (no text or symbols)natural_image
Two 3D-rendered objects with numbered labels (4 and 5) shown in different orientations (no text or symbols beyond labels)text_image
Diagram showing two hands holding a card and a tilted card, labeled with numbers 6 and 7.text_image
Technical diagram of a vacuum cleaner with numbered parts and component labelsnatural_image
3D rendered mechanical component with a circular hole and flange (no text or symbols)Filtro tessile (filtro permanente) BBZ10TFP
natural_image
Line drawing of a solar panel with grid layout and mounting bracket (no text or symbols)Filtro HEPA (classe H12) BBZ151HF
natural_image
3D-rendered gray rectangular block with black edges, no text or symbols visiblenatural_image
Mechanical component diagram showing a T-shaped assembly with a handle and two cylindrical parts (no text or symbols visible)Spazzola TURBO-UNIVERSAL® BBZ102TBB
natural_image
Simple line drawing of a mechanical lever or clamp device (no text or symbols)natural_image
Two 3D-rendered objects with numbered labels (4 and 5) shown in different orientations (no text or symbols beyond labels)Filtro permanente (4) e microfiltro (5)
text_image
Illustration showing two hand-drawn cards labeled 6 and 7, with the card being held by a pen.text_image
Technical diagram of a vacuum cleaner with numbered parts and component labelsnatural_image
Illustration of a mechanical component with a circular opening and flanged top (no text or symbols)natural_image
Simple line drawing of a solar panel with grid layout and mounting bracket (no text or symbols)natural_image
3D-rendered gray rectangular block with black edges, no text or symbols visiblenatural_image
Technical illustration of a mechanical component with no visible text or symbolsTURBO-UNIVERSAL®-borstel BBZ102TBB
natural_image
3D illustration of a mechanical lever or clamp device (no text or symbols)Vloermondstuk BBZ082BD
natural_image
Two 3D-rendered objects with numbered labels (4 and 5) shown in different orientations (no text or symbols beyond labels)Duurzaam filter (4) en microfilter (5)
text_image
Diagram showing two hands holding a card and a tilted card, labeled with numbers 6 and 7.Microsan-uitblaasfilter (6) en motorbeveiligingsfilter (7)
Microsan-uitblaasfilter (6):
identificatienr. 483332
Motorbeveiligingsfilter (7):
identificatienr. 187622
Beskrivelse da
text_image
Technical diagram of a vacuum cleaner with numbered parts and exploded view, including handlebars, clamps, and accessories.natural_image
Illustration of a mechanical component with a circular opening and textured base (no text or symbols)Tekstilfilter (fast filter) BBZ10TFP
Genanvendeligt filter med burrelukning.
natural_image
Simple line drawing of a solar panel with grid layout and mounting bracket (no text or symbols)HEPA-filter (klasse H12) BBZ151HF
natural_image
3D-rendered gray rectangular block with black edges, no text or symbols visibleAktivkul-filter BBZ190AF
natural_image
Mechanical component diagram showing a T-junction with a handle and base (no text or symbols)TURBO-UNIVERSAL®-børste BBZ102TBB
natural_image
3D illustration of a mechanical lever or clamp device (no text or symbols)Gulvmundstykke BBZ081BD
natural_image
Two 3D-rendered objects with numbered labels (4 and 5) shown in different orientations (no text or symbols beyond labels)text_image
Diagram showing two hands holding a card and a tilted card, labeled with numbers 6 and 7.text_image
Technical diagram of a vacuum cleaner with numbered parts and exploded view, including handlebars, covers, and accessories.1 Slangehándtak
2 Holder for tilbehør
3 Kombitilbehør
4 Sugeslange
5 Boremunnstykke*
6. Pâ-jay-knapp
7 Klar-indikator
9. Indikator for filterbytte
8 Indicator
9. Lukkaflik
5 LUKRENN
10 Utblasingsliter
11 Parkeringshjelp (med automatisk
utkobling"
12 Ramme til utblåsingsfilter
13 Sugekraftregulator
14. Stavbeholderdeksel
15. Deksel over utblåsingsfilter
89/336/EOS (med endringer i RL
91/263/E∅F, 92/31/E∅F og 93/68/E∅F). 73/23/E∅F (med endringer i RL 93/68/E∅S).
natural_image
3D rendered mechanical component with a circular hole and flange (no text or symbols)Tekstilfilter (langtidsfilter) BBZ10TFP
natural_image
Line drawing of a solar panel with grid layout and mounting bracket (no text or symbols)HEPA-filter (klasse H12) BBZ151HF
Anbefales til allergikere. Gir ekstremt ren
utblåsningsluft
natural_image
3D-rendered gray rectangular block with black edges, no text or symbols visibleAktivt kullfilter BBZ190AF
natural_image
Technical illustration of a mechanical component with no visible text or symbolsTURBO-UNIVERSAL*-børste BBZ102TBB
natural_image
Simple line drawing of a mechanical lever or clamp device (no text or symbols)natural_image
Two 3D-rendered objects with numbered labels (4 and 5) shown in different orientations (no text or symbols beyond labels)text_image
Illustration showing two hand-drawn cards labeled 6 and 7, with the card being held by a pen.Microsan-utblåsingsfilter (6) og
motorfilter (7)
Microsan-utblásingsfilter (6):
Id-nr. 483332
Motorfilter (7):
Id-nr. 187622
text_image
Technical diagram of a vacuum cleaner with numbered parts and exploded view, including handlebars, covers, and accessories.natural_image
Illustration of a mechanical component with a circular mark and handle (no text or symbols)Textilfilter (permanentfilter) BBZ10TFP
natural_image
Simple line drawing of a solar panel with grid layout and mounting bracket (no text or symbols)HEPA-filter (Klass H12) BBZ151HF
natural_image
3D-rendered gray rectangular block with black edges, no text or symbols visibleAktivtkolfilter BBZ190AF
natural_image
Mechanical component diagram showing a T-shaped assembly with a handle and two cylindrical parts (no text or symbols)TURBO-UNIVERSAL*-borste BBZ102TBB
natural_image
3D illustration of a mechanical lever or clamp device (no text or symbols)Golvmunstycke BBZ082BD
natural_image
Two 3D-rendered objects with numbered labels (4 and 5) shown in different orientations (no text or symbols beyond labels)text_image
Diagram showing two hands holding a card and a tilted card, labeled with numbers 6 and 7.text_image
Technical diagram of a vacuum cleaner with numbered parts and component labelsnatural_image
Simple line drawing of a mechanical component with a circular opening and flanged ends (no text or symbols)natural_image
Line drawing of a solar panel with grid layout and mounting bracket (no text or symbols)natural_image
3D-rendered gray rectangular block with black edges, no text or symbols visiblenatural_image
Mechanical component diagram showing a T-shaped assembly with a handle and two cylindrical parts (no text or symbols)TURBO-UNIVERSAL®-harja BBZ102TBB
natural_image
Simple line drawing of a mechanical lever or clamp device (no text or symbols)Lattiasuulake BBZ082BD
natural_image
Two 3D-rendered objects with numbered labels (4 and 5) shown in different orientations (no text or symbols beyond labels)text_image
Illustration showing two hand-drawn cards labeled 6 and 7, with the card being held by a pen.Microsan-poistoilman suodatin (6) ja
text_image
Technical diagram of a vacuum cleaner with numbered parts and exploded view, including handlebars, clamps, and accessories.natural_image
3D rendered mechanical component with a circular hole and flange (no text or symbols)Filtro textil (filtro permanente) BBZ10TFP
natural_image
Line drawing of a solar panel with grid layout and mounting bracket (no text or symbols)Filtro HEPA (clase H12) BBZ151HF
natural_image
3D-rendered gray rectangular block with black edges, no text or symbols visiblenatural_image
Mechanical component diagram showing a T-shaped assembly with a handle and two cylindrical parts (no text or symbols visible)Cepillo TURBO-UNIVERSAL® BBZ102TBB
natural_image
Simple line drawing of a mechanical lever or clamp device (no text or symbols)Boquilla universal BBZ082BD
natural_image
Two 3D-rendered objects with numbered labels (4 and 5) shown in different orientations (no text or symbols beyond labels)Filtro permanente (4) y microfiltro (5)
text_image
Illustration showing two hand-drawn cards labeled 6 and 7, with the card being held by a pen.Fallersleber Straße 50
40227 Düsseldorf
Oberbilker Allee 270 A
44287 Dortmund
Rodenbergstraße 47
45141 Essen
Bamlerstraße 1 a
124 125
47805 Krefeld
Robert Bosch (Australia) Pty. Ltd
57-63 McNaughton Roads
3168 CLAYTON
+61 (3) 9541 5555
+61 (3) 9541 5595
www.bosch.com.au/sha/default.asp
BA Bosnia-Herzegovina
"HIGH" d.o.o.
Odobašina 57
Sarajewo
+387 (033) 213 513
Info-Line: +387 (061) 100 905
delicnanda@hotmail.de
BE Belgium, Belgien, Belgique
BSH Home Appliances s.a.n.v.
Old Wolverton (P.O.Box 118)
MK12 5ZR Milton Keynes
+44 (8705) 678910
+44 (1908) 328660
www.boschappliances.co.uk/
www.bosc.happiances.co.uk
GR Greece
BSH Ikiakes Syskeves ABE
17km Ethnikis Odou Athinon-Lamias
& Potamou 20
14574 Kifissia
+30 (210) 4277-700
+30 (210) 4277-669
HK Hong Kong
BSH Home Appliances Limited
Unit 1&2B, 7th Floor
North Block, Skyway House
3 Sham Mong Road
Tai Kok Tsui - Hongkong/Kowloon
+852 (2565) 6151
+852 (2565) 6252
www.bosch-shop.com.hk/
HR Crestle
HR Croatia Andelsko C
Andabaka Commerce Cycdulieve 10
Gunduliceva 10
21000 Split
+385 (21) 481 403
Info-Line: +385 (21) 322 010
andabaka@inet.hr
HU Hungary
BSH Kft.
Királyhágó tér 8-9
1143 Budapest
+36 (1) 489 5461
+36 (1) 201 8796
IL Israel
C/S/B Home Appliance ltd
Uliel Building
- Hamelacha
Industrial Park North
71293 Lo
+972 (8) 9777 222
+972 (8) 9777 245
csh-genv@zahav.net.il
6.50 Serv@zunax.net
IR Ireland
Appliance Care
Unit 4
Ballymount Industrial Estate
Walkinslown
Dublin 12
+353 (1) 4502655
+353 (1) 450252
Outside of 01-area: 18903 22222
IS Iceland
Smith & Norland H/F
Noatuni 4
105 Reykjavik
+354 (520) 3000
+354 (520) 3010
www.sminor.is
www.hmmhof
IT Italy, Italia
72 Buluju street, house 2.
1067 Riga
+371 (7) 44 2114
.871 (7) 47 9300
+371 (7) 47 3300
latinter@latinter.N
MK Macedonia
RIMEKO SG*
Londoneke 19
Londonska 19 1000 Skopio
1000 Skopje
+369 (2) 377 144
MT Malta
Oxford House Ltd.
Notabile Road
Notable Road Michael PKD 1
Robert Bosch Australia Pty. Ltd
New Zealand Branch
New Zealand Branch 14-16 Constellation Drive
14-10 Constellation Drive 1010 Malvoni Bay Avondale
1310 Mairangi Bay Auckland
+64 (9) 4786158
+64 (9) 4782914
Terry Druce@nz.bosch.com
Tony.Bradu@12.bosson.com
PL Poland
BSH Home Appliances (SEA) Pte.
Ltd.
Camal Sahir Sok No. 26-28
Gemal Sanin SOK, No. 20-26 03470 Magidivakiva, Istenby
80470 Mecidiyekoy - Istanbul
+90 212 275 47 75
+90 212 275 55 04
www.boschauplantari.com
www.boschrevaleten.com
TW Taiwan
Achelis Taiwan Co., Ltd.
6th floor. No 2. Sec.3
Min Sheng F. Road
Mint Sheng L. Road
Tapei
+886 (2) 2321 6222
+886 8862 2397 1235
www.achelic.com.tw
www.achells.com.tw
UA Ukraine
KNER
СП»Транс-Сервис»
ОП»Транс-Серейск»
TEL: (044) 568-51-50
U.S. Deyers 94, Plak
III Bullevar 34, Blok 23
11070 Novi Beograd
+381
+281 (11) 130689
4361 (11) 159058 Info Line: 624.14
Info-Line: +381 (11) 138 552
spec.el@EUnet.yu
ZA South Africa
BSH-SA
15th Rd. Bondingspark
15th Rd., Handjespank
Private Bag X36, Randjespark
1685 Midrand - Johannesburg
+27 (11) 265 7800
+27 (11) 265 7600
+27 (11) 265 7867
DE Garantie
GB Conditions of guarantee
For this appliance the guarantee conditions as set
out by our representatives in the country of sale
apply. Details regarding same may be obtained
apply. Details regarding claims may be obtained from the dealer from whom the appliance was
from the dealer from which the appliance was purchased. For claims under guarantee the sale
purchased. For claims under guarantee the sale receipt must be produced
Receipt must be produced.
FR Conditions de garantie
natural_image
Symbol of a trash bin crossed with two crossed lines, no text or numbers presentde
This appliance is labelled in accordance with European Directive 2002/96/EG concerning used electrical and electronic appliances (waste electrical and electronic equipment - WEEE). The guideline determines the framework for the return and recycling of used appliances as applicable throughout the EU


