DGN845 - Stapler DEWALT - Free user manual and instructions
Find the device manual for free DGN845 DEWALT in PDF.

| Product Type | Gas Stapler/Nailer |
| Brand | DEWALT |
| Model | DGN845 |
| Energy | 100 J |
| Magazine Capacity | 36 nails |
| Height | 399 mm |
| Width | 125 mm |
| Depth | 422 mm |
| Weight (without battery, without nails, without gas cartridge) | 3.9 kg |
| Power Supply | 18 V Li-Ion battery + combustible gas cartridge |
| Compatible Nail Types | Length 13–40 mm, diameter 2.6 / 3.0 / 3.7 mm, flat or round head Ø 6.4 mm |
| Sound Pressure Level (L_PA) | 96.1 dB(A) |
| Sound Power Level (L_WA) | 100.3 dB(A) |
| Vibration Value (a_h) | 4.3 m/s² |
| Operating Temperature Range | -10 °C to 40 °C |
| Operating Mode | Contact trip with anti-double fire |
| Depth Adjustment | Yes, by wheel |
| Utility Hook | Yes, reversible |
| Maintenance Indicator | Yellow LED (low battery or service required) |
| Sleep Function | Yes, after 1 hour of inactivity |
| Maintenance | Cleaning with dry cloth, lubrication not required |
| Recommended Gas Cartridge | DEWALT DGN845080 |
| Optional Accessories | Magnetic tip DGN8451, STICK-E tip DGN8452, drywall tip DGN8453, Tool Connect chip |
Frequently Asked Questions - DGN845 DEWALT
User questions about DGN845 DEWALT
0 question about this device. Answer the ones you know or ask your own.
Ask a new question about this device
Download the instructions for your Stapler in PDF format for free! Find your manual DGN845 - DEWALT and take your electronic device back in hand. On this page are published all the documents necessary for the use of your device. DGN845 by DEWALT.
USER MANUAL DGN845 DEWALT
English (original instructions) 27
natural_image
Icon of a person using a computer (no text or symbols)Fig. A
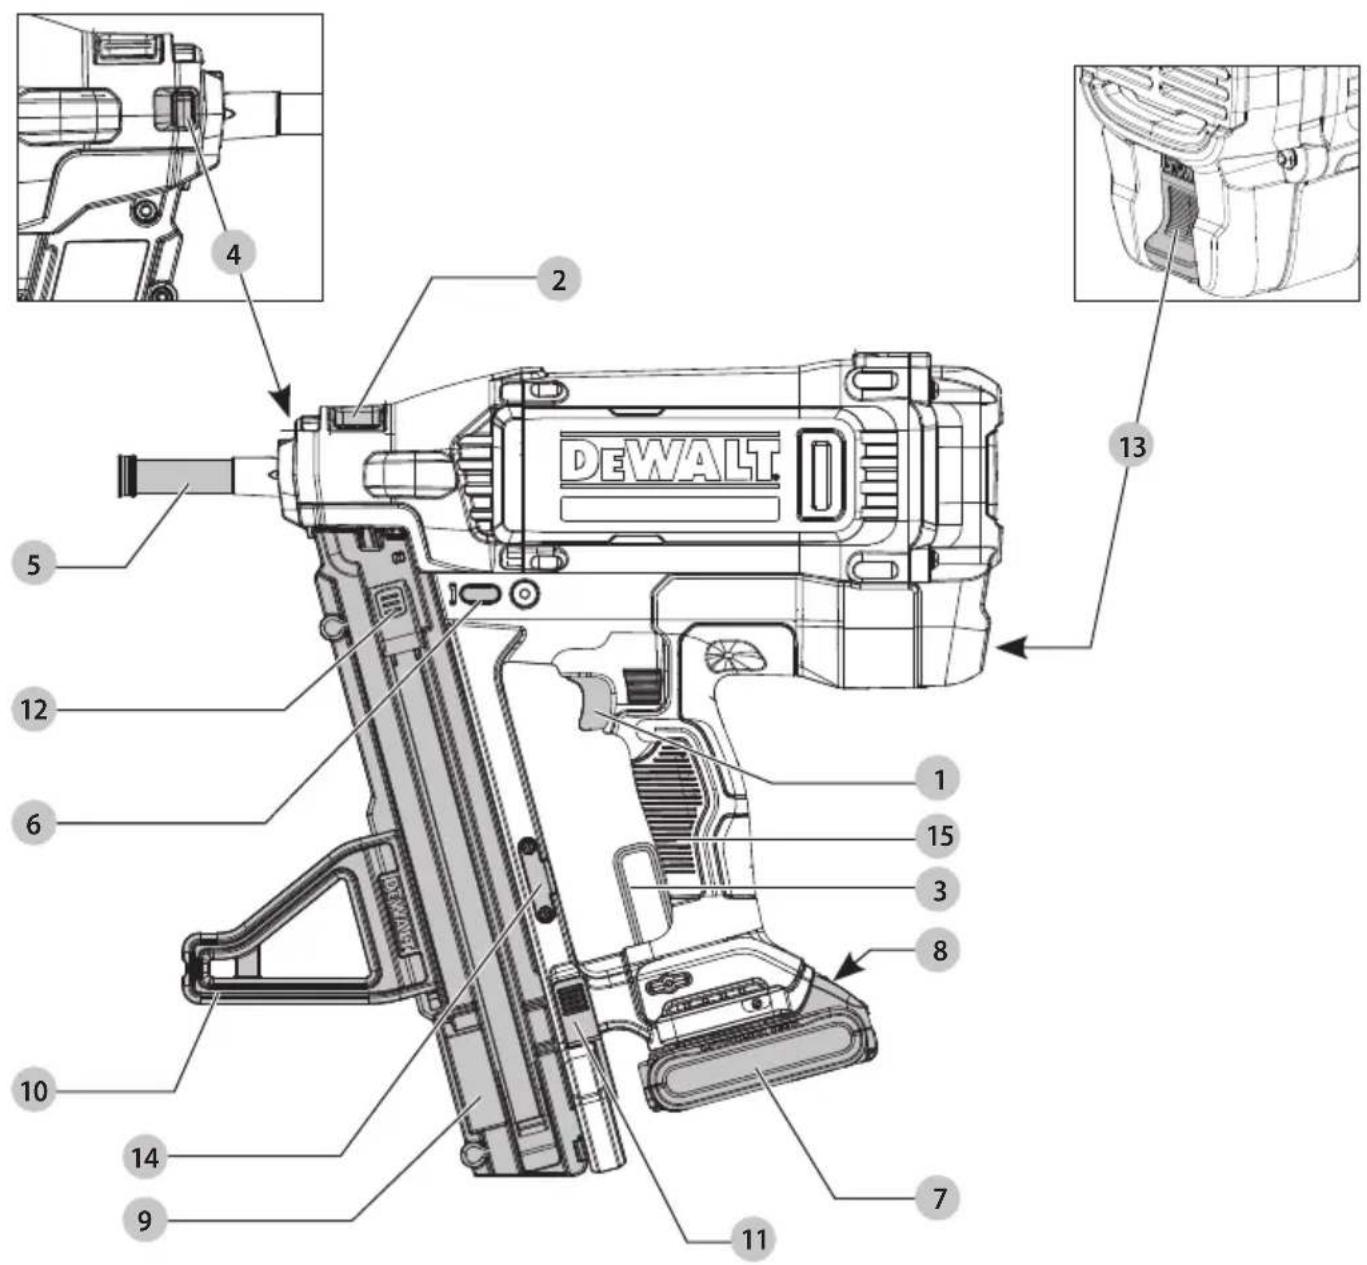
Fig. B
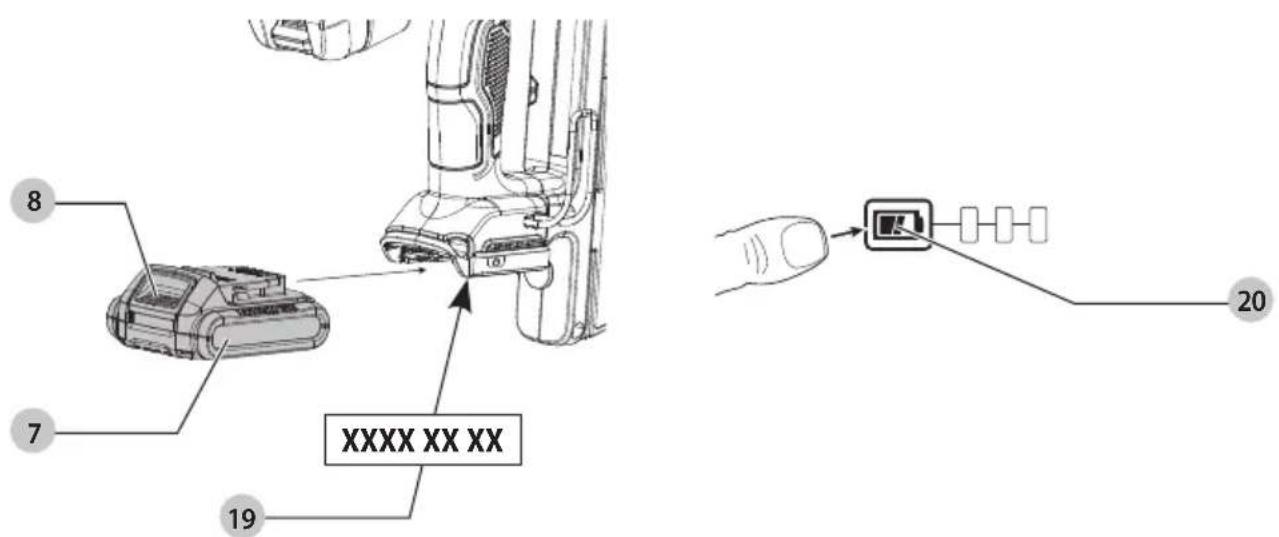
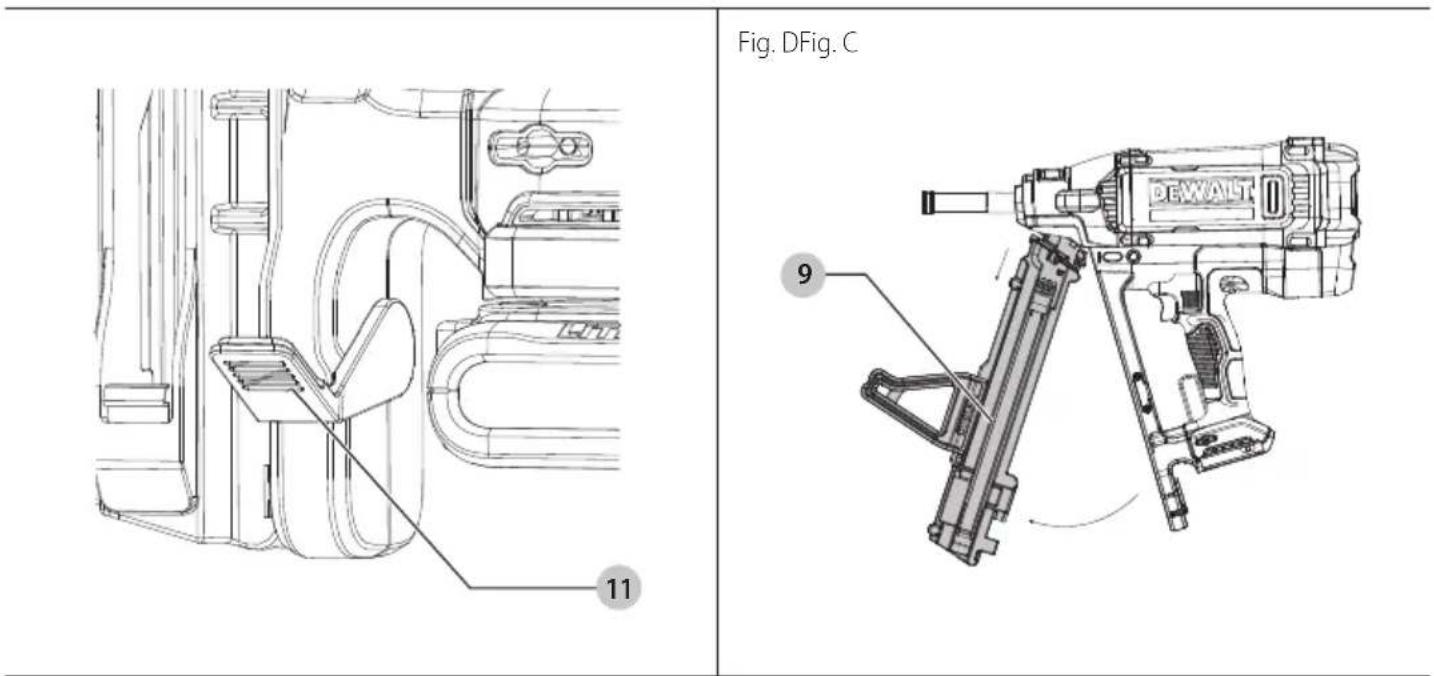
Fig. E
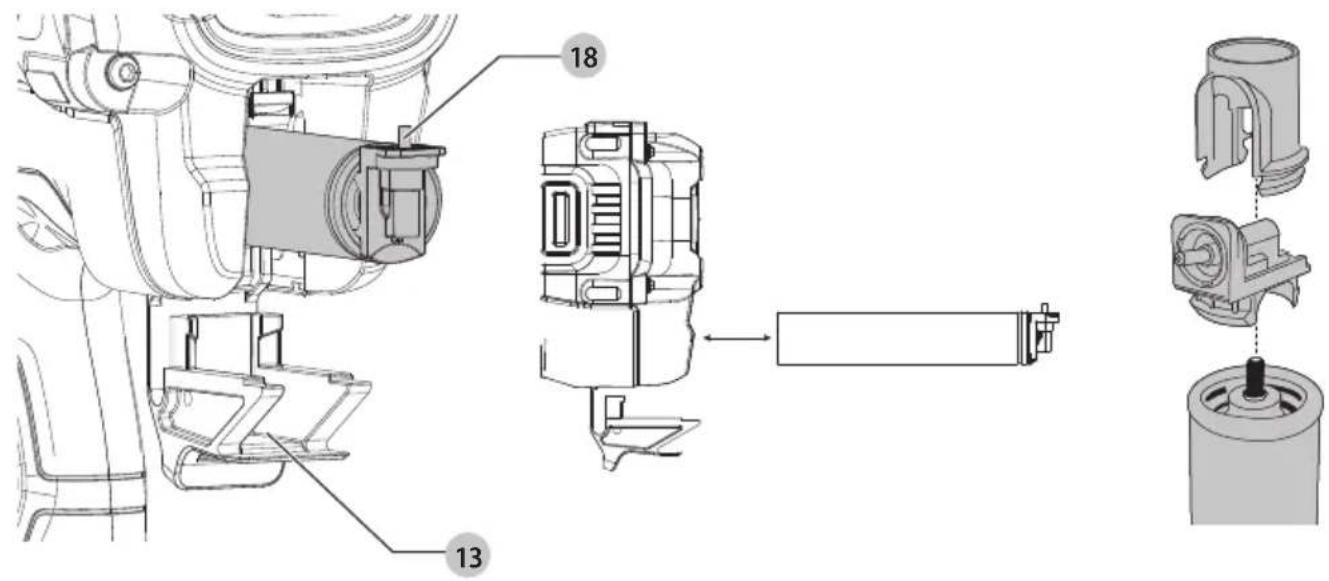
Fig. F
natural_image
Technical line drawing of a welding torch with no visible text or symbolsFig. G
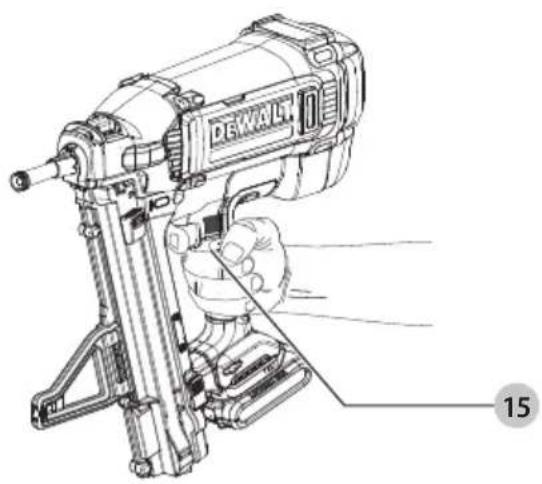
Fig. H
natural_image
Technical line drawing of a mechanical device with two views and a numbered annotation (2), no readable text or symbols present.Fig.1
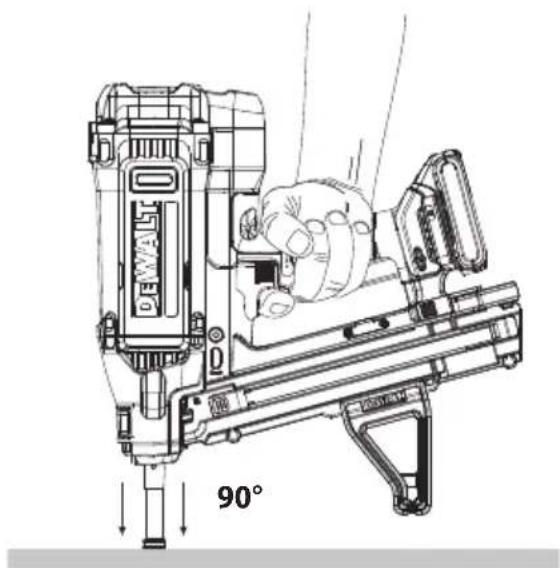
Fig. J

Installation of Tool Connect™ Chip
You have chosen a DEWALT tool. Years of experience, thorough product development and innovation make DEWALT one of the most reliable partners for professional power tool users.
Product Information
This gas-powered nailer is intended for professional users and may only be operated, maintained and serviced by trained, authorised personnel.
This personnel must be expressly made aware of the possible dangers. The product and its accessories can be dangerous if used by untrained personnel or not used as intended.
Technical Data
| DGN845 | ||
| Energy J 100 | ||
| Type 1 | ||
| Magazine capacity Nails 36 | ||
| Height | mm | 399 |
| Width | mm | 125 |
| Depth | mm | 422 |
| Weight (without battery, fasteners and fuel cell) kg 3.9 | ||
| Battery | ||
| Voltage V | DC | 18 |
| Type Lithium Ion | ||
Permissible Nails and Fuel Cells
| Nails mm 13-40 | |
| Diameter mm 2.6, 3.0, and 3.7 | |
| Nail head diameter mm 6,4 | |
| Type of nail head | Flat head, round head |
| DEWALT Fuel Cells | |
| Art. No. DGN845080 | |
Noise Values according to EN15895 and vibration values (Triax vector sum) according to EN28927-13:
| L_PA (emission sound pressure level)* | dB(A) | 96.1 |
| L_WA (sound power level)* | dB(A) | 100.3 |
| K (uncertainty for the given sound level) | dB(A) | 2.5 |
| Working mode: fastening of spikes at main handle | ||
| Vibration* emission value a_h = | m/s2 | 4.3 |
| Uncertainty K = | m/s2 | 1.5 |
*Values can vary: The work environment, workpiece support, workpiece, contact pressing force and so forth affect the noise development at the place of operation and the effects of vibrations on the object.
The vibration emission level given in this information sheet has been measured in accordance with a standardised test given in EN28927-13:2019 and may be used to compare one tool with another. It may be used for a preliminary assessment of exposure.
WARNING: The declared vibration emission level represents the main applications of the tool. However if the tool is used for different applications, with different accessories or poorly maintained, the vibration emission may differ. This may significantly increase the exposure level over the total working period.
An estimation of the level of exposure to vibration should also take into account the times when the tool is switched off or when it is running but not actually doing the job. This may significantly reduce the exposure level over the total working period.
Identify additional safety measures to protect the operator from the effects of vibration such as: maintain the tool and the accessories, keep the hands warm, organisation of work patterns.
EC-Declaration of Conformity
Machinery Directive

Trak-It® C6 Gas Nailer
DGN845
DEWALT declares that these products described under
Technical Data are in compliance with:
2006/42/EC, EN ISO11148-13:2018.
These products also comply with Directive 2014/30/EU and 2011/65/EU. For more information, please contact DEWALT at the following address or refer to the back of the manual.
The undersigned is responsible for compilation of the technical file and makes this declaration on behalf of DEWALT.

Markus Rompel
Vice President of Engineering, PTE-Europe
65510, Idstein, Germany
06.07.2024
DECLARATION OF CONFORMITY
THE SUPPLY OF MACHINERY (SAFETY) REGULATIONS
2008


Trak-It® C6 Gas Nailer
DGN845
| Batteries Chargers/Charge | Times (Minutes)*** | ||||||||||||
| Cat # V | DC | Ah Weight (kg) | DCB104 DCB107 | DCB112/DCB1102 | DCB113 | DCB115/DCB1104 | DCB116 DCB117 DCB118 DCB132 DCB119 | ||||||
| DCB546 | 18/54 | 6.0/2.0 | 1.08 | 60 | 270 | 170 | 140 | 90 | 80 | 40 | 60 | 90 | X |
| DCB547/G | 18/54 | 9.0/3.0 | 1.46 | 75* | 420 | 270 | 220 | 135* | 110* | 60 | 75* | 135* | X |
| DCB548 | 18/54 | 12.0/4.0 | 1.46 | 120 | 540 | 350 | 300 | 180 | 150 | 80 | 120 | 180 | X |
| DCB549 | 18/54 | 15.0/5.0 | 2.12 | 125 | 730 | 450 | 380 | 230 | 170 | 90 | 125 | 230 | X |
| DCB181 | 18 | 1.5 | 0.35 | 22 | 70 | 45 | 35 | 22 | 22 | 22 | 22 | 22 | 45 |
| DCB182 | 18 | 4.0 | 0.61 | 60/40** | 185 | 120 | 100 | 60 | 60/45** | 60/40** | 60/40** | 60 | 120 |
| DCB183/B/G | 18 | 2.0 | 0.40 | 30 | 90 | 60 | 50 | 30 | 30 | 30 | 30 | 30 | 60 |
| DCB184/B/G | 18 | 5.0 | 0.62 | 75/50** | 240 | 150 | 120 | 75 | 75/60** | 75/50** | 75/50** | 75 | 150 |
| DCB185 | 18 | 1.3 | 0.35 | 22 | 60 | 40 | 30 | 22 | 22 | 22 | 22 | 22 | 40 |
| DCB187 | 18 | 3.0 | 0.54 | 45 | 140 | 90 | 70 | 45 | 45 | 45 | 45 | 45 | 90 |
| DCB189 | 18 | 4.0 | 0.54 | 60 | 185 | 120 | 100 | 60 | 60 | 60 | 60 | 60 | 120 |
| DCBP034/G | 18 | 1.7 | 0.32 | 27 | 82 | 50 | 40 | 27 | 27 | 27 | 27 | 27 | 50 |
| DCBP518/G | 18 | 5.0 | 0.75 | 50 | 240 | 150 | 120 | 75 | 60 | 50 | 50 | 75 | 150 |
*Date code 201811475B or later
**Date code 201536 or later
***Battery charge times matrix provided for guidance only; charge times will vary depending on temperature and condition of batteries.
DEWALT declares that these products described under Technical Data are in compliance with:
The Supply of Machinery (Safety) Regulations, 2008, S.I. 2008/1597 (as amended), EN ISO11148-13:2018.
These products conform to the following UK Regulations: Electromagnetic Compatibility Regulations, 2016, S.I.2016/1091 (as amended).
The Restriction of the Use of Certain Hazardous Substances in Electrical and Electronic Equipment Regulations 2012, S.I. 2012/3032 (as amended).
For more information, please contact DEWALT at the following address or refer to the back of the manual.
The undersigned is responsible for compilation of the technical file and makes this declaration on behalf of DEWALT.

natural_image
Simple line drawing of a curved line with two intersecting lines (no text or symbols)Karl Evans
Vice President Professional Power Tools EANZ GTS
DEWALT UK, Meadowfield Avenue, Spennymoor, DL16 6YJ, England
06.07.2024

WARNING: To reduce the risk of injury, read the instruction manual.
Definitions: Safety Guidelines
The definitions below describe the level of severity for each signal word. Please read the manual and pay attention to these symbols.
▲ANGER: Indicates an imminently hazardous situation which, if not avoided, will result in death or serious injury.
WARNING: Indicates a potentially hazardous situation which, if not avoided, could result in death or serious injury.
CAUTION: Indicates a potentially hazardous situation which, if not avoided, may result in minor or moderate injury.
NOTICE: Indicates a practice not related to personal injury which, if not avoided, may result in property damage.
▲enotes risk of electric shock.
Denotes risk of fire.
GENERAL SAFETY INSTRUCTIONS
WARNING: Please read instructions and warnings for this tool carefully before use. Failure to do so could lead to serious injury. EMPLOYERS, TOOL OWNERS AND TOOL OPERATORS ARE RESPONSIBLE FOR THE SAFE USE OF THIS TOOL AND COMPLIANCE WITH ALL WARNINGS AND INSTRUCTIONS.
saVE aLL WaRnInGs and InsTRUCTIONS FOR FUTURE REFEREnCE
At a Minimum, Employers, Tool Owners and Tool Operators Must:
- Ensure that the manufacturer's tool operating/safety instructions, warnings and labels are available to all tool operators and users. Do not use tool with missing or damaged safety warning label(s).
- Train tool operators and users in the safe use of the tool as described in the tool operating/safety instructions, warnings and labels.
- Allow only persons who have read and understood the tool operating/safety instructions, warning and labels to operate the tool.
- Allow tool use only when tool operator and all other personnel in work area are wearing appropriate eye protection equipment, and when required, other appropriate personal protective equipment, such as, head, hearing and foot protection equipment. Provide information about the safe duration of use and appropriate working positions.

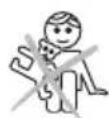
Avoid Explosion Hazard
Do not operate the tool in explosive atmospheres, such as in the presence of flammable liquids, gases or combustible dust.
General Safety Rules
- When using the tool, be aware that the fastener could deflect and cause injury.
- Keep fingers away from trigger when not operating this tool and when moving from one operating position to another.
- Keep all body parts such as hands, and legs, etc. away from firing direction and ensure fastener cannot penetrate workpiece into parts of the body.
- Read and understand the safety instructions before connecting, disconnecting, loading, operating, maintaining, changing accessories on, or working near the tool. Failure to do so can result in serious bodily injury.
- Place the nail discharge outlet of the tool on the work surface properly when operating. Failure to place the discharge outlet in a proper manner can result in fasteners shooting away from the work surface and is extremely dangerous.
- Hold the tool with a firm grasp and be prepared to manage recoil.
- Only technically skilled operators may use tool.
- Do not modify tool. Modifications may reduce the effectiveness of safety measures and increase the risks to the operator and/or bystander.
- When operating a tool intended to be used on hard surfaces such as steel and concrete, put additional down force required to operate the tool and prevent slipping.
- Do not use a tool if the tool has been damaged or is not in proper working order. Tag and physically segregate tool to prevent use.
- Be careful when handling fasteners, especially when loading and unloading, as the fasteners have sharp points which could cause injury.
- Always check the tool before use for broken, misconnected or worn parts.
- Do not overreach. Only use in a safe working place. Keep proper footing and balance at all times.
- Keep bystanders and children away (when working in an area where there is a likelihood of through traffic of people). Clearly mark off your operating area.
- Never point the tool at yourself or others. Serious accidents may be caused when misfiring. Be sure the discharge outlet is not pointed toward people when connecting, loading and unloading the fasteners or similar operations.
- Do not rest your finger on the trigger when picking up the tool, moving between operating areas and positions or walking, as resting finger on trigger can lead to inadvertent operation. For tools with selective actuation, always check the tool before use to ascertain the correct mode is selected.
- Only wear gloves that provide adequate feel and safe control of triggers and any adjusting devices.
- When not in use remove battery plus fuel cell.
- Always refer to tool maintenance instructions for detailed information on proper maintenance of the tool. Only qualified personnel shall repair the tool using parts supplied or recommended by DEWALT or parts that perform equivalently.
-
Before operating, inspect tool to confirm:
-
Use of proper power source - Refer to Technical Data.
• That tool is in proper working order.
• What actuation system is on tool and how it operates. - No misalignment or binding of moving parts.
- All conditions necessary for proper and safe tool operation.
- All screws and bolts are tight and properly installed prior to operating the tool. Loose or improperly installed screws or bolts cause accidents and tool damage when the tool is put into operation.
- Check the operation of the contact trip frequently. Do not use the tool not working correctly as accidental driving of a fastener may result. Do not interfere with the proper operation of the contact arm.
- Do not remove, tamper with, or otherwise cause tool operating controls to become inoperable (e.g., trigger, contact arm).
- Do not operate tool if any portion that is related to the tool operating controls (e.g., trigger, contact trip) is inoperable, disconnected, altered or not working properly.
- Always assume that the tool contains fasteners. Do not actuate tool unless tool is placed firmly against the workpiece.
- Respect the tool as a working implement.
- Do not engage in horseplay.
- Stay alert, focus on your work and use common sense when working with tools.
- Do not use tool while tired, after having consumed drugs or alcohol, or while under the influence of medication.
- Do not drive fasteners on top of other fasteners. It may cause deflection of fasteners which could cause injury.
- After driving a fastener, tool may spring back ("recoil") causing it to move away from the work surface. To reduce risk of injury always manage recoil by:
• Always maintaining control of tool. - Allowing recoil to move tool away from work surface.
- Not resisting recoil such that tool will be forced back into the work surface. In standard "Contact Actuation Mode," if contact trip is allowed to re-contact work surface before the trigger is released, an unintended discharge of a fastener will occur. In that scenario, Contact Actuation with Anti-Double Fire Mechanism and Single Actuation is designed to prevent the release of an unintended discharge of a fastener.
- Keeping face and body parts away from tool.
- When working close to an edge of a work surface or at steep angles use care to minimize chipping, splitting or splintering, or free flight or ricochet of fasteners, which may cause injury.
- Do not load the tool with fasteners when any one of the operating controls (e.g., trigger, contact trip) is activated.
- When fastening roofs or similar slanted surface, start fastening at the lower part and gradually work your way up. Fastening backward is dangerous as you may lose your foot place. Never actuate the tool into free space. This will avoid any hazard caused by free flying fasteners and excessive strain of the tool.
- Do not use the tool as a hammer.
- The tool must be used only for the purpose it was designed.
- Keep the tool in a dry place out of reach of children when not in use.
- After using the tool, please remove the battery and place the tool safely in a lateral position. The tool must not be placed horizontally for storage.
Foreseeable hazards and warnings in the general use of the tool are described below. Assess the specific risks that may be presented as a result of each use.
Projectile Hazards
- Remove battery plus fuel cell when:
- Not in use;
• Performing any maintenance or repairs; - Clearing a jam;
- Elevating, lowering or otherwise moving the tool to a new location;
- Tool is outside of the operator's supervision or control;
- Making adjustments;
- Removing fasteners from the magazine; or
- Changing/replacing accessories.
- During operation be careful that fasteners penetrate material correctly and cannot be deflected /misfired towards operator and /or any bystanders.
- During operation, debris from workpiece and fastening/collation system may be discharged. Take cautions of these debris.
- Always wear impact-resistant eye protection with side shields during operation of the tool.
- The risks to others shall be assessed by the operator.
- Be careful with tools without contact trip as they can be fired unintentionally and injure operator and/or bystander.
- Ensure tool is always safely engaged on the workpiece and cannot slip.
Operating Hazards
- Hold the tool correctly: be ready to counteract normal or sudden movements such as recoil.
- Maintain a balanced body position and secure footing.
- Appropriate safety glasses shall be used and appropriate gloves and protective clothing are recommended.
- Dust masks, hearing protection, hard hats, safety shoes or other personal protective equipment shall be required in some work environments. Employers, tool owners and operators must enforce use of appropriate personal protective equipment for all personnel in a specific work environment.
- Only use the correct battery and fuel cell for tool – refer to
Technical Data.
6. For fasteners, refer to Technical Data.
Repetitive Motion Hazards
- When using a tool for long periods, the operator may experience discomfort in the hands, arms, shoulders, neck, or other parts of the body.
- While using a tool, the operator should adopt a suitable but ergonomic posture. Maintain secure footing and avoid awkward or off-balanced postures.
- If the operator experiences symptoms such as persistent or recurring discomfort, pain, throbbing, aching, tingling, numbness, burning sensation, or stiffness, do not ignore these warning signs. The operator should consult a qualified health professional regarding overall activities.
- Any risk assessment should focus on musculoskeletal disorders and is preferentially based on the assumption that decreasing fatigue during work is effective in reducing disorders.
Accessory and Consumable Hazards
-
Use only fasteners and accessories made or recommended by DEWALT.
-
Refer to Technical Data section for detailed specification on fasteners and accessories.
- Disconnect the energy supply to the tool, such as air or gas or battery as applicable, before changing/replacing accessories such as workpiece contact, or making any adjustments.
Workplace Hazards
- Slips, trips and falls are the main causes of injuries in the workplace. Watch out for slippery surfaces, a fall can lead to unintentional operation of the nailer.
- Proceed with additional care in unfamiliar surroundings. Hidden hazards may exist, such as electricity or other utility lines.
- The tool is not intended for use in potentially explosive atmospheres and is not insulated from coming into contact with electric power.
- Use extra caution when driving fasteners into existing walls or other blind areas to prevent contact with hidden objects or persons on other side (e.g., electrical cables, gas pipes).
Dust And Exhaust Hazards
- If the tool is used in an area where there is static dust, it may disturb the dust and cause a hazard. Risk assessment should include dust created by the use of the tool and the potential for disturbing existing dust.
- Direct the exhaust so as to minimize disturbance of dust in a dust-filled environment.
- Where dust or exhaust hazards are created, the priority shall be to control them by changing the tool exhaust direction.
Noise Hazards
- Unprotected exposure to high noise levels can cause permanent, disabling hearing loss and other problems such as tinnitus (ringing, buzzing, whistling or humming in the ears). Risk assessment and implementation of appropriate controls for these hazards are essential.
- Appropriate controls to reduce the risk may include actions such as damping materials to prevent workpieces from "ringing".
- Use appropriate hearing protection.
- Operate and maintain the tool as recommended in the Safety/Operating Instructions Sections, to prevent an unnecessary increase in noise levels.
Vibration Hazards
- Information to conduct a risk assessment of these hazards and implementation of appropriate controls is essential.
- Exposure to vibration can cause disabling damage to the nerves and blood supply of the hands and arms.
- Wear warm clothing when working in cold conditions, keep your hands warm and dry.
- If you experience numbness, tingling, pain or whitening of the skin in your fingers or hands, seek medical advice from a qualified occupational health professional regarding overall activities.
- Operate and maintain the tool as recommended in these instructions, to prevent an unnecessary increase in vibration levels.
- Hold the tool with a light, but safe, grip because the risk from vibration is generally greater when the grip force is higher.
- If an operator is exposed to tool vibration for a long period of time, they may be in danger of repetitive strain injuries.
Additional Safety Instructions for Gas Tools
-
Gas tools shall only be used with fuel cells which are listed in the Technical Data.
-
Be careful when using gas tools, as the tool can become hot, affecting grip and control.
- Gas tools shall be used in ventilated spaces.
- In the case that liquid combustible gas comes into contact with human skin, injuries may occur.
- Ensure combustible materials are not exposed to hot exhaust gases.
- Do not use gas tools in explosive areas as the sparks generated in the tool may cause fire or explosion.
- For gas tools, a small release of gas might be generated by regular operations.
Cautions for Fuel Cells
1. Handle fuel cell carefully and check for damages.
Damaged fuel cell can explode and cause injury.
2. Read and follow the instructions printed on the fuel cell.
3. Store fuel cell in well-ventilated area.
4. Do not expose the fuel cell to the direct sunshine.
5. Do not place the fuel cell in a vehicle or a trunk where the temperature could rise. It could explode. A used empty fuel cell still contains a combustible propellant gas, which could swell and explode a container into pieces.
6. Store the fuel cell at ambient temperature of max. 40 °C.
7. The fuel cell contains the pressurized combustible gas. If it is exposed to the temperature higher than 40 °C , the gas could leak from it or burst, resulting in a fire.
8. Do not breathe in the gas.
9. Do not incinerate or recycle the empty fuel cell.
10. Never jet the gas from the fuel cell to the human body.
11. Do not remove the rubber plug from the bottom of the fuel cell except at disposal.
12. Do not make a hole in the fuel cell by driving a nail with a hammer.
Protective Equipment
Loose clothes, jewelry, falling objects, noise and similar hazards may present a danger to persons. Persons that will be using the device and have to reside in the vicinity of the device, must wear suitable personal safety equipment:

Safety helmet: protects the head against falling objects.

Safety ANSI Z87+ goggles: protects the eyes against flying objects, such as splinters and dust.

Hearing protection: protects the ears against excessive noise.

Safety footwear: Protects your feet against sharp objects on the ground and falling objects.
Device and Operational Safety
Fuel cells, charger, and batteries can cause hazards. Observe the safety instructions. Refer to Fuel Cells and the battery and charger manual.
Danger of explosion:
- When the barrel is pressed against a surface, the motor directs an explosive gas into the combustion chamber. If the trigger is not actuated, another press causes the explosive gas to escape.
-
Only use the gas nailer outdoors or in well-ventilated areas.
-
Never use the gas nailer in the vicinity of fires or highly flammable materials/liquids (thinner, paints/varnishes, gasoline).
- Never smoke while using the device.
Additional hazards for people:
- Prevent the gas nailer and fuel cells from being accessed by unauthorised persons and children.
- Only use the gas nailer if it is in good working condition and has been properly maintained.
- Only use the gas nailer with an effective safety yoke.
- When the device is not in use, the workplace is being changed, during transportation, in storage, in case of jams and during maintenance: Keep your finger away from the trigger and remove the battery as well as fuel cell.
- Slippery handles may lead to loss of control: Keep the handle dry, clean and free from oil and grease.
- There is a recoil when the nail is fired. Do not hold your head directly above the gas nailer during operation and start with low penetration depth.
- Ensure that you stand securely and can hold your balance, especially on platforms as well as elevated and/or slanted, uneven or slippery workplaces.
• The gas nailer may not be used on a ladder. - The gas nailers may not be used to close boxes or crates.
- The gas nailer may not be used to fit transport locks to vehicles and wagons.
Nails can break into multiple parts after firing and thus cause serious injuries:
- When materials are penetrated that are too soft, thin or too hard or if the ring depth is set too high.
• If nails hit other nails after entering. - Keep at least a distance of 5 cm to edges and corners.
- You may not use the gas nailer when people are located on the other side.
• Always position the gas nailer at a 90° angle to the surface.
Protection of persons:
- Do not hold the handgrip with excessive force.
• Take a work break when feeling numb, extremely warm or cold or a tingling sensation in your fingers/arms. Consult a doctor if this phenomenon repeats.
Property damage:
- Do not use the gas nailer in the rain or a very humid environment.
- Do not expose the gas nailer to high temperatures, for example the direct sunlight.
- Only use the gas nailer in well-ventilated areas or outdoors with temperatures ranging from -10^ to 40^ .
- Do not use the gas nailer with an empty magazine.
- Only store the gas nailer in dry and frost-protected rooms.
Immediately stop working:
• In case of unusual noises, such as uneven fan noise,
• In case of a strong smell/odour generation (unburned gases),
• In case extreme heat is suddenly being generated,
- If screws or other parts have become loose or fallen off the device.
Fuel Cells
Danger of explosion:
- Observe the instructions printed on the fuel cell and in the fuel cell safety instructions.
- Only store the fuel cell in well-ventilated rooms. The recommended storage temperature is 41 °F–77 °F (5 °C–25 °C). The storage temperature should not exceed 104 °F (40 °C).
- Follow regional standards for fire, explosion protection, transportation, and risk management.
- Do not store the fuel cell inside vehicles (cargo hold).
- Do not expose the fuel cell to high temperatures, for example the direct sunlight.
- Never refill an empty fuel cell.
- Never open or damage an empty or full fuel cell, throw it into a fire or smoke in the vicinity.
- Do not operate the gas can valve manually.
Dangers to persons:
- Escaping gas can cause injury to the eyes and skin.
• Empty fuel cells can still contain gases, which could cause drowsiness, dizziness and nausea if inhaled.
SAFETY NOTES
Please read the safety information carefully in order to ensure safe and proper operation of the device. Retain the operating instructions until the product is disposed of.
Residual Risks
In spite of the application of the relevant safety regulations and the implementation of safety devices, certain residual risks cannot be avoided. These are:
- Impairment of hearing.
- Risk of personal injury due to flying particles.
- Risk of burns due to accessories becoming hot during operation.
- Risk of personal injury due to prolonged use.
Battery Type
These battery packs may be used: DCB181, DCB182, DCB183, DCB183B, DCB183G, DCB184, DCB184B, DCB184G, DCB184LR, DCB185, DCB187, DCB189, DCBP034, DCBP034G, DCBP518, DCBP518G. Refer to Technical Data for more information.
Package Contents
The package contains:
1 Tool case with gas nailer
1Charger
1 Li-lon battery pack (C1, D1, E1, G1, H1, L1, M1, P1, Q1, S1, T1, U1, X1, Y1, Z1 models)
2 Li-lon battery packs (C2, D2, E2, G2, H2, L2, M2, P2, Q2, S2, T2, U2, X2, Y2, Z2 models)
3 Li-lon battery packs (C3, D3, E3, G3, H3, L3, M3, P3, Q3, S3, T3, U3, X3, Y3, Z3 models)
1 Battery and charger manual
1 Instruction manual
NOTE: Battery packs, chargers and kitboxes are not included with N models. Battery packs and chargers are not included with NT models. B models include Bluetooth® battery packs.
NOTE: The Bluetooth® word mark and logos are registered trademarks owned by the Bluetooth®, SIG, Inc. and any use of
such marks by DEWALT is under license. Other trademarks and trade names are those of their respective owners.
- Check for damage to the tool, parts or accessories which may have occurred during transport.
• Take the time to thoroughly read and understand this manual prior to operation.
Markings and Safety Labels on Tool
The following pictograms are shown on the tool:
The device may only be used if all safety labels on the device are both complete and legible.
Gas nailer (Magazine):

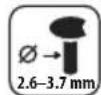
Permissible nails:
Length: 13 mm - 40 mm
∅ 2.6 mm - 3.7 mm

Read the instruction manual prior to using the device

Wear safety goggles

Wear hearing protection
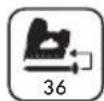
Loading capacity
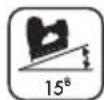
Suitable nail collation angle

Only use the gas nailer in well-ventilated areas
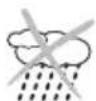
Do not use the gas nailer in the rain

Smoking forbidden
Keep the gas nailer away from children

Never point the gas nailer at other persons
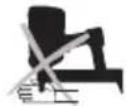
Keep the ventilation openings free.
Do not cover them with your hands
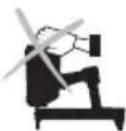
Never hold your hand or other body parts under the barrel
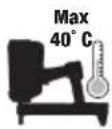
Only use the gas nailer up to an ambient temperature of 40 °C
Fuel cell:

DANGER: Extremely flammable gas
- Keep it away from heat, hot surfaces, sparks, open flames and other sources of ignition.
- Do not smoke or vape.
- Fire resulting from leaking gas: Do not extinguish the fire until the leak can be stopped safely.
- Remove all sources of ignition if this is possible without danger.
- Store the unit at a well-ventilated location.


Do not expose the fuel cell to temperatures above 50 °C.
Date Code Position (Fig. B)
The production date code 11 consists of a 4-digit year followed by a 2-digit week and is extended by a 2-digit factory code.
Description (Fig. A)
WARNING: Never modify the power tool or any part of it.
Damage or personal injury could result.
1 Trigger
2 Depth adjustment switch
3 Utility hook
4 Contact trip release button
5 Contact trip
6 Maintenance indicator light
7 Battery pack
8 Battery release button
9 Magazine
10 Magazine support leg
11 Magazine release lever
12 Pusher latch
13 Fuel cell door
14 Tool connect (optional accessory)
Intended Use
The gas nailer has to be used in accordance with the specifications of this instruction manual. Gas nailers are not "toys" and require prudent, responsible and careful handling. The gas nailer may only be used by persons over the age of 18 or trainees over the age of 16 in the presence of a responsible supervisor. They must not be under the in fluence of fatigue, alcohol, medication or drugs.
Suitable materials to use as a base, for example:
• Concrete of normal strength
- Steel
Materials that are unsuitable and should not be used as a base, for example:
• Materials that are too soft or too thin
- Materials that are too brittle, such as glass or ceramic
- Materials that are too hard, such as hardened steel
- Hollow block masonry
• Cast iron, plastic, marble, gypsum plasterboards
Misapplications, misuse or "fooling around" may cause lethal injuries and serious property damage. This particularly includes:
• The overriding of safety mechanisms
- Misusing the device as a "firearm"
- Misusing the device as a hammer or similar tool
Only use those fuel cells, charging devices and batteries made by the manufacturer of the gas nailer and only use nails approved by the manufacturer, for more information, see Technical Data. Other applications and uses as well as modifications to the device, additions to the device or conversions as well as maintenance operations and repairs performed by yourself can impair the safety, reliability and proper functioning of the device to a SIGNIFICANT extent and void any warranty claims.
DO NOT use under wet conditions or in the presence of flammable liquids or gases.
This gas nailer is a professional power tool.
DO NOT let children come into contact with the tool.
Supervision is required when inexperienced operators use this tool.
- Young children and the infirm. This appliance is not intended for use by young children or infirm persons without supervision.
- This product is not intended for use by persons (including children) suffering from diminished physical, sensory or mental abilities; lack of experience, knowledge or skills unless they are supervised by a person responsible for their safety. Children should never be left alone with this product.
Sleep Mode
The gas nailer is equipped with a "Sleep Mode" function to protect the battery. If the gas nailer has not been used for a duration longer than one hour, it can only be turned back on after the battery has been removed and reinserted.
Maintenance Indicator Light (Fig. A)
The maintenance indicator light 6 on the handgrip indicates two different states:
Yellow LED State/Status
On battery has to be charged
On gas nailer has to be serviced by a specialist workshop
ASSEMBLY AND ADJUSTMENTS
WARNING: To reduce the risk of serious personal injury, turn tool off and disconnect battery pack before making any adjustments or removing/installing attachments or accessories. An accidental start-up can cause injury.
WARNING: Use only DEWALT batteries and chargers.
Inserting and Removing the Battery Pack from the Tool (Fig. B)
NOTE: Make sure your battery pack 6 is fully charged.
To Install the Battery Pack into the Tool Handle
- Align the battery pack with the rails inside the tool's handle (Fig. B).
- Slide it into the handle until the battery pack is firmly seated in the tool and ensure that you hear the lock snap into place.
To Remove the Battery Pack from the Tool
- Press the battery release button 8 and firmly pull the battery pack out of the tool handle.
- Insert battery pack into the charger.
Fuel Gauge Battery Packs (Fig. B)
Some DEWALT battery packs include a fuel gauge, which consists of three green LED lights that indicate the level of charge remaining in the battery pack.
To actuate the fuel gauge, press and hold the fuel gauge button 20. A combination of the three green LED lights will illuminate, designating the level of charge left. When the level of charge in the battery is below the usable limit, the fuel gauge will not illuminate and the battery will need to be recharged.
NOTE: The fuel gauge is only an indication of the charge left on the battery pack. It does not indicate tool functionality and is subject to variation based on product components, temperature and end-user application.
Utility Hook (Fig. A)
The utility hook 3 is used to fasten the device to a belt (when climbing a ladder or scaffolding, etc.) and can be fitted to both sides of the gas nailer.
To Fasten the Utility Hook on the Opposite Side
- Loosen the screws with a Torx socket.
- Use these screws to attach the utility hook on the opposite side.
Replacing the Magazine (Fig. C, D)
- Pull the lever 11 used to unlock the magazine 9 and remove the magazine itself.
- Insert the (new) magazine back into the slot and push it into the magazine receptacle.
Inserting the Fuel Cell (Fig. E)
WARNING: Severe injuries due to accidental triggering.
- Remove the battery.
- Do not press the barrel of the gas nailer against any surfaces.
- Keep your finger away from the trigger.
-
Observe the Cautions for Fuel Cells safety instructions.
-
Press the fuel cell door 13. The fuel cell door will swing open.
-
Remove the depleted fuel cell (if present) and insert the new one.
- Align fuel cell metering valve stem 18 facing upwards and fit it into the adaptor of the tool.
IMPORTANT: Make sure that the stem of the metering valve is firmly seated before closing the fuel cell door.
- Close the fuel cell door. It locks into place.
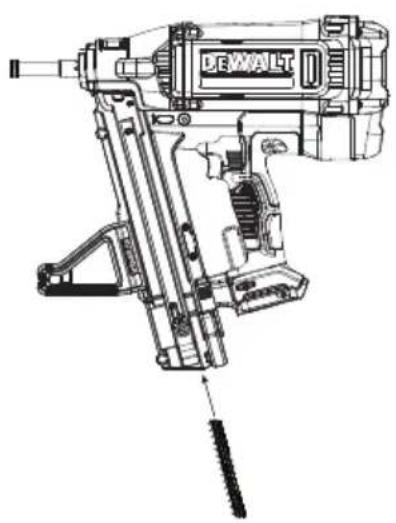
Inserting the Nail Strip (Fig. A, F)
WARNING: Severe injuries due to accidental triggering.
- Remove the battery.
- Do not press the barrel of the gas nailer against any surfaces.
-
Keep your finger away from the trigger.
-
Turn the nailer upside down.
-
Slide the spring-loaded pusher latch 12 to the base of the magazine to lock it into place.
- Drop pin strips into the loading slot of the magazine, making sure the pin heads align correctly with the slot opening. (Refer to Technical Data to determine compatible size.)
- Keeping fingers clear of the track, close the magazine by releasing the pusher latch. Carefully allow the latch to slide forward and engage the pin strip.
OPERATION
Instructions for Use
WARNING: Always observe the safety instructions and applicable regulations.
WARNING: To reduce the risk of serious personal injury, turn tool off and disconnect battery pack before making any adjustments or removing/installing attachments or accessories. An accidental start-up can cause injury.
Proper Hand Position (Fig. G)
WARNING: To reduce the risk of serious personal injury, ALWAYS use proper hand position as shown.
WARNING: To reduce the risk of serious personal injury, ALWAYS hold securely in anticipation of a sudden reaction. Proper hand position requires one hand on the handle 15 and the other hand on the cover, if needed, making sure it is not covering the air filter on the head of the tool.
Using the Gas Nailer
WARNING: Severe injuries due to accidental triggering.
• Always keep the fingers away from the trigger if the gas nailer is not facing the target material.
• Always put down/hang the gas nailer in such a way that the barrel is pointing downwards.
- Start with a low entering depth.
For Every Workstation Change
- Remove the battery and fuel cell.
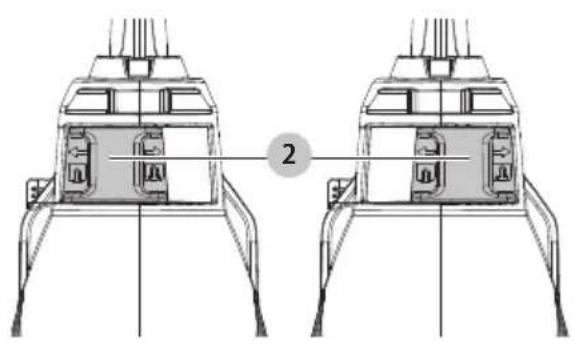
Setting the Firing Depth (Fig. H)
Setting the depth with the depth adjustment switch 2:
- Increase depth: push switch to the right.
- Reduce depth: push switch to the left.
Firing the Nails (Fig. A, I)
• Always position the gas nailer at a 90° angle to the surface.
- Keep at least a distance of 5 cm to edges and corners.
- Push the contact trip 5 against the work surface.
- Pull the trigger switch 1 to actuate the tool.
- Release the trigger and raise the nailer from the work surface.
NOTE: The tool motor returns to full speed automatically without the contact trip being depressed.
- Repeat steps 1–3 to actuate the next nail.
If the Gas Nailer Does Not Fire
- Repeat the process up to three times, replace an empty fuel cell (if applicable), Refer to Inserting the Fuel Cell.
- If the gas nailer still does not fire, it is possible that the "Sleep Mode" has activated, Refer to Sleep Mode.
- Remove the battery and insert it again.
MAINTENANCE
Your power tool has been designed to operate over a long period of time with a minimum of maintenance. Continuous satisfactory operation depends upon proper tool care and regular cleaning.
WARNING: To reduce the risk of serious personal injury, turn tool off and disconnect battery pack before making any adjustments or removing/installing attachments or accessories. An accidental start-up can cause injury. The charger and battery pack are not serviceable.
Maintaining the Gas Nailer
The gas nailer may only be maintained and repaired by an authorised specialist workshop. If a maintenance or service measure is required, the LED on the handgrip will start to illuminate. Refer to Maintenance Indicator Light.
Removing the Nail Strip (Fig. C, D)
WARNING: Severe injuries due to accidental triggering.
- Remove the battery.
- Do not press the barrel of the gas nailer against any surfaces.
- Keep your finger away from the trigger.
- Unlock the nail strip with the magazine slider.
- Hold the magazine downward while pressing the nail lock. The nail strip will slide out of the magazine 9.
Removing Stuck Nails (Fig. C, D)
WARNING: Severe injuries due to accidental triggering.
- Remove the battery.
- Do not press the barrel of the gas nailer against any surfaces.
- Keep your finger away from the trigger.
- Remove the nail strip from the magazine. Refer to Removing the Nail Strip. Pull the lever used to unlock the magazine and remove the magazine itself.
- If the stuck/jammed nail does not loosen by itself: remove the nail from the slot with a sharp object.
- Insert the magazine back into the slot and push it into the magazine receptacle.
- Move the lever 11 used to lock the magazine back to the starting position (locks into place).
Lubrication
Your power tool requires no additional lubrication.
Cleaning
WARNING: Severe injuries due to accidental triggering.
- Remove the battery.
- Remove the fuel cell.
- Remove the nail strip from the magazine. Refer to Removing the Nail Strip.
- Do not press the barrel of the gas nailer against any surfaces.
- Keep your finger away from the trigger.
AUTION: Hot surfaces.
- Remove the battery.
- Let the gas nailer cool down prior to cleaning.
Cleaning the Surfaces
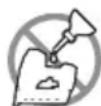
NOTICE: Damage to surfaces: do not use any thinners, solvents, gasoline, etc., for cleaning purposes.
- Only clean the gas nailer using dry cloths.
- Only clean the tool box with dry cloths and compressed air.
Optional Accessories
WARNING: Since accessories, other than those offered by DEWALT, have not been tested with this product, use of such accessories with this tool could be hazardous. To reduce the risk of injury, only DEWALT recommended accessories should be used with this product.
Consult your dealer for further information on the appropriate accessories.
Accessories Art. No.
| Fuel cells DGN845080 |
| Magnetic Contact Trip DGN8451 |
| STICK-E®Contact Trip DGN8452 |
| Drywall Contact Trip DGN8453 |
Tool Connect™ Chip (Fig. J)
WARNING: To reduce the risk of serious personal injury, turn unit off and remove the battery pack before making any adjustments or removing/installing attachments or accessories. An accidental start-up can cause injury. Your tool is Tool Connect™ Chip ready and has a location for installation of a Tool Connect™ Chip.
Tool Connect™ Chip is an optional application for your smart device (such as a smart phone or tablet) that connects the device to utilise the mobile application for inventory management functions.
Refer to Tool Connect™ Chip Instruction Sheet for more information.
Installing the Tool Connect™ Chip
- Remove the retaining screws 16 that hold the Tool Connect™ Chip protective cover 14 into the tool.
- Remove the protective cover and insert the Tool Connect™ Chip into the empty pocket 17.
- Ensure that the Tool Connect™ Chip is flush with the housing. Secure it with the retaining screws and tighten the screws.
- Refer to Tool Connect™ Chip Instruction Sheet for further instructions.
Protecting the Environment
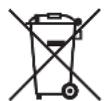
Separate collection. Products and batteries marked with this symbol must not be disposed of with normal household waste.
Products and batteries contain materials that can be recovered or recycled, reducing the demand for raw materials. Please recycle electrical products and batteries according to local provisions. Further information is available at www.2helpU.com.
Rechargeable Battery Pack
This long-life battery pack must be recharged when it fails to produce sufficient power on jobs that were easily done before. At the end of its technical life, discard it with due care for our environment:
- Run the battery pack down completely, then remove it from the tool.
- Li-Ion cells are recyclable. Take them to your dealer or a local recycling station. The collected battery packs will be recycled or disposed of properly.
TROUBLESHOOTING
| Problem Cause(s) Measure(s) | ||
| Barrel is pressed against surface, but engine is not running: | Barrel not pressed firmly enough against the surface. | Press the barrel harder against the surface. |
| The gas nailer has not been operated for longer than 30–45 minutes. | Refer to chapter Sleep Mode | |
| Electronics faults. Remove | the battery and insert it again after 30 seconds. | |
| Battery is empty. Charge the battery if the LED on the handgrip is illuminated. Refer to chapter Maintenance Indicator Light. | ||
| Battery overheated. Let the battery cool down. | ||
| Gas nailer overheated. Let the gas nailer cool down. | ||
| Gas nailer has to be serviced. | Have the gas nailer serviced if the LED on the handgrip is illuminated. Refer to chapter Maintenance Indicator Light. | |
| Bent barrel. Have the gas nailer repaired by a gas nailer authorised dealer. | ||
| Barrel is pressed against surface, but motor stops after 5 seconds: | Normal function. No measures. | |
| Problem Cause(s) Measure(s) | ||
| Barrel is firmly pressed against the surface, the motor is running, but the nails are not red when the trigger is pressed: | Fuel cell empty or not filled to a sufficient degree. | Refer to chapter Inserting the Fuel Cell. |
| Stuck/jammed nails. Refer to chapterRemoving Stuck Nails. | ||
| No nails in the magazine. Refer to chapter Inserting the Nail Strip. | ||
| Magazine slider not retracted. | ||
| Forbidden or unauthorised nails in the magazine. | Refer to chapterPermissible Nails and Fuel Cells under Technical Data. | |
| Magazine “bent” or not inserted properly. | Refer to theReplacing the Magazine section. | |
| Magazine slider spring defective. | ||
| Foreign object in the barrel or magazine. | Refer to chapterRemoving Stuck Nails. | |
| Gas nailer defective. Have the gas nailer repaired by an authorised dealer. | ||
| Loud or irregular fan noise: | Fan defective. Have the gas nailer repaired by an authorised dealer. | |
| Gas odours (unburned combustion gases): | When the barrel is pressed against a surface, the motor directs an explosive gas into the combustion chamber. If the trigger is not actuated, another press causes the unburned gas to escape. | Refer to chapterDevice and Operational Safety. |
CLAVADORA DE GAS TRAK-IT® C6 DGN845
¡Enhorabuena!
ATTENTION: surface chaude.
- Retirez la batterie.
Bloc-batterie rechargeable
WAARSCHUWING: Ernstige letsels vanwege
WAARSCHUWING: Ernstige letsels vanwege
Advarsler for drivstoffcelle
Sette inn brenselcellen (Fig. E)
Limpar as superfícies
Vice President of Engineering, PTE-Europe