
DW5155D1 FOCUS FASHION MICRO 400 - Iron CALOR - Free user manual and instructions
Find the device manual for free DW5155D1 FOCUS FASHION MICRO 400 CALOR in PDF.
| Product Type | Steam generator with iron |
| Brand | CALOR |
| Model | DW5155D1 FOCUS FASHION MICRO 400 |
| Power supply | 220-240 V, 50/60 Hz |
| Power | Approximately 2400 W |
| Water tank capacity | Approximately 1.2 L (fill to MAX mark) |
| Soleplate | Stainless steel |
| Steam functions | Continuous steam (low, medium, high), steam boost, vertical steam |
| Temperature setting | Temperature selector from ● to ●●● (MAX) with indicator light |
| Automatic shut-off | Yes, after 10 minutes of inactivity on the base |
| Anti-scale filter | Removable anti-scale cartridge (ref. EDC06) |
| Descaling system | Descaling indicator and removable descaling cassette |
| Recommended water type | Distilled water or a mix of 50% distilled water and 50% tap water |
| Dimensions (approx.) | Base: 30 x 20 x 25 cm; Iron: 15 x 10 x 12 cm |
| Weight (approx.) | Approximately 4 kg |
| Cord length | Approximately 1.8 m |
| Cleaning | Exterior: soft damp cloth; Soleplate: damp cloth |
| Usage | Household only; stable and heat-resistant surface |
| Safety | Do not immerse; keep cord out of reach of children; unplug before filling |
| Warranty | 2 years (standard) |
Frequently Asked Questions - DW5155D1 FOCUS FASHION MICRO 400 CALOR
User questions about DW5155D1 FOCUS FASHION MICRO 400 CALOR
0 question about this device. Answer the ones you know or ask your own.
Ask a new question about this device
Download the instructions for your Iron in PDF format for free! Find your manual DW5155D1 FOCUS FASHION MICRO 400 - CALOR and take your electronic device back in hand. On this page are published all the documents necessary for the use of your device. DW5155D1 FOCUS FASHION MICRO 400 by CALOR.
USER MANUAL DW5155D1 FOCUS FASHION MICRO 400 CALOR
WE'RE THINKING OF YOU
Thank you for purchasing an Electrolux appliance. You've chosen a product that brings with it decades of professional experience and innovation. Ingenious and stylish, it has been designed with you in mind. So whenever you use it, you can be safe in the knowledge that you'll get great results every time.
Welcome to Electrolux.
Visit our website to:

Get usage advice, brochures, trouble shooter, service information: www.electrolux.com

Register your product for better service: www.electrolux.com/productregistration

Buy Accessories and Consumables for your appliance: www.electrolux.com/shop
CUSTOMER CARE AND SERVICE
When contacting Service, ensure that you have the following data available. The information can be found on the rating plate. Model, PNC, Serial Number.

Warning / Caution-Safety information

General information and tips

Environmental information
Subject to change without notice.
| !BG | Ubayaemmi Klinennti, Възможино ePaperstata STANJIДа He Tenepeira npapa, BeJHATA CLEI KATO CTe I NaHbHINIMIN C BODA 3a II pBvBI NITM INCTOPHO pRzepBOApa. PrrnunHATAE, Ye cuaT OT bByDxNBA XbB VbB TBePIHNTA CISTEMA MOnE Da 3a2abBV Ta3I FHNKUNC CHKONKO CEXUYND. MonJ, PpOBRETE TpRPNHE OONTAITE OTHNOB, Kato HATNCHTE ByTOHa 3a npapa. 3a BaWte UdoobTO, npapata Ie npOblkDNa IaIImZa IcIe KATO OCSBOODITE ByTOHa 3a HAKOLIO CEXUYND; He e HEOXODIMIO To da e HAMNIATNE PBEme. OXpHInIE CBO RITbM 3a NaH-dO6pRzeyTAPmI Prnnpnaarne HA npapa. Bbanoqamd Bm 3a BHNMAHNETO; Hacndape tce Ha HOBATA npapa STAHNU. |
| !CS | Vazeny zakazniku, Po prvnim naplni nevo dobu napii nade rzyk je mozen, ze paarni panie stanci neubace dupeovokat páru. Jez to zduvodu, ze se downit systemu dostal vzduch, ktery muzé tuto fuki zpozidt o nikoluk sekund. Opakujte prosim tento krok znuov za pomoci stisknuti tacičika. Paera zacne yvhážet āz nikolik sekund poté, co uvolnite toto tlačitko, a tlačitko nenii nutné dale drzě stisknute. Vérime ze dosahnete s pomoci naši parnis stanci co nejlepsich vysledkú zheleni à dékujeme, ze jste se rozhodil pro tento výrobek. |
| !DA | Kare e kunde, Din dampstation producerer muligvis impeccable damp med det samme, nar den er brevet fyldt med vand forste gang, ellr nraren tankdes opigen. Grunden til ditre er, at noget luft i det individende system can forsinkse dette Funktion i nigh sekund. Bedes vare ŽaTMODIG og forsage iden ved at trykke pa dampknappen. For at gore demnere kommer der stadiyvek damp ud, nar du slpper knappen i nigh sekund. Dapmpfaste erneut. Der Dampf tritt aus, sobald Sie die Taste einelegung uloslassen. Es ist nicht notwendig die Taste gedrück zu halten. Finden Sie das richtige Maß, für beste Dampfergebnisse, selbst hersa. Vielen Dank für ihre Aufmersamkeit. Wir wünschen lhnien viel Freude mit ihrer neuen Dampstation. |
| !EE | Lugupeetud klient! VoIb Juhtuda, es imesim kaluskorral voi ueuste veega tätmisel ei hakka auurjaam kohe auru totma. Pohjuseks vöib olla sisteemis olev ohk, mis vöib funktsooni Toollhakmmist moni sekund edasi liukata. Oodaake rahulikut ja vajutage uestei aurunuppu. Mugava katusage tagamiseks jaktub auru eraldumine ka monda aegae parast npu lahtaskmist, ni et te iea pidevalt nappu vujatama. Sobiva auruhulga tagamises leidke endale sobiv ritm. Tâname tahelepanu eest. Nautige oma uut aurupaama! |
| !EN | Dear Customer, It may be possible that your steam station does not produce steam immediately after fi lling it with water for the first time or refi lling the tank. The reason for this is that air trapped in the inner system can delay this function a few seconds. Please be patient and try it again by pressing the steam button. For your convenience the steam will appear after you release the steam button for a few seconds and it is not necessary to press the button all the time. Find out your rhythm for the best steaming result. Thank you for your kind attention and please enjoy your new steam station! |
| !ES | Estimado cliente: Es posible que su centro de planchado no produzca vapor immediamente despues de llenorlo de agua la primera veo or de renlenar el depóso. El motivo es que algo de iren en el interno peut retrasar esta referencia alaguos segundos. Tena paciensia y vuela a intentarlo pulsando el botón de vapor. Para su comodidad, el vapor saldra despues de solter el botónanos segundos y no sera necessario mantenerlo pulsado continuamente. Encuentre su ritmo para obtenir los migliorores resultados de vapor. Le agradecemos su atencion y desearros que disfrute de su nuevo centro de planchado. |
| !FI | Hyva asiakas, Hóryasemasi é vãltãmãTTa tuota hiê hyry, kun se on tâctetytvedellá ensimmäisen kerran tai kun sailiò on tâctetyt. Tâma Johtuu sità, etta järjestelmässä mahdolissesti olea ilima vityvyyä klysista toimtnao joitakin kunejeta. Oåkarsvallinen ja kokeule eduleen palmamalla hórypainiketta. Hóryyá tuleu ulos joiden ksekentien jauan painkemakipauu vaputamienu jäkken, jotta pankiewe jatkua paimainenen olisi terpen. Lódyá oma rytmi siarpana silitystuloksen sauvuttamiseksi. Kiitämmé teita huomistonne ja tovitamme teile miellyttävi -hóryaseman kátthétkia! |
| !FR | Cher/Chère client(e), Il est possible que sua contra vete aleve prenda ne produzde pasveur vapremi emidiamento après l'avoir remplie d'eau pour la première fois, ou après avoir remplie le réservir. La cause est que de l'air à l'intérieur du systeme peut retarder cette fonction de quelques seconds. Patientez un instant pnuis réeessayez en appuyant à nouveau sur le bouton de vapeur. Pour plus de facilité, la vapeur sortira encore pendont quelques seconds après que vous ayez relaché le bouton, il n'est donc pas nécessaire d'appuyer sur le bouton en continu. Trouvez Your tyme pour de更好地 résultats. Merci pour toute attention et profi teiz bien de tout nouvelle centrale vapeur! |
| !HR | Pošovani kupce, moze se dogodi da vaśa parna postaja ne stvara parnet naken provog punjenja vodom ili nakan nadopunjavanja splernika. To se dogada jer zrk u unutamjem sustavu moze na nekoliko sekund odgoditi ovu fungcuji. Strpite se I pukusajte ponovno pritsinsuti tipku za paru. Radi prakticnosti pare ce se ispustati kada na nekoliko sekund opputiste tipku i necete trebati jieljo vrijeme pritskati tipku. Pronadite vastiti rimat na Najbolje rezultate rada s parom. Zahvaljumemo var na pažnj i uživajte i radu s vašom novom parnom postajom! |
| !HU | Tiszelt Vásárlon! Elófordulhat, hagy a gozállomás, amikor a tartály elóször tólti fel vizzel, nem azonalk nezi meg a goztermelést. Ennek az a ozka, hagy a belsó rendszerben talahato levego par masodperci keficič. Kérijuk, legyen turelmes, e a gozgomb megnyomásvával probájá ujra. A kényelme Erdékesben a goz a gomb éligendését kóvetöen is meg aramlik nehany masodperci et, és neu szükşégyes folyamatosan nyomni a gombot. A legjobb gozólesí eredmény Erdékesben tapasztalja ki sąjat ritmusát. Kózönjuk fi gyelmet, és kivánjuk, hagy lesel o rômt az ügózallomásában! |
| !IT | Gentile cliente, Potrebbe accadere che il suo ferro da stiro a vapeve, non emetta immediamente vapeve dopo aver introdotto l'acqua per la prima volta o dupo aver riempito il serbatoio. Questo perché dell'aria e entrata nel systema interno rotricularo cosi la funzione per alcuni secondi. Attenda qualche istante e riprovi premendo il tasto per l'emissione del vapeve. Per una magiore praticita, il vapeve furiousce soltanto alcuni secondo dopo aver rilasciato il relativo tasto e, non e necessario premero in modo continuo. Trovi il giusto ritmo per i miglioris risutati di stiratura. Grazie per la cortese attenzione e speriamo possa utilizzare al meglio il suo novo ferro da stiro a vapeve! |
| !LT | Gerbiamiei pirkejä, gali buti, kad jusii garinuvas ne i karto prades gaminti garus, pripildzius ii vandeniu pirma karta arba veliau papidizius talpykle. Ta ipyrta tadel, kad oras vidineje sstemojle gali kielias sekundesveli siq fungcuia, Bukite kantrus ir meginkite vél, paspaude garu mygtuka. Jusu patogumui kielias sekundespo mygtuk, atleidimo dar sklasir ir jums nereizes visua jalka spauspi mygtuko. Atskoste savo ritma geniausiems garinimo rezultatams pasiekti. Dekojame uz jus'demesj, ir megaukitesavo najuuouj, "garintuv! |
| !LV | Loti cienità kliente, loti godáais klient, lespèjams, kaji tsvuia tskazástja izcua reeve neveido tvaku péc tās piepildizanas ar udeni piro reizi vai aktartotas uzpidizias. Ta iemesls ir gisa tsičim, kas uz dāzam suksemde var aizkavet so founkiju. Lüdzu, esiet pacietiga(-) un megineti vrellez, nospieszot vtaika pugu. Jusu Ṭertamb tvaiki naeks dzas sekundespo pogas atleidimo anu skils klaiku spiest pugu. Atrodiet savu tvaika izlaiansanas ritmu. Paldies por jusu uzmanibu un izbaudiet savu jauno tvaika staciju! |
| !NL | Beste kiant, Het is mogelijk dat uw stomstonation Niet direct stomproductionert na het erste keer vullen met water of bijvullen van het reservoir. Ditkom doordat lucht in het systeme diefungie deuin aan deconden heutgelaten deud het is net nodig om de knep de hiele tijd in te drukken. Probeer uit hoe vaak u de knop moet indrukken voor het beste stoomresultaat. Bedankt voor uw andacht en veeil plezier met uwieve stemstation! |
| NO | Kjaere kunde, Det kan vaere at dampstasjonen din ikke umidelbart producerjens dampseret at den er fylt metr forste gang,Eller narten kylfles opp. Arsaken er at nooe av luften i det indre systemen kan forsenke donne nuksonj i noen sekunder.Vaer talmodig og prove ijenved atrykke pa damp-knappen.Dampen vil fortssatt comme ut etter at du slipper knappen i noen sekunder, og det er ikke naedvendig atrykke pa knappen heile tiden. Finn rytmen som passeder derg for best mulig dampresultat. Taktk for oppermksomhenten og kos deg med din yne dampstason! | |
| PL | Drogi Kliencie! Podczas pierwszego uzyca staci j parowej lub po ponomynm napelnieniu zbiornika woda moze wystapić pewne opozniennie w wytywarzani pary. Przyczyna tego zjawiska jest powietrzze znajduzie suga wukadzie wewnetzynkt, kozte opzonia o kilia sekund dzialandanie fungklei. Nalezzy zachowac ciepiwiwoś i ponownie naicism przyczak i. Welu owufiatniery korzystania a urzadzenia para wytwarzana jest eszeczze przy kilia sekund po zwolnienu przycziku –nie ma wie potrzeby jegoclego naskiania. Aby uzyskac naajlepsze efekty, naleye znalec zwaśny rytm obstrugi urzadzenia. Dziekujemy za azopznanie są zinstrukacja i zyczymmy przyjmennego korzystania ze staci parowej! | |
| PT | Estimado Component, E possess que a o seu ferro com caldeira não produza vapor imeditamente après o primeiro enchimento com agua ou um reabastecimento do deposito. Isto deve-se ao facto de poder existir algo ar noSYSTEM interior que atrase esta funcao por algoins segundos. Aguarde um momento e tente pressionar o botao do vapor novamente. Para sua comodidade, o vapor continua a sair durante os seguros;dopos de soltar o botao, não seende necessario estar sempre a pressionar o botão. Deve tentar encontrar o seu rito mdo para obter os melhoras resultados com o vapor. ObrigadoPGA sua atencao e desfrute do seu novo ferro com caldeira! | |
| RO | Stimate client, Se poate intampla ca statia cu abur sa nu produça abur imeditatmente dupa amplierea ei cu apa pensu prima data sa dupa reumpleratea revizoruluri. Motivul pensu care ne intampla acest lucru este estupfct ca estar la inferior intearcia acesta'situtce cui cate secunda. Vagugam sa avei rabadare sia sa incercato diu nou aspasand butonul de abur. Pentro confotul dvs., abur ula v iei la cateca secunde dupa el elaborata butonul, nefi nd incesare a asparesa permanenta a butonului. Gasiiti rittmul care vi se potrveste junpo pentro cei mai bune reultate c un abur. Va multumim pensu treno acnteta acordata sia vdo curatri da statia cu abur! | |
| RU | Ybaxaemblnokynatnel!Прп повимлелениь вордду рамаюсу вордду мдду рамаюсу вордду вордду вордду вордду вордду вордду вордду вордду вордду вордду вордду вордду вордду вордду вордду вордду вордду вордду вордду вордду ворд Prinncihno 3tofoqHETBZOxHBYTNCTCIMBly, KOTOPMIOH NOKCHKBO CENKYI 3dadePCKRTHA HUANO BTOB. PISOCM 3aatacTb terpeHINEM M denebatno HOBY pONNTIKU, HAKAB NA HONKNY BVDAAHUNA. Ддя ВASTERO YOZOBSTBA NOCE 0792E 1072E 1072E 1072E 1072E 1072E 1072E 1072E 1072E 1072E 1072E 1072E 1072E 1072E 1072E 1072E 1072E 1072E 0792E 1072E 1072E 1072E 1072E 1072E 1072E 1072E 1072E 1072E 1072E 1072E 1072E 1072E 1072E 1072E 10 Vazivniznari zaidenia je pohodlinne, ne pretoze para sa depunleni nádrze na vodu nebude paru produkovat okamzie. Dvdovom je, ze pritomnost' vzduchu vo vnuotomystem mezme spustenie tejo funkec o nokoLokkuk SECKUYI 3dadePCKRTHA HUANO BODAYNIA. Ддя ВASTERO YOZOBSTBA NOCE 0792E 1072E 1072E 1072E 1072E 1072E 1072E 1072E 1072E 1072E 1072E 1072E 1072E 1072E Pozivaniznari zaidenia je pohodlinne, ne pretoze para sa depunleni nádrze na vodu nebude paru produkovat okamzie. Dvdovom je, ze pritomnost' vzduchu vo vnuotomystem mezme spustenie tejo funkec o nokoLokkuk SECKUYI 3dadePCKRTHA HUANO BODAYNIA. Ддя ВASTERO YOZOBSTBA NOCE 0792E 1072E 1072E 1072E 1072E 1072E 1072E 1072E 1072E 1072E 1072E 1072E 1072E 0792E 1072E 1072E 1072E 0792E 1072E 1072E 1072E 1072E 1072E 1072E 1072E 1072E 1072E 1072E 1072E 1072E 0792E 1072E 1072E 10 Pozovaniznari zaidenia je pohodlinne, ne pretoze para sa depunleni nádrze na vodu nebude paru produkovat okamzie. Dvdovom je, ze pritomnost' vzduchu vo vnuotomystem mezme spustie zu kogun zu zdoaluk. Odkjire, ze stezmam vovali valoizoznai po stanci, ta pape, akzainje, po tem kiupsticnji u vipridje, akzainje, po tem kiupsticnji u vipridje, akzainje, po tem kiupsticnji u vipridje, akzainje, po tem kiupsticnji u vipridje, akzainje, po tem kiupsticnji u vipridje, akzainje, po tem kiupsticnji u vipridje, akzainjc, po tem kiupsticnji u vipridje, akzainjc, po tem kiupsticnji u vipridje, akzainjc, po tem kiupsticnji u vipridje, akzainjc, po tem kiupsticnji u vipridje, akzainjc, po tem kiupsticnji u vipridje, akzainjc, po tem ki upmiksmahetoh nyjutavd njuutdinnyi Slostovani, Možno je, da vaša pnarna posta ne proizvaja pare takoj prvm polnjenju z vodo ali poinovnem polnjenju posode. To se godi zato, ker lahko nekaj zrača v notranjem systeme zakasniz to funckzo zu kogunuk sekund odaddial. Prosim, budte trpezilii a skuste staclidio na vodybu pary znuov. SRA | |
| UK | Degerli musterimizern, Buharli utunuz, haznye kek su doldurdugunuzda vya su ekledigiizide hemen buhar uretmeyebilir. Bunun nedeni, system icerisindeki havanin bu konfysionen calusmasini bir kac saniye boyanca geciktebulimdesir. Håtaland och fiskovi genen att trykka gäncheni yoltsa peninieni ydnin. Kullanim kolayigi sāglamak adina, tsurbestubkdaton sonebir kanc saniye da buhar piskutümléve demev eradu tse sūkeli olerak baslmasina gerek yoktur. En iyi buharli utuleme icin ritminizi yakalyin. Vakit ayirdigniz icin teşekür ered, yeni buharli utinuzü iyi gunlinder kullanmanzii dileriz! | |
| UK | Doropi koprvcuvaqui!Можестся тк, за Кова нараза установа сны виroduяниаруно hayноку иrelаимо nhаловенец вiodу вадуошу вадуошу вадуошу вадуошу вадуошу вадуошу вадуошу вадуошу вадуошу вадуошу вадуошу вадуошу вадуошу вадуошу вадуошу вадуошу вадуошу вадuyошу вадuyошу вадuyошу вадuyошу вадuyошу вадuyошу вадuyошу вадuyошу вадuyошу вадuyошу вадuyошу вадuyошу вадuyошу вадuyошу вадuyошу вадuyошу вадuyошу vayalayin. |
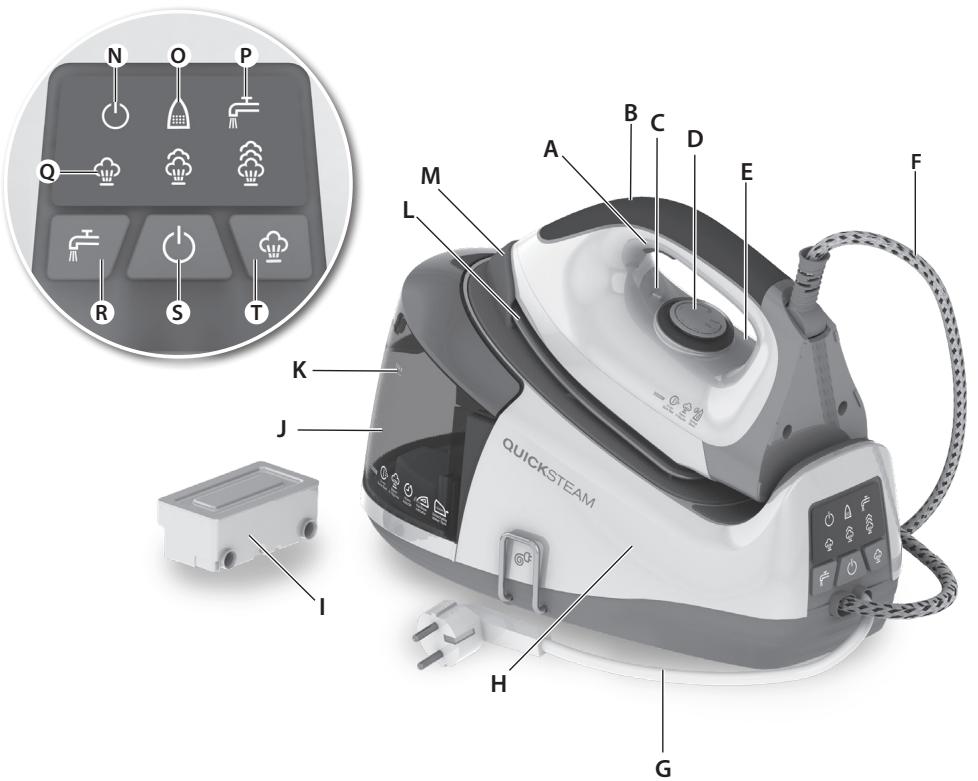
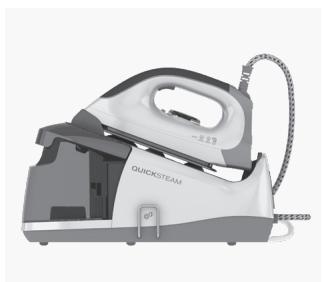
fig.1
fig. 2

fig. 3
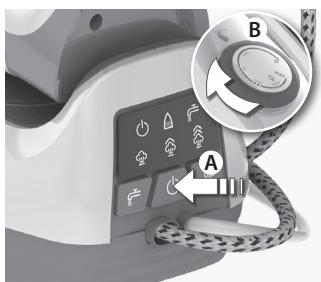
fig. 4
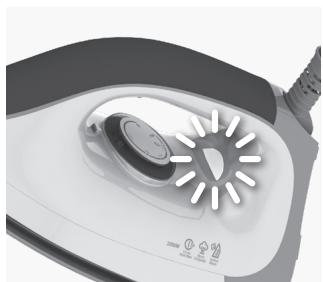
fig. 5
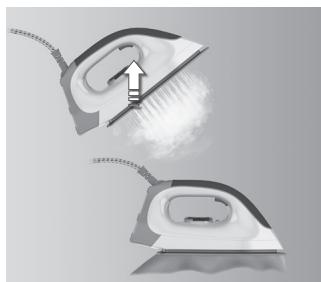
fig. 6
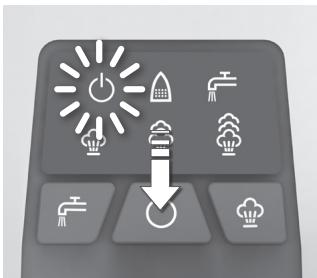
fig. 7
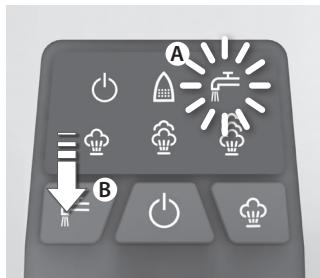
fig.8
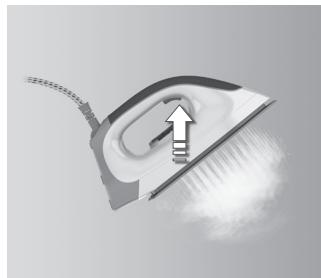
fig.9
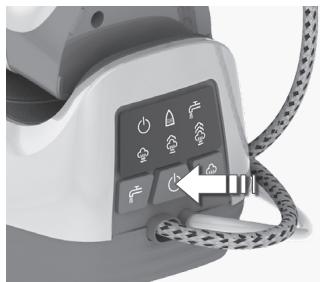
fig. 10
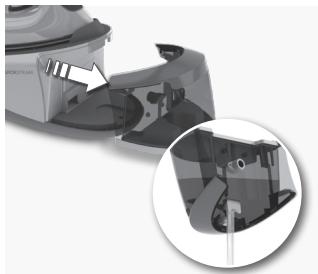
fig. 11
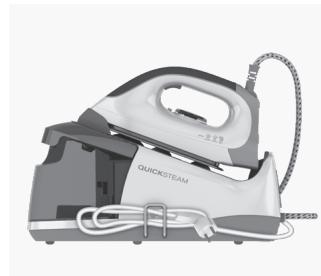
fig. 12

fig. 13
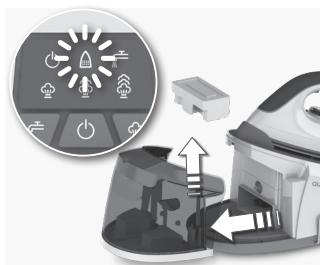
fig. 14
fig. 15
Read the following instruction carefully before using machine for the first time.
- This appliance can be used by children aged from 8 years and above and persons with reduced physical, sensory or mental capabilities or lack of experience and knowledge if they have been given supervision or instruction concerning use of the appliance in a safe way and understand the hazards involved.
- Children shall not play with the appliance.
- Cleaning and user maintenance shall not be made by children without supervision.
- Keep the iron and its cord out of reach of children less than 8 years of age when it is energized or cooling down.
- The surfaces are liable to get hot during use.
- This product is appropriate for use with tap water. It is recommended to use distilled water or a mix of 50% destilled, 50% tap water.
- The appliance may only be connected to a power supply whose voltage and frequency comply with the specifications on the rating plate!
- The iron is not to be used if it has been dropped, if there are visible signs of damage on the iron or its cord or if it is leaking.
- The appliance must only be connected to an earthed socket. If necessary an extension cable suitable for 10 A can be used.
- If the appliance or the supply cord is damaged, it must be replaced by the manufacturer, its service agent or similarly qualified person, in order to avoid hazard.
- The iron must be used and rested on a stable surface. When placing the iron on its stand, ensure that the surface on which the stand is placed is stable.
- Never leave the appliance unattended while connected to the supply mains.
- The appliance must be switched off and the mains plug withdrawn each time after use, before cleaning and maintenance.
- The plug must be removed from the socket outlet before the water reservoir is filled with water.
- The mains cable must not come into contact with any hot parts of the appliance.
- Do not immerse the appliance in water or any other liquid.
- Do not exceed the maximum filling volume as indicated on the appliances.
- This appliance is intended for domestic use only. The manufacturer cannot accept any liability for possible damage caused by improper or incorrect use.
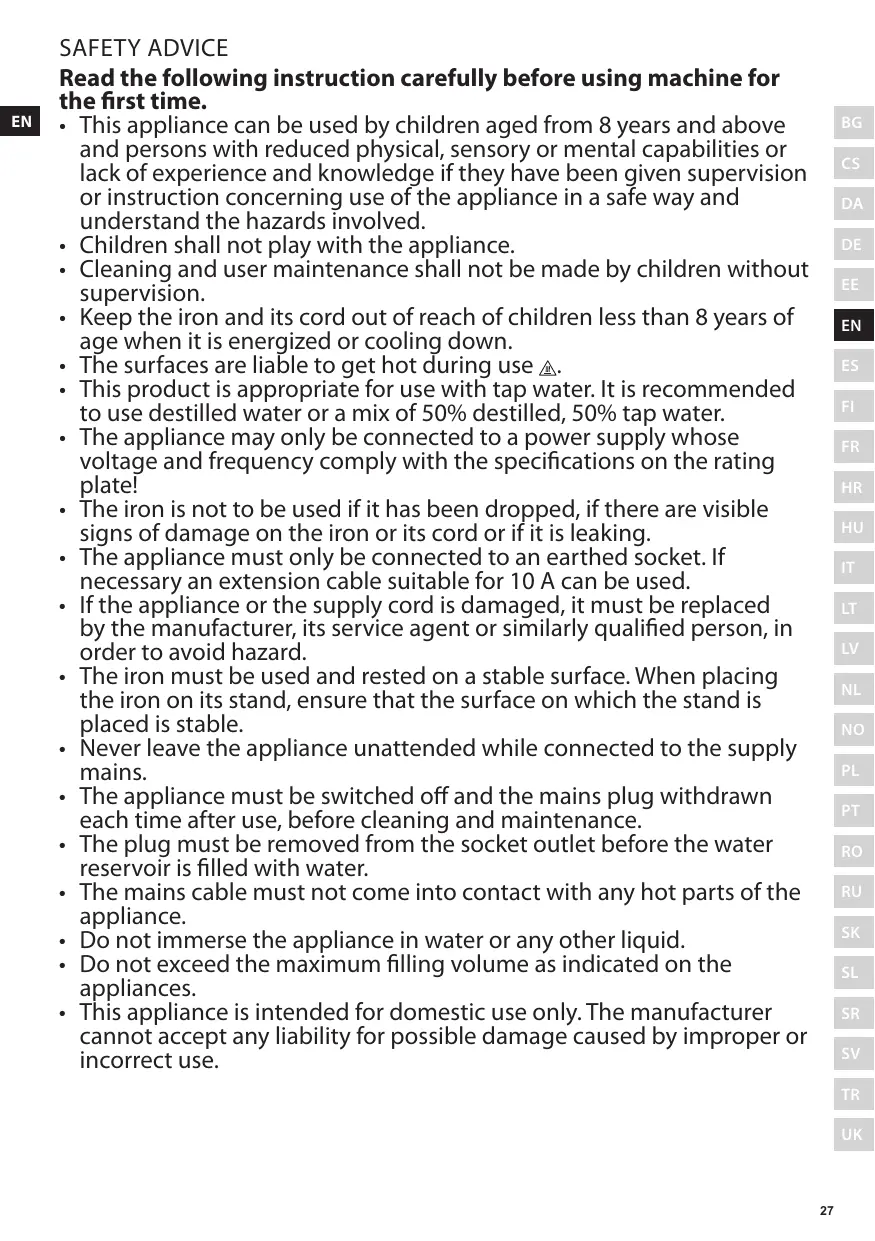
A. Steam button
B. Soft handle
C. Temperature alignment mark
D. Temperature selector
E. Temperature indicator light
F. Hot water pipe
G. Mains cable
H. Base unit
I. Anti-calc cartridge
J. Water tank
K. Maximum water level indicator
L. Stainless steel soleplate
M. Iron rest
N. Power indicator light
O. Descaling indicator light
P Low level water indicator light
Q. Steam level indicator light (Low, Medium, High)
R. Refill reset button
S. Power button
T. Steam level control button
IRONING CHART
| Fabric | Temperature setting | Ironing recommendation |
| Acrylic | ● | Dry iron on wrong side. |
| Acetate | ● | Dry iron on wrong side while still damp or use spray to dampen. |
| Nylon & Polyester | ● | Iron on wrong side while still damp or use spray to dampen. |
| Rayon | ● | Iron on wrong side of fabric. |
| Viscose | ● | Mainly dry iron. Steam can be used under manufacturer's instructions. |
| Silk | ● ● | Iron on wrong side. Use an ironing cloth to prevent shine marks. |
| Cotton blends | ● ● | Check label and follow manufacturer's instructions. Use setting fo the fibre requiring lowest setting. |
| Wool & wool blends | ● ● | Steam iron on wrong side or use ironing cloth. |
| Cotton | ● ● | Dry iron while still damp or use spray to dampen. Use steam medium to high. |
| Corduroy | ● ● ● | Steam iron on wrong side or use ironing cloth. |
| Linen | ● ● ● to "max" | Iron on wrong side or use ironing cloth to prevent shine marks, especially with dark colours. Dry iron while still damp or use spray to dampen. Use steam medium to high. |
| Denim | ● ● ● to "max" | Use maximum steam. |
| Varied ironing speed and fabric dampness might cause optimal setting to differ from that recommended in the table! | ||
ANTI-SCALE CARTRIDGE
| Hardness | To significantly reduce the built-up of lime scale in your steam station, we recommend to change the filter: |
| Hard water | Every 10 tanks |
| Medium water | Every 20 tanks |
| Soft water | Every 40 tanks |
| For the best performance we recommend cartridge from our range, reference number EDC06. | |
GETTING STARTED
- Before first use. Remove all adhesive remains and gently rub with a dampened cloth. Position the steam generator iron horizontally on the ironing-board or on a heat resistant, secure surface at the same height as an ironing-board. Unwind and straighten the power cord and the steam cord. When turned on for the first time, temporary vapours/odours may occur.
- Remove the water tank by gripping the slot on the underside and pulling it gently away from the base unit. (A) Detach the anti-calc cartridge and then immer it in water for more than one minute. (B) Insert the anti-calc cartridge back. Fill the water tank using cold water. It is recommended to use distilled water or a mix of 50% destilled, 50% tap water. Empty the water tank to rinse out any foreign particles which may remain from the manufacturing process.
- Always refill the water tank to MAX level using cold water (A). Insert the water tank into the base unit (B).
OPERATING INSTRUCTIONS
- Connect the steam generator iron to the mains supply. Press the power button. When the power switch is pressed, the power indicator will illuminate. Wait for one to two minutes, until the steam lamp illuminates. Select the steam level between Low - Medium and High. See Ironing chart for ironing recommendation.
- if the lower water level indicator is illuminated (A) (followed with two beep sounds), refill the water tank. After refilling the water tank, press and hold the refill reset button (B) for about 6 seconds. The refill reset button will be extinguished. Steam can now be used again.
CLEANING (DO NOT USE ANY DETERGENT)
13. Always store iron on its heel rest.
To clean exterior surfaces, use a damp soft cloth and wipe dry.
Caution: Do not use any chemical solvents, as these will damage the surface.
- Replacing the de-calc box: If the descending indicator is illuminated detach the water tank. Remove the de-calc box by pulling it upwards. Immerse a new de-calc box in water for more than one minute, then place it inside the water tank. Ensure the new de-calc box is correctly positioned, if not, the descending indicator will keep flashing.
For the best performance we recommend cartridge from our range, reference number EDC06.
It is recommended to use distilled water or a mix of 50% distilled, 50% tap water. Ensure that the water tank latches securely into place.
- Connect the steam generator iron to the mains supply. Press the power button (A). Turn the temperature selector clockwise to maximum setting (B). The temperature indicator light on the iron will illuminate. Then, select a steam level on the control panel, from low - medium - high steam.
- When the temperature indicator light turns on, the steam station is pre-heating. When the light turns off, it is ready to be used. Press and hold the steam button for about one minute to get steam. Then hold one more minute in order to clean the steam generating system.
-
Iron an old towel, to ensure that any residues inside the iron are not transferred to the laundry. If necessary, wipe the sole plate with a slightly damp cloth.
-
To activate the steam, press the steam button. When releasing the button, use up the steam before putting it back on the iron rest of the steam station.
- To turn off the iron by pressing the power button for a while, until a beep will sound. If the iron is left unattended on the iron rest, it turns automatically off after 10 minutes.
- Always cool the iron fully on the iron rest before stowing away. Once the iron is cool, empty the water tank. Store the steam generator iron
- Always store the cord winded safely by the side of the iron. NEVER wind the power cord around the iron
15.When finished using the appliance, turn the temperature dial to the OFF (0^ ) position. Store the iron on the iron rest.
Note: Do not store the iron with water in the tank.
| Problem | Possible cause | Solution |
| Soleplate is not heating even though iron is turned on. | Connection problem | Check main power supply cable, plug and outlet. |
| Temperature control is in MIN position. | Select adequate temperature. | |
| Iron does not produce steam. | Not enough water in tank. | Fill water tank (see "Getting started", no 2). |
| Steam control is selected in non-steam position. | Set steam control between positions of minimum steam and maximum steam (see "Ironing chart"). | |
| Selected temperature is lower than that specified to use with steam. | Increase temperature to at least ⋅ ⋅. | |
| Steam jet and vertical steam jet function does not work. | Steam jet function was used very frequently within a short period. | Put iron on horizontal position and wait before using steam jet function. |
| Iron is not hot enough. | Adjust the proper temperature to steam ironing (up to ⋅ ⋅). Put iron in vertical position and wait until temperature indicator light turns off. | |
| Water leaks from the soleplate during ironing. | The iron is not hot enough. | Set the temperature dial to a temperature ⋅ ⋅ to maximum) suitable for steam ironing. Put the iron on its heel and wait until the light has gone out before you start ironing. |
| Flakes and impurities come out of the soleplate during ironing. | You have used hard water, which has caused scale flakes to develop in the water tank. | Press and hold the steam button for about one minute to get steam. Then hold one more minute in order to clean the steam generating system. Iron an old towel, to ensure that any residues inside the iron are not transferred to the laundry. |
| Water leaks from the soleplate while the iron is cooling down or after it has been stored. | The iron has been put in horizontal position while there is still water in the water tank. | Empty the water tank and set the steam control to position off before storing the iron. |
| Brown streaks come out of the soleplate while ironing and stain the linen. | You have used chemical descaling agents. | Do not use any descaling agents. |
| Fabric fibres have accumulated in the holes of the soleplate and are burning. | Clean the soleplate with a damp soft cloth. | |
| Fabrics might not be properly rinsed or the garments are new and have not been washed before ironing. | Please rinse the laundry properly again. |
DISPOSAL

Recycle the materials with the symbol Put the packaging in applicable containers to recycle it. Help protect the environment and human health and to recycle waste of electrical and electronic appliances.
Do not dispose appliances marked with the symbol with the household waste. Return the product to your local recycling facility or contact your municipal office.

MEPbI INPEIOCTOPOXHOCTN
Ipeep nepBbIM npimHeHem yCtpoiCTBa BHImaTeIbHO npOuTnte cIeDyUoJyIO IHcTpkyIIO.
Данныnpибор может Экплуатрobаься DeТмИ CTapше 8
Лет И пицамС орранчeнhhIMN ΦиЗичeCKIMN, CEHCOPНИМN
ИПИУМСТВЕнhhIMN CПОСБHOCHTЯМИ N C HeДОCTaTOUHbIM ONыITOM
ИПИЗHAнHЯМN TOЛьКО ПОПСМOTPOM ИПИ NOСLE ПОЛУЧЕНЯ
COOTBETCTBYUOxN INHCTpyKcIи, ПОЗBOЛЯЮxN IM 6e3ОпаCHO
эКплуатрOBaTB npибор И дIoUxN IM РпсдТаBLeHne O6
ОпаСНСТИ, COпяжEHо erO ЭКплуаТациe.
-Дети He Должнынграьс пиборom.
OuNCTka NIOCTyINHOE NOJb3OBaTeIIO TexHnueCKoe O6cLyXnBaHne He DOJXHO pON3BOIDITbcr DaTbMn 6e3 npNCMOtpa.
-Держinte BKЛIOUeHHbI B CeT b IIN OCTbIBaIOuIyTIOr I erO SHHyP B MeCTe, HeNOCTyINHOM dIЯ DeTeN Do 8 JeT.
B xode pa60tbl NOBepxHocTN MOryT HArpeBaTbcra A.
B DaaHOM npi6ope MoKeT nCNoIb3OBAtbcra BOOpPOBOHaB BODa. PekomeHnyeTcnaNoJIb3OBAt b NCTnllnpoBaHHyIO IN BOOpPOBOHHyIO BOdy B COOTHOseHn 50% K 50%.
- UcTpoIcTBO MOxHOb BKJIIOuHaTb TOnIbKO B PO3eTKy CeTn C HApJxKeHnEm N uactOToI, COOTBeTCTByIOUzIMN Ta6JIuYKe TexHnueCKnx DaHHbIX MoJeIi!
- YTIOr He DoJIxKeH IcIOnIb3OBAtBcra NocIe NaIeHnI, PnI BnIIMbIX CneJax NOBpeKdEHNr yTIOr a nnI shHpya, nnI ecNn OH TeueT.
- UcTpoIcTBo MOxHOb IOdKJIIOuAToB ToJbKO K 3a3eMJIeHHOn po3eTKe. Ipn Heo6XODIMOCtN MOxHO BOCnOJIb3OBaTbcra ydJIINHHTeJIeM Ha 10 A.
B 6eJx 6e30NaChOCTn NOBpeJdeHHbIe yCTpoiCTBO nIu shHyp nITaHn IOnJXhbl 6bItb 3aMeHeHbI npON3BOJnteJIeM, aReHTOM IO 6cIyJxNBAHnIO nIu dpyrIM KBaIINΦuNpOBaHHbIM CneUaJIncTOM.
- YTOI D0JIKeH NcNOJb3OBaTbCn H CTaBtBcH Na yCTOuYBOI NOBepxHOCTn. IOMeua Ha NODCTaBky, y6eINTEcb, yTO NOBepxHOCTb, Ha KOTOpO IH CToNT, yCTOuYBa.
He octabJnTe 6e3 npncMOtpa yCTpoiCTBO, BKJIoueHHOE B CeTb.
- Пара obслуживаимьи упостков убенистов Выклюево,а вилka BыИнТа ИЗ сети.
- HanoiBaIte BOly B 6aUOK, TOnbKO BblHyB BnIKy n3 PO3ETKn.
- Μύνηρ πιτάνους ἡ οἰδόλχεν Καρρικατβκας Σ τορρυμήν Αγαστήν Αγθροίστba.
He norgykaite yctpoicBO B Ody iHn iNHyIO XnIDKoCTb.
He npeBbIaIte MaKcMmaJIbHbI 3aIOJIHReMbI O6beM, yKa3aHHbI Ha yCTpOJCTBax.
-Данhoe устюгость поедиаимею И сплььоганя Тольков Домашних устовя.ИзгOTOBITEь He Hecet OTBETCTBEHHOCTN 3a BO3MOЖные NOВржденья 33-a HeHaДLEЖацeroПримеоня.
A. Khonka noqau napa
B. Мярая руковая
C. YctahOBouHnaMeTKa TemnepaTpyb"
D. PerynjTop tempeatypbl
E. CBeTOBOH INDnKAToP TEMpePaTpybl
F. Ⅲnahr ropaye BODbl
G Hyp nntaan
H. Kopnyc naporehepatopata
I. KaptpnIx OT hakinn
J.Бачokдя Воры
K. Иndикатор уровь Воры
L. IopoosBa n3 HepXaBeOuSei cTann
M. Побставka ду утога
N. INHДИКaTOP BKJIQUeHIN
O. INHdkaTop ydaJIeHnHaKINN
P. INHINKAtop HN3KORO ypOBH BObl
Q HndkaTop ypOBn npa (MaBn, cpeHn, BbICOKn)
R. Khonka c6poca haNoJIHeHnIa
S. KhoIIKa BkIIOueHnA
T. Khonka perynipoBkn ypOBna napa
TABJIUNCAI TLAJXEHNIA
IOPADNI UOIO TEXHIKIN B3NEKN
Ipeed nepuIM BnKOpncTaHHaM npuJaIy yBaXHo npOuHTaTe IInCTpykciIO 3 ekCnLyataci.
- Zei npnilad moxe BnKOpncTOBvBaTncsra iITbMn cTapwe 8 pOKiB ta OcO6amn i3 3HnJxehmN fI3nUHNMn, ceHCOPHMn a6o nCnxiHMM MoKJIINBOCTaMn qH HeIOCTaTHIM IOCBIOM i 3HaHHaMn IInsePiHn HArJaDom a60 NiCJI npOBeDeHHI hCTpykTaJx CTOCOBHO 6e3NeuHOrO KopNCtYBaHHa npnilaIOM Ta po3yImHHI NOB'3aHnx i3 ZIM pN3NKiB.
-ДiTи He NOBUNHrI rpaTncb i3 npINaIOM. - Yünshen Ta texhuihe 06cnyroByBaHHa He MOxHa BIKOHyBaTu DiTAM 6e3 HaJIy.
36epiraite npacky ta ii kaebIy micizi, He doceKHomy IJra diTei moIOnIwe 8 pOKIB, kIIO BOHa BBIMKHeHa a6O OXIoJOnKyeTbcra. - Поверхни можуть награватиCB пд час Корисуваня A.
- Léen Bnpi6 MoxHa BnKOpNCTOBvBaTn 3 BOJOnpOBiDHO BOJOU. PeKOMeHnyetbCra BnKOpNCTOBvBaTn DnCTnJIbOBAHy BOy a6o Cymi, 50 MICTnTb 50% nCTnJIbOBAHOI BOyn i 50% BOJOnpOBiDHOI BOYN.
- Пилад можна під' endуbatи лише до джерение ehepronoctaчань, habpyra ta уacrToTЯ kORO bIDINObIaIbCneuΦikaizm, yka3aHIM Ha ta6niuci 3 texhiuHmДaHm!
3a6OpOHaETbCByBnKOpNCTOByBaTn npacky, kIoo BOHa naIana, MaO3HaKn nOuKOJxHHeHH Ha Kopnyci uHhpyi a6o npotika. - Пилад мсуть пдкючатся по заимленьoi розтук. 3a Heo6xIDHOCTI MOЖнавИКОПСТОВУВАТN NOДOBЖУBAЛьнй Ka6eNB, AKNI pIxOДNTB do 10 A.
- Y BnPaIky IOnsKoJxKeHn npIaIy a6o 7hypa JKNBLeHnry Ioro MaE 3amIHNT Bnpo6HnK, Ioro cepBicHn 7eHTp a6o IHwa KBaJIiΦIKOBaHa Oco6a, 706 3anO6irTn HeuacHomy BnPaIky.
- Пpacky слд ВИКОРИСТОВУВАТи Та 3берігати На CTIΚI NOВЕХН. ПID ус роЗмішени пpacки На пIDCTaBci,пepekoHAntecя, lo NOВЕХнЯ, на якій роЗтайова на пIDCTaBka, e CTIΚOЮ.
- Hikoli He 3aIIuAaTe 6e3 HaIpy npIJa, iKJIoueHn Do Jxepena KINBJIeHHJ.
3aBxDn BmNkaTe npuad i BnMaTe MepeXHn I TeCenb nICJyBNKOpNCtAHN, a TAKoX nepeJ uNueHNrM i NOTOHm O6cIyROByBaHHaM.
3aBxN BnMaIte 7TeIceIb i3 po3eTK npeed 3aIOBHeHnM pe3epByapa BOIOJ. - Ka6eJb JxBHeHH He NOBHeH TopKaTnC8 6yDb-aknx HaRpiTnx YactnH npnilady.
3a6opoheta3aHypobatn npnilad y BODy a6o 6yIb-ky iHsu piINHy.
3a60pOHaTeBcApeBnUyBaTu MaKcMmaJIbHn O6'Em HaIOBHeHHa, yKa3aHn Ha npIaDi. - Zei npilad npin3haeHn BnKIOUHO JIa DOMaunbOTo BnKOpNCtAHn. Bnpo6HnK He BiINOBiJaE 3a MoXJIbY uKOy, CnpuHHEny HeHaJeXHM YN HeNPaBnBnM BnKOpNCtAHnM.
A. Khonka napu
B. M'Як рука
C. TemnepaTyPha yctahOBouHa no3HaKa
D.ДиckperynIObAHNTeMnpepatyp
E. IHHaKATOp TEMpepaTpyn
F. Tpy6ka nodaui rapaouoi BOIN
G Ka6eJb XnBnHeHHa
H.Бa3OBu6nok
I. KaptpnIx npotu BannHnx BiKnaeHb
J. Pe3epByap Iy BODI
K.ПОЗHAчka MaKcIMaJIbHOro pIBH BODI
L.ПIDOWA3нержавиочистani
M.Плдстава
N. INDkaTop XINBneHHA
O. Ihdkatop BuaaeneHH BaHnHex BiKnaeHb
P. IHdkaTop Hn3bko rO pIBH BOIN
Q IHnkaTop pIBH napu (Hn3bKn,cepeHiBnCOKn)
R. Khonka ckndaHHeo6xidHOCTi 3aONBHeHH
S. KhONka JKNBneHHa.
T. Khonka ynpabniHn pibhem napu
TABINZHAJALHTYBAHb I PEEKHDAU
3dabaHTe Ha noBtrophy nepepo6ky MaTepiAn, no3NaueHi
BIDNOBiDnHm CmMBONOM .BkNiDaIte ynaKOBky BIDNOBiDi KOnTeHnepn IyBTOpHHoI CnPOBnH. DOnomOxitb 3axCTNTn HABKOINHc CepeDObuIe Ta ZdoP0'B'IHxnx IIOeI i3a6e3neuTn BTOpHHy nepep06y eJeKTpuHnx i eNEKtPOHHx npiaJiB.

He BkndaTe npinaDn,IO3naeHcI BiNDOBiHM CmBBOJOM ,pa3OM 3 IHM OMaOHIM CMITTM. IOBePHTb PpOdyKT do 3abody i3 TbotnHOI nepepeo6y u Baaih MiCceBoCTIo 3bePHTbcdo MIcEeBX MHyIINaHbNHX OPAHIB BLnD.
Electrolux Appliances AB
St. Goransgatan 143
S-105 45 Stockholm
Sweden
Share more of our thinking at www.electrolux.com

Printed on recycled paper


- WE'RE THINKING OF YOU
- Visit our website to:
- CUSTOMER CARE AND SERVICE
- Read the following instruction carefully before using machine for the first time.
- GETTING STARTED
- OPERATING INSTRUCTIONS
- CLEANING (DO NOT USE ANY DETERGENT)
- Always store iron on its heel rest.
- DISPOSAL
- MEPbI INPEIOCTOPOXHOCTN
- Ipeep nepBbIM npimHeHem yCtpoiCTBa BHImaTeIbHO npOuTnte cIeDyUoJyIO IHcTpkyIIO.
- IOPADNI UOIO TEXHIKIN B3NEKN
- Ipeed nepuIM BnKOpncTaHHaM npuJaIy yBaXHo npOuHTaTe IInCTpykciIO 3 ekCnLyataci.
Brand : CALOR
Model : DW5155D1 FOCUS FASHION MICRO 400
Category : Iron