
PTV 43GU-5024T - TV PEAQ - Free user manual and instructions
Find the device manual for free PTV 43GU-5024T PEAQ in PDF.

| Product Type | 43-inch TV |
| Brand | PEAQ |
| Model | PTV 43GU-5024T |
| Screen Size | 43 inches (109 cm) |
| Resolution | Ultra HD 4K (3840 x 2160) |
| Operating System | Google TV |
| Power Supply | 110-240 V AC, 50/60 Hz |
| Power Consumption | 95 W |
| Dimensions with Stand (W x H x D) | 957.4 x 608.5 x 229.4 mm |
| Dimensions without Stand (W x H x D) | 957.4 x 556.2 x 80.6 mm |
| Net Weight (without Stand) | 6.4 kg |
| VESA Standard | 300 x 100 mm |
| Audio Power | 2 x 10 W (Dolby Audio) |
| Connectivity | 3x HDMI (1 eARC), 1x USB 2.0, 1x USB 3.0, LAN, CI+, AV IN, optical output, antenna/cable, satellite |
| Tuners | DVB-T/T2/C/S/S2, ATV PAL/SECAM |
| Network | Wi-Fi 2.4/5 GHz, Bluetooth |
| Main Features | Smart TV Google TV, Netflix, Prime Video, YouTube, Fast Cast, USB media player, EPG, parental control, auto standby |
| Included Accessories | Remote control, 2 AAA batteries, user manual |
| Care and Cleaning | Clean the screen with a soft, dry cloth. Do not use abrasive products. |
| Safety | Ventilation: 5 cm clearance. Do not expose to moisture or heat. Wall mounting recommended. |
| Spare Parts and Repairability | Contact PEAQ customer service for spare parts. Repair by qualified technician. |
Frequently Asked Questions - PTV 43GU-5024T PEAQ
User questions about PTV 43GU-5024T PEAQ
0 question about this device. Answer the ones you know or ask your own.
Ask a new question about this device
Download the instructions for your TV in PDF format for free! Find your manual PTV 43GU-5024T - PEAQ and take your electronic device back in hand. On this page are published all the documents necessary for the use of your device. PTV 43GU-5024T by PEAQ.
USER MANUAL PTV 43GU-5024T PEAQ
natural_image
Front view of a modern flat-screen TV with two legs and a blank screen (no text or symbols visible)PTV 43GU-5024T
DE Bedienungsanleitung
EN User Manual
FR Mode d'emploi
ES Manual de instrucciones
natural_image
Simple line drawing of a monitor with a circular button on the front portion (no text or symbols)
Ausschalten
Hinweis:
natural_image
Front view of a modern flat-screen TV with two legs and a blank screen (no text or symbols visible)PTV 43GU-5024T
DE Bedienungsanleitung
EN User Manual
FR Mode d'emploi
ES Manual de instrucciones
Safety Information ....3
Antenna Connection ....6
General Operation 9
Remote Control....10
Nitial Setup Wizard....11
Main Screen....13
Apps 14
Menu Functions....15
Using System Settings ....16
Additional Information 21
Specification 22
Licences 24
Introduction
Figures and illustrations in this user manual are provided for reference only and may differ from the actual product appearance. Product design and specifications may be changed without notice.
Thank you for choosing our product. You'll soon be enjoying your new TV. Please read these instructions carefully. They contain important information which will help you get the best from your TV and ensure safe and correct installation and operation.
Because the Google TV operating system is periodically updated, the images, navigation instructions, titles and location of menu options shown in this manual may be different from what you see on the screen.
Safety Information

CAUTION
RISK OF ELECTRIC SHOCK DO NOT OPEN

CAUTION: TO REDUCE THE RISKOF ELECTRIC SHOCK DO NOT REMOVE COVER (OR BACK). NO USER-SERVICEABLE PARTS INSIDE. REFER SERVICING TO QUALIFIED SERVICE PERSONNEL.
In extreme weather conditions (storms, lightning) and long inactivity periods (going on holiday) disconnect the TV set from the Main Power Supply.
The main power connector must remain accessible on installation to unplug the device if needed. The device will still draw power in standby mode.
Note: Follow the on screen instructions for operating the related features.
IMPORTANT - Please read these instructions fully before installing or operating

WARNING: This device is intended to be used by persons (including children) who are capable / vienced of operating such a device unsupervised, unless they have been given supervision or action concerning the use of the device by a person responsible for their safety.
- Attention! In the event of a malfunction as a result of electrostatic discharge and momentary electrical surges, unplug the appliance and plug it in again.
- Use this TV set at an altitude of less than 2000 meters above the sea level, in dry locations and in regions with moderate or tropical climates.
• The TV set is intended for household and similar general use but may also be used in public places.
- For ventilation purposes, leave at least 5 cm of free space around the TV.
- The ventilation should not be impeded by covering or blocking the ventilation openings with items, such as newspapers, table-cloths, curtains, etc.
- The power cord plug should be easily accessible. Do not place the TV, furniture, etc. on the power cord. A damaged power cord/plug can cause fire or give you an electric shock. Handle the power cord by the plug, do not unplug the TV by pulling the power cord. Never touch the power cord/plug with wet hands as this could cause a short circuit or electric shock. Never make a knot in the power cord or tie it with other cords. When damaged it must be replaced, this should only be done by qualified personnel
- Do not expose the TV to dripping or splashing of liquids and do not place objects filled with liquids, such as vases, cups, etc. on or over the TV (e.g., on shelves above the unit).
- Do not expose the TV to direct sunlight or do not place open flames such as lit candles on the top of or near the TV.
- Do not place any heat sources such as electric heaters, radiators, etc. near the TV set.
- Do not place the TV on the floor and inclined surfaces.
• To avoid danger of suffocation, keep plastic bags out of the reach of the babies, children and domestic animals.
- Carefully attach the stand to the TV. If the stand is provided with screws, tighten the screws firmly to prevent the TV from tilting. Do not over-tighten the screws and mount the stand rubbers properly.
- Do not dispose of the batteries in fire or with hazardous or flammable materials.
WARNING
- Batteries must not be exposed to excessive heat such as sunshine, fire or the like.
- Excessive sound pressure from earphones or headphones can cause hearing loss.
ABOVE ALL - NEVER let anyone, especially children, push or hit the screen, push anything into holes, slots or any other openings in the case.
| Caution | Serious injury or death risk |
| Risk of electric shock | Dangerous voltage risk |
| Maintenance | Important maintenance component |
A television may fall, causing serious personal injury or death. Many injuries, particularly to children, can be avoided by taking simple precautions such as:
- ALWAYS use cabinets or stands or mounting methods recommended by the manufacturer of the television set.
• ALWAYS use furniture that can safely support the television set.
- ALWAYS ensure the television set is not overhanging the edge of the supporting furniture.
• ALWAYS educate children about the dangers of climbing on furniture to reach the television set or its controls.
- ALWAYS route cords and cables connected to your television so they cannot be tripped over, pulled or grabbed.
- NEVER place a television set in an unstable location.
- NEVER place the television set on tall furniture (for example, cupboards or bookcases) without anchoring both the furniture and the television set to a suitable support.
- NEVER place the television set on cloth or other materials that may be located between the television set and supporting furniture.
- NEVER place items that might tempt children to climb, such as toys and remote controls, on the top of the television or furniture on which the television is placed.
- The equipment is only suitable for mounting at heights ≤ 2 m.
If the existing television set is going to be retained and relocated, the same considerations as above should be applied.
Apparatus connected to the protective earthing of the building installation through the MAINS connection or through other apparatus with a connection to protective earthing – and to a television distribution system using coaxial cable, may in some circumstances create a fir hazard. Connection to a television distribution system has therefore to be provided through a device providing electrical isolation below a certain frequency range (galvanic isolator).
Accessories Included
- Remote Control
- Batteries: 2 x AAA
- Manual
WALL MOUNTING WARNINGS
- Read the instructions before mounting your TV on the wall.
- The wall mount kit is optional. You can obtain from your local dealer, if not supplied with your TV.
- Do not install the TV on a ceiling or on an inclined wall.
- Use the specified wall mounting screws and other accessories.
- Tighten the wall mounting screws firmly to prevent the TV from fall. Do not over-tighten the screws.
Stand Installation & Wall Mounting
Assembling / Removing the stand Preparations
Take out the stand(s) and the TV from the packing case and put the TV onto a work table with the screen panel facing down on the clean and soft cloth (blanket, etc.)
- Use a flat and firm table bigger than the TV.
- Do not hold the screen panel part.
• Make sure not to scratch or break the TV.
Assembling the stand
- Place the stand(s) on the stand mounting pattern(s) on the rear side of the TV.
- Insert the screws provided and tighten them gently until the stand is properly fitted.
Removing the stand from the TV
Be sure to remove the stand in the following way when using the wall-hanging bracket or repacking the TV.
- Put the TV onto a work table with the screen panel down on the clean and soft cloth. Leave the stand(s) protruding over the edge of the surface.
- Unscrew the screws that fixing the stand(s)
- Remove the stand(s).
When using the wall mount bracket
Your TV is also prepared for a VESA-compliant wall mount bracket. If it is not supplied with your TV, contact your local dealer to purchase the recommended wall-hanging bracket.
Holes and measurements for wall mount bracket installation;

| VESA WALL MOUNT MEASUREMENTS | ||
| Hole Pattern Sizes (mm) | W | H |
| 300 100 | ||
| Screw Sizes | ||
| Length (X) | min. (mm) 10 | |
| max. (mm) 16 | ||
| Thread (Y) M6 | ||
Model: PTV 43GU-5024T
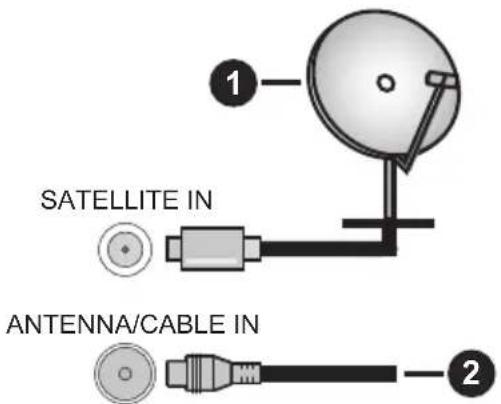
Antenna Connection
Connect the aerial or cable TV plug to the ANTENNA/CABLE IN(ANT) socket or satellite plug to the SATELLITE IN (LNB) socket located on the rear side of the TV.
Rear side of the TV
-
Satellite
-
Antenna or cable

- If you want to connect a device to the TV, make sure that both the TV and the device are turned off before making any connection. After the connection is done, you can turn on the units and use them.
- If you want to connect a device to the TV, a good quality shielded cable must be used, which ensures the electromagnetic compatibility of the product and the used cable as a whole.
Other Connections

- If you want to connect an external device to the TV, make sure that both the TV and the device are turned off before making any connection. After the connection is done, you can turn on the units and use them.
- If you want to connect an external device to the TV, a good quality shielded cable must be used, which ensures the electromagnetic compatibility of the product and the used cable as a whole.
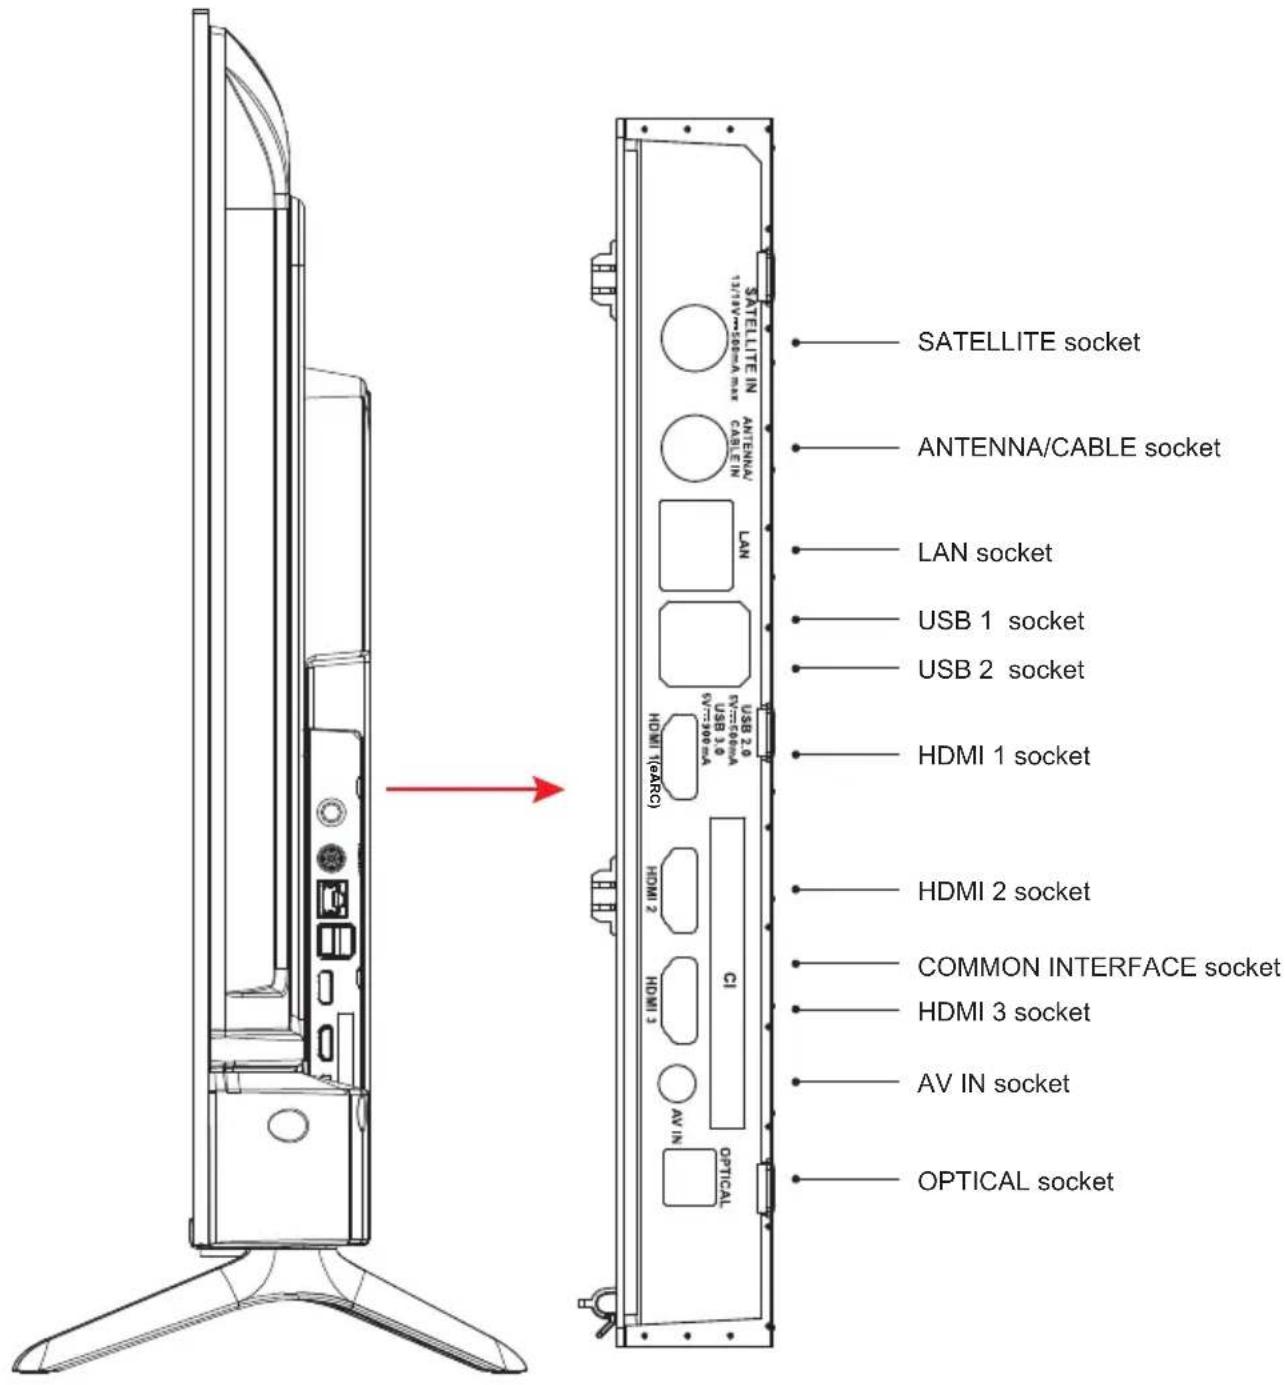
NOTE: Input / Output connectivity options may change from model to model.
Insert or remove the CI module only when the TV is SWITCHED OFF. You should refer to the module instruction manual for details of the settings. The USB inputs on the TV support devices up to 500 mA. Connecting devices that have current value above 500 mA may damage your TV. When connecting equipment using a HDMI cable to your TV, to guarantee sufficient immunity against parasitic frequency radiation and trouble-free transmission of high definition signals, such as 4K content, you have to use a high speed shielded (high grade) HDMI cable with ferrites.

* Do not touch or be close to the tuner port / AV port / earphone port / HDMI terminals, and prevent electrostatic discharge to disturb these terminals while in USB and LAN operation mode, or it will cause the TV to stop working or abnormal status, then restart the TV and restore the original operation mode manually is required.
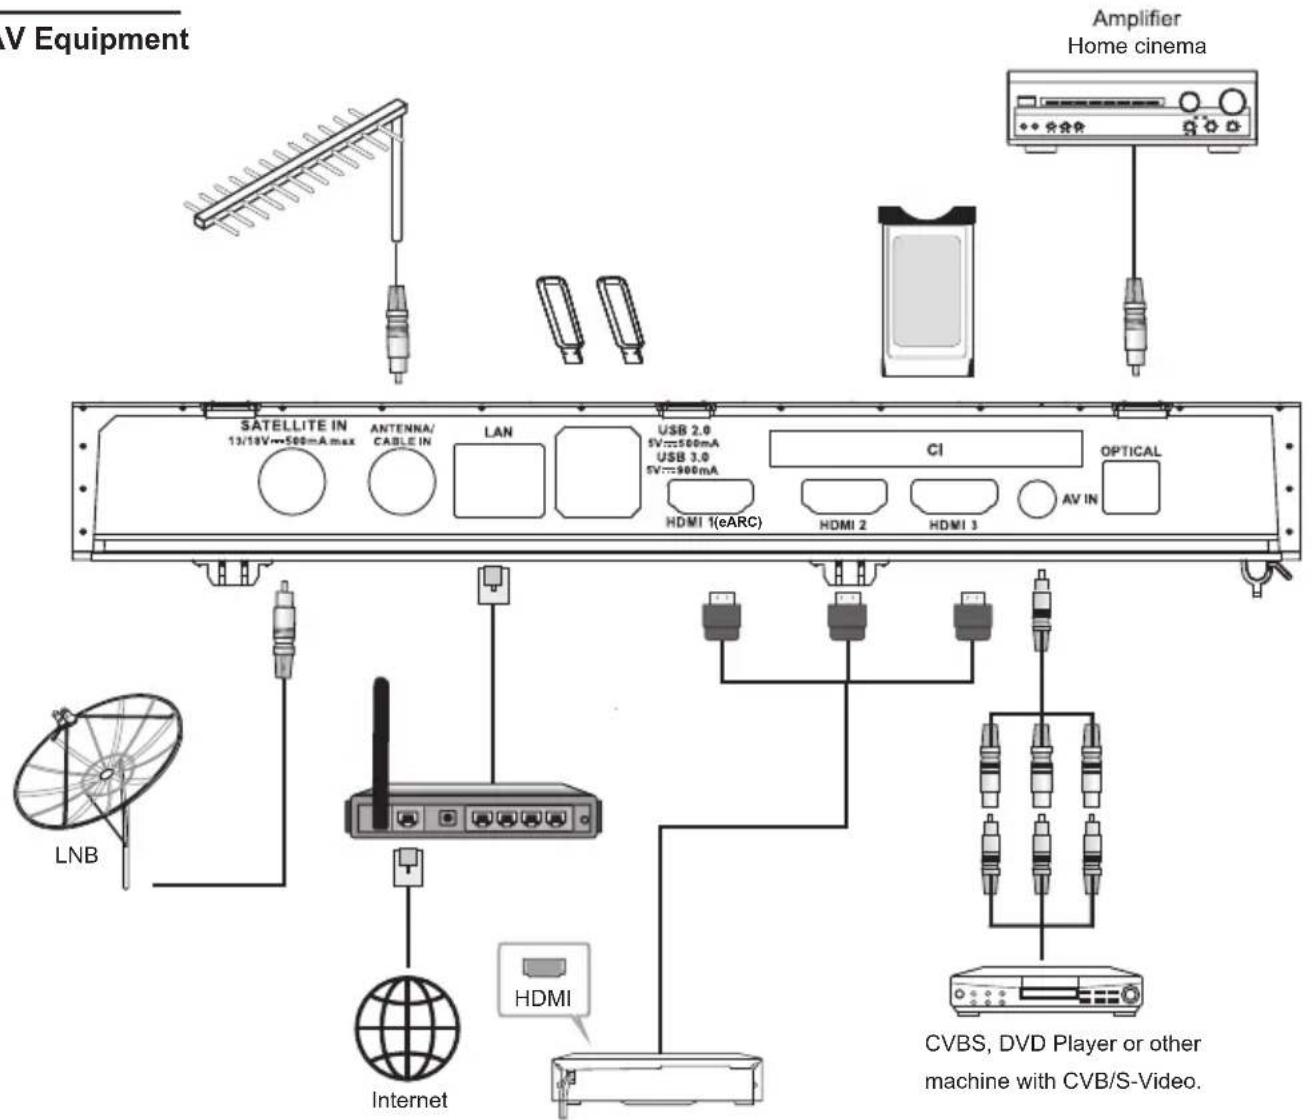
AV Equipment
| No. | Name Description | |
| 1 | SATELLITE IN This socket can be used to connect the satellite receiver pot. | |
| 2 | ANTENNA/CABLE IN | Connect a coaxial cable to receive the signal from your antenna, cable, or cable box. |
| 3 | LAN | Local area network (LAN) port. Connect a LAN cable to this port to connect to the Network. |
| 4 | USB | USB port. Connect a USB Storage device for multimedia file playback. |
| 5 | HDMI | Connect a HDMI input signal source, such as a DVD player, via the HDMI interfaces. |
| 6 | COMMON INTERFACE | COMMON INTERFACE slot. |
| 7 | AV IN | Connect audio and video signal sources via AV IN.It is recommended to buy an AV cable with magnetic ring to avoid signal interference. |
| 8 | OPTICAL OUT | This output can be used to connect a compatible digital audio receiver |
NOTE: Input / Output connectivity options may change from model to model.
General Operation
Turning On/Off the TV
Connect power
IMPORTANT: The TV set is designed to operate on 110 - 240 V AC, 50/60 Hz socket.
After unpacking, allow the TV set to reach the ambient room temperature before you connect the set to the mains.
Plug the power cable to the mains socket outlet. The TV will switch to standby mode
To switch on the TV from standby
If the TV is in standby mode the standby LED lights up. To switch on the TV from standby mode either:
- Press the Standby button on the remote control.
- Press the control button on the TV. The TV will then switch on.
To switch the TV into standby
- Press the Standby button on the remote control.
- Press the control button on the TV, the function options menu will be displayed. Press: Move
Keep pressed: Select
Press ⏻ and hold the button for about 2 seconds, the TV will switch into standby mode.
To switch off the TV
To power down the TV completely, unplug the power cord from the mains socket.
TV Control & Operation
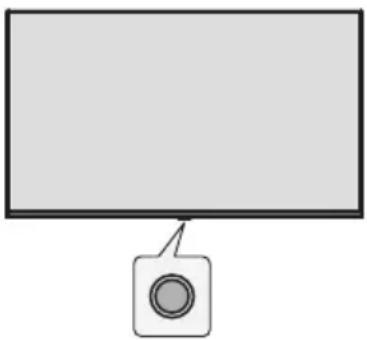
natural_image
Simple line drawing of a monitor with a circular button on the side (no text or symbols)Your TV has a single control button. This button allows you to control the Inputs / Volume Up-Down / Channel Up-Down / Standby-Off functions of the TV.
Note: The position of the control button may differ depending on the model.
Operating with the Control Button
- Press the control button to display the function options menu.
- Then press the button consecutively to move the focus to the desired option if needed.
- Press and hold the button for about 2 seconds to use the function, enter the sub menu or select the option.
Power On / Power Off
The TV is off, short press the button to turn on the power.
The TV is on, short press the button, the virtual button will display as shown below.


Power off
To turn Off the apparatus completely, you must pull the mains plug out of the mains socket.

Next channel

Previous channel

Volume increase

Volume reduction
Remote Control
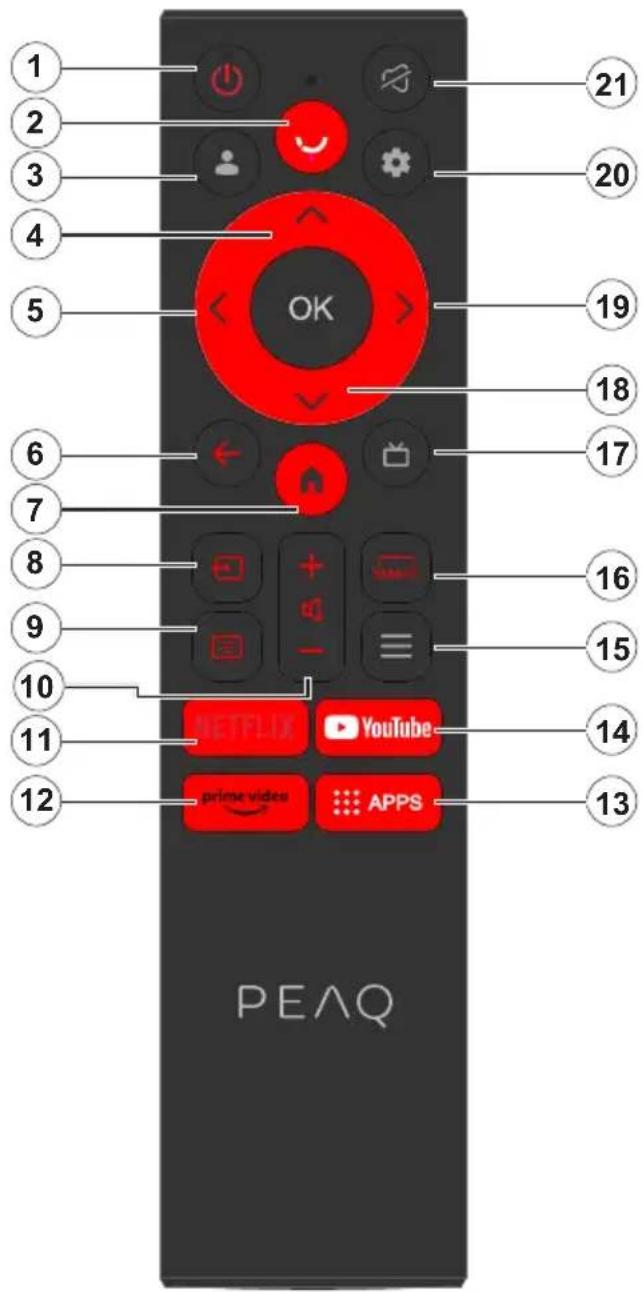
- Standby / On
- Activates the microphone on the remote
- Sign-in to Google TV.
Up Directional button 4. - Left Directional button
- Returns to previous menu screen, goes one step back, closes open windows.
- Opens the Home screen.
- Opens the input source list.
- Enter into virtual keyboard.
- Increases/decreases the volume level.
- Goes to the NETFLIX homepage.
- Goes to the prime video homepage.
- Goes to the APP homepage.
- Goes to the YouTube homepage.
- Enter into Quick Access Menu.
- Enter SMART function interface.
-
Enter display the electronic programme guide.
-
Right Directional button.
- Enter into Using TV System menu.
- To mute and un-mute the sound.
Inserting the Batteries into the Remote
Remove the back cover to reveal the battery compartment on the back side of the remote control first. Insert two 1.5 V - size AAA batteries. Make sure the (+) and (-) signs match (observe correct polarity). Do not mix old and new batteries. Replace only with same or equivalent type. Place the cover back on.
To pair remote with the TV
When TV is turned on for the first time, a pairing process for your remote will be performed during the initial setup. Your remote control should automatically pair with your TV at this point, but if it didn't, follow the on screen instructions to pair it. If you experience difficulties in pairing your remote with your TV you can turn off other wireless devices and try again.
Nitial Setup Wizard
Note: Follow the on-screen instructions to complete the initial setup process. Use the directional buttons and the Select button on the remote to select, set, confirm and proceed.
When you switch on the TV for the first time, a wizard will appear to guide you through the following initial settings: In order for the remote control to work, it must be paired with the TV set, follow the on screen instructions to pair it.
- Choose Your Language
The language selection options will be listed on the screen. Select the desired language from the list and press OK to continue.
- Select your region or country
The region \ country options will be listed on the screen. Select the desired region \ country from the list and press OK to continue.
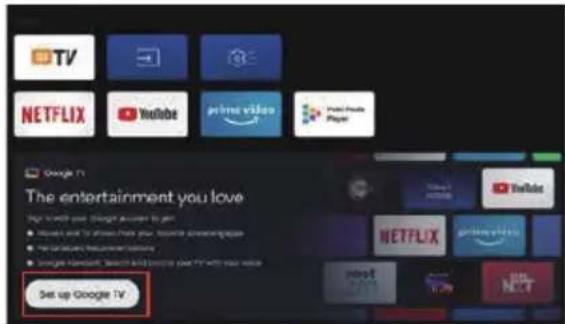
- Select whether you want to "Set up Google TV" or "Set up basic TV"
When we select "Set up basic TV".
- Connect to your network
If you did connect your TV to internet via an Ethernet cable before the initial setup begins this step will be skipped. If you didn't, your TV will search and list available wireless networks at this point. Select your network and press OK to connect to it. Select Skip in the list to skip this step.
- Please read and accept Google's terms of service and privacy policy.
Select "Accept" to proceed to the next step.
- Choose your Environment.
In the following step of the initial setup, you can set the TV's environment mode. It is recommended to select "Home" for home use.
- Please read the terms & conditions and agree.
Read the Terms and Conditions, then press OK to confirm and move on to the next step.
- Please read the privacy notice and agree.
Read the Privacy Notice, then press OK to confirm and move on to the next step.
On the next screen, you can tick relevant services, and then press OK to confirm and move on to the next step, or you can select the "Tick all and next" to proceed to the next step.
- Please read the cookie notice and agree.
Read the Cookie Notice, then press OK to confirm and move on to the next step.
- Channel installation.
Select Tuner Mode: Antenna, cable, satellite; Type: Digital, Analogue, All.
Select "Scan" in order to scan. Before the scan starts, you will be asked to check if your antenna cable is plugged properly into the antenna socket on your TV. You can also skip this step by selecting "Skip" on the screen.
Note: Please note that the process of scanning will take some time.
- Please check settings.
When all setup is done, the [Please check settings] interface displays on the screen, and press OK to finish the initial setup. You can also go back to former step and make any changes.
When we select "Set up Google TV".
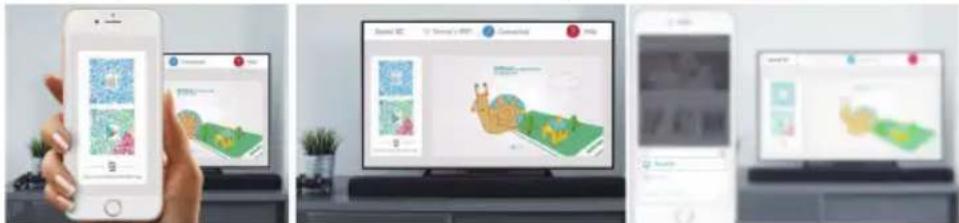
- Set up with the Google Home app.
You can try setting up the TV with your phone.
First, turn on your phone's Bluetooth (Note: Please make sure your phone has the Google Home App installed).
Go to Google Home APP on your phone, find your TV, and tap Connect. Once connected, scan the QR code on your TV with your mobile phone.
When your phone is connected to your TV, you can set up your TV on your phone (connect to WIFI and enter
Google account), your TV will automatically get the WiFi and Google account information on your phone.
You can also use the remote to set up your TV and log in to your Google account.
Press √ and OK to next step.
- Connect to your network
If you did connect your TV to internet via an Ethernet cable before the initial setup begins this step will be skipped.
If you didn't, your TV will search and list available wireless networks at this point. Select your network and press OK to connect to it.
Note: To use GOOGLE TV, must connect to WIFI.
- Sign In with Your Google Account
You can sign in to your Google account on the next screen. You need to be signed in to an Google account in order to use Google services. If you don't already have an Google account you can set up an account by choosing "Create account" option.
- Please read and accept Google's terms of service and privacy policy.
Select "Accept" to proceed to the next step.
Select "Continue" to proceed to the next step.
- Search across all your TV apps.
Select "Allow" or "No thanks" to proceed to the next step.
- Choose your subscriptions.
Select "Confirm" to proceed to the next step.
- Choose your Environment.
In the following step of the initial setup, you can set the TV's environment mode. It is recommended to select "Home" for home use.
- Please read the terms & conditions and agree.
Read the Terms and Conditions, then press OK to confirm and move on to the next step.
- Please read the privacy notice and agree.
Read the Privacy Notice, then press OK to confirm and move on to the next step.
On the next screen, you can tick relevant services, and then press OK to confirm and move on to the next step, or you can select the "Tick all and next" to proceed to the next step.
- Please read the cookie notice and agree.
Read the Cookie Notice, then press OK to confirm and move on to the next step.
- Channel installation.
Select Tuner Mode: Antenna, cable, satellite; Type: Digital, Analogue, All.
Select "Scan" in order to scan. Before the scan starts, you will be asked to check if your antenna cable is plugged properly into the antenna socket on your TV. You can also skip this step by selecting "Skip" on the screen.
Note: Please note that the process of scanning will take some time.
- Please check settings.
When all setup is done, the [Please check settings] interface displays on the screen, and press OK to finish the initial setup. You can also go back to former step and make any changes.
- Please check settings.
When all setup is done, the [Please check settings] interface displays on the screen, and press OK to finish the initial setup. You can also go back to former step and make any changes.
Note: After the internet connection is established, the TV will check for the software updates and download the latest software next, if any available. Please notice that this will take some time.
Setup is now complete and your TV is ready for viewing.
Note: If tuning has failed, check the connection of the RF cable, then follow the on-screen instructions.
Main Screen
The main screen is the centre of your TV. Press the Home button on your remote to display the main screen. From the main screen you can start any application, switch to a TV channel, watch a movie or switch to a connected device, or manage the settings. Depending on your TV setup and your country selection in the initial setup the main screen may contain different items.
You can scroll through the options and content of your Home screen using the directional buttons. When the cursor stays on the icon, it displays the information of the highlighted content. Available options and content may differ depending on the network connection status of your TV and whether you signed in to your Google account.
Press 🔍 to display homepage.
Press / / to select icons from the screen list.
Press OK to enter each option.


Press
or
t o exit the APP.
Note:
After connecting to the internet, Google will push it online and update it from time to time.
This image is only for example, and actual Google push will prevail.
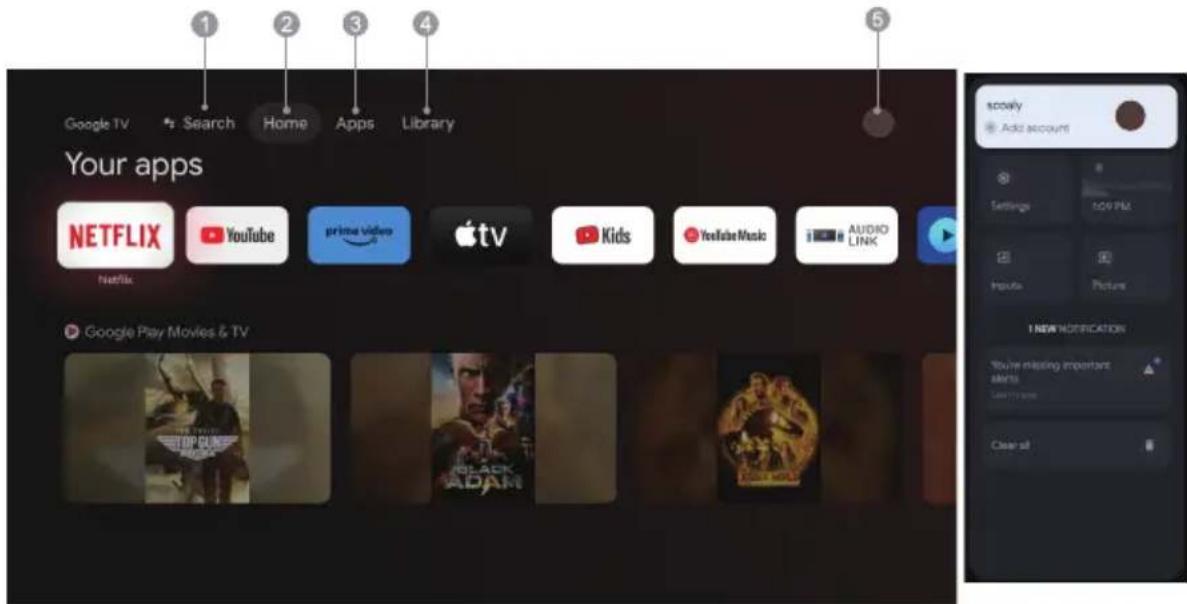
- Search: Hold the Assistant button down and talk Search movies shows, apps and more.
- Home: Select icons from the screen list.
- Apps: Show the list of favorite applications, or access the application center.
- Library: Your Library is empty, Find your purchases, rentals, and watchlisted content across TV mobile, and web here.
- ●: You can add user accounts.
Note:
- The functions and contents of "Home Page" may vary by different countries or models.
- Before using network functions in home page like network applications and so on, please connect the TV to the network firstly.
- Icon copyrights are owned by the application providers.
Apps
-
Press to display homepage.
-
Press to select [Apps] from the screen list.
-
Press /to select "Search for apps and games" and press OK to confirm.
-
Press ^/√/〈/〉 to use the virtual button on the screen, enter the App you want to search, and select
-
Press // to select the App to be installed, and press OK to confirm.
-
Select Install.It will automatically download and install this App (it must be connected to the network)
Uninstall the Apps
^IM < >
- Select [ Uninstall ], press OK to confirm.
You can also select the app you want to delete on the home page, press and hold the OK button, and follow the on-screen prompts to delete it.
Prime Video: Access various Amazon Prime Originals as well as other popular movies and TV shows. Firstly, please select
YouTube: Press this icon to enter into YouTube application. Browse this application to watch a wide variety of online videos.
Fast Cast: An app that quickly delivers mobile content to TV, allowing users to quickly deliver multimedia content such as photos, videos, music and more to TV terminals.
Fast Cast Step:
- Scan the code to download mobile app, or search "FastCast" in app store.
- Scan for devices in the local area network and select your TV. (Mobile and TV are connect the Same Wi-Fi) Device name: FastCast dc
- Select your mobile phone's media file cast to your TV.
Note:
-
This function may be unavailable for some mobile devices, and it subject to chipset support the files format.
-
Recommendations of working environments:
A: Local Area Network Speed recommendations on 1M/S\~2M/S
B: Applicable files: 4K video Definition shall be 30fps; Below 4K definitions not limited.
Media Player: You can view the corresponding files in the USB flash drive.
Accessing channels
In TV mode, press the √/^ buttons on the remote control or the corresponding buttons on the TV set to scroll through the channels.
The input
Press ☐ then press √/∧ to select your desired source, and then press OK to confirm.
Note: the available source may vary depending on the model.
Volume
Volume control: Press the ⏻ +/- buttons on the remote control or the corresponding buttons on the TV set to increase or decrease the volume.
Sound mute: Press the ➕ button to temporarily mutethe sound. Press this button again or the ⏻ +/- button to restore the sound.
Using
Note: Some of the functions might be unavailable in certain sources. And for some models, certain options
This section explores the menus and settings of your TV. Each menu is outlined and detailed to help you get the most from your TV. To access the menu system:
- In TV mode, press on the remote control to display the quick access list.
- Press / to select the desired item, then press OK to open the corresponding submenu.
- In submenu, use / and OK buttons to make the adjustments, or use / to select an item, use OK to enter and operate according to the on-screen display or guide.
- Press ← to return to the previous menu.
Note: Depending on the signal source, the menu that appears may be different, please refer to the actual situation.

Program guide: Go to the EPG interface, only under DTV sources.
New channels available: New Channels available, including CABLE, ANTENNA and SATELLITE.

Subtitle language: Select to Off, Basic and Hearing Impaired.
Add favorite: Add as a favorite show.
Remove from Favorites: Remove the show from your favorite list.
Open Favorites: Open your favorites list.
Audio Language: Select the audio language.
Channel options: Set channel function options, select to Hide Channels, Parental controls, CI CAM PIN code,
Common Interface, Audio Language, Signal Condition, Open source licenses and Version.
Virtual Keyboard: Turn the virtual keyboard on, press ← key to close.
Using System Settings
The Settings menu allows you to configure the TV with your preferences. Each menu is outlined and detailed to help you get the most from your TV.
Note: Some of the functions might be unavailable in certain sources. And for some models, certain options are not available.
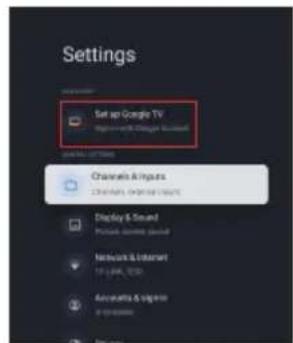
Set up Google TV
If you selected "Set up basic TV" during setup, you can log in to your Google account here.
There are two ways to enter. First, in the HOME interface, press the √/∧ to select "Set up Google TV" and proceed to the next step.
Note: The images shown for illustration and reference only.
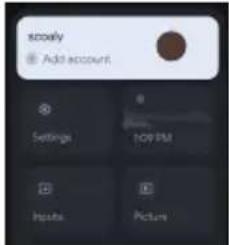
Add a Google account
If you are already logged in to your Google account, select "Account & Sign-in" in the settings and select "Add an account" to add a Google account.
You can also add an account by pressing the round icon on the Select HOME interface.
Channels & Inputs
Note: This function is only available in TV mode. Depending on the signal source, the menu that appears may be different, please refer to the actual situation.
ATV
In TV mode, 1. Press the ☑ of the remote control to select the ATV and enter.
- Press the ⚙ of the remote control to enter the settings menu and select "Channels & Inputs" to enter.
• Country and Region: Show your country or region.
- Analog Auto Scan: Press OK to start the automatic search process.
The search may take a few minutes. During the process, you can press ← to abort.
• Analog Manual Scan:
Press OK to enter the interface.
Press ∧/∨ to set Program, Audio System, Color System and Frequency, and press OK on the "Frequency" option to start scanning.
Setup favorite channel list.• Favorite:
- Channel Organizer: This option allows you to organize channels.
- Teletext: Select the language of the Teletext.
Inputs
HDMI CEC Settings:
CEC control: To select on or off.
Device Auto Power Off: To select on or off.
TV Auto Power On: To select on or off.
CEC Device List: Turn devices on and select [Enable] to enable control of HDMI devices.
CABLE

- Country and Region: Show your country or region.
• Auto Tune: Press OK to enter the interface.
Select an operator in the list.
When you choose one operator, you can use √/∧ to select Frequency(MHz) can be set Auto or Manual.

process.
When you choose "Others", use √/∧ to select Scan Type as Full Scan, Quick Scan and Network Scan, then select Start to start the automatic search process.
The search may take a few minutes. During the process, you can press ← to abort.
- Manual Tune:
Press ∧/M < > to set Channel Number and Frequency(KHz), then select Start Scan to start the search channel.
• LCN: To select On or Off.
• Auto service Update: To select On or Off.
ANTENNA

• Country and Region: Show your country or region.
- Auto Tune: Press OK to start the automatic search process.
The search may take a few minutes. During the process, you can press ← to abort.
- Manual Tune:

the search channel.
- LCN: To select On or Off.
• Auto service Update: To select On or Off. - Update scan: To select On or Off.
SATELLITE

- Country and Region: Show your country or region.
- Satellite Tuning:
1. Auto scanning
Press OK to enter the satellite search interface, select the corresponding satellite in the SATELLITE column on the left. Press the virtual keyboard button of the remote control, the digital remote control will appear on the screen, select the blue button, and the channel search interface will pop up.
Scan Mode: To select Network, Default or Blind Scan.
Channel Type: To select All channels or FTA Channels.
Note: The Scan Mode and Channel Type options can be combined in any way.
After the combination is successful, select the Enter to start the automatic search process.
The search may take a few minutes. During the process, you can press ← to abort.
2. Manual scanning
Press OK to enter the satellite search interface, Select the corresponding satellite in the SATELLITE column on the left, select the corresponding Transponder in the Transponder column in the middle, and select the corresponding LNB Type in the right column.
After the relevant parameters, the Signal Level and Signal Quality should be displayed with a blue signal bar, and if the signal is normal, the Signal Level and Signal Quality should be greater than 80.
Press the virtual keyboard button of the remote control, the digital remote control will appear on the screen, select the blue button, and the channel search interface will pop up.
Scan Mode: To select Network, Default or Blind Scan.
Channel Type: To select All channels or FTA Channels.
Note: The Scan Mode and Channel Type options can be combined in any way.
After the combination is successful, select the Enter to start the automatic search process.
The search may take a few minutes. During the process, you can press ← to abort.
- Auto service Update: In the General satellite option, select On or Off.
• LCN: To select On or Off.
Display & Sound
This menu contains all the settings and adjustments for your picture, screen, sound, and audio output.
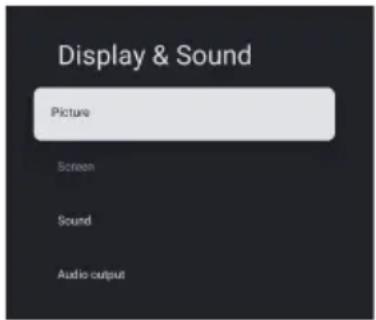
Picture Settings
Enter to adjust picture mode or advanced settings.
Picture Mode: To select Normal, Dynamic, Cinema, Sport, Game and Custom.
ECO: To select Off, Low and High.
Backlight: To select the level of 0-100.
Advanced Setting:
Color Temperature: To select the Standard, Warm and Cool.
Dynamic Contrast: To select ON or OFF.
HDMI PC/ AV Mode: To select Video, PC and Auto.
Noise Reduction: To select Off, Low, Middle, High and Auto.
Picture Reset: To reset the picture.
Motion Estimate and Motion Compensation(MEMC): To select Off, Low, Middle and High.
Screen Settings
To select this option to adjust the picture size.
Sound Settings
Select this option to set the sound adjustments.
Sound Mode: To select the mode of Standard, Speech, Music, Stadium and User.
Dolby Atoms: To select ON or OFF.
Surround Mode: To select Pure Sound or Surround.
Night Mode: To select ON or OFF.
Sound Only: To select it and the TV screen will turn off in 5 seconds.
Advanced Settings:
- Dialogue Enhancer
- Dialogue Enhancer Level 1-7
- Balance
- Sound Reset
Audio output Settings
Select this option to set the Audio adjustments.
Output Device: To select TV Speaker, SPDIF/Optical and HDMI-ARC.
Digital Output: To select PCM, ByPass and Auto.
Digital Audio Delay(ms): To select the level of 0 - 1000.
Digital Audio Volume: To select the level of 0-100.
eARC: To select Off or Auto.
Network & Internet
Select Wi-Fi or Ethernet to connect the monitor to the network environment and adjust network Settings. All the available networks will be shown here and this is where you can configure your network.
If you have connected your TV via an Ethernet cable or the Wi-Fi option is not set to ON, wireless networks will not be listed and wireless network related options will not be available.
Privacy
View or adjust privacy Settings for devices, accounts, and applications.
Apps
View or adjust application-specific Settings.
System
In this menu, you can read the information and settings of TV.
Accessibility: To select Captions, High contrast text, Text to speech, Accessibility shortcut, TalkBack, Switch Access and TVServiceManager.
About: You can update the system, view or change Device name, Reset and read the information of TV.
- System update: Update TV system.
- Device name: View and can change the TV name.
Date & Time: To select Automatic date &time, Set date, Set time, Set time zone and Use 24-hour format.
Note: Set date and set time are available when Automatic date & time is set to OFF.
Language: To select the menu language as you need.
Keyboard: To select Current keyboard, Gboard Settings and Manage keyboards.
Storage: Display internal shared storage, if there is an external device, you can also display external settings Storage.
Ambient mode: Screensavers settings, you can select the picture, the picture switching time, whether to show the weather and date, etc
Power & Energy: To select Power on behavior, Screen saver and Energy saver.
Cast: To select Always, While casting or Never.
System sounds: To select ON or OFF.
Device Preferences: To select Sleep Timer, Idle TV Standby, Settings Exit Timer, Settings, Environment, RCU Firmware Update, Software Version andUserId.
Restart: Restart your TV.
Remotes & Accessories
You can add an additional Voice Remote with Google to your TV, or you may also need to replace one if your old one broke. Other Bluetooth devices like speakers, games controllers can also be connected via Bluetooth.
NOTE: Under this menu, you can choose turn Bluetooth on or off, Add a new Remote & Accessories or set up a remote control or accessory that's already connected to your TV.
Follow the on screen instructions to pair it.(Press hold and for 5 seconds on the "new" remote. Once it is discovered, it will appear in the list. And then press OK on your "old" remote to confirm adding this new remote).
NOTE: If you experience difficulties in pairing your remote with your TV you can turn off other wireless devices and try again.
If you want to unpair the Bluetooth remote, follow these steps:
-
Press 🔥 button to enter the home page.
-
Press ∧/M < > to choose ⚙ to enter.


-
Press ∧/M < > to choose Remotes & Accessories, and press OK to enter.
-
Press ∧/M < > to choose you need to remove the remotes or accessory and press OK to enter.
-
Press ^/∨ to choose Forget and choose Yes.
Help & Feedback
Provide feedback to Google or use the web search screen to access the Google Description Center.
Auto power standby function
The TV will automatically go into Standby mode in the following conditions:
- No signal is received for 15 minutes.
2.[Sleep timer] is active in the [System] menu (p. 20).
Parental controls
[Parental controls] is in the [Quick Access Menu] menu (p. 15).
- Enter the Parental controls interface.
- Please set a new-4 digital PIN using the number keys on your remotecontrol or the keyboard shown below.
Troubleshooting
Before requesting service or assistance, please follow these simple guides to resolve the problem.
If an error message appears, follow the message's instructions.
If the problem still persists, please contact your local dealer for assistance.
Note: Some specifications may different regions or models, and please take your actual as the standard.
| Symptoms | Items to Check and Actions to Follow |
| “Ghost”or double image | This may be caused by obstruction to the antenna due to high rise buildings or hills, Using a highly directional antenna may improve the picture. |
| No power | 1. Check if the TVs AC power cord is plugged into the outlet.2. Unplug the TV, wait for 60 seconds. Then reinsert plug into the outlet and turn on the TV again. |
| No picture | 1. Check antenna connections at the rear of the TV to see if it is properly connected to the TV.2. Possible broadcast station trouble. Try another channel.3. Adjust the contrast and brightness settings. |
| Good picture but no sound | 1. Increase the volume level by pressing the + button on the remote control or on the TV control panel.2. Press the button on the remote control to ensure mute is off. |
| Good sound but poor color | |
| Snowy picture and noise Check the antenna connection. | |
| Horizontal dotted line | This may be caused by electrical interference (e.q. hair dryer, nearbyneon lights, etc.) Turn off the equipment. |
| Television not responding to remote control | 1. Check whether the batteries are working. Replace if necessary.2. Clean the remote control sensor lens on the TV.3. You can still use the buttons on the your TV. |
| Pixels (dots) that are always dark or always lit | Your TV is precision-manufactured using an extremely high level of technology. However, sometimes pixels may not display correctly. These types of occurrences are inherent to this type of product and do not constitute a defective product. |
| PTV 43GU-5024T | |
| Working voltage | 110-240 V AC, 50/60 Hz |
| Power Consumption (W) | 95 W |
| 229,4x957,4x608,5 | |
| TV Dimensions DxLxH (without foot) (mm) | 80,6x957,4x556,2 |
| Net weight without stand | 6.4 kg |
| RF Aerial Input | 75Ωunbalanced |
| Audio | MS12 config X (Dolby Audio) |
| 2 x 10 W | |
| Language of OSD Multiple options | |
| System | DTV: DVB-T/T2/C/S/S2ATV: PAL/SECAM BG/DK/I |
| Channel coverage | DTV: DVB-T: 177.5 MHz ~ 226.5 MHz474 MHz ~ 858 MHzDVB-C: 113 MHz~858 MHzDVB-S/S2: 950 MHz ~ 2150 MHzATV: 46MHz ~ 862 MHz |
| Wi-Fi frequency range(Wi-Fi maximum power) | 2412MHZ to 2472MHZ(<100mW)5180MHZ to 5320MHZ(<100mW)5500MHZ to 5700MHZ(<100mW)5745MHZ to 5825MHZ(<25mW) |
| BT-frequency range(BT-maximum power) | 2402MHZ to 2480MHZ(<10mW) |
| Software version (involve or above) | V02.00018 |
Country restrictions
This device is intended or household and/or office use in all EU countries (and other countries where the corresponding EU guideline is in place) without any restrictions excluding the countries listed below.
| Country Restriction | |
| Bulgaria General permit for outdoor use and use in public facilities | |
| France Use in closed spaces only for 2454-2483.5 MHz. | |
| Italy A general permit is required for use outside of private spaces. | |
| Greece Use in closed spaces only for 5470-5725 MHz. | |
| Luxembourg | General permit for network and service offers (not for spectrum) |
| Norway Broadcasting radio waves is not permitted in a geographic radius of 20 km around the center of Ny-Ålesund. | |
| Russian Federation Use in closed spaces only permitted | |
The regulations of individual countries are subject to change at any time. It is recommended that the user make an inquiry to the relevant agencies about the current stand of national regulations for 2.4 GHz and 5 GHz WiFi.
The device complies with RF specification when the device used at 20 cm from your body.
Suggested writing Method:
According to Article10(10) of Directive 2014/53/EU, the packaging shows that this radio equipment will be subject to some restrictions when placed on the market in Belgium(BE), Bulgaria(BG), the Czech Republic(CZ), Denmark(DK), Germany(DE), Estonia(EE), Ireland(IE), Greece(EL), Spain(ES), France(FR), Croatia(HR), Italy(IT), Cyprus(CY), Latvia(LV), Lithuania(LT), Luxembourg(LU), Hungary(HU), Malta(MT), Netherlands(NL), Austria(AT), Poland(PL), Portugal(PT), Romania(RO), Slovenia(SI), Slovakia(SK), Finland(FI), Sweden(SE), the United Kingdom(UK(NI)), Turkey(TR), Norway(NO), Switzerland(CH), Iceland(IS), and Liechtenstein(LI). The WLAN function for this device is restricted to indoor use only when operating in the 5150 to 5350 MHz frequency range.
The terms HDMI, HDMI High-Definition Multimedia Interface, HDMI Trade dress and the HDMI Logos are trademarks or registered trademarks of HDMI Licensing Administrator, Inc.

Manufactured under license from Dolby Laboratories. Dolby, Dolby Audio, and the double-D symbol are trademarks of Dolby Laboratories Licensing Corporation. Confidential unpublished works. Copyright © 1992-2019 Dolby Laboratories. All rights reserved.

This product contains free software that is subject to the GNU General Public License (GPL) and/or the GNU Lesser General Public License (LGPL). You may redistribute and/or publish it under the terms of the GNU General Public License or the GNU Lesser General Public License as published by the Free Software Foundation, either according to Version 2 or (at your option) any later version.
This program is published in the hope that it is of use to you but WITHOUT ANY GUARANTEE and especially without the implicit guarantee of BEING READY FOR THE MARKET or USE FOR A CERTAIN PURPOSE. You can find details in the GNU General Public License (GPL) and the GNU Lesser General Public License (LGPL). You can obtain the software from Imtron GmbH's customer service (per email at contact@imtron.eu or via the postal address IMTRON GmbH, Media-Saturn-Straße 1, 85053 Ingolstadt Germany). You can download the GNU General Public License (GPL) and the GNU Lesser General Public License (LGPL) at www.gnu.org/licenses/.
This device is suited solely for use in closed spaces. This device may be used in all EU countries.
Imtron GmbH hereby declares that the radio equipment PTV 43GU-5024T complies with the EU directive 2014/53/EU. Click on the following link to read the full text of the EU Declaration of Conformity: https://www.peaq-online.com/downloads.
Use the link https://eprel.ec.europa.eu/ to access the European product database (EPREL), in which more information about the product is saved. Type in the EPREL - registration number1819944, or simply scan the QR -code on the energy label to access the model information.
PE∧Q
natural_image
Front view of a modern flat-screen TV with two legs and a blank screen (no text or symbols visible)PTV 43GU-5024T
DE Bedienungsanleitung
EN User Manual
FR Mode d'emploi
ES Manual de instrucciones
Specifications ......22
Licences 24
Introduction
natural_image
Simple diagram of a monitor with a circular button and pointer, no text or symbols present.
Éteindre
- Installation de vos applications.
Remarque :
natural_image
Front view of a modern flat-screen TV with two black triangular legs (no visible text or symbols)PTV 43GU-5024T
natural_image
Simple diagram of a monitor with a circular button and pointer, no text or symbols present.
Apagado
Nota:
natural_image
Front view of a modern flat-screen TV with two black triangular legs (no visible text or symbols)PTV 43GU-5024T
natural_image
Simple diagram of a monitor with a circular button and pointer, no text or symbols present.
Kikapcsolás
Megjegyzés:
natural_image
Front view of a modern flat-screen TV with two legs and a blank screen (no text or symbols visible)PTV 43GU-5024T
DE Bedienungsanleitung
EN User Manual
FR Mode d'emploi
ES Manual de instrucciones
natural_image
Simple diagram of a monitor with a circular button and pointer, no text or symbols present.
Spegnimento
Nota:
natural_image
Front view of a modern flat-screen TV with two legs and a blank screen (no text or symbols visible)PTV 43GU-5024T
DE Bedienungsanleitung
EN User Manual
FR Mode d'emploi
ES Manual de instrucciones
natural_image
Simple diagram of a monitor with a circular button at the bottom (no text or symbols)
Uitschakelen
- Selecteer of u "Google-TV instellen" of "Basis-TV instellen" wenst
Wanneer wij "Basis-TV instellen" selecteren
Opmerking:
CEC-bediening: Selecteer Aan of Uit.
• LCN: Selecteer Aan of Uit.
- Automatische service-update: Selecteer Aan of Uit.
ANTENNE
• LCN: Selecteer Aan of Uit.
- Automatische service-update: Selecteer Aan of Uit.
Overscan: Selecteer AAN of UIT.
ALLM: Selecteer AAN of UIT.
Surround-modus: Selecteer Zuiver geluid of Surround.
Nachtmodus: Selecteer AAN of UIT.
eARC: Selecteer Uit of Auto.
Netwerk & internet
natural_image
Front view of a modern flat-screen TV with two legs and a blank screen (no text or symbols visible)PTV 43GU-5024T
DE Bedienungsanleitung
EN User Manual
FR Mode d'emploi
ES Manual de instrucciones
natural_image
Simple diagram of a monitor with a circular button at the bottom (no text or symbols)
Wyłączone zasilanie
Uwaga:
Covered by one or more claims of the HEVC patents listed at patentlist.accessadvance.com.


- PTV 43GU-5024T
- Hinweis:
- Introduction
- Safety Information
- CAUTION
- IMPORTANT - Please read these instructions fully before installing or operating
- WARNING
- Accessories Included
- WALL MOUNTING WARNINGS
- Stand Installation & Wall Mounting
- Assembling / Removing the stand Preparations
- Assembling the stand
- Removing the stand from the TV
- When using the wall mount bracket
- Antenna Connection
- Rear side of the TV
- Other Connections
- General Operation
- Turning On/Off the TV
- Connect power
- To switch on the TV from standby
- To switch the TV into standby
- To switch off the TV
- TV Control & Operation
- Operating with the Control Button
- Power On / Power Off
- Remote Control
- Inserting the Batteries into the Remote
- To pair remote with the TV
- Nitial Setup Wizard
- When we select "Set up basic TV".
- When we select "Set up Google TV".
- Main Screen
- Apps
- Note:
- Accessing channels
- The input
- Volume
- Using
- Using System Settings
- Set up Google TV
- Add a Google account
- Channels & Inputs
- ATV
- CABLE
- ANTENNA
- SATELLITE
- Auto scanning
- Manual scanning
- Display & Sound
- Network & Internet
- Privacy
- System
- Remotes & Accessories
- Help & Feedback
- Auto power standby function
- Parental controls
- Troubleshooting
- Country restrictions
- PE∧Q
- Éteindre
- Remarque :
- Nota:
- Megjegyzés:
- Wanneer wij "Basis-TV instellen" selecteren
- Opmerking:
- ANTENNE
- Netwerk & internet
- Uwaga:
Brand : PEAQ
Model : PTV 43GU-5024T
Category : TV