USER MANUAL PTV551203B PEAQ
LED Backlight TV PTV551203
Bederungsanlage
Manuale d'uso
NL Gebruikshandeling
Manual do Utilizar o
PL InstruKja uzykownika
Ru Pyko0o0aTOBnONsOaTe
SY Anvandarnhandbok
EN User Manual
FR Guide d'utilisation
es Manual de usuario
EL Eeyapidox npntm
Hu FelhasznalutmutatO
TR Kullanim ekitabi

List of languages
| 1 | Abbr. | Language | i Abbr. | Language | i Abbr. | Language | i Abbr. | Language | | | | | |
| 1 | DE | Deutsch | 2 EN | English | 3 IT | Itallano | 4 FR | Fangcais | | | | | |
| 5 | NL | Nederland | 6 ES | Espanol | 7 PT | Portugues | 8 EL | EL Aληνία | | | | | |
| 9 | | PL | Polski | | 10 HJ | Magyar | | 11 RU | Pyoc | Küli 12 | TR Türkei | | |
| 13 | | SV | Svenska | |
On screen display
Figure 1 Figure 2
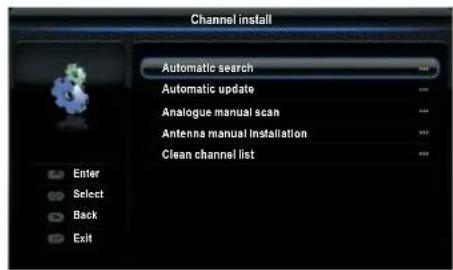

Figure 3 Figure 4
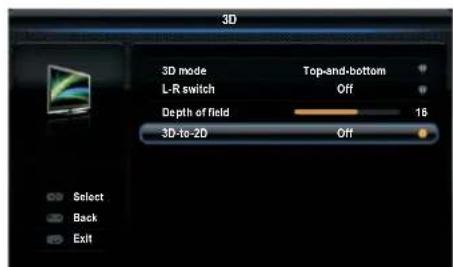
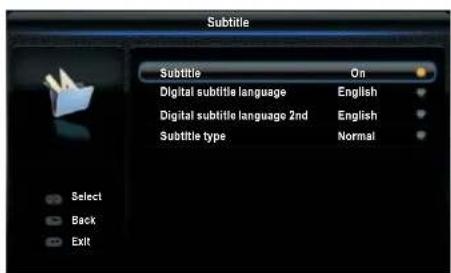
Figure 5
PVR (Personal Video Recorder)
(Personal-Videorekorder) 15
Planungsliste 15
PVR (Personal Video Recorder) (Personal-Videorekorder)
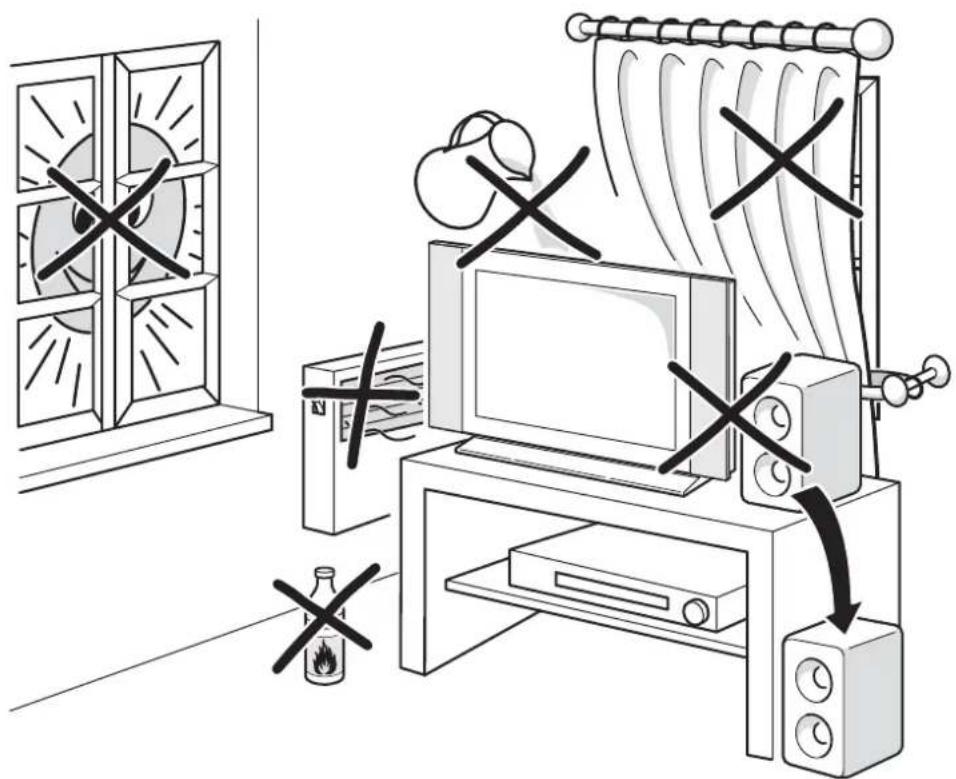
Ensure that your domestic mains supply voltage matches the voltage indicated on the identification sticker located at the back of your set. Where the mains plug or an appliance coupler is used as disconnect device, it shall remain readily operable.
On certain models, the light indicator is located at the side of the TV set. The absence of a light indication at the front does not mean that the TV set is fully disconnected from the mains. To disconnect the TV set completely, the mains plug must be pulled out.
The TV set's components are sensitive to heat. The maximum ambient temperature should not exceed 35^ Celsius. Do not cover the vents at the back or sides of the TV set. Leave sufficient space around it to allow adequate ventilation. Install the appliance away from any source of heat (fireplace, etc.) or appliances creating strong magnetic or electric fields.
Moisture in rooms where the set is installed should not exceed 85% humidity. Moving the set from a cold place to a warm one can cause condensation on the screen (and on some components inside the TV set). Let the condensation evaporate before switching the TV set on again.
WARNING
This appliance is intended for domestic household use only and should not be used for any other application, such as for non-domestic use or in a commercial environment. If the external flexible cable or cord of this transformer is damaged, it shall be replaced by the manufacturer or his service agent or a similar qualified person in order to avoid a hazard.
Leave more than 10cm clearance around the television to allow adequate ventilation. The ventilation should not be impeded by covering the ventilation openings with items, such as newspapers, table-cloths, curtains, etc.
The apparatus shall not be exposed to dripping or splashing and that no objects filled with liquids, such as vases shall be placed on the apparatus.

To prevent the spread of fire, keep candles or other open flames away from this product at all times.
WARNING: To prevent injury, this apparatus must be securely attached to the floor/wall in accordance with the installation instructions.
CAUTION: Connect headphones with the volume set low and increase if required. Prolonged listening through headphones at high volume settings can result in hearing damage.
Eye Fatigue
When using this product as a computer monitor, health and safety experts recommend short frequent breaks rather than occasional longer breaks. For example a 5-10 minute break after an hour of continuous screen work is considered to be better than a 15 minute break every 2 hours.
Do not use the monitor against a bright background or where sunlight or other bright light sources will shine directly onto the screen.
The or POWER button on the TV set or the Button on the remote control can be used to switch it on and put it into standby mode. If you are not going to be watching the TV for a lengthy period of time, switch it off completely by removing the plug from the mains power socket.
During thunderstorms, we recommend that you disconnect the TV set from the mains and aerial so that it is not affected
by electrical or electromagnetic surges that could damage it. For this reason, keep the mains and aerial sockets accessible so they can be disconnected, if necessary.
Unplug the TV set immediately if you notice it giving off a smell of burning or smoke. You must never, under any circumstances, open the TV set yourself, as you run the risk of an electric shock in doing so.
TV screen
The TV screen used in this product is made of glass. Therefore, it can break when the product is dropped or impacted upon by other objects.
The TV screen is a very high technology product, giving you finely detailed pictures. Occasionally, a few nonactive pixels may appear on the screen as a fixed point of blue, green or red. This does not affect the performance of your product.
Care
Use a glass-cleaning product to clean the screen and a soft cloth and mild detergent to clean the rest of the set.
Important: Using strong detergents, alcohol-based and abrasive products may damage the screen.
Dust the vents at the back and sides regularly. Using solvents, abrasive or alcohol-based products could damage the TV set. If an object or liquid enters the appliance, unplug it immediately and have it checked by an authorized engineer. Never open the appliance yourself since this may put you at risk or damage the appliance.
Hanging the TV set on the wall
Warning: This operation requires two people.
To ensure a safe installation, observe the following safety notes:
Check that the wall can support the weight of the TV set and wall mount assembly.
Follow the mounting instructions provided with the wall mount. For certain models, make sure to screw the hexagonal VESA wall mounting screw bosses (and screws) provided with the set into the nuts for the wall mount at the back of your set before your wall mounting.
The TV set must be installed on a vertical wall.
Make sure to use only screws suitable for the material of the wall.
Make sure that the TV set cables are placed so that there is not danger of tripping over them.
All other safety instructions about our TV sets are also applicable here.
Placing the TV on a table and other surfaces
Before setting up your television set, make sure that the surface you want to put the set on can support its weight. Do not place the set on an unstable surface (e.g. moving shelf, very edge of a unit) and make sure that the front of the television set does not overhang the surface it is standing on. To avoid TV from falling please fasten TV to the wall by using necessary screws (in Vesa wall mount holes), clamps, anchors to be bought separately. Install TV near to the wall to avoid falling backwards.
The features described in this manual are common to most models. Some features may not be available on your TV and/or your TV may include features that are not described in this user manual. The illustrations in this manual may differ from the actual product. Please refer to the actual product.

Products

Pb Battery
Notice:
The sign Po below the symbol for batteries indicates that this battery contains lead.
[European Union]
These symbols indicate that the electrical and electronic equipment and the battery with this symbol should not be disposed of as general household waste at its end-of-life. Instead, the products should be handed over to the applicable collection points for the recycling proper treatment, of electrical and electronic equipment as well as batteries for recovery and recycling in accordance with your national legislation and the Directive 2002/96/EC and 2006/66/EC.
By disposing of these products correctly, you will help to conserve natural resources and will help to prevent potential negative effects on the environment and human health which could otherwise be caused by inappropriate waste handling of these products.
For more information about collection points and recycling of these products, please contact your local municipal office, your household waste disposal service or the shop where you purchased the product.
Penalties may be applicable for incorrect disposal of this waste, in accordance with national legislation.
[Business users]
If you wish to dispose of this product, please contact your supplier and check the terms and conditions of the purchase contract.
[Other Countries outside the European Union]
These symbols are only valid in the European Union. If you wish to dispose of these items, please do so in accordance with applicable national legislation or other rules in your country for the treatment of old electrical equipment and batteries.
Contents
Important Information 1
Chapter 1 - Connections
Chapter 2 - Getting started
Chapter 3 - Installing channels
Chapter 4 - Using your TV
Chapter 5 - Using more of your TV
Connecting the power and antenna 4
DVD recorder, cable receiver 4
DVD player, home theatre system, PC 5
Game console, Blu-ray Disc player, headphones,
HD game console & HD camcorder 5
Remote control functions 6
Switching the TV on and off 7
Initial setup 8
Performing an automatic channel search 8
Accessing channels 9
Watching connected devices 9
Volume 9
Using TV menus 9
Selecting menu language 9
Setting up your favourite channels 9
Energy saving 10
Viewing TV using the 3D function* 10
Audio description 10
PAP function 10
Using subtitles 10
Turning on/off subtitles 11
Enabling subtitle languages on digital TV
channels 11
Selecting a subtitle type on digital TV
channels 11
Selecting decoding page language in Teletext ... 11
Digital Teletext language 11
SPDIF type 11
T-Link 11
Enabling or disabling T-Link 11
Using one-touch play 11
Using system standby 11
Network update 11
Common interface 11
Using the common interface module 12
Accessing common interface services 12
Software update 12
Changing to Shop or Home mode 12
MHEG function 12
Viewing photos, playing music and watching videos
from a USB storage devide 12
Photo 13
Music 13
Video 13
DivX video* 13
Time detection 14
Assigning a channel decoder 14
Diagnostics on digital TV channels 14
Time shift 14
Reset shop 14
Customising the input settings 14
Using Electronic programme guide 15
PVR (Personal Video Recorder) 15
Schedule list 15
Chapter 6 - Network connection
Connecting to a wired network 16
Connecting to a wireless network 16
Network setup 16
Chapter 7 - Share & See
Connecting to your PC 17
Adding media from your PC for sharing 17
Share & See application 17
Chapter 8 - Smart TV & HbbTV
Access Smart TV Applications (Apps) 17
HbbTV 18
Accessing HbbTV 18
Activation/deactivation of HbbTV 18
Troubleshooting 18
Television specifications 18
OSS Notice 18

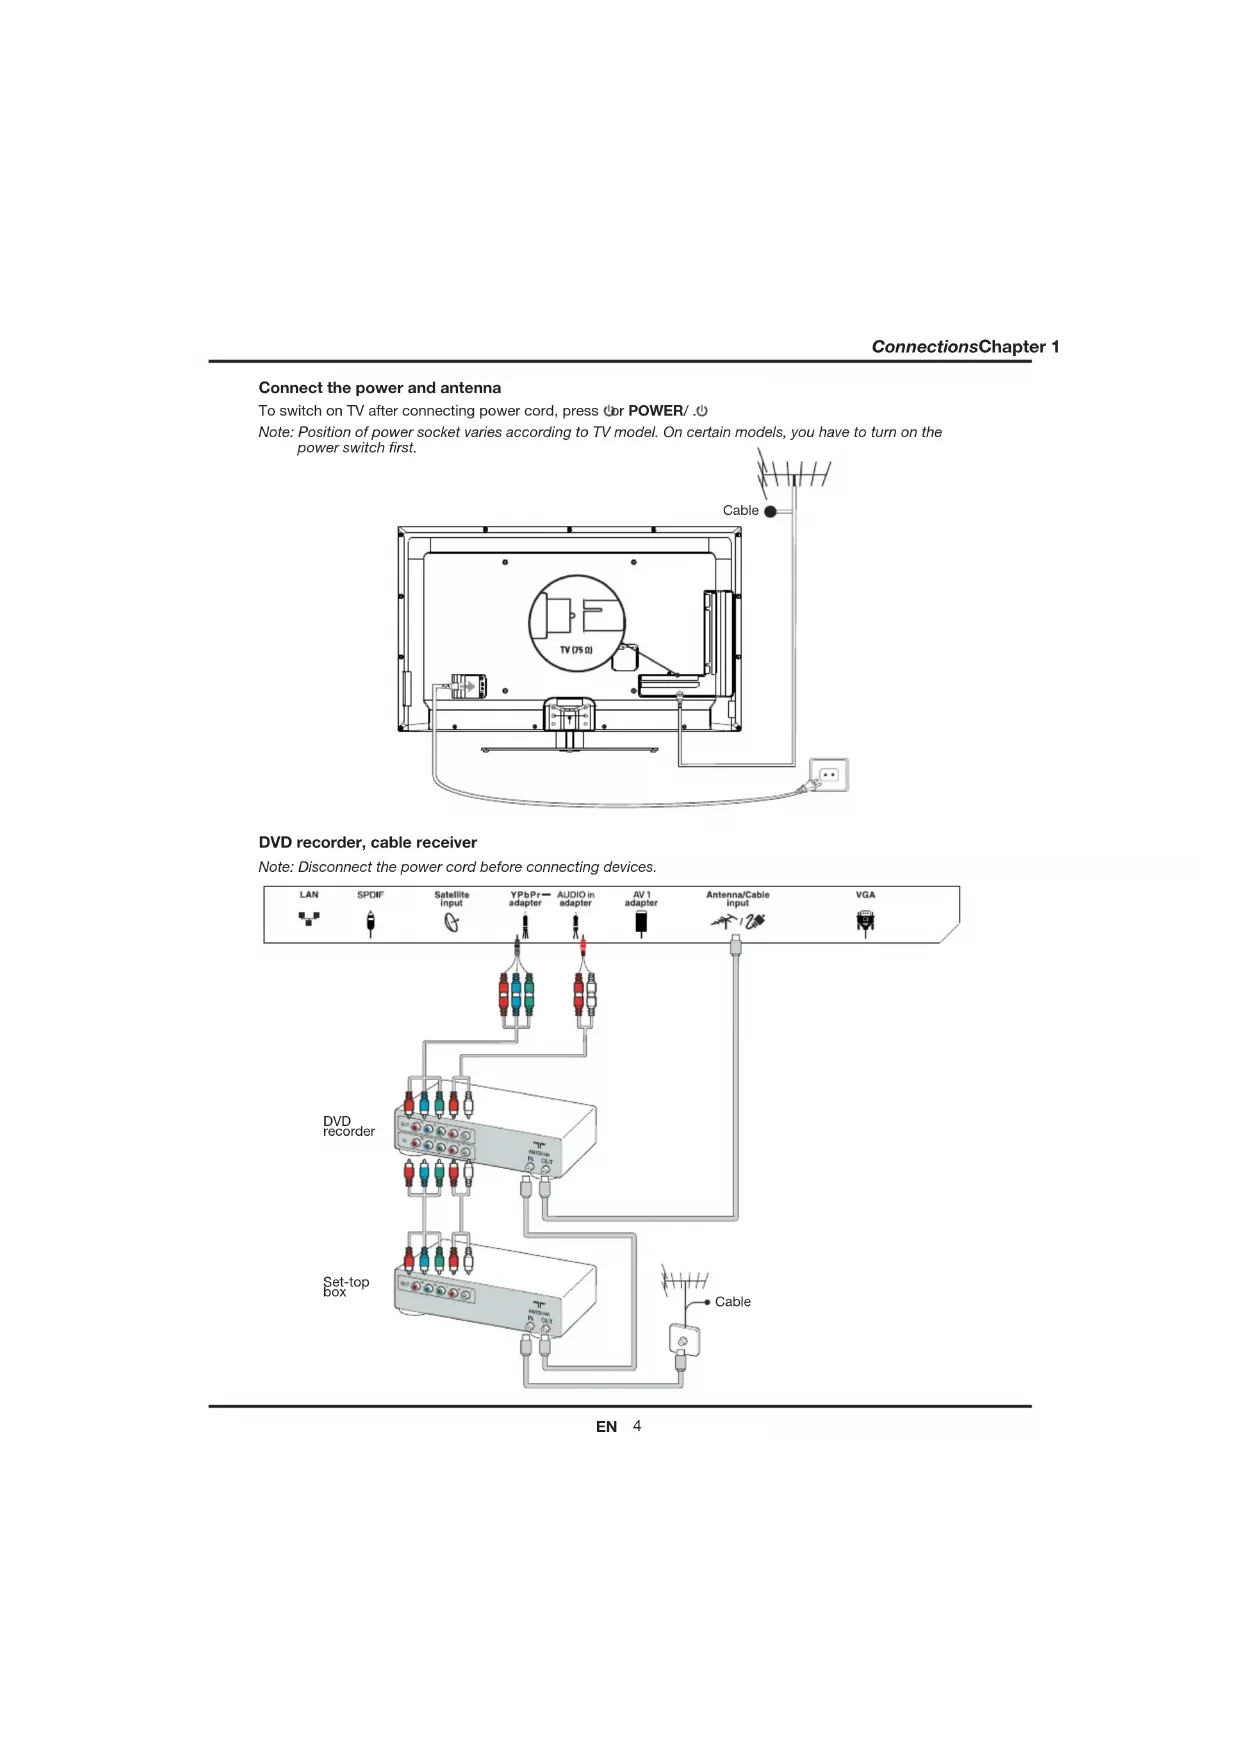
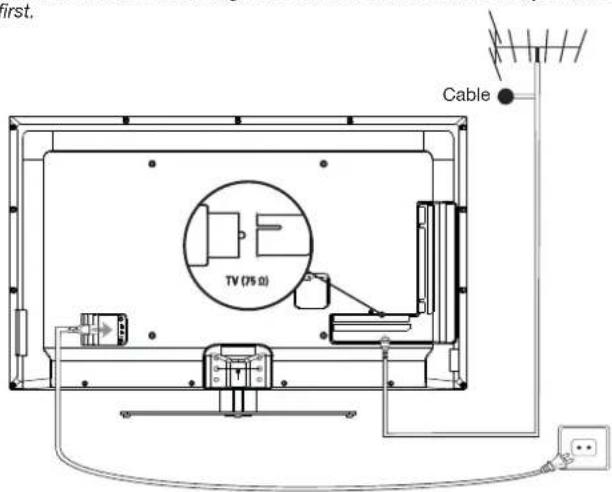
Connect the power and antenna
To switch on TV after connecting power cord, press or POWER/
Note: Position of power socket varies according to TV model. On certain models, you have to turn on the
power switch first.
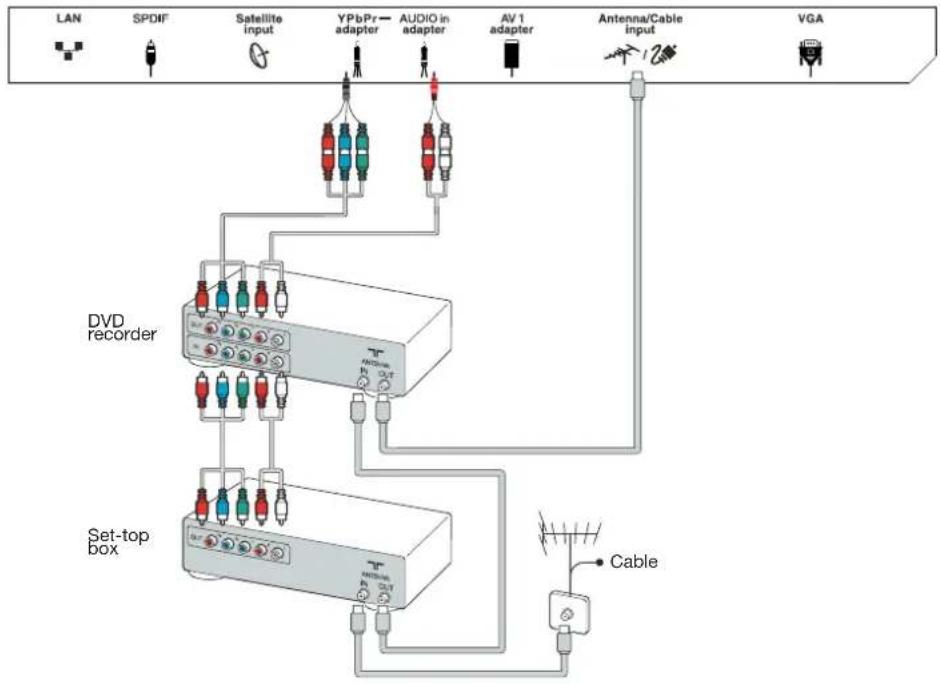
DVD recorder, cable receiver
Note: Disconnect the power cord before connecting devices.
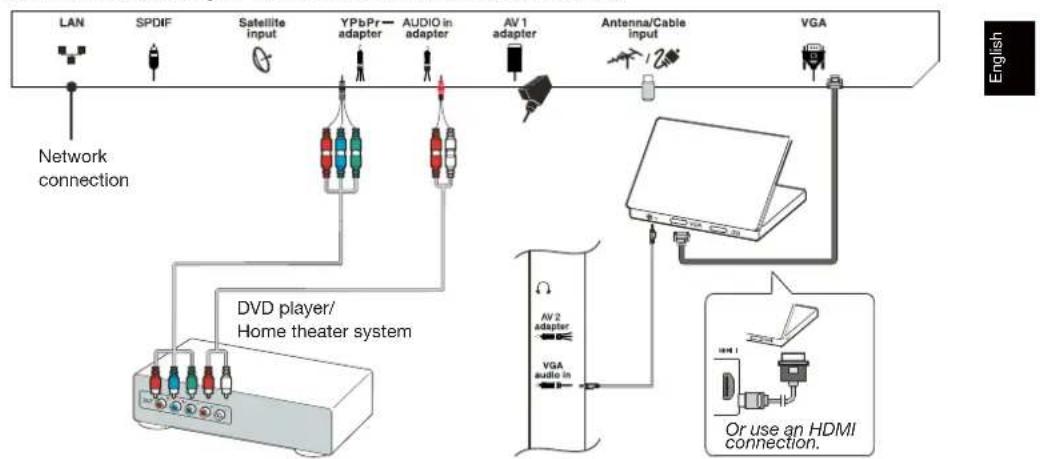
DVD player, home theatre system, PC
Note: Before connecting a PC, set the PC monitor refresh rate to 60Hz.
Game console, Blu-ray Disc player, headphones, HD game console & HD camcorder
Notes:
- USB connectors are for data input from USB storage devices. Only USB 1 port can be connected to your USB dongie.
- Excessive sound pressure from earphones and headphones can cause hearing loss.
- ARC(Audio Return Channel) function is only supported on HDMI 4 (ARC) port.
Number of HDMI may vary.
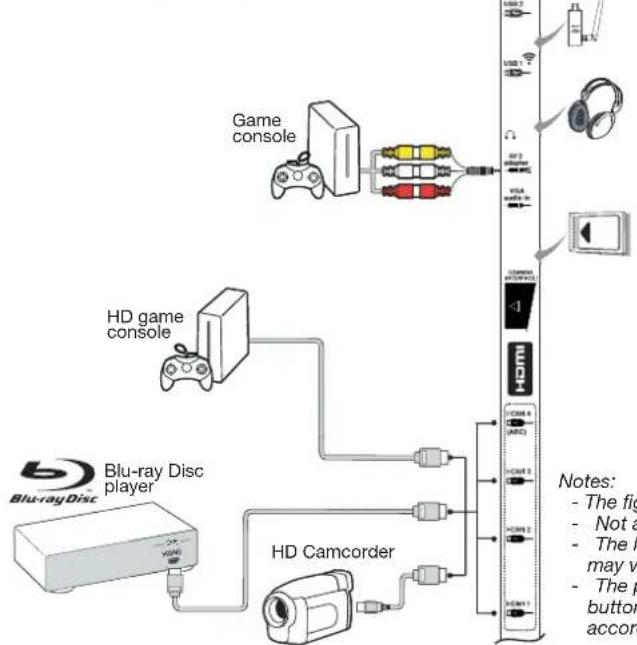
Notes:
- The figures are for representation only.
Not all connections available on all models.
The location of the power socket on the TV may vary according to TV model.
- The positions and names of the function buttons and connectors on the TV may vary according to TV model.
Remote control functions
Most of your television's functions are available via the menus that appear on the screen. The remote control supplied with your set can be used to navigate through the menus and to configure all the general settings.
Note: You are recommended to use the full screen mode. Do not use the display mode with black bars on both sides of the picture (such as 4:3) for long time; otherwise the TV screen may be damaged permanently.
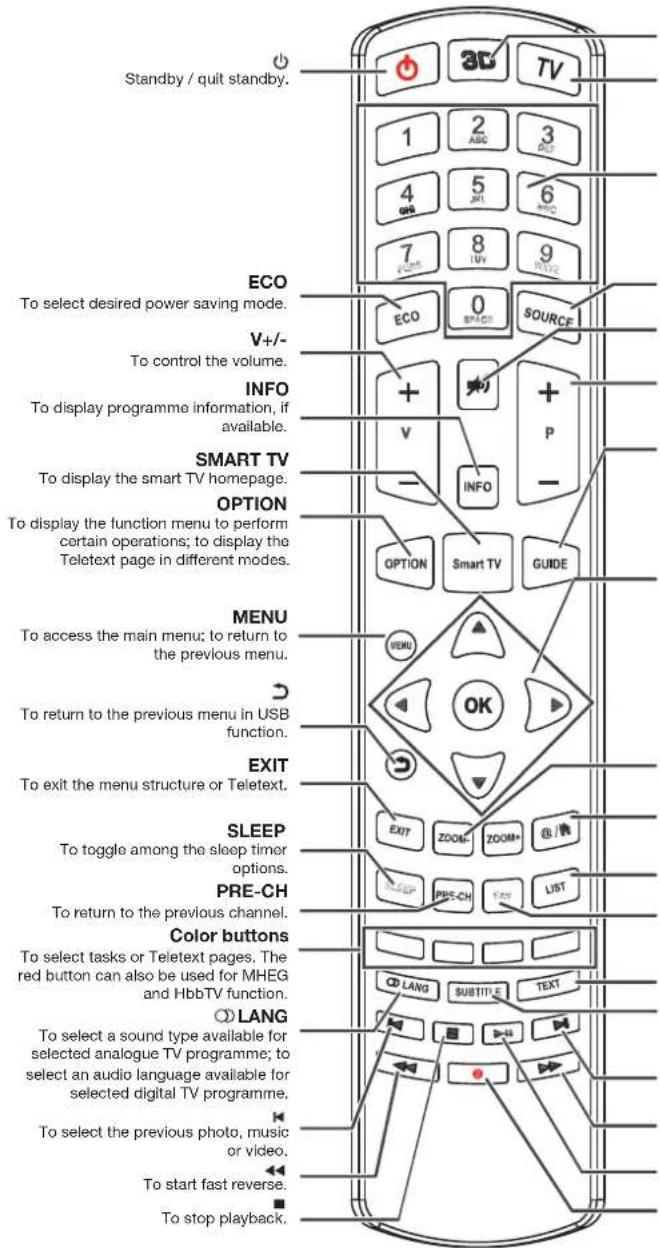
3D To toggle among the 3D input format options. TV To access TV mode.
Alphanumeric
To enter channel numbers; to enter a letter, a digit or a symbol in some functions.
SOURCE
To select connected devices.
#
To switch the sound off and back on again.
P+/-
To change channels.
GUIDE
To toggle the Electronic Programme Guide on or off (only available for digital channels).

To navigate through the menus; to set functions and change values.
#
To navigate through the menus; to select menu options; to switch to the previous or next photo, song or video in USB function.
OK
To confirm an entry or selection; to freeze/unfreeze the picture in digital TV mode.
ZOOM-/ZOOM+
To select the picture format.
@/
To operate in some smart TV applications.
LIST
To display the channel list.
FAV
To bring up the Channel list selection menu.
TEXT
To toggle Teletext on or off.
SUBTITLE
To select a subtitle language available for selected digital TV programme.
#
To select the next photo, music or video.
>>
To start fast forward.
H
To start or pause playback.
.
Recording button.
Important:
Batteries shall not be exposed to excessive heat such as sunshine, fire or the like. Remove batteries when the remote control is not to be used for a long time. Batteries left in equipment may cause damage through deterioration and corrosive leakage, invalidating the guarantee.
To protect the environment use local recycling facilities for battery disposal. Dispos of used batteries according to the instructions.
CAUTION: Risk of explosion if batteries are replaced by an incorrect type. Replace only with the same or equivalent type recommended by the equipment manufacturer.
If the batteries in your remote control are run down, you can use the buttons on your TV set. In TV mode, they have the same functions as the corresponding buttons on the remote control. The OK button on the TV set can be pressed repeatedly to select the required source. In the menus they have the following functions:
For models with OK button on the set:
For models without OK button on the set:
| PR+ or PR▲ | ▲ | PR+ or PR▲ | ▲ |
| PR- or PR▼ | ▼ | PR- or PR▼ | ▲ & OK |
| VOL+, ▲or VOL ▲ | ▲ | VOL+, ▲or VOL ▲ | ▲ |
| VOL-, ▲or VOL ▲ | ▲ | VOL-, ▲or VOL ▲ | ▼ |
| MENU or ≈ | MENU | MENU or ≈ | MENU |
| OK | OK | | |
Switch the TV on and off
- When the power cord is connected, the TV will be turned on directly or be in standby mode. If the TV is in standby mode, press the or POWER/ button on the set or the button on the remote control to turn it on.
- To put the TV into standby mode, press the or POWER/O button on the set or the button on the remote control. The TV set remains powered up, but with low energy consumption.
- To switch the TV off, unplug the mains plug from the mains outlet.
("On certain models, you have to turn on the power switch first.)

Initial setup
Initial setup involves selecting all the settings required to be able to search for and store all the analogue and digital channels you can receive. Make sure that the television is switched on and follow all the steps in turn specified hereafter.
Note: If the channel search retrieved only the analogue channels it could be caused by poor broadcasting and therefore is not covered by manufacturer warranty. Manufacturers cannot be held responsible for lack of or poor broadcasting in some areas.
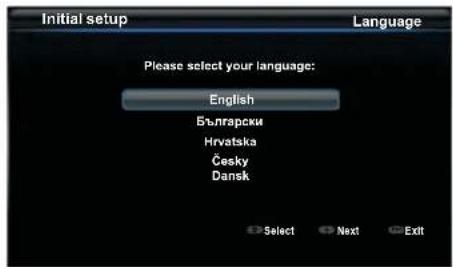
The first time you switch the set on, the Initial setup wizard opens, which guides you through the initial setup process. (Refer to Figure 1.)
- Press / to select your language, then press OK/▶ to enter the next step.
- Press / to select your country, then press OK to enter the next step. Note: If you select France, you will have to enter the Password setting menu here in order to set a password. Use the alphanumeric buttons to enter a four-digit number for your password. (0000 is too simple to be set as your password.) Re-enter the same code to confirm the password. After that, you will enter the next step automatically. (In this step, you can only press to return to the previous step.)
- Press / to select your tuner mode Antenna or Cable or Satellite. (Note: Satellite option may not be available for certain models.)
- Select Antenna
Press OK to enter.
- Select Digital & Analogue, Digital or Analogue, then press OK/
Press to select Scan, then press OK/ to start the automatic search for all DVB-T digital and/or analogue channels.
- Select Cable
Press OK to enter.
- Select Digital & Analogue, Digital or Analogue, then press OK/▶.
- Press / to select Scan, then press OK/▶ to directly start your initial setup or enter below step.
- Select Full if available to search for and store all DVB-C digital and analogue channels.
- You may select another advanced scan mode if available (for example, Advanced), then configure the correct cable information as described below. Use the alphanumeric buttons to adjust the values for frequency,
symbol rate and network ID; use to select a modulation mode.
- Press OK to start initial setup relating to all DVB-C digital and analogue channels.
SelectSatellite
Press OK to enter.
Press / to select Scan, then press OK/ to enter the next step to configure proper information relating to satellite and antenna.
- Press OK to start initial setup relating to all satellite channels.
Note: To prevent the channel setup process from being interrupted, wait for the message indicating that the setup is complete.
- Before starting the scanning, you can also select Skip scan to skip the initial setup process.
- During the setup, you can follow the hints available at the bottom of the screen to return to the previous step by pressing . Or press EXIT to exit or interrupt the search halfway.
- Once the automatic search ends, the set enters the next step automatically. Press / to select your location Shop or Home. Press OK/ to confirm your selection and enter the last step.
-
- In this step, you can press OK to exit the initial setup. The channels are arranged in a preset order. If you wish to skip channels, modify the preset order or rename channels, select Setup > Organiser and press OK / ▶ to enter. In this step, you can also reseeset to the previous step.
This section describes how to search and store channels automatically. Instructions are for both analogue and digital channels.
- Press MENU on the remote control and select Setup > Language > Menu language. Press to select your desired menu language.
- Press MENU to return to Setup, press / to select Country, then press to select your country. The TV installs and arranges channels according to your country.
- Press / to select Tuner mode, then press to select Antenna, available or Satellite. (Note: Satellite option may not be available for certain models.)
Select Antenna.
- Press / to select Channel install, and press OK/▶ to enter.
- Select Automatic search (Refer to Figure 2.), then press OK/▶ to display Automatic search.
-
Press OK to skip the country selection and enter the next step. Or use / to reselect your country, then press OK to enter.
-
Select Digital & Analogue, Digital or Analogue, then press OK/▶ to start the automatic search, which relates to all DVB-T digital and/or analogue channels.
- Select Cable.
- Press / to select Channel install, and press OK/ to enter.
-
Select Automatic search, then press OK to display Automatic search.
-
Press OK to skip the country selection and enter the next step. Or use to reselect your country, then press OK to enter.
-
- Select Digital & Analogue, then press OK/▶ to enter. Select your scan mode if available and configure proper cable information in the same way as in Initial setup. Select Scan and press OK/▶ to start your automatic search relating to all DVB-C digital and analogue channels.
- Select Digital, then follow the same process as above to start your automatic search relating to all DVB-C digital channels.
- Select Analogue, then press OK to start your automatic search relating to all analogue channels.
- SelectSatellite.
- Press▲/▼ to select Satellite setup, and press OK/▶ to enter.
- Press / to select a proper satellite or add new satellites if needed, then press OK to enter and configure the correct information relating to satellite and antenna.
-
Select Setup > Channel install > Automatic search, then press OK/▶ to enter.
-
Select Country, and use / to reselect your desired country, if necessary.
-
Select Satellite tuning, press OK to display Automatic search. Configure the proper information. Select Scan, and press OK to start initial setup relating to all satellite channels.
-
The search may take a few minutes. During the process, you can press MENU to abort halfway.
- Once the automatic search ends, press MENU to return to the previous step or press OK to restart your channel search.
- After the automatic search, channels are arranged in a preset order. You can skip channels, modify the preset order or rename channels.
Using your TV
Accessing channels
Using the alphanumeric buttons: press the corresponding alphanumeric buttons to access the channels.
Using the PR + / - or P + / - buttons: scroll through the channels.
Watching connected devices
Repeatedly press SOURCE on the remote control or OK on the TV set to toggle between TV and other input sources. To resume TV viewing, press any numeric button to enter the channel, while + / - will cycle through all TV channels and other input sources.
Note: Not all models have OK button on the set.
Volume
Volume control: use the VOL + / - or VOL buttons on the TV set or V + / - buttons on the remote control to increase or decrease the volume.
Sound mute: press the button to temporarily mute the sound. Press this button again or the V+ button to restore it.
- Press MENU to display the main menu. (Refer to Figure 3.)
- Press / / to select the desired item, then press OK to open the corresponding submenu.
- In submenus, use / to select menu options, use / to set functions or change values. Use OK to activate a setting. Use OK to open the corresponding submenu.
- Press MENU to return to the previous menu.
- Press EXIT to close the menu.
Note: Some options may not be available for certain signal sources.
You can choose your preferred menu language following the instructions below.
- Press MENU to display the main menu.
- Press / / to select Setup, then press OK to enter.
- Select Language and press OK to enter.
- Select Menu language and press▶ to select your desired language to display the menus.
- Press EXIT to close the menu.
Using more of your TV
Setting up your favourite channels
You can create a list of your favourite TV channels.
- Press LIST.
- Press the yellow button to enter Channel list selection. Press / to select the favourite list and press OK to enter.
- Press the blue button to start editing your favourite list. Press / to scroll through the channel list and press OK to select or deselect it.
- Repeat this procedure to setup other favourite channels.
- Press LIST/EXIT to exit.

Shortcut operation: Press FAV on the remote control to directly enter Channel list selection.
Energy saving
- Press MENU on the remote control and select Picture > ECO Settings > Energy Saving.
- Press to select a desired power saving mode to achieve the desired power saving effect.
- Press EXIT to close the menu.
Shortcut operation: Press ECO on the remote control to select a desired power saving mode directly.
Viewing TV using the 3D function
* not available for some models)
WARNING:
Some viewers may experience discomfort while viewing 3D TV such as dizziness, nausea and headaches. If you experience any such symptom, stop viewing 3D TV, remove your 3D glasses and rest.
Watching 3D videos too closely or for a long period of time may harm your eyesight.
A responsible adult should frequently check on children who are using the 3D function.
Do not use the 3D glasses for any other purpose than viewing 3D videos on a 3D TV.
Do not use the 3D function or 3D glasses while walking or moving around, otherwise it may result in injuries due to running into objects, tripping, and/or falling.
- Press MENU on the remote control and select Picture > 3D, then press OK to enter. (Refer to Figure 4.)
- 3D Mode: Wear the 3D glasses first, then press to select the right 3D input format among Top and Bottom, Side-by-Side, 2D-to-3D, Line interleave and Frame sequential for the playing 3D video.
- L-R Switch:Select On or Off to adjust the 3D video for the left and right eyes with better visibility.
- Depth of Field: Adjust the stereoscopic effect of the 3D image converted from 2D image.
- 3D-to-2D: Select Left or Right to display the image for the left or right eye only. This function is deactivated when 3D Mode is set to 2D-to-3D or Off.
-
Press EXIT to close the menu. Notes:
-
3D glasses from other manufacturers may not be supported.
- All photo functions are disabled in 3D mode.
- If changing to a different signal source or accessing the SmartTV, 3D mode will be automatically disabled.
- Some 3D modes may not be available depending on the input format of the 3D video source.
Supported 3D modes:
ATV, AV, YPbPr: 2D-to-3D
DTV, HDMI, USB, Videos from the Internet: Top and Bottom, Side-by-Side, 2D-to-3D, Line interleave, Frame sequential
- 3D function in USB mode: During the playback of a selected video from USB, press MENU to display the video menu in the browser mode, then select 3D Mode. For more detail information, refer to the above related descriptions.
Audio description
Audio description refers to an additional narration track for Blind and visually impaired viewers of visual media, including television programmes and movies. The description narrator talks through the presentation describing what is happening on the screen during the natural pauses in the audio (and during dialogue if deemed necessary). You can use this feature if the current broadcast contains audio description.
- Press MENU on the remote control and select Sound.
- Press OK to enter.
- Use / to select Type and / to set Visually impaired. The speakers, headphones and volume level can be adjusted by using the visually impaired menu.
PAP function
Use this function to display the pictures from different source inputs side by side. Note that one window is for both analogue and digital TV inputs, the other is for VGA, HDMI and YPbPr inputs. (Note: Not available for AV-Scart on both windows.)
- Press MENU to display the main menu.
- Select PAP and press OK to enter.
- Select the PAP option, and press to turn on/off PAP function.
- Select TV position, press to reposition the TV window.
- Press / to toggle the focus window.
- When the focus is on the TV window, the alphanumeric buttons and + / - work in TV. When the focus is on the other window, + / - switches available external sources.
Using subtitles
You can enable subtitles for each TV channel. Subtitles are broadcast via Teletext or DVB-T/DVB-C digital broadcasts. With digital broadcasts, you have the additional option of selecting a preferred subtitle language.
Turning on/off subtitles
- Press MENU on the remote control and select Options > Subtitle.
- Press OK/▶ to enter. (Refer to Figure 5.)
- Select the Subtitle option, and press to select On/Off to turn on/off subtitles.
Enabling subtitle languages on digital TV channels
- Press MENU on the remote control and select Options > Subtitle > Digital subtitle language.
- Press to select a subtitle language as your preferred language.
- Press / to select Digital subtitle language 2nd.
- Press to select a secondary subtitle language.
- Press EXIT to close the menu.
Shortcut operation: Press SUBTITLE on the remote control to directly select a subtitle language available for the selected digital TV programme.
Selecting a subtitle type on digital TV channels
- Press MENU on the remote control and select Options > Subtitle > Subtitle type.
- Press to select a subtitle type. You can select Hearing impaired to display the hearing-impaired subtitles with your selected language.
Selecting decoding page language in Teletext
Press MENU on the remote control and select Options
Teletext > Decoding page language. Select a proper type of language in which Teletext will display.
Digital Teletext language
For digital TV channels, your TV could change to a service with multiple initial Teletext pages in different languages. This function allows you to select an available language as primary language, which relates to different initial Teletext pages.
Press MENU on the remote control and select Options > Teletext > Digital teletext language.
Press to select.
SPDIF type
Connect to an audio device through the SPDIF output. Press MENU on the remote control and select Options > SPDIF type. Select a proper sound type from the list for digital programmes.
- If the current programme outputs sound in Dolby D format, then either PCM or Dolby D can be selected.
-
If the current programme does not output sound in Dolby D format, only PCM can be selected. Otherwise no sound will be output.
-
Select Off to turn off the audio output from the audio device connected to the SPDIF output.
Note: The options you may choose depend on the programme you are watching. If you select
PCM and the sound is ahead of the picture, you can select SPDIF delay from the Options menu and press to adjust the delay time to synchronize the sound with the picture.
T-Link
Use this function to search for CEC devices connected to the HDMI sockets in your TV and enable one-touch play and one-touch standby between CEC devices.
Enabling or disabling T-Link
- Press MENU on the remote control, then select Options > T-Link.
- Press / to select On or Off.
Using one-touch play
One-touch play enables you to press the play button on, for example, your DVD remote control. This starts playback on your DVD device and automatically switches your TV to the correct source, displaying DVD content.
Using system standby
System standby enables you to press the button on, for example, your TV remote control. This switches your TV and all connected HDMI devices to standby mode.
Network update
Press MENU on the remote control, then select Options > Network update. Select On/off to enable or disable the Network update function.
- When this function is on, the TV will automatically update channels if your DTV service provider updates his DTV network.
- When this function is off, you need to run the channel search again to get new channels or remove unavailable channels if your DTV service provider adds or removes channels from their DTV network.
Common interface
Encrypted digital TV channels can be decoded with a common interface module and a card provided by a digital TV service operator.
The common interface module may enable several digital services, depending on the operator and services you choose (for example, pay TV). Contact your digital TV service operator for more information about services and terms.

Using the common interface module
WARNING: Switch off your TV before inserting a common interface module. Be sure to follow the instruction described below. Wrong insertion of a common interface module may damage both the module and your TV.
- Following the directions printed on the common interface module, gently insert the module into the common interface slot on the TV.
- Push the module in as far as it will go.
- Turn on the TV and wait for the common interface function to be activated. This may take several minutes.
Note: Do not remove the common interface module from the slot. Removing the module will deactivate the digital services.
Accessing common interface services
After inserting and activating the common interface module, press MENU on the remote control and select Options > Common interface.
This menu option is only available if the common interface module is correctly inserted and activated. On-screen applications and content are provided by your digital TV service operator.
Software update
Note: Connect a USB device with free capacity above 250MB before you start software update. Do not switch off the TV, unplug, or remove the USB device until the upgrade is completed.
Press MENU on the remote control and select Options > Software update. Press OK/ to enter.
- Current version: Checks the current version of the software.
- Product name: Displays the product name of your set.
- Serial number(if available): Displays the serial number of your set.
- By network: Enables you to download and install the latest software version from the Internet. Make sure to set up a wired or wireless network connection first then select By network and press OK/▶ to enter. When new-version software is available, a progression bar appears. When the download finishes, the TV will go black and upgrade the software. Note: Keep successful network connection during upgrade.
- By channel: Enables you to install the latest version of the software if available. Select By channel and press OK/▶ to enter.
- Us/ to select Yes under Auto download to automatically download the latest software
if available. After the software has been downloaded successfully, you will be prompted to decide if you want to install it right now. If yes, follow the on-screen instructions to complete your installation. You can also select to ignore the installation here.
- Select No under Auto download to decline the automatic download.
- Select Manual download and press OK/to start manual scanning the latest software. Follow the on-screen instructions to complete. During the scan, press OK/EXIT to cancel or exit the process.
Changing to Shop or Home mode
- Press MENU on the remote control and select Options > Location.
- Press to select your location Shop or Home.
- Press EXIT to exit.
Note: According to the regulation of European Commission 2009/125/EC, in Home mode, TV will be put into standby mode automatically if there is no operation in 4 hours. This feature can be deactivated in Options menu.
MHEG function
Some digital TV broadcasters offer dedicated digital text or interactive services (for example, BBC1). These services work like normal Teletext with the addition of number, colour and navigation buttons.
- Press MENU on the remote control and select Options > Subtitle > Subtitle.
- Press to set Subtitle to Off. Note: MHEG and subtitles are mutually exclusive and cannot coexist on the same screen. If Subtitle is set to On, MHEG will not appear.
- Press the red button or TEXT on the remote control.
- Press / / to select or highlight items.
- Press OK to confirm or activate.
- Press one of the colour buttons to select an option.
- Press TEXT or EXIT to exit.
Viewing photos, playing music and watching videos from a USB storage device
Your TV is fitted with a USB connector that enables you to view photos, listen to music or watch videos stored on a USB storage device.
Supported file formats:
Photo JPEG
Music MP3
Video AVI, MPG, MPEG, TS, DIVX, MKV...
Notes: Some USB keys and USB products like digital cameras or mobile phones are not fully compatible with USB 2.0 standard so they may not work with the TV multimedia player. Not all USB keys or devices are compatible with the USB function. Not all above formats are recognised. The encoding formats of your files will determine whether or not they can be used.
When a USB device is detected, it enters the Media center menu directly. To enter the Media center manually, press MENU on the remote control and select Media.
Photo
Use this function to display photos, if available.
- Select Media center > Photo, then press OK to enter the main file content browser.
- In the main file content browser, use / / / to select a photo or an inner file folder.
- Select an inner file folder, press OK to enter a sub file content browser.
- Use / / to select a photo in either main or sub file content browser, press MENU to display the photo menu in folder mode.
- Sort: Sort folders and photos by modification Date or Name.
- Edit: Copy, paste or delete a selected photo.
- Parser: You can select Recursive to display photos from all sub file folders.
- Select a photo, press OK to watch, and a slide show begins from the selected photo. Press OK to pause the photo if you want to rotate the paused photo. Press MENU to display the photo menu in the browser mode. You can play, pause or rotate the photo, select different play modes and displaying effects, etc.
- Press the related buttons on the remote control to perform the available functions shown on the function bar at the bottom of the TV screen. Press the INFO button to show or remove the function bar.
Music
Use this function to playback music, if available.
- Select Media center > Music, then press OK to enter the main file content browser.
- Use / / to select a song in either main or sub file content browser in the same way as in photo display function, press MENU to display the music menu in folder mode.
- Sort: Sort folders and songs by Name, Genre, Artist or Album.
- Edit: Copy, paste or delete a selected song.
-
Parser: You can select Recursive to display songs from all sub file folders.
-
Select a song, press OK to play, and automatic playback begins from the selected song. Press MENU to display the music menu in the browser mode. You can play or pause the song, select different play modes, etc.
-
Show lyrics: This option is available for the songs with lyrics. Select it and use to turn on/off lyrics synchronized display.
-
Audio only: Select and press OK to listen to the music with the screen turned off. Any key press will turn the screen on.
-
Press the related buttons on the remote control to perform the available functions shown on the function bar at the bottom of the TV screen.
Video
Use this function to watch videos, if available.
- Select Media center > Video, then press OK to enter the main file content browser.
-
Use / / / to select a video in either main or sub file content browser in the same way as in photo display function, press MENU to display the video menu in folder mode.
-
Sort: Sort folders and videos by Type, modification Date or Name.
-
Edit: Copy, paste or delete a selected video.
-
Parser: You can select Recursive to display videos from all sub file folders.
-
Select a video, press OK to watch, and automatic playback begins from the selected video. Press MENU to display the video menu in the browser mode. You can play or pause the video, select different play modes, screen modes and preset picture settings, etc.
- Press the related buttons on the remote control to perform the available functions shown on the function bar at the bottom of the TV screen. Press the INFO button to show or remove the function bar.
DivX video (* not available for some models)
ABOUT DIVXVIDEO:DivX®is a digital video format created by DivX,LLC, a subsidiary of Rovi Corporation. This is an official Divx Certified device that plays DivX video. Visit divx.com for more information and software tools to convert your files into DivX videos.
ABOUT DIVX VIDEO-ON-DEMAND: This DivX Certified® device must be registered in order to play purchased DivX Video-on-Demand (VOD) movies.
Obtain your registration code:
- Press MENU on the remote control.
- Select Options > DivX(R) registration.
- Press OK and your registration code will be displayed.
Go to vod.divx.com for more information on how to complete your registration.

Deregister your TV:
If you wish to deregister your TV,
- Press MENU on the remote control.
- Select Options > DivX(R) deregistration.
Press OK and a message will guide you.
DivX®, DivX Certified®, DivX Plus® HD and associated logos are trademarks of Rovi Corporation or its subsidiaries and are used under license.
Time detection
You can detect the time from digital channels using the following operations.
- Press MENU on the remote control and select Options >Timer >Clock > Auto synchronization.
- Press to select On.
Assigning a channel decoder
Decoders that decode analogue channels can be connected to the AV connector. Assign the TV channel as a channel to be decoded. Then assign the connection where the decoder is connected.
- Press MENU on the remote control and select Setup > Decode.
- Press OK/▶ to enter the list.
- Press / to select the channel to decode.
- Press OK to select or unselect the channel.
- Press MENU to return to the previous menu.
Diagnostics on digital TV channels
- Press MENU on the remote control and select Setup > Diagnostics.
- Press OK/▶ to display some signal information on the current digital channel, such as signal strength, frequency, etc.
Time shift
Allows you to record the TV programme so that you will not miss the favourite part even if you go out. Before you use the function, connect a USB device to the TV first. For the first time, you should do the disk setup for the USB device.
Note: Feature is available only in selected products and, due to specific TV network limitations and country technical requirements, might not be available in product or place of installation. Feature might be also blocked by TV network due to copyright protection (HD content, recording protection). Please use OPTION on the remote control to check if feature is available in your product.
-
Press MENU on the remote control and select Setup > Time shift.
-
Press to select On to switch on the time shift function, then press EXIT to close the menu.
-
Press OPTION on the remote control and select Time shift, then press OK to confirm.
-
Follow the directions on the screen to do the setup.
-
After the disk setup is done, press OPTION and select Time shift.
-
Press OK to display the time shift menu. -Press the red button to pause the picture and begin the time shift.
-
Press the red button to play the recorded part.
- When the time shift menu disappears and only the timing of the time shift remains on the screen, you can press the red button or OK to access the time shift menu.
- Press the green button to fast backward or the yellow button to fast forward.
- Press the blue button to quit the time shift function.
Notes:
Before you connect the USB device to the TV, make sure you have backed up the data in the device to avoid the loss of your important data due to unforeseen malfunction.
We recommend you use a USB device with free capacity above 1GB and disk speed faster than 5.0MB/sec.
- The bigger the file size for time shift, the longer the recording time.
- If you change the channel in time shift mode, a message prompts you to select Yes or No. You can select Yes to exit the time shift function and execute the channel change.
Reset shop
Allows you to reset the TV to factory default settings.
- Press MENU on the remote control and select Setup, then press OK to confirm.
- Select Reset shop and press OK/ to enter.
- Use the alphanumeric buttons to enter the password.
- Press to select OK and press OK to confirm.
- The Initial setup menu appears. Follow the related instructions.
You can configure your TV according to the equipment you connect to it.
- Press MENU on the remote control and select Setup > Input settings.
- Press OK/▶ to enter Input settings.
- Press / to select a connector your equipment is connected to.
-
Press to select the type of apparatus attached to this connector.
-
Press MENU to return to the Setup menu.
After configuring, the selected source label will be displayed after the name of the related connector in the source list when pressing SOURCE on the remote control or OK on the TV set.
Note: Not all models have OK button on the set.
Using Electronic programme guide
EPG is an on-screen guide that displays scheduled TV programmes. You can navigate, select, view and record programmes.
- Press GUIDE on the remote control, the Now and Next EPG menu will appear, which allows you to get information about the current or next programme playing on each channel. Navigate through the different programmes using the navigation buttons on the remote control.
- Use the colour buttons to view the 8 Days EPG.
- Prev day (Red): List the previous day's EPG.
- Next day (Green): List the next day's EPG.
View detail (Yellow): Display the description of this programme if available.
- Type filter (Blue): Programme guide filter for digital TV programmes.
- Press the blue button to display the programmes' type and subtype lists.
- Navigate through the different types and subtypes using the navigation buttons on the remote control.
- Select one or more types, which you want to highlight from the Type list, press OK to select (or deselect). A checkmark will appear to the left of the type when selected. When you select a type, all its subtypes will be selected accordingly.
- Also, you can select some desired subtypes without selecting any type first.
- Press the blue button to exit the type and subtype list.
After filtering, all your desired digital TV programmes will be highlighted.
- Add schedule (Option): Press OPTION on the remote control to bring up the Schedule list menu. For details on scheduled recording, refer to the Schedule list section.
- Press GUIDE/EXIT to exit the EPG and switch to the selected channel.
PVR (Personal Video Recorder)
Allows you to record your favourite TV programme. Before you use the function, connect a USB memory device to the set first.
Note: Feature is available only in selected products and due to specific TV network limitations and country technical requirements might not be available in product or place of installation.
Feature might be also blocked by TV network due to copyright protection (HD content, recording protection). Please use OPTION on the remote control to check if feature is available in your product.
- Press OPTION on the remote control and select Quick access > PVR.
-
Press OK/▶ to enter.
-
Press:
-
the red button to start recording, the record file is put into a folder named after the channel number under the PVR folder in Media center > Video;
-
the green button to stop recording manually; if the recording duration finishes, the recording will stop automatically.
-
▲/▼/▲/▶ to adjust the recording duration.
-
In recording, PVR mini pane will also show on the screen to indicate the recording progress.
- To watch the recorded programme, exit PVR mode first and go to Media center > Video. Select the folder PVR, then select the related record file. Press OK to play. (It is the same if you record a digital radio programme).
Notes:
- Feature available only for digital non encrypted channels. Even when CICAM (CI or CI+) is inserted, feature is not available on encrypted channels.
- Only supports USB memory device of FAT32 format.
Before you connect the USB device to the set, make sure you have backed up the data in the device to avoid the loss of your important data due to unforeseen malfunction.
- The bigger the USB device memory size for the PVR function, the longer the recording time.
-
If you want to change channel or signal source during recording, store the recording data before changing the channel or source.
-
The set cannot play files normally if the parameters of the file exceed the limitations of the system, the file format is not supported, the file is damaged, or the file cannot be decoded.
- Do not disconnect the USB memory device when the system is reading a file or transmitting data, otherwise the system or the device may be damaged.
Schedule list
This function is used to perform scheduled recording.
- Press OPTION on the remote control and select Quick access > Schedule list.
- Press OK to display the schedule list.
- To add a schedule into your schedule list, press the red button first to display Schedule list. Then,

- Channel number to select the channel number.
- Start date: use the alphanumeric buttons to set the recording date.
- Start time: set the starting time of the recording.
-
Stop time: set the stopping time of the recording.
Schedule type:
-
Set Reminder to be reminded that you can switch to the scheduled programme when the time you have set comes. When time is out and you do not execute any operation, the dialog box will disappear and no further operation will be executed.
-
Set Record to check if you really want to start your scheduled recording when the time you have set comes. When time is out and you do not execute any operation, scheduled recording will start automatically.
-
Repeat type: set different repeat mddese recording.
-
Press / / to select Add, then press OK to add the schedule you set into your schedule list.
- Press the red button to repeat above procedures to add another schedule.
-
If you wish to edit or delete a schedule, select it and press OK to enter.
-
Press EXIT to close the menu.
Network connection
You can set up your TV so that it can access the Internet through your local area network (LAN) using a wired or wireless connection.
Connecting to a wired network
You can attach your TV to your LAN using cable in three ways:
- You can attach your TV to your LAN by connecting the LAN port on your TV to an external modem using a Cat 5 cable.
- You can attach your TV to your LAN by connecting the LAN port on your TV to an IP Sharer, which is connected to an external modem. Use Cat 5 cable for the connection.
- Depending on how your network is configured, you may be able to attach your TV to your LAN by connecting the LAN port on your TV directly to a network wall outlet using a Cat 5 cable. Note that the wall outlet is attached to a modem or router elsewhere in your house.
Select Setup > Network > Settings > Interface, then select Ethernet to connect to a wired network.
Connecting to a wireless network
To connect your TV to your network wirelessly, you need a wireless router or modem and a Wireless LAN Adapter. Connect your Wireless High-Gain USB
Adapter (USB dongle) delivered with your TV to your TV's USB 1 port.
- Select Setup > Network > Settings > Interface, then select Wireless to connect to a wireless network.
- Select Wireless setting and press OK/▶ to enter.
-
Connection Methods: You can setup the wireless network connection three ways.
-
Scan
-
Select Wireless setting > Scan, then press OK/▶, the TV will scan all access points within range. The access points found by the TV will be displayed.
-
Select an available access point, then press OK/▶ to connect the TV. Notes:
-
If you select a protected access point, you will have to enter the corresponding password. Press OK on the remote control to display the virtual keyboard to enable you to enter the password.
-
This set has a memory function of available access point, which enables your set to be connected to the network even if you switch on the TV after power off.
-
Manual
Select Wireless setting > Manual, then press OK/▶, you will be prompted to enter the correct SSID of an available wireless router to set up the connection.
-
Auto
If your AP supports WPS (Wi-Fi Protected Setup), you can connect to the network via PIN (Personal Identification Number) or PBC (Push Button Configuration). WPS will automatically configure the SSID and WPA key in either mode. Select Wireless setting > Auto, then press OK/▶ to enter.
PIN: Select PIN and press OK to enter. Generate a random PIN code. Make sure this code is installed on the AP. (For the procedures, refer to your router manual.) Press OK again to set up the connection.
- PBC: If your router has a PBC push button, select PBC, then press OK/▶ to enter. Press the PBC push button on your router within 2 minutes after you press OK/▶ again. Your TV will automatically acquire all the network setting values it needs and connect to your network.
Network setup
- Press MENU on the remote control and select Setup > Network > Settings > Internet
connection. Press to select On. Wait until the connection is automatically established.
- Select Setup > Network > Settings > Connection test, then press OK▶ to check the Internet connectivity. If it does not work, follow below steps to make sure of the connectivity.
- Select Setup > Network > Settings > IP setting, then press OK to enter the IP setting menu. - Set Address type to Auto, it will acquire and enter the needed IP address automatically.
- You can follow below steps to enter your IP address manually.
- Set Address type to Manual, then press to go to the first entry field.
- Enter the IP address, Subnet mask, Default gateway, Primary DNS and Secondary DNS values. Use the alphanumeric buttons to enter numbers and the arrow buttons to move from one entry field to another.
- After setting, select Setup > Network > Settings > Connection test to check the Internet connectivity again.
- Select Setup > Network > Settings > Information, then press OK/▶ to display the information on current connection, such as Interface, Address type, IP address, etc.
Share & See
Note: This manual covers products with Share & See function. Share & See is DLNA-compatible.
Connecting to your PC
Make sure to set up a wired or wireless connection from your TV to a router first. Then connect your PC to your router either through a network cable or wirelessly. Also make sure Setup > Network > Settings > Internet Connection is On and your computer firmware won't block the connection.
Enabling Share & See function
Select Setup > Network > Applications > Share & See and set it to On.
Follow the steps in turn specified hereafter, then you can enjoy recorded video, image and music saved on your PC.
Install a Share & See media server on your PC. The simple and familiar server you may install is Microsoft Windows Media Player 11. Allow your TV to share the designated files on your PC.
-
Open the Microsoft Windows Media Player 11.
-
Select Library > Media sharing.
- Check the checkbox Share my media to.
- Select the icon of the TV set connected to your PC.
- Select Allow to allow the TV set to access your PC, and select OK to enable your allowing.
Note: Use the Settings button to customize your desired settings.
-
- Select Library > Add to Library.
- Select your personal folders or folders of other users that you can access for sharing.
- Select Add and press OK to enable your adding
Share & See application
Select Media in the main menu and press OK to enter media center. Then you can view photos, listen to music or watch videos, which are stored on your PC.
Note: If Share & See is switched on, the TV will Display the list of available Share & See servers which are available in local network.
Smart TV
Allows you to enjoy Internet Applications (Apps), specially adapted internet websites for your TV. You can control the Apps with the TV remote control.
WARNING:
- Configure the network settings before using Smart TV.
Slow responses and/or interruptions may occur, depending on your network conditions.
If you experience a problem using an application, please contact the content provider.
According to circumstances of the contents provider, an application's updates or the application itself may be discontinued. Depending on your country's regulations, some applications may have limited service or not be supported.
Access Smart TV Applications (Apps)
Select 1. Smart TV in the main menu and press OK to display the smart TV home page. The App services depend on the country. You can do the country setting as below: Press the red button to display all the available country options and use / / to scroll through the options and press OK to confirm. Then select the "Home" button and press OK to go back to the smart TV homepage.
Shortcut operation: Press Smart TV on the remote control to display the smart TV home page directly.
- Use / / to select an App and press OK to enter.
Internet browsing is available with SmartTV portal 3. application. It can be accessed via the icon in the portal or via the green button when TV portal page is displayed.
Note: Since the connection with internet takes time, it's recommended that you wait a few minutes to use the smart TV feature after activation of TV from standby.

HbbTV
Some broadcasters of digital channels (only DVB-T/ C/S/S2 broadcasting) offer interactive HbbTV (Hybrid Broadcast Broadband TV).
With HbbTV, broadcasters combine their normal TV programme with all kinds of information or entertainment. You can browse this information interactively.
To fully enjoy HbbTV, you need to connect your TV to the Internet.
Note: You cannot download files to our TV with this feature.
Access HbbTV
When you tune to a TV channel that offers HbbTV, press the red button to open the interactive pages.
Then use / / / to navigate the HbbTV pages and OK to confirm.
Activation/deactivation of HbbTV
Since HbbTV broadcasting tests performed by some broadcasters' test applications might be annoying due to popping up menus, you can use the HbbTV on/off option in Options menu for better watching TV.
Password in Parental Control
- The default password is 1234. You can change it to a new one.
- The super password is 0423. If you forget your code, enter the super password to override any existing codes.
Troubleshooting
Please check the following list before requesting service.
There is no picture or sound.
Make sure the power cord is properly inserted in the power outlet.
- Make sure the source type is set correctly.
Make sure the antenna is properly connected.
Make sure the volume is not set to minimum or the sound is not set to mute.
Make sure the headphones are not connected.
- Reception other than those of broadcasting stations can be considered.
Picture is not clear.
- Make sure the antenna cable is properly connected.
- Consider whether your TV signal is being properly received.
-
Poor picture quality can occur due to a VHS camera, camcorder, or other peripheral being connected at the same time. Switch off one of the other peripherals.
-
The 'ghost' or double image may be caused by obstruction to the antenna due to high-rise buildings or hills. Using a highly directional antenna may improve the picture quality.
- The horizontal dotted lines shown on the pictures may be caused by electrical interference, e.g., hair dryer, nearby neon lights, etc. Turn off or remove these.
Picture is too dark, too light or tinted.
- Check the colour adjustment.
- Check the brightness setting.
- Check the sharpness function.
- The fluorescent lamp may have reached the end of its service life.
Remote control does not work.
- Check the batteries of the remote control.
Make sure the remote sensor window is not under strong fluorescent lighting.
- Try to clean the remote control sensor lens on the TV with a soft cloth.
If the above suggestions do not solve your technical issue, please refer to the warranty card for service information.
Television specifications
TV Broadcasting PAL/SECAM BG/DK/1/LL
Receiving channels VHF/UHF/Cable
Tuner type Frequency synthesized
OSS Notice
This product uses some software programs which are distributed under the Independent JPEG Group. This product uses some software programs which are distributed under the Freetype Project.
This product uses some software programs which are distributed under the OpenSSL Project.
This product uses some software programs which are distributed under the zlib license.
This product uses UNICODE software programs which are distributed under IBM Open source license.
This product uses libpng software programs which are distributed under OSI Certified Open source license.
This product uses Expat, Libcurl, c-ares software programs which are distributed under MIT license. This product uses some software programs which are distributed under the GPL/LGPL.
GPL software: Linux Kernel, Busybox, SquashFS, mtdutils, e2fsprogs, BlueZ, Dbus, Glib, NTFS-3G Read/Write Driver, samba, iconv, Linux File System FTA.
LGPL software: DFB, SAWMAN, ALSA.
Chapter 9
Due to the various capabilities of products featuring the SmartTV - Services, as well as limitations in the available content, certain features, applications, and services may not be available on all devices or in all territories. Some features on SmartTV may also require additional peripheral devices or membership fees that are sold separately. Please visit our website for more information on specific device information and content availability. The services and availability of content through SmartTV are subject to change from time to time without prior notice.
All content and services accessible through this device belong to third parties and are protected by copyright, patent, trademark and/or other intellectual property laws. Such content and services are provided solely for your personal noncommercial use. You may not use any content or services in a manner that has not been authorized by the content owner or service provider. Without limiting the foregoing, unless expressly authorized by the applicable content owner or service provider, you may not modify, copy, republish, upload, post, transmit, translate, sell, create derivative works, exploit, or distribute in any manner or medium any content or services displayed through this device.
Design and specifications are subject to change without notice.

PVR (Personal Video Recorder)
Activer/désactiver T-Link 11
PVR (Personal Video Recorder)
Acces aux applications (Apps) Smart TV 17
HbbTV 17
Activer/désactiver T-Link
Activering/deactivering van HbbTV 18
- Selecteer "Satellite" (Satelliet).
Activering/deactivering van HbbTV
LGPL-software: DFB, SAWMAN, ALSA.
Habilitar o inhabilitar T-Link
PVR (Personal Video Recorder)
2D-to-3D (2D-para-3D), Line interleave (Intercalar linha), Frame sequential (Imagem sequential)
T-Link 11 EvpepyoioiOn kai antepepyoioiOn T-Link 11
Xpno avanapaywnc e eva anyyua 11
Xprion avapovic ouotrijuaToc 11
EvnpwAn AiaikTuou 11
Kovn Diaovbcean 11
Xprn nnc movadac kownic diaovbceanc 11
PpOaBaan e urnpaeic kownic diaovbceanc 12
Evnpwn Aoyuikou 12
Evaayn eAeitoupyia Shop (Kaataonma) n Home (Znti) 12
Aerouyia MHEG 12
PpOBoInФwToypaWvKai avaTapaywnouaKnC Kai bivTeo anEva neo aonBKeuaNC USB 12
Φwtoypapia 13
Mouakni 13
BivTeo 13
BivTeo DivX 13
Evtoniooc Opac 14
Opiouoc aTOKwdiKoiToiNtBivTeo 14
AiaaywotikaTowipikawkavaiw 14
Alambdaipac 14
Kataotma eravapopac 14
AiaipoppwonTwpuuioewv Eioosou 14
Xprn HAnKpovikou o8nyou npoyapmuToc 15 PVR (Personal Video Recorder)
(1pocawntko BivTeo Eyypafo) 15
Aota npoypaatoc 15
Aipoppwn TwpuBmuwv Edoou
Mniopetee va puieoeiTreTnEpaon oocoupuvaue tic ouuuee cti oniec ouuendai.
- ΠείδE MENU ΟΟ το Μλαχεραιθηκ και εἰσιαδέτe Setup > Input settings (Pθμηιπ = Pθμιαίεις Ειδεύου)
- Nioote OK?ya va pmtte otn Aetoupyia Input settings (Poukicic Etodou).
- Niéde A√Y qya va etiAEEETe T ovUSeONOTV oToia UovEeTAn I OOUKEI OAC;
- Pioote via va etuueeTe TOV TUTO TNC OOUKUNTO EAVU OauEduy
- NIEOTE MENU via va enioptpeesTe oTo pEvou Setup (PbBmu).
Meto Tn diacopco, Ba eupatot n enaueyneneteta ninye.
muTo oovauTou oxetikou anoeuou ou n Aioia nuyuovot
natate SOURCE OTO TnAekipriopnIO NK OK OTN TnEepaoi.
Enyixion: Dev bioeouv ola ra povnla to koumOK om ouokoei.
XpHn HLeKtpovikou odnyou npoypaMAtoc
To EPG eivai evac, obnic, en tnc, obdynn nnu npbaen ta npoypaqniqaevia neioknna npoypaqata. Mntopeit va aonnyBete, va cteEeTe kai va epaovcete npoypaqita.
-
NIDEGUIDE an to mekovtpa. Taepowote to meuov Now and Next EPG (Hc Ony npoy TpaMeT), and oiou mtopoe va evnpeweite ra ta pexovta kai ta enoeva npoypapata taw kauwivn Panyneite oia daipopa npoypapata uow Tw aiktpwn Panymnc oto nKovtpa
-
Xpnouonoiote Ta Epypuia nKtpa va eepavote to 8 Days EPG (npoypua 8 npuiv).
-Prev day (npoyoucvnepea) (Kokko):EpaivcTov nAektpoikoo oyno tnc npoyoucvne npocac
Next day (eneyevn ynepa) (Pnpovc):Eepovceia tov nasketpovik oobny Tnc etouevn ynepa
View detail (Euipdwn) npanopopwiv (Ktpwo): EepcwCte Tn panopopoe, Tou npovpuocet oev evai biieaepe.
- Type filter (tturc, φιλτρυ) (Mιας); - Πβος Μεύσους
- Προνομίαις γοῦ τα Σηνείας Πτησετικα Προνομίαις.
PiEeTe To mae MarKToYoVa EaPovOeTe Tov Tuno ToTpooyoqupoc KAI Tn AiaT TwuTOnTuW.
Mntopoei va tynnyebe avqueo otouc diapocouc turoc kai uttouk; xynpiaotuivac, ta vniitoxa naiktpa tnaoynco oto naxepiottipio.
EnAeE Evnepooc Tnouc nou BeEe va onuoeae eon t loa Type (Tunv), kai meote OK yia va enAeE (1) anoeiEe). Ea onpdi Exyou Ba epovotel oia apopetro Tou Tnou otav enyec. Otav enAeEte turo, oai ci unotnoi enayovtai autouma.
EtniOeBota, o xipnTcnpnep va tuaiegeuutotoux, xcupic va tuaiegeuKupu TTO.
PTEOToTnAeYVaByEaTeAToNAtOAtoTnTOnTuK
OCTAVOAONAPAEOTaPAPQIA,DAaTynipkA npoyapaiia nou emuiee anueuvovta.
Add schedule (Pp. npoy.) (Option): Pnnyote OPTION 0to TExeiioTioia va Eaepownto tepeov Schedule list (Aota npoypaatoc). Ta aennpoeae, oeyika pa Tnpoypaataneewyopa, ovpatette otny evottna Aota npoypaatoc.
- NIEGE GUIDE/EXIT wia wai pyeite aio to EPG KAI wai nepaote OTTO EIAEVAKO KAVAI
Dostep do Smart TV Applications (Apps) 18
HbbTV 18
Dostep do Smart TV Applications (Apps)
BakhaHnboPmaH:IpyMaHHHeBH CmHbHX MOUJX DPJIHTH, COeOpKaAaCnPT, AabpaYNHIL BOCCT3M KIOCTN PIMBOCTM K NOBEPKJEHO XAPAH.
PeybHNDyDyBnTHe BcEBHnHnHxhCtBpOCTC TbnBnON CTOPOHNO BOKKNEAeNHO NBOEHNHO EINNHO HNNHO HNNHO HNNHO HNNHO HNNHO HNNHO HNNHO HNNHO HNNHO HNNHO HNNHO HNNHO HNNHO HNNHO HNNHO HNNHO HNNHO HNNHO HNNHO HNNHO HNNHO HNNHO HNNHO HNNHO HNNHO HNNHO HNNHO HNNHO HNNHO HNNHO HNNHO HNNHO HNNHO HNNNO HNNNO HNNNO HNNNO HNNNO HNNNO HNNNO HNNNO HNNNO HNNNO HNNNO HNNNO HNNNO HNNNO HNNNO HNNNO HNNNO HNNNO HNNNO HNNNO HNNNO HNNNO HNNNO HNNNO HNNNO HNNNO HNNNO HNNNO HNNNO HNNNO HNNNO HNNNO HNNNO HNNNOH NOH NOH NOH NOH NOH NOH NOH NOH NOH NOH NOH NOH NOH NOH NOH NOH NOH NOH NOH NOH NOH NOH NOH NOH NOH NOH NOH NOH NOH NOH NOH NOH NOH NOH NOH NOH NOH NOH NOH NOH NOH NOH NOH NOH NOH NOH NOH NOH NOH NOH NoOH NoOH NoOH NoOH NoOH NoOH NoOH NoOH NoOH NoOH NoOH NoOH NoOH NoOH NoOH NoOH NoOH NoOH NoOH NoOH NoOH NoOH NoOH NoOH NoOH NoOH NoOH NoOH NoOH NoOH NoOH NoOH NoOH NoOH NoOH NoOH NoOH NoOH NoOH NoOH NoOH NoOH NoOH NoOH NoOH NoOH NoOH NoOH NoOH NoOH NoAH NoAH NoAH NoAH NoAH NoAH NoAH NoAH NoAH NoAH NoAH NoAH NoAH NoAH NoAH NoAH NoAH NoAH NoAH NoAH NoAH NoAH NoAH NoAH NoAH NoAH NoAH NoAH NoAH NoAH NoAH NoAH NoAH NoAH NoAH NoAH NoAH NoAH NoAH NoAH NoAH NoAH NoAH NoAH NoAH NoAH NoAH NoAH NoAH NoAH NoANoANoANoANoANoANoANoANoANoANoANoANoANoANoANoANoANoANoANoANoANoANoANoANoANoANoANoANoANoANoANoANoANoANoANoANoANoANoANoANoANoANoANoANoANoANoANoANoANoANoA NoAH Nnnoa noa noa noa noa noa noa noa noa noa noa noa noa noa noa noa noa noa noa noa noa noa noa noa noa noa noa noa noa noa noa noa noa noa noa noa noa noa noa noa noa noa noa noa noa noa noa noa noa noa noa nno a noa noa noa noa noa noa noa noa noa noa noa noa noa noa noa noa noa noa noa noa noa noa noa noa noa noa noa noa noa noa noa noa noa noa noa noa noa noa noa noa noa noa noa noa noa noa noa noa noa noaa nno a nno a nno a nno a nno a nno a nno a nno a nno a nno a nno a nno a nno a nno a nno a nno a nno a nno a nno a nno a nno a nno a nno a nno a nno a nno a nno a nno a nno a nno a nno a nno a nno a nno a
KpenneHnTeNeBn3OpaHaCTeHy
BHHMaHHe: DnBbInoJIeHHMe 3ToI onepaun Tpe6yOITcBa
Yenobeka.
DIO CcCnHOHn HcCtachOH yCTaHOBK cJcEyT HmHT B HmTy
CcCOnOuHcZ aMocHAI:
YEGHNTTCHYCTBMAKXBTBAPXATBRETOBBN3OPAHEBOHHORKPOENH
CnHHTNHOHCTBHOYOTANBOE.1PepMCHAKOM HcTbHJHEKTOBMOENEOYCDTOBEPBTEBCBIOPOCTHXPENTHHBAHNTHEKTOBHOBBNTBVEVESA2D068A(BVHTs)BRAKCHIHO MOHTEXCAADIOHNAHNAIUECYPTOCTA
TeneBn30p CnedyT yCTaHbNtBaTaHaBaPnKaHoh CTHe.
ChoyetCNOB308bTolkoMOHTAKHHBVEHJI,COCTOBCTDYCLHE MATOOYNTCHI.
TeBbH3KHOHKBaJIeCBIyBdP3AeBHTIbTAKMnOBpKaOM,HTOChOH HNIIEPTCTBOUBIN DAEIKHNIOJIOJIO
MOKHO ANOHNODATN HOPOMPOHNO NO 0630ACHOTN HA 1060X HIOCTOYKMB, BYIYCKAMEB NDR HAIWU XTEBE30PBC
YctahOBKaTeJIeBn3OpaHaCToneIpyrnx NOBepxHOctTJX
PepoeyctahnoKoTepehnoa 56eDtttec.10noeepHoCTb.Ha KOTOPOy OH CYTAAHARBAETC,MOKOT BAYEPAPTHBEOEAC.
He cneyet yaeamau Tbeooepo HAp Heeyocm OCHOBAHn (HANpVME,Ha NEpejboxHbX NOKAX HA CAMOM KOe Cekm) TaKHe HeoBCXJIMo CNEHTB,TOOe PpejhoHbCTeNtBcNsOpAHO HbCytynana 3a npdeBnNoopxHOCTM,HA KOTOPOH OH YCTAHOBHN.
TcBtoe bnoepoHge yean, npkpenenr erc Ho CTRe hnpnONuou HEOBcIXMxUpyoob (EKPENKOBIOBTBcOeBnBCTBe No CTnNDaPTy Vasa), AAKOMN KpOeONN, KOTOPBO MNOHO PPQoOeON OTPAHIO.
TcBo TeNoopAoHge yean Haad,ycTAHONBtE rro ANTOHNOK CTCh.
FyKun,OnncaHHBbB a DaaHOM pyKOeOCTBE,ABIOKOTb OBHMII IOBbHMIOCTBaMDoan, HokToPOpE dyHUM MOY CtBu He DOCTYBI H BA BAtum TaeNoOOO, Vnni Bua TOnnoAOo MOKOT COpDKATu.
FyHKun, He OnncaHHBb B DAHNOM pyKOeOCTBE NOIbCSBeMT.
VInOeTOPOU B a ToM pKOeOCTBE MTOT ONITMOTOT OT Faktnieckcoo npOcydA. OpatInpctk K faktniockmoW npOdykTu.

PpOdyKzH

Pb Battapper
PIMPOSHSHB:
SHK F B NAOO
CMNOMA
MIA CHETEPN
CHINEMST
HCT CHENX
ODAPAMT
CBHIIL
HΦopMaJnI JnI noJIb3ObaTeNe I NO yTINImaunI cIapOro oBOpDyBaHnI 6BaTapeI [EbpoeKcIK CokO]
OTN CINMBQIbO 0603HAAOT, YTO 3NEKTPN1BCKOe
N3EIKPONIO BOPYOBAHnBnB AATapeo C
DANBHIMCINBMONOM HeNBaYTNHIMPOsBaTbBMECTe
C 06bHHHM 6bTOBbIM MycOpom NO CKOHNAHm
cpoKx IIXKNYATALIN. 3Nt NpOyTkbl CnpeyET
CATA B NYKTHbCOPa Dn COOTBCTBYKUJIe
NepcPABOTKH 3NtKPNCHCKORIO N3NKTPHOHOR
OBpyOBAHnA, a TAKKe BAtapeR, noJIEKAuXh
BOCCTAHOENHIO N INePABOTKBE, COOTBETCTBN
C HSAHNOHALbHM 33KHOHOATBoLTbCTBMn
DInPEKIVAMn 2002/96/EC n 2006/66/EC.
IpaBnBnaYyN3AaDAnbXpOyDyKTOB
NOMOKET COxPANHT NpOPOHbpeCypcb
INpOEDTpAPNTB G03MOXHOHErATNHHOE
BO3eKnTBe HApOpyKaHouUcpeDy IN
3dOpOBc6VNCoBA, KOTOPOcMOKET B03HNKHyTB
BCJeCTBeHX HePpABuHOB YTNHBAuM.
3aOnoJIHHeHIOH XNHpOPMuaHcO pTyHkTx
C6opApNopOpBaBOTKe DaHbNbIpoDyKTOB
06pAtInTeCB B MeCTHOe MyHmIaHbHOe
ynpaBnHHe, CzyKbOy No BvBuOy H yTNMaazm
OTdoBnIM B MaarAH, B KOTopoCM BpnoOpBn
DAHHIO npdyKT.
3a He npabnhyo yTnna3AIO OTOxOBO MORY
PmHaeBcBcU TpAcbb B COOTBETBNC
HALMOHbHBMM 3AKoNohOATEBOM.
[Kopnpatnbohbo]
Ecm Bby 3axOHTte ytnnncpoBb TaHHb
Pnpdyk, obpatntecb K CBOemy NocTabuNKy uYTOHNTB CPOKNI YCNOBnI DOROBOPa KynPiNpOpaKn.
[CTpaHbI,HeBxOJaMBeEbponeckn Coo3] 3Tn CmBOnBbl DeTeyTObKOHa TeprVtropn Ebponeckoro Coo3a. Ecnn Bbl Saxotnte ytniMaPBOAHTBaHHbInepejMeBTb,JeNJIte3TO CCOTBETCTEMC CyUeCTByOuIM HAIOHAbHBM 3AKoIOdTeBCTOBIM NpDyMMN pRABINAMn nepebaKTH CTaporo 3JNEKTPMueCKORO 06OpbyoBBHm BaTapei, DeIcTByOuMMB Bauon ctpaHc.
Copepkanne
BaxknaHOpMaun 1
Tnaba1-PoKnIOueHn
IoiKIOUeHHe 3NEKTPoNTaHnHa aHTeHHbI 4
DVD-pekopdep, npneMHNK Ka6eIbHoro TB 4
DVD-npOurpbIbateJIb,domaHmKINHOHeTaTp,IK...5
Hrpobar KOHCOB,Blu-rayDisc nneep
HayuHnK, HD irpoBa KcHcB n HD KaMkOpep ... 5
Tnaba2-Haayano pa60tb
FyHKnIyNbTaDnCTaHNOHOrO ynpabHeHnI 6
BkIOHHTb/BbIKIOHTb TB 7
TJaba 3 - Hactpoika KaHaoB
PepBHHa yCTaHObKa 8
ABTOMaTHueckn NOcK KaHaoB 8
Tnaba4-NCnoNb3ObaHneBaWero TeJeBn3opa
Docyn K KaHana 9
O6HapyKeHnnoCoeHNHeHHbIXycTPOIcTB
POMKOCTb 3ByKa 9
VcnoB30BaHMe MeHO TeneBu3Opa 9
Bb6op Raika MeHIO 9
Tnaba5-IOONHHTeJbHbIe BO3MOXHOCTN BaWeroTeJEu3Opa
HacpoKa IIO6MbIX KaHaIOB 9
HnHaMnuecka noDCBETKa 3KO 10
CMOTpeTB TB c cyHKnei 3D 10
TnphnonepeBd 10
ΦyHKpPAP 10
IcnoB3cbHne cybTnTpoB 10
BkIOueHNE/BbIKIOueHne cy6TnTpOB 11
Bb6op 3bika cy6TnTpoB Ha qnpoBbix
TeneKaHaIax 11
Bb6op Tnna cy6TnTpOB Ha qNpO8bIX
Tenekahanax 11
Bb6op 3bka CtpaHnUeIeKoOpOBaHm
B TENEKCTE 11
R3bIK UdppoBoro TeneTeKCTa 11
Tun SPDIF 11
T-MLHK. 11
PoiKIOeHne N BbIKIOeHHe pHyKmT-Link 11
Bocnpoun3BeHHe OHNH HAnKaTneM KHONK
Pekm OxuaHn CnCTembl 11
06HOBnHeHne cetn 11
CTaHdapTHbI INHTeppeic 11
IcnoJIb3OBAHnme Moyna o6uero nHTeppeca .... 12
DocTyN K cnYk6am o6uero nHTeppeca 12
06HOBJIeHnE P0 12
PepexoB D DEMOHCTpaHONHHI INN
domaHn peKIM 12
ФVHKUIMHEG 12
PPOCMOTpΦOTOrpaM,BOCPnO3BedeHne
M3bIKI IN POCMOTP BIDeo I3 3aONIMHaIOUeTo
yctpoIcTbA USB 12
ΦOTO 13
My3bika 13
Bvdeo 13
DivX video 13
OnpepeHne Bpemn 14
CTaHOBka KaHaJIbHOro DeKOepepa 14
HnOCTNka LppoBbIX TeneKaHaNoB 14
CDBINBpeMeH 14
lepe3ancaTb yactok 15
Imehenne npametpoB BbOa 15
IcnoJb3OBaHne 3NeKtpoHHo nporpaMMbl
eelenepeda 15
VR (Personal Video Recorder)
TepcoHaBbBn BnDeoMaHHToΦoH) 15
CnKOBbInonHeHn3anCeNo paCncaHIO 16
JaBa 6-CeTeBoe NOKJIIOUeHne
IokKIOHHeMe K npoBOHOcTn 16
IokKIOHHeHKe6ecnpoBHOcTn 16
CetebaryctaHOBka 17
Ja7 - Ioka3aTb n CMOTpeTb
IokKIOHHeNKe KBaUeMyIK 17
obablenne meena n3 bawero PKn
OBMECTHOIOHCNOB3OBAHNA 17
IpnnoxHne Ioka3aTb n CMOTpeTb" 17
Jnaba 8 - Smart TV n HbbTV
dctynK npnoxeknSmart TV 17
IbbTV. 18
Docyn K HbbTV 18
AKTBAaJy/deakTBAaJy FyHKuHbTV 18
JaBa 9- npOyA INHOpMaun
BbIeHneN uCtpaHHeHnpo6nem 18
EXHnueckne xapaKTePmCTMk TeBnDHeH 18
DSS yka3aHn 18
PoiKIOUeHne 3JIeKtpoNTaHHn aHTHeHbI
Dna poctyna K poxmy TB.
ByKBBeHHo-LmΦpoBbIe KHOKN
Bocchio Homopca KaIanoo; Bacchio Sykby. Lyckpybny GIMMEN BHKOTOPX#yHukhyn.
SOURCE
BbipatnoeHbteyctpoCTBa.
#
BnBuKIOCHIMNkIOCHIM3bkya.
P+/-
INNEPEKIOOENHKAHNIOE.
GUIDE
nepckoeHHnpoppMMEPG
(Nextpohthe nporpaMthnepenah).
#
DIN NPOVCEKIO NO TAPLOVI KMO, INR YCSTI OIKON KF KUKIN I NMOHOKI B3NIAKOV
#
DnTnK3aCnHcKa KaHaOB.
FAV
Дулбогониコн channel list selection (BbBbBc ncka KsbsbHnO)
TEXT
ДИРОПЕСТОМВЕСКIM B OCHIM TENGKCTA WIM BIXPOUS 3H HERO.
SUBTITLE
Dana boccaa cya cytmonc, dcymtono a batpaes hnuippono TB nporpamac.
#
Dnnaubopa cnoyioero photo. Myaikin hoo
#
HAAHAAOACGPOHepmKHepey
H
DnCnTnAaNnay3bBocnpnAeBdEHH.
Kur
- 2017年1月1日
BaxknaHnHcOpMaIaIaI:
He npckykaTe nepepeba 3nemHtna Hapnpmep, nD deKCTBnEM COHHehBx JyHb E KApKn DeHb N. ECnn PyIb IcTahUHOHO rOy npabEHHa He bdyet nCob3oBaTBC B TeHHe DOrFO BpEmHb, BInBe NT Hero GsataeHN. BaTaepn, octaHHeBb B cOpyoBaanM, Mory TIOBHe NbPpExdHn B peyltate OKNcHn IN poteHK BCJedCTBnKoppo3u, rapAHTnB TakOM Cnhyae TepreT CBOO CNY.
IIN3aunTbIKpKyaKoUe CpeBnCnOsbTyHeMeCTHbEYTINIM3auuHOHbE yCTAHOBKn IINyTNIM3aUN6BaTapeN. YTNIM3pyTeOTcJyKMBME BatapeB CCOOTBeCTBM C HCTpyKUMM.
PENyPENKDEHNE: CyueCTByeT pck B3pBbA npn 3aMehe BaTapeHa 6atapEn pyrTo Tmna. PponBodite 3amehy ToIbko Ha 6atapEn Tc0r KKe TnA mN kKBBaIeHTHbE eMy B COOTETCBM C pOKoMeHauaRMM PPON3BODITEJIA.
B cIyae BxOda n3 CTPOR 1nEMOHOB NITAHN B IyIbT6 DcCTAHUHO HTO ynpabJIeHNO MXXHO NcICLb3o8aTB KHOKN ynpabNEHnA paONIOXeHHBe Ha Kopnyce TeLEB3Opa. B PexmIE TB pHyKlM bOKa YnpabNeHn IN KHOKN HAkopTyce. KHONKY OK HA TReBImOp MOXHO HAXIMATb HEckOJIbKO pa3 JnBbOpa HeooXoMMORIO NcToHHka. B MeHIO OH IMeIOT cnEyHJcme OyHKLM:
ДлmaMoDEneC KhoNkoK OKHa Kopnyce:
ДЯ моделуь Зноки OK Ha Kopyce:
PR+unPR
PB-40N PB
VOL+, +VOL
VOL-,A- VOL
MENUMI
MENU
OK
PR+nnnPR
PR-MPR
VOL+,
VOL-,
MENUMI
&OK
MENU
BKIOHTb/BBIKIOHTb TB
- Eyn Hpy nHTAHnnooepHn, TaeBn30p 6yET BKNHOHnn 6yET HxOHTBCB p PEXKHMn OXnDAHn. DnnepeKIO-HNn HnPEXMMrTOFOBIOCTn BPAOCHMPEKMMr HAKMMTE HnPOWER/ HA nPiEMNHKe IHOO Ha nyIbTe JINCTAHJNOHOr ynpAJIeHHn.
- INI INEINCHENTB B PEXMMOTOBHOCHTN HAKMITE 1N NPOWER/1a npHEMHKe Wn 1yntbTe DACTAHIOHOHORO ynpaaJIeHHN. TB OCTaETCR NOPTAHBBIM, HO CMABIM NOTpe6NEHM.
- INONHORO OTKIOHUEHRA TB BbIbTe BIKy n3 po3ETK.
Ha onpegeeneHHbix Moedex Bby donkbl Chahana BknoHTb CNTemy OCHOBbIM BbknoHatelem.
NepBnHna yCTaHOBka
IepHHHARyCTAHOBKBBAKIOHOACTBCHOOOXQDMMBHACHTPOKA INNOMOKHCOXAHOHARBCOXDOCTYHBXAAHAFOBOBIXIMU ODBBBKAKAOB.
Y65D19T8CB TOM,TOBEN300B KJIOHIN, H BIOONJIHTE NIOOJOIATENHO CIEKJUHUAI
PIMMMAHME: EOMNCK KAHANOB OOBADYKMBAET TONBKO AHANOCBIE KAHAJI, BO3MOXHO, 9TO OTIIOKOTO BEUHNAH N HENICKBTO RAPAHNTHE M30TOBMTENE. N30TOBNTENHe OTB6AOKT3a KAHCTBO BEEJAHR B HEKOTOPBX OBACTIX.
Ipebmyo, Korga BkIOHAcTe CnCTeMy, NOBRIETcMACTep Initial setup (PteBOHaHbHe HactpOKeK), KOTOpB daet Bam yka3AHH no pOLOCCy BbIOHHO npBHOHO yctAHOBKn. (CM, pncyck 1.)
-
BbBepnE OINIO RbIka, NCIONBByH KONIKA ▲/▼, a 3aTEM HAKMITE KHONKY OK/ДгпнЕХODA K CJIeNyOIOcMy WJY.
-
BbIbApAITe CTpAHy C TIOOMUHKO KHOIOK ▲/,NOTOM HAKMMTE KHOKOK OK/ Dnpe NEPEXOa K CNDkyOUcMMy Wary. PIMMEAHHE: EONBblBbOpaRnFa (FpaHUM), BBI DOxIKHb BOHTB BPassword setting (YCTAHOBKa NaPOn) DnR YCTAHOBKn NPOON. NTOJIb3yITe CYKBENHO-APNOBcE KHOITK DnB BDOa YETbIPEx3AAHORo HOMepa BaWey napOrm. (OOOO CNILKOM CnAbSbNanpoN.) NOBTOPHO BBOJNTbTOT Xc camBuHOMOp DnI NIOJIbEPXkDNHn BDOa NAPOn. Nocie TOTo, KAK BblBcnNnapO, npoxOx K CNDyIOUcMMy Wary OcyUcCTBnTcR ABOMATINMeCK. (B ATOM ciuyae Bbl Mokete HAKATb ToJIbKO KHOKNY, TTOBblBcHPYbcrK InpDduUcMMy wary).
3.HAKMITE ▲▼BbOpaR peKIM paJIO Antenna (AHTOHNA),NnCable (KaEB)nnSatellite (CITYTHNK).(PIMMeHHeS Satellte (CITYTHNK)ONKOTOPAO MOKET HE BbIbIOCTyTHNO pH KEOKOTOBX MOQIOIN.)
BbIepeHr Antenna (Antennn).
- Haxmte OK
Bul6pnte Digital & Analogue (LInpOboN AnAnorobb), Digital (LInpOboN nn Analogue (AnAnorobb) nIOTM HAKMITE OK?
HAKIMITA ▲/Y DnB BvIbopa Scan (NOMCK), NOTOM HAKIMITE OK/12 HUR HAHA BHTOMATIKECKOKO TNOCKA BEXC uDPOBx IMAN ANHOROBx DVB-T KAHONB.
- Bébepué Cable (Kaebnb).
HaxMMTe OK/
- Búlopeite Digital & Analogue (LInpOboN AnAnoA [AnlOBOB] Digital (LInpOboN AnAnoAnaloge) [AnIaOBOB] N IOTOM HAKMITE OK/
HAXIMATE KHOKN ▼nBbOpa Scan (NocK), 3ATEM HAKMNTE KHONKY OK, Tc6bJ HANPMYIO 3aYCTHTIPOUECC NEPAHNO YCTAHNOK INI INePENIK K cnDEyOEMU BYA.
BubepitFaull(TnHb)cemxotnta bnoHHTB nOICK in coxpahntb BnMaTBAe CnLpOBoBe KAHAnbD DVC-BnAe hAnanoroe KaHAnb
MoxHO Bb6paTb paCmPPOHHb poKIM pa3BOpTKI npHnHnHnTAKBOHO (HARPPMEp, Advanced (DonOHHToJIH), 3aTeOM BcCTN HkyHbIO DaHHIO KABeO, KaONiMaHO HIXo, NcOnlSyIyO ByKBOHOUdppssBE KHOITKJ DINHACPTOAMNACTOTBI, CKOPCt
TIEHENOCA CHIMBOIIN ID CENV; NIOHOBAYBIE ▲▶,YIBA BIBOBA DEXMA MOYNJPLN.
- Haxmte OK nra hana Bexn anorobix n DVB-C LkΦoBx khanor.
NcnoB3OBAHHe BaWero TeneBn3Opa Docyn K KaHanam
CnOaBbOaHHe ByKBeHo-HPoBbX KHOONK; HAKIMMAIe COOTBeTcByOuYe ByKBeHo-LKpOoBbE KHOINK DnDocTyNa K KAHAAM.
MOnbOBAHnKHOJOKPR+/nnP+/-pIraTOrTO,0rO6B
ObhapyKeHne noDcoeMHHeHHbIX yctpoiCTB
TOBTOPOH HAKIMAI TOSURCSI DMTBUNHOYIUPABNEHINK OK TOLEBNIOPA JNDTPOEKHIIO-HNIR MCKDY TUCBNIOPOMN I DNYHMN BXOHNM NCTOHNNKAMM. YoBbI BEPHTCYK T OTEBNNOCPY, HAKMNTO JNOyKO UDOPOBYKO KHOTKY DIA BBOJKAHAJI, a C P+/- 0xODATBE BC TB KAHBI NVIHIE BXDNIIOCTOHNNIK.
PnmeHHe BcMgEmmNEMOTKHONKOKHa KOPNcye.
PpOMKoCTb 3Byka
PerynpOBKa TPOMKoCTI, IINyIeIMeHmN INM yMeHbEHHAR PPOKMOCT3B4YKNCIOJI3yITKEHONKVOL+/- INN VOL< HAp Kopnyce TeneBH3Opa IMKHNKvV+-HaNyIbTe DNTACTAUHOHOTO ynpAEBHnE.
PITIITYHHE38YK:HKMITE KHOJKY 1NTOB5ESEMHHO OTKIOHTB 38YK.ДИ RAOCCTAHOBHJI38YKHAKMMOTCOTY KHOKY OUIC pAIS NKHAKMTK HONIKY V+
Ucnonb3OBaHne MeHIO TeJeBn30pa
1.HDKMITE KHOIYI MENU IIBB BHBODI JINHBOI MOHO.CM. pinyOHK 3).
2.COMOLIOHOKHOJIKAOVBABIEOPVTyHKHHIyHKT,a3ETAMHEKMMOTOKOblOTKpHbCOOTBCTBYOUJIeNODMHEO.
3.BnoMeHIO nCnOJIyTe △/DnBbOpa onUH MHeIO, HcNOJIyTe ▲DnYCTaHOK4 dyHKmnn NIMNEMeHHe BEmHH npapWetPOs. NcNoJIyTe OKdA AKTINMaI HActPOkIK. NcNoJIyTe OKdPnBxOda B COOTBeTCTBYOUIE NOmHo
4. 183 B03Bpata B ppebulyue MEHIO HAKMTE KCHIKY MENU.
5.HAKMTBEXITDIAIByXoDAIN3MEOHIOHNEMAHHE:1BIEHKOTOpBIXHCTHOHHKOBCHHANH HAKOTOpBIXOHTHEDECTBYOT.
Bb6opra3bkaMeHIO
BbMOKTe BbCpaTb npEIOHHTaEMbI Bamn 3bIK MeHO,
BbINHRA HCTpyKUIM, KOTOpbI GbI NpNBcEhbl HIXe.
1. HApKMTe KONIKy MENU 1BbBbOpa TJIaBBHO MeHO.
2. HAKIMATTE KHOTKAI △/4/1 ▼BbBbOka Setup (HACTPOKA), NOTOM HAKMTTE KHONIK OK BKNOKA
3. Bépiepe rényk Language (RbHK) HuaKMTE KhoKky OK
4. Bupcipe Mngu Iansangu (B3K MCHG) HAXMNTO KHONY
5.HaMMTE EXIT aBbXOaN3 MeHIO.
IOnonHnTeNbHbIE Bo3MOxHoCTu BaWero TeneBn3opa
HacpoiKaIIO6MbxKaHaIOB
BIMOXKETeCO3DAE CINCCCKCBHXJIOOHNbIXKaHAnOB.
1.HaMMTE LIST
2.HaKMHTe HA KHOHky KeHOTOrO UEBa TnBxOa B Channel list selection (BbOpCnKcKa N6p8Horo).T0oBu bIopTaB CnCOK JIO6MnBk XAHKMTOA △/▼, aT0oBu BOITN HAKMTMe OK.

3.HaMKNTe KONK CY CnHrero UZeta Dn Hauana peDAKTHPOBAHRA BAAHX JIOBIMBX KAHAOS NCTNCKA. C nOMOUBIO KHOIOK ▲/NPOKpyuBaIte KAHABIN HAKIMATE KNOIKY OK,HTO6b BB6paTb NITOTMEHHT KaHAI.
4. Μόπορτε έληθεδέθεβα, Μήν ἀστρούκης Σγθήν Αλόμθεκθακαλίους.
5.HaXMMTe LIST/EXIT,HTO6bI BbHITN.
BbIcTbpBbIcBOKOMaHd:HaXmTe FAV yctpOCTBa
DnCTAHIOHHOHYyNPAJIeBHINr DnI pIIMoRO BvOda Channel list selection (BbI6Op cnnkca N36paHnro).
HnHaMnueckKa NOpCBetka 3KO
1.HaNytteDnCTAHIOHNOYnpAeJIeHnHaKMMTeMENuBb60rTcPicture ^E OCO Settings ^E Energy Saving(MaOp6paKeHe ^E HAMMeckanNoCBETKa3KO>DNHAMmecKanNoCBETKa3KO).
2. 706bI B6oBAtKJNAeMn3Heproc6pcoraoUpnmKHMNtA /TTOHOSOHMTIOCTMQYbKJEIAEMO3Heproc6pcoraoUero 3fFKeTA.
3. TTo6bbl3aKpbbl MeHIO HAXMATE EXIT.
BbIcTpbl BbI3OB KOMaH:YtOb6 BiCCTPO BbIopTaBxKaMaEBMy
BHePrcOcBeperupePexKIM,HaKMMTe ECO Ha NpJIeTe
DnactAHIOHOHOyPnPAHnHn.
CMOTpeTB C cyHKne 3D
*HEIOCTyTHNO pN HekOTopbIX MoJenX
PNEyIpyKJDEHNE:
Hekotophe 3pTEnH,CMOTpy 3D TB,MOYrHOHyCBTOBAt BIMOKFOPRTNHPMMEP,TOIOBOKpyXHEH,TOIHOHTY IROBHyBO6BoL.PnNOBHeHmTAKHX CMITOMOB INPKPATTEPOCMTOP3D TB,CHMMITE3OOKHnOTJQHXHTE.
PcmoCmTO 3D B1E0e CnHUNKOM 5Mn3AOK BnH TbeHeHAnI pIgOrO BpEMeHNoKOT MOnSePbTeB ABe 3peHne.
3aTeBmC,CMOTPzUmmM3D,CDJxKHeHnABnOTBTBeTbHH-1B3BcPOhJ.
- He nciolbayre 3D oukki nra pyrnu x iqnei, kpoem npocmaotra TB.
He ncoIbIyIe dyIIOHIO 3D mI 3D OHIO BO BEMIA npOryIa 3TO MOXET pINBECTIO K tOIOHOBOHIO IIOI NADHO
1. HAKMATE MENU HA RYNTE DCTAHUHHOHRO YPRABENHIM OKBepTe Picture > 3D (BVDeo > 3D), 3ATEM HAKMITE OK▶ DRA BXOda. (CM, PNC 4.)
2. 3D Mode (PexKIM 3D): ChauJHADOpHeTc 3D OKH, ATEM KONKAMM ▲▼BbEepnte PabNJIbH 3D BXOHNOPOMAT Top C0EiTop and Bottom (Becx N H3), Side-bySide (IapAaNnloHo), 2D-to-3D (2D-Ha-3D), Line interleave (HepeCtproH) n Frame sequential (PokApovB) dBA BOCpncBdoHNA 3D BVDoo.
3.L-R Switch(KommyTatop):Bb6epHTe On (Bkn)nn Off(Bkui) nIpyerIyipoKBA 3D0oopaXehnna I npabbl nnNeBbI rAaI dyuWero pOcMOTpa.
4. Depth of Field (Fng6hna noni); Otperynnpyte CTbpeoccknoeckn 3d06paxen H KOHcptpoaaHOrO 2D 06paekchN
5. 3D-to-2D (3D-Ha-2D): Bb6pnte Left (Jebb) INI Right (PbaB) INI PPOCMOTPA TOKIO NBbIM INI PABBM rA3OM, 3Ta fHyHKU DaKTHBNpyTOC, KORa 3D Mode (Pexm 3D) BkIOCH HA 2D-to-3D (2D-Ha-3D) INI Off (BbKn).
6.Hakmite EXIT 3aKpTMA MeHIO. PnmeHHI: -3D OHyOyTOPOvssBODHTARMOYrHeNOpePbHsBtCA
B pexnme 3D BCE poto dyHKHm OTKIOHeh.
I npnepeoxe K DYROMY VCTOCHy CHTANOB
Mn BIKHOHMe HSMrTV pexn3D BBKIOHNTC9
ABOMATHECKN.
- HeKOTOpBc 3D pexMMbMYOT bHbHeNOCTyHb BABCMOCTaT BYOXHOrTO foPMATA 3D BuJeo HCTOYHg.
Pneppnmbm3Dp0xmbm
ATV,AV,YPbPr 2D-to-3D (2D-Ha-3D)
DTV, HDM, USB, Bndeo 13 NHTepHeta: Top and Bottom (Bepx n Hs), Side-by-Side (TapanlneHc), 2D-to-3D (2D-Ha-3D), Line interlace (HepeocpOHHb), Frame sequential (ToKApOpB)
-3D dyhkmn B pexmme USB: Bo bpmr Bocnpmbedn Hn USB, Hxkmtte MEnu 110K03A MeHc, 3aTeM B6eepnt3D Mode (Pekim 3D). 0one noo06ha Hnnpopmaa Bbue.
TnФлопевod
TnFIOpepeBcO3HaaeTdoONHHTelbHoe TOnOCBOE conpoBcKJHeHJIaCINbIXnCIAOBWdAUXxApTeHEn Bn3yAlbHbIX CpeDCTVBNFOOPMAU, EKNIOUYANTEBEN3NCHBHepePeMaI NIKHO.
DIOKTOPROBPTNAPOTRAKCHINOKA3A,ONMCIBARTO,TTO
PnOICXODMHTA KpKaHe,BOEEMBACTCETBHXIAYB AyIDNO
(NBOPMDAHORA NO MOPCAHOOOxOUMOCTH).
3TyfPHKMOKHOHCIOBtB,ECINDECTBYOUe
TENEUEUHHE COPEXPKNTNFDIOIEBCD.
1.Hakmte MEnu HnyIe TnCTAHIOHHO yNpOAEHNA ByBepTe Suad (3ay).
2.HToBBoITN,HAXMNTeOK
3. T0bblBpaTb Type (TN), NcNolb3yIe KhoNkIy ▲/▼, a T0bbl HAcPToMbTV Visually impaired [INr CnlaOro 3poHn], NcNolb3yIe KhoNkIy ▲/■. MmKpOphH, HabyUHnKn I yPoBOH bPOMKOCTM MoXHO pOryuNPOBaTb, NcNolb3y MEHO DJI CnlaBOrO 3peHH.
Функлuar PAP
JaHnHyHKINCNIOB3yETCRN DNOHNPEMeHHORO OTObpaKHeHH NIObpaKHeHH NpaaNNHbIX BXOPaHIX NTOKOB INOCHNKA.OHO NO KHO nppehHaeho NnD HbAorOBORI NNlNDPBOBO TB CnHana, a ppyrO -nra CnHAnOB VGA, HDMI YPbPr.(PnmeHane: He doctynho nA VScart 600nx windows.)
1.HaxMMTE KHOHky MENU DBA BbBODa TnABHO MeHIO.
2. BbIbepnTe PAP n HAXMITE KHOIIKy OK nra BBOJa.
BbBePte OngUPO PAP. NOTOM HAKMMTE KHOHIKY △IJIBAKII/BbKJIpyfHKIMPA
4. Bālīqēpīrī TV position (NoJOKEXHēn Ākρāha), HAXMīTBE KHONKY ≅/↓ Ḍɪŋ A MɔHΕOHN JI NONOEXHη Kαρa ha TB.
5. HaxmMaTe KhoNKn 1/2n N3MeHeHn pOkyCa OKHa
6. Pn HapabneHm K OKy TeBnOpa 5yKBeHHo-UPOBbE HONK +/-pbaTaut C TeBnAOpM. Pn HapabneHm KpytomyOKy, +peepknnoaet MeKdy DocTyBBHM BHOUHMMNCTOHKKMM.
IcnoJIb3OBAHnE cy6TnTPOB
BbMoKTeNcNoB3oBaTcSyTnTpBdIaLHcPpOeBxTB-KanAOB.Cy6TnTpBnpepaOToCpeeaTeTetckTtVNVDB-T/DVB-CuPpOBeBxpeepaC.NOMoUbIOuPpOeBxpeepaBbMoKTeNcYnTbDOnOHnHTBHyBO3MoxHOCTbBbCopaRbKa cy6TnTpOB.
BkIIOueHHe/ByIKIOueHHe cy6TnTPOB
- Haxmte MENU Ha nyIbTe DnCTAHIOHOrO ynpabHINr Bui6pnte Options > Subtitie (Onuim > Cy6Tnptbl).
- HaxMMTE OK/ (CM.pnCyHOK 5.)
- BbEpTe OtnIIO Subtite (Cy6TnTpbl), HAXMITE KHOrkY / n BbEpTe On/Off (Bk./Bk) TBAKIIIOEHNIA/BkIKHOHNI Cy6TnTPOB.
Bb6opra3bika cy6tntpoB Ha uΦpObblx TelenKaHaIax
1.HakmITE KHOIky MENH Ha nyIbTe DnCTAHIOHOHOrO ynpaJIeHIN Mbl6epITe Options > Sublnte > Digital subltitle language (OnuM> Cy6TnPb> RaBk cy6TnPb0B uDPOBOrO KaHaJIa).
2.HaKMNTeKHOHKnBnBbOpaA3bKaCy6TmPOB.
3. [HbKMAE ▲▼, DVB BbGOpa Digital subtype language 2nd (BTOPOBRAK CYGBTTPCBU pIcDpOBO RKAHLA)]
4.HaKMATEKHOKky 一 _ 一 1nBb6opa BtoporO Raika cy6TITPOB.
5.HaxMHTC EXITIaBbXoDa m3MOHO.
BbCTPbHb3OB KOMAnD: HaxMHTe 3eHHyKHOkky
SUBTITLE HAyIbTe DmCTAHIOHHOrO ynpABHeHn4
OnpepepepeA3bKOc cyTNPoB,poCTyHbIXdBAbPOHHO
UpPOHOH TB-npopamMb).
Bb6op Tnna cy6TnptpoBa Ha uΦpObblx TeleKaHaJax
1.Haxmte MENU Hn tynthe JnctaHIOHOIynpaBHeHHN HbEeOte Options > Subtiye > Subtiye type (OnuM> Cy6Ttpr > Tyn cy6TtP0B).
2. KONKAMM ▲Bb6epitre TnC cyStntpoB. BblMOxete Bb6pTaHearing impaired (Dna cBorOc noCyxa) nBocPcn3eDEHnC C cyStntpAmBb6paHHO rBaika.
BbI6p Ja3bKa CTpaHnUbl JeKOIpObaHn B TeTeKCTe
HaKMIte KIOIky MENU HA Nylbte JcctaHIOOHOrO ynpabJIeHHN Hb6peRite Options > Teletext > Decoding page language (Onuim > Teletext > RaBk cTpaHnBu IekoipOBaHn), Bb6peRite RaBk, Ha KOTOPOM 6yETBocPON3BedeH TeteKTCT.
A3bIK UΦpOBOTeTeneKCTa
PnnpmeMeIcHpObIXKaHaIOB BaIeTeJIeBH3Op 6yIDT OTOBpaKabMbHOHOCHNHeCTpAHbIbTeNTCKCTHa paAHHbIXBaIKaX. DAnHNA FyHKUN No3BOJET yCTABOBHT HeoOOIMbIKbIK KaK DaIOOHOH, TaK IINDpyrNX CTpaHN TcNEtOKCTa.
HakMMte KhoIky MENU Hb nyIbte JdCTAHIOHHORI yipaaJIeHHIN Hb6BePte Options > Teletext > Digital teletext language (OnuN > Teletext > Ra3k uKdpboBOTe TeteKcTa). Bb6BePte 383k KhoIKNAM
Tun SPDIF
IIOKIOHcTcaydnoocctpOe3bXoDSPDIF.HaKMnTO KHOKNMENHTEPOUHTOyPABJIHNI KBOOPHTOOptions>SPDIFtype(Onm)TINSPDIF). BbBepTeIOxOuTmTn3ByKa nCnCKA DnIcPpObx npopam.
- ECN 35K TYKUJI INPORPAMMbI BbBQITTCB S FOOMATE Dolby D, TO MOXHO BbBpATb FOOMATb WJN PCM, WJN Dolby D.
- Ecm 3yck TeKUJIeI npOrpAMMbI nepepaTe H B foPOMATE Dolby D,TO MOnHO BbVbApT bToJIbKO PCM.B pOtoTHOB CMJHae BCOPONBDEHmE 3yka By he dyet.
BaBepute Off (BbKn) 1nOCTaHOBKn BOCpON3BeJENH3BbKaOT ayDyHOyCtPOiCTeA, NOkKIOHcHOro K BbXoY SPDF.
PIMMEHHE: OINM, KOIOPbE Bb MoXeTe BbOpaTb, 3aBNCRT OT KOHKpETOH NpOrpMMbI, ECIM Bbl BblpaN PC, a 3ByK ONepKaer H3o6paxKeHHe, bblpeDPI SPDF delay (3aepxkaSPDF) n3 MeHO Options
[ONLIMN] N KHTOKKAMM YCTBHCHBNTB BDMN SAEDPDKN DURCVNPHCHN3LM 3BYKJN HNO3O6EHNH
T-ннк
HannahdynKINKINACTON3yETCHNINONCKYCTPONTCB C npToTOKOMcTeBOrO ynpaBHeNHCEC,NOcOeHNHeHHbX KpTaBEMHDMHlHaBaWmTeBENOpE,nNoBcHnHT BKNIOATbBCNpOvABeBHeHn INPekM OKnDTHAHn HkAnMeH KNIOHnI BcEXyCTPONTCB CpToTOKOMcTeBOrO ynpaBHeNHCEC.
TIOKJIIOUeHne N BbIKIOUeHne dyHKmT-Link
1.HaKmte KHOHky MENU HA NyIbTe DnCTAHNOHHOrO ynpabEChN,IOTOM BbEepHTe Options >T-Link (OnuM> T-niHK).
2. HauKMMTE KHNKY 14nla Bbopa On (BKn) nH Off [BbIK].
Bocpon3BeHHe ODHMMaKaTHeM KHOIKN
FyKJHBCPOPNBSEHNEOJHMKACAHNEMHO3BOHNET HHaHTB BOCPONBSEHNEHpyTMEHKAHNTKHONIK BKN, HAnHPMEpHaNytBeJCTAHUHOHORoYpAABHNEBAIberoDVDnneepaJaHNOIePAupe6yET 3anyuHcBOPCPONBSEHNEBaIberoDVD-nneepa,uBaW TeneBnOOPSyETABOMaTNeEcknPeEKeIOeHHaNtOHNK BCPOPNBSeBauIN DVD.
PexkM OxuHaHn CNTembl
KdyuynpokmBknoaTcHAKATMCHKHOHnA HApnpm,HaNyIeTeDCTAHNOOHORoYpapBnHnE TOpCNbOPOm.1POnxOdnt PpckIOHNOHToBcBnOpaN BCCX nococHHhixHDMl-yctpoCtBbPckHMOKndaHn
06HOBHeHcTeM
HaMMeTE MENU HA Nytbe NCTAHOHORO KOHPTPOIA,3aTEM BbEepTe Options > Network update (Onm> O6HOJEHME cTn).BbIeOpOM On/off(BKn./BbKn.) BKNIOHTe NIN BkIKHOHTe 0yHKIOIO O6HOJEHME CNT.
- Ecnna atyfhykua Bknohe, TB abTomatneckn o6hOBNT Kaanbbl, cnn BaW DTV npobaidop 6hOBNT or DTV cctb.
- Ecm 3a fynkuiy BblkyoeHa, Bam Hxno nporHb KaHai bI IIN NOKIOHNEH HOB xin ydanHeH HeDCTBYOUX KAHANOB, eCN BAu DTV npoaeep NoKIOHoeT INI CHMAET KAHAJI co CBOEHT DTV cem.
CTaHdapTHbI INHTepΦeInc
3aoknpoabHbIe uippoBbTB-KaHbIbMoryr6bItb
KeDIOPOBaHbIcNOMOuBbKOMyTcTAHpTHOrOHTpePcCa
nKapTb,poDnOxckHHOnOncpatopOMuPDPBOBO TB.
MoYbCTAndPHTHOHTePepCAMOxETObecHeuBaTb
HECKoJIbKUmpoBbIX cepBCOB,3TOsABNCNTOT OepatopA
nBbopaHHO BAMcOpBCa(Hanpimep,naTbH TB).
CBXkntcBcOnepatopOMTB-cepBCaJITnIpyEHN
IOpOboHOBnHCPoPMaUM.
IcnoIb3OBAHMeMoJyMa oIeeroH
PNEyPNEKJEHNE:peep yctaHOBkoModynA CTanapTHORO INHeTpeEca BbIKIOUHTe TeneB3Op. O63aTeNbHO co6IIOaTe CneDyIOuNe HNCTpyKUnn. HenpabInbHa yctaHOBka Modyn MoXeT NOpeDnB n MOynB n BaW teneB3Op.
- BCTABINIte MOyBIn B CnEuaNIs HO rpeHdAHAeHHeH bIa HrO cIOT HA naHONI ToCnB3Opca, coBIOpa a octOPOXHOCTb HnIpaBaeHMeY, YK33aHHOe HaMOyIE
- Haxmte Ha Myynb do ynpa.
- BkHnHTe TeneBnOp HdoxPntecb, Foka NHTeppeHe He 6yETAKTNBOAH. 3IO MOKET 3AIHTB HECKOJIbKO MNIYT. PnmeAHHNE: He ydaIaHTe MoDyIbN 3CnOTA. YdaIaHE MeMoDyIbMOKET dEAKTNBOAOBt UcPOBOE ycTPOINCTBO.
OcTynK Cnyk6am OoIeero NHTeppeca
Tocie yctahOBaN A kAHTINBPOBaHm MOyIg CTAHdAPTHOro
INTePpOcA HAKMMITE KHOKNY MENH Nn PybTe
DCTAHIOHHORO ynpABeHn H BbEepTe Options > Common
interface (Onnn > CTAHdAPThBn INTePpeC).
OuHmMHeHO DocTyHb ToBkoTorga, KOrDa MoyIb CTnAPrTO HO HTePcHcA 6bn npabHIO yCTahOBnEH AKTNBOHAI. CoepJAHne, NoJIHRIUeCEBa HA kpaHae, 3ABVCNT Oat Baue TeneBIMHOKOMTAMHN
06HOBnHeHne IIO
PnmmuHm: npq TcM, KAc HauhTb oBHOJIeHnnporpaMMHOrO 06ceJeHHn, nQoCoaHnHTe yCTPOICTBO USB CcoBDOHN EMKCtBcOBbU250 MoraAaT. He BkKnOaHTe TeneBn3Op, He BbEeprIMBaIte Bnky n3pO3ETKn HHe NsBLeKaHTe YCTPOICTBOUSBdoTe np, noKa He aabepumTCB OBHIOHHe.
HaxMMTE MENU Hnynne JCTAHINHOH OTOYPANBENH Nb6BepeTe Options > Software update (IpaMetpbl> 06OBHMeNE IO).HaxMMTE OK>
Current Version (TkUJI BercPA):IPOBpKa TcKUJIeB BercPAIIOPRAAMMOI O6CNEHNI.
- Product name (HaimMOHOaHHe); HaaBaHHe nndnna BaWoFo KOMTIEKtA.
Serial number (CepiHbH MHOe) (ECnIMMBETc): CepiHbH HOMEP BAIHERO KOMIIEKTA.
By network (Nooepctbom cem)PipeoactanreB O30MOXHOCTbCKANBAbIyCtAHABnBAbTI NocTeHnDEBOPcINPpAMC m HHTePOTHa. CHaHARy b6eDTCb, YTO Bbl BKIOHNKAbElyhO nbcnpOBdHyO cTeBm 3aTEM Bbl6ePHTe BY network (NooepctbOM cem)HnAKMITE OK> Iany DBOA ydt DOCTYTHNA HO8A BEPCsIPORpAMMMHO OceCNENHNOBINTC nAHeHb npOTpeCCA. Pocne 3abepeHnna 3arpykTNeneBnsOp noracnetn 6OBHOBIT NPpAMMAHOC 06ccnHNC
PIMHNEHHE: BO BPEM OBOHNEHNE CJNEHTA 36 yCENBHNOMCOTEBNMOOCHINHHN
By channel (No KaHany): 3Ta onu npeoctabnEeB3MOXHOCTb yCTaHOHTb HOYIO BEPCNO IPOPpAMMHOO6cneHEn, cncn OHmEEeTc. BbIeepTe By channel (No KaHany) IN HAKMTte OK|dNkOJa.
HcnoB3y KHOKKn ▲,Bb6epnTe Yes (Ja) DnIOnn Auto download (Aba03aPy3Ka),Ot6bbl aTcMAtIneckn 3arpyntb nocpndHIO BepCNO nporpammmHOrO ocebeHHeNc,ecnn 2oB3mOKn。Pocne toro,KAK nporpammmHoe ocebeHHeNc 5bnc ycnEHHo 3arpyKeHo,
Bam 6py TnpnIOxoHpeWHTb, xOITNE BBy yCTAHOBHTB erpo nmo CyeHc. Ecm Ta, To BInONHnIe YKsA3HnK, KOTOpBle 6byT NOBHTbCn HkPaNe IyNpABINHOro BbONHnEBAuY cTANOBKn, BBy TaKxie MOKETe BBpaBt OMeHy OBOeHnBnBnB D aHHbMOMENT.
Bub6epHrte No (Her) pRnOnu Auto download (ATo3a3py3ka),YTObIOTMEnHbT abTomAtmNeckyo 3ary3ky.
Bb6ephtoOnuManual download (YyHaa3aarpyka) n HaxMMTE KHOIky OK/ Dny Ncya pyHoro cKaHNPOBaHHnOncJIeHIO ITOprrMMHOrO oBeCneHHN. BbIOJIHnTe HCTQyKUN, KOtOpBu 8dyT NOBnATCBnHa 3KpaH, Dny 3abepeHHN 3toI POeDpyb.Bo aPMeI NOCKA HaxKaHMeOK/EXIT MOxHO OTMENHb POMCK INIy BmYINI INIpoUCCA.
PepexoB DEmOHCTpaHNOHHb IIN DOMaHn peKIM
1.HakmTCKHOKNMYNENUHINLTPOINCTAHIOHNHO yipabHeHn HbBepMeTeOptions>Location(Onm> MecTohAXoXKeHne)
2. C O NOMOLO KHOONOK ▲Bb6epNE MCTOIONKHOHSE Shop(Ma3n)HnHome(Dom).
3.HAXMNTE EXIT,HTO6bI BbTIN.
PIMMEHAMB: BOOTBECTCBN C PACIOPOXHEHM EBPOENCKON KOMACCN 2009/125/EC,B DOMALLHE MVCNOISBOAHMB TB DCOKH ABOTOMATHEKNNIEPEKNIQCHBCHB PDEHM OKDAHIAE,CJIMC HMM HE PPOK3BDGTOR ONEPAUIN B TEHNEHME 4AACOB.3Ta FyHKnMAOKET 6BtB DEAKTVNHPOBAHBA MEHO B RHYKTE Options (Onu).
ФункцMHEG
HekotopbIe LmPpOBeTe TELBSeMaTeBHe KOMnAHnnpdAraoT cneauuN3PoaBaHbI NkPcPOBToK TeKT HnHETepaKTHBHe CnyXbI (HanPmep, BBC1).DaHhBe CnyXbI paobTaKaK o6bHbI TeTKeTcC JdoBaJIenHem KHOON HOmePA,UEBaNTKINABHNIpeMeLCHN.
1.Hekmte MENU ha npnte dctaHIOHO ynpabHnHn Hb6epte Options > SubtiTe > SubtiTe (OnuHn > Cy6HTtpy > Cy6HTtpb).
2.C NOMOUBIO KHONOK BbBbepnTe Dn Subtitie (Cy6HTPb) peKMM Off (BkN.).
PIMMAGAHNE: dyHmR MHEG n cyOTnPBn NKNOaOHOT dpyr dpyra Hne MOYt OcHOBpeMeHO HxOaHTBCn HA kXPAHe ECJyHKNu Subtitie (Cy6TIPb) HxOaDTCB n peKHMnE ON (BKn.), dyHKnMIHEG He NoNBTTCn HA kXPAe.
- Haxmte Kpachyio KHonky mN KHonky TEXT Ha nyIbTe.
4.CNOMOJIbKO HONOK △/▼/BbIEbEpNE INI NOCDBeTNE 3HAHOHJ.
5.HaMMTEOKIINIOITBepKxpeHHNAKTBAHIN.
6.ДИАБLOОРAPAMATEPHAKKMTEcHNYH3LBEHTBIX KHIOKI.
- HaxmTEXT INM EXIT INBbIXOda
Посмтфсогрд,在BocponaBeHneMysbIKnIpoSMTBPWdeOи3aONMaiooeroyctpoctBa USB
IMeoumnaHaTeBnOpe USB-pa3bEmno3bnReT
NOKIOVATb K Hemy HAKONITNEI NAMTA. BblMOXeTe
PocMatpVBat PhMbH FOOTORpaFNI HA 3kpaHe
TeBnOropa, a TAKKE HcNtB30BaT bero dnn PocCnyuBBAHM
My3bIK.
PoeepKmbaemble qaiioBbie cOpMaTb:
ΦoTo JPEG
My3bka M
BüdevoAVI,MPG,MPEG,TS,DIVX,MKV...
PnmeHnHn: Hekotophe USB-Hakonntm n USB- yctpOCTBa, Takiue kuk npoBte KAMsptb nn MOobhBHe TneOpHb, He NcNOCHOTBO CMOEeTMMb CO CTBnAPTOM USB2.0, NcTOMy CHN MOrY He paobotbc MyIbTHMeDnHbIM npeoM TneBvAocpa. He BcS USB-KKovHnn YcTPOCTBa CMOeTMMb c dyHKuMM USB. He Bce Yka3aHbIe Bblue foPMatbOnoHaKoTc. DekdApnoBaHHbe FOpmatb BaWxH faOBn BydyT OrpepeBy T. MOYr OH NcIOJIbIOBcBAOJIbCnHn HE.
Korda USB-ycptmoCTBO oBnapykeHo CNTTEM,HO CTANBOI BMOB MEO Media center (Meda-LHTP).T06bI BYHNO BOITMB Media center (Media-LHTP), HAKMITE MENU HaDCTAIOHOM Pnyte ynpabEHHN I Bb6epnte Media (Medma).
ΦOTO
DaaHaa dyhKnA hONb3yTeoT dN aOcbpaeknA foctorpaipn PN HauHHu TakoBvb.
- BubepeRrMedia Center>Photo(MedaunHent>ΦoTa), 3aTeMaHKMMTEKHOK,TObIBoTHOCHOBHORo MEHO pRpAMMAHIOPOCMOTA COePEXMKMOOCHOBHORo DAAJIa
- Bnpopamme npocmtpa coepkna HcHosHoro paHaN KHOKNAM ▲/▼/▶ BiBepHTe pTO HIN BHYTPEHIO NANKY c PAnNAM.
- Bb6epuTe nanky C BIOKHeHHaMn paHAMn HAKMMte KHOIky OK,HTo6blOTKpbIt 3Ty nanky B OKHe HABrATopa.
- VcnoIb3yIte KhoNkA/7/12nBbIbOpa cHnaC pOITOPaHmB CCHOBHM HJIOJIHOHTHEOMΦaHne NpOPTAMMbI POCOMTpa, 3ETM HAKMTe KhoNkY MENU dTObPakKeHMeHO pOTo BpeKHe MTOpBpKaEHnNAOK.
- SortcTropkoBatabI:CortpkoBana nank oFotporpaHnNo NO TATE KAMHEHINN NIM HAMMEHOBAHNO FAHNA.
- Edit {PojdkTnpoBAnHO:KoHPOBaHIO, BCTAka HIN yIaJIeHBe bIbObaHIO FOIO.
- Parse (Tnpcep): Bb Moxete BbpaB onu Recursive (PekypcBnHoo) for oToBpaKeHHa FOTOrpaHm H3 Ce TIOK NKHHeO OyPBHO.
5.Bb6epTe pTo, HaxMMTE OK, cNau-loy HAHHeTc C b6paHoro pTo. EJnXOTATE NOBpaATb pTo, HAXMITE OK. B pKIMME 6paayepaTO pTO MEHO B3bBAETC KHONKO MENU. Bc CMOKETe NOKa3aTb, NaYpObaTb, JIOE pAaTaT bTO, Bb6pATb pKIM NOKa3a, DFFeKtBn T.I.D.
6.HakMMTe COOTETCTByOUJIe KHOJIK HaIyIeTe DACTAHIOHORO IYnpAJIeHrI DA BILIOHNHEI BO3MOKHBIX 4HYKLM, KOtOpBc NOKa3aHI B FyHKIOHAIbHOI CTPOKE B HNKeH JACTn TB kApHa. TOr6bI OTO6pArITb INI cPrtAtb 4HYKIOHOHAIbHyo NBeHb,HAKMMTe KHOJIK INFO.
My3bika
DaHnA CyHKnI NcToJIb3yETCra I DaBocPON3BeDEHnMMy3bIKI PnHAnNTHaTkoBIO.
- Bubepure Media center > Music (Mejua-Lipnt > My3ka). NOTOM HAKMITE KONIKI OK dnn BXOa S OCHOBH NABIRATOP paJNOB.
- VIOJIbEyH KHOJIKA /▼/ ▼, BB6epTe 3aIINb NIOB B OCHOBHM OKHE HABATOPA, NIOB EERO OHKAN HOJE HAIKOYPOBJBH TOHAKI KIC NOCCOEM, TTO INPNI IOTIOJB3OBAHN cyHKUIM OTOpakKeHH pOToTpaM
H2KMMOTHEKHTKYMENUOIOOPAKSEHBMy3HKUHOHO MEHO B DEXKIMI EANIKO
- Sort (Coptiporobatb): Coptiporobka nanok 3 aniatce neceh no cnekyoim nprihakam - Name (HaMeHoBaHme), Genre (Kahc), Artist (McnoHHTen) nin Album (AnboX).
- Edit (Pojdaktnopobahno): KonpobaoHIO, BCTa3ka HIN, yuJyIaJIeBbBbBbBbBbBbBbBbBbBbBbBbBbBbBbBbBbBbBbBbBbBbBbBbBbBbBbBbBbBbBbBbBbBbBbBbBbBbBbBbBbBbBbBbBbBbBbBbBbBbB
-Parser (Papcep): Bby MoKote Bb5a7b OnuNo Recursive (PekypCnBHe) dne OTo6paXeHna 3anmCe H3 Bccx nanok HnHexo O yOHHN.
3.Bb6p9rTIEHO, HAKMHTOKI BOCP013BcEHNH, BOCP013BcEHNH AynOaHnHnHnHcTAMOTMAeKn, C3dAHHIOHIECNH. HAKMHTKIKONKY MENU JI 0CTOBpaKeHNMy3bKaJIbHO rHO MeHO pTOrnpaHnB PekHMHe HABrAtOPa. BB MoKETe BB6pATb BOCP013BcEHNH INN NAY3y npA BOCP013BcEHNH PcEHN, BB6pATb DpyroI pxkIM BOCP013BcEHNH, N T.I.
Show lyrics (ПокастыTekT): 37а оплдя достунда
Дався сениховTekTСВ. КНОКAMM yCTAHOBITe
СИХΚΟΗΝΥСТЕТКΤΑ.
Audio only (Tolbo 38yK); Bb6epnte n Hekmte OK nIpyoCtuyuBnHMy MBykyni PpBbKIOHcENHKeKpHe. HekatneM NIOOJI KHOKNI BKNOHTe KpAH CHOBA.
4.HaKMMTE COOTSECTBYIOUHE KHOHN HA NyIbTe JNTACTHIOHCHOTYIPADABENHIAJINB BIIIOHINHBAO3MOKHXFyHKNJ, KOITOpBE NOKA3AHBJ BpyHKIOHAHBOH CTPOKE B HIXKHEAATN TB 3kpaHa.
Bndeo
DHaHHaFyHKLMNcONbEyCTCRdINPPOCMOTpaBnDEO pN HAIHIM TAKOBTO.
- Bubepyme Media center Video (Media-LBHTp Bindeo), HANKMITE KONIKY OK dner npocopa k npocmotpy faainob c nMOUPOI qaiHIOBO O HABINATOPA.
- IcnoIb3yKoHnK ▲/□,Bb6peHte B/deo NIO B OCHOBHM OKHe HABrAtopa,IM50 B oOHXs 5ooie HAKORO YPOHN TOHO TAKM KJE CIOOCBOM,TOI NPM INCOIb3oBHm DpyHCIN OTOp6pKeHHa FOtorpaDn, IN HAKMITE KHONKY MEN DTO OToPaeKeHHa MybIKeJIbHoro MEHO B pekkme nAOK.
Sort (COTPVOBa): COTPVOBKa NIOH K I BNDO (FADNIOB NO TINY, DATE VMOHONH INI HAMHONBOAHI).
Edit(PedaktnpoBaHne)KornpoBaHne,BCtaSKaHH ydaHHe Bb6paHOrO Bd30 qha.
-Parser (Papocp) Bu MoXeTe BuPoStb OnpIO Recursive (PekycnBHe) nI OTOpaKeHnH BnDeoepaHIOB 13 CEXN nAnOK HIXKHeO yPOBII.
- Bb6epteBIDeO,HAKMTOEOKI npocmotpa, BOCPON3EDEHEHBAETOTABOMATUeCKN,HBNHAR C Bb6paHORo BIDeOpAaJIa,HAKMTTEKHOKNyMENU DnO OTOpApckHHMCHIOBEOeOpaiIOB B pekMH HABRAtoppa. BblMOKETBb6papbTBCOPON3EDEHeHINNay3y,Bb6ppatb paAHHbIpeKmblBOCPON3EDEHH,peKIMkPAKaHa N3adaHbIcYCTAHOBKH3IOoPakKHHN T.I.
4.HAKMITE COOTBETCTByIOJIe KHOJIK HAITyIte DANTAHIOHCHOTYIPABJIENHIAI BII BIIINHIEHRA BO3MOKHBX FyHKLIM,KOTOPBIOKNA33HBI BFOKHUMOHAIHOI CTPOKO B HAXHEHACTN TB AOKaHA. YTOBbIOTobpaaNTMI CnPHTATb FyHKUHOHAIHYIOAHIb, HAKMITE KHONKY INFO.
DivX video (*HIDOCTYINHO PNI HEKOTOpbIX MOENAX)
O DIVX BIDEO:DivX-3to copmat ndpoboro BIDeo, coaandnbl dnnanom KOMannan Rovl Corporation Divx, LLC. 3to cnpnabno ceepnmporpo hoe yctpoctbdo Divx nnpnptbBnHn Divx BIDeo. Dn npnyeHn detanboh
H3HAKOMNEHCAIPOPRAMMHSIMCPEJCTBMAJINKOHBePITMOBAHARDAIIOB BFOPMATBIDEO DIVXnocETMEcaITdivx.com.
OΦOPMATE DIVXVIDEO-ON-DEMAND:3ToycptpoCTBO DivX Certified@doJnKHO6bTb3apeHrncTpnoBaHOIINB BoCpPouBcEHHpyoBpeTeHHbXfHbMoB BΦOPMATE DivX Video-on-Demand (VOD).
PonyuHTe Baw perncpaonHbKo
HaKMMTE KHOKNY MENH A HNIbTe DACTAHIOHOHOTypanaJIeHH.
- Búloδoparte Options > DivX(R) registration (OnLIM > PerceptroniqueDivX(R)).
HaKMMTE KHOKN OK, Tc05b Baaw peHCTpaMOnHHK KOtOo8paeHn HaKeapae.
IIN PONYENHANBONE NPOPBOJN INPOPMAUIN O TOM, KAK SABEPWNTB BAI NPLOECC PERNCTPAUN,NEPEIDHTA H NHTERPH-CTPAHUYV odv.difx.com.
OTMeHa pernctpaun BaWero TB:
EcnBbXOTHTcOTMeHHTb prrnctpaauBaUero TB,
HaKMMHKeKNOHcKMenu HA ngbte dactAHIOHHOTYnpaBHeN
- Bы(бергг) Options > DivX(R) deregistration (Опци > DivX(R) Деревский).
HaKMMeK KHOHkY OK> nOcNE HcEoHeYTe IHCTpyKlIaM HnK3pKe
DivX®, DivX Certified®, DivX Plus® HD n Cb83AahBbe c NMMI Jorotmbl - 30 to Toproble Mapkn KOMaHnMI Rovi Corporation UINC e cnHnAnoB, KOtOpBe IcNpJIa3yOITcr o NIMeHnMI.
OnpeJeHne BpeMeHH
BbIOJIIBHcOeIyUeIeIepALM,MOXHO OIpeJELITb BpMaC IaIPOBIXKAIABIOB.
- HaxMITE KHOKNY MENU HA Nylte DuctaHIOHHTO ynpabJIeHnN BbIepeRte Options > Timer >Clock> Auto synchronization (Onuim > TaImep > UcbI > ATo CINXPONH3AUNI.
2.HaMMTe KONKn 17Bb5opa On (Bkn).
YcTaHOBka KaHbHorO deKOepa
DeKepbI pAnAHANHbIX KaHOB MoryT bblb NoCoJHeHbI K pa3eMy AV. HsHaHbTe daHHb TB-KaHAN KAK DeKpOyEbeM. ToOnm Ha3HaBte pa3bEm, K KOtOpomy NoKnIOeH, DeKoep.
1.HaxmTe MEnu HnIbTe,INCTaHUMOHoro ynpaBHeNn VblBepeVte Setup>Decode(HacTpoKa> [KokDipOpaBaHk]
2. Haxmte OK/ INBxOda B CnMCOK.
HAKIMTE KHOKNK △/N bly6epTe KaHaI JIaJI KIOJIOPOBIAH
4.Hakimite KHONKY OK JIaB BbOba IIN OTMeHb BbOba KaHana.
5.ДЯьбетаВпрддуцмMoHнБКМТСКНКИY MENU.
MnarHocTKa uΦpoBbIX TeNeKaHaJIIOB
- HaxmiTe KhoNky MENU Ha nyIte TeiCTaHILIOHOHorO ypaBHeNIA N BbEpyTe Setup > Diagnostics (HaTcpoJa > DaIarHocTka).
2.HaMMTe OK|DnT OTO6pAKEHNI CINHJIbHO HOpOMUIMO TKeYJcEMI KpOBOM KAHAe,TAKOK KA MUHOCBt CINHJIa,JACTOTA INP.
CdBnBpeMeHH
3Ta cyHKnA DaC Bo3MOKHOCTb 3aHcNcTb TB-nporpMMy
TAKM O6P3OM, YTO6Bb Hb NOpOYNTNO HyKHy
NEpePAy D Tom C1yue, KOrDa BAcET HoMa. Npei
NCIOIIOBAHOM DAHNHO FyHKuIN CNOyD yOeHTBC
ChAHAp, TQ K TB-PIPOHMHI NKoNDKIOHO YCTCPONCTBO USB,
Pn IepROMIOKIOKHeHH BBoINHITb HAcTPOKY yCTPOKCTBA
USB cHCTALIMHONHO DkCA.
PmmeHHe: DaHHa FyHKuMIOCTOYHnTOIbKO B H36B4HNbHnpDQyTbX N MOKET 6bITb HNDOTCYHnB IN PpOyDKrNIMB MecTe yCTAHOBKN H3-3A ONpeDEHEhBX OPAnHMeHn TEbNBOHOHONCtE H TeHXueCKNX TpOobBaHn CTpaHc. 3Ta FyHKuMA TAKKE MoKErBTbbls AabIOKApOBAHa TEeBnMOHOH CbTKo BCNECTBn 3aUHTb1 bTOpCKHX npRb (3aUHTa nPpHa Na KONTHT BbICOKxO paoepuHn, 3yko3aMnCb). YTObI npoeepntb DOctTyHOCTb DAHHo FyHKuHa H BaWem npOqyKTe, hCNoNs3yIte KHOKy OPTION Ha IpyIbTe DcCTaHIOHOHOr ytpaBHeHH.
1.Hakatb KHONky MENHnyIyIbTeDnCTAHIOHOHORO ynpaBIOHHN Hbl6pTaBOnTOIINo Setup >Time shift (HaTropkaKc> CdbrrgpeMEn).
2.HaKaTHb KHONKY 一 P 1Bb6paOnIuNOn (BKn.),TO6bBKIOHTb ONUIN CDBHRA BPEMENH,3ATEM HAKaTHb KHONKY EXIT,TO6bBy3AkpblbMeHO
3.Hakatb KHOTKY OPTION Hn Pynte DmCTAHIOHORO ynpabHeHn BbIpsbT onuHc Time shift (CdbmBpemeha) a 3aTeM HAKATb KHOrkY OK, Tt6bI NoTBePdTpBbIbOp.
4.CIeNyTeBbIOHHTbYK3AHHa, KOTOpBeOyDytN0OBtBcBA H KaOHO B PpOLOCCHeHApOHO.
5. Nocie 3abepiHn HnactpOJnA hNcA HnKbTt KHOYIPTIONI BvOpaBtOnuHIO Time shC(BcnBVPeMeHH).
6.HAKKTB KHONKY OK,HTO6b Bb6paTb MEHO FyHKmCDBNA BPEMENI.
HakatbKPachyho KHONky,HTO6blcpeNaTbPaay3 npBocpoW3BcEHIN 306paKHeHnHaHbAeTB BODcBnARaBpEmeHn。
HakatbKPcchHyo KHONky,TObSbBnOHTnhts Bocpoa360DHOIeA3NACHoRTOOtpb
Korjna VcHcHHe MeHO Taimepa n octaHTeHTC ToBko CCHTmK, MoKeTe HaxKaTb KpaChyIO KHOnKy INN OK dApOtny K MeHO Taimepa.
- Hakatb 3eNHNKHOKNH BY 6bCTPOI NEEPOTKNA3A4
1n JENETY KONKHOY D8 bCTPOI NEEPOTKNA BNEPeD.
- Haukatb cyHIOO KHOIky, YTO6bI bBnIaN3 dyHKnIcDJIIN4B EBMENI.
DPMGHAH
- Ipeq iopkloHem USB yctpoiaTBA k TB, yjoctoBepstc, 40 daHaJIbY cjoPOnCTBa COxpaHeHb. TaB BnE6OeHTne NotioPi NIOpOpAII.
- Pekomehuyem HcHbBcBt USBYCTPOHCTBO CboCboDbHM qanm Dooee 10aHTN CKOPOCTHO DnCKA 0oee5MOTrC.
- 7em cokolbye paoep qpaia - tem coklwe spernr 38APN.
EcmBnnpcknoaKaHAn a CpaWbApeGMHN, nonBtca Coo6eHHe Yes [Ja] Nm No (HcT). BbOpaa Yes [Ja]. Bb MoKeTe bHInN 3 pHyKuM cDgTu BpeMeHN n nppeKnOHTb KaHAn.
Ipe3ancaTb yactok
IIO3BOJNT C500CHTB HACTPOHn HA BaUMC TONCBVDOPO HA 3HAHCHN,3AaHHbIM PNOBMDTELOM NO yMOHANIO.
1.HAKMITE KOKIyIe MENU NITIte JIMCTAHIOHOHORO UYPaBHeHn H BbEpeHt Setup (HaTpoKHa), 3atEM HAKMITE OK IJIN NOITBepKJHm.
2. BbEpeTne dyHkuu Reset shop (IpeeaancaTe yactok) HAKMITE OK/ DnBxOda.
3.VcTIOJIbIyTe 8yKBeHHO-LYfPObIOE KHOKNKIN DnBEOJa napNOJ.
4.CNMOUHIOKHOIOK BbIOpHTeOKnHAXMMTeOKnIPOITBEpIXeHHIA.
5. PONBHTC MEOH Initial setup (PBOHOBA-NHLBHE HACTPOKI). CNDyDy COOTBEETBYOILMIM HNCCTOPKUMM
I3meHeHne npaMeTpOB BBOda
BbMOKETe KOHcHpypO8BaT BaU TB B COOTBETBnC nOdkKHeHHm K Hemy 06Opdyo8AHm.
- Hacmte KhoNky MENU HnyKHe IMCTSHIOHOHORO ypaBLOHIA N BbOpTe Setup>Input settings (Hactroka >HactroKnBIO).
- Hacmite OK/ДЯ BXOda B Input settings (HacTpoKnBIO,IM).
3.HaKMTeA/TVyBb6opaeCoepHNTenrCnMOUIO KOtOpOroNkKnueTcOboOpD0BaHHe.
4.HaMMTO KONKy DnBbOpa Tnna annapatpyo, COeMHHeHHO C 3TNM COeMHHTENEM.
5.HaMMTE MENU DnA BO3epaB MaHOp SuHop (HaTPOK). TocRe BbIOHmHE HACTPOKm, BbIpaHnH MetKa ITOHnHK. 6OETOTOPaKBeCTcNOCHe HAIMeHOBAHn COOBTeCTByuOJER ToDgBa CnICKe NtOHHKOS CHIFANOS TOOE HAKATN KHOTIKI SOURCE HnPiBte JNTCTAHIOHNO YpIaBnHnMI INN KONIK OK HA TEIEBScope.
PnmeGae: He Bce MoerM mEOT KHONK HA KOpnyce.
IcnoB3OBAHne 3NeKtpoHn nporpaMMbTeenepeday
C nomoubEPG MOHNO BHAHTB CNOC TENENEPEJAH.C NOMOIOE PEG BIMOKTe NCKTaB, BILMnTn IPOCMATPBnTnpORAMMBN.
1.HaxMMTEGUIDEHaNyIbTeDmCTAHIOHHOyPpABJIHnM, NOBHTCMeNoNNow and Next EPG (EPG (AeKtPOHHB I nII),NO3BOJHOUHmIHFOPmPOBaTbO TcKUoH IN CNDyIOUe nporpaMA KKaDPKOraKAHXAN. PepeKIOHeHNE KAHAHOBC NOMOUBHK HABRAIUNOOHbXKHOHN
2.ДулковаэБЕPG(IrogрaramMbIbEPHa8IeHJIb3yB1EBCpASHOLIBETbIMa KHOKAMIA
-Prev day (Ppebduynn deh) (KONka Kcachoro Cbeta): Bbvodnt nporpammy EPG npebuyeero dHa.
-Next day (CneDyouu nnBb) (KONka 3eHoro Ubeta): BbOpaTn nporpammy EPG cneDyouo eo.
- View detail (Плесьатын посторistically) сели Сота, Бульбдени.
- Данный данный Довен的好!
- Дaria Калганов на лесьмь на чим.
- В�доград
- В�доград
- В�доград
- В�доград
- В�доград
- В�доград
- В�доград
- В�доград
- В�доград
- В�доград
- В�доград
- В�доград
- В�доград
- В�доград
- В�доград
-В�доград
-В�доград
-В�доград
-В�доград
-В�доград
-В�доград
-В�доград
-В�доград
-В�доград
-В�доград
-В�доград
-В�доград
-В�доград
-В�доград
-В�دоград
-В�доград
-В�доград
-В�доград
-В�доград
-В�доград
-В�доград
-В�доград
-В�доград
-В�доград
-В�доград
-В�доград
-В�доград
-В�доград
-В�догatron
-В�догatron
-В�догatron
-В�догatron
-В�догatron
-В�догatron
-В�догatron
-В�догatron
-В�догatron
-В�догatron
-В�догatron
-В�догatron
-В�догatron
-В�догatron
-В�догatron
-
-В�догatron
-
-В�догatron
-
-В�догatron
-
-В�догatron
-
-В�догatron
-
-В�догatron
-
-В�догatron
-
-В�догatron
-
-В�догatron
-
-В�догatron
-
-В�догatron
- Type filter (TINФчнлра) (KONКС синeroцета):ФИльтпда пограмДдгдсрвьх TB канов.
Hakimnke CmHO KIOHKY DIO NOKA3 TINPA INPOPMM I cnKcA cySTNtPOB.
C FMOIOIbHO KHOTOKIHA HAYIbTbDACTAHIOHHOYypaBHeHbIKoPAepeaHBe TnIbIPOpMaMMyCytNtPOB.
Bb6pnto 0nHnn 50bnue TmnoB, KOTOPBO BxOHTTOIOMETINB CINCKe Type (TNI),NITOM HAKMITE OK
HbBbopa (nHbBbaprt),Ppnt stom cBBA or BbpaHoro Tnna NOBHTCOTMNTKa. PnBbOpe Tnna, BbA tOAMATRcckn BbBbaperte nce ero noTfHM.
Taoke non30BaTeB MOKET BbIbnpa Tcpei NODTNIOB, He dena npedbaonlho Bboopa Tnna.
- HAKMNT3 CHIOHO KHONKY JIA BYXOJA N3 CNTCKA TINPOB I NQTNIOY
Pnocie qtnpnoBAMn 6dyT OTmpeHb Bce BAaIIOBMOBt TB-noprpAmBa.
Add schedule (Добавь радим) (Option): HabKMTE
OPTION Ha DCtAHMOHOM yPABJIeHIM DnBb3OBA M8HO Schedule list (CnCOK no rpaFkY).DnnoPob6hocTe No 3aIaNr paFkoB opaTntEcK paPaedny CnCOK no rpaFky.
- HaxMMTEGUIDE/EXITDnBbIXOaH3EPGnpeKIOueHnHa BbipAHn KaHn.
PVR (Personal Video Recorder)
-
Haxkmtte Ha Tnyte DaCTHaHLOHORo YtnpaIeHNOPTION NbIbEpeItte Quick access > PVR (6bOcTbPdOctyT > PVR).
-
HADKMITE OK/
3.HAKMMTC:
-KpachnKHONKa-DHANAHALI BANACM,3AMCnHHbIΦaHcOxpanHHTCBIANKE,HA3BHNHOHIOHmEPyKANLAIOI nanko PVr Media center>Video(MedaueHTP>BuEO); -3ENHYQKONKYOCTAHOBNTB3AINCb.
A/√/4peynpoeKa3anncn.
4.Bo DPOBMAI3NCH,OBREHTC MHNH-OKHO PVR, NOKa3bBAUOUEPPOLECCJANH
5. Tc6bI pOcMOTpB 3aIImcaHHyIO pOrpaMMy, HADo CHaHaJIa BbIMINIO pKIMMA PVR INBOIT B pKIMMgMedia center> Video (Media-entp> Buaeo).Bb6pabTnpiKyPVR, sateM Bb6pabTco0tBeCTbHyUdI 3aIImcaHHy IaHkAHT KONKY OK, Tc6bI HAnHbTOBcPNO3BDEHeH.(TakOnJ8 npRdoX JETBTHNIOHNIOE, ECNIIOI3OBaTeBb 3aIImcbBaT LfPpOBy paoIO pOrpaMMy).
POMME4AHM
-ФИКИМД DOCTYНA TOIbKO DApR UHpOBoBx KaHAnOB Bo3 KPNITTORPAINHECKON 3aunltB DaKe EcN yCTaHOBEN MOyIb YcNOBHORO DOCTYNA O6uero INrTePdEma (CI uMn Cl+), daHnA DeKUHNe He oyET DOCTYNA Ha KaHAnax C KPNITTORPAINHECKON 3aunltB.
-NoepnnaTToNbKOUSBnamrphopmaFAT32.
- Paped nokrohenem USB yctpovctba yoctobepbtecb. 0y Bb 3a hann daanhahe Hne Notepae Taahhne daanhe 13-3nnoxoro dykyuHIOHPOBANH.
-EMBONBLWEPASMEPAMNTUSBYCTPOVCTBAIpyHKLPMVRTEMONBLWBPEMAR3A
-ECM Bbl XOTATE CMHHTA KAHAN WNTOCHIK BO BPEM 3aAMC, COXPAHTE WHOPOMAU NNEPEN PEPKNOHEM
Bocipov3beHHe HeosMOKHO,ecm oobem qainna npeebWaeTnpelbHO pOryCTMOe 3aHHeHHe, He npodepKBAeTcFOpMaT,etbNOBpeJHnHnFAa, a TaKoe npI Hey2AHOHDMekDIOOBBHH.
He OTKIOUHTBE USB narnbTO BO BEMN TNEHN NNNNEPDAH, INNAO CNTEMM NNN YCTPONCBO MOTYt 60nBnNEPOXENHb.
Cnncok BbInonHeHnaNce no paCnncaHIO
37a dyhkuu HcnoHbayetoc JyBbHnneHaeHaeHn no paccncaHNO.
1.HAKIMTE KHOHOKY OPTION HA NytBte DAcTAHIOHORO ynpabnHIN H B66pOeIOnuOyUoNk Quick access >Schedule list [EbctprB doctyn> CnCCK BeDae03anCe]
2.HaKMnTe KhoNky OK dnn cToOpaeKeHmCnKcAeHcei
3.IIpaBaeHHaBcB BauCnCOK, HAKMITE CHAHANA KPACHyKOHNKIOIIOI OTObpaKeHbS Schedule list (CNtcoK 3aONeO no pacmcaHNO) 3atEm.
-
Channel number (Homep KaHana): NcNtbn3y KInnKa
-
Start date (Data HaHaHa 3aHmN); MNOJIbSyIe 6yKbcHoHIOA PPBOBIE KHOKNI Dn HAcTPOKn DaTb 3aHmN.
-
Start time (Bpemr cTepra): yctaHOBtE Bpema HauJAA 37nnn.
-
Stop time (BEMA octaHOBKn 3AENC): yCTAIOBITE BPEMA octaHOBKn 3AENIC.
-
Schedule type (Tin pacncaHna):
BKNHHTeRimder(HaONHHTb),KOTOpB Bam HANOMHT, KOrdaHaNo BIKHOITcBcBnPdAqN, kOnKOTOPo BByyctAHOBINBpCMB. EclnOHOCTcT, aBbHeCObepmnnHnKakoroDeICTBn, DAnorOBOoe OKHONCuesHET He 6dyTnpedpnHbHnKaKMeDpytme DeICTBn.
Biknne Record (Pekop), Kjda peumte npoeipb Hactpokny rpaivka n korga noqet spme, KOTOPoe BbycTBAHIN. EcnB Pemr NCTeH, a Bb He COBPIIIMHKAKO DECTBHA, 3AIAcB rpaivka HAHHTB ATOMATHECKN.
-Repeat type(TYN NOBTOPEHIA):YCTAHCBITEpaHHHbIEpEXMHNOBTOPHI3JANHC.
4.HaKMMaTe KONIKN ▲/▼/■DnBb6opaAdd [DobabHTb],3atcHaxMMTe KONIKY OK,TTObBbIOnJIHTb DobabChHe Baowy cTahOBKn B BaW cnCOK aanncn no paacncaHIO.
5.HAKMITE KAPACHYIO KHONKY,HTO6BI NOSTOPVITN PNPWEDEHHIE BIIUEIPOUQUYI IN 3AHECTIN JpyIYIO I0SMLMO BACTINCAHVE.
6.EcN BxOHTHE OTepeAaTIOPOBAt Nm ydaHnTB 3aNtNCb H3 pACINCAH, To HAp BoPbAT STy 3aNtNCb HAKMMTE KONKY OK, HToCBI BOITN.
7. HaxMMTE EXIT DnBbXoDa H3 MoHIO
Cetbeo noKIOHneHn
BblMoKToYcTaHbNtBaTbTB TAK,HToBbOHnOJKnIOHNCK K NHTePHerYepeBaBLaNkAaHbYcTei(LAN)npOBdHm Hm BecnPoBDHmNoKTHHeHm.
IopKIOUoyHeNk npOBoHOH cETn
BbMoKTepeNpOKnIOHTbBaW TB K LAN KaSeIem TpeMn cnoC0aBeT
- MoXHO NOJKIIOnHb TB K LAN ka6eIeM Cat 5 K BHeUHEMy MOEy.
MOnHIO NIOKIOHTB TB K LAN rPi HOMOII IP Sharer, NOIIOHOBBIM K BEEHMMy MoEMy. IVoNBo3yTe Ka6eB Cat 5.
B 3ABNCIMOCTH OT BAUJI CEH,MOKHO NOKIIHO IMTB K LAN,NOKIOHB LAN nOPT BAUJERO TB K PO3EKe CETH Ka6eMe Cat 5. 3aMeTBe, NOKIOHOHa NIN PO3eTKA K MODEMy mno poyTepy.
TcBbI npKIOHbCTK NpOBOHcTe, BbIePHTe Setup > Network > Settings > Interface (HaCtpoKa> CToB > UctaHOKn > HtepFecj, 3atm BbIePHTe Ethernet (Ethernet).
IopKIIkyeHne K 6ecnpoBOHOH cetn
ДИЗбсрпбдогигл�нкьчесьгнTунженБсрпбдогьшуретпIMMOMEMNбсрпбдогьнLANaДтп.ПОдknIOHETbeCspnOgDyUSBaNTP(USBZaryuK),ИКOMNIIeKTABaueRO TB K USB 1 nopy.
- TROBIOKIOHHTBCaI K BcnpoBdoHcTb bboepnTe Setup > Network > Settings > Interface (Hacptpoika > Cetb > YctanIOKn > NHTeppeC), 3atem bboepnTe Wireless (EecnpoBdoHa).
- Bb6pOte Wkssing set (BocPBOoHDA yctaHOBA) H KAKMTE OK PJU BIXOJA.
- Moetoi DIOJI KIOHEnoue: BBI MOKETB NOI KIOHIOITbO K 6ecripoHOJH COTN TPEM MEOTJAMIA.
Scan (Ponck)
Bb6epnre Wireless setting > Scan (Gecnpobnna yctahOBKa > POnCK), 3atm HekMnTE OK▶, TB 6ydet cKaHpoBaT bce KaHaJIb. O6hApyeKeHbIe KaHaJIb BydyT nKo3aBtBA7BcN.
BbI6epMTe KaHAn HauKMnTe OK/1
ECINBbBbipanSAKOpOBaHHKaHnBAMnO BBeCTN CooBETCByoUpNapOn. HaxmMTE OK Ha NytIe DnCTAHNOHOYnpaBHeHnI IN3OpaXeHnR BApTnAHOH KKnABMTypePBI BcDzAPnAOH
-3TOYCTPOAIE60HMEEITNAMRbOOBAPyKHHbIX KAHABIOB,TOYNO3BOJRTBKOHOHTbHXDAKEIOONJIENOTOKINCHNTHTANHAR.
Bb6epnre Wireless setting > Manual (BeCnpoBDHna yctAHOBA > PyHNO, sateM hAXmTE OK/ ▪, noBNTO nOcK3AOK BOIT B npABINbH bSSD IOCTyHORO BeCnpoBDHoro POyTepa Iy cTaHOBKn CB3N.
ECIN BAI AP NOJIDEPKNAEET WPS (Wi-Fi 3aunuHnAHB yctahOBKA), BIL MOXETE NOJIKIOHTbC K CETM Hpez3 PIN (TepcoHaihBn HIOHNTMkATOp) mPBC (KohpNpypaAHHKONIK). WPS ATOOMATUPOCK CKOHPNpyPvET SSID WPA KNOH BV NOCM PEXKMM.
Bb56p9te Wireless setting > Auto (BecPocBocHAny yctobAOK>ABTO), 3atam Hekmite OK> DTR BxOJIA.
PIN(PIN):BbIbepHTe PIN(PIN)HaxMMTE OK> DnXkOa. PpO3oERETenePAJUaCnyHaHOrPOKnda. YOCTOBEPbTeBC,HTO STOT KQyCTAHOBnEH AP. (O6paTtceB K HcTpyKuPoyTepe.) HaxMMTE OK> DnY CTAHOBKn CEBR.
PBC(PBC)ECNHAHBMOPOTPC0CTKNKONPA BPC,BbCepMePBA (BPC),3aTeM HAXMMTE OK/ PnB XPODA.HXMMTTO KHOKNY PBC HA BAPMOPOTPE NOpDKINBNTBTOCHHO 2MinHTNATGM HAXMMTE OK/BAuTBABOMATMAECKNBOCPIMMETcHn NDKIOHOTCRKHO
Ceteba yctaHObka
1.HaxMMTe MENHa HnyIbTo DnCTaHIOHOHOyUpBaNHeH N Bb6BepiTe Setup Network Settings Internet connection (HactpoKa ^+ Cetb YctaHOBk IqdkHOHOeK K IVHtPOHTy).HaxMMTe A/ YTO6bblbpaTbOn (BKn.).IIOOxMTeDIO yCtAHOBKnCB3M
2. 106bipnpoepbTbIOKIOOHmE KHTIepeHcy, Bb6epTe Setup Network Settings Connection test (HaCtpoKa > Cetb > YctaHOBKN > PpOBePka IOJKnIOHmH),3atEM HAXMMe OK/ Ecm He NpOHyIOHcB, CnEyITe YkA3AHFMN VNOK.
3. Bb6epTe Setup > Network > Settings > IP setting (HactpoKa > Cetb > YctaHOBKn > YctaHOBKa IP), 3ATEM HAKMTe OK/ДЯВ BXOД B MEHIO IP setting (YCTaHOBKa IP).
- Yctanobite Address type (Tin appeca) Ha Auto (Atro), IP aappoc 6ydt BBOeH AOTOMaTHHeCKH.
HnHex HnAnCaK KAK BBeC IP AApE BpyHyO. SytCTaONHtate Address type (Tin anpeca)Ha Manual (PyHoi, INKHOK▼BouNTe B npoeB none.
BBeHrte IP address (IP apecc), Subnet mask (MaKa cyGhETa), Default gateway (L1103), Primary DNS (TcpeHHbN DNS) & Secondary DNS (BtropHHbN DNS) 3AHOHJ, CnOJIb3yIe 6yKBeHHo-UPDPOBIE, DnE BDOJA HcEJI KHOJI-KCTPENI dy NEpEXOa DT OJHO TON J KDPYOMY.
- TRObI CHOBI PNOBEPMTN NOKNIQHHeNE K NTIEPHTE, NIOIE YCTAOHBN BIOEPMTe Setup > Network > Settings > Connection test (HAcTPOJKA > CToB > YCTAOHBN > IPOBEPKA NIOKNIOHEN)
4.ДИАОТБРASKEHINHDPOMMUNO TERYUEMCOEDHHEHMa IMEHNO VHTERPECIO,TNIMApDCA,IPAGNCI.T.D.BB6PENE Setup Network>Settings Information(Hactpovia) Cetb > YCTANIOKNI>IVHOPMAUMIA3ATEM HAKMNTEOK/
PokaTb mCOTpeTb
PIMMAHME 3TO pyKOBQCTBO NOKBNAET PNDYKT C TAKOH cyKMOK KAK KOa3aTb n CMOTpeb.10Ka3aT b mCOTpeb.COMECTMnCDLNA
PoiKIOUeyHe K Bauemy PIK
CHaHaA oBaCleBte NIOKIOHOHHe BAIeBO TB KpOpyTe.
TOM NIOKIOHMe BAI NK pOpyTe CBeBbIM KaBcHem IIM
63kAc6BnHIO. Y6DcmtocB, TTo Setup > Network > Settings >
Internet Connection (Hactpo/ka> Cet> YCTaONIOK>
IOKIOHOHHe K HHTepHer) On (BKL). EKIIOHO, a CNTema
3aUJIbI BAIeBO KOMNIOTOPa He 3aBnOKPiYET ONDKIOHOHHe.
BkIIOUeHe FyHKmN «Noka3aTb n CMOTpeTb»
Bb6epTe Setup > Network > Applications > Share & See (HaCtpoKa > CToB > PnVIOKChNIA > PNOA3TaN INCMOTpB) IN yCTAHOBITE On (BKl).
IocnoobateBbHb BnONHnTte WnH,OnHCaHHe DaJIbe, H Bbl CMOKTe TNOHYHTb YIOBOBcTBME OT npOCMOTpa 3AincaHHbx BIDEO, V3OcbpaKeHHm My3bIKn, COxPAeHHbX HA BaIeM KOMTHoTepe.
IobabHeMe MednBaWero PIK dNIOCBMECTHORIOICNOB3OBAHIN
YCTAHOBITME MCMAACBOPeTOKa3bHcMTPOBHa BauI KIP, PPOCTOy uD06hN cepBep-3TO Microsoft Windows Media Player 11.Pa3peWHTo BOCINb3oBaTbCBAuEMy TB paJnAmn C BAUero PIK.
- Okpoite Microsoft Windows Media Player 11.
Bb6epure Library > Media sharing (EbnnoTeKa > CoBmeCTHOe noIb3oBaHne MeHa).
「PObepE,TeIaJOKSharemydata to (CGMecTHIO)NCIOB3o8aTb MOH MeJa#.
- Bb6epntnHKOHy TB nnoKIOCHHcR KBaWemyI.K.
- Béboperte Allow (Papocenth) no30878 TaoncknBtcbk k PK n Béboperte OK dN no109Bepzehn Hn no30878H
PnmeHna: HcnoIbayte KhoNkny Settings (YCTaHOBK) 101 YCTAHOBNEHINHbXHNCHTPOEK.
- -Bb6epeLibrary>Add to Library (Bv65nntoTeKa > 20d6aBtB B v65nntoKyo).
BubepepeNTaPRAKDPyTHXNIOJIb3OBATeIeJIN dyOBMeCTHOHNCIOJIb3O8HN.
B-BioCepHTe Add (DIOBAEBITU) NHEKMMTTE OK DIAI TIOJIETEPXJHINH DIOBEEHINH
PpnoJoxHeNe 巧 Na3aTb n CMOTpeTb
Tc6bl BOITM B Medma-LHHTp, Bb6epnte Media (MeMa) B. RABHOM MEHO HAKMMTE OK. Nocce STORo MoxHo npC0aMtpBab foPorpaHm, CNYaBt My3byK mCMptb BBDQ, KOTOpBie xpAHTCRHa BAuEOM KOMNtBtpe.
PnmeHHe: Ecm FyHKnnaShare&See (KoKa3aTb n CMOTpBb) BKNKHOA, TB OTO6OaBHTCnCCKO DCOTYHbX CEPBEOB "KOKA3aTb n CMOTpeTb" KOTOPHbIOCTYHbN B KOKTHOBOTm.
Smart TV
P03B0AETNCNtS0BAtbHaBaiEeTEBEHOpEHTEPHeTnpTOXHOHNIOaONMUNHOADaTTPOBAHbUE HIEpHCTCaITbIyYIpABaJIrTpNOXeKHeHMMOKHO C NOMOJIbKO TEEBEHNOHHOTpyIbTAIDCTAHNOHOHO TYpABJHnI.
OCTOPOXHO:
sgerrRQAYr?PqOqQeBQTeHbSMart TV
S.HBQJzDj.BePzPej7dUQyTyrDuUqRrDrzHeIeDU 3BAMCIOCTOCHNARBAUE CETIN.
screbuiHerTQBHTyIqRtTeJfHRIqRUeP?7pH1nokanycta,obpatntcckNkctabuikky codepkannr.
HBeTHeHrQyAryrReaTu aqRrTeChEe rQzPrjBHI 0HOHEHnNtOb3oBAHnme CamFOI pNIOKKeHHMOY T 6bItpKpALCHJI.
HBeHTnHJQrYqYBECUQZcYesrTeYTeRRejdlqRlDTeJI HekOTOpHe NPOXKHEMPOFTOcNkHBATCBORPAH/HeHHO HINH NOIDEPKMBATCB.
DocTyK npnoxehnM Smart TV
Bbctpbblb308KOMAHDJIa6bCTpOroOTobpaKHHI HAIHIO CTpAMHIbSMrTVHbKMITE SmrTVHaITyIbTe DACTAHJHOHORO ynpABNHE.
2. TTo5bI Bb6paTb pInIOXeHHe, HAKMITE △/▼/□, a TTo5bI BOITN HAKMITE OK.
3. PPOCMOT INHTEPHECT CTAHMLDQCTYNEB NOPTABHBIX NPOIOKCHIMX SmartTV, POIyHb K HMOCTOOPMNOHO, HONIOB3A 3HOKOBPTAPAEINI 3EIEHYKO KHONKY BO BPEM 0TO6PAXEHCTCPAHMLTTELEBMBHCHOFOPTNA.
1.ДггггггггггггггггггггггgSmart TV BBB6eepNTe Smart TV (Smart TV)ВТВВHOMMннннннннннннннннннннннннннннннннннннн
Счкьд рллхонку 38SACRTTOTCTPаHR.БьМохкету
усотаныпармт彬 CTPы,КAK TOKKASHO HNKK;
Дггггггггггgгgггgгgгgгg
HAKMITE KAPACHYKO KHONKY,аТСБИ ВРОЧYINH
ONLIM, INCLOB3yHTE ▲/▼/nHAKMITE OK ДЯ
noITBepKdHIV.ТСБИ BEPHYTBa HAI TBAHNO CTPANHIL
Smart TV,BB6eepNTe KCHIN "Home" nHAKMITE OK.
POMMeyHME:POKOBKY COOENHEMH CHTHEPOTOM 3AHMMET HOKOTOPOG BPEM, PDEKOMSHVYTCN 10QOXDAHB HECKONKO MMYT IIEEP TM, KAK NCOJIb3o8aB TaHHyO dyHNkIO Smart TV POCLNE BCABPAeHnI TeneBnCopa a p5ocm peKM.
HbbTV
KHeOpTOpBie BcUeTApTe LmPbOBrux KAnHOB (BaUHnAe TOnbIO B CTaHdaptX DVB-T/C/S/S2) PpeIaI aIOT HtpepAKTHHy ToTexHONIO HbDTV [LmuKoDyanaLoHHoTbeNBeuBauHInE]
B TexhONrHM HbTV BcuaTeM COeTaTcO CBOI O6bHHy TENHEKACHOHY IPOPAMVy CO ECEMH HADMM NHPOPMAIMN INPA3BaeHcyH,OTy HDPOMAUKO MOKHO NPCCMATPVBaTB INHTBPAKTBVHOM PEXKIME.
YTO6bHaacnabTbC8TeXHONrMeHbTVBnonHmpe,HyKHO NOcOeMHITCBsOtnTeNEB3OpKVIHTepHety.
PIMMEMVAHAE: HA NOLLA TEN MELIOKOBI HEBIL 3ZARGYKATB DABHB, VICTOBLY ZAHDAHYO YQHHLQA.
DocytK HbbTV
IITOKpbTINHHTePAKTHBHXCTPAAHHLHAKMITEKAPCHYKOHNKYO BEOEEMA HACTOPOIN TELEBEHNOHOKARANCTEXHONORHEHbTV.HTO6bI NPEMeMuaTcnoCTpeHnAMHbTv,KNIOH3yIeA T/▼/T, aHHIOJIIOBHePckDHNHNAHAKMTNE OK.
AKTUBaUM/JeakTUBaUM yHKUH HbbTV
IockkkyBeeaTebHbTEcTbHbTV,ipOBDMMB B HekOTopBX TECTObXIPNIOKCHINXBEUATeNEi, MORYT pa3paKaTB BCINIBaIOUIMM MEHO, Dn8 BoIEE KOMΦOpTHOrO PPOCMOPa TEENEMOPMOKHO INCNOBcBaTOnHO BKN/BlKn HbbTV B MCHO ONI.
Почая Информача
PapOBBpoDHTenbckOM KOHTpOne
- PpOJIbI NO yMOnHnHIO: 1234. NpIbSOBATEB MoKET INMENHtB OTO HJIIOB DcYrO
Cynepe npap0423. Ecnblb 3ab5bn Csoi npap01, BvBdnte Cynepe npap Dnre npexoJa cepes no6npap01.
BbIaBHeHne uycpaHne npo6nem
IpeTeM, KAKOBpaTbBcB C7yK6y, O3HAKOMbTEcB CO 10dyuoumnpchHcm.
EcHn Ht n3o6paXeHH Wm 3Byka.
Y6dTeCb,TOKAbEbnPiTaHnPbAByInHO BCTaBHeN B pos3kY.
YbdeTtce,TOI TIO IOTIOHINK YCtABIOHNJI PABSIINHO. YbdeTtce,TOI AHTENHNOCOBDEHINPASSINHO
Y56D1Te8c,TOPOOMKo3bHbYCTAHOBHeaMHINHMABHbHOM yponBHO 3BHKyEHTAOJHOBHbHaEE33BHyIbPEXM.
- Y6eITecb,TO HayuHnKn He NOcOeHHeHbI.
BMOKOKOBCTNCTPOBJCTHEORPAHINBAIOTCPIIOEMOMUPOKOBUEATENBHCTAHILIM.
Ecnn n3o6paXeHne He YETKoe.
-8601030b,HTo aHToCHHH Ka50bI IOcOoHINHO PPABuHIO. PpOBepBe, ppaBnHIO IINPINMMEETC TENBEHNHO CINHII
KaHCTBOIIO6PbAKENMOKETYXUYUINTBcBCNECTBMEOHOBBPEMeHHIOIOOOeHNHEMHVHS-KAMEbp,KAMKOpJIepaNNDpFIOH NEPNHPMHIOTGCTPOITCTBA.OTKNCHTe OHOHXNPENPHHbX YCTPOICTB.
BbCtHbIe 3JyAaJIIN WIA BOSBILHEU HIOO CJOADTIO NOMEXAI JAHTEHHeH,TO MOKET BbSbATn NOJIEHOI EIOOOHORIO
JIBOHOIOI306paKaHENK.KAeCTBOI306paKaHENMOKET yUyHJIbCnTPOINVTOB30SAHNOCPTPOHARP8AEHEHOI AHTEHHJIb.
TropaONTHANBHe NIKIINH HAI 306pAKHM MOrYT 6bTB BISBAHIOEMXAMN OT 3NEKTPHECKHX PnIOBOB, HApIMep,OT pHaH, HAOJIIXPON NOIN3OCTN HeOOHBx IaMnI T.I. BbIKNCHITE INN y6peHTE INX.
EcIIaI6PbAKHeHcCNIiHKoMTeMHoe,CNIiHKoCMBeTHeO INIINTOHHPOBaHHeO.
PpOBepBeHAcTpoKuBETA.
PpOBepeyCtAHOBKyApKocTN.
PpOBepeTe dyHKuK pe3KocTn.
Mor 3aKOHHTbCpO KJIyXbI JIOMMHeUeHTHOJAMMBI.
Nyt TaHIOHOHO ynpaBHeHa He pa6oTaet.
Ppoepebte 6aataeKn B nyIbe nctahHIOHO ynpabHeHn.
Y6eDITECb,TOOKUKO,DACTBIOHORO,DaTHNKA,HE NpOBepraTcERBO3EINCTBMO CNBHOJIOHNMHeHTHOO OCBIUCHIV.
PnHOMOIAI MIK KOHK TKBHIOIbIaTIECb OINCTITIs JINH3bl HAXDAJIeFOCA HA TeBIm3Op DaTHMKA,INCTAHUHOHORO PnIbTaYpNAONHO.
EeBbIeBnepBcHHeBbYka3AaHBeH NOMOyT BAM BpeLHEH TExHHeCKoR BOpOca, OpaTAtTEcK TpaHtHMOHYanHOy 3a HNOpPmaJNo o6cbNyXbAHnIO.
Texnueckne xapaKtepcntmK TepeBudHna
TepeeeuaHne
PAL/SECAM
BG/DK/1/L
KaHaJIbI npnMa CBV/YBv/Ka6eNb
TIN TIOHEPA C CHTTEOM HACTOTBI
OSS yka3aHn
TToT PnOyDKI NcNBo3yeHekOTOpBIE npOrpAMMb, KOTOpBie pacipocctpaHmTCB COoTBETCBM C yCIOBMAH He3ABNCIMOH rpynnj JPEG.
ETOTnpOdyKTNIOJIb3yOT HekOTOPUbI npOrpMMbl, KOTOpBpeacnPocTpaHHTOCB COOTBCTCBM C yCIOBMAH NPOCKTA Freetype.
TOTnpOuyKTNCIOBb3oyHekOTOpBIEpOpyBMbl,KOTOpBie paccpOCTpaHrOTCB COOTBCETCBM C yCIOBBAIMN PocOgTA OpenSSL.
OTnpOdyKTNCNOLb3yETHeKOTOpBle npOrpMMbl, KOTOpBle
paacipocptpaHHTCB B COOTBETCTMB C yCIOBAMM JILJEHBMZlib.
OTnpOdyKTNCNOLb3yETnpoPAMMbHOe oBeCEHEHM
UNICODE,KOTOpoe PaocopCTpaHETCB COOTBETCTMB C
cYCNOBMAIJIHEMCM COKbTBIMNCXODHMKOOM IBM
3TOTPnpdyTKINON3yETnPpAMMHOeObeceHHeIbpg, KOtOpoe pacrpoctPaHHTcER B COOTBCTCBN C cyLNOHM NJIENHCM C kTbPTbIM NxCOHDMKOOM OSI Cerifed.
3TOTnpdykMCN0N5sEYnporpamMHeOEbcneHHeExpat, Libcur, c-ares, KOTOPOE paccnoctpaHcERc COOTBETCN C cycOBNAIMIHNMI.
3T01npdyKtVcHb5yETnpippaMMHoeobcIeHHe, KOTOppe pacnpcTpAraTeCBAcoTBcTBmCycOBaMnGPL/LGPL.
PporpmaHoe oeceneHne GPL: Rnpo Linux, Busebox, SquashFS, naker mld-ultils, e2fspros, BlueZ, Dbus, Glib, dpaeBep TcHm/3aunci NTFS-3G, samba, iconv, Linux File System FTA.
PporpamMHOoe oBecneHHe LGPL: DFB, SAWMAN, ALSA.
M3-3a pa3mHbX BO3MOKHOCTO npOyKuC C yHKJMAI SmrTV, a TAKKe ORpaHnHn H B DOcTyNHN KOHTHe, OpeDeneHHBe yHKU, pINIOKEHn H cyTaN MORYT 6blTe DOctyHn Hc H BCCx YTOPOCTBAX Nc Hc BO BCCX MecTax, Hn HEKOTopbX dyHKU HA SmrTV TaKKe MOrY NTpe6oBaTcB
Pa3dienb19
npouaHOpMaun
JONHHTAHBHe NEPDHPBHeYcTPOCTBA HIN HENKAE B3HOb, KOTOpBe PnOaTcR OTeBHO. POXaNtCy, NOcETe HAII B6-CaIT DII NIOHHeN JONHHTAHBn HINOPOMALI IN KOHKPETHOMY cTOPTyHNOCTN KOHTeTA. YcYrTa N DOCTYHOCCT KoHTeHa HepeS SmrTV MOrTy SPEM OT BpEMEH N3MOHTBc 6e3npdpAHTBHO rSybDMnHE.
BecKoHTHnYcTMyNIOCTyHbIeYepe33TOyCTPOiCTBO,
PnHnADKcKATPTcBIMNIAAMN3AaUuCCHbABTOPCKHMn
PnBaAaMn,NTaHtAaM,TOBaBHmN3AaKHMnN/INnJpyTMM
3aKaOHMaO6bHHTeJIeKTyAaHbHOcOCTBeHHoCTM. TaKoI
KOHTHOYcTyrNtPODcOtaBnIOCTcKKnIOHTHo
BaWoEYOHHORHKOOMOpHcKOHOrOcNOLOBHaBA, BnHO
MOKeTe NOIb3OaBbTI KIOoB KOHTEH NmYcTyrNt KAKIM-IM50
HOpaPoOHbHMBnAoBcLbCM KOHTHO TmN NOCTaBuNKOM
ycyTbO6a3oM.BoE OpAHmHHeaBbIKsIOXeKHO, eCNn HE
NoIyMeHO paopSeHHee COOTBETByouOe BOaDaJIbLa bKOHTHe
mN yCytY, BbHO MOKeTo I3MoHbT, KOKNoPb, NpOe3dABat,
3aPykArb, NyIaKOBaBt, NpOdaBaT, NpOboOHTb, PpOdaBaT,
CoaDaJIbPaIOPOBcHbHe PaobTb, PpODAHAt Mm KAKM
NoIyEHHbIE C NOMUbIc 3TOrO yCTPOiCTBa.

KANH XapakTOPHM MORYT BbTH HOMOHN63 yEOONENNA
Önemli bilgi
Güvenlik
Options > Common interface (Secenekler > Genel Arayüz)'ü,)
Väj Setup > Network > Settings > Interface (Installation