USER MANUAL PTV462403S PEAQ
PVR (Personal Video Recorder)
(Personal-Videorekorder) 15
Planungsliste 15
PVR (Personal Video Recorder) (Personal-Videorekorder)
Ensure that your domestic mains supply voltage matches the voltage indicated on the identification sticker located at the back of your set. Where the mains plug or an appliance coupler is used as disconnect device, it shall remain readily operable.
On certain models, the light indicator is located at the side of the TV set. The absence of a light indication at the front does not mean that the TV set is fully disconnected from the mains. To disconnect the TV set completely, the mains plug must be pulled out.
The TV set's components are sensitive to heat. The maximum ambient temperature should not exceed 35^ Celsius. Do not cover the vents at the back or sides of the TV set. Leave sufficient space around it to allow adequate ventilation. Install the appliance away from any source of heat (fireplace, etc.) or appliances creating strong magnetic or electric fields.
Moisture in rooms where the set is installed should not exceed 85% humidity. Moving the set from a cold place to a warm one can cause condensation on the screen (and on some components inside the TV set). Let the condensation evaporate before switching the TV set on again.
WARNING
This appliance is intended for domestic household use only and should not be used for any other application, such as for non-domestic use or in a commercial environment. If the external flexible cable or cord of this transformer is damaged, it shall be replaced by the manufacturer or his service agent or a similar qualified person in order to avoid a hazard.
Leave more than 10cm clearance around the television to allow adequate ventilation. The ventilation should not be impeded by covering the ventilation openings with items, such as newspapers, table-cloths, curtains, etc.
The apparatus shall not be exposed to dripping or splashing and that no objects filled with liquids, such as vases shall be placed on the apparatus.

To prevent the spread of fire, keep candles or other open flames away from this product at all times.
WARNING: To prevent injury, this apparatus must be securely attached to the floor/wall in accordance with the installation instructions.
CAUTION: Connect headphones with the volume set low and increase if required. Prolonged listening through headphones at high volume settings can result in hearing damage.
Eye Fatigue
When using this product as a computer monitor, health and safety experts recommend short frequent breaks rather than occasional longer breaks. For example a 5-10 minute break after an hour of continuous screen work is considered to be better than a 15 minute break every 2 hours.
Do not use the monitor against a bright background or where sunlight or other bright light sources will shine directly onto the screen.
The or POWER button on the TV set or the button on the remote control can be used to switch it on and put it into standby mode. If you are not going to be watching the TV for a lengthy period of time, switch it off completely by removing the plug from the mains power socket.
During thunderstorms, we recommend that you disconnect the TV set from the mains and aerial so that it is not affected
by electrical or electromagnetic surges that could damage it. For this reason, keep the mains and aerial sockets accessible so they can be disconnected, if necessary.
Unplug the TV set immediately if you notice it giving off a smell of burning or smoke. You must never, under any circumstances, open the TV set yourself, as you run the risk of an electric shock in doing so.
TV screen
The TV screen used in this product is made of glass. Therefore, it can break when the product is dropped or impacted upon by other objects.
The TV screen is a very high technology product, giving you finely detailed pictures. Occasionally, a few nonactive pixels may appear on the screen as a fixed point of blue, green or red. This does not affect the performance of your product.
Care
Use a glass-cleaning product to clean the screen and a soft cloth and mild detergent to clean the rest of the set.
Important: Using strong detergents, alcohol-based and abrasive products may damage the screen.
Dust the vents at the back and sides regularly. Using solvents, abrasive or alcohol-based products could damage the TV set. If an object or liquid enters the appliance, unplug it immediately and have it checked by an authorized engineer. Never open the appliance yourself since this may put you at risk or damage the appliance.
Hanging the TV set on the wall
Warning: This operation requires two people.
To ensure a safe installation, observe the following safety notes:
Check that the wall can support the weight of the TV set and wall mount assembly.
Follow the mounting instructions provided with the wall mount. For certain models, make sure to screw the hexagonal VESA wall mounting screw bosses (and screws) provided with the set into the nuts for the wall mount at the back of your set before your wall mounting.
The TV set must be installed on a vertical wall.
Make sure to use only screws suitable for the material of the wall.
Make sure that the TV set cables are placed so that there is not danger of tripping over them.
All other safety instructions about our TV sets are also applicable here.
Placing the TV on a table and other surfaces
Before setting up your television set, make sure that the surface you want to put the set on can support its weight. Do not place the set on an unstable surface (e.g. moving shelf, very edge of a unit) and make sure that the front of the television set does not overhang the surface it is standing on. To avoid TV from falling please fasten TV to the wall by using necessary screws (in Vesa wall mount holes), clamps, anchors to be bought separately. Install TV near to the wall to avoid falling backwards.
The features described in this manual are common to most models. Some features may not be available on your TV and/or your TV may include features that are not described in this user manual. The illustrations in this manual may differ from the actual product. Please refer to the actual product.

Products

Pb Battery
Notice:
The sign Po below the symbol for batteries indicates that this battery contains lead.
[European Union]
These symbols indicate that the electrical and electronic equipment and the battery with this symbol should not be disposed of as general household waste at its end-of-life. Instead, the products should be handed over to the applicable collection points for the recycling proper treatment, of electrical and electronic equipment as well as batteries for recovery and recycling in accordance with your national legislation and the Directive 2002/96/EC and 2006/66/EC.
By disposing of these products correctly, you will help to conserve natural resources and will help to prevent potential negative effects on the environment and human health which could otherwise be caused by inappropriate waste handling of these products.
For more information about collection points and recycling of these products, please contact your local municipal office, your household waste disposal service or the shop where you purchased the product.
Penalties may be applicable for incorrect disposal of this waste, in accordance with national legislation.
[Business users]
If you wish to dispose of this product, please contact your supplier and check the terms and conditions of the purchase contract.
[Other Countries outside the European Union]
These symbols are only valid in the European Union. If you wish to dispose of these items, please do so in accordance with applicable national legislation or other rules in your country for the treatment of old electrical equipment and batteries.
Contents
Important Information 1
Chapter 1 - Connections
Chapter 2 - Getting started
Chapter 3 - Installing channels
Chapter 4 - Using your TV
Chapter 5 - Using more of your TV
Connecting the power and antenna 4
DVD recorder, cable receiver 4
DVD player, home theatre system, PC 5
Game console, Blu-ray Disc player, headphones,
HD game console & HD camcorder 5
Remote control functions 6
Switching the TV on and off 7
Initial setup 8
Performing an automatic channel search 8
Accessing channels 9
Watching connected devices 9
Volume 9
Using TV menus 9
Selecting menu language 9
Setting up your favourite channels 9
Energy saving 10
Viewing TV using the 3D function* 10
Audio description 10
PAP function 10
Using subtitles 10
Turning on/off subtitles 11
Enabling subtitle languages on digital TV
channels 11
Selecting a subtitle type on digital TV
channels 11
Selecting decoding page language in Teletext ... 11
Digital Teletext language 11
SPDIF type 11
T-Link 11
Enabling or disabling T-Link 11
Using one-touch play 11
Using system standby 11
Network update 11
Common interface 11
Using the common interface module 12
Accessing common interface services 12
Software update 12
Changing to Shop or Home mode 12
MHEG function 12
Viewing photos, playing music and watching videos
from a USB storage devide 12
Photo 13
Music 13
Video 13
DivX video* 13
Time detection 14
Assigning a channel decoder 14
Diagnostics on digital TV channels 14
Time shift 14
Reset shop 14
Customising the input settings 14
Using Electronic programme guide 15
PVR (Personal Video Recorder) 15
Schedule list 15
Chapter 6 - Network connection
Connecting to a wired network 16
Connecting to a wireless network 16
Network setup 16
Chapter 7 - Share & See
Connecting to your PC 17
Adding media from your PC for sharing 17
Share & See application 17
Chapter 8 - Smart TV & HbbTV
Access Smart TV Applications (Apps) 17
HbbTV 18
Accessing HbbTV 18
Activation/deactivation of HbbTV 18
Troubleshooting 18
Television specifications 18
OSS Notice 18

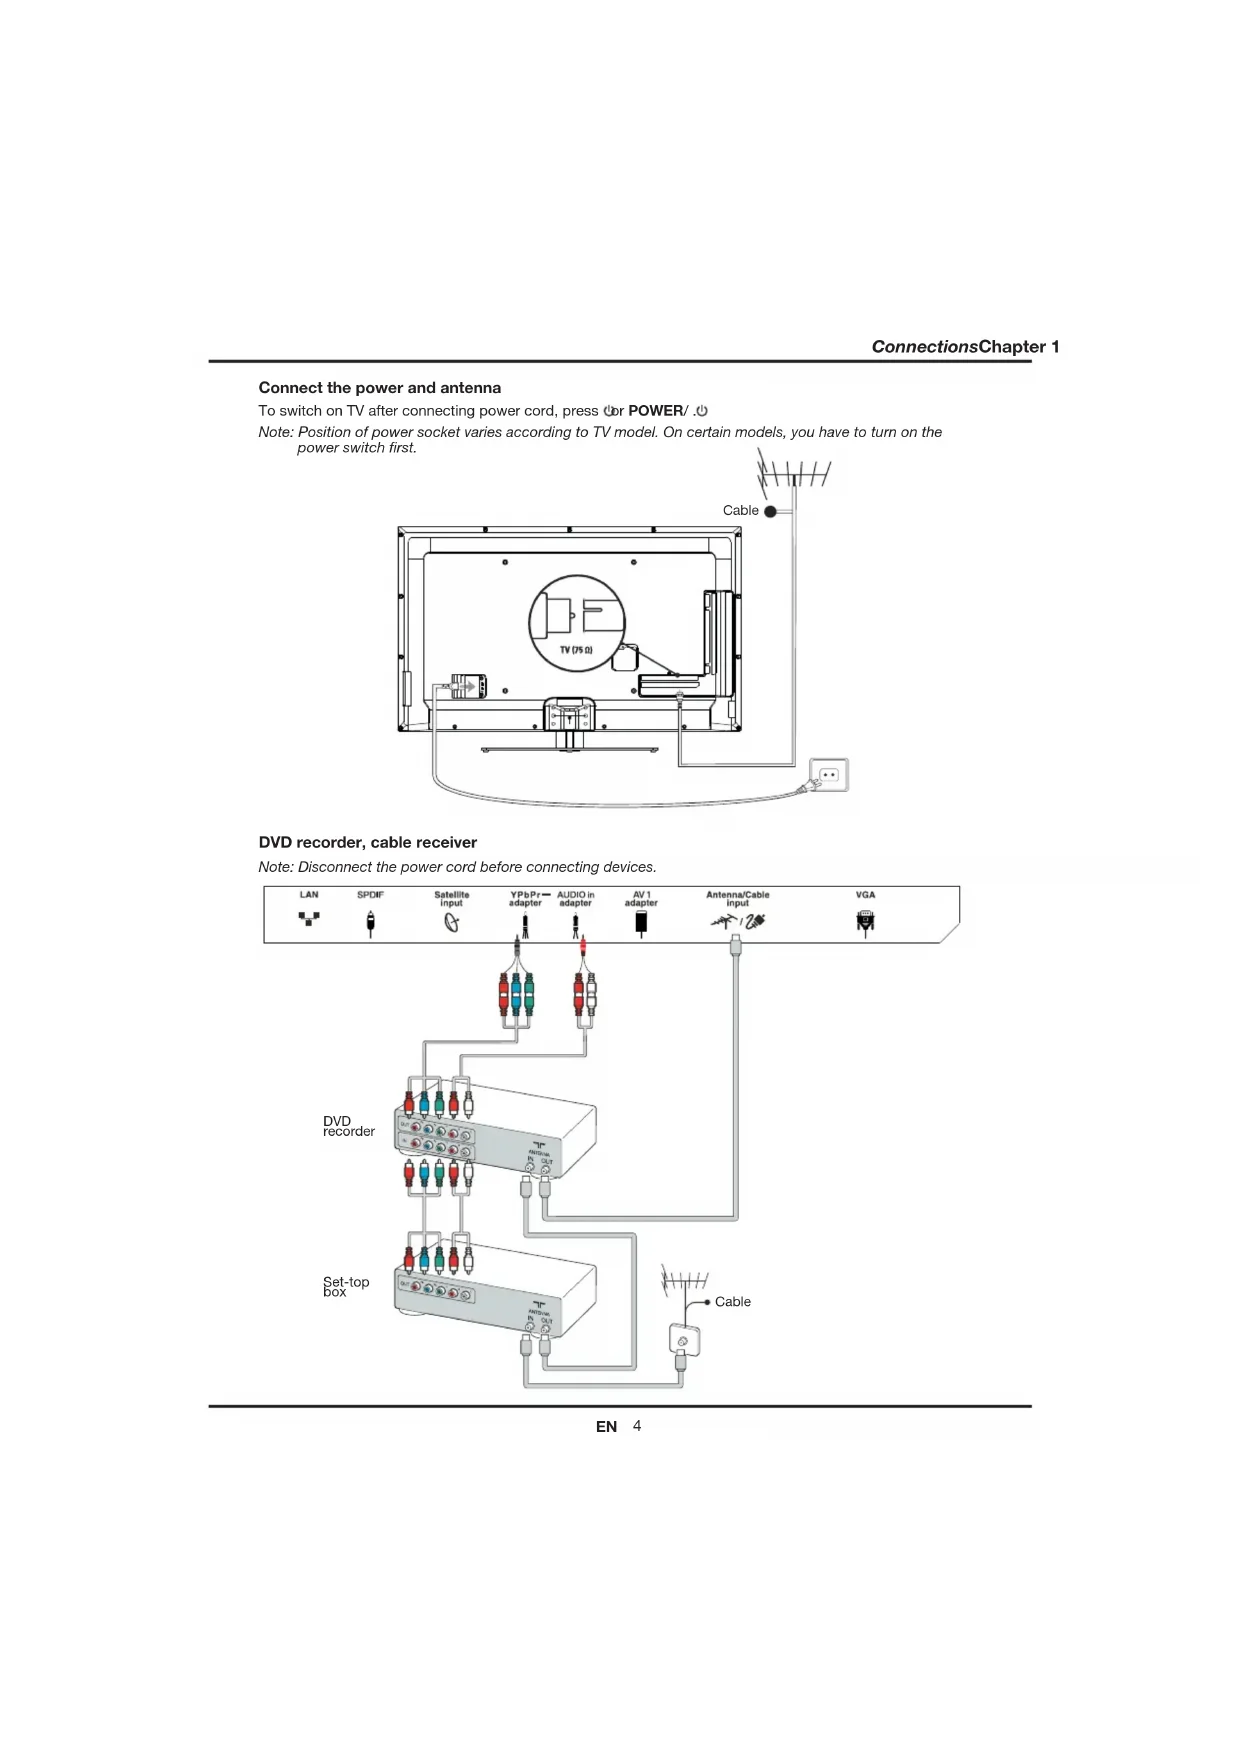
Connect the power and antenna
To switch on TV after connecting power cord, press or POWER/
Note: Position of power socket varies according to TV model. On certain models, you have to turn on the
power switch first.
DVD recorder, cable receiver
Note: Disconnect the power cord before connecting devices.
DVD player, home theatre system, PC
Note: Before connecting a PC, set the PC monitor refresh rate to 60Hz.

Game console, Blu-ray Disc player, headphones, HD game console & HD camcorder
Notes:
- USB connectors are for data input from USB storage devices. Only USB 1 port can be connected to your USB dongie.
- Excessive sound pressure from earphones and headphones can cause hearing loss.
- ARC(Audio Return Channel) function is only supported on HDMI 4 (ARC) port.
Number of HDMI may vary.
Notes:
- The figures are for representation only.
Not all connections available on all models.
The location of the power socket on the TV may vary according to TV model.
- The positions and names of the function buttons and connectors on the TV may vary according to TV model.
Remote control functions
Most of your television's functions are available via the menus that appear on the screen. The remote control supplied with your set can be used to navigate through the menus and to configure all the general settings.
Note: You are recommended to use the full screen mode. Do not use the display mode with black bars on both sides of the picture (such as 4:3) for long time; otherwise the TV screen may be damaged permanently.
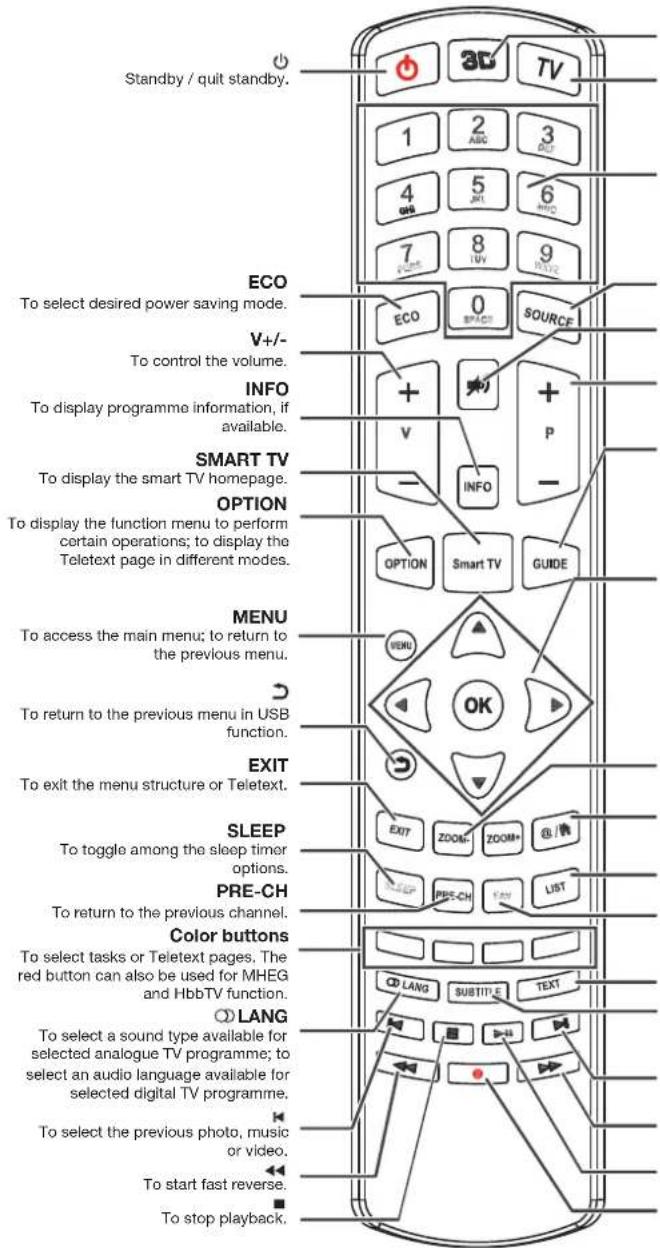
3D To toggle among the 3D input format options.
TV To access TV mode.
Alphanumeric
To enter channel numbers; to enter a letter, a digit or a symbol in some functions.
SOURCE
To select connected devices.
如
To switch the sound off and back on again.
P+/-
To change channels.
GUIDE
To toggle the Electronic Programme Guide on or off (only available for digital channels).

To navigate through the menus; to set functions and change values.
#
To navigate through the menus; to select menu options; to switch to the previous or next photo, song or video in USB function.
OK
To confirm an entry or selection; to freeze/unfreeze the picture in digital TV mode.
ZOOM-/ZOOM+
To select the picture format.
@/
To operate in some smart TV applications.
LIST
To display the channel list.
FAV
To bring up the Channel list selection menu.
TEXT
To toggle Teletext on or off.
SUBTITLE
To select a subtitle language available for selected digital TV programme.
#
To select the next photo, music or video.
>>
To start fast forward.
#
To start or pause playback.
.
Recording button.
Important:
Batteries shall not be exposed to excessive heat such as sunshine, fire or the like. Remove batteries when the remote control is not to be used for a long time. Batteries left in equipment may cause damage through deterioration and corrosive leakage, invalidating the guarantee.
To protect the environment use local recycling facilities for battery disposal. Dispose of used batteries according to the instructions.
CAUTION: Risk of explosion if batteries are replaced by an incorrect type. Replace only with the same or equivalent type recommended by the equipment manufacturer.
If the batteries in your remote control are run down, you can use the buttons on your TV set. In TV mode, they have the same functions as the corresponding buttons on the remote control. The OK button on the TV set can be pressed repeatedly to select the required source. In the menus they have the following functions:
For models with OK button on the set:
For models without OK button on the set:
| PR+ or PR▲ | ▲ | PR+ or PR▲ | ▲ |
| PR- or PR▼ | ▼ | PR- or PR▼ | ▲ & OK |
| VOL+, ▲or VOL ▲ | ▲ | VOL+, ▲or VOL ▲ | ▲ |
| VOL-, ▲or VOL ▲ | ▲ | VOL-, ▲or VOL ▲ | ▼ |
| MENU or ≈ | MENU | MENU or ≈ | MENU |
| OK | OK | | |
Switch the TV on and off
- When the power cord is connected, the TV will be turned on directly or be in standby mode. If the TV is in standby mode, press the or POWER/ button on the set or the button on the remote control to turn it on.
- To put the TV into standby mode, press the or POWER button on the set or the button on the remote control. The TV set remains powered up, but with low energy consumption.
- To switch the TV off, unplug the mains plug from the mains outlet.
("On certain models, you have to turn on the power switch first.)

Initial setup
Initial setup involves selecting all the settings required to be able to search for and store all the analogue and digital channels you can receive. Make sure that the television is switched on and follow all the steps in turn specified hereafter.
Note: If the channel search retrieved only the analogue channels it could be caused by poor broadcasting and therefore is not covered by manufacturer warranty. Manufacturers cannot be held responsible for lack of or poor broadcasting in some areas.
The first time you switch the set on, the Initial setup wizard opens, which guides you through the initial setup process. (Refer to Figure 1.)
- Press / to select your language, then press OK/▶ to enter the next step.
- Press / to select your country, then press OK to enter the next step. Note: If you select France, you will have to enter the Password setting menu here in order to set a password. Use the alphanumeric buttons to enter a four-digit number for your password. (0000 is too simple to be set as your password.) Re-enter the same code to confirm the password. After that, you will enter the next step automatically. (In this step, you can only press to return to the previous step.)
-
Press / to select your tuner mode Antenna or Cable or Satellite. (Note: Satellite option may not be available for certain models.)
-
Select Antenna.
Press OK to enter.
- Select Digital & Analogue, Digital or Analogue, then press OK/
Press to select Scan, then press OK/ to start the automatic search for all DVB-T digital and/or analogue channels.
Press OK to enter.
- Select Digital & Analogue, Digital or Analogue, then press OK/▶.
- Press to select Scan, then press OK/ to directly start your initial setup or enter below step.
- Select Full if available to search for and store all DVB-C digital and analogue channels.
- You may select another advanced scan mode if available (for example, Advanced), then configure the correct cable information as described below. Use the alphanumeric buttons to adjust the values for frequency,
symbol rate and network ID; use /> to select a modulation mode.
- Press OK to start initial setup relating to all DVB-C digital and analogue channels.
SelectSatellite
Press OK to enter.
Press / to select Scan, then press OK/ to enter the next step to configure proper information relating to satellite and antenna.
- Press OK to start initial setup relating to all satellite channels.
Note: To prevent the channel setup process from being interrupted, wait for the message indicating that the setup is complete.
- Before starting the scanning, you can also select Skip scan to skip the initial setup process.
- During the setup, you can follow the hints available at the bottom of the screen to return to the previous step by pressing . Or press EXIT to exit or interrupt the search halfway.
- Once the automatic search ends, the set enters the next step automatically. Press / to select your location Shop or Home. Press OK/ to confirm your selection and enter the last step.
-
- In this step, you can press OK to exit the initial setup. The channels are arranged in a preset order. If you wish to skip channels, modify the preset order or rename channels, select Setup > Organiser and press OK / ▶ to enter. In this step, you can also reseeset to the previous step.
This section describes how to search and store channels automatically. Instructions are for both analogue and digital channels.
- Press MENU on the remote control and select Setup > Language > Menu language. Press to select your desired menu language.
- Press MENU to return to Setup, press / to select Country, then press to select your country. The TV installs and arranges channels according to your country.
- Press / to select Tuner mode, then press to select Antenna, available or Satellite. (Note: Satellite option may not be available for certain models.)
Select Antenna.
- Press / to select Channel install, and press OK/▶ to enter.
- Select Automatic search (Refer to Figure 2.), then press OK/▶ to display Automatic search.
-
Press OK to skip the country selection and enter the next step. Or use / to reselect your country, then press OK to enter.
-
Select Digital & Analogue, Digital or Analogue, then press OK/▶ to start the automatic search, which relates to all DVB-T digital and/or analogue channels.
- Select Cable.
- Press / to select Channel install, and press OK to enter.
-
Select Automatic search, then press OK to display Automatic search.
-
Press OK to skip the country selection and enter the next step. Or use to reselect your country, then press OK to enter.
-
- Select Digital & Analogue, then press OK/▶ to enter. Select your scan mode if available and configure proper cable information in the same way as in Initial setup. Select Scan and press OK/▶ to start your automatic search relating to all DVB-C digital and analogue channels.
- Select Digital, then follow the same process as above to start your automatic search relating to all DVB-C digital channels.
- Select Analogue, then press OK to start your automatic search relating to all analogue channels.
- SelectSatellite.
- Press▲/▼ to select Satellite setup, and press OK/▶ to enter.
- Press / to select a proper satellite or add new satellites if needed, then press OK to enter and configure the correct information relating to satellite and antenna.
-
Select Setup > Channel install > Automatic search, then press OK/▶ to enter.
-
Select Country, and use / to reselect your desired country, if necessary.
-
Select Satellite tuning, press OK to display Automatic search. Configure the proper information. Select Scan, and press OK to start initial setup relating to all satellite channels.
-
The search may take a few minutes. During the process, you can press MENU to abort halfway.
- Once the automatic search ends, press MENU to return to the previous step or press OK to restart your channel search.
- After the automatic search, channels are arranged in a preset order. You can skip channels, modify the preset order or rename channels.
Using your TV
Accessing channels
Using the alphanumeric buttons: press the corresponding alphanumeric buttons to access the channels.
Using the PR + / - or P + / - buttons: scroll through the channels.
Watching connected devices
Repeatedly press SOURCE on the remote control or OK on the TV set to toggle between TV and other input sources. To resume TV viewing, press any numeric button to enter the channel, while + / - will cycle through all TV channels and other input sources.
Note: Not all models have OK button on the set.

Volume
Volume control: use the VOL + / - or VOL / buttons on the TV set or V + / - buttons on the remote control to increase or decrease the volume.
Sound mute: press the button to temporarily mute the sound. Press this button again or the V+ button to restore it.
- Press MENU to display the main menu. (Refer to Figure 3.)
- Press / / to select the desired item, then press OK to open the corresponding submenu.
- In submenus, use / to select menu options, use / to set functions or change values. Use OK to activate a setting. Use OK to open the corresponding submenu.
- Press MENU to return to the previous menu.
- Press EXIT to close the menu.
Note: Some options may not be available for certain signal sources.
You can choose your preferred menu language following the instructions below.
- Press MENU to display the main menu.
- Press / / to select Setup, then press OK to enter.
- Select Language and press OK to enter.
- Select Menu language and press▶ to select your desired language to display the menus.
- Press EXIT to close the menu.
Using more of your TV
Setting up your favourite channels
You can create a list of your favourite TV channels.
- Press LIST.
- Press the yellow button to enter Channel list selection. Press / to select the favourite list and press OK to enter.
- Press the blue button to start editing your favourite list. Press / to scroll through the channel list and press OK to select or deselect it.
- Repeat this procedure to setup other favourite channels.
- Press LIST/EXIT to exit.
Shortcut operation: Press FAV on the remote control to directly enter Channel list selection.
Energy saving
- Press MENU on the remote control and select Picture > ECO Settings > Energy Saving.
- Press to select a desired power saving mode to achieve the desired power saving effect.
- Press EXIT to close the menu.
Shortcut operation: Press ECO on the remote control to select a desired power saving mode directly.
Viewing TV using the 3D function
* not available for some models)
WARNING:
Some viewers may experience discomfort while viewing 3D TV such as dizziness, nausea and headaches. If you experience any such symptom, stop viewing 3D TV, remove your 3D glasses and rest.
Watching 3D videos too closely or for a long period of time may harm your eyesight.
A responsible adult should frequently check on children who are using the 3D function.
Do not use the 3D glasses for any other purpose - than viewing 3D videos on a 3D TV.
Do not use the 3D function or 3D glasses while walking or moving around, otherwise it may result in injuries due to running into objects, tripping, and/or falling.
- Press MENU on the remote control and select Picture > 3D, then press OK to enter. (Refer to Figure 4.)
- 3D Mode: Wear the 3D glasses first, then press to select the right 3D input format among Top and Bottom, Side-by-Side, 2D-to-3D, Line interleave and Frame sequential for the playing 3D video.
- L-R Switch:Select On or Off to adjust the 3D video for the left and right eyes with better visibility.
- Depth of Field: Adjust the stereoscopic effect of the 3D image converted from 2D image.
- 3D-to-2D: Select Left or Right to display the image for the left or right eye only. This function is deactivated when 3D Mode is set to 2D-to-3D or Off.
-
Press EXIT to close the menu. Notes:
-
3D glasses from other manufacturers may not be supported.
- All photo functions are disabled in 3D mode.
- If changing to a different signal source or accessing the SmartTV, 3D mode will be automatically disabled.
- Some 3D modes may not be available depending on the input format of the 3D video source.
Supported 3D modes:
ATV, AV, YPbPr: 2D-to-3D
DTV, HDMI, USB, Videos from the Internet: Top and Bottom, Side-by-Side, 2D-to-3D, Line interleave, Frame sequential
- 3D function in USB mode: During the playback of a selected video from USB, press MENU to display the video menu in the browser mode, then select 3D Mode. For more detail information, refer to the above related descriptions.
Audio description
Audio description refers to an additional narration track for Blind and visually impaired viewers of visual media, including television programmes and movies. The description narrator talks through the presentation describing what is happening on the screen during the natural pauses in the audio (and during dialogue if deemed necessary). You can use this feature if the current broadcast contains audio description.
- Press MENU on the remote control and select Sound.
- Press OK to enter.
- Use / to select Type and / to set Visually impaired. The speakers, headphones and volume level can be adjusted by using the visually impaired menu.
PAP function
Use this function to display the pictures from different source inputs side by side. Note that one window is for both analogue and digital TV inputs, the other is for VGA, HDMI and YPbPr inputs. (Note: Not available for AV-Scart on both windows.)
- Press MENU to display the main menu.
- Select PAP and press OK to enter.
- Select the PAP option, and press to turn on/off PAP function.
- Select TV position, press to reposition the TV window.
- Press / to toggle the focus window.
- When the focus is on the TV window, the alphanumeric buttons and + / - work in TV. When the focus is on the other window, + / - switches available external sources.
Using subtitles
You can enable subtitles for each TV channel. Subtitles are broadcast via Teletext or DVB-T/DVB-C digital broadcasts. With digital broadcasts, you have the additional option of selecting a preferred subtitle language.
Turning on/off subtitles
- Press MENU on the remote control and select Options > Subtitle.
- Press OK/▶ to enter. (Refer to Figure 5.)
- Select the Subtitle option, and press to select On/Off to turn on/off subtitles.
Enabling subtitle languages on digital TV channels
- Press MENU on the remote control and select Options > Subtitle > Digital subtitle language.
- Press to select a subtitle language as your preferred language.
- Press / to select Digital subtitle language 2nd.
- Press to select a secondary subtitle language.
- Press EXIT to close the menu.
Shortcut operation: Press SUBTITLE on the remote control to directly select a subtitle language available for the selected digital TV programme.
Selecting a subtitle type on digital TV channels
- Press MENU on the remote control and select Options > Subtitle > Subtitle type.
- Press to select a subtitle type. You can select Hearing impaired to display the hearing impaired subtitles with your selected language.
Selecting decoding page language in Teletext
Press MENU on the remote control and select Options
Teletext > Decoding page language. Select a proper type of language in which Teletext will display.
Digital Teletext language
For digital TV channels, your TV could change to a service with multiple initial Teletext pages in different languages. This function allows you to select an available language as primary language, which relates to different initial Teletext pages.
Press MENU on the remote control and select Options > Teletext > Digital teletext language.
Press to select.
SPDIF type
Connect to an audio device through the SPDIF output. Press MENU on the remote control and select Options > SPDIF type. Select a proper sound type from the list for digital programmes.
- If the current programme outputs sound in Dolby D format, then either PCM or Dolby D can be selected.
-
If the current programme does not output sound in Dolby D format, only PCM can be selected. Otherwise no sound will be output.
-
Select Off to turn off the audio output from the audio device connected to the SPDIF output.
Note: The options you may choose depend on the programme you are watching. If you select
PCM and the sound is ahead of the picture, you can select SPDFI delay from the Options menu and press to adjust the delay time to synchronize the sound with the picture.
T-Link
Use this function to search for CEC devices connected to the HDMI sockets in your TV and enable one-touch play and one-touch standby between CEC devices.
Enabling or disabling T-Link
- Press MENU on the remote control, then select Options > T-Link.
- Press / to select On or Off.
Using one-touch play
One-touch play enables you to press the play button on, for example, your DVD remote control. This starts playback on your DVD device and automatically switches your TV to the correct source, displaying DVD content.
Using system standby
System standby enables you to press the button on, for example, your TV remote control. This switches your TV and all connected HDMI devices to standby mode.
Network update
Press MENU on the remote control, then select Options > Network update. Select On/off to enable or disable the Network update function.
- When this function is on, the TV will automatically update channels if your DTV service provider updates his DTV network.
- When this function is off, you need to run the channel search again to get new channels or remove unavailable channels if your DTV service provider adds or removes channels from their DTV network.
Common interface
Encrypted digital TV channels can be decoded with a common interface module and a card provided by a digital TV service operator. The common interface module may enable several digital services, depending on the operator and services you choose (for example, pay TV). Contact your digital TV service operator for more information about services and terms.

Using the common interface module
WARNING: Switch off your TV before inserting a common interface module. Be sure to follow the instruction described below. Wrong insertion of a common interface module may damage both the module and your TV.
- Following the directions printed on the common interface module, gently insert the module into the common interface slot on the TV.
- Push the module in as far as it will go.
- Turn on the TV and wait for the common interface function to be activated. This may take several minutes.
Note: Do not remove the common interface module from the slot. Removing the module will deactivate the digital services.
Accessing common interface services
After inserting and activating the common interface module, press MENU on the remote control and select Options > Common interface.
This menu option is only available if the common interface module is correctly inserted and activated. On-screen applications and content are provided by your digital TV service operator.
Software update
Note: Connect a USB device with free capacity above 250MB before you start software update. Do not switch off the TV, unplug, or remove the USB device until the upgrade is completed.
Press MENU on the remote control and select Options > Software update. Press OK▶ to enter.
- Current version: Checks the current version of the software.
- Product name: Displays the product name of your set.
- Serial number(if available): Displays the serial number of your set.
- By network: Enables you to download and install the latest software version from the Internet. Make sure to set up a wired or wireless network connection first then select By network and press OK/▶ to enter. When new-version software is available, a progression bar appears. When the download finishes, the TV will go black and upgrade the software.
Note: Keep successful network connection during upgrade.
- By channel: Enables you to install the latest version of the software if available. Select By channel and press OK/▶ to enter.
- Us/ to select Yes under Auto download to automatically download the latest software
if available. After the software has been downloaded successfully, you will be prompted to decide if you want to install it right now. If yes, follow the on-screen instructions to complete your installation. You can also select to ignore the installation here.
- Select No under Auto download to decline the automatic download.
- Select Manual download and press OK/to start manual scanning the latest software. Follow the on-screen instructions to complete. During the scan, press OK/EXIT to cancel or exit the process.
Changing to Shop or Home mode
- Press MENU on the remote control and select Options > Location.
- Press to select your location Shop or Home.
- Press EXIT to exit.
Note: According to the regulation of European Commission 2009/125/EC, in Home mode, TV will be put into standby mode automatically if there is no operation in 4 hours. This feature can be deactivated in Options menu.
MHEG function
Some digital TV broadcasters offer dedicated digital text or interactive services (for example, BBC1). These services work like normal Teletext with the addition of number, colour and navigation buttons.
- Press MENU on the remote control and select Options > Subtitle > Subtitle.
- Press to set Subtitle to Off. Note: MHEG and subtitles are mutually exclusive and cannot coexist on the same screen. If Subtitle is set to On, MHEG will not appear.
- Press the red button or TEXT on the remote control.
- Press / / to select or highlight items.
- Press OK to confirm or activate.
- Press one of the colour buttons to select an option.
- Press TEXT or EXIT to exit.
Viewing photos, playing music and watching videos from a USB storage device
Your TV is fitted with a USB connector that enables you to view photos, listen to music or watch videos stored on a USB storage device.
Supported file formats:
Photo JPEG
Music MP3
Video AVI, MPG, MPEG, TS, DIVX, MKV...
Notes: Some USB keys and USB products like digital cameras or mobile phones are not fully compatible with USB 2.0 standard so they may not work with the TV multimedia player. Not all USB keys or devices are compatible with the USB function. Not all above formats are recognised. The encoding formats of your files will determine whether or not they can be used.
When a USB device is detected, it enters the Media center menu directly. To enter the Media center manually, press MENU on the remote control and select Media.
Photo
Use this function to display photos, if available.
- Select Media center > Photo, then press OK to enter the main file content browser.
- In the main file content browser, use / / / to select a photo or an inner file folder.
- Select an inner file folder, press OK to enter a sub file content browser.
-
Use / / to select a photo in either main or sub file content browser, press MENU to display the photo menu in folder mode.
-
Sort: Sort folders and photos by modification Date or Name.
- Edit: Copy, paste or delete a selected photo.
-
Parser: You can select Recursive to display photos from all sub file folders.
-
Select a photo, press OK to watch, and a slide show begins from the selected photo. Press OK to pause the photo if you want to rotate the paused photo. Press MENU to display the photo menu in the browser mode. You can play, pause or rotate the photo, select different play modes and displaying effects, etc.
- Press the related buttons on the remote control to perform the available functions shown on the function bar at the bottom of the TV screen. Press the INFO button to show or remove the function bar.
Music
Use this function to playback music, if available.
- Select Media center > Music, then press OK to enter the main file content browser.
-
Use / / to select a song in either main or sub file content browser in the same way as in photo display function, press MENU to display the music menu in folder mode.
-
Sort: Sort folders and songs by Name, Genre, Artist or Album.
- Edit: Copy, paste or delete a selected song.
-
Parser: You can select Recursive to display songs from all sub file folders.
-
Select a song, press OK to play, and automatic playback begins from the selected song. Press MENU to display the music menu in the browser mode. You can play or pause the song, select different play modes, etc.
-
Show lyrics: This option is available for the songs with lyrics. Select it and use to turn on/off lyrics synchronized display.
-
Audio only: Select and press OK to listen to the music with the screen turned off. Any key press will turn the screen on.
-
Press the related buttons on the remote control to perform the available functions shown on the function bar at the bottom of the TV screen.
Video
Use this function to watch videos, if available.
- Select Media center > Video, then press OK to enter the main file content browser.
-
Use / / to select a video in either main or sub file content browser in the same way as in photo display function, press MENU to display the video menu in folder mode.
-
Sort: Sort folders and videos by Type, modification Date or Name.
Edit: Copy, paste or delete a selected video.
Parser: You can select Recursive to display videos from all sub file folders.
-
Select a video, press OK to watch, and automatic playback begins from the selected video. Press MENU to display the video menu in the browser mode. You can play or pause the video, select different play modes, screen modes and preset picture settings, etc.
- Press the related buttons on the remote control to perform the available functions shown on the function bar at the bottom of the TV screen. Press the INFO button to show or remove the function bar.
DivX video (* not available for some models)
ABOUT DIVXVIDEO:DivX@ is a digital video format created by DivX,LLC, a subsidiary of Rovi Corporation. This is an official Divx Certified device that plays DivX video. Visit divx.com for more information and software tools to convert your files into DivX videos.
ABOUT DIVX VIDEO-ON-DEMAND: This DivX Certified® device must be registered in order to play purchased DivX Video-on-Demand (VOD) movies.
Obtain your registration code:
- Press MENU on the remote control.
- Select Options > DivX(R) registration.
- Press OK and your registration code will be displayed.
Go to vod.divx.com for more information on how to complete your registration.

Deregister your TV:
If you wish to deregister your TV,
- Press MENU on the remote control.
- Select Options > DivX(R) deregistration.
Press OK and a message will guide you.
DivX®, DivX Certified®, DivX Plus® HD and associated logos are trademarks of Rovi Corporation or its subsidiaries and are used under license.
Time detection
You can detect the time from digital channels using the following operations.
- Press MENU on the remote control and select Options >Timer >Clock > Auto synchronization.
- Press to select On.
Assigning a channel decoder
Decoders that decode analogue channels can be connected to the AV connector. Assign the TV channel as a channel to be decoded. Then assign the connection where the decoder is connected.
- Press MENU on the remote control and select Setup > Decode.
- Press OK/▶ to enter the list.
- Press / to select the channel to decode.
- Press OK to select or unselect the channel.
- Press MENU to return to the previous menu.
Diagnostics on digital TV channels
- Press MENU on the remote control and select Setup > Diagnostics.
- Press OK/▶ to display some signal information on the current digital channel, such as signal strength, frequency, etc.
Time shift
Allows you to record the TV programme so that you will not miss the favourite part even if you go out. Before you use the function, connect a USB device to the TV first. For the first time, you should do the disk setup for the USB device.
Note: Feature is available only in selected products and, due to specific TV network limitations and country technical requirements, might not be available in product or place of installation. Feature might be also blocked by TV network due to copyright protection (HD content, recording protection). Please use OPTION on the remote control to check if feature is available in your product.
-
Press MENU on the remote control and select Setup > Time shift.
-
Press / to select On to switch on the time shift function, then press EXIT to close the menu.
-
Press OPTION on the remote control and select Time shift, then press OK to confirm.
-
Follow the directions on the screen to do the setup.
-
After the disk setup is done, press OPTION and select Time shift.
-
Press OK to display the time shift menu. -Press the red button to pause the picture and begin the time shift.
-
Press the red button to play the recorded part.
- When the time shift menu disappears and only the timing of the time shift remains on the screen, you can press the red button or OK to access the time shift menu.
- Press the green button to fast backward or the yellow button to fast forward.
- Press the blue button to quit the time shift function.
Notes:
Before you connect the USB device to the TV, make sure you have backed up the data in the device to avoid the loss of your important data due to unforeseen malfunction.
We recommend you use a USB device with free capacity above 1GB and disk speed faster than 5.0MB/sec.
- The bigger the file size for time shift, the longer the recording time.
- If you change the channel in time shift mode, a message prompts you to select Yes or No. You can select Yes to exit the time shift function and execute the channel change.
Reset shop
Allows you to reset the TV to factory default settings.
- Press MENU on the remote control and select Setup, then press OK to confirm.
- Select Reset shop and press OK/ to enter.
- Use the alphanumeric buttons to enter the password.
- Press to select OK and press OK to confirm.
- The Initial setup menu appears. Follow the related instructions.
You can configure your TV according to the equipment you connect to it.
- Press MENU on the remote control and select Setup > Input settings.
- Press OK/▶ to enter Input settings.
- Press / to select a connector your equipment is connected to.
-
Press to select the type of apparatus attached to this connector.
-
Press MENU to return to the Setup menu.
After configuring, the selected source label will be displayed after the name of the related connector in the source list when pressing SOURCE on the remote control or OK on the TV set.
Note: Not all models have OK button on the set.
Using Electronic programme guide
EPG is an on-screen guide that displays scheduled TV programmes. You can navigate, select, view and record programmes.
- Press GUIDE on the remote control, the Now and Next EPG menu will appear, which allows you to get information about the current or next programme playing on each channel. Navigate through the different programmes using the navigation buttons on the remote control.
- Use the colour buttons to view the 8 Days EPG.
- Prev day (Red): List the previous day's EPG.
- Next day (Green): List the next day's EPG.
View detail (Yellow): Display the description of this programme if available.
- Type filter (Blue): Programme guide filter for digital TV programmes.
- Press the blue button to display the programmes' type and subtype lists.
- Navigate through the different types and subtypes using the navigation buttons on the remote control.
- Select one or more types, which you want to highlight from the Type list, press OK to select (or deselect). A checkmark will appear to the left of the type when selected. When you select a type, all its subtypes will be selected accordingly.
- Also, you can select some desired subtypes without selecting any type first.
- Press the blue button to exit the type and subtype list.
After filtering, all your desired digital TV programmes will be highlighted.
- Add schedule (Option): Press OPTION on the remote control to bring up the Schedule list menu. For details on scheduled recording, refer to the Schedule list section.
- Press GUIDE/EXIT to exit the EPG and switch to the selected channel.
PVR (Personal Video Recorder)
Allows you to record your favourite TV programme. Before you use the function, connect a USB memory device to the set first.
Note: Feature is available only in selected products and due to specific TV network limitations and country technical requirements might not be available in product or place of installation.
Feature might be also blocked by TV network due to copyright protection (HD content, recording protection). Please use OPTION on the remote control to check if feature is available in your product.
- Press OPTION on the remote control and select Quick access > PVR.
-
Press OK/▶ to enter.
-
Press:
-
the red button to start recording, the record file is put into a folder named after the channel number under the PVR folder in Media center > Video;
-
the green button to stop recording manually; if the recording duration finishes, the recording will stop automatically.
-
▲/▼/▲/▶ to adjust the recording duration.
-
In recording, PVR mini pane will also show on the screen to indicate the recording progress.
- To watch the recorded programme, exit PVR mode first and go to Media center > Video. Select the folder PVR, then select the related record file. Press OK to play. (It is the same if you record a digital radio programme).
Notes:
- Feature available only for digital non encrypted channels. Even when CICAM (CI or CI+) is inserted, feature is not available on encrypted channels.
- Only supports USB memory device of FAT32 format.
Before you connect the USB device to the set, make sure you have backed up the data in the device to avoid the loss of your important data due to unforeseen malfunction.
- The bigger the USB device memory size for the PVR function, the longer the recording time.
-
If you want to change channel or signal source during recording, store the recording data before changing the channel or source.
-
The set cannot play files normally if the parameters of the file exceed the limitations of the system, the file format is not supported, the file is damaged, or the file cannot be decoded.
- Do not disconnect the USB memory device when the system is reading a file or transmitting data, otherwise the system or the device may be damaged.
Schedule list
This function is used to perform scheduled recording.
- Press OPTION on the remote control and select Quick access > Schedule list.
- Press OK to display the schedule list.
- To add a schedule into your schedule list, press the red button first to display Schedule list. Then,

-
Channel number to select the channel number.
-
Start date: use the alphanumeric buttons to set the recording date.
-
Start time: set the starting time of the recording.
-
Stop time: set the stopping time of the recording.
Schedule type:
- Set Reminder to be reminded that you can switch to the scheduled programme when the time you have set comes. When time is out and you do not execute any operation, the dialog box will disappear and no further operation will be executed.
-
Set Record to check if you really want to start your scheduled recording when the time you have set comes. When time is out and you do not execute any operation, scheduled recording will start automatically.
-
Repeat type: set different repeat mddese recording.
-
Press / / to select Add, then press OK to add the schedule you set into your schedule list.
- Press the red button to repeat above procedures to add another schedule.
-
If you wish to edit or delete a schedule, select it and press OK to enter.
-
Press EXIT to close the menu.
Network connection
You can set up your TV so that it can access the Internet through your local area network (LAN) using a wired or wireless connection.
Connecting to a wired network
You can attach your TV to your LAN using cable in three ways:
- You can attach your TV to your LAN by connecting the LAN port on your TV to an external modem using a Cat 5 cable.
- You can attach your TV to your LAN by connecting the LAN port on your TV to an IP Sharer, which is connected to an external modem. Use Cat 5 cable for the connection.
- Depending on how your network is configured, you may be able to attach your TV to your LAN by connecting the LAN port on your TV directly to a network wall outlet using a Cat 5 cable. Note that the wall outlet is attached to a modem or router elsewhere in your house.
Select Setup > Network > Settings > Interface, then select Ethernet to connect to a wired network.
Connecting to a wireless network
To connect your TV to your network wirelessly, you need a wireless router or modem and a Wireless LAN Adapter. Connect your Wireless High-Gain USB
Adapter (USB dongle) delivered with your TV to your TV's USB 1 port.
- Select Setup > Network > Settings > Interface, then select Wireless to connect to a wireless network.
- Select Wireless setting and press OK/▶ to enter.
-
Connection Methods: You can setup the wireless network connection three ways.
-
Scan
-
Select Wireless setting > Scan, then press OK/, the TV will scan all access points within range. The access points found by the TV will be displayed.
-
Select an available access point, then press OK/▶ to connect the TV. Notes:
-
If you select a protected access point, you will have to enter the corresponding password. Press OK on the remote control to display the virtual keyboard to enable you to enter the password.
-
This set has a memory function of available access point, which enables your set to be connected to the network even if you switch on the TV after power off.
-
Manual
Select Wireless setting > Manual, then press OK/▶, you will be prompted to enter the correct SSID of an available wireless router to set up the connection.
- Auto
If your AP supports WPS (Wi-Fi Protected Setup), you can connect to the network via PIN (Personal Identification Number) or PBC (Push Button Configuration). WPS will automatically configure the SSID and WPA key in either mode. Select Wireless setting > Auto, then press OK/▶ to enter.
PIN: Select PIN and press OK to enter. Generate a random PIN code. Make sure this code is installed on the AP. (For the procedures, refer to your router manual.) Press OK again to set up the connection.
- PBC: If your router has a PBC push button, select PBC, then press OK/▶ to enter. Press the PBC push button on your router within 2 minutes after you press OK/▶ again. Your TV will automatically acquire all the network setting values it needs and connect to your network.
Network setup
- Press MENU on the remote control and select Setup > Network > Settings > Internet
connection. Press to select On. Wait until the connection is automatically established.
- Select Setup > Network > Settings > Connection test, then press OK▶ to check the Internet connectivity. If it does not work, follow below steps to make sure of the connectivity.
- Select Setup > Network > Settings > IP setting, then press OK/▶ to enter the IP setting menu. - Set Address type to Auto, it will acquire and enter the needed IP address automatically.
- You can follow below steps to enter your IP address manually.
- Set Address type to Manual, then press to go to the first entry field.
- Enter the IP address, Subnet mask, Default gateway, Primary DNS and Secondary DNS values. Use the alphanumeric buttons to enter numbers and the arrow buttons to move from one entry field to another.
- After setting, select Setup > Network > Settings > Connection test to check the Internet connectivity again.
- Select Setup > Network > Settings > Information, then press OK/▶ to display the information on current connection, such as Interface, Address type, IP address, etc.
Share & See
Note: This manual covers products with Share & See function. Share & See is DLNA-compatible.
Connecting to your PC
Make sure to set up a wired or wireless connection from your TV to a router first. Then connect your PC to your router either through a network cable or wirelessly. Also make sure Setup > Network > Settings > Internet Connection is On and your computer firmware won't block the connection.
Enabling Share & See function
Select Setup > Network > Applications > Share & See and set it to On.
Follow the steps in turn specified hereafter, then you can enjoy recorded video, image and music saved on your PC.
Install a Share & See media server on your PC. The simple and familiar server you may install is Microsoft Windows Media Player 11. Allow your TV to share the designated files on your PC.
-
Open the Microsoft Windows Media Player 11.
-
Select Library > Media sharing.
- Check the checkbox Share my media to.
- Select the icon of the TV set connected to your PC.
- Select Allow to allow the TV set to access your PC, and select OK to enable your allowing.
Note: Use the Settings button to customize your desired settings.
-
- Select Library > Add to Library.
- Select your personal folders or folders of other users that you can access for sharing.
- Select Add and press OK to enable your adding
Share & See application
Select Media in the main menu and press OK to enter media center. Then you can view photos, listen to music or watch videos, which are stored on your PC.
Note: If Share & See is switched on, the TV will Display the list of available Share & See servers which are available in local network.
Smart TV
Allows you to enjoy Internet Applications (Apps), specially adapted internet websites for your TV. You can control the Apps with the TV remote control.
WARNING:
- Configure the network settings before using Smart TV.
Slow responses and/or interruptions may occur, depending on your network conditions.
If you experience a problem using an application, please contact the content provider.
According to circumstances of the contents provider, an application's updates or the application itself may be discontinued. Depending on your country's regulations, some applications may have limited service or not be supported.
Access Smart TV Applications (Apps)
Select 1. Smart TV in the main menu and press OK to display the smart TV home page. The App services depend on the country. You can do the country setting as below: Press the red button to display all the available country options and use / / to scroll through the options and press OK to confirm. Then select the "Home" button and press OK to go back to the smart TV homepage.
Shortcut operation: Press Smart TV on the remote control to display the smart TV home page directly.
- Use / / to select an App and press OK to enter.
Internet browsing is available with SmartTV portal 3. application. It can be accessed via the icon in the portal or via the green button when TV portal page is displayed.
Note: Since the connection with internet takes time, it's recommended that you wait a few minutes to use the smart TV feature after activation of TV from standby.

HbbTV
Some broadcasters of digital channels (only DVB-T/ C/S/S2 broadcasting) offer interactive HbbTV (Hybrid Broadcast Broadband TV).
With HbbTV, broadcasters combine their normal TV programme with all kinds of information or entertainment. You can browse this information interactively.
To fully enjoy HbbTV, you need to connect your TV to the Internet.
Note: You cannot download files to our TV with this feature.
Access HbbTV
When you tune to a TV channel that offers HbbTV, press the red button to open the interactive pages.
Then use / / / to navigate the HbbTV pages and OK to confirm.
Activation/deactivation of HbbTV
Since HbbTV broadcasting tests performed by some broadcasters' test applications might be annoying due to popping up menus, you can use the HbbTV on/off option in Options menu for better watching TV.
Password in Parental Control
- The default password is 1234. You can change it to a new one.
- The super password is 0423. If you forget your code, enter the super password to override any existing codes.
Troubleshooting
Please check the following list before requesting service.
There is no picture or sound.
- Make sure the power cord is properly inserted in the power outlet.
- Make sure the source type is set correctly.
Make sure the antenna is properly connected.
Make sure the volume is not set to minimum or the sound is not set to mute.
Make sure the headphones are not connected.
- Reception other than those of broadcasting stations can be considered.
Picture is not clear.
- Make sure the antenna cable is properly connected.
- Consider whether your TV signal is being properly received.
- Poor picture quality can occur due to a VHS camera, camcorder, or other peripheral being connected at the same time. Switch off one of the other peripherals.
The ghost' or double image may be caused by obstruction to the antenna due to high-rise buildings or hills. Using a highly directional antenna may improve the picture quality.
- The horizontal dotted lines shown on the pictures may be caused by electrical interference, e.g., hair dryer, nearby neon lights, etc. Turn off or remove these.
Picture is too dark, too light or tinted.
- Check the colour adjustment.
- Check the brightness setting.
- Check the sharpness function.
- The fluorescent lamp may have reached the end of its service life.
Remote control does not work.
- Check the batteries of the remote control.
- Make sure the remote sensor window is not under strong fluorescent lighting.
- Try to clean the remote control sensor lens on the TV with a soft cloth.
If the above suggestions do not solve your technical issue, please refer to the warranty card for service information.
Television specifications
TV Broadcasting PAL/SECAM BG/DK/1/LL
Receiving channels VHF/UHF/Cable
Tuner type Frequency synthesized
OSS Notice
This product uses some software programs which are distributed under the Independent JPEG Group. This product uses some software programs which are distributed under the Freetype Project.
This product uses some software programs which are distributed under the OpenSSL Project.
This product uses some software programs which are distributed under the zlib license.
This product uses UNICODE software programs which are distributed under IBM Open source license.
This product uses libpng software programs which are distributed under OSI Certified Open source license.
This product uses Expat, Libcurl, c-ares software programs which are distributed under MIT license. This product uses some software programs which are distributed under the GPL/LGPL.
GPL software: Linux Kernel, Busybox, SquashFS, mtdutils, e2fsprogs, BlueZ, Dbus, Glib, NTFS-3G Read/Write Driver, samba, iconv, Linux File System FTA.
LGPL software: DFB, SAWMAN, ALSA.
Chapter 9
Due to the various capabilities of products featuring the SmartTV - Services, as well as limitations in the available content, certain features, applications, and services may not be available on all devices or in all territories. Some features on SmartTV may also require additional peripheral devices or membership fees that are sold separately. Please visit our website for more information on specific device information and content availability. The services and availability of content through SmartTV are subject to change from time to time without prior notice.
All content and services accessible through this device belong to third parties and are protected by copyright, patent, trademark and/or other intellectual property laws. Such content and services are provided solely for your personal noncommercial use. You may not use any content or services in a manner that has not been authorized by the content owner or service provider. Without limiting the foregoing, unless expressly authorized by the applicable content owner or service provider, you may not modify, copy, republish, upload, post, transmit, translate, sell, create derivative works, exploit, or distribute in any manner or medium any content or services displayed through this device.
Design and specifications are subject to change without notice.

Activer/désactiver T-Link 11
PVR (Personal Video Recorder)
acces aux applications (Apps) Smart TV. 173
IbbTV 17
Activer/désactiver T-Link
Activering/deactivering van HbbTV 18
- Selecteer "Satellite" (Satelliet).
Activering/deactivering van HbbTV
LGPL-software: DFB, SAWMAN, ALSA.
Habilitar o inhabilitar T-Link
2D-to-3D (2D-para-3D), Line interleave (Intercalar linha), Frame sequential (Imagem sequential)
BaeuBaeuBaeuO tO tAOJIOoI a oVtEeI to BaoOeN TnTnBaoOoN KAI NkDkAaER ENTOO EOTNPOE.
AkaaoureTie Tc onyic ctiipnec NTO npoxovtae TE YI TOB ENIOOCTNTOPIE. Tc gukykepuiya mvoTe,BeBaWtee OI BIOVUETe Tc TAVuuec (Kai PioSe) Eeyuuvuae bDxvCESVA yo Toonotetn otov Toxo NTO npoxovta u Tnv Tnepaoa oT a Tepokxia yw tv Toonotetn otov Toxo oTo nuppeoc Tc Tnpaoaocac pnv anTv Toonotetn otov Toxo.
HnAepaon 6a npena va tonoeetBte eKaBeto toxo.
Bepaabebe 10x npopponote pmo KatoAAnPc BieC yto uako TOTOyoo.
Baeuuee ta Kaiaua TIC TAEoepoTTO BEOTuIe.
TPOW WOTe vay uTAPxel KINVOC oKVAOIEETNauOaTU.
Entoric, iouov dce cdoee oynoe oynedie tie TAEoepoEe.
TOnoBttnon TnC tnAopaoc oTpaneKai aAee
PtoTTO TOTIOIgAeTMy TnOeapd Aoc, BpauoBteOn tN EIOEVOA OIOPOU vAoTEy oBOOc TNC.
MnTOnTeTei TmNtApOaNnWvce enPawEeIou Ev Eivai Otaepic (x.n un otapso padi, atnv dipn jua cuaekun) kai Befauwitee o to npaoia upeoc, mTn Mtnpaoaev, ne PooaeExa ano Tny eupovda nVOW ovio nOia oiva eoTnOeTne.
Ia triy aayiun nwni ng tnaeapoeae,otepeoote try oto tox oie ntn apaainnre Bieec (onee atepwua Vasa), oaykntpec kai ouvbetnpce (ev npaaqabovotri onn oukeuola). Toctobetntry triy thn eopao Kovt otov toxio, wote va atokaietai to evexoxjevo v Tneoipoc ta iin.
Ta xapaikpiotika rou npiepaoviae oto auto evpeipioioyouwa ta nepoeopoteoovra. Opojueva xapaikpiotika evbgeyta va myu unocmpoiovai an ny tnaedapaoan ac /kai va unocnpoiovai kanaa dala xapaikpiotka ta orla sev npiepooivai ce auto To expeipiox pprionc Okiokovce autou ty evpeipioivexbgeyta va biapepvou ato npayatpu npioev Avpatette oto npayatko npioiv.

Npoiovra

Pb Mgtnolo
Enquancy: To ougou, Po kwa ane To ougou, uanuapwau unoukowu oanu npaupwau mepwau. paueo.
Pnnpoepieac npopppsi naiou e0anmuokaiptapiwv
[Eupwtaikn Ewoan]
Auta ta oujba oioeikovou ot i naekpokc kai naktpovke cukuec koi ptapiec. Tpuo depouv to ukyckipuve oukofo dev Ba npetie va anoppittrovat ma ie ta oika da atopupata peta To TEKoc TIC Cwic, Touc. AvntBecTa npoiovta auta B npetie va npadabodva yia avakokwana stk aonua jauanyic naktpikuvkai naektpovkow oukeuwkui kai npatapwya kartan anolomnqk avakowon auupwva me tvv ekn vovobeda ka TC Odyic 2002/96/EK ka 2006/66/EK
AtopipintovTac aotata auta ta npoiovta,
oipalaote atnynpocatau yau kivuk
tupav kai tnyatopayi mawabv apyivkav
enittwewiy to nepiaalov kai tv uyeida,
o otioec fo npopouaova npokAnov ce
nepiunonakdaranncdiayelpiocantuv
anopipupaow.
Tia piaoatepe Tpaoopoe cxytae Ta
anpaia uauowc kai avokawoncu antuuv Tw
tpovwot, aeneuubvBeTe 0rO shjuO CDC, TY
utnpedia diaheong okaikuw anoppmuTuW To
kataotnua an to ntoia ayopaate To npiov.
Hakatanaan anoppwn auou Tou npovtoc,
evexetra va empepeonov, ovawaoye Tny
evkvnc vovbeca.
[Etaipkn xpon] Ev emuie va anoppiete auto to npoiov, aneuBuei te oav npouBent oac kai kEyTe Touc opouc kal tc npouoBgeoc tnc oujbaonc ayopdc.
[Xupec EKtoc Eupwniaikic Evwnoc]
Auta Ta ouboia loxouovlo vay tyn EupaataiEvow. Eav embouite va atopipite auto To npoiiv, akouhote Tny iouooa ebvkiVovoeia n Touc laotoc kavoviaoc Tnc Xwpaac yia Tn diaeipion naiou NkckpokouEeaioukai kntapaidy.
περιεχόμενα
PpOaon otic eapouoyc Smart TV (Apps) 17
HbbTV 18
PpOaon anv HbbTV. 18
Evpeyortoinaneepeyortoin HbbTV 18
Aipoppwon twputhetaewv eoosou
Mniopetee va puieoeiTre TnEpaon ooc oupuvaue ie tic ouqueeoc tioieoc ouvaidc.
- ΠείδE MENU ΟΟ τη Μλαχεραιθηκ και εἰσιαδετe Setup > Input settings (Pθμηι + Pθμιαδει Εοεδου)
- Pte OK/ va va pneir ot n kouipia Input settings (Pudicic Eiooou).
- Niéde ▲√ yia va etiāeEetie tiv ouveoan otioia ouveoetian ooueokoi ooc;
- Pioote via va etuauete ToT UTO TNC OOUKUNTO EAVU uouduu
- NIEOTEMENUwa va enioppeTe OTo pevoo Setup (PUBIion).
MetaTn diacopcoon, Ba eupoatnt n enauevyn etteta ninye.
muTo oovau ta oxetikou anoeuoc au otia nuyuovot
natate SOURCE OTO TnXeepiEtnpO NK OK OTN TnEepaon.
Enyisxion: Dev biotouv ola taevia to kounOK onn ouokuei.
XpHn HLeKtpovikou odnyou npoypaMAtoc
To EPG eivai evac, obnxoc, en tnc, oobvnc nnu npbaetra npoypaqumqevia neoiknnpoypaqata. Mntopee va aonynBete, va cteEeTe kai va epaovcete npoypaquta.
-
NIDEGUIDE an to mekovtpa. Taepowote to meuov Now and Next EPG (Hc Ony npoy TpaMeT), and oiou mtopoe va evnpeweite va ta pexovta kai ta enoeva npoypata Tuw kawluw, Pnanyte sta daopa npoypata uow Tu w tktpw nmyoc oto nkeovtpa.
-
Xpnouonoiote Ta Epypuia nKtpa va eepavote to 8 Days EPG (npoypua 8 npuiv).
-Prev day (npoyoucvnepea) (Kokko):EpaivcTov nAektpoikoo oyno tnc npoyoucvne npocac
Next day (enoyen) njupepa) (npadevo): Epuapeva tov naektoptkwo oboyno Tnc enoyenncnepae
View detail (Euipdwn) npanopopwiv (Ktpwo): EepcwCte Tn panopopoe, Tou npovpuocet oev evai biieaeue.
Type filter (ttnc,phiTPO) (MnIa;phiTO OByoY Ipyocpaiaocya ta YA TsyNpaia TpKaorttca pyocpaia.
PIEOTOJMAE MAKTPOVA VA EUPAMoTe TOTU TOIPOPOpApocKai TM AiaTa TOW UNTUTW.
Mntopoei va tynnyebe avqueo otouc diapocouc turoc kai uttouk; xynpiaotuivac, ta vniitoxa naiktpa tnaoynco oto naxepiottipio.
EnAeE Evnepooc Tnouc nou BeEe va onuoeae eon t Mota Type (Tunv), kai meote OK yia va enaee (1) anoeaeE). Ea onpdi Exyou B paovotel ot apopetro Tou Tnou Ovat enyec. Otav eneEte tnt, oci unotnnoi enayovtai autouma.
EtniOeBota, o xipnTcnpnep va euaeeu utotoux, xcupic va enaiae Kupu Torto.
- Ieote to pae va via pyeite anr tio Aotia tonk kai ANOTUNT.
OCTAVoAOKPaeTe ToFpApQa, Oa Ta unPbKa npoyopjata no Emfoue erqunovvot.
Add schedule (Pp. npoy.) (Option): Pnnyote OPTION 0TTO TAEEXPOITIOHO WIA VEAKOWTEI TO peovx Schedule list (Aioia npoypaatoc).Tia Aennopeepex, oxetix pa Tnv npoypaatopew Epypa; ovatpeite OTN Evnta Aioia npoypaatoc.
- NIEGE GUIDE/EXIT WIA WAO PYEITE AIO TO EPG KAI WAI NIPPODETE OTO ETDAVJEVO KAVGIA
PVR (Personal Video Recorder) (Прочи Ковс Eуразфис)
Zac eniptepe va ydpate to ayantjnevo tac nAOTTO npopayua.
Pax xprionnoaetn Tn ouyekpkiyn Aotoupyia ouvdeote npwta
mu ooukeun uvnuc USB.
Zyueow: Auto to xapaknnpaikno daibetai mvo yia
enaaevna npovla kai, loaw tav cuyekepieivw
peopqunv tuv tneonnnn kni kai nay
teynkwn ananrreeuyn trc ekatotre xupac, evbexetar
va mynu anoortpaeia and to npovn v nayn
diertare va tn jaupa eykarataaoc. Etnnc, to
xapaknnpaikno evbexetar va pndokpetaia and to Tyeonttko dktuo or a naiaia npootaiaoc
nveupctnck ickiartnac (mepyaevno HD.
npootaiaoc and anypaxprj. Ncote OPTION and to
Tnepnntnoe nnoe ne eene ne to npnnnne noonnoe nnoe nnoe noo
-
PIDE OPTION OTO TIAKovtpo KaI EINAEt Quick access > PVR (Aueon npocbaon > PVRI).
-
NIOATE OK/ ya wa ouweyioe.
-
Πεότε:
To kokawa koujiri yia va Ekwnyin yypapn to apxio
yypapnc antoeaei e evv unopakao me to ovua tau
qipouk kavaiou oto pkeo PVR oTo Media center > Video (Kevpc Noueow > Bivteo)
To npao WKOJIyIY Tn 1sikotnTc yypapicxipokvnta, av n dapkeia yypapic, Eetepacte n yypapdikdtetra autojata.
A/V/10va npooapocote n idpkiae yppaipc.
4. Kata Tjdeltaka Tc Eyspaic, eva kipko onja PVR Ba eepawotzi enionc oovyn ia va uno6eir Tn daikkiaea Eyspaic.
5. Pia va defre To eeyypauevo npoypaue, pyte rto TIV
Iaeuaypiv PVR npto kai katomnvnyalve oTo Media
center> Video (KeYPO TnAoueuv >BvTe).EnEAEto
Pfakao PVR, kai teto enaTSeTo to oxetko apexio. Ptece OK yia
avamapayuyin. (Eiva to ido av o xonotm ypaia ev aynipkdo
pabokpoko npoypaqu)
T
To xapaiknpiokdo biaiBertaiuvo yia nKoitovpokniye vnykbiak kovlaka. Aekur kai av Eeyiv ekiayuyi CICAM (CI iC), to xapaiknpiokdo de biaiBertaiu yia To Kocitovpokniye kovlaka.
- YnoompiKeu oovoukuv ano0kauoc USB p0pfcF FAT32.
Now oswedetemn oukeur USB onoukeur, beaowde nue. EeTe DNouyoupeu Auyauapaa OApaloe Tuv daequevuvc Mocoukeur wTm anopoy Anuuae Oauanrav Decoovw Lao npabertnc Daeuoyouv.
- Ooo neyolsteepn eivc n pumjnt mc uokneurjc USB wia nI
Ieroupiia PVR, too nepiooteepdo apkei n biadkacia
eyopdrc.
Edu 1eaeieo a oAede Kauo n JnJrOACOT Kato TIV EyypaH, aoaneWoeT a eewopueva deoepaov npiv nI AauN KauoN r Njyic.
To ouoteta dev npoei va avanapoye apexia kavonka av or npaetpoTou apexiou SENPOVU Tc dvatOTITc Tou auotniac, n pOpiRrTou apexiou dev unoomoketai, to apexio evai KATEAPUVE, n av to apexio dev npoei va anokokontnei.
Mny aapee m ouaeur USB 0r to oumua kvei ouaywac apyieu retaapepe bsepeva, auiue npuep va npowryu bufdec rco uouma r t oouk.
AioTa npoypaMAtoc
Aun n Aetauy xponononrna Tny kxtexon npocpaatquevnc,ewpaoic.
- NIOCTE OPTION TTO TPAEXIAKIOI KOA EIAEETe Quick access > Schedule list (P'YyOoN npoeBaoN > Aiota npoypaiaToc).
- NIEOT OK va va epapvatee T AIOA npoypuaToc
- Tia va npooBHeTea JIA aIa npoypApJatoc, nIeate npitra To KKKKO KOUJIY VA EAPOMETI eTukOy Schedulist (Aotra npoypApJatoc). 21 mUwOy
Channel number (ApiBuc, KavXoU): xpojortorOTeTo koujiT iya va etiAeeTos vaoBuc TOu KavXoU.
- Start date (Hujepounviwa evapncx: xpanpomortote ta aafapaeunntka koupania va opoeet mny hujepounviyaewapnc.
- Start time (Dpa evapEn): opiate tox xpovo evapEn: TNC EvapAnic
- Stop time (Xpovoc; diakotir) o: opiTE TAV Xpovoc diakotirK, TNC EyyapadK.
Schedule type (Turoc npoypaatoc):
Opate To 0rpoieo Rerimder (Ynveuian) yia va EvnpueGeTe ot npoeite va aAldEeTo KaBopioevo npoypau Tny apia nou eXeTe opoei. Oar avJeO xpvoc kai Dev Exete EKTEAeKaTOnaia Ateouyia, Taedapawei To piaia DlaDcyou kai Dev EeAeTeAeTe Kaiaia dAn Jtouyia.
- Opiote trv enuiv Record (Eypaip) yia va eAvee c av 06epe npayatka va Eekwne TTV npoypaatpauynen EypaipnTIV nupnTuEe opoei. Otav Anei oxpovoc Kai dev exte kteleq Kaia Aetoupya, Ba Ekwosai autopata n npoypaatpuyn evyapak.
- Repeat type (Tortoc etavadjunc): opicte diadoopetikk katoataon etavadjunc: syppadprc.
- PioeA 1/1/1y va emiEeAdd (Poo0hkn), kai om ouxya, OK yva npoeaeot to npoypaiaou opiae ot Aot npoyapatoc dac.
- THE TO KAKKVO KOJUMI YA va enaVaaBete TIC npaTAVU SIADKAIOE YA va npooOeTe AALnpoypaua.
-
AvéEÀte va etépeAotée n va diapayéte éva npópyaipá, àvêEÀte κai maité OY va yipóquyHécte.
-
NIEOTEXIT yva va KAEIOETO MEVOU
UvOeAn oE ikTuo
Mnogeite va pubiaeTre Tn Tne6paon aac Etoi, Wte va Exe npoPaan ro taiaiktu neou Tou tarkou oac kktou LAN), pouu dveupatn n auopupnt ouvocnc.
Dostep do Smart TV Applications (Apps) 18
HbbTV 18
Dostep do Smart TV Applications (Apps)
BHHIMAHIE:BOE6xHaeNTHTRPMAETXPOCTOCTOCTOCTO 800000000000000000000000000000000000000000000000000000000
PNEODECETPKEHME: PnPiIOJIOEJIYHINAHI YIHHKHOYCTOHANBIMMHNHIL yPOBQHNI POOMKCHN I NMOHHTO OBO CAYHE HEHOEOXIDNOCT. DNTIEHIOEPOCNUHANBEHPEH YIHHKHOPI BIBOCIKO PONKOCT MOKERT EOBRTTS IOBPOEKDEHCE QYX8X
3puTeJIbHoe yTOMneHe
PnHcHbOaAaHdIaHIOoNQyTA B KApCTBCKOMNIOTePHORMOHmOPa CINBAAHNTIO Oxepae AepoeB EBDsHACHOCHTOCBOEYIOBtAE HAcHbKcXoTHNNEpeBbA BHe CUYaAHHE DHHHHe NpepeBbHaHnpeMe,mye cpenb5-10MnHyTHnepeBnaocne HacnpepeBbHOpaBoTa 3aKpAHO,EM15MnHyTHnnepeBbNOnc2-2X HAcBPOBbO.
HeHcnohlyeMOHHTOPBAPKOnOBCTHOKe H HeDpyckaiTe nonpaHnHaEaepnHpNOPMoConeHIOHOCBETAUNPpKOBCEBN3 DNYIKHTOHHOK
KHOHNOHNPOWPOBTEENHOOPNKNHOHNOHNOTMOTBNTBOONBOBBHIOE BOKOHNEHINDAIIEPEPCEBA EPHNKOMOHNHOHPNNDNPOHNPOTENEOHPDEKOWHEYERNAIOHOCTAOKNOHTFOBHHUYLLTNCANHIOYBAPKHYKPOOHTKCSMTCKPTONTTAIA.
Bo apemr np03a peKAMHpye TcNkHHTeBnepOT CETY 2AeKPTPOINTHMn H ATeHHb, HToBb MOKNCHTBosBIOCTNEHB HHO rOHTAHILHn OAnCHLbcknKpAOKCNHnOcKoTOMnAHTIHbI MNHnYCCoB.CBORN CCMN CNOyDQoAouuCtoBcOeBBle POaOTKN H aHTEHhIE rHe3da cyHDM BOSMOKHOCTm NERKO cOgTyrn n bCTPcRc OTKNoHcyENBnKpApn DcEooKpOoMOnr.
CJETT HEMOTN OTKIOHHTB TAEHOB,aBb Bn NOYCTROAHIN 3ANX RAP NAM YIENDBbM. HNORDA HNI PAKKIX 0OCTONIECTBAX He CJETYAMOCOTONBJN OTKPBIBTTELEE3OP, NOKCNKUYPNTOM CYLIOCTBYPTNCKNPOPAKHEHAN3NEKTPNECKM TOKOM.
TB 3kpH
TBKpH,NCNbIyOeMnB a OTM HApHm, KOrTOcHnH 3Ctckna.
TIOsTMpyPiN BaeHHM NIN COyDaeHHM C DpyrYMM PpeMTMA OH
MOKET p367vCb.
TB KEPK HANRETC OOHBI BUCOK TOX-OTONHIMIADKOM,
OOCCTBACUOLN 10000000C BUCOKKHOCTBOHM
paepehveHm. HIOJDA MORYTIOBVITCR BCKOJIIC HOEHTNIHIX
NKCHIK (TOHKI CHIKO, ZIEHORIO KPOACHORO UBOTEO). STO HE HINHET
HA KACCTO pAOB TSTO ILOH
yxo
IINCHKOKHCAOIOYONLOOBOA OMOIOLOOEOCDCTBA, IPOIENHCHIEHOACTNCTCKO,aONCTALIOXCTCOTB TEBKDBD-MAIKKYOKTHKBAIKMKBKOIOUOGBCPDGHTG
BakhaHnOpmaaIpyMaeeHHB CmBbIX MCOUAX CPBCTB, COOPKAAICNCPT, AOBa3AHIIL BOCJCTA MOXCTPMDCTNK NPOEIPINHOAOKPAHA.
PENYBNDyDyBnTHe BcEBHINHOHNHX CbETNBOC TcBnBnONCTOPOHNOI NOKOMTTOEIOA, PIMPHIOHNIACPAOTBDIOA, a. TAKKE cncptocodepkaxnn HApbaMnHx NpOdyKToa, MOKET npVaeCTMA KnopejNEMeHHNtEOA, B cnhye nnonanHNNHYPTe NteBnEAOA KAKORo NcOcNtOCHNHO pnpmTaHsN KJKNCCOTCN DcyTe HBeMeDyTNHbKbNIOHTyo nPiHnACNTb KaNfKnPPOABAHORO TEXNHecKO rneHnAacta 1npoepkn paBtoocochoctn TcNEHnOAc, HnKo?Ha 8cKpnBnuey yQpTaNrCaAMCOnTEnHbNO, NOCKLNky pny OTHO3KKBET PCK TpAIVPPOBAHIN NOIaONATON NMIPOBPOEHN TNEBNOA,
KpenneHnTeNeBn3OpaHaCTeHy
BHHMaHHe: DnBbInOnHeHHa 3Toonepaun Tpe6yOToeBa QneBeka.
DnocCnHOHnA CooTachOH YCTAHOBK CNOyET HMMt B MNTY CNOyUcQaMCHAI
YEBIeTJHc, 10C TCBMA KMOKBT BUNPEXATB BEC TBEBAOPOA IN HECTBOHHORKOOPNHOAR.
ChyEHTHNTOPYIMNIOHOCTHOHYCCTHOKIE,MOHJOKOMH CTHETI HcKOTOPX MPOJENI YDOCTOBPEBTE BIPNOCHX XPERINHBA, BHHITHE EVOYTOHBRE BHNb VESA BIOBENBnBHTB)BRAK 2010MOHIXCADIOHNIHNIHIOOCTOFT
TeneBn30p CnedyT yCTaHbNtBaTaHaBaPnKaHoh CTHe.
Cn2yETCNJNBJ308aTbTJIOKMOHTAKHHEBVHTI,CCOTBTCTBYICHE MATMOYNTCTCHI.
TETKIEKHOHKBKAEI CIGYETD3A3BCT1TBAKAM06PBCOM.HC00AHONHEPNPTCTBOBUNENIKHKOJIOJIPO
MOKHOVONHOBORAHIVOPOMMIO NO GOZONHOCHOTNAHIO6XH HNOHYOKUM, BYINKOCAEMBXI DAIHNOXTEWEN3OPOC
YCTAHOBKaTeLEBn3OpaHaCToneN Dpyrnx NOBepxHOCTX
PepoeyctahnoKoTepehnoa 8eepnre.40neepxHocb,Ha KOTOPOy OHCTAHARBAETC,MOKOT BAPEPXHTBEO RBCHOE. He cndey aeeau Taeboeap HAp He cytoTcHOM CCHOBAH (hanpVme,Ha nepebpckHXN knoan HA camaom KOe cekm) Taekoe HebeooJIOcNEHIT,TOOe PpepeHHCTepehnsopHe bHcyrana3a npdeBn NopepXHOCTM,HA KOTOPOH OH CYTAHOHN. 40Tbe Taeboeep Hc yean, npkepenire erc Ho CTneepnnpnncn EheooMeix Wypynoe (E pKepeonpOteBcENB C TBeTe No CTnAaDPY Vasa), Akknnn H KpOeONN, KOTOpB MNOHO PPQoOeNT OPAHBO. 40Tbe TaeboeaoHc Hya Haaed,yctAHOHTBcEro ANTOHNOK CTOH. FyKun, onncaHHe B DAHOM pykoecDBe, ABIOKOTs OBHMIM BoHbIIOCTBa MOdN, HokToPOpE dyHkM MOrY CbTa He POctyTHb H BaBoum TaehoOOO, YNNB Bau ToOnaHOO MOKOT COpOeKATy FyHKun, He ONCAHHe B DAHOM pykoecDBe, NOBcBATER. IVIOOeTPOU B ATOM OPOeOeCTBEOT MYOT OT faktnieckoro npOyoDA. OpatInpocK KfAKTHOCMKYnpOkyT.

PpOdyKzH

Pb Battapper
PIMPOSHSHB:
SHK F B NAOO
CMNOMA
MIA CHETEP
CHINEMST
HCT CHENX
ODAPAMT
CBHIIL
HnΦopMaJnДЯ noIb3ObaTeNeI NO yTnImaun CTapRo OobOpDObaHNu 6BaTapeE [EbponeKcKnCoko]
3TINCMBOIbO603HAAOT,HTO3NEKTPN8BCKOE 3N3EKPONIOOBOPDPOBAHIN BATAPEO C DaHIMCMBOIOMHeNJIYTHINIPPOABTBM EMECT CobHbHM6bTOBbIM MyCOPOM NOOKOHAHIM CpOKAIXKcIKNYATALIN.3TNnpOyTkCBNDyET CdaTb BYnKtBcPOBa DcFOoCOTBCTBYKUeIe NpcPb8OHTK3NkPTPN4CCKORIO INKKTPOHOHO OBpyDOBAHIN, A TAKKE GATApE, NOJIEKAIUXX BOCCTAHOENHIO INepPo8OCTK,B COOTBTCTBN I CHAUHbHM 3A KHOHOdToBcTBM IN DpeKTHAMN 2002/96/EC n 2006/66/EC.
IpaBnBnaYyN3AaDAnbXpOyDyKTOB
NOMOKET COxPAHNT BnPPODyIbe pecypcb
IN PnDEoTBPATNTB G3MOXHOE HERATNHHOE
BO3eKnTBe Ha OkpyKaHouyO Cpey I
3dOpOBc VCN0BcKa, KOTOPoK MOCHTHOHytB
BCJeCTBeHX HePpABuHoi YTNH3aUIM.
3a DoonlHIHeHIOh XnKpOmaIe o PyHXTk
C6opAp nOpopoBeToK DaHbNpOyKTo
6opAtTeCB B MeCTHOe MyHNiMaIbHoE
ynpaBnHeHn, CnyKbOy No BvBo3y N yTNM3aUIM
OTdoBn IM B MarAH, B KOTOPOM BnPno6pJI
DAHBI npOyKT.
3a He npabnhyo yTnna3AIO OTOxOBO MORY
PmHaeBcBcU TpAcbb B COOTBETBNB C
HALMOHbHBMM 3AKOHNOBATEBOM.
[KopnpatnboNBOBATENI]
EcnB Bz 3axOHTte yTNnNtropOBAT daHHb
Pnpdyk, obpatntecb K CBOemy NocTabuNKy uYTOHNTB CPOKNI YCNOBnI DOROBOPa KynPiNpOdoakn.
[CTpaHbI,HeBxOJaMBeEbponeckn Co03] 3Tn CmBOnBbl DeTeyTObKOHa TeprVtropn Ebponeckoro Co03a. Ecnn Bbl Saxotnte ytniMaPBOAHTBaHHbInepejMeBTb,JeNJIte3TO CCOTBETCTBM C CyUeCTByoUIM HAIOHAbHBM 3AKoIOJATEbCTBOM NpDyYMM PnABINAMn nepepaOTKn CTaporo 3JNEKPTnecKOrO 6obopyoBBHn BaTapei,DeCTByoUIMB B Bauon ctpaHc.
Copepkanhe
BaxknaHOpMaun 1
Tnaba1-PoKnIOueHn
IoiKIOUeHHe 3NEKTPoNTaHnHa aHTeHHbI 4
DVD-pekopdep, npneMHNK Ka6eIbHoro TB 4
DVD-npOurpbIbateJIb,domaHmKINHOHeTaTp,IK...5
Hrpobar KOHCOB,Blu-rayDisc nneep
HayuHKn, HD irpoBaKoHcOJIb n HD KaMKOpDep ... 5
Tnaba2-Haayano pa60tb
FyHKnIyNbTaDnCTaHNOHOrO ynpabHeHnI 6
BkIOHHTb/BbIKIOHTb TB 7
TJaba 3 - Hactpoika KaHaoB
PepBHHa yCTaHObKa 8
ABTOMaTHueckn NOcK KaHaoB 8
Tnaba4-NCnoNb3ObaHneBaWero TeJeBn3opa
Docyn K KaHana 9
O6HapyKeHnnoCoeHNHeHHbIXycTPOIcTB
POMKOCTb 3ByKa 9
VcnoB30BaHMe MeHO TeneBu3Opa 9
Bb6op Raika MeHIO 9
Tnaba5-IOONHHTeJbHbIe BO3MOXHOCTN BaWeroTeJIeBUN3Opa
HacpoKa IIO6MbIX KaHaIOB 9
HnHaMnuecka noDCBETKa 3KO 10
CMOTpeTB TB c cyHKnei 3D 10
TnphnonepeBd 10
ΦyHKpPAP 10
IcnoB3cbHne cybTnTpoB 10
BkIOueHNE/BbIKIOueHne cy6TnTpOB 11
Bb6op 3bika cy6TnTpoB Ha qnpoBbix
TeneKaHaIax 11
Bb6op Tnna cy6TnTpoB Ha qNpPoBbIX
Tenekahanax 11
Bb6op 3bka CtpaHnUeIeKoOpOBaHm
B TENEKCTE 11
R3bIKuDpOBOrTeTepEKeKa 11
Tun SPDIF 11
T-MLHK. 11
PoiKIOeHne N BbIKIOeHne dyHKmT-Link 11
Bocnpoun3BeHHe OHNH HAnKaTneM KHONK
Pekm OxuaHn CnCTembl 11
06HOBnHeHne cetn 11
CTaHdapTHbI INHTeppeic 11
IcnoJIb3OBAHnme Moyna o6uero nHTeppeca .... 12
DocTyN K cnYk6am o6uero nHTeppeca 12
06HOBJIeHnE P0 12
PepexoB D DEMOHCTpaHONHHI INN
domaHn peKIM 12
ФVHKUNMHEG 12
PPOCMOTpΦOTOrpaM,BOCnpon3BedeHne
Mv3bIKN PPOCMOTP BIDeo 3aONMOHauLOeTo
yctpoIcTbA USB 12
ΦOTO 13
My3bika 13
Bvdeo 13
DivX video 13
OnpepeHne Bpemn 14
CTaHOBka KaHaJIbHOro DeKOepepa 14
HnOCTNka LppoBbIX TeneKaHaNoB 14
CDBINBpeMeH 14
lepe3ancaTb yactok 15
Imehenne npametpoB BbOa 15
IcnoJb3OBaHne 3NeKtpoHHo nporpaMMbl
eelenepeda 15
VR (Personal Video Recorder)
TepcoHaBbI BUneOMaHHToPoH) 15
CnKOBbInonHeHnaNceNo paCncaHIO 16
JaBa 6-CeTeBoe NOKJIIOueHne
IokKIOHHeMe K npoBOHOcTn 16
IokKIOHHeHKe6ecnpoBHOcTn 16
CetebaryctaHOBka 17
Ja7 - Noka3aTb n CMOTpeTb
IokKIOHHeNKe BAlWeMy IK 17
obablenne meena n3 bawero PKn
OBMECTHOIOHCNOB3OBAHNA 17
Ipnnoxehne Ioka3aTb n CMOTpeTb" 17
Jnaba 8 - Smart TV n HbbTV
OCTyn K npnloKeHm Smart TV 17
IbbTV. 18
Docyn K HbbTV 18
AKTBAaJIy/DeaKTHBaIyIyHKUHbTV 18
JaBa 9- npOyA INHOpMaun
BbIeHneN uCtpaHHeHnpo6nem 18
EXHnueckne xapaKTePmCTMk TeBnDHeH 18
DSS yka3aHn 18
PoiKIOUeHne 3JIeKTPoNTaHHn aHTHeHbI
Dna poctyna K poxmy TB.
ByKBBeHHo-LmΦpoBbIe KHOHKn
Bocchio Homopca KaIanoo; Bacchio Sykhy. Lyckpyi. 1960. 287 pp. 195 illus. ISBN 978-7-830406X7-98KuHbKu
SOURCE
Bbipatnoepnneheyyctpoctba.
#
DnBukIOCHINNkIOOCHIN3yka
P+/-
INNEPEKIOOENHKAHNIOE.
GUIDE
nepckoeHHnpoppMMEPG
(Nextpohthe nporpaMthnepenah).
#
DIN NPOVCEKIO NO TAPLOVI KMO, INR YCSTI OIKON KF KUMA N MOKHOM KIM NAOVKO
#
PNOOJIaIcLcR NO MOIO: bUbHepa; OINNI MOIO: NPOHO K PNOOduJyIuN IIN CbeKyoDQeIΦoTporpaFIn, TnCINN INBJeEO dyHNAN USR.
OK
PDBTREPTBEXCUHINBb60C38MOPO3HTB/ PABMOPO3HTVOCBPAKNEBBE BPEKIMBE PPDOOOFO TOUCDIOIIR.
ZOOM-/ZOOM+
Bb6paTfOcMAtu3oepaeknH.
@
Pa50taBgHKOTOPbIXnIOXeHxSsrtTV.
LIST
DnTnK3aCnHcKa KaHaOB.
FAV
Дулбогониコн channel list selection (BbBbBc ncka KsbsbHoro).
TEXT
DnCnTAPTaHmNay3bI BOCNPonMBeDeHHa
Kur
- 2017年1月1日
BaxknaHnHcOpMaIaIaI:
He npnyckai Tepepeba 3nemeta nntaHnna, Hanpimep, noi deekTBnem COHHbix Jywe B kapki n Heh n. Ecm NytBtCTAHUHOHoro ynpabEHHa He bdyet nOcb3oBaTcB a TbeHme DORFO BpEMHn, BInBe NT Hrero 8atapennn. BaTApEN, octaHbIe B oOpyoBaanM, Mory TIOBNEb NOBpeKdHn B pezylbate OKNCLEnHn IN poteHK BCJedCTBne Koppo3m, rapaHTHaB TAKOM CJIyae TepreT CBOO CNY.
IIN3aunTbIKpKyaKoUe CpeBnCnOsbTyHe MeCTHbE yTNIM3auuHOHbE yCTaHOBKn IINyTNIM3aUN6BaTapeN. 1YTNIM3pyTEOTcJyKMBMe BAtapEN B COOTBetCTBM C HCTpyKUMM.
PENyPENKDEHNE: CyueCTByeT pck B3pBbA npn 3aMehe BaTapeHa 6atapEn pyrTo Tmna. PponBodite 3amehy ToIbko Ha 6atapEn Tc0r KKe TnTa nn EKBanEHTHbE eMy B COOTETCBM C pOKoMeHdaqrrnn PPON3BODITEJIA.
B cIyae BxOda n3 CTPOR 1nEMOHOB NITAHN B IyIbT6 DCTAHUHO HTO ynpabJIeHNO MXXHO NcICLb3o8aTB KHOKN ynpabNEHnPAIOLOXeHHBe Ha Kopnyce TeLEB3Opa. B PexmIE TB pHyKlM 60ka ynpabNeHn N KHONK HAkopTyce. KHONKY OK HA TReBImOp MOXHO HAXIMATb HEckOJIbKO pa3 JnB bIoopa HeooXoDMIMO rCtOHNIKA. B MEHIO OH IMEIOT cnEyHIOme OyHKIM:
Длma moTeJIeN c KhoIkoN OK ha Kopnyce:
ДЯ моделуь Зноки OK Ha Kopyce:
PR+unPR
PB-401PB
VOL+, +VOL
VOL-,A- VOL
MENUMI
MENU
OK
PR+ mPR
PR-MPR
VOL+,
VOL-,
MENUMI
&OK
MENU
BKIOHTb/BBIKIOHTb TB
- Eyn Hpy nHTAHnnooepHn, TReBn30p 6yET BKNHOHnn yDyET HxOHTBCB p PEXKHMn OXnDAHn. DnnepeKIO-HNn HnPEXMMrTOFOBIOCTn BPAOCHMPEKMMr HAKMMTE HnPOWER/ HA nPiEMNHKe IHOO Ha nyIbTe JINCTAHJNOHOr ynpAJIeHHn.
- INI INEINCHENTB B PEXMMOTOBHOCHTN HAKMITE 1NIN POWER/1a npHemHKe Wn 1yntbTe DACTAHIOHOYnpaJIeHHN. TB OCTaETCR NOPTAHBBIM, HO CMABIM NOTpe6NEHM.
- ⅡA NOHORO OTKIOHueHRA TB BbHbTe Bnky n3 po3ETK.
("Ha onpegeeneHHbix Moqenix BbydoKbHb Chahana BkIOHTB CTTEMY OCHOBHM BbIKHOATEmE.)
NepBnHna yCTaHOBka
IepHHHARyCTAHOBKBBAKIOHOACTBCHOOOXQDMMBHACHTPOKA
IINOMOKHA COXAHOHARBCCOXDOCTYHBX AHAIOTOBBXIM
LIDOPDBXB KAAHOB.
Y65D19T8CB TOM,TOBENBLOOPKBJIOH,IBIOIOJIHTE NIOOJOEATINHO CIEJIOUOJIUOJI.
PIMMMAHME: EOMNCK KAHANOB OOBADYKMBAET TONBKO AHANIOTBIE KAHAJI, BO3MOXHO, 9TO OTIIOKOTO BEUHNAH N HENICKBTO RAPAHNTHE M30TOBMTENHE. 130TOTOBNTENHE OBTBACOT 3a KAHCTBO BEEJAHNA B HEKOTOPBX OBACTIX
Ipebmyo, Korga BkIOHAcTe CnCTeMy, NOBRIETcMACTep Initial setup (PteBOHaHbHe HactpOKeK), KOTOpB daet Bam yka3AHH no pOLOCCy BbIOHHO npBHOHO yctAHOBKn. (CM, pncyck 1.)
-
BbBepnE OINIO RbIka, NCIONBByH KONIKA ▲/▼, a 3aTEM HAKMITE KHONKY OK/ДЯ NEPEXOJa K CJIeNyIOUcEm My
-
BbIbApAITe CTpAHy C TIOOMUHKO KHOIOK ▲/,NOTOM HAKMMTE KHOKOK OK/ Dnpe NPOEXOa K CNDkyOUcMMy Wary. PIMMEAHHE: EONBblBbOpaRnFa (FpaHUM), BBI DOxIKHb BOHTB BPassword setting (YCTAHOBKa NaPOn) Dnry YCTAHOBKn NpOON. NcTOLb3yHrte CyKBENHO-uaPBOeBIE KHOFTK INBra BDOa YHeBPEX3AAHORo HOMepa BaWey nAPOrm.(OOOO CNLIKKOM CNaBbNapON.) NOBTOPHO BBDNTbTOT Xc camBuHOMOp IINr NIOIDBePAXDNHn BDOaNapON. NpOcTe TTO, KAK BblBcnNnapON, npOExO K CNOdyIOUcMMy Wary OcyUcCTBnTcR ABOMATMNecK. (B ATOM ciuyae Bbl MoKeTe HAKaTB ToJIbKO KHOKNY, 4TObbl BcPhYbcR K npDduuMY wary).
3.HAKMITE A BOPAR pKIM PAJNO Antenna (AHTOHNA) Cable (KaEBb) nSatellite (CITYTHNK). (PIMMEHNE) Satellite (CNYTHNK) ONKOTOPAO MOKET HE 6BHTI DOCTYTHN PNI HEKOTOPBX MOQIOX.)
BbIepeHr Antenna (Antennn).
- Haxmte OK
Bul6pnte Digital & Analogue (LInpOboN AnAnorobb), Digital (LInpOboN nn Analogue (AnAnorobb) nIOTM HAKMITE OK?
HAKIMITA ▲/Y DnB BvIbopa Scan (NOMCK), NOTOM HAKIMITE OK/12 HUR HAHA BHTOMATIKECKOKO TNOCKA BEXC uDPOBx IMIN ANANOROBX DVB-T KAHONB.
- Bébepué Cable (Kaebnb).
HaxMMTe OK/
- Búlopeite Digital & Analogue (LInpOboN AnAnogue) [Ananocobn] Digital (LInpOboN AnAnogue) [AnAnogue] N I NOM TAKMITE OK/
HaxmaTe KONKn ▼nBbOpa Scan (Tnck), 3aTEM HAKMNTe KHONKY OK, Tc6bHnHpMyo 3anyCTNtB nOeCCnepnHnO yCTAHOBKn mI npEeTTK cnDeyemyu.
Bb6epHrFull(TnHb)cMTHOTHTBe bnoNTHTB nONCK INCOXAHNTB B NMTN BCE NIOPOBSE KaHANBI DVC-B BCE ANHOROBSE KAHANI
MoxHO Bb6paTb paCmPPOHHb poKIM pa3BOpTKI npHnHnHnTAKBOHO (HARPPMEp, Advanced (DonOHHToJIH), 3aTeOM BcCTN HkyHbIO DaHHIO KABeO, KaONCAHO HIXo, NcOnbEyIyO ByKBOHOUppBBE KHOITKJ DINHACPTOKM NACTOTBI, CKOPC
TIEHENOCA CHIMBOIIN ID CENV; NIOHOBAYBIE ▲▶,YIBA BIBOBA DEXMA MOYNJPLN.
- HaxMMTE OK nIaHauBa BCEx aHaanorOboX n DVB-C LkΦoBbK KaHOB.
NcnoB3OBAHHe BaWero TeneBn3Opa Docyn K KaHanam
CnOaBbOaHHe ByKBeHo-HPoBbX KHOONK; HAKIMMAIe COOTBeTcByOuYe ByKBeHo-LKpOoBbE KHOINK DnOCTyna K KAHAAM.
MOnbOBAHnKHOJOKPR+/nnP+/-pIraTOrTO,0rO6B
ObhapyKeHne noDcoeMHHeHHbIX yctpoiCTB
TOBTOPOH HAKIMAI TOSURCSI DMTBHMOHHTO YPABREHNI KNOKTOBCHN0A DITOPOKHIHOCHIN MCKDYTOLCBIOPOV N DPTYHMN BXDHHMMNCTOHNNKAMM. YoBbI BEPHYTCK TLOEBN3OPOy, HAKMNTO JFOyU OPOBOYKO KHONKY DIA BBOJa KANAH, a C P+/- 60xOJATE BCE TB KAHBI NVIHIE BXDIIIOHCTOHNIK.
PnmeHHe He BcMogmIMNEMOT KHONKOK Ha KOPNcye.
PpOMKoCTb 3Byka
PerynpOBKa TPOMKoCTI, IINyIeIMeHmN INM yMeHbEHHAR PPOKMOCT3B4YKNCIOJI3yITKe KHONK VOL+/- INN VOL< HAp KOpNyCe TeneBH3Opa IMN KHONK V+/- Ha NpIbTe DNTCAHIOHHO ynpAEBHn.
PITIITYHHE38YK:HKMITE KHOJKY 1NTOB5ESEMHHO OTKIOHTB 38YK.ДИ RAOCCTAHOBHJI38YKHAKMMTO CTY KHOKNQUO pAIN HAKMMOTKHOKNY V+
IcnoB3OBaHHe MeHIO TeJeBn3Opa
1.HAKMITEHKHOYI MENU JINBIBHOBJTHAHBOI MOHIO.CM. pinyCOK3.)
2.COMOLIOHOKHOJIKAOVbBbEepyTeHyKHHIyHKT,AB3ETAHKMMTEOK,TOOblOTKpHtCoOTBCTBYOUJIeNODMHEO.
3.BnoMeHO nCnOJIyTe ▲/DnBbOpa OIIMN MEHO, HcNOJIyTe △/DnYCTaHOBKn FyHKnIIN NIMNEMHeHBeHNH NapawETPOB. NcNoJIyTe OKdA KAtmEHaUNH HAcTPOKNI. NcNoJIyTe OK/ DnBXoDA B COOTBETCTBYOUOE NOIHO.
4. 108 B03BpTa B TnpdbuLyue MEHIO HAKMTe KHOTy MENU
5.HAKMTBEXITDIAIByXoDAIN3MEOHIOHNEMAHHE:1BIEHKOTOpBIXHCTHOHHKOBCHHANH HOKOTCbEOTNHEDECTBYOT.
Bb6opra3bkaMeHIO
BbMOKTe BbCpaTb npEIOHHTaEMbI Bamn 3bIK MeHO,
BbINHRA HCTpyKUIM, KOTOpbIe bIyI npIBeDcHbI HIXE.
1. HApKMTe KONIKy MENU 1BbBbOpa TJIaBBHO MeHO.
2. HAKIMATTE KHOTKAI ▲/4/1 ▼ D#Bb#Oka Setup (HACTPOKA), NOTOM HAKMTTE KHONIK OK BKNOKA
3. Bépiepe rényk Language (RbHK) HuaKMTE KhoKky OK
4. BucipyTe Mngu Language (B3kMCHG) HAXMMTCHKONY
5.HaMMTE EXIT aBbXo0a N3 MeHIO.
IOnonHnTeNbHbIE Bo3MOxHocTu BaWero TeneBn3opa
HacpoiKaIIO6MbIX KaHaIOB
BIMOXKETeCO3DAE CINCCCKCBHXJIOOHNbIXKaHAnOB.
1.HaMMTE LIST
2.HAKMITE HA KHONKY KENITO OU BETA JUN BXOJA B Channel list selection (Bb60p CNKCA N6P8HORO).T00bI b10paTb CnCOK JIO6MnBIX KAHAIOB, HAKMMTO A▼, aT00bI BOHTN, HAKMMTE OK.

3.HaMKNTe KONK CY CnHrero UZeta Dn Hauana peDAKTHPOBAHRA BAAHX JIOBMBX KAHAOS N CTNCKA. C nOMOUBIO KHOIOK ▲/NPOKpyuBaIte KAHABIN HAKIMATE KNOIKY OK, YTO6b BB6paTb NIT OTMeHHb KaHAI.
4. Μόπορτε έληθεοδέθεινα, Μήσα ἀντρούκην ὅγπχιν έλόβμθκ κΑλίους.
5.HaXMMTe LIST/EXIT,HTO6bI BbHITN.
BbIcTbp B1308 KOAMH:HaKMTVEFAV yctpOCTBa
DnCTAHIOHHOHY nypBAJIeHN DnI pIIMoO BvOa Channel list selection (BbI6Op cncNkA N36paHnO).
HnHaMnueckKa NOpCBetka 3KO
1.HaNytteDnCTAHIOHHOynpAeHHeHnHaKMMTeMENuBb60rTcPicture ^E OCO Settings ^E Energy Saving(MaOp6paKeHne ^E HnHAMmckean noCebTKa 3KO>HNAMmckean noCebTKa 3KO).
2. 706bI B6oB4T JKNAeMn3Heproc6pcoraoUpnmKHMNtA /TTOHOSOHMTIOCTMQYbKJEAEMO3Heproc6pcoraoUero 3fFKeTA.
3. TTo6bbl3aKpbbl MeHIO HAXMATE EXIT.
BbIcTbpBb3O8 KOAmH:YtOb6bIbCTpo BbIbpaTBKenaEMbIM bHePrcOepeaAEOPEKIM,HaKMMTEECHOyJIbTe DACTAHIOHOHOYpABHOHO.
CMOTpeTB C cyHKne 3D
*HEIOCTyTHNO pN HekOTopbIX MoJenX
PNEyIpyEKeJDEHNE:
Hekotophe 3pTEn,CMOTpy 3D TB,MGYrHOHyBCTBOBaTB JINKOMFOPRTHAPIMEP,TOIOBOKpyXHEHME,TOLHOHTY INIIOBHyBO6bL.PnNPOBHeHmTAKHX CMMITOMOB IpeKPATHTIPOCMTP 3D TB,CHMIMTE 3D OKHn OTJQHXHTE.
PcmoCmTO 3D B1E0e CnHUNKOM 5Mn3AOKB NtB TceHeHARIgOrO BepMeHOn KoMoeTbNspTeB Baua BSepeHne.
3aTeBmC,CMOTRzIMM3D,CDJKeHnABnOBtBTBeTbHHB-3BcPOhB.
- He nciolbayre 3D oukki nra pyrnu x iqnei, kpoem npocmaotra TB.
He ncoIbIyIe dyHIO 3D mI 3D OHO BO BEMI npOryIKa -30 MoKET pIpBeCTN K tOIOHOBOHIO IIN PAIDHO
1. HAKMATE MENU HA RYNTE DCTAHUHHOHRO YPRABENHIM OKBepTe Picture > 3D (BVDeo > 3D), 3ATEM HAKMITE OK▶ DRA BXOda. (CM, PNC 4.)
2. 3D Mode (PexKIM 3D): ChauJHADOpHeTc 3D OKH, ATEM KONKAMM ▲▼BbEepnte PabNJIbH 3D BXOHNOPOMAT Top C0EiTop and Bottom (BeXn Hn3), Side-bySide (IapAaNIOBHO), 2D-to-3D (2D-Ha-3D), Line interleave (HepeCtproHn) n Frame sequential (PokApOboY) dRBOCPoBDOHn 3D BVDoo.
3.L-R Switch(KommyTatop):BbIbePHTe On (Bkn.) mN Off (Bkn.) nIa peyIyRnKBA 3D no6paXepHnHa nIpaBn IIN JeBb IraA nIyUWero pOcMOTpa.
4. Depth of Field (Fng6hna noni); Otperynnpyte CTn06paexhen, KOHcptpnoaHOrO 2Dn06paekchna
5. 3D-to-2D (3D-Ha-2D): Bb6pnte Left (Jebb) INI Right (PbaB) INI PPOCMOTPA TOI KIO JEBBM INI PABBM Ira3OM, 3Ta FyHKU DaKTHBNpyTOA, KORa 3D Mode (Pexm 3D) BkIOCH HA 2D-to-3D (2D-Ha-3D) INI Off (BbKn).
6.Hakmite EXIT 3aakpTnM MeHIO. PnmeHHI: -3D OHdyoTOPOVvSbOeTARMOYTHneNdoepxbsatcb
BpeKIMME 3D BCE pfofo yHKuOg OTKIOHeHb.
BNI NpEeKOe K DpyOMy NCTOHky CHTAHOB
MIM BIKIOHeHMy SmrTIV peKIM 3D BbIKIOHTCH
BTOMATHECKN.
- HeKOTOpBc 3D pexMMbMYOT bHbHeNOCTyHb BABCMOCTaT BYOXHOrTO foPMATA 3D BuJeO HCTOYHg.
Pneppnmbm3Dp0xmbm
ATV,AV,YPbPr 2D-to-3D (2D-Ha-3D)
DTV, HDM, USB, Bndeo 13 NHTepHeta: Top and Bottom (Bepx Hn), Side-by-Side (TapanlneHc), 2D-to-3D (2D-Ha-3D), Line interlace (HepeocpOHHb), Frame sequential (TokaPPOB)
-3D dyhkmn B pexmme USB: Bo bpmr BocnpmbednHgnt USB, Hxkmtte MEnu 110K03A MeHO, 3aTeMBb6epW3D Mode (Pekim 3D). 0one noo06hnaHnpOpmaaBbue.
TnФлonepeBoD
Tnnponepebo03HauaETdoNHTBHeO TOnocBoe conpoBooKneHIEIJIcBbIXNcAcbWdUxuX 3pTeTbe B3yaNbHbIX CpeCTB NfOPMaUN, EKNIOJAN TEENB3NCHbHE PepedaN KINHO.
ДКТСРБОВИТ HA NPTOJXCHIM NOK3A, OINCMBIBARTO, TTO
ПОПСXYDМНHA 3KAPANE, BO BPEM ECTCETBEHbIX NAY3 B AYINO
(и BO BPMNDAIORA NO MOPG HOOXBODMOCTN)。
3TуФункIM NO MOKHNO IICNIOJI 3OBATB, ECINДЕТСBYIOJIeB
TEBUEUZAHE COJDPKHT KTNIPONIEBEOD.
1. HaxmiTe MENU nIyIbTe IcHTaHUMHO rO yIaBHeNIA mBaCePteSound (3NyK).
2.HToBBoITN,HAXMNTeOK
3. T0bblBpaTb Type (TN), NcNolb3yIe KhoNkIy ▲/▼, a T0bbl HAcPToMbTV Visually impaired [INr CnabOro 3pOHIA], NcNolb3yIe KhoNkIy ▲/■. MmKpOphOB, HabyUHKn IN ypoBCH I pOMKOCTM MOXHO pOryuNPOBaTb, NcNolb3y MEHO DJI CnabOro 3pEHNA.
ФунклmaPAP
HnHHa dyHKINNCNb3yETCR NIDONDBPemehHORO OTOBpaKHeHNIO30pKaekHN 13PAAHINbIX BXOPJHXNTOKOB IOCHTOHNO.ODHOOKHOpeH3aHHeHOEN DHAHOPOBO RNNI UHPoBORTO TB CnHana, apyrtoe -nir CHHANOBVGA HDMNIYPbPr.(PnmeHane:He.docTynHO nA VScart oov windows.
1.Haxmte KhoNky MENU 1B BBBOda TnABHO MeHIO.
2. BbIbepnTe PAP n HAXMITE KHOIIKy OK nra BBOJa.
BbBePte OngUPO PAP. NOTOM HAKMMTE KHOHIKY △IJIBAKII/BbKJIyFHyKUNIPOPA
4. Bālīqēpīrī TV position (NoJOKEXHēn Ākρāha), HAXMīTBE KHONKY ≅/↓ Ḍɪŋ A MɔHÉOHN JI NONOEXHη Kɔρa ha TB.
5. HaxmMaTe KhoNKn 1/2n N3MeHeHn pOkyCa OKHa
6. Pn HapnaBHeHn K OKHy TeneBnOpa 5yKBeHHo-UNPbOBie KHNH P/-paoTaut C TeneBnOpor. Pn HapnaBHeHn KpyrToM y, P+peKeRIOaET MeXy DocTyHBM BHOUHMN NCTOHKMn
IcnoB3OBAHme cy6THTPOB
BbMOKTeNCNOL308aTcSyNTnPbI DnA UHPOBbTB-KaHANO. CbSYNTpBnpeoAOe TpeoTKeTnDVB-T/DVB-CUHPOBbXnepeoA.CNOMOuOuUHPOBbXnepeoAH BbMOKTeNOnyHTbDOONHHTBHyBOBMOxHOCTbBbCpa 3bkaCySTnPob.
BkIIOueHne/BlkIOueHne cy6TnTPOB
- HaxmiTE MENU Ha nylte DaCTAHIOHO Oy npabHnHnBnBnBnBnBnBnBnBnBnBnBnBnBnBnBnBnBnBnBnBnBnBnBnBnBnBnBnBnBnBnBnBnBnBnBnBnBnBnBnBnBnBnBnBnBnBnBnBnBnBn
- HaxMMTE OK/ (CM.pnCyHOK 5.)
- BbEpTe OtnIIO Subtite (Cy6TnTpbl), HAXMITE KHOrkY / n BbEpTe On/Off (Bk./Bk) TBAKIIIOEHNIA/BkIKHOHNE Cy6TnTPOB.
Bb6opra3bika cy6tntpoB Ha uΦpObblx TelenKaHaIax
1.HakmITE KHOIky MENH Ha nyIbTe DnCTAHIOHOHOrO ynpaJIeHIN Mbl6epITe Options > Sublnte > Digital subltitle language (OnuM> Cy6TnPb> RaBk cy6TnPobuDPOBOK KaHaJ).
2.HaKMnTe KhoNnK 17BnBbOpa3bkaCy6TuTPOB.
3. [HbKMATE ▲▼, DVB BbGOpa Digital subtype 2nd (BTOPOBRAK CYGBTTOPOB UcnpDpOBO KHaLA).]
4. HaxMMATE KONKy DnBbIbopa BtOporo RaIbKa cy6TITPOB.
5.HaxMHTC EXITIaBbXoDa m3MOHO.
BbCTPbHb3OB KOMAnD: HaxMHTe 3eHHyKHOkY
SUBTITLE HAyIbTe DnCTAHIOHHOrO ynpABHeHn4
Onpepepepe3bKOc cyTNPoB,poCTyHNbIX dRbBpaHHo
LdppoHOB TB-npopamMb).
Bb6op Tnna cy6TnptOB Ha uΦpObblx TeNaHaIax
1.Haxmte MENU Hn tynte JINCTAHIOHOIynpaBHeHn HbE6pTeOte Options > Subtitle > Subtitle type (OnuM> Cy6Tttp > Tyn cy6TtP0B).
2. KONKAMM ▲Bb6epitre TnC cySttproB. BblMOxete Bb6pTaHearing impaired (Dna cBorOc noCyxa) nBocPnc3eDEHnC C cySttpanm Bb6paHHO rBaika.
BbI6op 3bika CTpaHnUbl DeKOIpObaHnB TeteTeKCTe
HaKMIte KIOIky MENU HA Nylbte JcctaHIOHHOrO ynpabJIeHHN Hb6peRite Options > Teletext > Decoding page language (Onuim > Teletext > RaBk cTpaHnBu IekoipOBaHn), Bb6peRite RaBk, Ha KOTOPOM 6yETBocPON3BedeH TeteKTCT.
A3bIKUdpOBOroTeNeTeKcTa
PnnpmeMeIcHpObIXKaHaIOB BaIeTeJIeBH3Op 6yIDT OTOBpaKabMbHOHOCHNHeCTpAHbIbTeNTCKCTHa paAHHbIXBaIKaX. DAnHNApyHKUINNo3BOJET yCTABOBHT HeoOOIMbIbIKbIK KAK DaONBOH, TaK IINDpyrNX CTpaHNU TcNEtOKCTa.
HakMMte KhoIky MENU Hb nyIbte JdCTAHIOHHORI yipaaJIeHHIN Hb6BePte Options > Teletext > Digital teletext language (OnuN > Teletext > Ra3k uKdpboBOTe TeteKcTa). Bb6BePte 383k KhoIKNAM
Tun SPDIF
IIOKIOHcTcaydNOyctPOCTBOepe3bXhoSPDIF.HaKMnTO KHOKNMENHETeJIMCTAHNOHOHOYnpABJIeHNi HbIOOPHTo Options>SPDIF type(Otum TIN SPDIF). BbBepTeIOxOuPmTN3BvKaN3CnCKA JnIcPpObxn nporpAMM.
-ECN 35yK TEKYIeI NpORPAMMbbl BbIOBITTCB S FOOMATE DolbyD,TO MOXHO BbIOPATb FOOMATBI WIM PCM,ININ Dolby D.
- Ecm 3yck TeKUJIeI npOrpAMMbI nepeAeTc H B foPOMATE Dolby D,TO MOnHO BbVbApTa Tolbko PCM.B npOTnBOM CNYHae BCOPONBDEHmE 3yka By He dyet.
BaBepute Off (BbKn) 140CTaHOBKn BOCnPON3BeJENH3BbKaO ayDyHOyCtPOiCTEa, NOkKIOEHHO K BbXoY SPDF.
PIMMEHHE: OINM, KOIOPbE Bb MoXeTe BbOpaTb, 3aBNCRT OT KOHKpETOH NpOpMMb, ECIM Bbl BblpaN PC, a 3ByK ONepKaer H3o6paxKeHHe, BblbpEn SPDIf delay (3aepKa SPAID) n3 MeHO Options
[ONLIMN] N KHTOKKAMM YCTBHCHBNTB BDMN SAEDPDKN DURCVNPHCHN3LMY 3BYKJN HNO3O6EHNH
T-IMHK
HannahdynKINKINACTONETAYETCHNINNOCKYCTPONTCB C npToTOKOMcTeBOrO ynpaBHeNHCEC,NDcoeHNHeHHbX Kp3aBEMHDMHHaBaWmTeNEBIOpe,NNoBcONHET BKNIOHTBCNPOPZABEHEH INPEKM OKnDHHA HnKaTHMeKHOKNI DnBCExYCTPONTCB C npTOKOLmCeTBOrO npaBHeNHCEC.
IopKIOUeHne N BbIKIOUeHne FyHKnT-Link
1.HaKmte KHOHky MENu HnyIbTe DnCTAHNOHHOrO ynpabEChN,IOTOM BbEpHeTe Options >T-Link (Onmu> T-niHK).
2. HacMMTE KONKY 对Bbopa On (BKn) nH Off [BbKn].
Bocnpoun3BeDHeHne OdHM HaKaTneM KhoIKN
FyKJHBCPOPNBSEHNEOJHMKACAHNEMHO3BOHNET HHaHTB BOCPONBSEHNEHpyTMEHKaHNTKHONIK BkN, HAnHPMEp,HaNyIe TaCTAHUHOHORoYpAbaHEBBAuERoDVD nneepaJaDnAnOpEpaue 3aunyeHo BOCPONBSEHNEHBe BAUero DVD-nneepa,uaBaTeNeBENOPSyETABOMaTHecknpeEKnQeHHaNtOHNK BOCPONBSeBauin DVD.
PexkM OxuHaHn CNTembl
KdyuynpokHM KINIOAChr HaxaHcM KHONKn HApNIMeP,HaYyIe TaHCTAHNOHHOT OYPABINHE TOnbELOPOPM.1PcXoHTOePpOKHOHOToNBOEOPaBNCox NocOooHHHbIX HDMI-yctPOnCTB B pOKHM OKnDaHn
06HOBHeHcTeM
HaMMTE MENU HA NyIbte NCTAHIOHO HO KOHPTOIA,3aTEM BbIEOpTe Options > Network update (Onm > O6HOJEHMe cTn).BbIopOM On/off (BKn./BbKn.) BKNIOHTe NIN BIKIOHTe 0yHKIOIO O6HOJEHMe cTn.
- Ecnn 3a pynkna BknoeHa, TB abTomatneckn o6hOBnT Kaanb, cnn BaW DTV npobaidop 6hOBnT oro DTV cto.
- Ecm 3a fynkuiy BblkyoeHa, Bam Hxno nporHb KaHai bI IIN NOKNOEHN HOB xN yIaENH HeDCTBYOUX KAHANOB, eCN BAu DTV npoaeop NoKIOAeT NIN CHMAET KAHAJI co CBOEHT DTV cem.
CTaHdapTHbI INHTepΦeInc
3aoknpoabHbIe 1pOpoBte TB-KaHbIbMoryr6bItb
KeDOKPOBaHc I cMOuBbKO MydIc TcAnpTHorO INHePpeCa
N KApTb, PNOJnKoHHo ONepaTOOM pOpBOBO TB.
MoYbCTAnpTHO INHePpeCA MoXET OecIEyHbTa
HECKoJIbKO LpOboBIX cepBCOB, 3To SABNCIT OT OEPaTOPA
N BbOpaHOrO BMn CopeBcA (HanpIMep, nAtbH TB).
CBxKInTeC c OepaTOpOM TB-cePbVca DnIIOyEHN
IOpOboHOr INHcpOmaU.
IcnoIb3OBAHMeMoJyMa oIeeroH
PNEyPNEKJEHNE:peep yctaHOBkoModynA CTanapTHORO INHeTpeEca BbIKIOUHTe TeneB3Op. O63aTeIbHo co6IoJaTe CneDyIOuNe HNCTpyKUnn. HenpabInbHa yctaHOBka Modyn MoXeT NOpeDnB n MOynB n BaW teneB3Op.
- BCTABINIte MOyB IN CnEuaNIs HO rpeHdAHAeHHeH bIa HrO cIOHT HA naHONI ToCnB3Opa, coBIOJaa OCTOPOXHOCTb HnIpaBaeHMe, YK33aHHOe HaMOyJIe
- Haxmaite Ha Moynb do ynpa.
- BkIOHHTe TeneBnIop H DoXpTaeCb, Roka HTeppeHe He 6yjET AKTNIBPOBAH. 3TO MOKET 3AHTBt HECKOJIbKO MmIYT. PnmeHaHHe: He ydaBnRE MoDyIb N3 CnOTA. YdaNHE MOyIO MAOT JDAKTHINIPoBaB tnppoBoe ycTPOCTBO.
OcTynK Cnyk6am OoIeero NHTeppeca
Tocie yctahOBaN A kAHTINBPOBaHMAOyI CTAHdAPTHOro
INTePpOcA HAKMMITE KHOKNY MENU Hn PybTe
DCTAHIOHHORO ynpAbeHn N BbEepTe Options > Common
interface (Onm>CTAHdAPTHBnINTePpeC).
OuHmMHeHO DocTyHb TcIbKO Torga KOrda MoyIb CTaIaDPHTHO HnTepFoeBaH npAbaHb YoCTAHOBEN AOKTHPOBAA. CoepJAEHae, noJIbAUIOeBaHa KaPae, 3ABVCNT Oat BaUe TbeEIMHOHOMKOMPAHIN
06HOBnHeHne IIO
PnmmuHm: npq TcM, KAc HauhTb oBHOJIeHnnporpaMMHOrO 06ceJeHHn, nQcoaHnHTe yCTPOICTBO USB C coCBoDHN EMKoCTbO CBHIO 250 MoraAaT. He BIKKouAITe TEENB3Op, He BuepeRIMaIte BUNKy I3 p03ETKN HHe N3EKeAHTe YCTPOICTBO USB do TeN np, nKa H e aBaepumTCB OBHOBJIeHn.
HaxMMTE MENU Hnynne JCTAHINHOHor ynpaBHeHn Hb6epuTe Options > Software update (IpaMaTpe) > O6OBHeHne IO), HaxMMTE OK>
-Current version (Tekyu Bercya):IproBeka TekyuJeBercya IprogPAMMOO 6oeCHeHn.
- Product name (HaimoHosaiHm) : H3BaHnE N3dEJaB AbaTeo KOMIIEKTA.
- Serial number (CepiHbH N HOMO) (BCnIMM8eTc): CepiHbH N HOMO BALIETO KOMUIEKTA.
By network (NooepdctBOM cHt): NpOeOAnTnEBB03MOXHOCTb CkANBaTb NcTahANBIMBaTb NocLeHnDEBPCnIO pORpAMM C nHTCnHOTa. ChAHana Y6bEETcB, YTO Bbl BKIOIINN KAbEhLyKo NmBecPBOBHyKO cTeB N aTeEM Bbl6ePHTe By network (NooepdCTBOM cHt) HnAKMITE OK> IJRA bXoJa. KOrda SdyDcOTyTHHa HOsA BpcSbI npORpAMMHO OceCneHnI, NOBINTc NaHEnb IpORpeCCA. Pocne 3abepeHnI aRpy3kn TeneBnsOp Norachet N o6HOBNT npORpAMMHO O6ccnCHHMc.
PIMHNEHHE: BO BPEM OBOHNEHNE CJNEHTA 36 yCENBHNOMCOTEBNMOOCHINHHN
By channel (No KaHany): 3Ta onu npeoctabnEeB3MOXHOCTb yCTaHOHTb HOYIO BEPCNO IPOPTpAMMHOO6cneHHe, eCN OH NMEeTc. BILSEPeTe By channel (No KaHany) IN HAKMTMe OK> DnA XkDa.
HcnoB3y KHOKKn ▲,Bb6epnTe Yes (Ja) DnIOnn Auto download (Aba03aRpy3ka),Ot6bbl aTcMAtIneckn 3arpyntb nocpndHIO BepCNO nporpammmHOrO ocebeHHeNc,ecnn 2oB3MOxHc。Pocne toro,KAK nporpammmHoe ocebeHHeNc 5buno ycnEHHo 3arpyKeHo,
Bam 6py TnpnIOxoHpeWHTb, xOITNE BBy yCTAHOBHTB erpo nmo CyeHac. Ecm Ta, To BInONHnIe YKsA3HnK, KOTOpBc 6byT NpHbTBc HkKpaHe Iy npABnHOro BbINONHEBaBv yCTAOHKn, BBy TaKxE MOKETe BBipat OTMeHy OBOeHnBnBnB D aHHbMOMENT.
Bub6epHrte No (Her) pRnOnu Auto download (ATo3a3py3ka),YTObIOTMEnHbT abTomAtmNeckyo 3ary3ky.
Bb6ephtoOnuManual download (YyHaa3aarpyka) n HaxMITE KHOIky OK/ Dny Ncya pyHoro cKaHNPOBaHnNOCJIIEHrO IporpAMMHO OBeCneHEn. BbIOJIeHnIe HCTQyKUN, KOtOpBIO bdyT NOBnATCBa HkPae, Dny 3abepeHHeH 3toIpoJeDpy.Bo aPMeI NOCKA HaxKaHMeOK/EXIT MOxHO OTMeHnIb POMCK INIy BmYINI INIPOeCCA.
PepexoB DEmOHCTpaHNOHHb IIN DOMaHn peKIM
1.HakmTCKHOKNY MENU HA NylbTO pACTAHIOHORO yipabHeNn H BbEepTe Options >Location (OnuM> MeTOhAXoXKeHne)
2. C O NOMOLO KHOONOK ▲Bb6epeTNE MECTONIOKHOHHE Shop (Marzhi) nimi Home (Dom).
3.HAXMNTE EXIT,HTO6bI BbTIN.
PIMMEHAMB: BOOTBECTCBN C PACIOPOXHEHM EBPOENCKON KOMACCN 2009/125/EC,B DOMALLHE MVCNOISBOAHMB TB DCOKH ABOTOMATHEKCHNIEPEKNIQHATCBN PDEKMM OKDAHIAE,CJIMC HMM HE PPOK3BDGTOR ONEPAUIN B TEHNEHME4 HAOCB.3Ta FyHKLNA MOKET DBtB DEAKTVNUPOBAA B MEHO B IYHKTE Options (Onu).
ФункцMHEG
HeKOTOpbIeUHFPoBIE TeLEBeEaTeBbIe KOMnAHmnpdNarAOt cneauuHpOBaHbI uHFCPOBoi TEKT HnHHTepAKTMBHbIe CNYXbI (HanPmEP, BBC1).DaHbIe CnyXbIpaOBaTOK KAK ObHbIy TELTEKETC JIOBABJIeHMe KNHOKHomePA,UEBaNTKNLBIHNEPEMEcHNI.
1.Hekmte MENU Hnnybte DCTAHHORO ypanBHeHn H b6epeThe Options > SubtiTe > SubtiTe (OnuM> Cy7HTpry > Cy7HTpB).
2.C NOMOUBIO KHONOK BbBbepnTe Dn Subtiie (Cy6ntptb) peKm Off (Bkn.).
PMMHAAHE: dyKmIg MHEG n cyTmptbNCKHOaOHOT dpy
dpyn Hn Me MOYt cDnOBpeMeHO HxOaHTBCn HA kXpAHe ECm IyKmIg Subtiie (Cy6TmPTb) HxOaDTCB n peKmmeOn (Bkn.), dyKmIg MHEG neonBnCn HA kXpAe.
- Haxmte Kpachyio KHonky mnn KHonky TEXT Ha nyIbTe.
4.CNOMOJIbKO HONOK △/▼/BbIEbEpNE INI NOCDBeTNE 3HAHOHJ.
5.HaMMTEOKIINIOITBepKxpeHHNAKTBAHIN.
6.ДИА ВБОGAпапамETра НЖМITE OДNY H3 LIPETHEX KHIOKI.
- HaxmTEXT INM EXIT INBbIXOda
Посмтфсогрд,在Bocpon3eHneMzbykInIpoCmTpBnDeoN3aONMHaOueroyctpoctBa USB
IMeoumnaHaTeBnOpe USB-pa3bEmno3bnReT
NOKIOVATb K Hemy HAKONITNEI NAMTA. BblMOXeTe
PocMatpVBat PhMbH FOOTORpaFNI HA 3kpaHe
TeBnOropa, a TAKKE HcNtB30BaT bero dnn PocCnyuBBAHM
My3bIK
PoeepKmbaemble qaiioBbie cOpMaTb:
ΦoTo JPEG
My3bka M
BüdevoAVI,MPG,MPEG,TS,DIVX,MKV...
PnmeHnHn: Hekotopb USB-Hakonntm n USB-ycpctCBa, TAKK Kukdpocbe KAMepbl NMOOBHBHeTaeFbH, He NOHNOCHTBO CBOMCTHMb CO CTBnAPTOI USB 2.0, NoTOMy OHN MORY HE pabotc c MyNtMMeDhBM NnEeepom TaneBvAcpa. He BCS USB-KROHNNYCTOPCTBA CMOACTMBc C dyHKuIMM USB. HE BCE YkAs3HHbHe Bblue FOPMATb Oo3NaOcTc. JekDaHPOBaAHbHe FOPMATb BaWx Phaob Bydy OnpeDeBt-B MOYr OHN NCOIOBScOBaBbN HET.
Korda USB-ycptmoCTBO oBnapykeHo CNTTEM,HO CTANBOI BMOB MEO Media center (Meda-LHTP).T06bI BYHNO BOITMB Media center (Meda-LHTP), HAKMITE MENU HaDCTAHHOM Pnyte ynpabEHHN I BiSEpnte Media (Medma).
ΦOTO
DaaHaa dyhKnA hONb3yTeoT dN aOcbpaeknA foctorpaipn Pn HauHnn TakoBx.
- BubepeRrMedia Center>Photo(MedaIeHHT>ΦOa), 3aTeM HAKMTE KHNYOK,HTobI BoTHO CHOBHORO MEHO IPOPAMMI POCOMPTA COJEPKIMHO OCHOBHORO DAJIIA.
- Bnpopamme npocmtpa coepkaihna cchohoro faia HKNKAMN ▲/▼/■ BiBcpeTte pTOH INH BYTPeHHIO KANky c paanbAm.
- Bb6epuTe nanky C bIOKeHHaMM paHAMM, HAKMMTE KHOIKY OK, TTObI OTKpbTb 3Ty nanky B OKHe HABrATopa.
- VcnoIb3yIte KhoNkA/7/12nBbIbOpa cHnaC pOITOPaHmB CCHOBHM HJIOJIHOHTHEOMΦaHne NpOPTAMMbI POCOMTpa, 3ETM HAKMTe KhoNkY MENU dTObPakKeHHMOH pOTo BpKHeMHOTbPakKeHHaNOK.
- SortcTropkoBatabI:CortpkoBana nank oFotporpaHnNo NO DATE KAMHEHINN NIM HAMMEHOBAHNO FAHNA.
- Edit {PojdkTnpoBAnHO:KoTnpoBAnHO, BCTaBA KINYUJANHE BbOpaHNO FOIO.
- Parse (Tnpcep): Bb Moxete BbpaB onu Recursive (PekycnBHO) for oToBpaKeHMy fOToRaPmN 130 CNTIKK NkHcE OyPBHy.
5.Bb6epTe pTo, HaxMMTE OK, cNau-loy HAHHeTc C b6paHoro pTo. EJnXOTATE NOnpaaTb pTo, HAXMITE OK. B pKIMME 6paayepaTO pTO MEHO B3BbAeTc KHONKO MENU. Bbl CMOKETe POKa3aTb, NaYpOaBaTb, JIOE pApTaT bTO, Bb6pATb pKIMIKo3a3, A#fckTbN T.I.D.
6.HakMMTe COOTETCTByOUJIe KHOJIK HaIyIeTe DACTAHIOHORO IYnpAJIeHrI DA BILIOHNHEI BO3MOKHBIX 4HYKLM, KOtOpBc NOKa3aHI B FyHKIOHAIbHOI CTPOKE B HNKeH JACTn TB kApHa. TOr6bI OTO6pArITb INI cPrtAtb FyHKIOHAIbHyIOHeH, HAKMMTe KHOJIK INFO.
My3bika
DaHnA CyHKnI NcToJIb3yETCnI DnB OBCTPON3BeDEHnMMy3bIKI Pn HAnHn TSKOBKo.
- Bubepure Media center > Music (Mejua-Lipnt > My3ka). NOTOM HAKMITE KONIKI OK dna BXOa b OCHOBH NABIRATOP paJNOB.
- IIOJIbEyI KHOIIKIA ▲/▼/■, BbIbEpIe 3aIINb IIIOB O OIOHOM OKHE HABIRATOPA, IIOB EERO OHKAn OIOBE HKORO yOBIIB HO TAOH TAKIM CnOICOSOM, TOI INI MIOJIOJBOTBOAHNpyHKIN OTOpOBAKENH pOITOPA#m
H2KMMOTHEKHTKYMENUOIOOPAKSEHBMy3HKUHOHO MEHO B DEXKIMI FANIKO
-Sort (Coptropobatb): Coptropobka nanok 3 aniatne neceh no clyoumnpnnaHakam-Name(HaMeHoBaHaMe), Genre(KaHc),Artist(McnonHTernty)in Anlum(AnbboV).
- Edit (Pojdaktnopobahno): KonpobaoHIO, BCTa3ka HIN, yuJyIaJIeBbBbBbBbBbBbBbBbBbBbBbBbBbBbBbBbBbBbBbBbBbBbBbBbBbBbBbBbBbBbBbBbBbBbBbBbBbBbBbBbBbBbBbBbBbBbBbBbBbBbB
-Parser (Papcep): Bby MoKote Bb5a7b OnuNo Recursive (PekypCnBHe) dne OTo6paXeHna 3anmCn H3 Bccx nanok HnHexo O yOHHN.
3.Bb6pTNE TcHNO, HAKMTNE OKI BOCPON3BedeHN, BOCPON3BedeHN AynmoAaNIOH HAHETC ABOOMATHEeKN, C 3aJIaHHOIN TcHNO, HAKMTNE KIKONKY MENU JUNI OTO6paKHeH My3bKaJIbHOrO MeHO FOToRpaDN B PekHMn HABIRATOP. Bbl MoKeTe BB6pTaB BOCPON3BedeHN INN na3y npn BOCPON3BedeHN NcHn, BblpTaB pTyOn pexMn BOCPON3BedeHN, nT.I.
Show lyrics (ПокастыTekT): 37а оплдя достунда
Дався сениховTekTСВ. КНОКAMM yCTAHOBITe
СИХΚΟΗΝΥСТЕТКΤΑ.
Audio only (Tolbko 38yK); Bb6epnte n Hekmnte OK nIpy IpoCtuyuBnAHMy Bb6yni PpBbIKIOHcENK hKepeh. HekatneM NIOOJI KHOKNI BKNOHTe KpAHN CHOTA.
4.HaKMMTE COOTSECTBYIOUHE KHOHN HA NyIbTe JNTACTHIOHOTTOYIPADABENHIAJINBBIIOHINHBO3MOKHXFyHKNJ, KOITOpBE NOK3AHBb BpyHKIOHAHBJOHCTPOKE B HIXKHEAACTN TB 3kpaHa.
Bndeo
DHaHHaFyHKLMNcONbEyCTCRdINPPOCMOTpaBnDEO pN HAIHIM TAKOBTO.
- Bubepyme Media center> Video (Media-LBtp > Bindeo), HANKMITE KONIKY OK dja npocopa k npocmotpy faainob c nMOUPOI qaiHIOBO O HABINATOPA.
- 1003345KONHIAA/4Bb6epHTBdEoNHO B OCHOBHM OKHE HABATOPa, N50B eOHXK50e8 HAKOKO YPOHN TOHIO TAKMIK KE CIOBCOM, YTO NPM INCFOB30BOAH DYHCIN OTOBPAKENH FOITORPADIN, HAKMIITE KONKHYI MUNI ATOOBpKaEHMyBkJIbHOF MOH B PEXKIME IANOK.
Sort (COTPVOBa): COTPVOBKa NIO H BINOEOI NO TINY, DATE IMOHONHIN NHNHMCHOBAIH
Edit(PedaktnpoBaHne)KornpoBaHneBCTsKaMn ydaHHe Bb6paHOrO Bd30 qna.
-Parser (Papocp) Bu MoXeTe Bu6oStb OnpIO Recursive (PekycnBHe) nI OTO6paKeHnH BnDeoepaHIOB 13 CEXN nAnK HIXKHeO yPOB.
- Bb6epteBIDeO,HAKMTOEOKI npocmotpa, BOCPON3EDEHEHBAETOTABOMATUeCKN,HBNHAR C Bb6paHORo BIDeOpAaJIa,HAKMTTEKHOKNyMENU DnO OTOpApckHHMCHIOBEOeOpaiIOB B pekMH HABINATopA. BblMOKETBb6pabTcBOPON3EDEHeHmNnay3y,Bb6pabT paAHHbIpeKHMbBOCPON3EDEHH,peKHM 3kPaHa N 3adaHHbcYCTAHOBKH3K0pApckHHN T.I.
4.HAKMITE COOTBETCTByIOJIe KHOJIK HAITIte DANTAHIOHCHOTYIPABJIENHIAI BII BIIINHEHRA BO3MOKHBX FyHKLIM,KOTOPBIOKNA33HBI BFOKHUMOHAIHOI CTPOKO B HAXHEHCACTN TB AOKPAHA. YTOBbI OTOBpa3TI MII CHPATATb FyHKUHOHAIHYIOAIEH, HAKMITE KHONKY INFO.
DivX video (*HIDOCTYINHO PNI HEKOTOpbIX MOENAX)
O DIVX BIDEO:DivX-3to copmat ndpoboro BIDeo, coaandnbl dnnanom KOM panannn Rovl Corporation Divx, LLC. 3to cnpnabno hce nptnpmaor hoe yctpoctbdo Divx nnpnptbBnAnh Divx BIDeo. Dn noyieHne detanboHn
H3HAKOMNEHCAIPOPRAMMHSIMCPEJCTBMAJINKOHBePITPOBAHARDAIIOB BFOPMATBIDEO DIVNOCETMEcaITdivx.com.
OΦOPMATE DIVXVIDEO-ON-DEMAND:3ToycptpoCTBO DivX Certified@doJnKHObItb3apeHrncTPOBaHOI DnI BocPouBHeHINpno6peTeHHbIXfHbMbOBΦopMATE DivX Video-on-Demand (VOD).
PonyuHTe Baw perncpaonHbKo
HaKMMTE KHOKNY MENH A HNIbTe DACTAHIOHOHOTypanaJIeHH.
- Búlo6oparte Options > DivX(R) registration (OnLIM > Perceptración DivX(R)).
HaKMMTE KHOKN OK, Tc05b Baaw peHCTpaMOnHHK KOtOo8paeHn HaKeapae.
IIN PONYENHANBONEIPOPBIIOHNPOPMAUINOTOM, KAK SABEPWNTB BAI NPOLECC PERNCTPAUN,NEPEIDHTA H NHTERPHET-CTPAHUYVod.dlv.com.
OTMeHa pernctpaun BaWero TB:
EcnBbXOTNEOTMeHnTbprrntpaauBaUero TB
- HauKHTe KHOKNy MENU HA nylbte DaCTAHIOHHOTY npynabHtE.
- Bыбэрпгх Options > DivX(R) deregistration (Орizuи > DivX(R) Деренистраду).
- HακμπTe KhoπKγ OK, nocne Hero Cnεdγη ΜHCTpykινιρι έλεκρηθε.
DivX®, DivX Certified®, DivX Plus® HD IN CBA3AHBbCbe cHMMI Jorotmbl - 30 Toptrope ble Mapkn KOMaHmRovi Corporation UINc ce fHnAnoB, KOtOpBe NcNpBa3yOToT no IuHdEHNs.
OnpeJeHne BpeMeHH
BIOIIOIIBI OIEIIOIIEIPOIIIMMOXHO IIOEJIINITb BPMO CIOIIOIIOIIOIKAIOIOI.
- HaxMITE KHOKNY MENU HA Nylte DuctaHIOHOTO ynpaBHeHn N bIbeprnte Options > Timer > Clock > Auto synchronization (OnuNn > TaMep > UcBt > ATo CINxPOHn3Auiy).
2.HaMMTe KONKn 17Bb5opa On (Bkn).
YcTaHObKaHaHbHoro DeKoepa
DeKepbI pAnAHANHbIX KaHOB MoryT bIbI
noCoJeHHHeMb Kpa3eMy AV.HaHaBtpe daHHb TYKaHAN
kak DeKpOyEmb. NToTOM HaHaBte pa3bEm, K KOtOpM y
nDknIOeH DeKoep.
1.Haxmte MENU Hn PybIte DCTaHUMHOYor ynpabHeNn Nbl6epyTe Setup>Decode(HacTpoKa> [KoOpnoBaHaH]
2. Haxmte OK/ BxOaB CnCOK.
HAKIMTE KHOKNK △/N bly6epTe KaHaI JIaJ ENKOJIPOBBAH
4.Hakmite KhoNkiy OK JnBa BbOpa IIN OTMeHbI BbOpa KaHana.
5.IIaBo3BpTaBnpeDyDuOe MeHOHxKMMTe KHOHNy MENU.
MnarHocTKa uΦpoBbIX TeNeKaHaJIIOB
- HaxmiTe KhoNky MENU Ha nyIe Te nCTaHluOHoro ypaBHeNIA N BbEpyTe Setup > Diagnostics (HaTcpoJa > DaIarHocTka).
2.HaMMTe OK|DnO TO6pAKEHNI CINHJIbHO HOpOMALU O TKeYJcEM UKPOBOM KAHJe,TAKO KAK MUHOCb CYINHJIa,JACTOTA INP.
CdBnBpeMeHH
3Ta cyHKnA DaCT Bo3MOKHOctb 3aHnCaTb TB-npOpaMMy
TAKIM O6p3OM, T06B1 BHe npOnyCTNTO HxHyKo
IpePaeYBaB TOM CAY, KOrlaB Bac HET DmA. NpeiD
NCIOB3OBAHmDAM DAHHON FyHKnCnOyET y6OHTCB
ChAHAA, T0K TBP-npOeMHNK NOkKNIOHO YcTPOCTBO USB,
PiN IepBOM NoKIOKHeHN BBIOINHTB HAcTPOKY yCTPOCTBA
USB C nHTALNIHNO HO DnCKA.
PmmeHHe: DaHHa FyHKuMIOCTOYHnTOIbKO B H36B4HNbHnpDQyTbX N MOKET 6bITb HNDOTCYHnB IN PpOyKeINN B MEcTe YCTAHOBKN H3-3A ONPeDEJIeHNbIX OTRAHUHNEH TELBNIHOHONH CHTN TeHXUYECKNX TpeoBBOAHn CTpaHs. 3Ta FyHKuMIA TAKKE MOKeT BbIb SAHIOKApOBAH aTEBENHOHCOBn CBTbKO BCLEDCTBN 3aunHb ABTOCPKxN pRb (3aauTnPpBa n KOHTBt BbICOKxO PAaepueHn, 3yko3aHcMb). YTObI pOoeepntb DOctTyHOCTb DAHHo FyHKuMn HA Balaem pOqdyTe, hCNONs3yIte KHOKkyOPTN Ha IpyIbTe DcCTaHIOHOHOY UpBaBHeH.
1.Hakatb KHONky MENHnyIyIbTe,INCTAHIOHOHORO ynpaBIOHHN BYIbPaTb ONIOSetup > Time shift (HaTropkaKc>CBIgRpEmeHn).
2.HaKaTHB KHONKY 一 P 1nBb6paOnIuNOn (BKn.),HTO6bBKIOHTb ONUIN CDBHRA BPEMENH,3ATEM HAKaTHB KHONKY EXIT,TTO6b3AkapbMbENHO
3.Hakatb KHOTKY OPTION Hn Pynte DmCTAHIOHORO ynpabHeHn BbIpsbT onuHc Time shift (CdbmBpemeha) a 3aTeM HAKATb KHOrkY OK, Tt6bI NoTBePdTpBbIbOp.
4.CnEyET BbIIOINHTyKAsAHM,KOTOpBIE6yDyT NOBIAITbCAH 3KpaHcB INPOUCCC HAcTPOIKN.
5. Nocie 3abeepenHn HnactpOJnA JnKaHTb KTHIOY OPTIONN BvOpaBt onlUIO Time shift (C2nnVBPmEH).
6.HAKKTb KHOKNK OK,HTOBo BbIbpaTb MEHO FyHKmCDBnA BpEMeH.
HakatbKPachyho KHONky,HTO6blcpeNaTbPaay3 npBocpoW3BcEHnH306paKHeHnHaHbAeTB BODcBnARaBpemeHN。
HakatbKPcchHyo KHONky,TOBbI BnOHTnhts BoocpO360DHOHAnCHoHOROTOpbH
Korjna VcHcHHe MeHO TaMepea N OCTaHTeHTC TOnbKO CCHTtHK, MoKeTe HaxKaTa KpaChyIO KHONKY INN OK dApOCTNY K MeHO TaMepeA.
- Hakatb 3eNHNKHOHNIyBn6IcTPONEPMOTNHA3aI IINJENYIOKNHOYIINB6IcTPONEPMOTNBApeD.
- Haukatb cyHIOO KHOIky, YTO6bI bBMyI IN ΦyHKmI cDJIINB, BEMEHNI.
DPMGHAH
- Ipeq iopkloHem USB yctpoiaTBA k TB, yioctoeepstc, 40 daHaJIbY cypOaTBA COxPAHeHb. TaB Bn6eKote notipio hnpoAPmI.
- Pekomehuyem HcHbBcBt USBYCTPOHCTBO CboCboDbHM qanm Dooee 10aHTN CKOPOCTHO DnCKA 0oee5MOTrC.
- TEM COBILBE PAGAMEP DAPRA - TEM COBILBE EPMR 3896N.
EcmBnnpcknoaKaHAn a CpaWbApeGMHN, nonBtca Coo6eHHe Yes [Ja] Nm No (HcT). BbOpaa Yes [Ja].BbMokTe bHInN3 pHyKuM cDgMaBpBeHMn n nppeKnOHTb KaHAn.
Ipe3ancaTb yactok
IIO3BOJNT C500CHTB HACTPOHn HA BaUMC TONCBVDOPO HA 3HAHCHN,3AaHHbIM PNOBMDTELOM NO yMOHANIO.
1.HAKMITE KOKIyIe MENU NITIte JIMCTAHIOHOHORO UYPaBHeHn H BbEpeHt Setup (HaTpoHka), 3atEM HAKMITE OK IJIN NOITBepKJHm.
2. BbEpeTne dyHkuu Reset shop (Ipeeaanicae yactok) HAKMITE OK/ DnBEXOda.
3.VcTIOJIbIyTe 8yKBeHHo-LHfPObIOe KHOHNKIN DnBEOda npAOJ.
4.CNMOUHKOHOBbOepHTeOKnHAXMMTOKnnIIOJIIEBpIXeHHIA.
5. PONBHTC MEOH Initial setup (PBOHOBA-NHLBHE HACTPOKI). CNDyDy COOTBEETBYOILMIM HNCCTOPKUMM
I3meHeHne npaMeTpOB BBOda
BbMOKETe KOHcHpypO8BaT BaU TB B COOTBeTcHbC NOdKIOeHHbM K HEMy O6Opdyo8AHmE.
1.Hakmte KhoNky MENU HyaNKe DHTSAHOHORO ypaBIOHnA N BbOpTe Setup>Input settings (Hactroka >HactroKnBIO).
2. Hacmite OK/ДЯ BXOda B Input settings (HacTpoKnBIO,IM).
3.HaKMTeA/TVyBbBbopaCoepHNTenrCnMOUIO KOTOPORO NOKNIOVAETcOOBpyOBAHHe.
4.HaKMMTO KHOKNK/ДЯьБбОТаTNIA ANPAPATyI,COUHINHENCHGTHM C 9TNIAM COUHINHEN
5.HaKMTNE MENU DnA BOePATA B MoHIO Setup(HAcTPOIKA). Pocne BnBIOHINHEACTPOIKN, BbBpaHnHMAETKIA HcTOHNIKA 6BdTe OToBpAKteCSOncNE HaMHeOBAHn COOTBTCTByIOJERTO THe3A B CNTICKE NCTOHNNCOB CHTANBO NOCNE HAKATNI KHOKNI SOURCE INI INITBE JIMCTAHIOHNHO UYPABINHNI INI KNKIK OK HA TELEBIVSCOPE.
PnmeGae: He Bce MoerM mEOT KHONK HA KOpnyce.
IcnoB3OBAHne 3NeKtpoHn nporpaMMbI Tenepea
C nomoubEPG MOHNO BHAHTB CNOCK TENEPEJAH.C NOMOIOE PEG BIMOKTe NCKTaB, BBIOMATN INPOCMATPBtnpORAMMBM
- HaxMMTEGUIDEHaNyIbTeDmCTAHIOHHOyPpABJIHnM, NOBHTCMeNoN Now and Next EPG (EPG (AeKtPOHHB I nII), N03BOJHOUHmIHFOPmPOBaTbO TcKUoH IN cNDyIOUe npOrpMa KKaDPKORA KaHNApeKIOHHe KAHAIHO B C NOMOUBK HABRAIUNOHbX KHONL.
PVR (Personal Video Recorder)
2.HaKMnTe KhoNky OK dnn OToBpaKeHmCnMa Ka 3anHee.
3.ДибшнаньдгБвсBakCOK,HAKMITE CHHANA KPachyKHOKNIpyDIObPaxekhenBu Schedule list (Cnckoc anno no pacmicahno),3atm,
-
Channel number (Homep KaHana): NcnoIb3y KHOJIKA
-
Start date (Data HaHaHa 3aHmN); MNOJIbSyIe 6yKbcHoHIOA PPBOBIE KHOIKIN DIA HACTPOKN DaTb 3aHmN.
-
Start time (Bpemr cTapra): yctbaHOBtBe Bpema HaujAa 3aIcNn.
-
Stop time (Bpemx octaHOBn 3aIMCN): yCTAHOBATE BpEMX octaHOBKn 3aIMCN.
-
Schedule type (Tin pacnncanra):
BKNHHTeRerimder(HaONHHTb),KOTOpBn Bam HANOMHHT,KGDAHADBOHKINHcBcBnPdA,KnKOTOPORo BByyctAHOBHINBpCME.CcN OHO NCTCH, aBbHe C0eepuHmHnKAKOReDcTBA,NanorOBOoe OKHONCHEsHt He 6dyTnpedpnHbHkAKMe Dpyrme DcETBA.
Biknne Record (Pekop), Kjda peumte npoeipb Hactpoyki rpaivka n korga noqet spme, KOTOPoe BbycTahOBiM. EcnB BPMA NCTeH, a Bb He COBEPIMIHKAKO DECTBHA, 3anACb rpaivka HAHHTB ATOMATHECKA.
-Repeat type(TYN NOBTOPEHIA):YCTAHCBITEpaHHHbIEpEXMHNOBTOPHI3JANHC.
4.HaKMMaTe KONIKN ▲/▼/■DnBb6opaAdd [DobABHT),3atcM HaxMMTe KONIKY OK,HToBb BbIOnHHTb DabAChHe BaWy yctahOBKn B BaW crncck aanncn no paacncaHIO.
5.HAKMITE KAPACHYIO KHONKY,HTOBy NOSSTOPINb PNBEDEHHBIE BIIUEIPOUJIpyBn 3AHECTN DpyTyrNO TOSUMBOB PACTNCANHE.
6.EcN BxOHTHE OTepeAaTIOPOBAt Nm ydaHnTB 3aNtNCb H3 pACINCAH, To HAp BoPbAT STy 3aNtNCb HAKMMTE KONKY OK, HToCBI BOITN.
7.HaMMTE EXIT DnB BixOJa 3M MoHIO.
Ceteboe noKIOUOHeHn
BbMOKOTcYCTAOHNTBaT TB TAK,TOObl OH NOJKNIOHNCK INHTEPHEY BEEPA3 BAJIANHIOY CEBi (LAN) npOBQHbIM HINBeCnPOBOBdHbIM NpIKNIOHcEM.
PoiKJIIOUeHne K npoBOdHOcETn
BMOKTe nOckHHTb BAaT TB K LAN KaBeIeM TpeMa CnOco6aAM:
- Mokho nojkiouh TB K LAN ka6elem Cat 5 K BheuHemy MOdemy.
MOnHIO NIOKIOHTB TB K LAN rPi HOMOII IP Sharer, NOIIOHOBBIM K BEEHMMy MoEMy. IVoNBo3yTe Ka6eB Cat 5.
B 3ABNCIMOCTH OT BAUJI CEH,MOKHO NOKIIHO IMTB K LAN,NOKIOHB LAN noPT BAUJERO TB K PO3ETKE CETN Ka6eM Cat 5. 3aMeTBe, NOKIOHcHAA NIN PO3OTKA MOIDMy mno poyTey.
TTObI npKIOHITcB KnpOBHOCTe, BbIbepnte Setup > Network > Settings > Interface (HAcTpOHa> CToB > UctAHOKn > HTepeNc), aTeB bIbEpnte Ethernet (Ethernet).
IopKIIIOUeHne K 6ecnpoBOHOH cetn
Ia 6ecnpoBHOIO NOKIOHcHbM TB HxHcH 6ecnpoBHO bpoTep uIN MDM E6CnpoBDoH LAN aDantPe. NIOKnIO-IE6cecnpoBHO bADanP (USB 3aryuKy), IN KOMNKeTBAIeBO T K USB 1 npTy.
- Tio6b nocknHbCnBcN BceepoBdoHcN CTe, bIbepePte Setup > Network > Settings > Interface (HaCTpoJa > Cetb > YctaHooN > NHTeppOc), 3atem bIbepePte Wireless (EecnpoBdoH).
- Bb6pOte Wessing set (BocPBOBDAH yCTaHOBA) IN HAKMITE OK▶IIBXBOJDA.
- Moetoi NoJIKNoHEnu: BBI MOKETB NOJIKIOH/ITbC K 6eciproOJHJ CEN TPEM MEOTJAMIA.
Scan (Ponck)
Bb6epnre Wireless setting > Scan (Gecnpobnna yctahOBKa > POnck), 3atm HekMnTE OK▶, TB 6ydet cKaHpoBaT bce KaHaJIb. O6hApyeKeHbIe KaHaJIb BydyT nKo3aBtBA7BcN.
BbI6epMTe KaHAn HauKMnTe OK/1
ECINBbblbpamzakOIOPOBaHHnKanH,BAMHAp0 BBeCTCNCCOTBE1CTBYKOUmI NaOpB. HAKMHTE OKHa NByTbe DNTAHCHNOHOYnpaBHeHnI IN3OpaXeHnI BMOYAnbHbKnKbAEBMATEpDBBcBAIPOaNpO
-3TOYCTPOAIE60HMEEITNAMRbOOBAPyKHHbIX KAHABIOB,TOYNO3BOJRTBKOHOHTbHXDAKEIOONJIENOTOKINCHNTHTANHAR.
Bb6epnre Wireless setting > Manual (BeCnpoBDHna yctAHOBA > PyHNO, sATEM HAXMMOTE OK/, noBNITcno nOcK3AOK BOIN B npabnnbH bSSID DcTyrHoro BeCnpoBDHnOPOyTePAI yctAHOBA C8N3I.
ECIN BAI AP NOJIDEPKNAEET WPS (Wi-Fi 3aunuHnAHB yctahOBk), BI MXXETE NOJIKIOHTbC K CETM Hpez3 PIN (IepcoHaihBn HIOHNTMKAcTOP) mPBC (KohpNpypaAHHKONIK). WPS ATOOMATUPOCK CKOHPNpyPvET SSID WPA KNOH BV NOCM PEXKMM.
Bb56p9te Wireless setting > Auto (BecPocBocHAny yctobAOK>ABTO), 3aTEM HAKMMTE OK> DTRB BxOJIa.
PIN(PIN):Bb6epnTE PIN (PIN) n HaxmITE OK/ Dn bXOa. Pnpou3oienrreHepaun cynaHoro PIN Kpa. YoctoBepbc, 70c 3OTK KOJ yCTAHOBnE B AP. OpaatbeK INCTpykmu poyepa.) Haxmite OK/ Dn yctaHOKn C83n.
PBC(PBC)ECNHA BalaempoType octb KhoKna PBC,Ba6eepTe PBC),3atEMHKMTE OK/
DnBxoDA.HekMHTe KOHYPBCHa HakoMpoType
UdopKBAIeBTO TcHHO 2 MinHT HAtOM HAKMMTE OK/BAIITBBAOTMATNIIECKNBOCIPIMETcEIN bNDKnKHTTcK Hoi.
Ceteba yctaHObka
1.HaxMMTe MENHa HnyIbTo DnCTaHIOHOHOyUpBaNHeH N Bb6epMe Setup Network Settings Internet connection (HactpoKa ^+ Cetb YctaHOBk▶PiokIOHOHOK KIVHTPOHETy).HaxMMTe YTObblbpaTbOn (BKn.) IIOOxMTeDIO yCtAHOBKnCB3M.
2. 106bipnpoepbTbIOKIOOHmE KHTIepeHcy, Bb6epTe Setup Network Settings Connection test (HaCtpoKa > Cetb > YctaHOBKN > PpOePka IOJKnIOHmH),3atEM HAXMMe OK/ Ecm He NpOyHnOcb, CNeDyTe YkA3AHFMN VNOE.
3. Bb6epTe Setup > Network > Settings > IP setting (HactpoKa > Cetb > YCTaHOBKn > YCTaHOBKa IP), 3aTEM HAKMTE OK/Дгд BXOД B MEHIO IP setting (YCTaHOBKa IP).
- Yctanobite Address type (Tin appeca) Ha Auto (Atro), IP aappoc 6ydt BBOeH AOTOMaTHHeCKH.
Hnke HnncanKak BBeCtn IP aDpec BpyHyIO.
- YctaHOBeHte Address type (Tin appeca) Ha Manual (PyHnHO), H KOJIKO N BOJIO B NEPO BoJe.
CyBnDE IP address (IP aDpcc), Subnet mask (MaKa C
yBnHTa), Default gateway (LNk3), Primary DNS
(TCpBMHhDNS) DNS ySecondary DNS (BtOPhmH hDNS)
zHAHOHry, NcNOnLbYte 6yKBeHo-1pPboBle, nI BBOpa
yICeIy KHOJKNCTpeJIKn DnI nepeXopOA oD HOrO IONI
K DpyOMy.
- TRObI CHOBI PNOBEPMTN NOKNIQHHeNE K INTEPHTY, NIOIE yCTAOHBN BIOEPIETe Setup > Network > Settings > Connection test (HAcTPOJKA > CToB > YCTAOHBN > IPOBEPKA nOKNIOHEN)
4.ДИОTOБРAXEHINHOPMALINO TKeYUJIEM COEIMHEHN, a IMEHNO INHTERPeIC, TNN apDeca, IP apDece N T.D., BbIEpNE Setup > Network > Settings > Information (HactPonKa > Cetb > YctaONKn > VInfopMAJIN), sateM HekMNTE OK>
PokaTb mCOTpeTb
PIMMAHMEPOKOBADNPOOADKTACOKI PAK KINKa3aB n CMOTpeb. NkA3aB mCMTpeb.COMECTMnCDLNA
PoiKIOUeyHe K Bauemy PIK
CHaHaA oBaCleBte NIOKIOHOHe BAsIe TB K pOpyTe.
TOM NIOKIOHbte BAsI K pOpyTe cTeBbIM KaBbEM IIM
63kAbcBbHIO. YbOcIITocB, TTo Setup > Network > Settings >
Internet Connection (HactPoi/ka> Cet> YctAIOKIO>
NIOKIOHOHe M K HHTepHer) On (BkI). EKnIOHO, a CnCTema
3aAtuBbI BAsIg O KomBIOTopA He 3abKnIOpYET O NIOKIOHOHe.
BkIIOUeHe FyHKmN «Noka3aTb n CMOTpeTb»
Bb6epTe Setup > Network > Applications > Share & See (HaCtpoKa > CToB > PnVIOKChNIA > PNOA3TaN INCMOTpB) IN yCTAHOBITE On (BKl).
IocnoobateBbHb BnONHnTte WnH,OnHCaHHe DaJIbe, H Bbl CMOKTe TNOHYHTb YIOBOBcTBME OT npOCMOTpa 3AINCAHHbIX BIDEO, V3OcbpaKeHmN My3bIKn, COxPAeHHbX HA BaIeM KOMTHoTepe.
IobabHeMe MednBaWero IK dNIOCBMECTHORIOICNOB3OBAHIN
YCTAHOBITME MCMAACBOPeTOKa3bHcMTPOBHa BauI KIP, PPOCTOy uD06hN cepBep-3TO Microsoft Windows Media Player 11.Pa3peWHTo BOCINb3oBaTcBAuEMy TB paJnAmn C BAUero PIK.
- Okpoite Microsoft Windows Media Player 11.
Bb6epure Library > Media sharing (EbnnoTeKa > CoBmeCTHOe noIb3oBaHne MeHa).
「PObepE,TeJHbOKSharemydatain(COSMCTHO NCIOB3o8aTb MOH MeJaA)
-Bb6epntnHKOHy TB nnoKIOCHHcR KBaWemyIK.
- Béboperte Allow (Papocenth) no3087B TaoncknBtckkcknK nK n Béboperte OK dN no109Bepzehn HnDnKIOHHeHH.
PnmeHna: HcnoIbayte KhoNky Settings (YCTaHOBcIK) 101 YCTAHOBcIKHe NINHbX HcTPOeK
- -Bb6epeLibrary>Add to Library (Bv65nntoTeKa > 20d6aBtB B v65nntoKyo).
BubepepeNTaPRAKDPyTHXNIOJIb3OBATeIeJIN dyOBCEMCTHOHNCIOJIb3O8HN.
B-BioCepHTe Add (DIOBAEBITU) NHEKMMTE OK DIAI TIOJIETEPXJHINH DIOBAEBIHIN.
PpnoJoxHeNe 巧 Na3aTb n CMOTpeTb
Tc6bl BoITM B Meda-LIEHTp, Bb6epHte Media (Me)B. RABHBM MeHO HAKMMTE OK. Nocne STORo MoxHO pOcOMatPbAtb foTporpaHm, CnyuAtb My3kyi CMOTpeb BIDeo, KOTOpBie XpAHHTCRHa BAeum KOMnIbTepe.
PmmeHHe: EcmfynkuraShare&See(Toka3aTb n CMOTpeB)BKIOHOA, TBOTo6paBHTCnACOK DOCTyHbIX CepBeBOP "Koka3aTb n CMOTpeB" KOTOPbIOCTyHbIX B NOKABHOBOTM.
Smart TV
P03B0AETNCNtS0BAtbHaBaiEeTEBn3OpEHTHePepHpIIOXHOHN CNOaMUNHO aadTIVPOBAAHbUe HINTEPCHCABMbYyPABJIITR pIIOXeEHMMMOKHO C NOMOULBO TELEBINHOHOpyBIA DACTAHOOHOTO yipabJHNI.
OCTOPOXHO:
Hactpoite cetb noonbsaSmart TV.
BOSMOXHb3aMeJINHeHBeOTBeTbI INpePBbAHnBBA B3BACmCIOCTOcTOCHNBAULBcETn
Ecm y Bac 03NHH-yn pno6bme C npnOKeHHEM, nokanyjvct, o6patheTrc K noctabuKin cypeJkaHN
B 3ABVNCMOCTN OT YCNOBIN NOCTABUIMKA CODEPKAAH, O6HOHEENI INM NCOJI3OBAHIE CAMOFO PNIIOXENH MOTY B6HTB NPCPAUCHD.
B 3A8VIMOCNOT 3AKOHDateIbCTaBCTaPbHIIpe6bIaBHINH HOKOTOPBIPINIOKENHMOYTOCJyKNBAIbCBOTPAHINHOH NINHE NOIDDPDKIIBATCB.
DocTyK npnoxehnM Smart TV
BbCtpbnBb3OBKOMAHD:IaBbCTpOroOTo5pKaHCHINI HAIHOM BnTmHiSMart TV HAKMITE Smart TV HA nIyIbe DACTAHJHOHORO ynpABNHE.
1.ДИОТБОВСЕСССССССССССССССССССССССССССССССССССССССССССССССССССССССССССCS
Smart TV (Smart TV) B T R A H O M E K H N H A K M C M T E OK.
CSTYK6I PRINNOXENH B3SACNT OT CTPAHI. BI MOKOTE
YCTAOHHTB TAPAMOTPU CTPAHBI, KAK NOKBAHIO HNKO;
ДИОТОБРASCHNII BCEX DQCTNYHIX ONPILT CTPAHI
HAKMITE KPACHYO KHONKY, A TTOBIS PPOKPYHMBATB
ONJIM, INCPOLJIBYHTE ▲/▼/■ HAKMITE OK ДИА
NODTEBEXDEHIV, YTOBIS BEPHYTBSA HAI TBAHBO HY CTPAHMI
Smart TV, BSLBEPITE KHOKNHY "Home" HAKMITE OK.
2. 1065bl BbOpBt PnIOXOHEH, HAKMITE ▲/▼/▶, a 1065bl BOHTI NHPKMTE OK.
3. PpOcMToP INHTepHET CpaHnIIOCTyNtB NoptanBbIX npAnOJOHmX SmrTV, NpOHyMbK HCMV OTOyT MxHO, HONJbEy 3AHOK B NOPTAE WnEHeYKO KHONKY BO BPEMR OTo6pBeHnIc TcPAHnIe TeteBnAHOHnO ToPnTA.

POMMeyHME:POKOBKY COOENHEMH CHTHEPOTOM 3AHMMET HOKOTOPOG BPEM, PDEKOMSHVYTCN 10QOXDAHb HECKONKO MHYT TIEEP TM, KAK NCOJIbSOSBt DANHYKO DYHKNUO Smart TV NOCNE BCABPAeHHI TENAEHcopa Bpaocn peKM.
HbbTV
KHeOpTOpBie BcUeTApTe LmPbObux KAnHOB (BuHAnH TOnbIO B CTaHdaptX DVB-T/C/S/S2) PpeIaI aIOT HtepaKTHHy ToTexHONIO HbDTV [LmuKoDyanaLoHHoTbeTEBueBaHnE]
B TexhONrHM HbTV BcuaTeM COeTaTcO CBOI O6bHHy TeneHAnKHOHIO pOpaMVy Co ECEMM HAdMM NHPoPMAMIM Nm PA3BaeHcyN, 3Ty HDPoMAuKO MOKHO NPOCMATPVBaTB INHTBpAKTBEHOM PEXKIME.
YTO6bHaacnabTbC8TeXHONrMeHbTVBnonHmpe,HyKHO nOoCoeHNITCBsOtnTeNEB3OpKVIHTepHety.
PIMMEMVAHAE: HA NELIA TENYEMOKBIO HEBIL 3ZI ZAFYKAYTSI DABHBL, VICTONLY 3A YAHNYO DYKHALPO.
DocytK HbbTV
IINKTHNNTHNEPAKTHNHBXCTCPAHNHLHKMMTE KAPCHKOHNKBO ESPMAHACPOJAI TELEBMHOHOHORO KAHANCA ToxHONPHEH HbbTV.HToBb NepEMeUaTcBc No cTpaHnAM HbbTV,ncIOhBaYteAe 一 / / - ,a IINNIOITBHeKJdHnH NKMAEOT OK.
AKTUBaUM/JeakTUBaUM yHKUH HbbTV
IockkkyBeeaTebHbTEcTbHbTV,ipOBDMMB B HekOTopBX TECTObXIPINNOKCHNIXBEUATeNEi, MORYT pa3paKaTB BCINIBaIOUIMM MEHO, Dn8 BoIEE KOMΦOpTHOrO PPOCMOPa TEENEMOPMOKHO INCNOBcBaTOnHO BKN/BlKn HbbTV B MCHO ONI.
PpoaHΦopMaun
PapOBBpoDHTenbckOM KOHTpOne
- npoIb no ymoNnHIO: 1234. NolbaOBeJIb MoKET nMeHHT b erHa IIO60IpyrOI.
Cynepe npap0423. Ecnblb 3ab5bn Csoi npap01, BvBdnte Cynepe npap Dnre npexoJa cepes no6npap01.
BbIaBHeHne uycpaHne npo6nem
IpeTeM, KAKOBpaTbCBA CNYK6y, O3HAKOMbTEcB CO 10dyuUIMnpCHHm.
EcHn Ht n3o6paXeHH Wm 3Byka.
Y6dTeCb,TOKAbEbnPiTaHnPbAByInHO BCTaBHeN B pos3kY.
YbdeTtce,TOI TIO IOTIOHINK YCtABHOINIEPABSAIBHO. YbdeTtce,TOI AHTeHHA NOCOBDEHINHA PABSAIBHO.
Y56D1Te8c,TOPOOMKo3bHbYCTAHOBHeaMHINHMABHbOMP0BHOHE3BHKyEHTAOJIBHbHE633BHyIbPBKM.
- y6eTecb,TO HayuHnKHe NoCoEHNHeBb.
BMOKOKOBCTNCTPOBJCTHEORPAHINBAIOTCPIIOEMOMUPOKOBUEATENBHCTAHILIM.
Ecnn n3o6paXeHne He YETKoe.
-8601030b,HTo aHToCHHH Ka50bI IOcOoHINHO PPABuHIO. PpOBepBe,IIpaAIBHo IINPINMMBETC TENBEHMOHH B
KaHCTBOIIO6PbAKHNI MOKETYXUYUINTBc BCNECTBME OHOBBPEMHIO HOOCEENHIMVHS-KAMEPb, KAMKOPJepa INN DpyrTO NepnpeHHNOYCTPOINCTBA.OTKNCHTEoHO INN NpNNHINHbYyCTPOINCTB.
BbCtHbIe 3JyAaJIIN WIA BOSBILHEU HIOO CNOJAOIT NTOEMXAI JAHTEHHeH, YTO MOKET BbSbATb NOJAEHO
JIBOHOIOI306paKaHENK.KAeCTBOI306paKaHENMOKET yUyHJIbCnTPOINVTOB30SAHNOCTOHOARPAEHEHOI AIHEHTHb.
Tropo30179bHbeNtIKpIbHe NnHnHaN36paKBeHMnMoryT 6bItb BIsBaHbN NOBExAMn OT 3NeKTPReCKHX PnIOBOP8, HApIMep,OT pHaHnHOaPcXnO6NI3OCTn HeOOHBx IaMn n.Ⅰ. BbIKnCHte INn y6peHte INx.
EcIIaI6PbAKHeHcCNIiHKoMTeMHoe, CNIiHKoMCBTeHNoI ToHHIOBaHNoe.
PpOBepBeHAcTpoKuBETA.
PpOBepeyCtAHOBKyApKocTN.
PpOBepeTe dyHKuK pe3KocTn.
Mor 3aKOHHTbCpOK CJIyXkbI JIOMMHeCLeHTHOJAMMBI.
Nyt TaHIOHOHO ynpaBHeHa He pa6oTaet.
Ppoepebte 6aataeKn B nyIbe nctahHIOHO ynpabneHn.
Y6eDITECb,TOOKUKO,DACTBIOHORO,DaTHNKA,HE NpOBepraTcERBOESIECTBMOCNIBHOJINOMHECHLEHTHOF OCBGCHIV.
PnHOMOIAI MIK KOHK TKBHIOIbITAECTCB OHNTATB JINH3bl HAXDAJIeFOCA HA TEEBM3Op DaTHNKAJNDCTAHJMOHHOTy PnTbTAYPNAONHO
EeBbIeBnepEnCHeHBe yKa3AaHHeN HOMOyT BAM BpeUeHN TExHnEeCKoR OBoPcO, oOpATiTeB K rapaTHmHYOM TaHOH aHnFopmauN no cbLyKnaHAnIO.
Texnueckne xapaKTepeNCTMKe TeneBudHn
TepeeeuaHmE
PAL/SECAM
BG/OKI/LL
KaHaJIbI npnMa CBV/YBv/Ka6eNb
TIN TIOHEPA C CHTTEOM HACTOTBI
OSS yka3aHn
TTO pOdyKT NcNBo3yET HKeToTOpBe InpOrpAMMbI, KOTOpBle
pacipocctpaHnHCTCB B COoTBetCTBm C yCIOBMAH He3ABNCIMOH
rpynnj JPEG.
ETOTnpOdyKTNIOJIb3yOT HekOTOPBIE npOrpMMbl, KOTOpBpeacnPocTpaHHTOCB COOTBCTCBM C yCIOBMAH NPOCKTA Freetype.
TOTnpOuyKTNCIOJIb3yOT HekOTOpBIE npOrpeMmbl, KOTOpBie paccpOCTpaHrOTCB COOTBCETCBN C yCIOBIMn npOcKa TOpenSSL.
OTnpOdyKTNCNOLb3yETHeKOTOpBle npOrpMMbl, KOTOpBle
paacipocptpaHHTCB CCOBTcTBmC yCIOBAMM JIJIeHSnZlib.
OTnpOdyKTNCNOLb3yETnpaPMMHoe oBeCEHHNE
UNICODE,KOTOpoe PaocopCTpaHETBC COBTcTBmC
ycIOBAMM NJIeHSm C OTKbTBM NXCJHbM KOOM IBM
3TOT Pnpdyk Icnno3yEET nporpamHHeO oebeeneHbIbpng, KOtOpoe pacnpoctpaHaeTcB COOBTeCBTN C yolosHM NJIeHNm C cKtpblm NxOChM kODOM OSI Cerifed.
3TOTnpdykMCNpNs3yETnporpaMMHoeOececneHHeExpat, Libcur, c-ares, KOTOPOE paccnoctpHaRcTc COOTBcTeBN C cycOBNAIMIHNMI.
3T01npdyKvNIOJIbEyI npOpaMMHoe o6eCIEHHe, KOTOpoe pacnpoctpAraTeB C COOTBeCTBmC yCyoBmMn GPL/LGPL.
PporpmaHoe oeceneHne GPL: Rnpo Linux, Busebox, SquashFS, naker mld-ultils, e2fspros, BlueZ, Dbus, Glib, dpaeep tHeN/3aInci NTFS-3G, samba, iconv, Linux File System FTA.
PporpamMHOoe oBecneHHe LGPL: DFB, SAWMAN, ALSA.
M3-3a pa3mHbX BO3MOKHOCTO npOyKuC C yHKJMAI SmrTV, a TAKKe ORpAHnEHN B DOcTyNHOM KOHTHe, OPeDeneHHBe yHKU, pINIOKeHMe N yCytN MORYT 6BtIE DOctyHn Hc Hb BCCx YcTOPOCTBX HA Hc BO BCCX MecTAX. JHEKOTopbX dyHKU HA SmrTV TaKKe MOrY NTpe6oBaTc
Pa3dienb19
npouaHOpMaun
JIOIHTHNTBHe NEPDPEHPBVEYCTPOCTBA HIN TNEHOKAE B3HOcI, KOPTOb PNOAOTCR OTDeHNo. POKAAyTCA, NOCEITNE HAJI B6-CaT DII NIOYHEH NDOJIOHTHEH INOPOMALI IN KOHKPETHOMV YOCTPOCTBY IN JOCYTHHOCTN KOHTHTA. YCNYTA N DOCTYTHOCB KOHTEHATe HEPES SmartTV MORYT SPEMOT BPEMEHN 3M0HTbCB 63npdpAPHTBHO 7EBDMNH
BecKoHTHnYcTMyNIOCTyHbIeYepe33TOyCTPOHCTBO,
PnHnADKcKATPTcBIMNIAAMN3AaUuCCbHbAByTOPCKMM
PnBaAaM,NTaHtAaMT,TOBAPbHMN3AaHKAMN N/INJpyTMM
3aKaOHMMoVBHTeJIeKTyAaHbHOcOCTBeHHOCTH. TaKoI
KoHTOH nCytTNpOcOCTaBnIOCTcNcKIOVHTHNO
BaWero HnHOrHOhKOMmOPHeCKoRHOcNcLbOBAHMe, BnHo
MOKeTe MOnlB3OaBbTIOoKoHTEHnIYMcYrTHNNKAKIM-IM60
HOpaPoOHbHMBnAoBcBcM KOHTHTa IMNocTaBuNKOM
ycyTbOeA2oMa.BoEorpanHHeBBuIKsToXoKHeHO,ecnH He
NoIyMeHO paapSeHHeeCOOTBETcyouOe IBaJaDJIbLa KoHTHa
mUyCytB,BoHEoKOteI3MoHbT,KOHPoBb,TnpO3dABaTb,
3aPykAs,nyiKnOBaTb,npOdaBb,TnpOboDHTb, npOdaBb,
CoDaBaIbPnOvBdHbIbePaObTb,npODAHbTbIMN KAKAM
NoIyHeHHbC NOMUeBIO TOrO yCTPOHCTBa.

KANH XapakTOPHM MORYT BbTH HOMOHN63 yedomnne
Önemli bilgi
Güvenlik
Yerel ana guc kaynagivoltajinizin setinizin arkasinda bulunan tanitim etiketinde gosterilen voita uygun olmasini saglayin. Sebeke fisinin veya aygr bitlastrincin cihazin baglantisini kesmek icin kullanimasi durumnda calismaya hazir sekilde durmalir.
Options > Common interface (Secenekler > Genel Arayüz)'ü,)
Indeterminate acc. 10
Dont Balley
Innepahll bly
Initial installing 8
Hur man utfor en automatisk kanalsokning 8
PVR (Personal Video Recorder)
(Personlig videobandspelare) 15
Schedule list 15
Väj Setup > Network > Settings > Interface (Installation