NRC 6-22 - Power tool HILTI - Free user manual and instructions
Find the device manual for free NRC 6-22 HILTI in PDF.

| Product type | Cordless rebar cutter |
| Brand | Hilti |
| Model | NRC 6-22 |
| Dimensions (L × W × H) | 490 mm × 142 mm × 156 mm |
| Weight (without battery) | 3.4 kg |
| Power supply | Li-Ion battery Hilti Nuron series B 22 (21.6 V) |
| Cutting capacity (rebar) | 10 mm – 25 mm |
| No-load speed | 1,000 – 2,200 rpm (configurable) |
| Saw blade diameter | 110 mm |
| Operating temperature | -17 °C to 60 °C |
| Storage temperature | -20 °C to 70 °C |
| Sound pressure level (LpA) | 81 dB(A) |
| Sound power level (LwA) | 89 dB(A) |
| Vibrations (cutting 25 mm rebar, battery B22-110) | 2.7 m/s² |
| Vibration uncertainty | 1.5 m/s² |
| Main functions | Flush or free cutting of rebar, mild steel, galvanized, and stainless steel threaded rods |
| Safety | Side handle, protective guard, motor brake, anti-kickback, fall protection |
| Maintenance | Clean ventilation slots with a dry brush; wipe housing with a damp cloth; no silicone cleaners |
| Spare parts and repairability | Original Hilti spare parts; repair only by Hilti customer service |
| Supplied accessories | Side handle, saw blade, blade guard, hex key, chip tray, instructions for use |
Frequently Asked Questions - NRC 6-22 HILTI
User questions about NRC 6-22 HILTI
0 question about this device. Answer the ones you know or ask your own.
Ask a new question about this device
Download the instructions for your Power tool in PDF format for free! Find your manual NRC 6-22 - HILTI and take your electronic device back in hand. On this page are published all the documents necessary for the use of your device. NRC 6-22 by HILTI.
USER MANUAL NRC 6-22 HILTI
Deutsch 1
English 17
Nederlands 31
Français 47
Español 62
Português 79
Italiano 94
Polski 110
Česky 126
Slovenčina 140
Magyar 155
Slovenščina 171
Hrvatski 186
Srpski 201
Русский 216
Українська 234
Казак 252
Български 269
Română 286
Ελληνικά 301
תְבָר
319
لېي
332
Türkçe 348
2
natural_image
3D mechanical assembly diagram showing a shaft and gear mechanism (no text or symbols)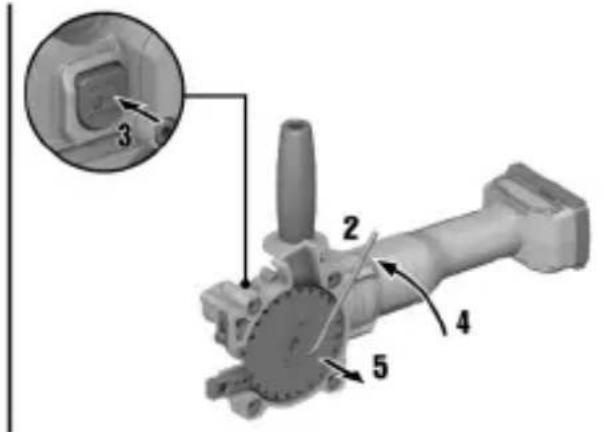
3

natural_image
3D mechanical assembly diagram showing a shaft and gear mechanism with no visible text or symbols4
Information about the operating instructions
About these operating instructions
- Warning! Read and understand all accompanying documentation, including but not limited to instructions, safety warnings, illustrations, and specifications provided with this product. Familiari yourself with all the instructions, safety warnings, illustrations, specifications, components, and functions of the product before use. Failure to do so may result in electric shock, fire, and/or serious injury. Save all warnings and instructions for future reference.
- HILSTI products are designed for professional users and only trained, authorized personnel are permitted to operate, service and maintain the products. This personnel must be specifically informed about the possible hazards. The product and its ancillary equipment can present hazard if used incorrectly by untrained personnel or if used not in accordance with the intended use.
- The accompanying documentation corresponds to the current state of the art at the time of p. Please always check for the latest version on the product's page on Hilti's website. To do this follow the link or scan the QR code in this documentation, marked with the symbol.
- Ensure that these operating instructions are with the product when it is given to other persons
Explanation of symbols
Warnings
Warnings alert persons to hazards that occur when handling or using the product. The following signal words are used:

DANGER
DANGER !
- Draws attention to imminent danger that will lead to serious personal injury or fatality.

WARNING
WARNING!
- Draws attention to a potential threat of danger that can lead to serious injury or fatality.

CAUTION
CAUTION !
- Draws attention to a potentially dangerous situation that could lead to personal injury or damage to the equipment or other property.
Symbols in the operating instructions
The following symbols are used in these operating instructions:

Comply with the operating instructions

Instructions for use and other useful information

Dealing with recyclable materials

Do not dispose of electric equipment and batteries as household waste

Hilti Li-ion battery

Hilti charger
Symbols in illustrations
The following symbols are used in illustrations:

These numbers refer to the illustrations at the beginning of these operating instructions.
| 3 | The numbers in illustrations refer to important work steps or to components important for the work steps. In the text, the corresponding numbers draw attention to these work steps or components, e.g. (3). |
| 11 | Item reference numbers are used in the overview illustration and refer to the numbers use in the key in the product overview section. |
| ! | This symbol is intended to draw your special attention to certain points for handling the product. |
Symbols on the product
General symbols
The following symbols can be used on the product:
| n_0 | No-load speed |
| /min | Revolutions per minute |
| RPM | Revolutions per minute |
| ∅ | Diameter |
| Saw blade | |
| - - - - | Direct current (DC) |
| The product supports near-field communication (NFC) technology compatible with iOS and Android platforms. | |
| Li-ion | Li-ion battery |
| Never use the battery as a striking tool. | |
| Do not drop the battery. Never use a battery that has suffered an impact or is damaged any other way. |
Warning symbols
Warning symbols warn of dangers.

Keep hands away from saw blade
Command symbols
Command symbols indicate binding actions.

Always work with both hands. Not applicable for this product.

Wear eye protection
Safety
General power tool safety warnings
WARNING Read all safety warnings, instructions, illustrations and specifications provided with this power tool. Failure to follow all instructions listed below may result in electric shock, fire and/or serious injury.
Save all warnings and instructions for future reference.
The term "power tool" in the warnings refers to your mains-operated (corded) power tool or batt operated (cordless) power tool.
Work area safety
- Keep work area clean and well lit. Cluttered or dark areas invite accidents.
- Do not operate power tools in explosive atmospheres, such as in the presence of flar liquids, gases or dust. Power tools create sparks which may ignite the dust or fumes.
- Keep children and bystanders away while operating a power tool. Distractions can cause you to lose control.
Electrical safety
▶ Power tool plugs must match the outlet. Never modify the plug in any way. Do not use adapter plugs with earthed (grounded) power tools. Unmodified plugs and matching outlets reduce risk of electric shock.
- Avoid body contact with earthed or grounded surfaces, such as pipes, radiators, ranges and refrigerators. There is an increased risk of electric shock if your body is earthed or grounded.
- Do not expose power tools to rain or wet conditions. Water entering a power tool will increase the risk of electric shock.
▶ Do not abuse the cord. Never use the cord for carrying, pulling or unplugging the power tool. Keep cord away from heat, oil, sharp edges or moving parts. Damaged or entangled cord increase the risk of electric shock.
- When operating a power tool outdoors, use an extension cord suitable for outdoor use. Use of a cord suitable for outdoor use reduces the risk of electric shock.
▶ If operating a power tool in a damp location is unavoidable, use a residual current device (RCD) protected supply. Use of an RCD reduces the risk of electric shock.
Personal safety
- Stay alert, watch what you are doing and use common sense when operating a power. Do not use a power tool while you are tired or under the influence of drugs, alcohol or medication. A moment of inattention while operating power tools may result in serious personal injury.
▶ Use personal protective equipment. Always wear eye protection. Protective equipment such as a dust mask, non-skid safety shoes, hard hat or hearing protection used for appropriate condit will reduce personal injuries.
▶ Prevent unintentional starting. Ensure the switch is in the off-position before connecting to power source and/or battery pack, picking up or carrying the tool. Carrying power tools your finger on the switch or energising power tools that have the switch on invites accidents. - Remove any adjusting key or wrench before turning the power tool on. A wrench or a key left attached to a rotating part of the power tool may result in personal injury.
- Do not overreach. Keep proper footing and balance at all times. This enables better control of the power tool in unexpected situations.
- Dress properly. Do not wear loose clothing or jewellery. Keep your hair and clothing from moving parts. Loose clothes, jewellery or long hair can be caught in moving parts.
If devices are provided for the connection of dust extraction and collection facilities, ensure these are connected and properly used. Use of dust collection can reduce dust-related hazards - Do not let familiarity gained from frequent use of tools allow you to become complacent and ignore tool safety principles. A careless action can cause severe injury within a fraction of a second.
Power tool use and care
▶ Do not force the power tool. Use the correct power tool for your application. The correct power tool will do the job better and safer at the rate for which it was designed.
▶ Do not use the power tool if the switch does not turn it on and off. Any power tool that cannot be controlled with the switch is dangerous and must be repaired.
- Disconnect the plug from the power source and/or remove the battery pack, if detach from the power tool before making any adjustments, changing accessories, or storing pc tools. Such preventive safety measures reduce the risk of starting the power tool accidentally.
- Store idle power tools out of the reach of children and do not allow persons unfamiliar with the power tool or these instructions to operate the power tool. Power tools are dangerous the hands of untrained users.
- Maintain power tools and accessories. Check for misalignment or binding of moving p breakage of parts and any other condition that may affect the power tool's operation. If damaged, have the power tool repaired before use. Many accidents are caused by poorly maintained power tools.
- Keep cutting tools sharp and clean. Properly maintained cutting tools with sharp cutting edges are less likely to bind and are easier to control.
▶ Use the power tool, accessories and tool bits etc. in accordance with these instructions, taking into account the working conditions and the work to be performed. Use of the pc tool for operations different from those intended could result in a hazardous situation. - Keep handles and grasping surfaces dry, clean and free from oil and grease. Slippery handles and grasping surfaces do not allow for safe handling and control of the tool in unexp situations.
Battery tool use and care
▶ Recharge only with the charger specified by the manufacturer. A charger that is suitable for one type of battery pack may create a risk of fire when used with another battery pack.
▶ Use power tools only with specifically designated battery packs. Use of any other battery packs may create a risk of injury and fire.
- When battery pack is not in use, keep it away from other metal objects, like paper c coins, keys, nails, screws or other small metal objects, that can make a connection from terminal to another. Shorting the battery terminals together may cause burns or a fire.
▶ Under abusive conditions, liquid may be ejected from the battery; avoid contact. If contact accidentally occurs, flush with water. If liquid contacts eyes, additionally seek medical help. Liquid ejected from the battery may cause irritation or burns.
▶ Do not use a battery pack or tool that is damaged or modified. Damaged or modified batteries may exhibit unpredictable behaviour resulting in fire, explosion or risk of injury.
▶ Do not expose a battery pack or tool to fire or excessive temperature. Exposure to fire or temperature above 130^ C (265 °F) may cause explosion.
▶ Follow all charging instructions and do not charge the battery pack or tool outside the temperature range specified in the instructions. Charging improperly or at temperatures outs the specified range may damage the battery and increase the risk of fire.
Service
▶ Have your power tool serviced by a qualified repair person using only identical replacement parts. This will ensure that the safety of the power tool is maintained.
▶ Never service damaged battery packs. Service of battery packs should only be performed by the manufacturer or authorized service providers.
Additional safety instructions
Personal safety
▶ Never tamper with or modify the product or accessories in any way.
▶ Use the side handle whenever possible to ensure safe and stable operation of the tool. Keep the grips dry, clean and free from oil and grease.
▶ Take frequent breaks and do physical exercises to improve the blood circulation in your fingers. High vibration during long periods of work can lead to disorders of the blood vessels and ner system in the fingers, hands and wrists.
HILTI
▶ The product is not intended for use by debilitated persons who have received no special training. Keep the product out of reach of children.
- Dust produced by grinding, sanding, cutting and drilling can contain dangerous chemicals. Some examples are: lead or lead-based paints; brick, concrete and other masonry products, natural stone and other products containing silicates; certain types of wood, such as oak, beech and chemically treated wood; asbestos or materials that contain asbestos. Determine the exposure of the operator and bystanders by means of the hazard classification of the materials to be worked. Implement the necessary measures to restrict exposure to a safe level, for example by the use of dust collection system or by the wearing of suitable respiratory protection. The general measure for reducing exposure include:
▶ working in an area that is well ventilated,
- avoidance of prolonged contact with dust,
- directing dust away from the face and body,
▶ wearing protective clothing and washing exposed areas of the skin with water and soap.
▶ The user and the other persons in the vicinity must wear eye protection, a hard hat, ear protection and breathing protection while the product is in use.
- Risk of injury by falling tools and/or accessories. Before starting work, check that the battery and installed accessories are secure.
- Keep the air vents clear at all times. Risk of burn injuries due to blocked air vents!
▶ Switch the product on only after you have brought it to the working position.
▶ Wait until the product stops completely before you lay it down.
▶ Do not attach a belt hook to this product.
▶ Do not touch the metal head while the product is running because the head is hot.
▶ Do not touch the hot cut area after cutting the material.
▶ The saw blade or other metal parts can be hot or have sharp edges. Wear protective gloves when changing the saw blade, cleaning the chip collection bag, and cleaning the vents.
▶Do not hold the workpiece by hand, but use a vise or similar to prevent it from moving durin. If the workpiece moves or vibrates, the operation becomes unstable and cannot be controlled. Stop the operation immediately and secure the workpiece correctly, otherwise the blade will be damaged and serious injury can result.
- Secure the workpiece to prevent the off-cut from falling and causing injury.
▶ Metal chips and sparks from the cutting operation can damage the surroundings or cause a fire. Hot metal chips can melt the material of the chip collection bag. Do not operate the product flammable or fragile items.
- When working at height, it is recommended to install the chip collection bag. Hot chips can fly out and fall, burning the operators and bystanders.
- Do not use a damaged chip collection bag. Fragments of the saw blade or sawdust could fall out of the chip collection bag and cause injuries.
- When working at height, make sure there is no-one below. Off-cuts, material or products dropped could cause an accident.
▶ Make sure no abnormal sounds or vibrations occur during operation. Operation when abnormal sounds or vibrations are perceptible can damage the blade, resulting in serious injury.
▶ Metal chips are sharp and can cause injuries. Wear snug-fitting clothing to prevent chips from getting inside gloves, shoes, or elsewhere.
Kickback - causes and safety instructions
- Kickback is the sudden reaction occurring when the saw blade snags, jams or is out of align causing uncontrolled movement of the power tool away from the workpiece and toward the operator.
- If the saw blade snags or jams in the kerf, it binds and motor force drives the power tool ba toward the operator.
- If the saw blade twists or is out of alignment in the kerf, the teeth at the trailing edge of the blade can snag in the surface of the workpiece, flicking the saw blade out of the kerf and dr the power tool back toward the operator.
Kickback is the result of power tool misuse and/or incorrect operating procedures or conditions. can be avoided by taking the proper precautions as described below.
▶ Hold the power tool firmly, with your arms into a position where you can absorb the kickback forces. Always position yourself off to one side of the saw blade; never bring the blade into li with your body. In the event of a kickback, the power tool can jump backwards, but the oper can control the kickback forces by taking appropriate precautions.
▶ If the saw blade jams and when you interrupt the operation, switch off the power tool and hold it with the saw blade in the material until the saw blade has come to a standstill. Never attempt remove the power tool from the workpiece or pull it back while the saw blade is in motion, but kickback can occur. Investigate and take corrective action to eliminate the cause of the blade binding.
▶ To restart a power tool that is stuck in the workpiece, center the saw blade in the kerf and make sure that no teeth are snagged in the workpiece. If the saw blade is jammed it can flick out kerf or cause kickback when the power tool is restarted.
▶ Support large rebar to reduce the risk of kickback from a jammed saw blade. Large rebar can bend under its own weight.
▶ Do not use a dulled or damaged saw blade. A saw blade with dulled or misaligned teeth causes increased friction, binding of the saw blade and kickback due to a narrow kerf.
Power tool use and care
▶ Never use the product without the blade cover.
▶ Tighten the insert tool and clamping flange securely. If the insert tool and clamping flange are not tightened securely, the insert tool can work loose from the arbor due to the braking effect of motor as it slows down after being switched off.
- Match the forward pressure of the product to the saw blade and the workpiece. In this way you prevent the saw blade from stalling and possibly causing kickback.
▶ Start cutting only after the product has reached maximum speed. Touching the saw blade to the workpiece before starting the motor overloads and damages the saw blade, possibly resulting in serious injury.
▶ Do not cut material that in size exceeds the cutting capacity of the product.
▶ Make sure the saw blade is not deformed, chipped, cracked or worn out. Do not use a saw blade that exhibits damage or wear. Cutting under such conditions can cause further damage to the blade, chip collection bag with the adapter, and even result in serious injury.
▶ Use only saw blades approved for the product that correspond to the specifications in the technical data. Using the saw blade for other applications can cause excessive wear, detachment of the blade, low cutting performance and abnormal generation of heat, resulting in damage to the sa blade and serious injury.
▶ Do not use the product to cut material that is not specified in Intended Use 24.
Electrical safety
▶ Before beginning work, check the working area for concealed electric cables or gas and water pipes. External metal parts of the product could give you an electric shock or an explosion cc result if you accidentally damage an electric cable or a gas or water pipe.
- Dirty or dusty products that have been used frequently for work on conductive materials should be checked at regular intervals by Hilti Service. Dust (especially dust from conductive materials) or dampness adhering to the surface of the power tool may, under unfavorable conditions, lead electric shock.
HILTI
Workplace
- Slits cut in load-bearing walls of buildings or other structures may influence the statics of the structure, especially when steel reinforcing bars or load-bearing components are cut through. Consult the responsible structural engineer, architect or person in charge of the building project before starting work.
Careful handling and use of batteries
- Comply with the following safety instructions for the safe handling and use of Li-ion batteries. Failure to comply can lead to skin irritation, severe corrosive injury, chemical burns, fire and/or explosion.
▶ Use only batteries that are in perfect working order.
▶ Treat batteries with care in order to avoid damage and prevent leakage of fluids that are extremely harmful to health!
▶ Do not under any circumstances modify or tamper with batteries!
▶ Do not disassemble, crush or incinerate batteries and do not subject them to temperatures over 80 °C (176 °F).
▶ Never use or charge a battery that has suffered an impact or been damaged in any other way. Check your batteries regularly for signs of damage.
▶ Never use recycled or repaired batteries.
▶ Never use the battery or a battery-operated power tool as a striking tool.
▶ Never expose batteries to the direct rays of the sun, elevated temperature, sparking, or open flame. This can lead to explosions. - Do not touch the battery poles with your fingers, tools, jewelry, or other electrically conductive objects. This can damage the battery and also cause material damage and personal injury.
- Keep batteries away from rain, moisture and liquids. Penetrating moisture can cause short circuits, electric shock, burns, fire and explosions.
▶ Use only chargers and power tools approved for the specific battery type. Read and follow the relevant operating instructions.
▶ Do not use or store the battery in explosive environments.
▶ If the battery is too hot to touch, it may be defective. Put the battery in a place where it is clearly visible and where there is no risk of fire, at an adequate distance from flammable materials. A the battery to cool down. If it is still too hot to touch after an hour, the battery is faulty. Consult Hilti Service or read the document entitled "Instructions on safety and use for Hilti Li-ion batteries".

Observe the special guidelines applicable to the transport, storage and use of lithium-ion batteries. 30
Read the instructions on safety and use of Hilti Li-ion batteries that you can access by scanning the QR code at the end of these operating instructions.
Description
Product overview
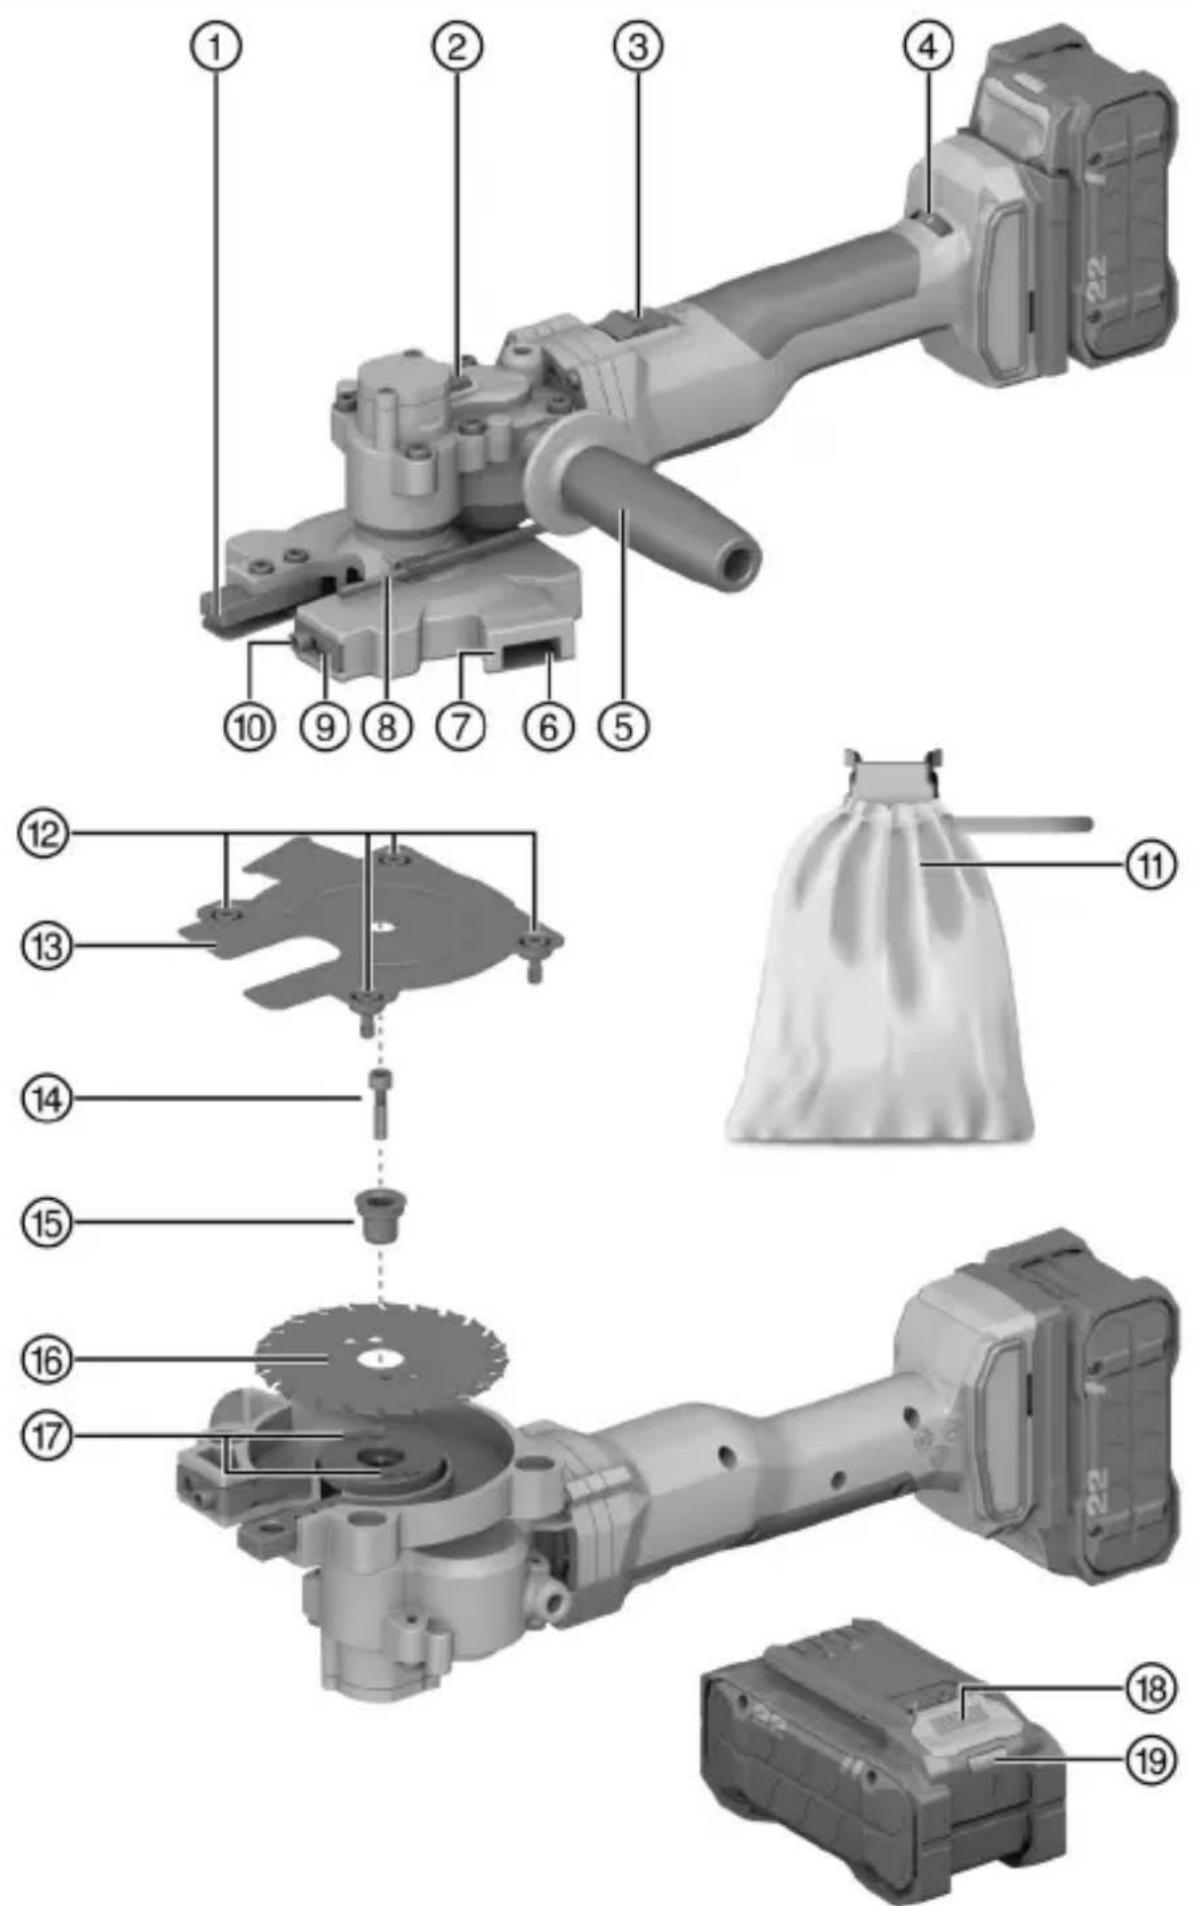
① Guide
② Spindle lock button
③ On/off switch
④ Speed adjusting knob
⑤ Side handle
⑥ Outlet
⑦ Chip collection bag holder
⑧ Hex key
⑨ Width adjusting block
⑩ Width adjusting screw
⑪ Chip collection bag with the adapter
⑫ Blade cover retaining screw
⑬ Blade cover
⑭ Clamping screw
⑮ Clamping flange
⑯ Saw blade
⑰ Positioning pins
⑲ Battery status indicator
⑱ Battery release button
Intended use
The product described is a cordless rebar flush cutter. It is intended for flush cutting or free cu rebars, mild steel threaded rods, galvanized mild steel threaded rods and stainless steel threaded rods used in the construction industry.
- For this product, use only Hilti Nuron lithium-ion batteries of the B 22 series. For optimum performance, Hilti recommends the batteries stated in the table at the end of these operating instructions for this product.
- For these batteries, use only Hilti chargers of the type series stated in the table at the end of these operating instructions.
Items supplied
Rebar flush cutter, side handle, saw blade, blade cover, hex key, chip collection bag, operating instructions
Other system products approved for use with this product can be found at your local Hilti Store or at: www.hilti.group
Motor protection function
The motor protection function monitors current consumption and motor temperature and prevents the product from overheating.
If the motor is overloaded through application of excessive working pressure, the product's performance drops noticeably or it might stall completely.

If the power tool stalls or slows significantly due to overloading, relieve the pressure applied the product and then allow it to run under no load for approx. 30 seconds.
Status indicators of the Li-ion battery
Hilti Nuron Li-ion batteries can indicate state of charge, fault messages and the battery's state of health.
Indicators for state of charge and fault messages

WARNING
Risk of injury by a falling battery!
▶ If the release button is pressed with a battery inserted in the product, subsequently check that the battery is correctly re-engaged and secure.
Short-press the release button of the battery to get whichever of the following status indications applicable at the time.
State of charge and, if applicable, faults are indicated constantly as long as the connected prod is switched on.
| Status Meaning | |
| Four (4) LEDs show constantly green State of charge: 100 % to 71 % | |
| Three (3) LEDs show constantly green State of charge: 70 % to 51 % | |
| Two (2) LEDs show constantly green State of charge: 50 % to 26 % | |
| One (1) LED shows constantly green | State of charge: 25 % to 10 % |
| One (1) LED slow-flashes green | State of charge: < 10 % |
| One (1) LED quick-flashes green | The Li-ion battery is completely discharged. Recharge the battery.If the LED again starts quick-flashing after the battery has been charged, consult Hilti Servic |
Status Meaning
One (1) LED quick-flashes yellow The Li-ion battery or the product in which it is inserted is overloaded, too hot or too cold, or experiencing some other fault. Bring the product and the battery to the recommended working temperature and do not overload the product when it is in use. If the message persists, consult Hilti Service.
One (1) LED shows yellow The Li-ion battery and the product in which it is inserted are not compatible. Consult Hilti Service.
One (1) LED quick-flashes red The Li-ion battery is locked and cannot be used. Consult Hilti Service.
Indicators showing the battery's state of health
To check the battery's state of health, press the release button and hold it down for longer than three seconds. The system does not detect a potential malfunction of the battery due to misuse example battery dropped or pierced, external heat damage, etc.
Status Meaning
All LEDs show in sequence, followed by one (the) battery can remain in use. LED showing constantly green.
All LEDs show in sequence, followed by one LED quick-flashing yellow. The check to ascertain the battery's state of health did not complete. Repeat the procedure, or consult Hilti Service.
All LEDs show in sequence, followed by one LED showing constantly red. (f) a connected product can still be used, the remaining battery capacity is below 50 %. If a connected product can no longer be used, the battery has reached the end of its useful life and has to be replaced. Consult Hilti Service.
Technical data
Product information
| Rated voltage | 21.6 V | |
| Weight | 3.4 kg(in accordance with EPTA-Procedure 01 without battery) | |
| Dimensions | 490 mm × 142 mm × 156 mm | |
| Rebar cutting capacity | 10 mm ... 25 mm | |
| No-load speed Setting 1 | 1,000 /min | |
| Setting 2 | 1,200 /min | |
| Setting 3 | 1,400 /min | |
| Setting 4 | 1,600 /min | |
| Setting 5 | 1,800 /min | |
| Setting 6 | 2,200 /min | |
| Saw blade diameter | 110 mm | |
| Ambient temperature for operation | -17 °C ... 60 °C | |
| Storage temperature | -20 °C ... 70 °C |
Battery
| Battery operating voltage | 21.6 V |
| Weight, battery | See the end of these operating instructions |
| Ambient temperature for operation | -17 °C ... 60 °C |
| Storage temperature | -20 °C ... 40 °C |
| Battery charging starting temperature | -10 °C ... 45 °C |
Noise information and vibration values
The sound pressure and vibration values given in these instructions were measured in accordance with a standardized test and can be used to compare one power tool with another. They can also be used for a preliminary assessment of exposure.
The data given represent the main applications of the power tool. However, if the power tool is used for different applications, with different accessory tools, or is poorly maintained, the data can vary. This can significantly increase exposure over the total working period.
An accurate estimation of exposure should also take into account the times when the power tool is switched off, or when it is running but not actually being used for a job. This can significantly reduce exposure over the total working period.
Identify additional safety measures to protect the operator from the effects of noise and/or vibration, for example: maintaining the power tool and accessory tools, keeping the hands warm, organization of work patterns.

Detailed information on the versions of the EN 62841 standards applied here is to be found in the reproduction of the declaration of conformity 365.
Sound level information
| Sound power level ( K_WA ) | 89 dB(A) |
| Emission sound pressure level ( K_A ) | 81 dB(A) |
| Uncertainty (sound values) ( K_A and K_WA ) | 3.0 dB(A) |
Vibration emission value
| Cutting 25 mm rebar_h,(a) B 22-85 | 2.9 m/s ^2 | |
| B 22-110 | 2.7 m/s ^2 | |
| Uncertainty (total vibration) | 1.5 m/s ^2 | |
Preparations at the workplace

WARNING
Risk of injury by inadvertent starting!
▶ Before inserting the battery, make sure that the product is switched off.
- Remove the battery before making any adjustments to the power tool or before changing accessories.
Observe the safety instructions and warnings in this documentation and on the product.
Charging the battery
- Before charging the battery, read the operating instructions for the charger.
- Make sure that the contacts on the battery and the contacts on the charger are clean and dry.
- Use an approved charger to charge the battery. 24
Inserting the battery
WARNING
Risk of injury by short circuit or falling battery!
Before inserting the battery, make sure that the contacts on the battery and the contacts on the product are free of foreign matter.
▶ Make sure that the battery always engages correctly.
- Charge the battery fully before using it for the first time.
2.Push the battery into the product until it engages with an audible click. - Check that the battery is seated securely.
Removing the battery
- Press the battery release button.
- Remove the battery from the product.
Removing saw blade

WARNING
Risk of burns and cut injuries at saw blade, clamping screw and clamping flange The consequences can be burns and cut injuries.
▶ Wear protective gloves when changing the saw blade.
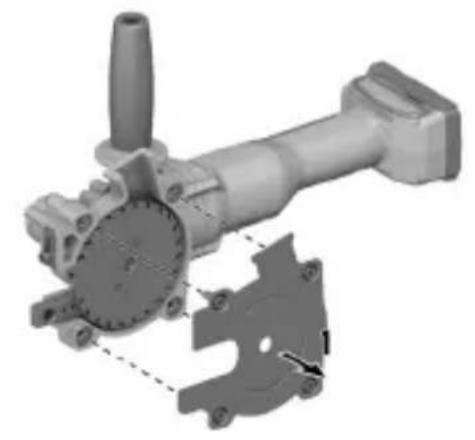
- Use the hex key to remove the 4 retaining screws from the blade cover.
- Insert the hex key into the clamping screw retaining the clamping flange.
3.Push in the spindle lock button and using the hex key as a handle, rotate the saw blade until prevented from further rotation by the lock button. - With the saw blade locked, turn the hex key counter-clockwise to loosen the clamping screw; remove the clamping screw.
- Remove the clamping flange and the saw blade.
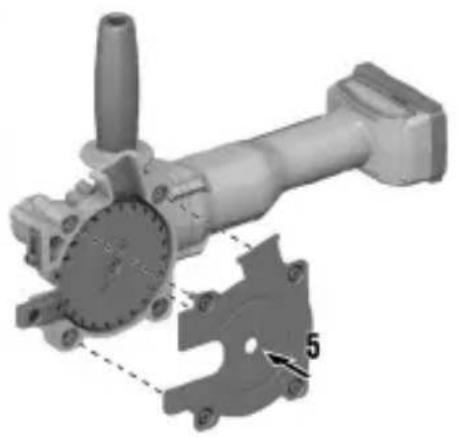
Replacing saw blade

Make sure that the Hilti NRC Xcut 110/4.3" saw blade is used. Use only saw blades that are i perfect condition.
- Fit the saw blade on to the output shaft. Make sure that the four positioning pins in the outp engage the holes in the saw blade.

Check the saw blade teeth and machine settings and the direction of rotation. Do not use saw blade with teeth reduced to less than 1 mm.
- Insert the new clamping flange.
- Insert the new clamping screw.
4.Push in the spindle lock button completely and tighten the screw with the hex key.

Ensure that the spindle lock button is completely pushed in. If not, the saw blade can ro and cause injury.
- Insert the new blade cover with 4 retaining sews and tighten the screws with the hex key.
Fall arrest
WARNING
Risk of injury by falling tool and/or accessory!
▶ Use only the Hilti tool tether recommended for your product.
▶ Prior to each use, always check the attachment point of the tool tether for possible damage.

Comply with the national regulations for working at heights.
As drop arrester for this product, use only a combination of the Hilti retaining strap #2293133 and the Hilti tool tether #2261970.
- Secure the retaining strap to the installation openings for accessories. Check that it holds securely.
- Secure one carabiner of the tool tether to the retaining strap and secure the second carabiner to a load-bearing structure. Check that both carabiners hold securely.

Comply with the operating instructions of the Hilti retaining strap and those of the Hilti tool tether.
Installing or removing the chip collection bag
- To install, push the adapter of the chip collection bag on to the chip collection bag holder un engages with an audible click.
- To remove, open both clamps on the adapter of the chip collection bag slightly outwards.
Installing side handle
▶ Screw the side handle into one of the threaded holes.
Adjusting opening width
- Loosen the width adjusting screw.
- Move the width adjusting block left or right to obtain the desired opening width.
Operation
Observe the safety instructions and warnings in this documentation and on the product.
Switching on

CAUTION
Risk of injury Loss of control over the product.
▶ Before operating the product, check that the side handle, clamping flange, blade cover and the screws retaining the saw blade cover and all other screws are secure.
- Press the rear section of the on/off switch.
2.Slide the on/off switch forward.
▶ The motor runs.
- Lock the on/off switch.
Cutting rebar

WARNING
Risk of injury Incorrect placement or cutting speed can cause serious injury and damage to the motor's electronics.
- When cutting, slow down the forward (cutting) movement both at the start and approaching the end of the cut.
▶ Hold the product firmly so that it does not vibrate when cutting. - Do not start cutting immediately after the motor is switched on. Allow the saw blade to reach full speed before starting the cut.
▶ Do not touch the rotating parts as they can cause serious injury.
▶ Do not cut rebar with a diameter of less than 4 mm. -
Do not cut rebar less than 10 mm in length, as the off-cut can stick between the saw blade and the cover which can cause damage and possibly serious injury.
-
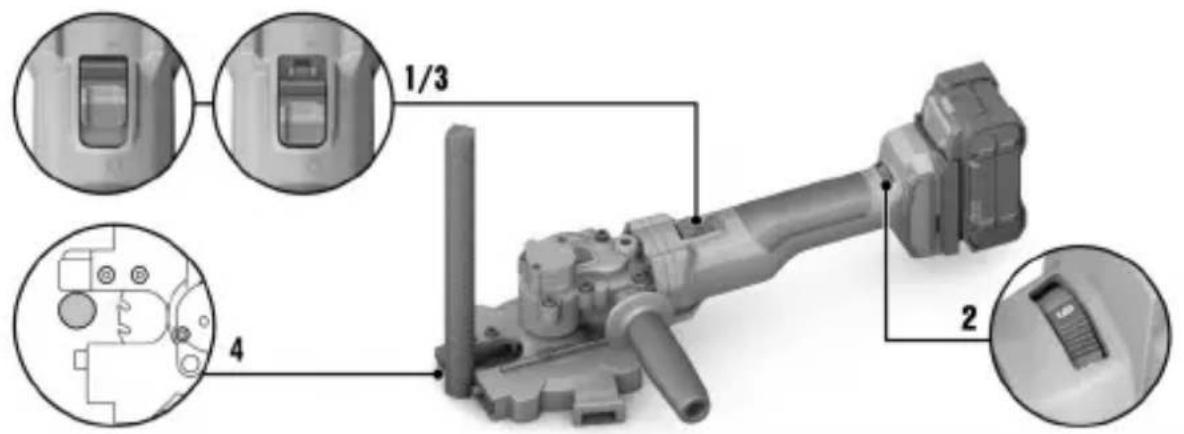
Check that the switch is at the O position (1).
- Choose the most suitable setting for the intended cut (2).

Select setting 6 for highest cutting speed. Select a lower setting to reduce sparking.
3.Switch on the product: 28
4. Fit the rebar tightly against the guide. Slowly ease the product forward to start cutting the rebar (4).
HILTI
- After finishing the cut, switch off the product. 29
Switching off
▶ Press the rear section of the on/off switch.
▶ The on/off switch jumps into the off position and the motor stops.
Care and maintenance

WARNING
Risk of injury with battery inserted!
▶ Always remove the battery before carrying out care and maintenance tasks!
Care of the product
- Carefully remove stubborn dirt.
- Carefully clean the air vents, if present, with a dry, soft brush.
- Use only a slightly damp cloth to clean the housing. Do not use cleaning agents containing s as these can attack the plastic parts.
- Use a dry, clean cloth to clean the contacts of the product.
Care of the Li ion batteries
- Never use a battery with clogged air vents. Clean the air vents carefully using a dry, soft bru
- Avoid unnecessary exposure of the battery to dust and dirt. Never expose the battery to high of moisture (e.g. by being dipped in water or left in the rain).
If a battery has been soaked by moisture, treat it as a damaged battery. Isolate it in a non-fla container and consult Hilti Service.
- Keep the battery free of extraneous oil and grease. Do not permit dust or dirt to accumulate unnecessarily on the battery. Clean the battery with a dry, soft brush or a clean, dry cloth. Do use cleaning agents containing silicone as these can attack the plastic parts. Do not touch the contacts of the battery and do not remove the factory-applied grease from 1 contacts.
- Use only a slightly damp cloth to clean the housing. Do not use cleaning agents containing s as these can attack the plastic parts.
Maintenance

WARNING
Danger of electric shock! Improper repairs to electrical components may lead to serious injuries including burns.
▶ Repairs to the electrical section of the tool or appliance may be carried out only by trained electrical specialists.
- Check all visible parts and controls for signs of damage at regular intervals and make sure that they all function correctly.
- Do not use the product if signs of damage are found or if parts malfunction. Immediately have product repaired by Hilti Service.
- After cleaning and maintenance, install all guards and protective devices and check that they are in full working order.

To help ensure safe and reliable operation, use only genuine Hilti spare parts, consumables accessories. Spare parts, consumables and accessories approved by Hilti for use with your product can be found at your Hilti Store or online at: www.hilti.group
Transport and storage
Transport of cordless power tools and batteries
CAUTION
Accidental starting during transport!
▶ Always transport your products with the batteries removed!
▶ Remove the battery/batteries.
▶ Never transport batteries loose and unprotected. During transport, batteries should be protected from excessive shock and vibration and isolated from any conductive materials or other batteries that may come in contact with the terminals and cause a short circuit. Comply with the local applicable regulations for transporting batteries.
- Do not send batteries through the mail. Consult your shipper for instructions on how to ship undamaged batteries.
- Prior to each use and before and after prolonged transport, check the product and the batteries for damage.
Storage of cordless power tools and batteries
WARNING
Accidental damage caused by defective or leaking batteries!
▶ Always store your products with the batteries removed!
- Store the product and the batteries in a cool and dry place. Comply with the temperature limits stated in the technical data 25.
▶ Do not store batteries on the charger. Always remove the battery from the charger when the charging operation has completed.
▶ Never leave batteries in direct sunlight, on sources of heat, or behind glass. - Store the product and batteries where they cannot be accessed by children or unauthorized persons.
▶ Prior to each use and before and after prolonged storage, check the product and the batteries for damage.
Troubleshooting
If a problem occurs, always observe the status indicator of the battery. See the section headed Status indicators of the Li-ion battery 24.
If the trouble you are experiencing is not listed in this table or you are unable to rectify the pro by yourself, contact Hilti Service.
| Trouble or fault Possible | cause Action to be taken | |
| The product cannot be switched on. | Battery is discharged. ▶ Change the battery and charge the empty battery. | |
| The battery runs down more quickly than usual. | Very low ambient temperature. ▶ Allow the battery to warm up slowly to room temperature. | |
| The battery does not engage with an audible click. | The retaining lug on the battery is dirty. ▶ Clean the retaining lug and re-insert the battery. | |
| The motor has no braking effect. | Battery is discharged. ▶ Change the battery and charge the empty battery. | |
| Product is momentarily overloaded. ▶ Switch the product off and then on again. | ||
Disposal
WARNING
Risk of injury due to incorrect disposal! Health hazards due to escaping gases or liquids.
▶ DO NOT send batteries through the mail!
▶ Cover the terminals with a non-conductive material (such as electrical tape) to prevent short circuiting.
▶ Dispose of your battery out of the reach of children.
- Dispose of the battery at your Hilti Store, or consult your local governmental garbage disposal or public health and safety resources for disposal instructions.
Most of the materials from which Hilti products are manufactured can be recycled. The materials must be correctly separated before they can be recycled. In many countries, your old tools, machines or appliances can be returned to Hilti for recycling. Ask Hilti Service or your Hilti sales representative for further information.

▶ Do not dispose of power tools, electronic equipment or batteries as household waste!
Manufacturer's warranty
▶ Please contact your local Hilti representative if you have questions about the warranty conditions.
Further information
For more information on operation, technology, environment and recycling, follow this link:
qr.hilti.com/manual/?id=2412886&id=2412878
This link is also to be found in these operating instructions in the form of a QR code, indicated by the symbol.
:הכלההוּרָהוּרָהוּרָהוּרָהוּרָהוּרָהוּרָהוּרָהוּרָהוּרָהוּרָהוּרָהוּרָהוּרָהוּרָה
בִרָהוֹת אַעּל
.הכלההוּרָהוּרָהוּרָהוּרָהוּרָהוּרָהוּרָהוּרָהוּרָהוּרָהוּרָהוּרָהוּרָהוּרָהוּרָה
.הכלההוּרָהוּרָהוּרָהוּרָהוּרָהוּרָהוּרָהוּרָהוּרָהוּרָהוּרָהוּרָהוּרָהוּרָהוּרָה
Declaration of conformity
Declaration of conformity
The manufacturer declares, on his sole responsibility, that the product described here complies with the applicable legislation and standards.
The technical documentation is filed here:
Hilti Entwicklungsgesellschaft mbH | Tool Certification | Hiltistrasse 6 | D-86916 Kaufering, Germany
Product information
| Rebar flush cutter NRC 6-22 | |
| Generation 01 | |
| Serial no. 1-999999999999 |
Head of Quality and Process Management
Business Area Electric Tools & Accessories
Head of BU Power Tool & Accessories
Business Area Electric Tools & Accessories

UK Declaration of Conformity
Declaration of conformity
The manufacturer declares, on his sole responsibility, that the product described here complies with the applicable legislation and standards.
The technical documentation is filed here:
Hilti Entwicklungsgesellschaft mbH | Tool Certification | Hiltistrasse 6 | D-86916 Kaufering, Germany
Product information
| Rebar flush cutter NRC 6-22 | |
| Generation 01 | |
| Serial no. 1-99999999999 |
Manufacturer:
Hilti Corporation
Hilti (Gt. Britain) Limited
No. 1 Circle Square, 3 Symphony Park
Manchester, England, M1 7FS

Supply of Machinery (Safety) Regulations 2008
Electromagnetic Compatibility Regulations 2016
The Restriction of the Use of Certain
Hazardous Substances in Electrical and
Electronic Equipment Regulations 2012
EN 62841-1:2015, AC: 2015 A11:2022
EN IEC 55014-1:2021
EN IEC 55014-2:2021
Schaan, 22.06.2023
Dr. Tahar Zrilli
Head of Quality and Process Management
Business Area Electric Tools & Accessories
Edward-Louis Przybylowicz
Head of BU Power Tool & Accessories
Business Area Electric Tools & Accessories

Hilti Corporation
LI-9494 Schaan
Tel.:+423 234 21 11
Fax:+423 234 29 65
www.hilti.group