NPR 019 IEA22 - Power tool HILTI - Free user manual and instructions
Find the device manual for free NPR 019 IEA22 HILTI in PDF.
Document temporarily unavailable
The manual is currently being transferred to our new server. It will be accessible again in a few hours. Thank you for your patience.
| Brand | Hilti |
| Model | NPR 019 IEA22 |
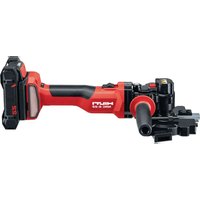
| Product type | Cordless electro-hydraulic crimping tool |
| Power supply | Li-Ion battery B22 series, 21.6 V |
| Weight (with B22/8.0 battery) | 2.7 kg |
| Max. crimping force | 19 kN |
| Crimping time | ≈ 4 s |
| Operating temperature | -17 °C to 60 °C |
| Storage temperature | -20 °C to 70 °C |
| Sound pressure level | 70 dB(A) |
| Total vibration value | 2.5 m/s² |
| Crimpable materials | Alloy, copper and steel pipe fittings |
| Safety | Warning LED, emergency stop, optional fall protection |
| Maintenance and cleaning | Clean with slightly damp cloth, no silicone; service inspection after 15,000 cycles or 1 year |
| Spare parts | Approved crimping jaws; contact Hilti service center |
| Warranty | Manufacturer's warranty (contact your Hilti partner) |
| Certifications | CE Declaration of Conformity |
Frequently Asked Questions - NPR 019 IEA22 HILTI
User questions about NPR 019 IEA22 HILTI
0 question about this device. Answer the ones you know or ask your own.
Ask a new question about this device
Download the instructions for your Power tool in PDF format for free! Find your manual NPR 019 IEA22 - HILTI and take your electronic device back in hand. On this page are published all the documents necessary for the use of your device. NPR 019 IEA22 by HILTI.