DEH660H - Dehumidifier MSW - Free user manual and instructions
Find the device manual for free DEH660H MSW in PDF.

| Product type | Dehumidifier |
| Model | MSW-DEH660H |
| Rated voltage / frequency | 230 V~ / 50 Hz |
| Rated power | 790 W |
| Air flow rate | 480 m³/h |
| Refrigerant type / quantity | R290 / 150 g |
| Dimensions (W x D x H) | 500 x 485 x 885 mm |
| Weight | 34 kg |
| Operating temperature range | 5 °C to 38 °C |
| Humidity adjustment range | 10% to 95% RH |
| Water tank capacity | Approx. 6 L (estimate) |
| Main functions | Automatic dehumidification, auto defrost, timer (on/off), continuous drainage, LED display |
| Noise level | N/A (estimate: 50-55 dB) |
| Required electrical supply | Grounded wall outlet, no extension cord |
| Maintenance and cleaning | Regular cleaning of air filter, water tank, and exterior surfaces with damp cloth |
| Safety | Overload protection, automatic shut-off when tank full, fault detection (codes E1-E4) |
| Spare parts and repairability | Repair by authorized service only, spare parts available from manufacturer |
| General information | 2-year warranty (standard), end-of-life recycling according to regulations |
Frequently Asked Questions - DEH660H MSW
User questions about DEH660H MSW
0 question about this device. Answer the ones you know or ask your own.
Ask a new question about this device
Download the instructions for your Dehumidifier in PDF format for free! Find your manual DEH660H - MSW and take your electronic device back in hand. On this page are published all the documents necessary for the use of your device. DEH660H by MSW.
USER MANUAL DEH660H MSW
natural_image
Yellow and blue MGU MOTOR TECHNIOS industrial vacuum cleaner with control panel and wheels (no visible text or symbols on device body)4 - ("Hour- / Humi -")
This User Manual has been translated for your convenience using machine translation. Reasonable efforts have been made to provide an accurate translation; however, no automated translation is perfect nor is it intended to replace human translators. The official User Manual is the English version. Any discrepancies or differences created in the translation are not binding and have no legal effect for compliance or enforcement purposes. If any questions arise related to the accuracy of the information contained in the User Manual, please refer to the English version of those contents which is the official version.
Technical data
| Parameter description | Parameter value |
| Product name | Air dehumidifier |
| Model | MSW-DEH660H |
| Rated voltage [V~] / frequency [Hz] | 230/50 |
| Rated power [W] | 790 |
| Airflow [m3/h] | 480 |
| Refrigerant type / Refrigerant amount [g] | R290 / 150 |
| Dimensions [width x depth x height; mm] | 500 x 485 x 885 |
| Weight [kg] | 34 |
1. General description
The user manual is designed to assist in the safe and trouble-free use of the device. The product is designed and manufactured in accordance with strict technical guidelines, using state-of-the-art technologies and components. Additionally, it is produced in compliance with the most stringent quality standards.
DO NOT USE THE DEVICE UNLESS YOU HAVE THOROUGHLY READ AND UNDERSTOOD THIS USER MANUAL.
To increase the product life of the device and to ensure trouble-free operation, use it in accordance with this user manual and regularly perform maintenance tasks. The technical data and specifications in this user manual are up to date. The manufacturer reserves the right to make changes associated with quality improvement. The device is designed to reduce noise emission risks to a minimum, taking into account technological progress and noise reduction opportunities.
Legend


The product satisfies the relevant safety standards.
Read instructions before use.
The product must be recycled.
WARNING! or CAUTION! or REMEMBER! Applicable to the given situation. (general warning sign)
ATTENTION! Electric shock warning!
ATTENTION! Fire hazard - flammable materials!
Only use indoors.

PLEASE NOTE! Drawings in this manual are for illustration purposes only and in some details may differ from the actual product.
2. Usage safety

ATTENTION! Read all safety warnings and all instructions. Failure to follow the warnings and instructions may result in electric shock, fire and/or serious injury or even death.
The terms "device" or "product" are used in the warnings and instructions to refer to:
Air dehumidifier
2.1. Electrical safety
a) The plug of this device must fit into the outlet. Do not modify the plug in any way. Original plugs and matching outlets reduce the risk of electric shock.
b) Avoid touching grounded parts, such as pipes, heaters, ovens, and refrigerators. There is an increased risk of electric shock if your body is grounded and touches the device while exposed to direct rain, wet pavement, or while working in a damp environment. If water enters the device, there is an increased risk of damage to the unit and electric shock.
c) Do not touch the device with wet or damp hands.
d) Do not use the cord in an unintended manner. Never use it to carry the device or to pull the plug out of the socket. Keep the cord away from heat sources, oil, sharp edges or moving parts. Damaged or tangled cords increase the risk of electric shock.
e) If you cannot avoid using the product in a wet environment, use a residual current device (RCD) to connect it to electrical mains. Using an RCD reduces the risk of electric shock.
f) Do not use the device if the power cord is damaged or shows signs of wear. A damaged power cord should be replaced by a qualified electrician or the manufacturer's service department.
g) To avoid electric shock, do not immerse the cable, plug, or the device itself in water or other liquid. Do not use the appliance on wet surfaces.
h) CAUTION – DANGER TO LIFE! When cleaning or using the appliance, never immerse it in water or other liquids.
i) Use only power sources that are grounded.
2.2. Safety in the workplace
a) Keep the work area tidy and well lit. Disorder or poor lighting can lead to accidents. Be foresighted, watch what you are doing and use common sense when using the unit.
b) Do not use the device in a potentially explosive atmosphere, for example in the presence of flammable liquids, gases or dust. The unit produces sparks that can ignite dust or fumes.
c) If you find any damage or irregularities in the operation of the unit, immediately turn it off and report it to an authorized person.
d) If you have any doubts as to whether the product is working properly or if it is damaged, contact the manufacturer's service department.
e) Repairs to the device may only be carried out by the manufacturer's service. Do not attempt to repair the product on your own!
f) In the event of ignition or a fire, use dry powder or CO2 extinguishers only to suppress the fire of the appliance is live.
g) Keep this manual for future reference. If the product is to be handed over to a third party, hand it over with this user manual.
h) Keep packaging components and small installation parts out of the reach of children.
i) Keep the device away from children and animals.

Remember! When using the device, protect children and other bystanders.
2.3. Personal safety
a) Do not operate this device if you are tired, ill or under the influence of alcohol, drugs or medication that could impair your ability to operate the device.
b) The device is not intended to be used by persons (including children) with reduced mental, sensory or intellectual functions or persons who lack experience and/or knowledge unless they are supervised or have been instructed by a person responsible for their safety on how to operate the device.
c) The unit may be operated by persons who are physically fit, capable of operating it and appropriately trained, and who have read this instruction manual and have been trained in occupational safety and health.
d) To prevent accidental start-up, make sure the switch is in the off position before connecting to a power source.
e) The product is not a toy. Children should be watched to ensure that they do not play with the appliance.
2.4. Safe device use
a) Do not overload the device. Use tools that are suitable for the application. A correctly selected product will do a better and safer job for which it was designed.
b) Disconnect the device from the power supply before adjusting, cleaning, or servicing. This precaution reduces the risk of accidental start-up.
c) Keep unused product out of the reach of children and anyone unfamiliar with the device or this manual. Products are dangerous when used by inexperienced users.
d) Keep the product in good working order. Check before each use for general damage or damage to moving parts (cracks in parts and components or any other condition that may affect the safe operation of the device). If damaged, have the device repaired before use.
e) Keep the product out of the reach of children.
f) Repairs and maintenance should be carried out by qualified personnel using only original spare parts. This will ensure the safety of use.
g) To ensure the designed operational integrity of the device, do not remove factory-installed covers or loosen screws.
h) When transporting or moving the unit from storage to the place of use, observe the health and safety rules for manual handling applicable in the country where the unit is used.
i) Do not move, shift, or rotate the machine while in operation.
j) Clean the device regularly to prevent permanent dirt build-up.
k) The product is not a toy. Cleaning and maintenance must not be performed by children without adult supervision.
I) Do not tamper with the device to alter its performance or design.
m) Keep the unit away from sources of fire and heat.
n) Do not block the ventilation openings of the unit!
o) Do not store heavy, poisonous or corrosive objects inside the unit.
p) Do not use the device in unheated rooms or places with high air humidity.
q) CAUTION! The unit in its construction contains flammable substances. For this reason, the unit should be taken to a specialist for disposal at the end of its service life.
r) Do not place the device in the vicinity of open fire sources, electric furnaces, coal stoves, etc., and do not place the device in direct sunlight.
s) The unit must be connected directly to a wall plug socket; do not use splitters etc.
t) Ensure that the power supply to the unit corresponds to that specified on the identification plate!
u) Do not place heavy objects on the unit.
v) Do not damage the refrigerant circuit.

ATTENTION! Despite the safe design of the device and its protective features, and despite the use of additional elements protecting the operator, there is still a slight risk of accident or injury when using the device. Stay alert and use common sense when using the device.
3. Use guidelines
The device is designed to dehumidify the air in the room, protecting it and the objects in it from the negative effects of moisture.
The user is liable for any damage resulting from unintended use of the device.
3.1. Device description
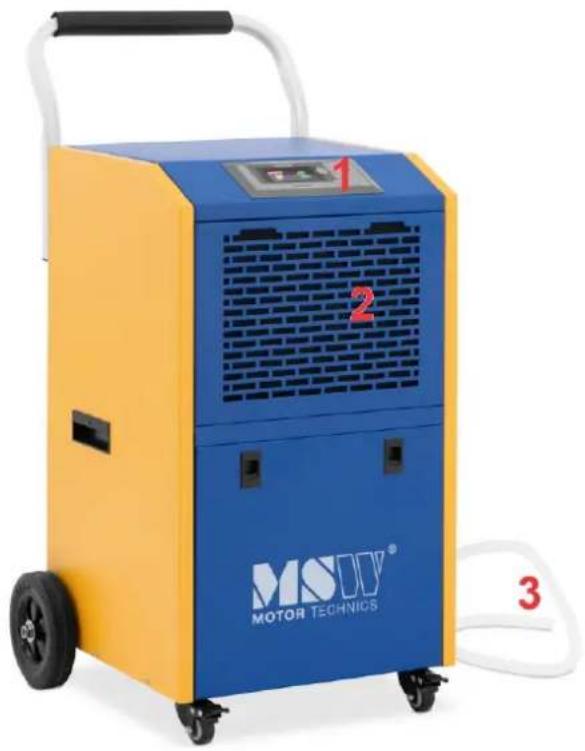
natural_image
Yellow and blue MGU MOTOR TECHNIOS industrial vacuum cleaner with control panel and wheels (no visible text or symbols on device body)1 - Control panel
2 - Air inlet
3 – Water discharge pipe
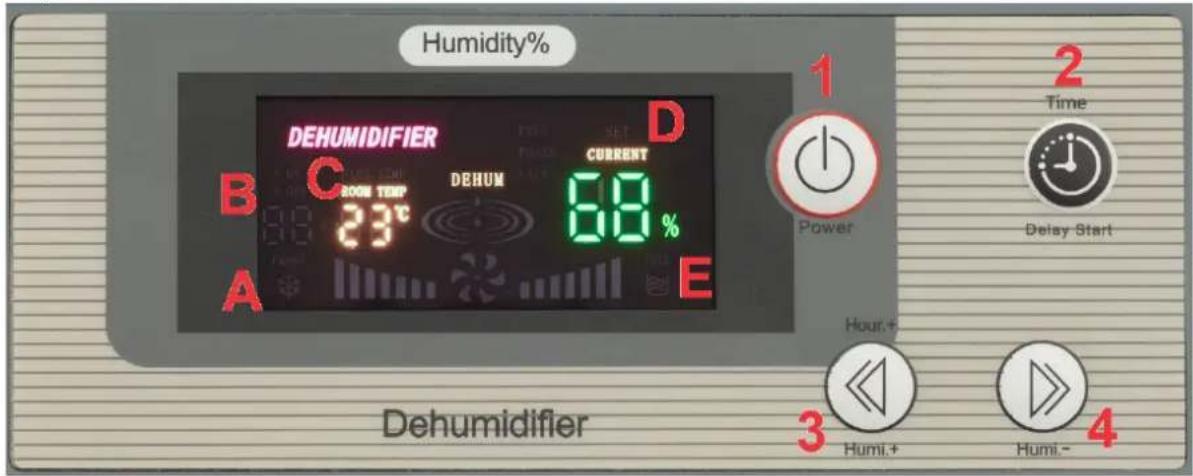
Control panel:

A. Defrosting.
B. B. Timer status ("T ON" - timer for start of operation, "T OFF" - timer for end of operation).
C. Coil temperature („PIPE TEMP“) / ambient temperature („ROOM TEMP“).
D. Set ("SET") / measured ("CURRENT") humidity.
E. Lights up when the water tank is almost full.
1 – (POWER) switching the device on and off.
2 - (Time / Delay Start):
o Pressing this button once will enter the relative humidity setting mode.
- Pressing this button twice will enter the automatic on setting mode ("T ON").
- Pressing this button three times will enter the automatic off setting mode ("T OFF").
○ Pressing this button four times will enter the defrost time setting mode.
o Pressing this button five times will switch to the original interface.
3 - ("Hour+ / Humi +"):
Press to increase the relative humidity level (1 press increases by 1%).
In auto on/off setting mode, press to increase the number of hours.
4-(„Hour-/Humi-”)
Press to reduce the relative humidity level (1 press reduces by 1%).
In auto on/off setting mode, press to reduce the number of hours.
3.2. Preparing for use
APPLIANCE LOCATION
The temperature of environment must not be higher than 40^ C and the relative humidity should be less than 85%. Ensure good ventilation in the room in which the device is being used. There should be at least 10 cm distance between each side of the device and the wall or other objects. The device should always be used when positioned on an even, stable, clean, fireproof and dry surface, and be out of the reach of children and persons with limited mental and sensory functions. Position the device such that you always have access to the power plug. The power cord connected to the appliance must be properly grounded and correspond to the technical details on the product label.
• The device should operate at a temperature of 5^ C to 38^ C.
• The electrical installation that powers the device must be grounded.
- Do not use the dehumidifier near walls, curtains or other objects that may block the inlet and outlet. The air inlet and outlet should be free from obstruction.
- If the machine is tilted by more than 45^ , leave it upright for at least 24 hours before putting it into operation.
• Never install the device in places where it could be exposed to:
- Heat sources, such as radiators, heaters, stoves or other devices that produce heat.
- Direct sunlight.
○ Mechanical vibration or shock.
○ Excessive dust. - Lack of ventilation.
- Uneven surface.
- Flammable gases.
3.3. Device use
IMPORTANT:
• To prevent damage, the compressor delays startup for three minutes each time the unit is started.
- When the unit is running, the compressor produces heat, which is normal.
Switching on the unit
Press the POWER button to start the appliance. To turn off the device, press the POWER button again. After starting the device, the LED screen will show the temperature and humidity of the environment.
Automatic defrosting
The surface of the evaporator will be covered with frost at low temperatures, which will affect the efficiency of dehumidification. The device has an automatic defrosting function. During defrosting, the compressor stops working and the "FROST" lamp is lit. When the defrosting process is complete, the unit will automatically return to dehumidifying mode.
Automatic dehumidification
a) Check the current temperature and RH (relative humidity). Press „Time / Delay Start“ once to set the target humidity. Press „Hour+ / Humi +” or „Hour- / Humi -” to set the humidity. The setup is complete if no button is pressed for 5 seconds.
b) When the ambient humidity is 3% below the set relative humidity, the unit will stop dehumidifying and the screen will flash "DEHUM".
c) When the ambient humidity exceeds the set relative humidity by 3%, the unit automatically starts dehumidifying.
d) Humidity setting range: 10-95%
Note: Once the target humidity is set to less than 30%, the device will constantly dehumidify.
Timer functions
• Start-up timer setting ("T ON")
Press the „Time / Delay Start” button three times to set the start timer. Press the „Hour+ / Humi +” or „Hour- / Humi -” button to set the hours. When the unit is not working and reaches the set time, it will start up automatically. The setup is complete if no button is pressed for 5 seconds.
• End of run timer setting ("T OFF")
Press the „Time / Delay Start“ button four times to set the end of operation timer. Press the „Hour+ / Humi +” or „Hour- / Humi -” button to set the hours. When the unit is running and the set time is reached, the unit will automatically turn off. The setup is complete if no button is pressed for 5 seconds.
- Turn off the timer
Change the timer value to "00" to turn it off.
Error codes
| Error code | Error description | Solution | Notes |
| E1 | Fault in coil temperature sensor | Contact the manufacturer | - |
| E2 | Ambient temperature sensor fault | - | |
| E3 | Humidity sensor fault | - | |
| E4 | Low pressure or refrigerant leakage | - | |
| Overload | Compressor not operating | - | |
| Phase sequence | Supply phase sequence fault | Applies to three-phase power supply | |
| Lack of phase | Missing power phase | Applies to three-phase power supply |
The machine can be placed near a sewage system to enable continuous drainage. Here are the installation tips:
- If the drain pipe is long enough to reach the waste water drain, there is no need to connect an extension
• The discharge pipe must not bend or twist.
• The end of the discharge pipe should be below the beginning of the pipe. - When the water tank is full, the "FULL" light will light up
3.4. Cleaning and maintenance
a) Unplug the mains plug and allow the device to cool completely before each cleaning, adjustment or replacement of accessories, or if the device is not being used.
- Wait for the rotating elements to stop.
b) Use only non-corrosive cleaners to clean the surface.
c) After cleaning the device, all parts should be dried completely before using it again.
d) Store the unit in a dry, cool place, free from moisture and direct exposure to sunlight.
e) Do not spray the device with a water jet or submerge it in water.
f) Do not allow water to get inside the device through vents in the housing of the device.
g) Clean the vents with a brush and compressed air.
h) The device must be regularly inspected to check its technical efficiency and spot any damage.
i) Use a soft, damp cloth for cleaning.
j) Do not use sharp and/or metal objects for cleaning (e.g. a wire brush or a metal spatula) because they may damage the surface material of the appliance.
k) Do not clean the device with an acidic substance, agents of medical purposes, thinners, fuel, oils or other chemical substances because it may damage the device.
DISPOSING OF USED DEVICES:
Do not dispose of this device in municipal waste systems. Hand it over to an electric and electrical device recycling and collection point. Check the symbol on the product, instruction manual and packaging. The plastics used to construct the device can be recycled in accordance with their markings. By choosing to recycle you are making a significant contribution to the protection of our environment.
Contact local authorities for information on your local recycling facility.

natural_image
Yellow and blue MGU motorTechnics device with control panel and wheels (no visible text or symbols on main body)ROZWIĄZYWANIE PROBLEMÓW:
natural_image
Blue and yellow MGUV MOTOR TECHNICS vacuum cleaner with control panel and wheels (no visible text or symbols on device body)natural_image
Yellow and blue MGW MOTOR TECHNICS industrial machine with control panel and wheels (no visible text or symbols on device body)natural_image
Yellow and blue MGU MOTOR TECHNICS vacuum cleaner with control panel and hose (no visible text or symbols on device body)natural_image
Yellow and blue MGUV MOTOR TECHNICS vacuum cleaner with control panel and wheels (no visible text or symbols on device body)natural_image
Yellow and blue MGTV MOTOR TECHNICS industrial machine with control panel and wheels (no visible text or symbols on main body)4 - ("Hour- / Humi -")
natural_image
Yellow and blue MGU MOTOR TECHNIOS electric vacuum cleaner with control panel (no visible text or symbols on device body)3 - ("Time+ / Humi +"):
APPARATETS PLACERING
natural_image
Yellow and blue MGUV MOTOR TECHNICS vacuum cleaner with control panel and wheels (no visible text or symbols on device body)4 - (Tunti- / Humi - ,)
natural_image
Yellow and blue MGUV MOTOR TECHNICS vacuum cleaner with control panel and hose (no visible text or symbols on device body)PLAATS VAN HET APPARAAT
natural_image
Yellow and blue MGUV MOTOR TECHNICS vacuum cleaner with control panel and wheels (no visible text or symbols on device body)3 - ("Time+ / Humi +"):
OBS! Brandrisk - brandfarliga material!

natural_image
Yellow and blue MGTV MOTOR TECHNICS industrial machine with control panel and side arm (no visible text or symbols on device body)1 - Kontrollpanel
2 - Luftintag
3 – Vattenavloppsrör
Kontrollpanel:
APPARATENS PLACERING
natural_image
Yellow and blue MGW MOTOR TECHNICS industrial machine with control panel and wheels (no visible text or symbols on main body)1 - Painel de controle
2 - Entrada de ar
3 – Tubo de descarga de água
Painel de controle:

natural_image
Yellow and blue motorTechnics air purifier device with labeled ports (no text beyond branding)For the disposal of the device please consider and act according to the national and local rules and regulations.
CONTACT
expondo Polska sp. z o.o. sp. k.