P115 - Sewing machine Prixton - Free user manual and instructions
Find the device manual for free P115 Prixton in PDF.

| Brand | Prixton |
| Model | P115 |
| Product type | Home sewing machine |
| Dimensions (L x W x H) | 280 x 130 x 245 mm |
| Weight | Approximately 2.5 kg (estimated) |
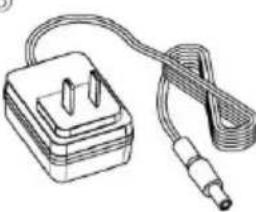
| Power supply | Power adapter 100-240 V~, 50/60 Hz, max 500 mA, output 6 V=1.5 A |
| Motor power | Approximately 9 W |
| Lighting | Integrated LED lamp (0.06 W) |
| Number of stitches | 14 patterns |
| Sewing speed | Approximately 300 stitches/min, 2 speeds |
| Max stitch width | 4 mm (zigzag) |
| Max stitch length | 3-4 mm |
| Main functions | Straight stitch, zigzag, manual buttonhole, reverse stitch, twin needle sewing, bobbin winder, thread cutter, free arm |
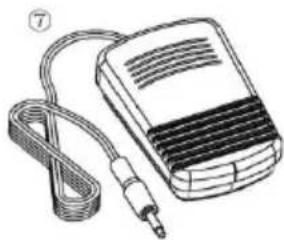
| Included accessories | Buttonhole presser foot, 2 needles, 2 bobbins, needle threader, 2 spools, power adapter, foot pedal |
| Maintenance and cleaning | Unplug before cleaning. Clean with a soft, dry cloth. Do not immerse in water. |
| Safety | Unplug the machine before any intervention. Do not use if the cord is damaged. Keep out of reach of children. |
| Spare parts | Needles, bobbins, presser foot, power adapter, foot pedal available from the manufacturer. |
| Repairability | Do not open the casing. Have any repairs done by a professional. |
| Warranty | Compliant with the legislation of the country of purchase. Contact via www.prixton.com |
Frequently Asked Questions - P115 Prixton
User questions about P115 Prixton
0 question about this device. Answer the ones you know or ask your own.
Ask a new question about this device
Download the instructions for your Sewing machine in PDF format for free! Find your manual P115 - Prixton and take your electronic device back in hand. On this page are published all the documents necessary for the use of your device. P115 by Prixton.
USER MANUAL P115 Prixton
Definitions: whenever used, the fallowing terms identify safety and property damage messages and designate a level of hazard seriousness.
This is the safety alert symbol. It alerts you to potential personal injury hazards. Obey all safety messages that fallow this symbol to avoid possible injury or death.
Warning - indicates a potentially hazardous situation, which, if not avoided, could result in death or serious injury.
Caution - indicates a potentially hazardous situation, which, if not avoided, may result in minor/moderate injury.
Notice - addresses practices not related to personal injury, such as product and/or property damage. When using this or any other electrical appliance, always fallow these basic safety precautions:
Read all instructions before use.
Warning- to reduce the risk of fire, electric shock, or serious personal injury:
This product is intended for non-commercial use for sewing fabrics. Do not use the product for any other purpose.
-
Keep the product out of the reach of children and pets. This product is not a toy and is not intended for use by children. Extra caution is necessary when using this product near children or pets.
-
Do not leave the product unattended while it is in use. Always unplug the product from the electric outlet when not in use or when changing or threading the needle.
-Do not use attachments not recommended or sold by the product manufacturer.
-
This product uses a power adapter (included) for the sewing machine. Never plug the product into an electric outlet unless it is properly assembled. Use only the power adaptor provided.
-
Do not place the product in, or expose it to, water or other liquids.
-
When using the power adapter (included) never operates the product with wet hands, without shoes on, or while standing in water or on a wet surface. Never locate the product where it may fall into a sink or other water/liquid filled container. If the product falls into water or other liquid, do not touch or reach into the water/liquid. Immediately unplug it from the electric outlet before retrieving it from the water/liquid.
-
Keep the power cord and product away from heated surfaces.
-
Unplug the product from the electric outlet prior to putting on or removing parts.
-
To disconnect the product adapter from an electric outlet, pull directly on the plug; do not pull on the power cord. Do not put any stress on the power cord where it connects to the product adapter, as the power cord could fray and break.
-
Do not operate the product with the adapter if the power cord is cut, damaged, or if the wires are exposed.
-
Do not immerse or expose the power cord or plug to water or other liquids.
-
Never operate this product with the adapter if the power cord or plug is damaged, malfunctions or is not working properly, has been dropped, or damaged. This product has no user-serviceable parts. Never open the main motor case of the product. The mechanism has been factory adjusted. Do not attempt to inspect or repair this product yourself. Only qualified service personnel should perform any servicing; take the product to a sewing machine repair shop of your choice for inspection and repair.
Caution-- to reduce the risk of personal injury:
This product is intended for indoor, non-commercial, non-industrial, household use only.
-
Do not allow the adapter's power cord to hang (E.G., Over the edge of a table or counter) where it may be tripped over or pulled.
-
Do not sew with this machine on fabric/clothing a person is wearing.
-
Always check the threading of the product before sewing. Improper threading or improper placement of the bobbin in the bobbin case could damage the machine.
-
To avoid breaking the needle and causing damage to the product, do not pull on the fabric as you sew; gently guide the fabric under the presser foot.
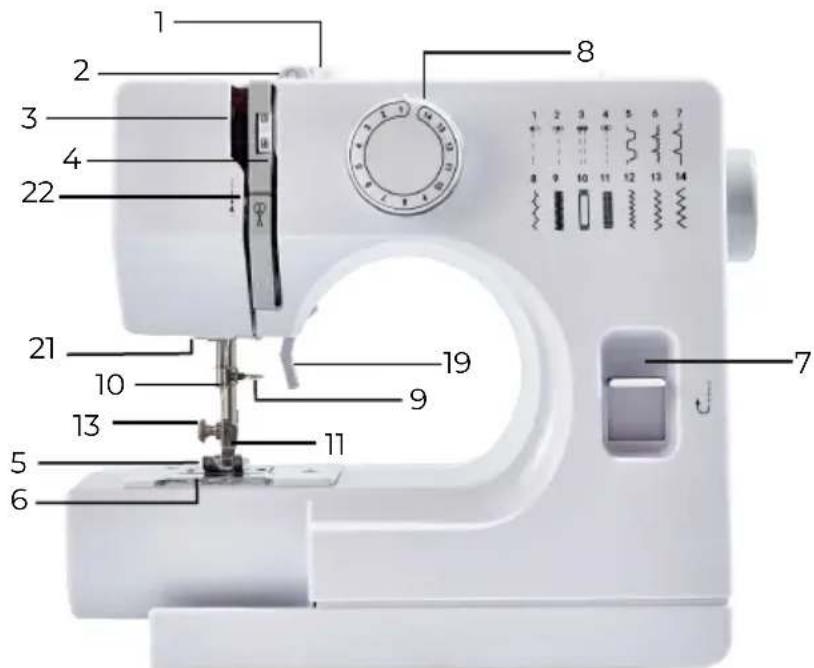
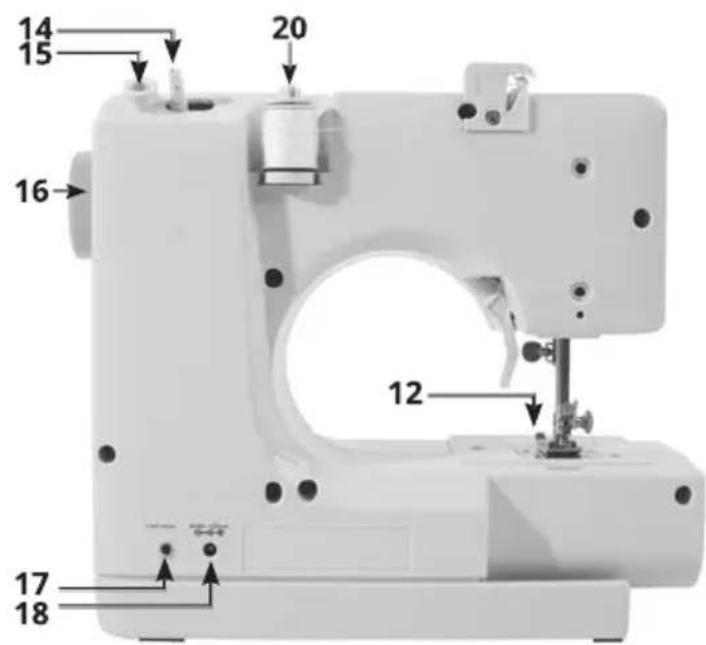
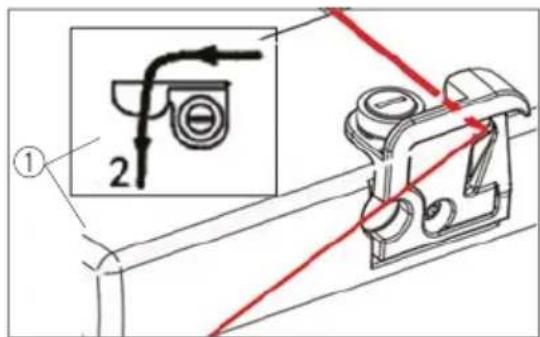
PARTS DESCRIPTIONS
- Bobbin winding tension disk
- Upper thread guide
- Thread take-up lever
- Thread tension dial
- Needle plate
- Bobbin cover plate
- Reverse stitch lever
- Stitch selector
- Needle clamp screw
- Needle bar thread guide
- Needle
- Presser foot
- Setscrew
- Bobbin winder spindle
- Bobbin winder stopper
- Handwheel
- Foot switch jack
- AC adapter jack
- Presser foot lifter
- Spool pin
- LED light
- Thread cutter
Accessories included
- Needle x2
- Bobbin x2
- Threader x1
- Spool x2
- Buttonhole presser foot x1
- Power adapter x1
- Foot pedal x1
- Double needle

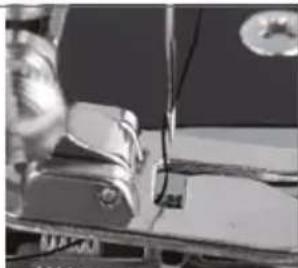
THREADING THE SEWING MACHINE
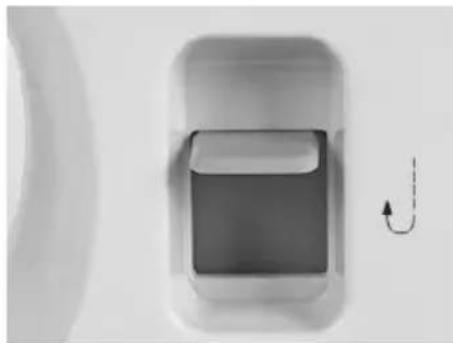
- Make sure the "OFF / I & II speed switch" is on the "OFF" position.
- Raise the presser foot lifter and turn the handwheel counterclockwise until the needle is in its highest position.
- Place a thread spool onto the spool pin, making sure that the thread rolls off the spool in a counterclockwise direction. When needed, use the thread spool pin foot and/or thread spool cap.
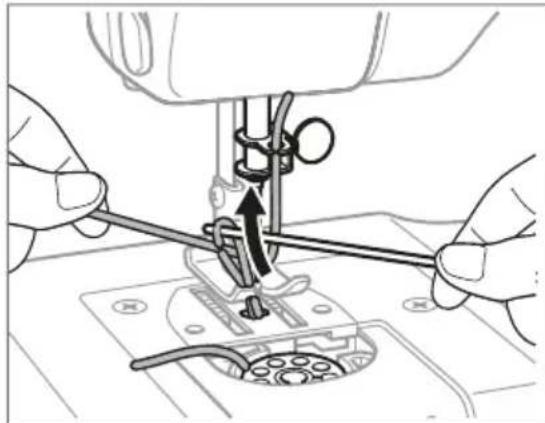
- Hook the thread through the Upper thread guide and then securely slip.
- Bring the thread down through the tension disk slot, go around the U-turn, and bring it back up.
- Pass the thread through the eye of the take up lever, from right to left.
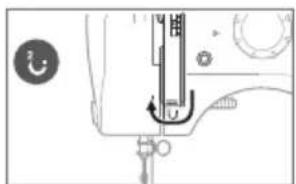
- Bring the thread back down and thread the guide, from top to bottom, on the needle clamp.
- Thread the needle from front to back, making sure that the thread is to the back of the needle and under the presser foot.

Needle replacement
CAUTION: Disconnect the AC/DC adapter before starting to replace the needle.
- Turn the hand wheel to raise the needle to its highest position.
- Hold the old needles and loosen the needle clamp screw. Remove the old needle and discard responsibly.
- Insert a new needle into the clamp with the flat side of the needle towards the back of the sewing machine. Be sure to push the needle all the way into the clamp before tightening the needle clamp screw.

Before first use
- Remove all packaging of the device.
Check if the voltage of the appliance corresponds to the main voltage of your home.
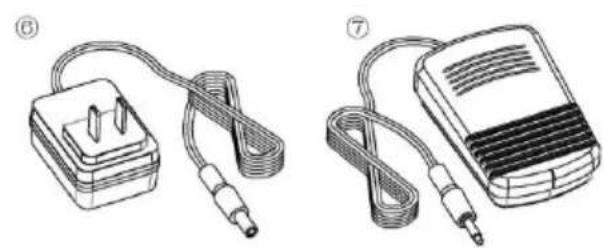
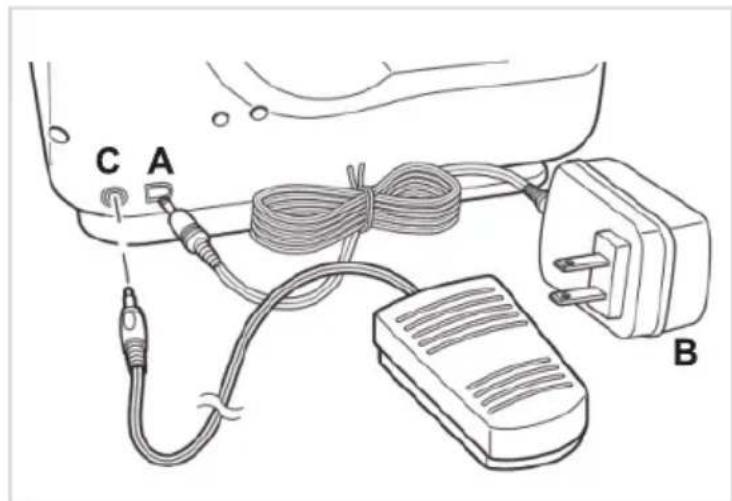
Connecting To The Power Source
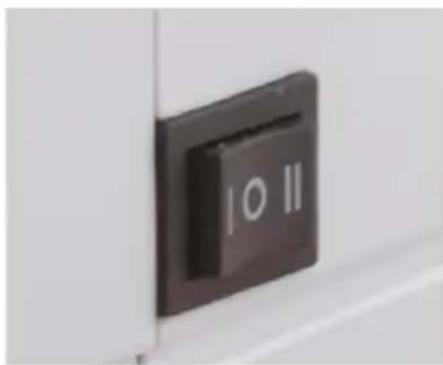
- Make sure the "OFF/ I & II speed switch" is on the "OFF" position.
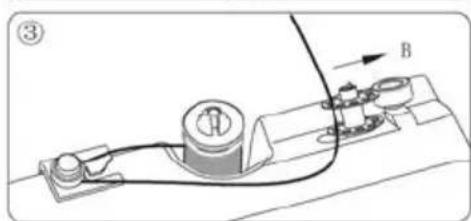
- Connect the jack position A to the DC input socket on the back of the sewing machine, and connect the plug position B into the main power supply.
- Connect the foot pedal position C to the sewing machine by inserting the jack into the foot pedal input socket on the back of the sewing machine.
- You can either use the foot pedal (please keep the power/speed switch on the off position) or the power/speed switch (II setting for high sewing speed whilst the I stand for low sewing speed) to operate the sewing machine.
CAUTION: Whenever the sewing machine is not in use, make sure it is switched off and unplugged from the mains power supply.
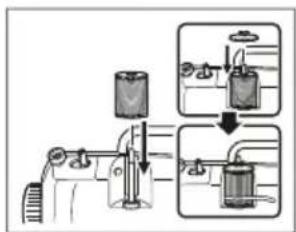
Winding a bobbin
Always use a metal bobbin, otherwise the magnetized bobbin case will not be able to function properly, resulting in a lack of tension on the bobbin thread.
-
Turn the sewing machine so that you are facing it from behind.
-
Place an empty bobbin onto the bobbin winder pin and push it to the left.
-
Place a spool of thread on the spool pin, so that the thread rolls off the spool in a counterclockwise direction. If desired, place the thread spool cap on the spool pin.
-
Guide the thread to the thread guide disk and slip it securely under the disk, going counterclockwise.
-
Wrap the end of the thread clockwise around the bobbin several times.
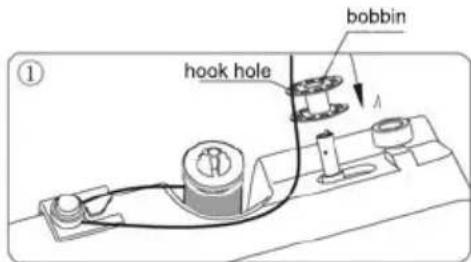

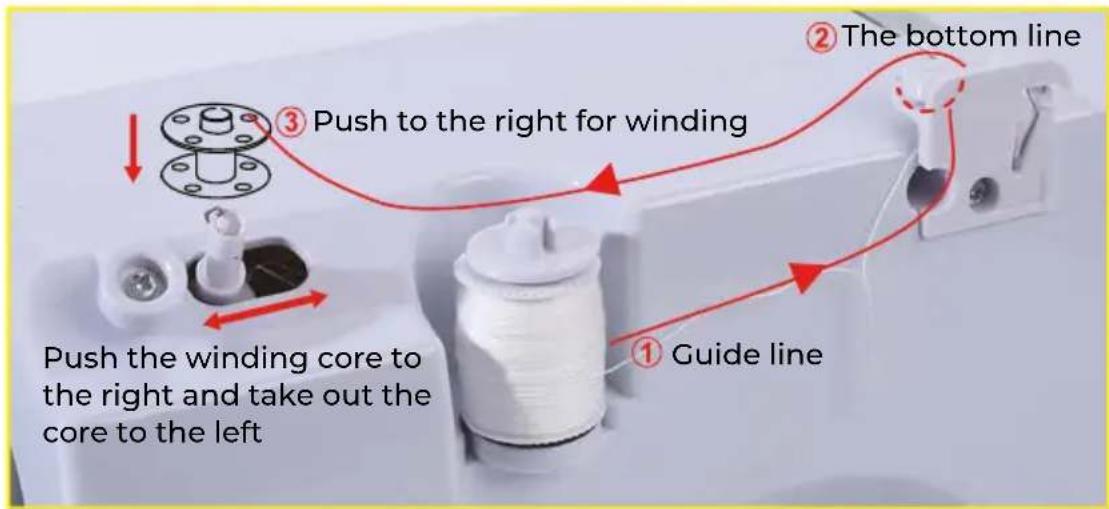
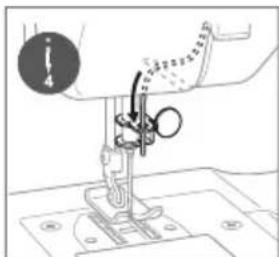
Drawing bobbin thread
Always use a metal bobbin, otherwise the magnetized bobbin case will not be able to function properly, resulting in a lack of tension on the bobbin thread.
1. Turn the handwheel counterclockwise until the needle is in its highest position.
2. Raise the presser foot lifter
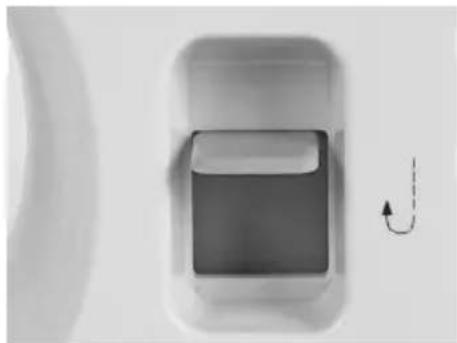
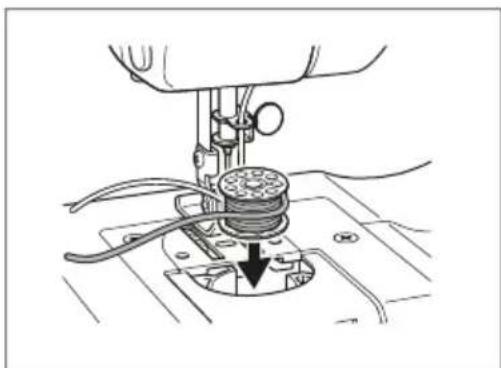
3. Slide the bobbin compartment cover towards you and remove it.
4. Remove the old bobbin and put a filled bobbin into the bobbin compartment.

Drawing bobbin thread
-
Pull out about 4 inches of thread from the new bobbin, making sure that the bobbin turns clockwise, or you will not have the correct tension when you begin to sew.
-
Hold the needle thread loosely with your left hand and turn the handwheel counterclockwise towards you, first lowering the needle, and continuing to turn the hand wheel until the needle comes to its highest position. In so doing, the needle thread will pickup the bobbin thread and pull it through the hale under the needle.
-
Lightly pull up the needle thread and pickup the bobbin thread which will appear through the needle plate slot.
-
Make sure the needle thread is threaded through the groove of the presser foot, and pull both threads to the back of the machine, leaving about a 4 inch tail.
-
Replace the bobbin compartment cover.

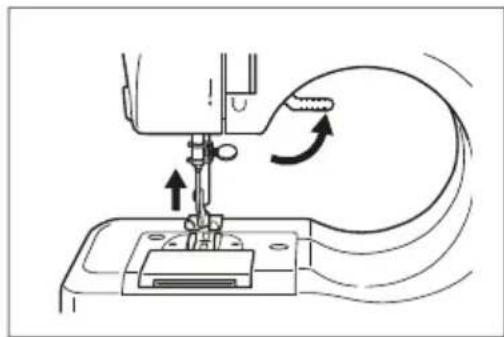
Sewing
-Turn the hand wheel counterclockwise to raise the needle to its highest position.
-Raise the presser foot lifter and place the fabric you want to sew under the presser foot.
-Lower the presser foot.
- Rotate the pattern selection dial to select the stitch pattern you wanted.
- Use either the foot pedal or the power OFF/ Speed switch to start the sewing machine and begin sewing.
CAUTION:
Before you change the stitch pattern, please turn off the switch and turn the hand wheel to raise the needle all the way up so it doesn't get stuck and bent. Changing the stitch pattern is not allowed when the machine is running; otherwise, the needle and/or machine may damage.
Turn the hand wheel counterclockwise several times to make sure there is no jamming in the stitches. Slide the power switch to the Low or High speed position, and the machine will automatically start sewing. We recommend the low speed for beginners.
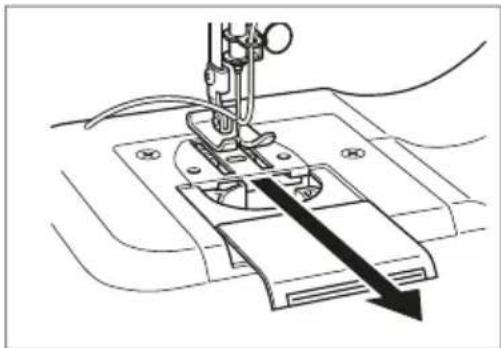
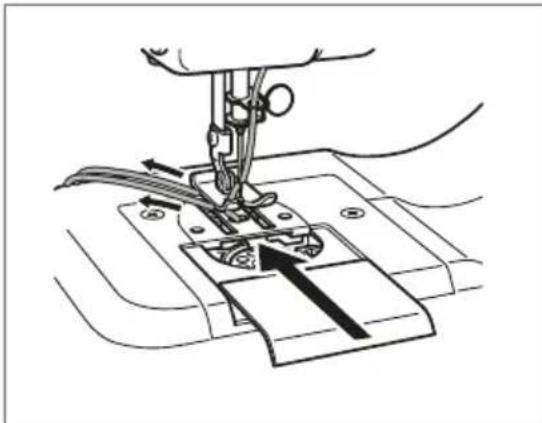
When you finished the sewing, turn off the switch, unplug the adapter, turn the hand wheel to raise the needle all the way up, lift the presser foot, and then gently remove the fabric from the sewing machine, and cut the thread with the thread cutter.
USAGE TIPS:
please turn the hand wheel if it is difficult to remove the fabric, and then pull out the fabric gently.
if the thread had tangled or jammed, please turn the hand wheel and simultaneously pull the thread slightly to release the thread. Bottom bobbin mechanism is a more precise part, inappropriate actions may damage it, please do not push or pull it by finger or any tools
When you are ready to stop sewing a particular piece, proceed as follows:
- Lift your foot off the foot pedal or slide the power OFF/speed switch to the "OFF" position.
- Turn the handwheel counterclockwise to raise the needle to its highest position.
- Move the presser foot lever up to lift up the presser foot and gently remove the fabric from the machine.
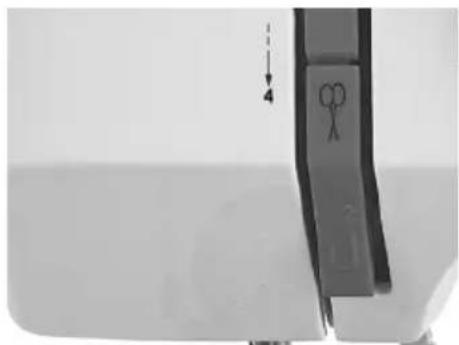
- Cut the threads using the thread cutter on the sewing machine
Adjusting the needle thread tension
Balanced tension
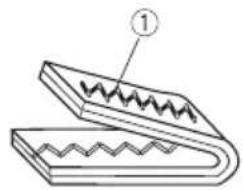
The ideal straight stitch has threads locked between two layers of fabric, as illustrated.
Turn the dial to adjust the tension.
- Toloanen
- To tighten
The tension requires adjustment depending on:
-stiffness and thickness of the fabric
-number of fabric layers
-type of stitch
3. Needle thread (Top thread)
4. Bobbin thread (Bottom thread)
5. Right side (Top side) of fabric
6. Wrong side (Bottom side) of fabric
Tension is too tight: If the bobbin thread shows through on the right side (top side) of the fabric, turn the dial to a lower number to loosen the needle thread tension.
- Bobbin thread (Bottom thread)
- Right side (Top side) of fabric
- To loosen
Tension is too loose: If the needle thread shows through on the wrong side (bottom side) of the fabric, turn the dial to a higher number to tighten the needle thread tension.
- Needle thread (Top thread)
- Wrong side (Bottom side) of fabric
- To tighten
For an ideal zigzag stitch, the bobbin thread should not show on the top side of the fabric and needle thread should show slightly on the bottom side of the fabric.
- Needle thread (Top thread)
FEATURES and PATTERNS
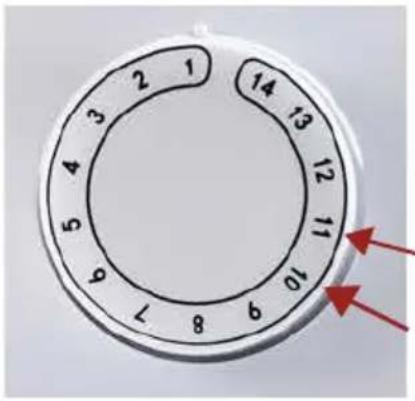
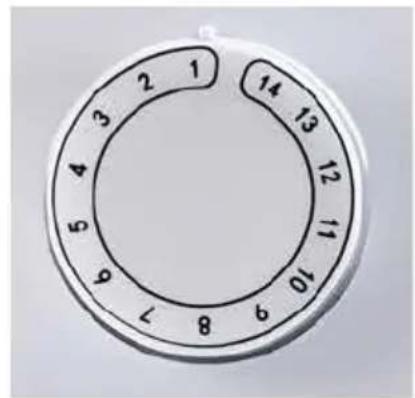
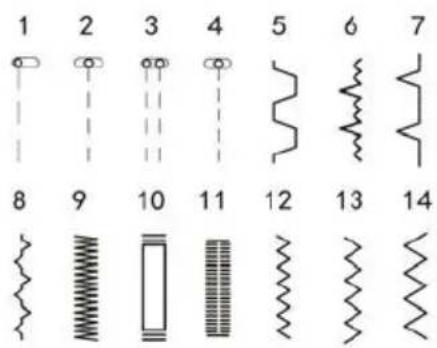
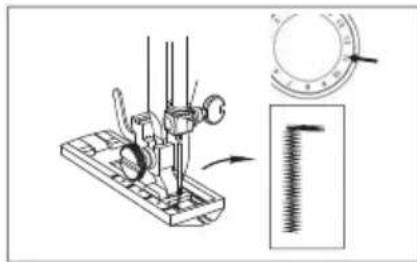
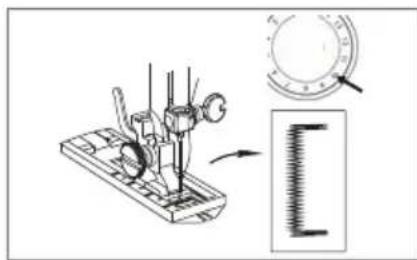
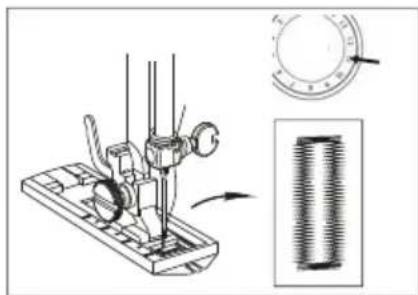
- The sewing machine has a choice of 14 different stitch patterns. To select the stitch you require, look at the diagrams numbered 1-14 on the front of the sewing machine, choose the corresponding number on the dial which is lined up with the arrow. For example, to select zigzag stitch (diagram number 6), simply turn the selector dial until the number 6 on the dial is lined up with the arrow.)
Note: Pattern 3 only for double needle sewing.
- When you wish to change a stitch pattern turn the hand wheel on the side of the sewing machine to raise the needle to the highest point and set the pattern selection dial to the desired stitch type in the same way as above.
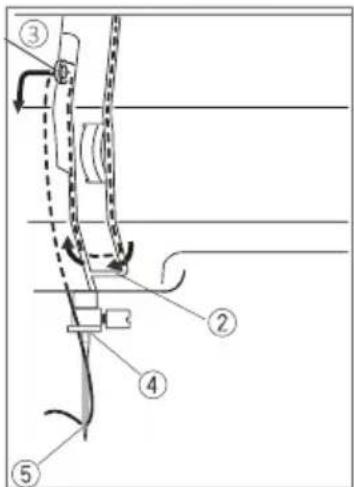
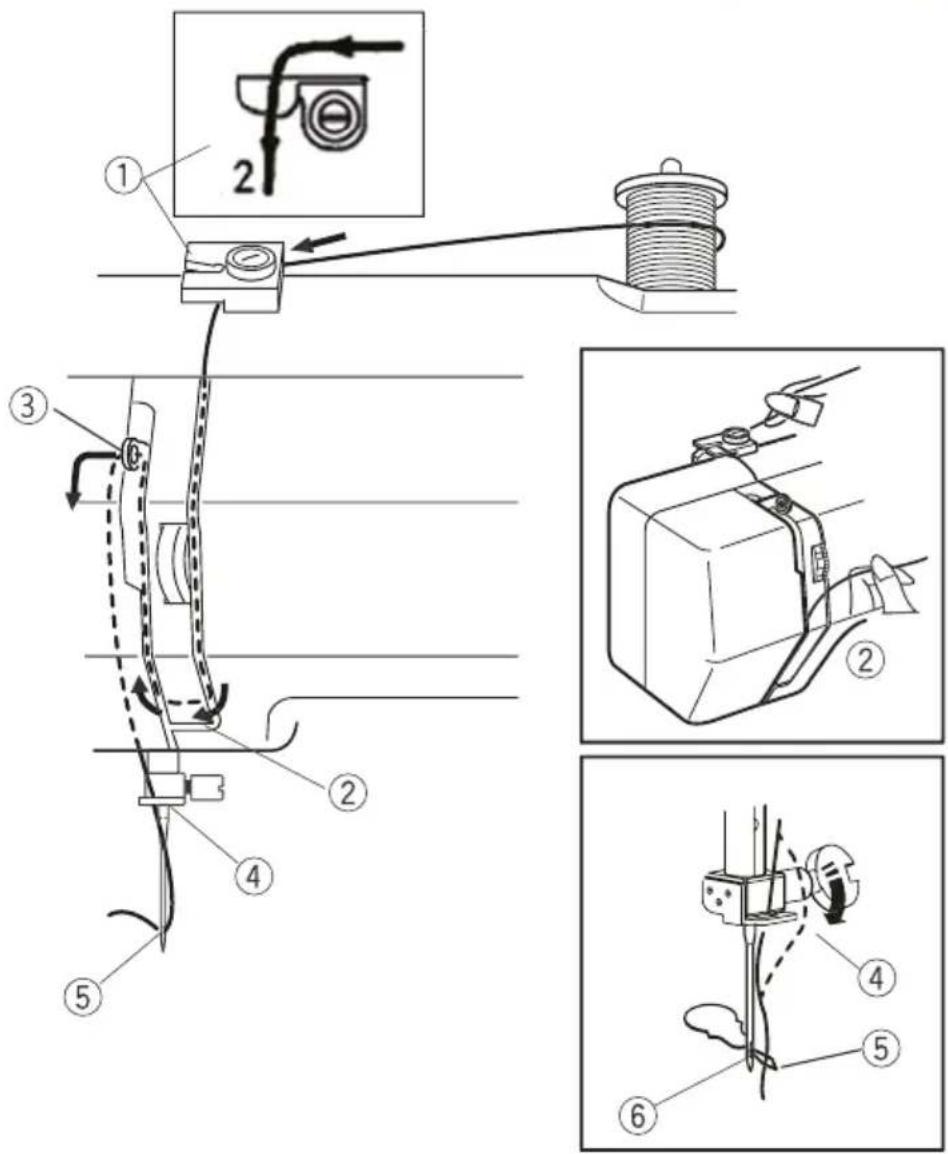
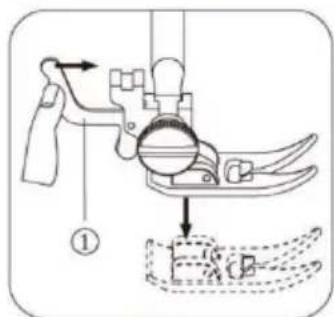
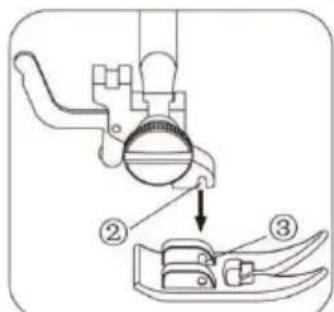
DOUBLE NEEDLE SEWING
- Change the needle into double needle. (Refer to NEEDLE REPLACEMENT part)
- Raise the presser foot lifter and turn the handwheel counterclockwise until the needle in its highest position.
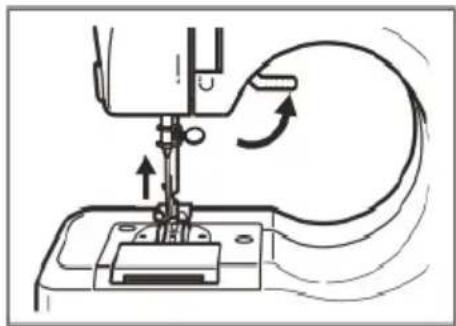
- Thread the double needle:
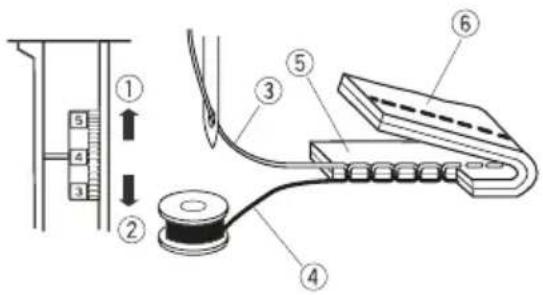
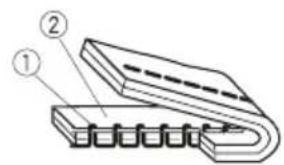
A) Place two bobbins onto the spool pin. Make sure two bobbins in different direction. One positive (clockwise) and the other opposite (counterclockwise) direction.
(refer to Step ①)
B) Hook two threads through the Upper thread guide
(refer to Step ②)
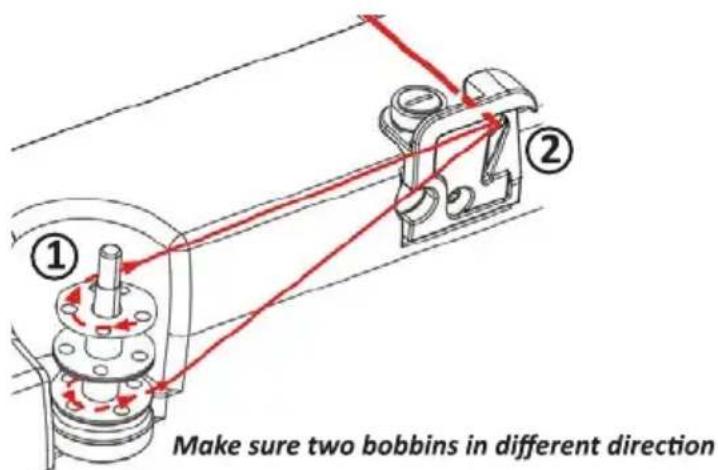
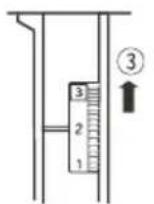
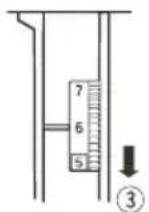
C) Bring both threads down through the tension disk slot, go around the U-turn, and bring both threads back up.(refer to step ③)
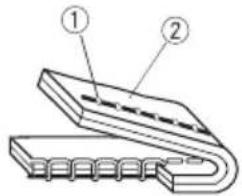
D) Pass both threads through the eye of the take up lever, from right to left(refer to step ④)
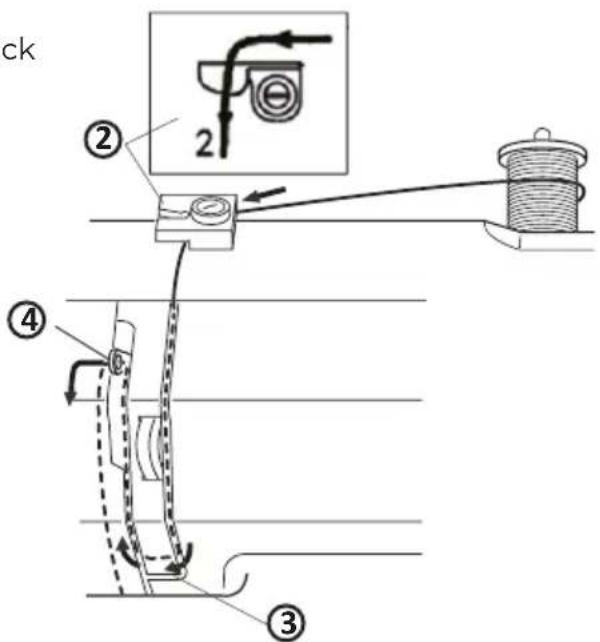
E) Only bring both thread down, and only take one thread pass the thread guide on the needle clamp, from top to bottom.(refer to step 6)
Note: only take on thread pass the thread guide on the needle clamp
F) Thread the needle from front to back, one thread through one needle eye.(refer to step⑦) and make sure that the thread if to the back of the needle and under the presser foot.
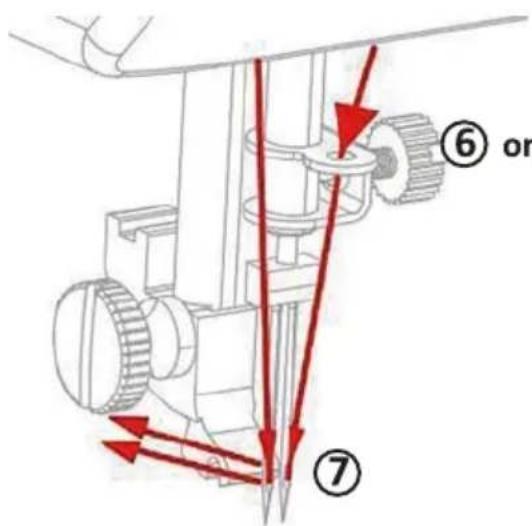
(6) one thread through one needle eye
- Totate the pattern stitch to No.3
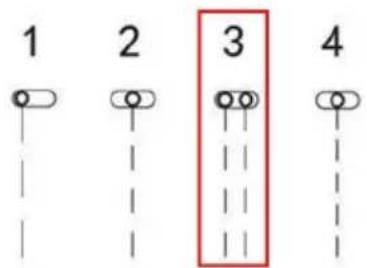
Note: only pattern No. 3 for double needle sewing.
- Begin the sewing.(Refer to SEWING part)
REVERSE STITCH BUTTON
Reverse sewing (back stitching) is useful for reinforcing the beginning and end of seams. To use this function proceed as follows:
Sew forwards as normal, and then press and hold down the reverse stitch button on the front of the sewing machine to sew backwards.
To sew forwards again simply release the reverse stitch button. Reverse sewing distance is 1.5 4.5mm according to the need to control the reversing button trip to control the sewing distance, reversing button pressing end; sewing distance maximum.
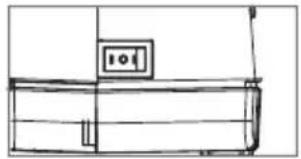
SETTING THE SEWING SPEED
This sewing machine has two sewing speeds. Push the OFF' button, into the right, to the 'll' position and the sewing speed will be increased, while on the I 'position will reduce the speed.
WORK LIGHT
When the power supply is connected, the light is always on.
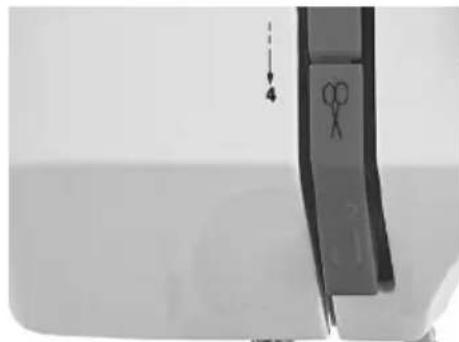
THREAD CUTTER
It has a thread cutter and it can cut off the thread after sewing or winding thread.

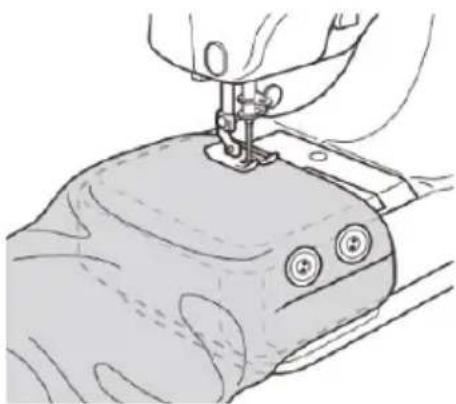
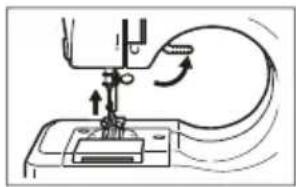
SEWING SLEEVES
This sewing machine has been designed to sew sleeves or any narrow openings in garment.
5. Lift the presser foot.
6. Position the garment over the sewing arm.
7. Lower the presser foot and follow the regular sewing instructions.

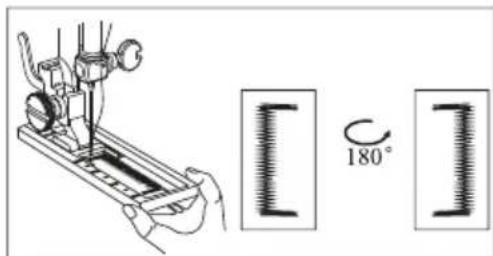
- Turn the handwheel counterclockwise, until the needle is in its highest position.
- Lift up the presser foot lifter to raise the buttonhole presser foot
- Put the fabric under the buttonhole presser foot and lower it onto the fabric where you need to sew a buttonhole.
- Turn the pattern selection dial 2 to stitch pattern # 10 and sew 5-6 stitches.
-
Turn the handwheel counterclockwise, until the needle is in its highest position.
-
Turn the pattern selection dial to stitch pattern # 11, and sew the desired buttonhole length.
- Turn the handwheel counterclockwise, until the needle is in its highest position.
- Turn the pattern selection dial to stitch pattern # 10 and sew 5-6 stitches.
-
Turn the handwheel counterclockwise, until the needle is in its highest position.
-
Raise the buttonhole presser foot and rotate the cloth 180^ .
-
Turn the pattern selection dial to stitch pattern # 11, and sew until the buttonhole is fully sewed.
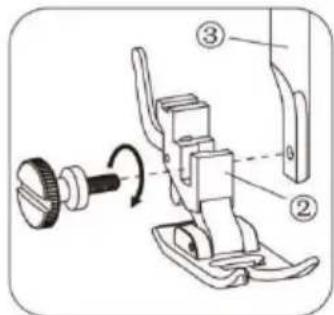
REPLACING THE PRESER FOOT
CAUTION!
Risk of injury!
Improper handling of the sewing machine may result in injury.
-
Always unplug the sewing machine, disconnect the foot pedal, remove the batteries, and make sure the power Standby/speed switch is set to "Standby" before replacing the presser foot.
-
Unplug the sewing machine, disconnect the foot pedal, and make sure the power Standby/speed switch is set to "Standby."
-
Place the sewing machine on a flat and level surface.
-
Turn the handwheel counterclockwise to raise the needle to its highest position.
-
Lift up the presser foot lifter and lift up the presser foot locking lever. The presserfoot will automatically drop off from the locking device.
-
Put a new presser foot under the presser foot locking device.
-
Lower the presser foot lifter and lift up the presser foot locking lever to reconnect the presser foot.
Technical specifications Sewing machine
Battery output: 6V = 1,500mA
Motor power: approx. 9W max.
Lamp power: approx. 0.06 W
Sewing speed: approx. 300 stitches/min.
Adjustable zigzag width: max. 3/16" (4 mm)
Adjustable stitch length: max.1/8"-3/16" (3-4 mm)
Adjustable stitch width: max. 3/16" (4 mm)
Dimensions (L x W x H): 280x130x245mm
Power adapter
Input: 100-240 V-, 50/60 Hz, Max. 500 mA
Output: 6V = 1,500mA

TROUBLESHOOTING
Problem:
No power or the machine runs slowly
Problem cause:
Batteries are installed incorrectly
Batteries are low
New and old batteries used together
Adapter power is not properly connected.
Amendment:
Re-install the batteries, making sure they are the correct way around
Use new batteries
Correctly connect adapter.
Replace with a new adapter
Problem:
Skipping stitches
Problem cause:
Needle eye not in the middle
Needle bent
Presser foot too loose
Amendment:
Remove and re-insert the needle with the flat side of the needle to the back Remove and re-insert a new needle
Tighten the presser foot according to installation instruction above mentioned.
Problem:
Bobbin thread cannot be drawn up.
Problem cause:
Lower thread has been used up
Needle threaded incorrectly
Amendment:
Replace with new full bobbin
Re-thread the needle, making sure it is threaded from the front to the back
Problem:
Thread keeps breaking
Problem cause:
Thread blocked by lower bobbin
Needle scarf too rough
Needle shank not seated in the upper end
Thread tension dial, thread guide or thread pulling bar is rough
Amendment:
Correctly thread the upper thread and lower thread again according to instruction above mentioned. Remove and re-insert a new needle Insert the needle correctly. Polish with fine sand paper.
Problem:
Stitches too loose or uneven
Problem cause:
Thread blocked by upper bobbin spool
Upper thread too loose or tight
Needle bent
Threading incorrect
Amendment:
Pull out the spool pin and make the bobbin or thread run smoothly
Adjust thread tension dial and make the stitches sew evenly
Remove and re-insert a new needle
Check and thread again
Problem:
Needle breaks
Problem cause:
Presser foot and/or needle is loose
Pull fabric with force when sewing
Needle not lowered into fabric when start sewing
The needle is in the fabric when adjusting the pattern selection dial
Amendment:
Remove and re-insert a new needle, and tightly fix presser foot and needle.
Remove and re-insert a new needle, and tightly fix it. After that thread machine again.
Remove and re-insert a new needle, and tightly fix it, thread again, turn the hand wheel to lower the needle into fabric, and then start sewing
Remove and re-insert a new needle, and tightly fix it.
Warranty policy
This product complies with the warranty law in force in the country of purchase. When you have a problem that you can not solve, you must access the web www.prixton.com and click on the contact option to send us your assistance form.
These technical and electrical specifications are those of typical units and may be changed without prior notice in order to provide improved equipment.
Simplified EU Declaration Of Conformity
We, La Trastienda Digital located in Avenida Cervantes 49, modulo 25, Basauri 48970, Bizkaia hereby declare that the following goods, imported and selling at European market:
| BRAND | MODEL NAME DESCRIPTION | CATEGORY | |
| Prixton | P115 | Sewing machine | Home |
Are in compliance with the EC Council Directive of 2014/53/EU (EM DIRECTIVE) and harmonized standards and with the board of the 16th of April 2014.
The complete text of the UE Declaration of conformity is available anytime at this website address:
www.prixton.com
LA TRASTIENDA DIGITAL
SECURITE IMPORTANTE
m = 311

ENFILANDO LA MAQUINA DE COSER
These Nahmaschine woke up, and he turned to the door. "Go inside," he said. "I'm going to see you." He looked down at the door and saw a figure standing in front of him. "You're coming?" He asked. "I'm sure you're coming." The figure was tall and had a dark, black hair. "What's this about?" He asked. "You're coming?"