VM75 - Baby monitors MOTOROLA - Free user manual and instructions
Find the device manual for free VM75 MOTOROLA in PDF.

| Product Type | Digital Video Baby Monitor |
| Brand | Motorola |
| Model | VM75 |
| Parent Unit | LCD screen, built-in lithium battery, 4 hours battery life |
| Baby Unit | Camera, microphone, temperature sensor, automatic night vision |
| Baby Unit Power Supply | AC adapter (included) |
| Parent Unit Power Supply | DC 5V/1000mA AC adapter (included) or rechargeable battery |
| Initial Charge Time | 16 hours for both units |
| Range | Up to 300 m outdoors (depends on environment) |
| Main Features | Night vision, digital zoom, two-way talk (talk to baby), lullabies, camera patrol, alarm timer |
| Remote Control | Pan, tilt, zoom via parent unit buttons |
| LED Indicators | Battery level, signal strength, sound level |
| Screen Standby Mode | Screen turns off automatically, turns back on with sound |
| Number of Supported Cameras | Multi-camera (up to 4) |
| Safety | Keep cords out of reach of children (>1 m), do not use extension cord, does not replace adult supervision |
| Maintenance and Cleaning | Clean with a dry, soft cloth. Do not use liquid or abrasive products. |
| Warranty | Refer to the user guide or motorolanursery.com |
Frequently Asked Questions - VM75 MOTOROLA
User questions about VM75 MOTOROLA
0 question about this device. Answer the ones you know or ask your own.
Ask a new question about this device
Download the instructions for your Baby monitors in PDF format for free! Find your manual VM75 - MOTOROLA and take your electronic device back in hand. On this page are published all the documents necessary for the use of your device. VM75 by MOTOROLA.
USER MANUAL VM75 MOTOROLA
natural_image
White and black digital camera with a circular logo at the base (no visible text or symbols on device body)
natural_image
Digital camera module displaying a baby photo with a 5.0-inch display (no readable text or symbols on screen)Quick start guide / Schnellstartanleitung / Guide de démarrage rapide / Snelstartgids / Guía de inicio rápido / Guida rapida / Guia de início rápido / Oδηγός Γρήγορης Εκκίνησης / Skrócona instrukcja obsługi / Rychlý návod / Stručná príručka / Snabbstartsguide / Hurtigstart-guide
English....3
Deutsch....7
Français....11
Nederlands ....15
Español 19
Italiano....23
Português....27
Ελληνικά......31
Polski....36
Česky 40
Slovenčina....44
Svenska 48
Dansk....52
Important Notes:
- When charging the batteries for the first time, charge for at least 16 hours continuously.
- Be aware that this Digital Video Baby Monitor is only intended as an aid. It is not a substitute for responsible and proper adult supervision.
1. Welcome
This booklet provides you the quick start information of your VM75. For a full explanation of all features, download the user guide from motorolanursery.com.
2. Contents inside the box
- Baby unit
- Parent unit (with built-in Lithium battery)
• Power adaptors x 2 - Quick Start Guide
In multi-camera packs, you will find one or more additional baby units with power adapter units.
3. At a glance
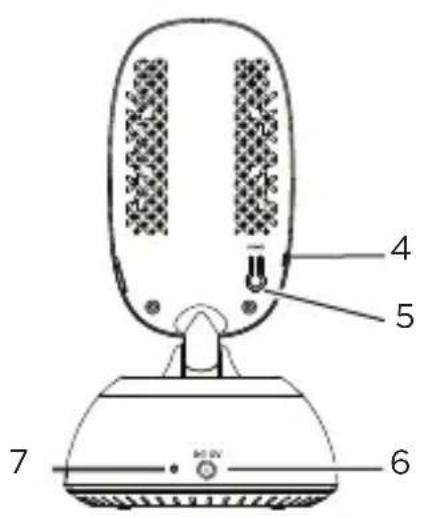
3.1 Baby unit
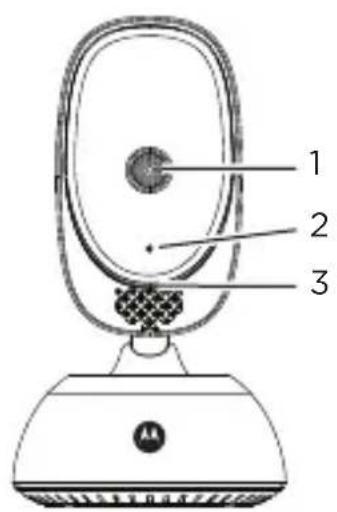
1. Camera Lens
2. Microphone
3. Power indicator
Lights up in blue when the Baby Unit is switched on and linked to the Parent Unit.
Automatically Off during night mode.
4. Light Sensor (Night Vision Mode)
5. Pairing Key
Press and hold to pair with the Parent Unit.
6. Power Adapter Socket
7. Temperature Sensor
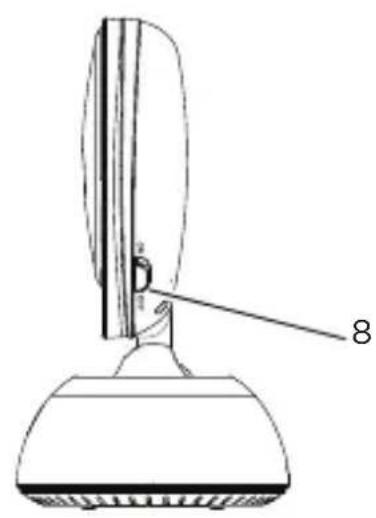
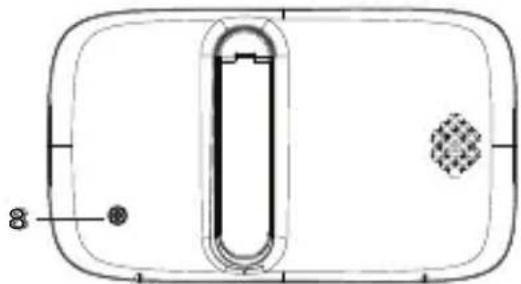
8. Power ON/OFF switch
Slide to switch the Baby Unit on or off.
3.2 Parent unit

natural_image
Pure technical diagram of a rectangular device with internal components and a circular inset element (no text or symbols)1. Display (LCD screen)
2. Battery status, Power, Sound level and Pairing indicators
- Lights up in purple when the Parent Unit's battery is being charged, it turns blue when the battery is fully charged.
- Lights up in green when the Parent Unit is switched on.
- Green-Orange-Red-Red. Show the sound level detected by the Baby Unit - the louder the sound detected, the more LEDs light up. Flashes rapidly in green when the Parent Unit is searching for the Baby Unit, or is in pairing mode.
3. Main menu button

Press to enter/exit menu mode.
4. OK / 📁 button
When in a menu, press to choose an item, or save a setting.
Press to enter remote scan mode.
5. Control key panel
- UP / VOLUME+

Press to increase speaker volume in camera viewing mode.
When in a menu, press to scroll up. When in remote scan mode, press to tilt up.
- DOWN / VOLUME-

Press to decrease speaker volume in camera viewing mode.
When in a menu, press to scroll down.
When in remote scan mode, press to tilt down.
- LEFT

Decrease brightness in camera viewing mode.
When in a menu, press to scroll left.
When in remote scan mode, press to pan left.
- RIGHT

Increase brightness in camera viewing mode.
When in a menu, press to scroll right.
When in remote scan mode, press to pan right.
6. TALK BACK

Hold down to talk back to the baby unit.
7. Power button

Press and hold to switch the unit On/Off.
Press to turn the video screen Off/On. When the video screen is off, it turns on automatically when sound is detected.
8. Power socket
3.3 Parent unit display icons
| Signal Strength | Screen brightness |
| AC power mode | Speaker volume |
| Speaker on / off | Video on time |
| Lullabies menu / mode | Add camera |
| Zoom menu / mode | Delete camera |
| Night vision | View camera |
| Alarm timer | Talk back function |
| Battery status |
Camera Patrol Mode Camera Identification Number
4. Connect and charge

WARNING
- Do not remove the tags from the AC Adapters. Only use the AC adapters provided.
- Strangulation Hazard. Children have STRANGLED in cords. Keep adapter cords out of the reach of children (more than 1 metre away). Never use extension cords with AC adapters. Only use the AC adapters provided.
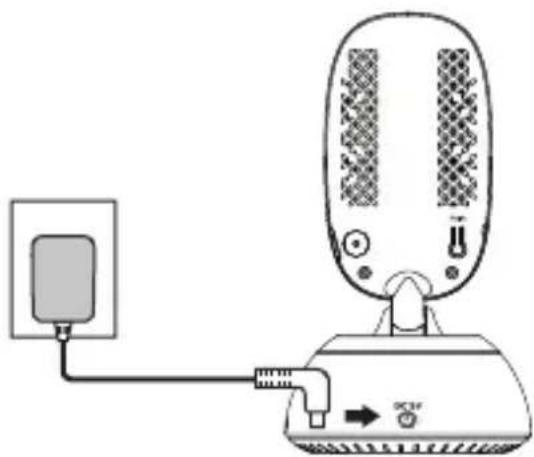
4.1 Connecting the Power Supply for Baby Unit
natural_image
Diagram of a device connected to a power outlet, showing internal components and connection lines (no text or symbols)- Place the baby unit near a electrical outlet in the room where you're going to be monitoring your baby most of the time. It should also be at least 3 feet away from your baby.
- Plug the DC plug of power adapter into the baby unit, connect other end to a suitable electrical outlet.
- Slide the power button on the side of the baby unit up to turn it on.
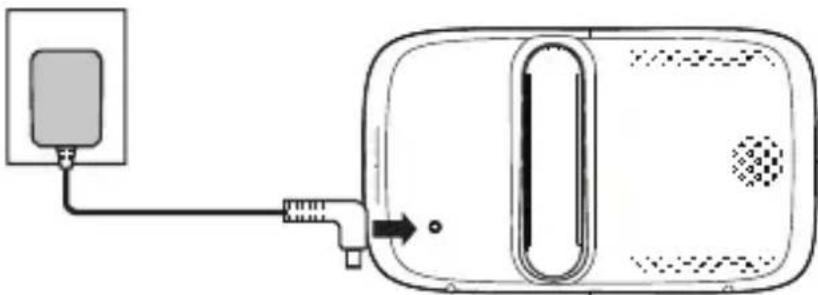
4.2 Connecting the Power Supply for Parnet Unit
natural_image
Simple line drawing of a device with a power outlet and cable, no text or symbols present- Plug the DC plug of power adapter(DC5V/1000mA) into the Parent unit, connect the other end to a suitable electrical outlet.
- Leave to charge for 16 hours.
Note
The first time you use the Parent unit, or if you haven't used it for a long time, it will take 16 hours to fully charge.
The battery life on a single charge lasts for 4 hours. We recommend you keep the cable plugged into the mains power socket if you're going to use for longer than this or throughout the night.
When the battery gets very low, it'll take about 30 minutes to charge enough for you to use it for a short time. To charge the Parent unit in the shortest amount of time, turn it off while it's charging.
natural_image
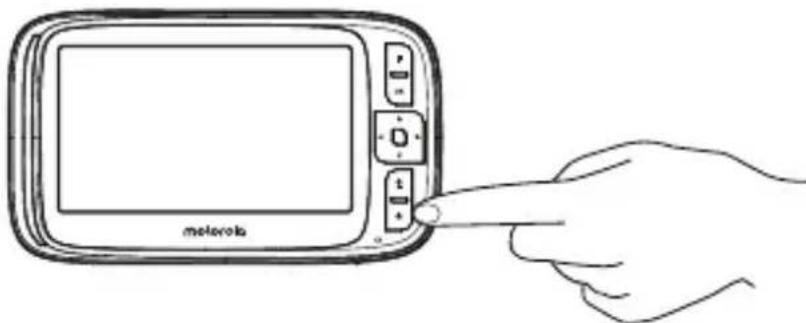
Line drawing of a hand pointing at a device labeled 'motorola' (no other text or symbols)• After the Parent unit has charged for 16 hours you can switch it on.
- Before you do, move the Parent unit at least 3 feet from the Baby unit. Any closer and you might get audio feedback sounds.
- Press and hold the button to turn the monitor unit on, the monitor unit and camera unit are automatically linked and ready to use.
Wichtige Hinweise:
natural_image
Line drawing of a mechanical device with a labeled component (8), no text or symbols presentnatural_image
Pure technical diagram of a rectangular device with internal components and a circular inset element (no text or symbols)natural_image
Diagram of a microphone connected to a power adapter via cable (no text or symbols)natural_image
Simple line drawing of a device with a power outlet and cable, no text or symbols presentnatural_image
Line drawing of a hand pointing at a device labeled 'motorola' (no other text or symbols)natural_image
Pure technical diagram of a rectangular device with internal components and a circular inset element (no text or symbols)natural_image
Diagram of a microphone connected to a power outlet, showing internal components and wiring (no text or symbols)natural_image
Simple line drawing of a device with a power outlet and cable, no text or symbols presentnatural_image
Line drawing of a hand pointing at a device labeled 'metrona' (no other text or symbols)natural_image
Technical line drawing of a mechanical device with a labeled component (8), no readable text or symbols present.1. Cameralens
2. Microfoon
3. Voedingsindicator
natural_image
Pure technical diagram of a rectangular device with internal components and a circular inset element (no text or symbols)1. Display (LCD-scherm)
natural_image
Diagram of a device connected to a power outlet, showing internal components and connection point (no text or symbols)natural_image
Simple line drawing of a device with a power outlet and cable, no text or symbols presentnatural_image
Line drawing of a hand pointing at a device labeled 'motorola' (no other text or symbols)natural_image
Pure technical diagram of a rectangular device with internal components and a circular inset element (no text or symbols)1. Pantalla (pantalla LCD)
natural_image
Diagram of a microphone connected to a power outlet, showing internal components and wiring (no text or symbols)natural_image
Simple line drawing of a device with a plug and connector, no text or symbols presentnatural_image
Line drawing of a hand inserting a cable into a device labeled 'motorola' (no other text or symbols)natural_image
Pure technical diagram of a device casing with internal components and no text or symbols1. Display (schermo LCD)
natural_image
Diagram of a device connected to a power outlet, showing connections via cable (no text or symbols)natural_image
Simple line drawing of a device with a power outlet and cable, no text or symbols presentnatural_image
Line drawing of a hand pointing at a device labeled 'motorola' (no other text or symbols)natural_image
Technical line drawing of a mechanical device with a labeled component (8), no readable text or symbols present.1. Lente da câmara
2. Microfone
natural_image
Pure technical diagram of a rectangular device with internal components and a circular inset element (no text or symbols)1. Visor (ecrã LCD)
natural_image
Diagram of a device connected to a speaker, showing signal flow and connection points (no text or symbols)natural_image
Simple line drawing of a device with a plug and connector, no text or symbols presentnatural_image
Line drawing of a hand holding a motorcycle device with a screen and control buttons (no text or symbols on the device itself)natural_image
Line drawing of a mechanical device with a labeled component (8), no text or symbols presentnatural_image
Pure technical diagram of a rectangular device with internal components and a circular inset element (no text or symbols)natural_image
Diagram of a device connected to a power outlet with a cable, showing no text or symbolsnatural_image
Simple line drawing of a device with a power outlet and cable, no text or symbols presentnatural_image
Line drawing of a hand holding a device labeled 'motorola' (no other text or symbols)natural_image
Line drawing of a mechanical device with a labeled component (8), no text or symbols present1. Obiektyw kamery
2. Mikrofon
natural_image
Technical line drawing of a rectangular device with internal components and a circular inset element (no text or symbols)natural_image
Diagram of a device connected to a power outlet with cable (no text or symbols)natural_image
Simple line drawing of a device with a power outlet and cable, no text or symbols presentnatural_image
Line drawing of a hand pointing at a device labeled 'motorola' (no other text or symbols)natural_image
Technical line drawing of a rectangular device with internal components and a circular inset element (no text or symbols)natural_image
Diagram of a device connected to a power outlet with a cable, showing no text or symbolsnatural_image
Simple line drawing of a device with a power outlet and cable, no text or symbols presentnatural_image
Line drawing of a hand pointing at a device labeled 'motorbox' (no other text or symbols)natural_image
Technical line drawing of a mechanical device with a labeled component (8), no readable text or symbols present.natural_image
Pure technical diagram of a device casing with internal components and no text or symbolsnatural_image
Diagram of a device connected to a power outlet, showing connections via cable (no text or symbols)natural_image
Technical line drawing of a rectangular device with internal components and a circular inset element (no text or symbols)1. Display (LCD-skärm)
natural_image
Diagram of a microphone connected to a power outlet, showing internal components and wiring (no text or symbols)natural_image
Simple line drawing of a device with a power outlet and cable, no text or symbols presentnatural_image
Line drawing of a hand pointing at a device labeled 'motorbox' (no other text or symbols)natural_image
Technical line drawing of a mechanical device with a labeled component (8), no readable text or symbols present.1. Kameralinse
2. Mikrofon
3. Strømindikator
natural_image
Pure technical diagram of a rectangular device with internal components and a circular inset element (no text or symbols)natural_image
Diagram of a device connected to a power outlet with a cable, showing no text or symbolsnatural_image
Simple line drawing of a device with a power outlet and cable, no text or symbols presentnatural_image
Line drawing of a hand pointing at a device labeled 'motorbox' (no other text or symbols)This product is in compliance with the essential requirements and other relevant provisions of the RED Directive 2014/53/EU.
UK Declaration of Conformity
Hereby, MZGW declares that this product is in compliance with the requirements for UKCA marking.
The CE and UK Declaration of Conformity can be obtained at motorolanursery.com.
Imported and Distributed by
A.I.&E., Adriaan Mulderweg 9-11, 5657 EM Eindhoven, The Netherlands. Edco UK Ltd, 1st Floor, Two Chamberlain Square, Birmingham, B3 3AX, UK.
Manufactured, distributed or sold by Meizhou Guo Wei Electronics Co. LTD., official licensee for this product. MOTOROLA and the Stylized M Logo are trademarks or registered trademarks of Motorola Trademark Holdings, LLC. and are used under license. All other trademarks are the property of their respective owners. © 2023 Motorola Mobility LLC. All rights reserved.
Version 1.3 (EU)
Printed in China