Power Matic-ccino Cremma - Coffee machine CECOTEC - Free user manual and instructions
Find the device manual for free Power Matic-ccino Cremma CECOTEC in PDF.


User questions about Power Matic-ccino Cremma CECOTEC
0 question about this device. Answer the ones you know or ask your own.
Ask a new question about this device
Download the instructions for your Coffee machine in PDF format for free! Find your manual Power Matic-ccino Cremma - CECOTEC and take your electronic device back in hand. On this page are published all the documents necessary for the use of your device. Power Matic-ccino Cremma by CECOTEC.
USER MANUAL Power Matic-ccino Cremma CECOTEC
natural_image
Exterior view of a modern industrial machine with a green laser unit and control panel (no visible text or symbols)cecòtec
Safety instructions 7
-
Parts and components 47
-
Before use 48
-
Installation 48
-
Operation 49
-
Cleaning and maintenance 54
-
Troubleshooting 59
-
Technical specifications 60
B. Disposal of old electrical and electronic applian-
ces
-
Technical support and warranty 60
-
Copyright 61
SOMMAIRE
Read these instructions thoroughly before using the product.
Keep this instruction manual for future reference or new users.
- This product is exclusively designed for household use. It is not suitable for commercial or industrial use. Do not use the device outdoors.
- It is your responsibility to make sure every user is informed about the warnings and precautions stated in this instruction manual. Do not use the appliance for any use other than the one specified in the manual.
- WARNING: an incorrect use of the appliance can endanger both the appliance and the user.
- Make sure that the mains voltage matches the voltage stated on the rating label of the device and that the wall outlet is grounded.
- Check the power cord regularly for visible damage. If the cord is damaged, it must be repaired by the official Technical Support Service of Cecotec to avoid any type of danger.
- When filling up the water tank, be careful to avoid spillage, especially on the pipe and electrical parts of the appliance.
- Unplug the appliance from the mains in any of the following circumstances:
A. Before filling up the water tank.
B. Before removing or installing any of the appliance's parts.
C. Before cleaning or maintenance.
D. When the appliance is not working properly.
E. After use.
- Empty the water tank when the appliance is not going to be used for some time.
- Make sure the appliance has cooled down completely before removing or installing parts and before cleaning it.
- Always use cold water. The use of hot water or other liquids may damage the appliance.
- Use the grinder to grind only coffee beans.
- Do not use caramelised or frozen coffee beans. This appliance can only be used with natural coffee beans.
- This appliance can be used by children aged 8 and above, and persons with reduced physical, sensory, or mental capabilities or lack of experience and knowledge, as long as they have been given supervision or instruction concerning the use of the appliance in a safe way and understand the hazards involved.
- Supervise children to prevent them from playing with the appliance. Close supervision is necessary if the appliance is used near children.
- This appliance cannot be used by children. Keep this appliance and the power cord out of reach of children.
- Do not use extension cables unless authorised by a qualified authority.
- Never leave the appliance unattended when it is connected to the mains.
- Do not let the cable protrude over the edge of the table or worktop or come into contact with hot surfaces or sharp edges.
- Keep your hands and the cord away from the appliance's hot parts during operation.
- Place the device on a flat, stable surface. Do not use or place the appliance on a hot or damp surface.
- Do not use the appliance if the drip tray is not properly positioned.
- Do not use the appliance if any of its parts are damaged or if the appliance is not working properly.
-
The surface of the heating element is exposed to residual heat after use.
-
Do not attempt to open the main body or disassemble any part of the appliance, as there are no repairable parts inside.
- Do not immerse the cord, plug, or any other part of the appliance in water or any other liquid or expose electrical connections to water. Make sure your hands are dry before handling the plug or switching on the appliance.
- The use of accessories not provided with the product is not recommended. It could be dangerous.
- If, when using the hot-water function, the water tank runs empty, you must wait some time before re-activating the function.
INSTRUCTIONS DE SÉCURITÉ
- External drip tray
- Internal drip tray
- Coffee-residue residues tank
- Adjustable coffee spout
a. Adjustable coffee-spout cover
b. Milk frother / Cappuccinatore
c. Milk tank connector-tube inlet
d. Coffee spout
e. Milk spout - Control panel
- Coffee-bean tank
- Coffee-bean tank cover
- Water tank
- Power cord
- Side cover
- Brewing unit
- Cleaning brush
- Milk-tank
- Milk-tank cover
- Milk-tank connector tube
- Cappuccinatore connector tube
- Rubber connector piece
- Milk-tank interior tube
- Needle
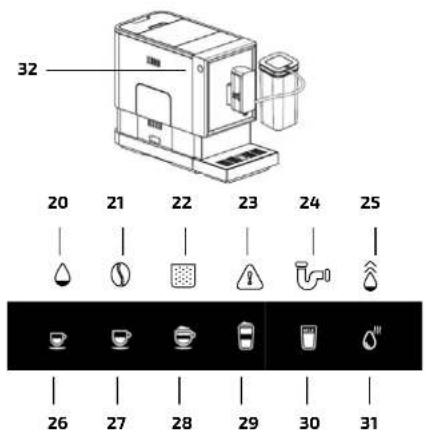
Control panel
Fig. 2
- Strong-coffee button: to prepare a coffee with more ground coffee and less water.
- Mild-coffee button: to prepare a coffee with less ground coffee and more water.
- Cappuccino button: to prepare a coffee with milk and lots of foam, pouring the milk first and then the coffee.
- Latte-macchiate button: to prepare a coffee with frothed milk by pouring the milk first and then the coffee.
- Frothed-milk button.
- Hot-water button.
- If the icon flashes: low water level/water tank not installed.
- If the icon flashes: insert coffee beans.
- If the icon remains steady: the coffee-residue tank is full.
If the icon flashes: interior drip tray/coffee-residue tank not installed.
ENGLISHENGLISH
- If the icon remains steady: the brewing unit is not installed or installed incorrectly. If the icon flashes: the side cover is open or not correctly placed.
- If the icon remains steady: the coffee machine must be descaled. If the icon flashes: ongoing descaling process.
- The system-emptying function is underway.
- On/Off button.
Accessories
The product includes three sachets of cleaning product for the self-cleaning process.
NOTE
The graphics in this manual are schematic representations and may not exactly match the product.
2. BEFORE USE
- This appliance is packaged in a way as to protect it during transport. Take the device out of its box and remove all packaging materials. You can keep the original box and other packaging elements in a safe place. This will help you prevent product damage when transporting it in the future. In case the original packaging is disposed of, make sure all packaging materials are recycled accordingly.
- Make sure all parts and components are included and in good conditions. If there is any piece missing or not in good condition, immediately contact the Technical Support Service of Cecotec.
3. INSTALLATION
- Remove protective plastic, stickers, and any other packaging material from the device.
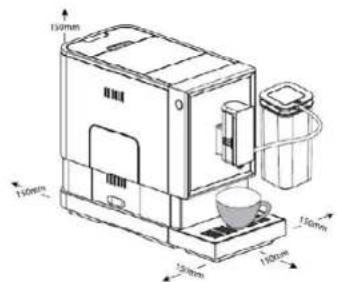
- Place the appliance on a safe and stable surface with an accessible socket outlet and a minimum distance between the walls of the appliance and other appliances. Fig. 3
- Fill up the water tank with water (see section 'Filling up the water tank').
- Fill up the coffee-bean container with coffee beans (see 'Filling up the coffee-bean tank').
- Unwind and pull out the power cord and insert the connector into the back of the machine. Insert the other end of the power cord into an outlet of suitable voltage.
Tip
No self-cleaning will be carried out if the appliance is switched off for a short time. You can toggle this function by following these steps if active or activate it if deactive.
Step 1: remove the side cover.
Step 2: press the On/Off button until the device beeps.
Please note
Press the hot-water button to clean the inside of the machine before first use.
4. OPERATION
Filling up the water tank
When Oflashes, it indicates that the water tank has a low water level, and you should fill it up.
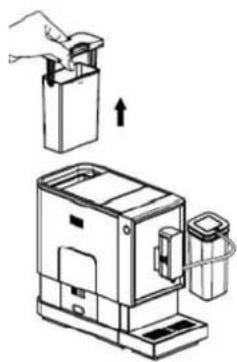
1. Lift the water tank by using the lid as a handle. Fig. 4
2. Rinse the water tank with drinking water, fill the tank to the Max mark, and place it back in the machine. Make sure it is properly placed.
Please note
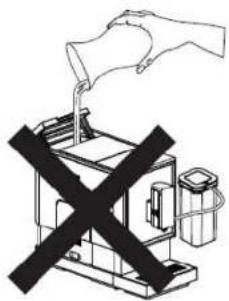
To prevent water from spilling out of the water tank, do not use a container to pour water directly into the tank. Fig. 5
Important
Never fill up the water tank with hot water, lukewarm water, carbonated water, or any other liquid that may damage the tank and the machine.
Filling up the coffee-bean tank
If① flashes, it indicates that you should fill up the coffee-bean tank:
- Remove the coffee-bean tank cover.
- Carefully put in the coffee beans.
- Put the tank cover back on.
Important
Only fill up the coffee-bean tank with natural-roast coffee beans. The use of ground coffee, instant coffee, caramelised coffee, or any other object could damage the appliance. Never use unroasted coffee, high-roast coffee, or a blend of natural and high-roast coffee.
Preparing mild and strong coffee
- Make sure the drip tray is placed under the coffee spout and that water tank is filled up. Then, press the On/Off button to switch on the machine. The hot-water button will start flashing and the machine will automatically rinse and spurt water from both the milk and the coffee spouts. You can cancel this process by pressing the hot-water button.
- Once rinsing is finished, the function buttons on the control panel will activate (Standby mode) indicating the appliance is ready for coffee making.
- Place a glass or cup under the coffee spout and adjust the spout's height based on the
ENGLISHENGLISH
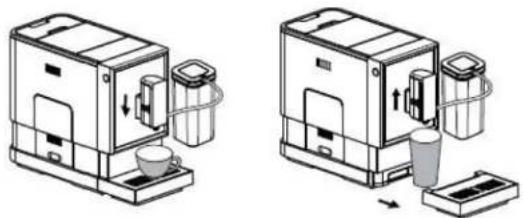
container's. Depending on the size of the container (height and width), you can remove the drip tray as shown in figure 6.
- Press the strong coffee (20) or mild coffee (21) button based on your preference.
- The coffee button you press will light up, indicating the appliance is preparing coffee.
- Once the machine goes back to Standby mode, the coffee will be ready for drinking.
Preparing cappuccino
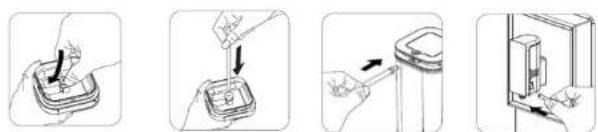
Assembling the automatic milk-frothing system. Fig. 7
1. Place the rubber connector piece in the recess on the inside of the cover.
2. Insert the milk tank's inner tube into the rubber connector piece on the inside of the cover.
3. Insert the milk-tank connector tube into the rubber connector piece on the outside of the cover.
4. Remove the cap from the cappuccinatore inlet and insert the mil-tank connector tube into the inlet.
5. Fill up the milk tank and close the cover. Press the On/Off button to switch on the machine and make sure the drip tray is located under the coffee spout and there is water in the water tank.
6. Place a container under the spout.
7. Press the cappuccino button (22): It will light up indicating cappuccino is being prepared. The indicator will remain lit during the preparation process.
8. The coffee machine will first dispense milk and then coffee.
9. Preparation will stop automatically. If you want to stop it, press the cappuccino button again during operation. You can stop milk and coffee preparation separately by pressing the button during each preparation.
10. Remove the milk tank from the appliance by disconnecting the connector tube from the cappuccinatore inlet and place it in the refrigerator.
11. After use, see the section 'Daily cleaning of the appliance' to clean the automatic milk-frothing system.
Please note
- Clean the automatic milk-frothing system before first use.
- Use cold milk (at a temperature of approximately 5 °C/41°F) with fat content of at least 3% to ensure optimal foam results.
Warning
- When preparation starts, the appliance may splash hot milk or emit steam.
- Place the milk-tank connector tube around the milk-tank cover after each use. Do not drop it, as it may spill milk due to the pressure difference.
Install the automatic milk-frothing system as described in the section 'Preparing cappuccino'.
- Fill up the milk tank and close the cover. Press the On/Off button to switch on the machine and make sure the drip tray is located under the coffee spout and there is water in the water tank. The appliance will perform an automatic rinse and flush out an amount of water equivalent to a small cup. You can cancel this process by pressing the hot-water button.
- Place a container under the spout.
- Press the latte-macchiato button (23): it will light up to indicate that a latte macchiato is being prepared. The indicator will remain lit during the preparation process.
- The coffee machine will first dispense milk and then coffee.
- Preparation will stop automatically. If you want to stop it, press the button again during operation. You can stop milk and coffee preparation separately by pressing the button during each preparation.
- Remove the milk tank from the appliance and place it in the refrigerator.
- After use, see the section 'Daily cleaning of the appliance' to clean the automatic milk-frothing system.
Please note
Use cold milk (at a temperature of approximately 5 °C/41°F) with fat content of at least 3% to ensure optimal foam results.
Warning
- When preparation starts, the appliance may splash hot milk or emit steam.
- Place the milk-tank connector tube around the milk-tank cover after each use. Do not drop it, as it may splash milk due to the pressure difference.
Preparing frothed milk
Install the automatic milk-frothing system as described in the section 'Preparing cappuccino'.
1. Place a container under the spout.
2. Fill up the milk tank and close the cover.
3. Connect the milk-frothing system to the appliance.
4. Press the frothed-milk button (24). The indicator light will turn on during preparation.
5. After use, see the section 'Daily cleaning of the appliance' to clean the automatic milk-frothing system.
Please note
Use cold milk (at a temperature of approximately 5 °C/41°F) with fat content of at least 3% to ensure optimal foam results.
ENGLISHENGLISH
Warning
- When preparation starts, the appliance may splash hot milk or emit steam.
- Place the milk-tank connector tube around the milk-tank cover after each use. Do not drop it, as it may splash milk due to the pressure difference.
Hot water
-
Place a container under the spout.
-
Press the hot-water button (25): it will light up to indicate that the function has been activated and the machine will dispense hot water from the milk spout. The indicator will remain lit during the preparation process.
Turning off the coffee machine
To switch off the machine, press the On/Off button.
Auto-off
The appliance is equipped with an automatic shut-off system. Depending on the selected mode, the appliance will have a different automatic switch-off time (see "Modes" section).
Adjusting the hot/foam coffee/water quantity
You can store the desired quantity of coffee, frothed milk, or hot water.
You should follow these steps while frothing milk, dispensing hot water, or preparing a mild coffee, strong coffee, latte macchiato, or cappuccino:
- While the machine is preparing coffee (either mild or strong) or dispensing frothed milk or hot water, press and hold the button of the selected option. The appliance will continue dispensing the selected beverage.
- When the beverage quantity corresponds to the desired quantity, release the button. The machine will beep twice, indicating that the beverage quantity has been saved.
- For cappuccino and latte macchiato, you must carry out steps 1 and 2 for both milk and coffee.
Adjusting the grinding level
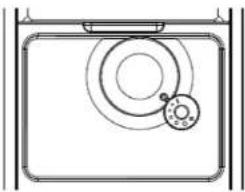
You can adjust the grinder's grinding level by turning the adjustment knob in the coffee-bean tank.
-
While the grinder is running, you can turn the knob to change the setting. CAUTION: never change the grinder settings when the grinder is not in operation, as this may damage it.
-
The dots on the knob indicate the grinding level. Fig. B
Modes
The machine has 3 different modes: Default mode, ECO mode, and Quick mode. In ECO mode, the appliance will save more energy. In Quick mode, the user can prepare coffee faster than in default mode.
| ECO mode Quick mode Default mode | |||
| Light Indicator No Yes | Yes | ||
| Pre-infusion ^a | Yes | No | Yes |
| Automatic shut-off time | 10 min | 30 min | 20 min |
| Coffee/milk/hot-water quantity setting | Yes | Yes | Yes |
\*Please note:
The pre-infusion function hydrates the ground coffee in the machine with a small amount of water before coffee is fully extracted. This expands the coffee to create a higher pressure in the coffee machine, which helps with the extraction of all the oils and the full flavour of the ground coffee.
- When the coffee machine is in Standby mode, press and hold the On/Off button for 5 seconds.
- The control panel will display the following indications for the different modes:
| Hot-water button (25) | Strong-coffee button (20) | Mild-coffee button (21) | |
| In ECO mode | steady light | flashing | flashing |
| In Quick mode | flashing | steady light | flashing |
| In Default mode | flashing | flashing | steady light |
-
Press the hot-water button (25) to enter ECO mode, the strong-coffee button (20) to enter Quick mode, and the mild-coffee button (21) to enter Default mode. The device will beep twice to indicate that one of the above-mentioned modes has been selected. (Note: if you press the button corresponding to the mode already selected, the machine will not respond).
-
If you do not want to change the settings, press the On/Off button again or wait approximately 10 seconds for the device to return to Standby mode.
ENGLISHENGLISH
5. CLEANING AND MAINTENANCE
Daily cleaning of the appliance
Proper cleaning and maintenance of the appliance is important to prolong its service life.
Cleaning the drip tray and the coffee-residue tank
Empty and clean the drip tray daily.
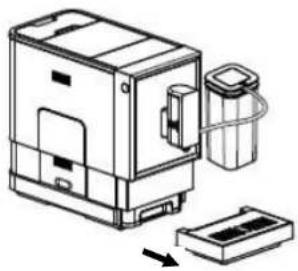
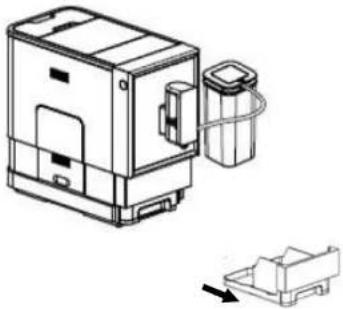
1. Remove the external drip tray. Fig. 9
2. Empty the drip tray into a sink and rinse with water. Then, dry up the drip tray.
3. Slide the Interior drip tray and the coffee-residue tank out. Fig. 10
4. Empty the coffee-residue tank and clean that and the interior drip tray with water. Dry them up afterwards.
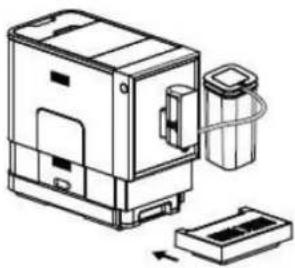
5. Place the coffee-residue tank back on the interior drip tray and put them back in their original position. Fig. 11
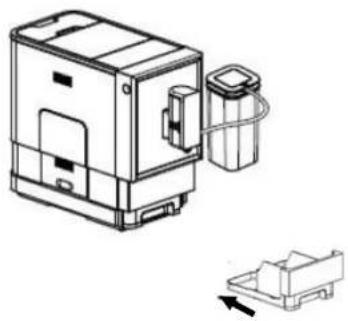
6. Place the exterior drip tray back to its original position. Fig. 12
Please note
If stays steady, the coffee-residue tank must be emptied.
If is flashing, the coffee-residue tank is not installed.
Cleaning the brewing unit. Fig. 13-14
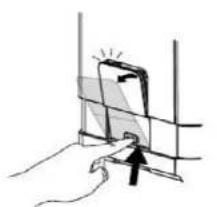
- Press lightly on the side cover's bottom part to remove it.
- Press the side buttons to release the brewing unit and remove it.
- Wash the brewing unit with drinking water. Then, dry up the brewing unit.
- Put the brewing unit and the side cover back in their original position.
Please note
If stays steady, it indicates that the brewing unit is not installed or is not positioned correctly. If the icon flashes, it means the side cover is not properly placed or not placed at all.
Water-tank cleaning
- Lift the water tank to remove it from the machine and clean it with drinking water.
- Fill it with drinking water up to the Max mark and place it back in the coffee machine.
Cleaning the automatic milk-frothing system
Please note
It is important that you perform this cleaning task after preparing a milk beverage to ensure the automatic milk-frothing system is working properly.
- Place a container under the adjustable coffee spout.
-
Fill the milk tank with drinking water.
-
Connect the milk tank to the machine as described in the section 'Preparing cappuccino'.
- Press the frothed-milk button (24).
- The coffee machine will dispense hot water and emit steam to clean the spout and milk spout.
- Press the button again to stop the water.
- Remove the milk-tank connector tube, the adjustable coffee-spout cover, and the cappuccinatore. Clean it with drinking water. Fig. 15
To clean the cappuccinatore, follow the steps below:
- Step 1: separate the two parts of the milk frother and clean them with drinking water. Fig 16. You can use a bristle brush to clean the area around the figure to ensure no more remains are present.
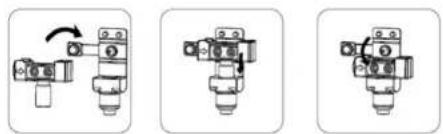
- Step 2: reassemble the milk frother. Fig.17
- Insert the cappuccinatore back into place and replace the cover. Fig. 18
Cleaning the milk tank and connector tube
Please note
Daily cleaning is important to ensure the automatic milk-frothing function works properly.
- Empty the milk tank and clean it with drinking water, remove the rubber connector piece and the interior milk-tank tube, wash them with drinking water, then reconnect them to the cover (make sure they are properly connected).
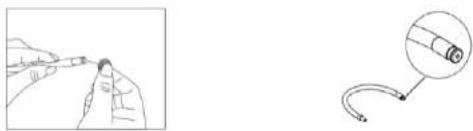
- Clean both ends of the milk-tank connector tube with drinking water. Make sure the hole of the cappuccinatore connector is clean (Fig. 19). You can use the needle to clean the hole.
- Fill up the milk tank with drinking water and connect it to the coffee machine.
- Press the milk-frothing button to activate this function. The water in the milk container will clean the inside of the connector tube. You can stop cleaning by pressing the button to froth milk again.
Descaling
When L remains steady, it indicates that the appliance is due for descaling. The appliance will be kept in optimum condition if you perform this function when the machine indicates it or more frequently depending on the hardness of the water used. To do so, follow the below steps:
- Fully fill up the water tank.
- Add the provided sachet of cleaning product into the water tank.
- IMPORTANT: Do not use vinegar or other non-specific cleaning products to perform self-cleaning on the appliance. Use only cleaning products specific for coffee machines. The use of another cleaning product could damage the appliance.
- Place a large empty container under the coffee spout.
- In Standby mode, press and hold the On/Off button (32) and the strong-coffee button
ENGLISHENGLISH
(20) for 5 seconds. The machine will beep, and both 📋 and the strong-coffee button will flash.
- Press the strong-coffee button (20) to confirm the start of the descaling process. To cancel the descaling process and return to Standby mode, press the On/Off button (32).
Please note
If you cancel the descaling process, the icon will not disappear.
- will flash to indicate that descaling is in progress.
Caution: keep skin and other body parts away from hot water.
-
When all the water in the tank is dispensed, and the strong-coffee button (20) will flash. Remove any remaining cleaning solution from the water tank, rinse it, and refill it with clean water up to the Max mark. Empty the collecting container and place it back under the coffee spout. When the water tank is reinstalled, will turn off. The appliance will then carry out a rinsing process, dispensing half a tank of water first and then waiting for about a minute before dispensing the rest of the water in the tank.
-
When the rinsing process is finished, the machine switches off automatically.
Please note
To ensure that the descaling process is complete, be patient during the process and make sure the appliance has switched off automatically.
System-emptying function
It is recommended to use the system-emptying function before a long period of inactivity, to protect the appliance against frost and before repairing the product.
-
In Standby mode, press and hold the On/Off button (32) and the mild-coffee button (21) for 5 seconds.
-
will start flashing
-
Remove the water tank from the product. ☐ will light up steadily to indicate that the system emptying function is being carried out. You can press the On/Off button before removing the water tank to cancel the process and return to Standby mode.
-
When the system-emptying function is completed, the appliance will automatically switch off.
Important
After performing the system-emptying function, when using the machine again, press the hot-water button until the machine dispenses water before using any of the functions.
Manual rinsing
You can perform a manual rinse cycle to clean both the coffee spout and the milk spout after use. A manual rinsing is also recommended if the appliance has not been used for a long period of time.
- Place an empty container under the adjustable coffee spout.
- In Standby mode, press and hold the On/Off button (32) and the hot-water button (25).
- The machine will beep twice, and the hot-water button will flash. Both the milk and the coffee spout will then dispense a small amount of water used for rinsing.
Danger: the water dispensed is hot. Avoid contact with water or splashing - After rinsing, the machine will return to Standby mode.
Cleaning of the appliance
- Unplug the cord from the power supply.
- Discard the drip-tray water.
- Use a damp cloth or a non-abrasive cleaning agent to clean water stains from the appliance.
Important
Do not use any abrasive cleaning agents, descaling agents, or vinegar to clean the appliance.
Cleaning the ground-coffee outlet
The ground coffee may stick to the outlet wall of the machine after using it for a long time. It is recommended to clean the outlet frequently by following these steps to ensure the machine can dispense ground coffee.
- Press on the cover's bottom part.
- Remove the side cover.
- Press the sides of the brewing unit.
- Remove the brewing unit.
- Rinse the brewing unit under running tap water. Allow it to dry completely before reinstalling.
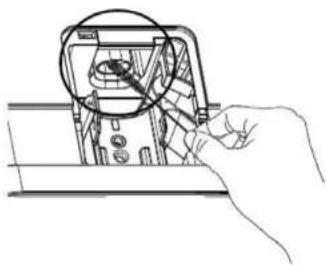
- Use the cleaning brush to clean the ground-coffee outlet and remove any remaining ground coffee or coffee beans from the machine. Fig. 20
- Use a cloth to clean the inside of the appliance thoroughly. Dry up the appliance completely before placing the cover back on.
ENGLISHENGLISH
- TROUBLESHOOTING
| PROBLEM CAUSE SOLUTION | ||
| The device does not work. | The appliance is not connected to a mains socket. | Connect the device and turn it on. Check the cord and plug. |
| When you press a button on the panel repeatedly, it does not work or works with a delay. | The device is subject to electromagnetic interference. The control panel is dirty. | Unplug the device. Restart the device after a few minutes. Clean the control panel with a cloth. |
| Coffee is not hot enough. | You have not preheated the cup or glass. The brewing unit is too cold. | Rinse the machine at least 3 times before brewing coffee. |
| Coffee does not come out and the hot-water button flashes. | Air is in the coffee machine ducts. | Make sure the water tank is correctly assembled and filled up with water. Press the hot-water button until the machine dispenses water from the milk spout. |
| The first coffee prepared is of poor quality. | The grinder's first pass does not pour enough coffee into the brewing unit. | Discard the coffee. Subsequent coffees will be of good quality. |
| The coffee has no foam or is very clear. | The coffee beans are not fresh. The grinding level is very coarse. | Change the brand of coffee beans and use a suitable one. Adjust the grinding level to a finer one upon operating the grinder. |
| Buttons do not respond. | You are not pressing the buttons from the front of the device. | Press the lower part of the button from the front. |
| The appliance takes too long to warm up. | Too much limescale. Descale the appliance. | |
| The water tank has been removed or the water level is very low, but does not turn on. | The water-tank connector's area is wet. | Remove the water around the water-tank connector. |
| The interior drip tray has a lot of water in it. | There's too-fine ground coffee blocking the water spout. | Adjust the coffee grind level to a coarser level while operating the grinder. |
| Coffee is dispensed too slowly or drips. | There's too-fine ground coffee blocking the water spout. | Adjust the coffee grind level to a coarser level while operating the grinder. |
| The empty coffee-bean tank indicator flashes, but there are still coffee beans in the coffee-bean tank. | The interior ground-coffee outlet is blocked. | Follow the steps in the 'Cleaning and maintenance' section to clean the outlet. |
| The machine does not release frothed milk. | The automatic milk-frothing system is dirty or not installed correctly.The hole in the milk-tank connector tube is blocked with milk residue.The type of milk used is not suitable for foaming.The milk is too hot. | Clean the automatic milk-frothing system and make sure it is correctly installed.Refer to the section "Daily cleaning of the appliance", follow the steps in the section "Cleaning the milk tank and connector tube", clean the connector tube, and make sure that the hole in the connector tube is clean. Use the needle to clean the hole.Different types of milk will have different results in terms of foam quantity and quality. Whole cow's milk gives good results.Use cold milk. |
| The hole in the milk-tank connector tube is blocked with milk residues that cannot be cleaned properly. | The connector tube has not been cleaned for a long time. | Leave the connector tube immersed in hot water for one hour, follow the instructions in the section 'Cleaning the milk tank and connector tube'. Continue to use the milk-frothing function until the machine dispenses water smoothly.Use a needle to clean the hole. |
ENGLISHENGLISH
| The coffee machine splashes milk on the table. | The milk dispensing tube is not positioned correctly. | Position the tube well. |
| The descaling indicator continues to flash even though the descaling process has stopped. | The descaling process has not finished. | Be patient and wait until the process has finished. The machine will switch off automatically. Do not switch it off manually. |
7. TECHNICAL SPECIFICATIONS
Product: Power Matic-ccino Cremma
Product reference: 01627
Power: 1235-1470 W
Voltage and frequency: 220-240 V, 50-60 Hz
Technical specifications may change without prior notification to improve product quality.
Made in China | Designed in Spain
8. DISPOSAL OF OLD ELECTRICAL AND ELECTRONIC APPLIANCES

This symbol indicates that, according to the applicable regulations, the product and/or battery must be disposed of separately from household waste. When this product reaches the end of its shelf life, you should dispose of the batteries/accumulators and take them to a collection point designated by the local authorities.
Consumers must contact their local authorities or retailer for information
concerning the correct disposal of old appliances and/or their batteries.
Compliance with the above guidelines will help protecting the environment.
9. TECHNICAL SUPPORT AND WARRANTY
Cecotec shall be liable to the end user or consumer for any lack of conformity that exists at the time of delivery of the product under the terms, conditions, and deadlines established by the applicable regulations.
It is recommended that repairs be carried out by qualified personnel.
If at any moment you detect any problem with your product or have any doubt, do not hesitate to contact Cecotec official Technical Support Service at +34 963 210 728.
10. COPYRIGHT
The intellectual property rights over the texts in this manual belong to CECOTEC INNOVACIONES, S.L. All rights reserved. The contents of this publication may not, in whole or in part, be reproduced, stored in a retrieval system, transmitted, or distributed by any means (electronic, mechanical, photocopying, recording or similar) without the prior authorization of CECOTEC INNOVACIONES, S.L.
FRANÇAISFRANÇAIS
1. PIÈCES ET COMPOSANTS
Img.1
text_image
Exploded view diagram of a household appliance with numbered parts for identification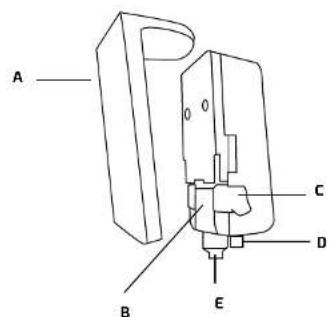
text_image
A B C D EFig./Img./Abb./Afb./Rys1
text_image
32 20 21 22 23 24 25 26 27 28 29 30 31Fig./Img./Abb./Afb./Rys 2
text_image
130mm 130mm 150mm 150mm 130mmFig./Img./Abb./Afb./Rys 3
ČEŠTINA ČEŠTINA
natural_image
Line drawing of a hand operating a device with an arrow indicating upward motion (no text or symbols present)Fig./Img./Abb./Afb./Rys 4
natural_image
Simple line drawing of a hand using a tool to lift a device into a box, with no text or symbols present.Fig./Img./Abb./Afb./Rys 5
natural_image
Two line drawings of a coffee machine with a cup, showing the interior and exterior views (no text or symbols)Fig./Img./Abb./Afb./Rys 6
natural_image
Four-step diagram showing hand positioning and mounting process of a device (no text or symbols)Fig./Img./Abb./Afb./Rys 7
natural_image
Simple line drawing of a rectangular container with two circular components and a side panel (no text or symbols)Fig./Img./Abb./Afb./Rys 8
ČEŠTINA ČEŠTINA
natural_image
Line drawing of a portable kitchen appliance with a side panel and a container, showing no text or symbols.Fig./Img./Abb./Afb./Rys 9
natural_image
Technical line drawing of a mechanical device with internal components and a separate schematic view (no text or symbols)Fig./Img./Abb./Afb./Rys 11
natural_image
Technical line drawing of a mechanical device with a zoomed-in inset showing internal components (no text or symbols)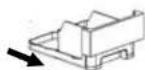
natural_image
Technical line drawing of a portable air conditioner unit with cooling unit and side panel (no text or symbols)Fig./Img./Abb./Afb./Rys 12Fig./Img./Abb./Afb./Rys 10
ČEŠTINA ČEŠTINA
natural_image
Hand holding a small object near a wall, with no visible text or symbols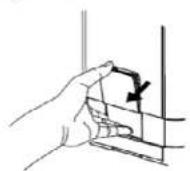
Fig./Img./Abb./Afb./Rys 13
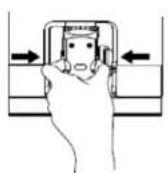
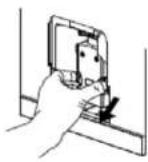
Fig./Img./Abb./Afb./Rys 14
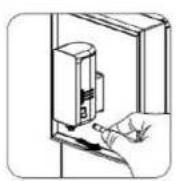
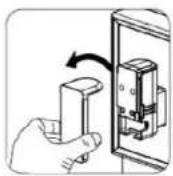
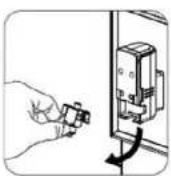
Fig./Img./Abb./Afa./Rys 15
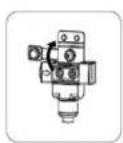
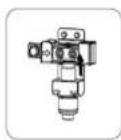
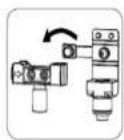
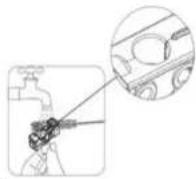
Fig./Img./Abb./Afb./Rys 16
ČEŠTINA ČEŠTINA
natural_image
Three mechanical assembly diagrams showing progressive assembly of a valve or pump component (no text or labels)Fig./Img./Abb./Afb./Rys 17
natural_image
Line drawing of a hand holding a device with a magnified inset showing internal components (no text or symbols)Fig./Img./Abb./Afb./Rys 20
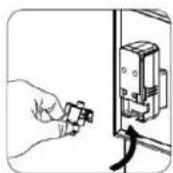
Fig./Img./Abb./Afb/Rys 18
natural_image
Illustration showing a hand holding a pen and a close-up of a curved wire with a magnified inset (no text or symbols)Fig./Img./Abb./Afb./Rys 19
www.cecotec.es
Quart de Poblet, Valencia (Spain)
YV03220329
ČEŠTINA
ČEŠTINA ČEŠTINA
ČEŠTINA ČEŠTINA
ČEŠTINA ČEŠTINA
ČEŠTINA ČEŠTINA
ČEŠTINA ČEŠTINA
ČEŠTINA ČEŠTINA
ČEŠTINA