GALILEO HE BK glass NG A83 - Cooker FABER - Free user manual and instructions
Find the device manual for free GALILEO HE BK glass NG A83 FABER in PDF.

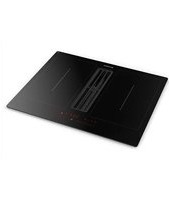
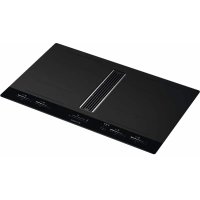
| Product type | Induction cooktop with integrated hood |
| Brand / Model | Faber GALILEO HE BK glass NG A83 |
| Dimensions (W x D) | 830 x 520 mm |
| Net weight / Gross weight | 19 kg / 26 kg |
| Number of cooking zones | 4 (including 2 flexible zones) |
| Heat source | Induction |
| Electrical supply | 220-240 V, 50/60 Hz; 380-415 V three-phase possible |
| Total max power | 7,620 kW |
| Power per zone (standard / boost) | 2100 W / 3700 W (flexible zones up to 3700 W) |
| Cooking functions | PowerPlus (10 min boost), rapid cooking, defrosting, keep warm (74°C), low-temperature cooking (92°C), independent timer per zone, zone linking, Stop&Go, child lock |
| Hood functions | Automatic mode, 9 speeds + 2 intensive, 15 min timer, activated charcoal filter (manual activation), filter saturation indicator |
| Safety | Residual heat indicator, automatic shut-off after 10 s without pan, pan detection, child safety, safety shut-off in case of crack |
| Cleaning and maintenance | Daily cleaning with soft cloth; grease filters dishwasher-safe every 2 months; regenerable charcoal filter; do not use steam cleaner or abrasive pads |
| Repairability | Error codes (ER03, ER20, etc.); component replacement only by manufacturer or authorized service; spare parts available on request |
| Included accessories | Edge adhesive seal, mounting kit, grease filters, user manual |
Frequently Asked Questions - GALILEO HE BK glass NG A83 FABER
User questions about GALILEO HE BK glass NG A83 FABER
0 question about this device. Answer the ones you know or ask your own.
Ask a new question about this device
Download the instructions for your Cooker in PDF format for free! Find your manual GALILEO HE BK glass NG A83 - FABER and take your electronic device back in hand. On this page are published all the documents necessary for the use of your device. GALILEO HE BK glass NG A83 by FABER.
USER MANUAL GALILEO HE BK glass NG A83 FABER
natural_image
Technical line drawing of a mechanical assembly with no visible text or symbolsEN
1. SAFETY INFORMATION
For your safety and correct operation of the appliance, read this manual carefully before installation and use. Always keep these instructions with the appliance even if you move or sell it. Users must fully know the operation and safety features of the appliance.
Induction systems of these hobs meet the requirements of EMC standards as well as the EMF Directive and should not interfere with other electronic devices. Heart pacemakers users or other electronic implants users should clarify with their medical doctor or with the manufacturer of the implants whether these devices are sufficiently interference resistant.

The wire connection has to be done by specialized technician. Before proceeding with electrical connection please refer to Chapter ELECTRICAL CONNECTION.
For appliances with supply cords, the arrangement of the terminals, or the length of the conductors between the cord anchorage and the terminals, shall be such that the current carrying conductors become taut before the earthing conductor if the cord slips out of the cord anchorage.
• The manufacturer will not be
held liable for any damages resulting from incorrect or improper installation.
- Check that the mains voltage corresponds to that indicated on the rating plate fixed to the inside of the product.
- Means for disconnection must be incorporated in the fixed wiring in accordance with the wiring rules.
- For Class I appliances, check that the domestic power supply guarantees adequate earthing.
- Connect the extractor to the exhaust flue through an adequate pipe. Please refer to the purchasable accessories shown in the installation manual (if circular pipe: minimum diameter 120 mm). The route of the flue must be as short as possible.
- Connect the product to the power net by using an omnipolar switch.
• Regulations concerning the discharge of air have to be fulfilled.
- Do not connect the extractor appliance to exhaust ducts carrying combustion fumes (boilers, fireplaces, etc.).
- If the extractor is used in conjunction with non-electrical appliances (e.g. gas burning appliances), a sufficient degree of aeration must be guaranteed in the room in order to prevent the backflow of exhaust gas. When the cooker appliance is used in conjunction with appliances supplied with energy other than elec-
tric, the negative pressure in the room must not exceed 0,04 mbar to prevent fumes being drawn back into the room by the cooker appliance.
- The air must not be discharged into a flue that is used for exhausting fumes from appliances burning gas or other fuels.
- If the supply cord is damaged, it must be replaced from the manufacturer or its service agent or similarly qualified son in order to avoid a hazard.
- Connect the plug to a socket complying with current regulations, located in an accessible place.
- With regards to the technical and safety measures to be adopted for fume discharging it is important to closely follow the regulations provided by the local authorities.

WARNING: Before installing the appliance, remo ve the protective films.
- Use only screws and small parts in support of the appliance.

WARNING: Failure to install the screws or fixing device in accordance with these instructions may result in electrical hazards.
- Do not look directly at the light through optical devices (binoculars, magnifying glasses...).
-
Cleaning and user maintenance shall not be made by children without supervision.
• Children should be supervised to ensure that they do not play with the appliance. -
This appliance is not intended for use by persons (including children) with reduced physical, sensory or mental capabilities, or lack of experience and knowledge, unless they have been given supervision or instruction concerning use of the appliance by a person responsible for their safety.
- This appliance can be used by children aged from 8 years and above and persons with reduced physical, sensory or mental capabilities or lack of s, experience and knowledge if they have been given supervision or instruction concerning use of the appliance in a safe way and understand the hazards involved. Children shall not play with the appliance.

WARNING: The appliance and its accessible parts become hot during use.
Care should be taken to avoid touching heating elements.
Children less than 8 years of age shall be kept away unless continuously supervised.
- Clean and/or replace the Filters after the specified time period (Fire hazard). See paragraph Care and Cleaning.
- There shall be adequate ventilation of the room when the appliance is used at the same time as appliances burning gas or other fuels (not applicable to appliances that only discharge the air back into the room).
- WARNING: If the surface is cracked, switch off the appliance to avoid the possibility of electric shock.
- Do not switch on a device if thenot exposed to atmospheric surface is cracked or there is aagents (rain, sun). damage to the material thickness Ensure that the ventilation of the
- Do not touch the appliance with wet parts of the body.
• To clean the product a steam cleaner is not to be used.
- Metallic objects such as knives, forks, spoons and lids should not be placed on the hob surface since they can get hot.
• After use, switch off the hob element by its control and do not rely on the pan detector.
- WARNING: Unattended cooking on a hob with fat or oil can be dangerous and may result in fire. NEVER try to extinguish a fire with water, but switch off the appliance and then cover flame e.g. wi a lid or a fire blanket.
- CAUTION: The cooking process has to be supervised. A short term cooking process has to be supervised continuously.
- The appliance is not intended to be operated by means of an external timer or separate remote-control system.
- WARNING: Danger of fire: do not store items on the cooking surfaces.
- Ensure that the device is installed in a way that allows to disconnect it from the power supply, with a contact opening
distance (3 mm) that ensures complete disconnection in category III overvoltage conditions.
- Ensure that the device is not exposed to atmospheric agents (rain, sun). - Ensure that the ventilation of the appliance is in accordance with the manufacturer's instructions.
2. USE
- The extractor appliance has been designed exclusively for domestic use to eliminate kitchen smells.
- Never use the appliance for purposes other than for which it has been designed.
- Deep fat fryers must be continuously monitored during use: overheated oil can burst.
- Do not operate the appliance with an external time switch or a separate remote control system.
The appliance shall not be installed behind a decorative door in order to avoid overheating. - To avoid damaging the appliance, do not climb onto the appliance.
- To avoid damaging the silicon grouting, do not put hot cookware on the frame.
- Do not cut or prepare food on the surface or drop hard objects onto it. Do not drag cookware across the surface.
3. CARE AND CLEANING
- The Activated Charcoal odour filter can be regenerated. Follow the instructions provided on the Kit itself both for the regeneration method and for the replacement times.
- Grease filters Z: The filters must be cleaned every 2 months of operation, or more frequently for particularly heavy usage, and can be washed in a dishwasher. Do not wash the grid in the dishwasher.
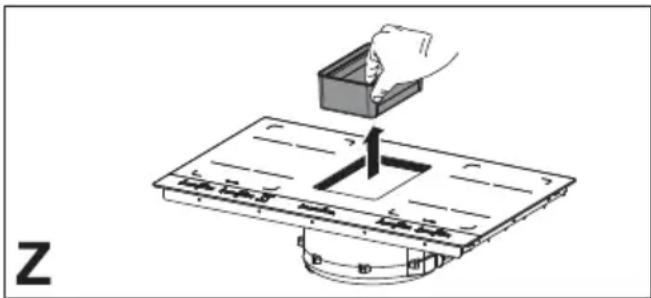
natural_image
Diagram showing a hand placing a small box onto a mechanical component with a central slot (no text or symbols)General recommendations
- Never use scouring pads, steel wool, muriatic acid or other products which could scratch or mark the surface.
- Foods that accidentally fall or settle on the surface, on the functional or aesthetic elements of the hob must not be eaten.
Cleaning the appliance
- Clean the appliance after every use in order to prevent food residues from burning on. Cleaning dried-on and burnt-on dirt requires more effort.
- To clean everyday dirt, use a soft cloth or sponge with water and a suitable cleaning agent. Follow the manufacturer's advice with regard to cleaning agents. We recommend using protective cleaning agents.
- Remove encrusted dirt, e.g. from milk that has boiled over, with a glass ceramic hob scraper while the hob is still warm. Please follow the manufacturer's advice with regard to the scraper.
- Remove sugary foods, such as marmalade, that have boiled over with a glass ceramic hob scraper while the hob is still warm. Otherwise, this could damage the glass ceramic surface.
- Remove melted plastic with a glass ceramic hob scraper while the hob is still warm. Otherwise, this could damage the glass ceramic surface.
- Remove limescale stains using a small amount of lime-dissolving solution, e.g. vinegar or lemon juice, when the hob has cooled down. Then clean again with a damp cloth.
4. CABINET REQUIREMENTS
- The cooking hob is intended to be built into the worktop above a kitchen cabinet of 600 mm width or more.
- If fitting in flammable material, the guidelines and standards for low voltage installations and for the fire protection must be strictly observed.
- For fitted units, the components (plastic materials and veneered wood) must be assembled with heat-resistant adhesives (min. 100 °C): Unsuitable
materials and adhesives can result in warping and detachment.
- The kitchen cabinet must allow sufficient room for the electrical connections of the appliance. Suspended kitchen cabinets above the appliance must be installed at a distance that provides enough room for comfortable working process.
- The use of hard wood decorative borders around the worktop behind the appliance is allowed, in this case the minimum distance remains as indicated on the installation illustrations.
- The minimum distance between the built-in appliance and rear wall is indicated at the illustration for the installation of the built-in appliance (150 mm for the side wall, 40 mm for the rear and 500 mm minimum for any cabinets above it).
- To prevent leakage of liquid between the edge of the hob and the countertop, place the adhesive seal provided along the entire outer edge of the hob before assembly.
5. ELECTRICAL CONNECTION
- The wire connection has to be done by specialized technician.
- This appliance has a Type “Y” attachment and requires at least a power supply cord Type H05VV-F. MONO-PHASE, BI-PHASE and THREE-PHASE connection: min. section of the conductors: 2,5 mm ^2 . External diameter of the supply cord: min. 7 mm - max. 15 mm.
- Connection terminals are revealed when the connection box cover is removed.
- Make sure the characteristics of the household electrical system (voltage, maximum power and current) are compatible with those of the appliance.
- Connect the appliance like shown in the dia-d gram (in accordance with the mains voltage and country standard reference).
- We suggest to use power supply cord 5 × 2.5 ~mm^2 H05V2V2-F. In case of use of power supply cord 5 × 2,5 ~mm^2 H05V2V2-F, below instructions have to be followed: for three-phase connection separate the 2 wires and remove the blue sheaths on grey wires.
6. DISPOSAL
- The symbol 📄 on the product or on its packaging indicates that this product may not be treated as household waste. Instead it shall be handed over to the applicable collection point for the recycling of electrical and electronic equipment. By ensuring this product is disposed of correctly, you will help prevent potential negative consequences for the environment and human health, which could otherwise be caused by inappropriate waste handling of this product. For more detailed information about recycling of this product, please contact your local city office, your household waste disposal service or the shop where you purchased the product.
- The appliance is in accordance with the Directive 2012/19/EU, regarding the reduction of the hazardous substances used in electrical and electronic appliances, and waste disposal.
7. CONTROLS
![B[○] B[○] 8.8.8 + + 1 2 3 4 5 6 7 8 P Q A ○------→ ◎ □ □ □ □](/content/2026/04/709986/images/806617ac8080c8d141d3db807e925ab57b54685974dcaea70ad5f3803c090c5e.jpg)
 | |||
| ON/OFF of the hob/hoodPress ON. Press again to turn OFF. | |||
| By default when turn on the hob/extractor the hood is in automatic mode and the led Awill turn on.Touch (press) the selection bar to deactivate the automatic mode and work with the extractor fan in manual mode.The led Awill turn off. | |||
| Activate TimerPress and hold 5 seconds the button, the hood will be in delay mode with a preset timer of 15 min.The delay indicator led on the hood will turn on ⏻Press and hold 5 seconds the button again in order to deactivate the delay.When the timer has finished the countdown, there is an acoustic signal (for 2 minutes, or it will stop when the On/Off button is pressed), while the display ⏻ turns off.The countdown is not visible, the visual feedback is the led ⏻ | |||
| Stop&Go / Recall | |||
| Encrise/Decrease the timer for cooking zone | |||
| Press and hold to reset grease filterPress and hold to reset odour charcoal filter | |||
| Touch and simultaneously for few seconds | |||
| A 1 2 3 4 5 6 7 8 P A o----P | |||
| 0----P | Extractor fan selectionIncrease/Decrease extraction speed (power) | ||
| A | Activation/Deactivation of automatic function (by default automatic mode is active).When the selection bar of the cooker hood is touched (pressed), the automatic mode deactivates and works with the extractor fan in manual mode.To re-activate the automatic mode press button A and the led A will light up to indicate that the hood is working in this mode. | ||
| By default the hood is in ducted mode.Activate charcoal filterPress for 5 sec the button A on the hood the first time that it is switched on.Since that time the lit icon will show when it is necessary to perform maintenance of the charcoal (odour) filter The grease cleaning filter notification through led is always enabled.Resetting activated carbon odour filter saturationAfter performing maintenance on the filters:press and hold 5 sec the button - - The grease led will turn off, and the indicator countdown will start again.press and hold 5 sec the button + - The odour led will turn off, and the indicator countdown will start again. | |||
| P | Set the speed INTENSIVE 1This speed is timed to run for 10 minutes. At the end of this time, the system returns automatically to the speed that was set before. | ||
| Set the speed INTENSIVE 2This speed is timed to run for 5 minutes. At the end of this time, the system returns automatically to the speed that was set before. | |||
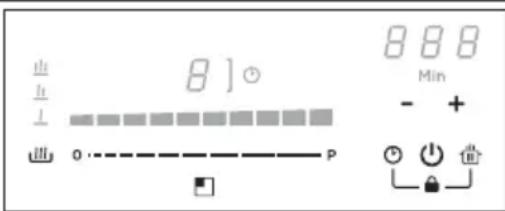 | |||
| ➊ | ON/OFF of the hob/hoodPress ON. Press again to turn OFF. | ||
| ➊ | Select the Cooking zone to set indipendent timer. | ||
| It is a countdown, which can be set for each cooking zone, even simultaneously.At the end of the set period the cooking zones will automatically shut down and an acoustic signal informs of it.Activation/Regulation of the hob timer:Press more time the key ⏻ to chose the cooking zone you want to activate.The relative icon on the cooking zone will be lighted on.When the desired cooking zone is selected, regulate the duration of the timer:Press the + to increase the automatic shutdown time.Press - to decrease the automatic shutdown time. | |||
| - + | Setting the time (plus /minus). | ||
| ➒ | Stop&Go / RecallThis function allows to suspend / restart any function active on the hob, bringing the cooking power to zero. Press to activate, press again and slide completely the indicated slider from left to right to deactivate.Note: If after 10 minutes, the Pause function is not deactivated, the hob will turn off automatically. | ||
| This function allows to recover all the hob settings, in case of accidental shutdown Activation:- Turn the hob back on- Press ⏻ within 6 seconds. | |||
| ➌ +➂ | Locking/unlocking the hobAllows to block the settings of the hob to prevent accidental tampering, leaving the functions that have already been set active. Repeat the operation to deactivate. | ||
| ➌➌➌➌ | Cooking zone position indicator | ||
| The cooking zones are able to work in combination, creating a single zone with the same power level. Front master and back secondary cooking zones. To activate the Bridge function: touch simultaneously the 2 bar and the symbol lights up.With the selection bar of the master zone it is possible to select the power level.To deactivate the bridge function simply repeat the same activation procedure. | |||
| ○----→ ≈ | Cooking zone selection.Increase/Decrease power level. | ||
| Supplementary power feature which remains active for 10 minutes, after which the temperature returns to the previously set value.Touch and scroll along the Selection bar and activate the Power Booster.The power booster level is shown on the display of the selected zone with the symbol “P”. | |||
| ➌➌ | Temperature Manager activation. The display shows ↺. | ||
| ➌ | Cooking / Keep warming at 42°C | ||
| ➌➌ | Cooking / Keep warming at 74°C | ||
| ➌➌ | Cooking / Keep warming at 92°C | ||
| ] | Bridge zone between two cooking zones activated | ||
| P | Power Booster activated | ||
How induction hobs function
Induction hobs function considerably differently to conventional hobs or solid plates. The induction coil under the glass ceramic creates a magnetic field that alternates quickly and which directly heats the magnetisable base of the cookware. The glass ceramic is only heated by the hot cookware. If the cookware is removed from the cooking zone, the power supply is interrupted immediately.
Pan detection
Every cooking zone is equipped with pan detection. The pan detection recognises cookware with a magnetisable base that is suitable for use with induction hobs.
If the cookware is removed during operation or unsuitable cookware is used, the display near the bargraph flashes with ♀
If there is no cookware placed on the cooking zone during the pan detection time of 10 seconds:
- The cooking zone switches off automatically after 10 seconds.
- The display of each cooking zone shows ♀
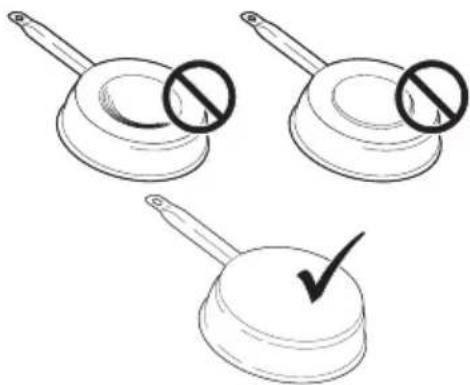
Cookware
Suitable cookware
Only cookware with a fully magnetisable base is suitable for cooking on the induction hob.
The magnet adheres to every point on the entire base of the cookware.
Cookware suitable for use in induction cooking
Cookware used on the induction cooking surface must be made of metal, with magnetic properties and a sufficiently large base.
Suitable cookware:
- Enamelled steel cookware with thick bases.
- Cast iron cookware with an enamelled base.
- Cookware in multilayer stainless steel, ferritic stainless steel and aluminium with a special base.
Unsuitable cookware:
- Copper, stainless steel, aluminium, fireproof glass, wood, ceramic and terracotta cookware.
- To see whether the pan is suitable, bring a magnet close to the bottom: if it is attracted, the pan is suitable for induction cooking. If you do not have a magnet, you can put a small amount of water in the pan, place it on a cooking zone and start the cooking zone. If the symbol appears on the display, it means the pan is not suitable.
Note: Use only cookware with a perfectly flat bottom and suitable for induction cooking zones. Using cookware with an irregular bottom could jeopardise the efficiency of the heating system and prevent cookware from being detected on the cooking zone.
Noise during cooking
Cookware can make noise during cooking. This does not indicate any malfunction, nor does it affect the functioning of the appliance in any way. Noise depends on the cookware used. If the noise causes considerable disturbance, it can help to change the cookware.
Advice on energy-saving
- The diameter of the base of the pan must correspond to the diameter of the cooking zone.

- When buying a pan, check whether the diameter indicated is that of the base or the top of the pan, as the top is almost always larger than the base.
- When preparing dishes with long cooking times, you can save time and energy by using a pressure cooker, which also makes it possible to preserve the vitamins in the food.
- Make sure that the pressure cooker contains enough liquid as, if there is not enough and it overheats, this may cause damage to both the pressure cooker and the cooking zone.
- If possible, always cover pans with a suitable lid.
- Choose a pan suitable for the quantity of food to be cooked. A large, half-empty pan leads to a waste of energy.
| Cooking zone Pan Bottom | Remarks | ||
| ∅ Min.(recommended) | ∅ Max.(recommended) | ||
| 184 mm x 220 mm (single) | 145 mm 180 mm | ||
| 380 mm x 220 mm (double) | 110 mm | 245 mm | with bridging function |
Normal operating noises of the cooktop
Induction technology is based on the creation of electromagnetic fields. They may generate heat directly on the bottom of the cookware. Pots and pans may cause a variety of noises or vibrations depending on the way they've been manufactured.
These noises are described as follows:
Low humming (like a transformer)
This noise is produced when cooking at a high heat level. It is based on the amount of energy transferred from the cooktop to the cookware. The noise ceases or quiets down when the heat level is reduced.
Quiet whistling
This noise is produced when the cooking vessel is empty. It ceases once water or food is placed in the vessel.
Crackling
This noise occurs with cookware comprised of various materials layered one upon the other. It's caused by the vibrations of the surfaces where different materials meet. The noise occurs on the cookware and can vary depending on the amount and method of preparation of the food.
Loud whistling
This noise occurs with cookware comprised of different materials layered one upon the other, and when they are additionally used at maximum output and also on two cooking zones. The noise ceases or quiets down when the heat level is reduced.
Fan noises
For proper operation of the electronic system, it is necessary to regulate the temperature of the cooktop. For this purpose, the cooktop is equipped with a cooling fan, which is activated to reduce and regulate the temperature of the electronic system. The fan may also continue to run after the appliance is turned off if the detected temperature of the cooktop is still too hot after turning it off.
Rhythmic sounds and similar to the hands of a clock
This noise occurs only when at least three cooking zones are operating and disappears or weakens when some of them are switched off.
The noises described are a normal element of the described induction technology and shouldn't be regarded as defects.
Switching the appliance on
Hold ⏻ for one second to switch on the appliance.
- „0“ flashes in all power levels displays.
- If there are no further inputs, the appliance switches off after 10 seconds for safety reasons.
Selecting a cooking zone
Press the „0“ near the bargraph slider of the cooking zone and swipe it to set the power level.
| Power level Cooking method Use for | |
| 1 Melting, gentle warming Butter, chocolate, gelatine, sauces | |
| 2 Melting, gentle warming Butter, chocolate, gelatine, sauces | |
| 3 Swelling Rice | |
| 4 Continued cooking, reducing, stewing Vegetables, potatoes, sauces, fruit, fish | |
| 5 Continued cooking, reducing, stewing Vegetables, potatoes, sauces, fruit, fish | |
| 6 Continued cooking, braising Pasta, soup, braised meat | |
| 7 Gentle frying Rosti (hash brown), omelettes, breaded fried foods, sausages | |
| 8 Frying, deep frying Meat, chips | |
| 9 Flash frying Steak | |
| P Fast heating Boiling water | |
| Temp. level | Cooking method | Use for |
| Melting | Melting butter, chocolate or honey at around 42°C | |
| Keep Warm | Sauces, keep food ready for serving at around 74°C | |
| Slow cooking | Keep ready-cooked food warm at around 92°C |
Switching a cooking zone off
Touch „0“ on the bargraph.
- If there is no further input and the other cooking zones are switched off, the appliance switches off after 10 seconds.
Switching the hob off
Touch ☑ for a few seconds to switch the hob off.
- If there is no further input on the display and all the cooking zones are switched off, the appliance switches off after 10 seconds.
Residual heat indicator
After a cooking zone is switched off and is still hot, an "H" remains illuminated on the panel as long as there is a risk of burns.
Defrost, Keep warm and Slow cooking setting
With the defrost function you can defrost food or gently melt butter, chocolate or honey.
The keep warm setting keeps ready-cooked foods warm at approx. 74 °C.
The slow cooking setting keeps ready-cooked foods warm at approx. 92 °C. With the slow cooking setting you can cook at low temperatures to preserve the nutritional value of the aliments.
- Select the cooking zone by pressing „0“ near the bargraph of the cooking zone.
- Press 📁 one time.
- To select the setting for „Melting“ (defrosting), press 📄 one more time.
1 appears.
- To select the setting for „Keep warm“, press one more time.
appears.
- To select the setting for „Slow cooking“, press one more time.
appears.
PowerPlus setting
All the cooking zones are equipped with the PowerPlus booster.
When PowerPlus is switched on, the cooking zone selected works at extra high power for 10 minutes. PowerPlus can be used, for instance, to quickly heat a large quantity of water.
- Swipe up on bargraph until a „P“ appears in the display.
- To end PowerPlus, swipe down on the bargraph to the desired power level.
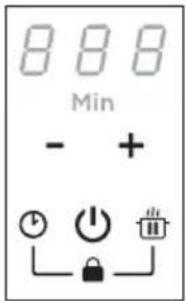
Timer
When a timer is set, the cooking zone switches off after a set time between 1 min and 1 h 59 min.
Setting the timer
- Hob switched on.
- Cooking zone set.
-
Press ⏻
-
„00“ appears in the middle of the display.
- Touch+to increase the timer duration, touch to reduce the time.
When you press +for the first time „1“ is illuminated in the display.
Changing the timer
-Timer set
-Press ⏻
-Press the active cooking zone of the timer that you want to change.
-Change the timer duration using +and .
Bridging function
The bridging function allows two individual cooking zones to be switched on to be adjusted together.
- Press the bargraphs of the two cooking zone. - The display near the two zones shows „[“ on one side and „]“ on the other side.
If one of the cooking zones is already running when the bridging function is switched on, the power level and operating time of this cooking zone will be used for both zones. If both cooking zones are already running, the operating times are cleared in the power level displays.
In the Bridging function is not possible set the Boost speed.
Child proof lock
- Appliance switched on
- Touch and simultaneously for few seconds until an acoustic signal is emitted.
The display is locked. When the display switches off in this state, the lock function will still be active once you restart the hob.
- To deactivate the childproof lock, press and simultaneously for a few seconds.
Heat-up Function
This function is used to heat up a pan at maximum power before continuing to cook at a
selected level. The period of time the cooking area will remain at maximum power depends on the final cooking level that is set. See table:
| Lev. Power Time |
| 1 48 seconds |
| 2 144 seconds |
| 3 230 seconds |
| 4 312 seconds |
| 5 408 seconds |
| 6 120 seconds |
| 7 168 seconds |
| 8 216 seconds |
| 9 not available |
| P not available |
To activate, with a pan on the hob and selected cooking area, press and hold for 3 seconds on the selected value (from 1 to 8) on the power bar. The Display for the corresponding area shows "A". It is possible to increase the cooking level, but if it is decreased the function is deactivated. It can also be deactivated by pressing and holding for 3 seconds the button for the cooking area in question.
| MODEL | GALILEO HE BK GLASS NG A83 |
| Max Total Power 7,6 | 20 kW |
| Error codes | |||
| Error code Des | cription Possible cause of | error Remedy | |
| ER 03 and continuous tone | Continuous sensor activation; TC turn off after 10 sec | Water or cookware on the glass over the touch control sensors | Clean the control surface, remove objects on the sensors. |
| ER20 | Flash memory - TC error | μC- defective | Replace TC |
| ER22 Button evaluation | defective, UI shuts off after 3.5-7.5 sec | Short or open circuit in the area of the button sensoric | Replace TC |
| ER31 Incorrect configuration data or deviation between generator and TC | New configuration of the induction generator required | New configuration (Service menu) | |
| ER36 NTC value de | defective on TC; UI turns off | Short or open circuit of NTC Replace TC | |
| ER47 Communication error between TC and induction | No or erroneous LIN communication! (Slave does not answer to request of master) | Connection cable not correctly plugged in or defective. | |
| U400 Continuous tone Power supply on inlet to high | Incorrect connection of the cooktop | Correct power supply connection | |
| E/2 Excess temperature of the induction element | Overload of cooktop or empty boiled cookware | Let system cool down. | |
| E/A | Error on the power board | Component failure | Replace power board |
| E/6 Error on power board | No power supply or error on power board | 1. check wiring2. check filter board3. replace power board | |
| E/8 | Incorrect fan speed | Error on fan left or right | Air exhaust blocked, e.g. by paper Replace Defective fan |
| E/9 Defective temperature sensor on inductor | Replace inductor Replace power board | ||
8. MAINTENANCE AND REPAIR
- Make sure that maintenance on electrical components is carried out only by the manufacturer or the customer service.
- Make sure that damaged cables are changed only by the manufacturer or the customer service.
When contacting the customer service, please provide the following information:
- type of fault
- appliance model (Art./Cod.)
- serial number (S.N.)
This information is given on the data plate. The data plate is attached on the bottom side.
9.TECHNICAL DATA
Product identification
Type: 4300
Model: GALILEO HE BK GLASS NG A83
Refer to the data plate placed on the bottom side of the product.
The manufacturer provides continuously product enhancements. For this reason, the text and the illustrations in this manual may be changed without notice.
Further information on technical data is available on: www.faberspa.com
POWER MANAGEMENT
This product is equipped with electronically controlled Power Management.
This function monitors electricity loading and limits the maximum power output to 3700 W for each Bridge Cooking zone (1+2 and 3+4), optimizing the power distribution and preventing the system from overloading. The function divides the power between cooking zones belonging to the same Bridge Cooking zone. See the illustration. The function decreases the power of the other cooking zone belonging to the same Bridge Cooking zone, if necessary (the last command has highest priority).
Example:
If boost level (P) is selected for cooking zone 1, automatically cooking zone 2 cannot exceed level 5 at the same time.
GALILEO HE BK GLASS NG A83
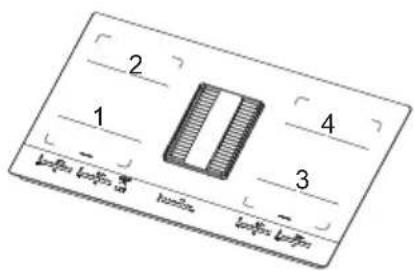
1,2 Flexible zone 1+2 bridged
3,4 Flexible cooking zone 3+4 bridged
| Parameter Value Dimensions (mm) | ||
| Working dimensions - 830 × 520 (W x D) | ||
| Power supply voltage /frequency 220-240 V, 50 Hz; 220 V, 60 Hz3N~ / 2N~ 380-415 V, 50 Hz;3N~ / 2N~ 380 V, 60 Hz | ||
| Power and heating element values | ||
| Cooking zone 1,2,3,4 2100 W; | Power Boost: 3700 W | 230 x 210 |
| Flexible Cooking zone 1+2, 3+4 | 3700 W 460 x 210 | |
| Parameter Symbol Value Unit of measure | |||
| Appliance weight M 26 / 19 kg | |||
| Number of cooking zones 4 | |||
| Heat source | induction | ||
DE
natural_image
Three identical kitchen utensils with no text or symbols, one marked with a prohibition symbol and the other with a checkmark (no text or labels present)natural_image
Diagram of a hand placing a small object into a container on a flat base, with no visible text or symbols.natural_image
Three identical illustrations of cooking utensils with no text or symbols, one marked with a checkmark (no text or symbols present)FONCTION DE GESTION DE LA PUISSANCE
natural_image
Diagram showing a hand placing a small container into a tray with an upward arrow, labeled 'Z' (no text or symbols on the diagram itself)natural_image
Diagram showing a hand placing a component into a tray with a central arrow, no text or symbols presentnatural_image
Three identical illustrations of kitchen utensils with no text or symbols, one marked with a prohibition symbol and the other with a checkmark (no text or symbols present)natural_image
Diagram showing a hand placing a small container into a tray with a central slot, labeled 'Z' (no text or symbols on the diagram itself)natural_image
Diagram showing a hand placing a small container into a tray with an arrow indicating motion (no text or symbols)natural_image
Diagram showing a hand placing a small box onto a mechanical platform with a central arrow (no text or symbols)Generelle anbefalinger
natural_image
Three identical diagrams showing a cooking pan with a handle and a checkmark, no text or symbols present.1. S I K K E FORMASJON
3. VEDLIKEHOLD OG RENHOLD
natural_image
Diagram showing a hand placing a small container onto a flat plate with a central slot, labeled 'Z' (no text or symbols on the diagram itself)Generelle anbefalinger
natural_image
Three identical illustrations of cooking utensils with no text or symbols, one marked with a prohibition symbol and the other with a checkmark (no text or symbols present)| Kokesone Pannebunn Merknader | |||
| Min. ∅ (anbefalt) Maks. ∅ (anbefalt) | |||
| 184 mm × 220 mm (enkel) 1 | 45 mm 180 mm | ||
| 380 mm × 220 mm (dobbel) 1 | 10 mm 245 mm med brofunksjon | ||
Normal driftsstøy for platetoppen
PowerPlus-innstilling
8. VEDLIKEHOLD OG REPARASJON
1,2 Fleksibel kokesone 1+2; Med brofunksjon aktivert 3,4 Fleksibel kokesone 3+4; Med brofunksjon aktivert
| Parameter Verdi Mål (mm) | ||
| Arbeidsmål - 830 × 520 (B x D) | ||
| Strømforsyningsspenning / frekvens | 220-240 V, 50 Hz; 220 V, 60 Hz3N~ / 2N~ 380-415 V, 50 Hz;3N~ / 2N~ 380 V, 60 Hz | |
| Effektforbruk | ||
| Kokesone 1,2,3,4 2100 W; Power Boost: 3700 W 230 x 210 | ||
| Fleksibel kokesone 1+2, 3+4 | 3700 W 460 x 210 | |