
Olla GM H Deluxe Fry - Saucepan CECOTEC - Free user manual and instructions
Find the device manual for free Olla GM H Deluxe Fry CECOTEC in PDF.

| Product Type | Electric pressure cooker with diet fryer function |
| Brand | Cecotec |
| Model | Olla GM H Deluxe Fry |
| Reference | 02036 |
| Pressure Cooker Power | 1000 W |
| Fryer Power | 1530 W |
| Voltage and Frequency | 220-240 V ~ 50/60 Hz |
| Usable Pot Capacity | 4.7 liters |
| Working Pressure | 70 kPa |
| Maximum Admissible Pressure | 125 kPa |
| Pressure Cooker Functions | Pressure cooking, steaming, stewing, slow cooking, poaching, confiting, fermenting, bread, dessert, rice, pasta, grill, saute, fry, oven |
| Diet Fryer Functions | Meat, fish, seafood, fries, chicken, chicken wings, pizza, reheat |
| Additional Functions | Built-in scale, cleaning function, Eco mode, delayed programming, keep warm, reheating, voice guidance (6 languages) |
| Pot Material | Non-stick (Excellence) |
| Sealing Ring | Removable silicone gasket |
| Safety | 14 interlocked safety systems, safety valve, pressure lock, protection against opening under pressure |
| Cleaning and Maintenance | Hand-washable pot (not dishwasher safe), removable valves and gasket for cleaning, do not immerse the appliance |
| Included Accessories | Non-stick pot, diet fryer, basket, grill, ladle, measuring cup, recipe book, learning guide |
| Spare Parts and Repairability | Spare parts authorized by the manufacturer; contact Cecotec customer service for any repairs |
| Warranty | Legal warranty according to applicable regulations; Cecotec customer service at +34 9 63 21 07 28 |
Frequently Asked Questions - Olla GM H Deluxe Fry CECOTEC
User questions about Olla GM H Deluxe Fry CECOTEC
0 question about this device. Answer the ones you know or ask your own.
Ask a new question about this device
Download the instructions for your Saucepan in PDF format for free! Find your manual Olla GM H Deluxe Fry - CECOTEC and take your electronic device back in hand. On this page are published all the documents necessary for the use of your device. Olla GM H Deluxe Fry by CECOTEC.
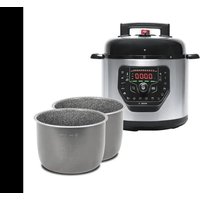
USER MANUAL Olla GM H Deluxe Fry CECOTEC
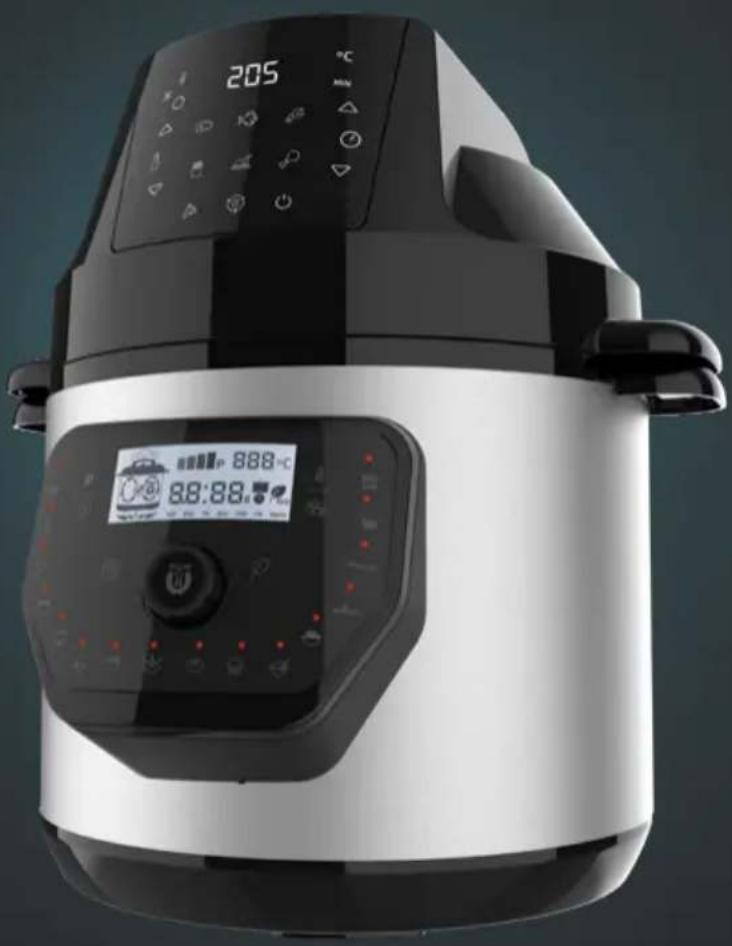
Programmable electric cooker with air-frying component
natural_image
Modern air fryer with digital display and control panel (no visible text or symbols)
Safety instructions 9
-
Parts and components 66
-
Before use 67
-
Important information on pressure
cooking 71
-
Operation 72
-
Cleaning and maintenance 75
-
Troubleshooting 77
-
Disposal of old electrical and
electronic appliances 90
-
Technical support and warranty 80
-
Copyright 90
SOMMAIRE
Before using the appliance, read all the following instructions carefully. Keep this instruction manual for future reference or new users.
- We suggest you visit the Ollas GM cookers YouTube channel for use recommendations.
- Visit our website www.storeollasgm.com for general terms and conditions and information regarding exchanges, returns or repairs.
- Keep the pressure cooker out of the reach of children when in use.
- Never put the cooker inside an oven.
- When pressure cooking, avoid moving the cooker as much as possible or move it very carefully. Do not touch hot surfaces. Use the handles. Use protective gloves if necessary.
- Warning: incorrect or improper use can be dangerous for both the device and the user. Use this appliance only for intended purposes as described in this manual.
- This device is intended for pressure cooking. An improper use of the pressure cooker can cause scalding. Make sure the pressure cooker is properly closed before applying heat. Read use instructions carefully.
- Never force the pressure cooker open. Do not open the cooker until pressure inside the cooker has decreased completely. Read use instructions carefully.
- Always use the pressure cooker with water inside to avoid product damage.
- Do not exceed more than 23 of the cooker's capacity. When cooking food that may expand, such as rice or dehydrated vegetables, do not fill up the cooker more than half full.
- The cooker Model H Deluxe Fry has its own heat source. Never
add external heat sources, unless you are using accessories exclusive to Ollas GM that are compatible with this model.
- After cooking meat with skin (e.g., beef tongue) which may swell under the effects of pressure, do not pierce the meat with the skin swollen, as this may cause scalding.
- When cooking pasty food, shake the cooker gently before opening the lid to prevent food ejection.
- Before each use, check that the steam and safety valves are properly installed and not blocked. Read use instructions carefully.
- Never use the pressure cooker to fry food in plenty of oil when it's operating under pressure.
- Do not tamper with any of the safety systems besides the ones specified in this instruction manual's maintenance instructions.
- Only use spare parts approved for this model by the manufacturer. The main body and lid in particular.
- The appliance is not intended to be used by children under the age of 8. This appliance can be used by children aged 8 years and above and persons with reduced physical, sensory, or mental capabilities or lack of experience and knowledge if they have been given supervision or instruction concerning the use of the appliance in a safe way and understand the hazards involved. Children must not play with the appliance. Cleaning and user maintenance should not be carried out by unsupervised children.
- The appliance should not be used by children. Keep this appliance and its power cord out of reach of children under the age of 8.
- This appliance is designed for domestic use only and is not intended for bars, restaurants, farm houses, hotels, motels, and offices.
- Do not immerse the cord, plug, or any non-removable part of the product in water or any other liquid. Do not expose the electrical connections to water. Make sure your hands are dry before handling the plug or switching on the appliance.
- This appliance is not intended to be operated by means of an external timer or separate remote-control system.
- Place the appliance on an even, stable, heat-resistant surface. Position the appliance in such a way to avoid spillage of hot liquids. Be especially careful with the handles.
- Warning: take precautions to avoid spillage of liquids on the cord.
- The surface of the heating element is exposed to residual heat after use.
- This symbol means "Caution, Hot Surface". Accessible surfaces are likely to heat up during use.
- Do not switch on the cooker if damaged.
- The included accessories may only be used with the cooker model H Deluxe Fry; otherwise, irreparable damage may occur.
- Do not expose to sunlight or weather conditions.
- Do not use the programmable cooker on or near heat sources such as ovens, stoves, or ceramic/induction hobs; otherwise, it may get damaged.
- Use the cooker for cooking only.
- The steam expelled from the valve reaches very high temperatures; keep away to avoid burns.
- Do not place food above the maximum-quantity mark on the inner pot.
- Make sure the cooker is tightly closed when pressure cooking.
-
Check that the mains voltage matches the voltage indicated on the label on the back of the appliance before using it.
-
Do not place the cooker on the edge of the worktop.
- Keep the cooker at least 20 cm away from any textiles.
- Do not put the cooker in the sink.
- Do not use any other element as a lid, unless indicated as such by Ollas GM cookers.
- Do not lift the entire cooker with the lid handle, as it is intended only for lifting the lid.
- Make sure that the base of the cooker and the surface you place it on are dry.
- Avoid using damaged inner pots.
- Do not put food or liquids inside the cooker without the inner pot.
- Do not touch the valve during use.
- Do not use abrasive products to clean the cooker, pressure lid, inner pot, or air-frying component.
- Avoid metal utensils such as knives, forks, etc. from coming into contact with the inner pot to preserve its non-stick qualities.
- Check the power cord regularly for visible damage. If the cable is damaged, it must be replaced by Cecotec's official Technical Support Service to avoid any danger.
- Do not try to disassemble or repair the product by yourself. Contact the official Technical Support Service of Cecotec.
- Keep this manual for future reference.
OBLIGATIONS ARISING FROM SPANISH REGULATIONS FOR USERS OF PRESSURE COOKERS
As a user of this product, you shall, by virtue of the applicable regulations:
- Know and apply the instructions in this manual regarding the use, safety measures and maintenance of the product.
- Do not put the product into service or prevent it from
operating unless the requirements of this manual are complied with.
- Use the product within the operating limits provided for in this manual and take it out of service if it no longer meets the necessary safety requirements.
- Maintain the product in accordance with the operating conditions and these operating instructions and inspect it at least once a year.
INSTRUCTIONS DE SÉCURITÉ
Cooker and air-frying component Fig.1
-
Steam diffuser cap
-
Pressure valve
-
Handle
-
Pressure valve open/close knob
-
Lid
-
Safety lock
-
Safety valve
-
Back cover
-
Silicone ring
-
Inner pot
-
Waste-water tank
-
Inner body
-
Top ring
-
Control panel
-
Base
-
Stainless-steel body
-
Handle
-
Cooker main body
-
Air-frying component
NOTE:
The graphics in this manual are schematic representations and may not exactly match the product.
Accessories Fig. 1
- Basket: it is used for frying and as a baking tray.
- Rack: it is used for baking. It is placed inside the inner pot and the food to be baked is placed on top of it. It is also used for steaming; in this case, it is placed inside the inner pot with at least 2 measures of water and the food is placed on the rack.
- Spoon: made of a non-corrosive material ideal for working on non-stick surfaces. Do not use corrosive utensils on the non-stick surfaces of the cooker.
- Measuring cup: measurement reference for recipes. When a recipe indicates a measure, it refers to this measuring cup.
- Power cord.
2. BEFORE USE
- This appliance is packaged in a way as to protect it during transport. Take the device out of its box and remove all packaging materials. You can keep the original box and other packaging elements in a safe place. This will help you prevent product damage when transporting it in the future. In case the original packaging is disposed of, make sure all packaging materials are recycled accordingly.
- Make sure all parts and components are included and in good conditions. If any of them are missing or not in good condition, please contact the official Cecotec Technical Service immediately.
Box contents:
- GM Cooker Model H Deluxe Fry cooker
- Air-frying component
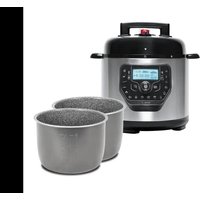
- Non-stick Excellence inner pot
- Measuring cup
- Spoon
- Rack
- Basket
- Guide recipe book
- Instruction manual
Follow the steps below to check the proper operation and carry out the first cleaning:
- Remove all packaging materials present (both the stickers on the inner pot and valve as well as the heating element cover located between the inner pot and the cooker).
- Check the contents of the packaging and make sure nothing is missing.
- Add half a litre of water in the inner pot and a few slices of lemon. Lemon helps to eliminate odours.
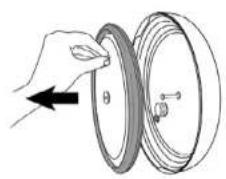
- Check the back lid and the safety valve are correctly placed. Fig. 2
- Close the lid firmly and press it lightly into place (this is very important, as in many cases it looks as if the lid is completely closed, but it is not).
- Place the valve in the closed position. Fig .3
- Connect the cooker to the mains and press the Clean button; immediately after that, the process will start, which takes up 9 minutes.
- Do not touch the lid during the entire process.
- Once the process is complete, open the valve to depressurise the cooker. Avoid direct skin contact with the steam. You cannot remove the lid until the cooker has completely depressurized, so do not force the lid open if it's not possible to do so naturally. Remove the lid by turning it clockwise.
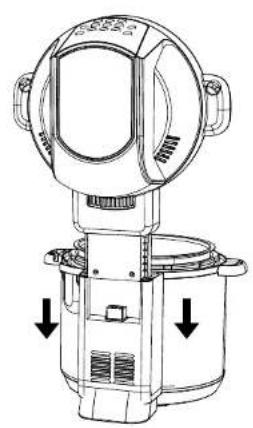
- Put the air-frying component in place until the connectors fit correctly as shown in Figure 15.
ENGLISHENGLISH
- Fold it down to close it.
- Select a menu and make sure it starts up. Then, on first use, cook without any food inside at 200 °C for 20 minutes to remove unpleasant odours resulting from the manufacturing process. You may notice a slight smell of burning or smoke during this process. This is normal, do not worry. This does not affect the safety of your appliance.
- If the cooker has not given any error during this process, it is working properly.
3. CONTROL PANEL
Cooker's control panel Fig.4
- GM button
- Knob
- Menu button
- ECO mode button
- Pressure button
- Set time button
- Temperature button
- Scale/Clean button
- Turbo menu indicator
- Pressure Menu indicator
- Steam Menu indicator
- Stew Menu Indicator
- Low Heat menu indicator
- Poach Menu indicato
- Confit Menu indicator
- Ferment Menu indicator
- Bread Menu indicator
- Dessert Menu indicator
- Rice Menu indicator
- Pasta Menu indicator
- Griddle Menu indicator
- Stir-fry Menu indicator
- Fry Menu indicator
- Oven Menu Indicator
- LCD display
Air-frying component's control panel Fig. 16
- Touch ON/OFF icon
- Touch Temperature icon
-
Touch Temperature Adjustment icons
-
Touch Time Icons
- Touch Time-Adjustment icons
- Time and Unit indicators
- Temperature and Unit Indicators
- Running Fan Indicator
- Touch Meat Menu icon
- Touch Chips Menu icon
- Touch Pizza Menu icon
- Touch Fish Menu Icon
- Touch Reheat Menu icon
- Touch Chicken Menu icon
- Touch Chicken Wings Menu Icon
- Touch Seafood Menu icon
COOKER
Setting the time
Press the Time-Adjustment icon (icon 6, Fig. 4) to set the time you want the food to be ready. Turn the knob (2, Fig. 4) to set the time and press the GIM button (1, Fig. 4) to confirm it. Turn the knob again (2, Fig. 4) to set the minutes and press the Menu button (3, Fig. 4) to select the menu to be prepared. It is not advisable to schedule less than 3 hours.
Menu
After setting the time, press the button (3, Fig. 4) and turn the knob (2, Fig. 4) to select the desired menu.
Knob
Turn the knob to navigate through the different menus, increase the minutes and hours (clockwise), and decrease them (counterclockwise).
Tip: if you do not want to set the time, turn the knob and choose the desired menu, so you do not have to press the Menu button.
Temperature
Once the menu has been selected, press the temperature button (button 7 in Fig. 4) to set the temperature; choose the temperature based on the ingredients, menus and recipes. There are menus in which pressure and temperature can be set and others in which only pressure or temperature can be set. Only the cooking time can be set in the Poach, Confit and Ferment menus.
Pressure
Once the menu is selected, press the Pressure button (5, Fig. 4) to set the pressure. Choose the pressure according to the recipe. For spoon dishes, select a very high pressure; for hard meat stews such as veal, select a high pressure; for more delicate meat stews such as chicken or
ENGLISHENGLISH
vegetables, medium pressure; and for dry dishes, low pressure. Do not select pressure when using the cooker with oven, griddle or grill function.
GM button
The main function of this button is to confirm each step. In addition to this, it is also used to start the keep warm and reheat functions; press the button once or twice respectively to activate them. Finally, press and hold for more than one second to change the cooking time or programming at any time and restart the process.
ECO mode
With the ECO mode you can save up to 50% power when cooking. In addition, it evenly distributes the temperature in the inner pot, which increases its non-stick properties and prevents food from sticking to increase its durability. It can be used with any menu as long as the temperature does not exceed 140°C. If this is not the case, it is advisable to activate ECO mode after preheating has finished and cooking time has started. Using the Eco mode for preheating in menus with temperatures above 140°C will significantly increase the preheating time.
Scale/Cleaning
To select the scale, press the scale button (B, Fig. 4) to weigh the ingredients in the inner pot. Press the button again when you want to tare the scale. Once you're finished using the scale, press the GM button.
To clean the cooker, pour 2 cups of water and place half a lemon in the inner pot, close the lid and check that the valve is closed. Press and hold the scale button (8, Fig. 4) for a few seconds. The cleaning function will start up immediately and run for 9 minutes.
Menu Indicators
The cooker features 16 different menus (Fig. 4) for you to cook every dish you can imagine. Each menu is extensively developed in the book recipe and in the 16 video-recipes that you can check by visiting our website www.storcollasgm.com. Once the menu has been selected, set, if possible, the desired temperature, pressure and cooking time or set by the recipe and press the GM button to confirm and start the cooking process.
Voice navigation
The GM Model H Deluxe Fry cooker has voice control to guide you through every step. There are 6 languages available, with Spanish being the default one. If you prefer to change it, hold down the ECO button for about 3 seconds and select the language with the knob. Confirm the language by pressing the GM button. If you prefer to deactivate the voice control, hold down the temperature button for about 5 seconds and confirm by pressing the GM button. Repeat this process to reactivate it.
AIR-FRYING COMPONENT
Selecting menus
To select the desired menu, press the corresponding icon. Once selected, time and temperature parameters can also be changed by pressing the time/temperature touch icons before starting or at any time during cooking.
Default parameters for each menu are as follows:
| Menu | Meat | Fish Menu | Seafood Menu | Chips Menu | Chicken Menu | Chicken Wings Menu | Pizza Menu | Reheat Menu |
| TEMP. (°C) | 175 160 | 160 205 | 90 185 180 | 15 | ||||
| Time (min) | 25 | 15 | 12 | 25 | 30 | 40 | 15 | 12 |
Setting Time and Temperature
To enter temperature and time parameters manually (or change default ones), press the touch Temperature/Time icon and then use the touch Temperature/Time-Adjustment icons (+ and -) to enter the desired parameters. If you press the touch Temperature/Time-Adjustment icons (+ and -), you will directly enter the function without having to press the touch Temperature/Time icon.
- With the touch Time icon, you can set the cooking time from 1 to 90 minutes. Pressing and holding this touch icon will automatically increase time by the minute.
- With the touch Temperature icon, you can set the temperature from 65 to 205 degrees Celsius. Pressing and holding this touch icon will automatically increase temperature by 5 degrees.
4. IMPORTANT INFORMATION ON PRESSURE COOKING
Pressure diffuser cap: place it on the pressure valve whenever you are cooking. Turn it clockwise to place it and counterclockwise to remove it.
Inner pot capacity
- Always put the right amount of food/liquids in the inner pot.
- Never exceed the maximum capacity levels of the inner pot.
- For foods that expand (rice, legumes, cereals, etc.), do not exceed half their capacity.
- Make sure to always fill the inner pot at least half its capacity to avoid thermal damage
ENGLISHENGLISH
Fig.5
Closing the lid
- Make sure the silicone ring is correctly placed in the back cover.
- Turn the lid to open and close it, do not force it. It must close and fit into place effortlessly. If the electric cooker contains hot food, you may need to press it slightly for the lid to close due to the pressure.
When cleaning the safety valve rubber, be especially careful when placing it back. Check the explanatory videos on our Ollas GM YouTube channel.
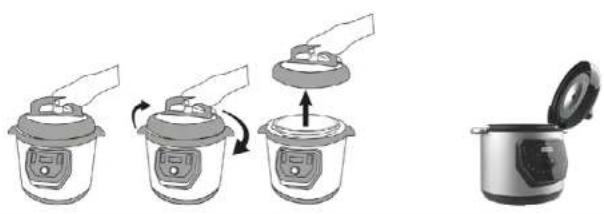
Opening the lid
- After high-pressure cooking, open the valve with a cloth or a kitchen utensil, avoiding direct contact with the steam before opening the lid. Otherwise, you will not be able to open it. It is opened clockwise. Fig. 6
If you cannot open the lid of the cooker, do not force it, as this indicates that some pressure may still be inside. This is due to the safety system of the cooker. If this happens, wait, and you will be able to open the lid shortly after.
Note:
Never force the pressure cooker open. Do not open the cooker until pressure inside the cooker has decreased completely.
Steps to follow before each use of the H DELUXE FRY model
- Open the lid by turning it clockwise.
- Wash the lid and the silicone ring with hot soapy water and dry afterwards.
- The silicone ring is reversible. Make sure it is placed in the right position.
- The lid has only one position and must be placed in the correct position. If it was not properly closed, it could become pressurised, and the food would overflow out of the sides of the cooker.
- Clean the inner pot and make sure that everything makes proper contact.
- Check that the waste water tank at the back of the cooker is in place.
- Connect the cooker to the mains. The cooker will start, set the settings according to your preference.
5. OPERATION
COOKER
- Open the lid by turning it clockwise until it stops, then it will lift.
- Put all the ingredients in the inner pot and, if necessary, some of the accessories, as indicated in the recipe book.
There are marks on the interior of the inner pot which, in case of pressure (especially high
pressure), should not be exceeded at their maximum line by any kind of liquid, and must reach the minimum limit to avoid thermal damage. If the lid is used, check that it is properly closed before starting to cook.
- Then select the menu according to the recipe book. Once the menu has been selected, set the cooking time. To do this, use the knob, which increases the cooking time by 1-minute intervals by turning it clockwise, and decreases the time by turning it counterclockwise. It is advisable to follow the times specified on the recipe book, but you can also modify them to your liking.
- If you prefer to cancel the selected process, press and hold the GM button and the cooker will reset.
- Select the pressure level at which you prefer to cook. In the Oven, Low heat, Fry, Stir-fry. Dessert, Bread, Ferment, Confit, Poach and Griddle menus, pressure cooking is not possible, so you can only set the temperature and time. In these menus it is recommended to leave the valve or the cap open.
- Set the temperature and if all parameters are set, press the GM button to start the cooking process. The cooker will automatically start preheating.
- During preheating, the heating icon will flash on the display (Fig. 7). Once this process has been completed, the selected cooking time will be displayed and a countdown will start, with each elapsed minute being deducted from the originally programmed time (Fig. 8).
- When the cooking has finished, the cooker will alert you by voice: to comida está lista. From this moment on and if you have chosen a menu with a cooking temperature over 80°C, the heat function will activate indefinitely (except for the Ferment, Comfit, and Poach menus) and you will be alerted by voice: to comida se mantiene caliente. Your cooker will keep the food warm until you decide to eat it. Fig. 9
- In addition, you can activate this function whenever you prefer by pressing the GM button at any time, it will only be cancelled by pressing the GM button for more than 1 second. Fig 10
- The Reheat function can also be activated by pressing the GM button twice. Fig. 11
- To open the lid, you must ensure that there is no pressure inside the cooker by moving the pressure valve to the open position using the position knob (otherwise you will not be able to open the lid). The cooker will release all the steam inside. Make sure the pressure inside has completely dissipated before opening the lid. Never touch the metal parts of the cooker while cooking or just after cooking. Fig.12
Schedule a meal for a specific time
- Whenever you turn on the cooker, the voice control will suggest you choose a menu to cook on the spot or to set the eating time for later. To set the time you want the cooking to finish press the Time button. Then, choose the desired schedule by setting the number of hours and press the GM button to confirm. If you prefer to set the minutes as well, select them once the hours have been set by turning the knob.
- Then set the menu (3, Fig.4), cooking time, temperature, and pressure as described in the previous section. Finally, press the GM button to set your programming.
ENGLISHENGLISH
- The cooker automatically calculates when to start so that the food is freshly cooked at the set time. In case the cooking time is over the time set to eat, your cooker will automatically start the cooking process to get as close as possible to the pre-set time.
- If you set the cooker for less than 3 hours from now, it would start cooking immediately and keep the food warm until the eating time. The cooker has an EPROM memory, if during cooking or standby there is a power failure the cooker will remember its programming and as soon as the power comes back on it will continue the cooking process.
Warning
While using the pressure cooker, the air-frying component must not be on. Be sure to remove it before using the pressure cooker.
AIR-FRYING COMPONENT
- To cook with the air-frying component, place it on top of the cooker while closed, with the food to be cooked already inside. The pressure-cooking lid must be removed. Fig. 15
- Once in place, you will hear a beep and the display will light up for two seconds. After that, only the touch ON/OFF icon will stay lit.
- To turn the air-frying component on, press the touch ON/OFF icon.
- The digital display will light up. After selecting the desired parameters, press the touch ON/OFF icon to confirm and the air-frying component will start cooking. If the touch ON/OFF icon is not pressed after entering the desired cooking parameters, the air-frying component will start cooking after about 5 seconds.
- To pause cooking at any time, lift the air-frying component. When placed back on top of the cooker, cooking will resume with the previously selected temperature and time settings. Fig. 17
- To interrupt the cooking at any time, press the touch ON/OFF icon. The word OFF and the touch ON/OFF icon will appear on the display and the Running Fan indicator will flash. Once the air-frying component is switched off, the fan will remain on for about 20 seconds. Then, the air-frying component will switch off, warning with 5 beeps and only the touch ON/OFF icon will stay lit. The display cannot be switched on again until the word OFF and the Running Fan indicator disappear from the display.
- If no cooking parameters are entered, the display will switch off after about 10 seconds.
Cooking tips and precautions
- It is advisable to preheat for 3-4 minutes before using the air-frying component or to add 3 minutes to the total cooking time.
- Avoid overfilling the inner pot to achieve optimal cooking results.
- It is advisable to turn the food over halfway through the process for even cooking and better results.
-
To get crispy potatoes, it is advisable to spray a little oil over them. Once added, cook them for a few minutes. Cook 500 gr. of potatoes max. at a time.
-
Do not fry ingredients that are too fatty, such as sausages.
- Snacks that can be cooked in the oven can also be cooked with the cooker's air-frying component. Pre-made/bought dough requires less preparation time than homemade dough.
- Once cooking is complete, lift the air-frying component to check that the food is at the desired doneness. If not, add more minutes to the cooking time.
- During the cooking process, it is advisable to lift the air-frying component at least once to check on the food and modify the parameters accordingly if necessary.
- After cooking is complete, open the air-frying component and wearing heat-resistant gloves, remove the inner pot and place it on a heat-resistant surface. Be very careful when handling the inner pot and food as well as the air-frying component, as they can reach very high temperatures.
6. CLEANING AND MAINTENANCE
- Unplug the appliance before cleaning or maintenance.
- Let it cool down before cleaning.
- All parts and components of the product that come into contact with food must be washed after each use.
- Regularly clean both the pressure valve and the safety valve.
- To clean the pressure valve, unscrew the steam diffuser cap (1. Fig. 1) and pull the pressure valve (2. Fig. 1) until it comes out of its housing. Clean both with mild soap and water, remove them, and put them back in place.
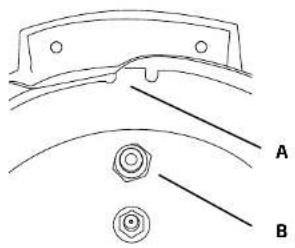
- To clean the safety valve (7. Fig. 1), remove the back cover (Fig. 13.1) and remove the small silicone ring B (Fig. 13.2).
- To remove the safety valve, press the left pin A (Fig. 13.2) and it will release automatically.
- Clean both with mild soap and water and dry.
- To reassemble, insert the safety valve by its smaller-diameter side through the lid's outer hole.
- Once inserted, press the left pin A again (Fig. 13.2).
- Place back the silicone ring B (Fig. 13.2) and the back cover (Fig. 13.3).
- Use a damp cloth, soap and water to clean the interior of the product and then rinse it.
- Clean the silicone sealing ring after each use. To do this, remove it from the lid and wash it separately with soap and water. Then rinse it with water and dry it with a dry cloth.
- Remove the inner pot and wash it with soap and water. Then rinse it with water and dry it with a dry cloth.
- Use a damp cloth, soap, and water to clean the air-frying component exterior and rinse it.
- Do not use abrasive chemicals, as they may damage the surface of the product.
- Do not immerse the product in water or other liquid.
- Make sure the product is completely dry before storing or using it again.
ENGLISHENGLISH
Note
The inner pot is dishwasher safe, but it is recommended to wash it by hand to keep the coating in better condition for a longer period of time.
- Use a soft, damp cloth to clean the product's outside surface.
- Do not use abrasive cleaners or scouring pads to clean the product.
- Do not immerse the main body of the product or the power cord in water or any other liquid
- Clean the base of the product with a dry, soft cloth.
After cleaning
Make sure to place the silicone sealing ring correctly back into position.
Check pressure and valves and make sure they are working properly.
Make sure that all components are correctly installed in position and completely dry before using the product again.
Safety
The programmable cooker has 14 interlocking safety systems that operate simultaneously. The exclusive safety valve system prevents your cooker from opening as long as there is pressure inside, therefore, to open or close your cooker. It is essential that we eliminate the steam inside by placing the pressure valve in the open position. Fig. 14
The product is designed so that the cooker and the air-frying component work independently in an automatic manner. When the air-frying component is in operation, the cooker cannot operate and vice versa.
Handle the air-frying component as well as the inner pot with heat-resistant gloves and place both objects on a heat-resistant surface.
- TROUBLESHOOTING
| Abnormal operation Solution | |
| COOKER | |
| The cooker does not reach pressure Remarks:Ollas GM cookers can work with pressure as long as the conditions require it. This depends on several factors, amount of liquids, solids, oil in the tank, as well as room temperature and the temperature of the contents. Do not confuse pressure build-up with the fact that it cooks and works properly. If the cooker has heated up and cooked within the selected time, it functions correctly, and no error can be determined. | - Check that the back lid and the silicone ring are correctly placed.- Check that the pressure valve is in the closed position.- Check that the safety valve is correctly positioned.- Press down hard on the lid after turning it to close.- Add 1 litre of water, select the Pressure menu, 20 minutes, medium pressure, 200 °C and cook. Do this also with the Steam and Pressure menus. If the pressure builds up, the cooker works properly. If the pressure builds up, the cooker works properly.- In order for the cooker to have pressure, the selected temperature must be over 130°C and have enough liquid in the inner pot.- Try another cable (desktops have the same cable). Can the cooker be opened while cooking? |
| The cooker does not turn on. - Circuit fault Contact the Technical Support Service The cooker does not speak.- Check by using another socket.- See point 6 and verify the configuration. If the problem persists, contact the Technical Support Service. | |
| The cooker does not heat up Add 1 litre of water and select the oven menu at 200 °C for 10 minutes. | As long as the cooker has not reached pressure, although it is advisable not to open it as it will release the steam. |
| Pressure switch fails. Contact the Technical Support Service. | E3 error on the digital display Overheating. Contact the Technical Support Service. |
| The cooker does not talk. Check section 3 and the setting. If the problem persists, contact the Technical Support Service. | |
ENGLISHENGLISH
| The cooker deducts time right after programming it (for more than 3 hours) or right after selecting the menu. | Check section 6 and the setting. If the problem persists, contact the Technical Support Service. |
| The cooker does not heat up. Pour 1 litre of water and select the Oven menu at 200°C for 10 minutes. | |
| E4 error on the digital display. - Check section 5 and the cooking stage of the cooker.- The pressure switch fails. Contact the Technical Support Service. | |
| E3 error on the digital display. - Overheating Let the cooker cool down without using it for at least 24 hours.- Add liquid always overt the minimum mark on the inner pot and select a menu.- If the error appears right after connecting the machine to the mains, contact the Technical Support Service. | |
| E2 error on the digital display. Contact the Technical Support Service. | |
| AIR-FRYING COMPONENT | |
| The air-frying component does not turn on. | - Circuit fault Contact the Technical Support Service The cooker does not speak.- Check by using another socket.- See point 6 and verify the configuration. If the problem persists, contact the Technical Support Service.- With the inner pot correctly in place, enter the desired parameters and check that the air-frying component's lid is correctly positioned and closed. |
| Food is not cooked. - Excessive food amount in the inner pot. Put in less food.- Temperature is too low: enter a higher value and continue cooking. | |
| Unevenly cooked food. - It is advisable to turn the food over halfway through the process for even cooking and better results. | |
| White smoke is observed during cooking. | - Too much oil has been added or the accessories have leftovers from previous cooking. Clean the inner pot and accessories to remove said leftovers. |
| Unevenly cooked chips.- Use fresh, | firm, natural potatoes. Be sure to cut them evenly and not in very large pieces. Remove excess water and dry the starch before placing them in the inner pot.- If frozen potatoes are used, make sure to remove any water or ice before placing the food in the inner pot.- It is advisable to turn the food over halfway through the process for even cooking and better results. |
| French fries are fried unevenly in the device. | - Dry the fries thoroughly before oiling them. Cut into smaller pieces and add a little more oil if necessary.- Make sure to remove any water or ice before placing the food in the inner pot.- It is advisable to turn the food over halfway through the process for even cooking and better results. |
| Cut into smaller pieces and add a little more oil if necessary. | Align the hinge so that the gaskets fall into the slots and then close the lid tightly. |
| E1 error on the digital display. Contact the Technical Support Service. | |
| E2 error on the digital display. Contact the Technical Support Service. | |
8. TECHNICAL SPECIFICATIONS
Model: GM Modelo H DELUXE FRY cooker
Product reference: 02036
Cooker's power: 1000 W
Air-frying component's power: 1530W
Voltage and frequency: 220-240 V\~50/60 Hz
Operating pressure: 70 kPa
Maximum permissible pressure: 125 kPa
Usable capacity: 4.71
Technical specifications may change without prior notification to improve product quality. Made in China | Designed in Spain
9. DISPOSAL OF OLD ELECTRICAL AND ELECTRONIC APPLIANCES

This symbol indicates that, according to the applicable regulations, the product and/or cells must be disposed of separately from household waste. When this product reaches the end of its shelf life, you should dispose of the batteries/accumulators and take them to a collection point designated by the local authorities.
Consumers must contact their local authorities or retailer for information concerning the correct disposal of old appliances and/or their batteries.
Compliance with the above guidelines will help protecting the environment.
10. TECHNICAL SUPPORT AND WARRANTY
Cecotec shall be liable to the end user or consumer for any lack of conformity that exists at the time of delivery of the product under the terms, conditions, and deadlines established by the applicable regulations.
It is recommended that repairs be carried out by qualified personnel.
If at any moment you detect any problem with your product or have any doubt, do not hesitate to contact Cecotec official Technical Support Service at +34 963 210 728.
11. COPYRIGHT
The intellectual property rights over the texts in this manual belong to CECOTEC INNOVACIONES, S.L. All rights reserved. The contents of this publication may not, in whole or in part, be reproduced, stored in a retrieval system, transmitted, or distributed by any means (electronic, mechanical, photocopying, recording or similar) without the prior authorization of CECOTEC INNOVACIONES, S.L.
FRANÇAISENGLISH
1. PIÈCES ET COMPOSANTS
Fig./Img./Abb./Afb./Rys./Obr.2
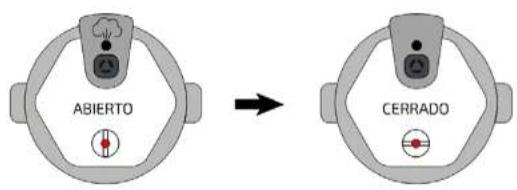
Fig./Img./Abb./Afb./Rys./Obr.3
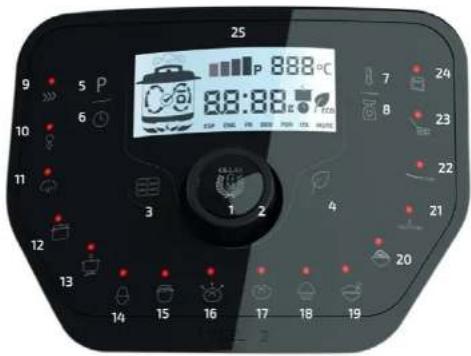
Fig./Img./Abb./Afb./Rys./Obr.4
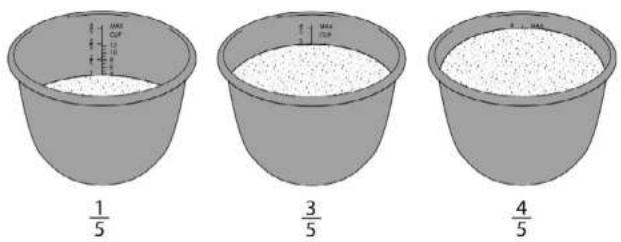
Fig./Img./Abb./Afb./Rys./Obr.5
natural_image
Illustration of a cooking process showing four steps of adding a pot to a rice cooker (no text or symbols present)Fig./Img./Abb./Afb./Rys./Obr.6
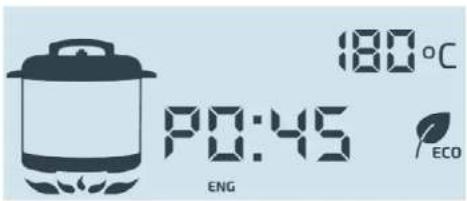
Fig./Img./Abb./Afb./Rys./Obr.7
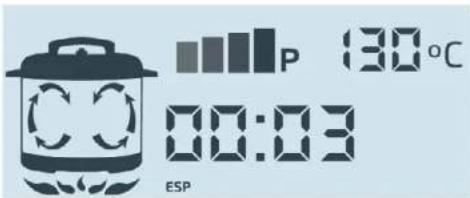
Fig./Img./Abb./Afb./Rys./Obr.8
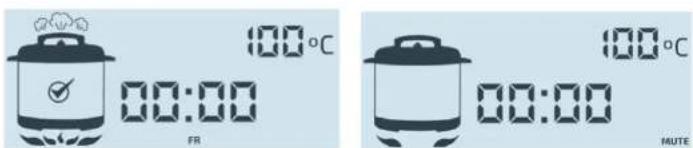
Fig./Img./Abb./Afb./Rys./Obr. 9 Fig./Img./Abb./Afb./Rys./Obr. 10
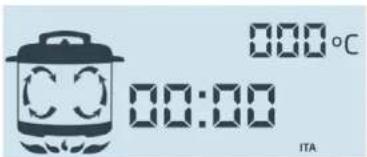
Fig./Img./Abb./Afb./Rys./Obr.11

natural_image
Cross symbol of a mushroom with a hand holding a paper, no text or labels presentFig./Img./Abb./Afb./Rys./Obr. 12
natural_image
Diagram showing a hand adjusting a circular component with an arrow indicating rotation (no text or symbols present)Fig./img./Abb./Afb./Rys./Obr. 13.1
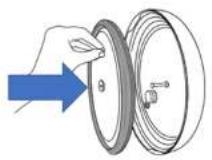
Fig./Img./Abb./Afb./Rys./Obr. 13.3
[Figure]
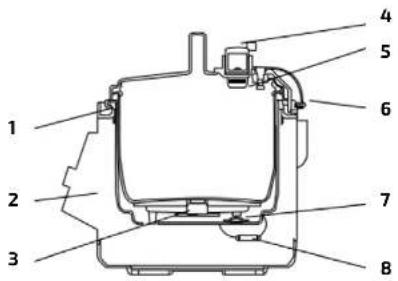
Fig./Img./Abb./Afb./Rys./Obr.14
Fig./Img./Abb./Afb./Rys./Obr. 13.2
natural_image
Technical line drawing of a kitchen grater with directional arrows indicating movement (no text or symbols)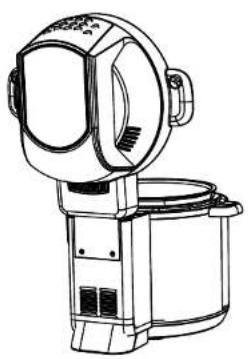
natural_image
Line drawing of a portable electronic device with dual-mounted ports (no text or symbols)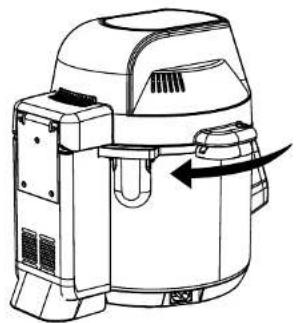
natural_image
Technical line drawing of a mechanical device with no visible text or symbolsFig./Img./Abb./Afb./Rys./Obr. 15
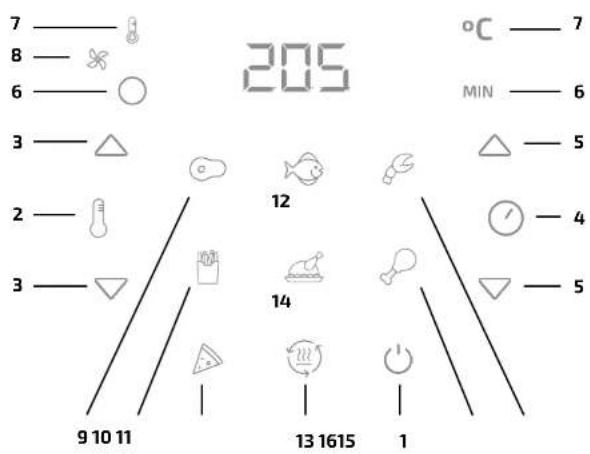
Fig./Img./Abb./Afb./Rys./Obr.16
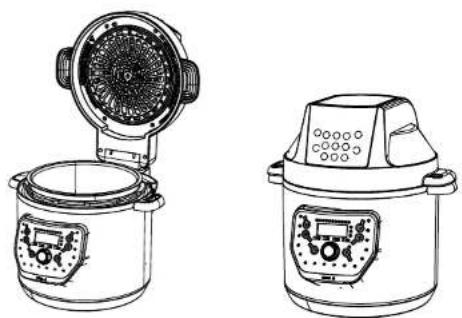
natural_image
Line drawings of two rice cookware containers, one with a speaker grille and the other with a control panel (no text or symbols)Fig./Img./Abb./Afb./Rys./Obr.17
www.cecotec.es
Quart de Poblet, Valencia (Spain)
YV_01220816
- SOMMAIRE
- OBLIGATIONS ARISING FROM SPANISH REGULATIONS FOR USERS OF PRESSURE COOKERS
- INSTRUCTIONS DE SÉCURITÉ
- BEFORE USE
- Box contents:
- ENGLISHENGLISH
- CONTROL PANEL
- COOKER
- Setting the time
- Menu
- Knob
- Temperature
- Pressure
- GM button
- ECO mode
- Scale/Cleaning
- Menu Indicators
- Voice navigation
- AIR-FRYING COMPONENT
- Selecting menus
- Setting Time and Temperature
- IMPORTANT INFORMATION ON PRESSURE COOKING
- Inner pot capacity
- Closing the lid
- Opening the lid
- Note:
- Steps to follow before each use of the H DELUXE FRY model
- OPERATION
- Schedule a meal for a specific time
- Warning
- Cooking tips and precautions
- CLEANING AND MAINTENANCE
- Note
- After cleaning
- Safety
- TECHNICAL SPECIFICATIONS
- DISPOSAL OF OLD ELECTRICAL AND ELECTRONIC APPLIANCES
- TECHNICAL SUPPORT AND WARRANTY
- COPYRIGHT
- PIÈCES ET COMPOSANTS
Brand : CECOTEC
Model : Olla GM H Deluxe Fry
Category : Saucepan