
ChupChup - Saucepan CECOTEC - Free user manual and instructions
Find the device manual for free ChupChup CECOTEC in PDF.
| Product type | Electric casserole / slow cooker |
| Brand | Cecotec |
| Model | ChupChup |
| Reference | 02031 |
| Power supply | 220-240 V ~, 50/60 Hz |
| Power | 260 W |
| Pot material | Ceramic |
| Lid material | Tempered glass |
| Pot capacity | Recommended: fill to 2/3 |
| Main functions | Slow cooking (low/high), keep warm, delayed programming |
| Power levels | 2 (Low, High) |
| Programming | Adjustable timer up to 20 hours in 30-minute increments |
| Maximum cooking time | 20 hours |
| Automatic keep warm | Yes, after the end of programmed cooking |
| Care of pot and lid | Dishwasher safe (lid not oven safe) |
| Care of main unit | Wipe with a damp cloth; do not immerse |
| Safety | Do not touch without gloves; do not immerse; use on a stable surface |
| Warranty | 2 years (upon invoice) |
| After-sales service | +34 96 321 07 28 (official Cecotec after-sales service) |
| Country of manufacture | China, designed in Spain |
| Recommended use | Household use only |
Frequently Asked Questions - ChupChup CECOTEC
User questions about ChupChup CECOTEC
0 question about this device. Answer the ones you know or ask your own.
Ask a new question about this device
Download the instructions for your Saucepan in PDF format for free! Find your manual ChupChup - CECOTEC and take your electronic device back in hand. On this page are published all the documents necessary for the use of your device. ChupChup by CECOTEC.
USER MANUAL ChupChup CECOTEC
- Parts and components 06
- Safety instructions 19
- Before use 21
- Operation 21
- Cleaning and maintenance 26
- Technical specifications 27
- Disposal of electrical appliances 27
- Technical support service and warranty 28
INDICE
ES
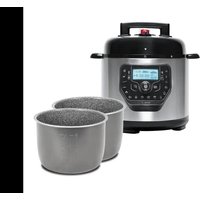
- Hinged glass lid
- Silicone ring
3.Removable ceramic cooking pot - Cooker main body
- Handles
- Control panel
- Display
- Temperature and function buttons
- Increase
- Decrease
- Select
- On/off/confirm
IT
natural_image
Line drawing of a cooking pot with a power outlet connected to its side (no text or symbols)
natural_image
Illustration of a hand pressing a steaming pot on a rice cooker (no text or symbols)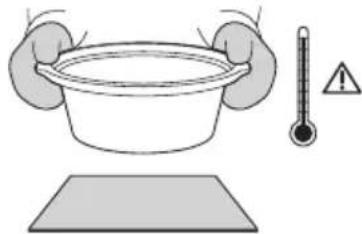
AJUSTES DE COCCIÓN
2. SAFETY INSTRUCTIONS
Read these instructions thoroughly before using the appliance. Keep this instruction manual for future reference or new users.
- Make sure that the mains voltage matches the voltage stated on the rating label of the appliance and that the wall outlet is grounded.
- This appliance is intended for domestic use only. It is not suitable for commercial or industrial use. Do not use it outdoors.
- Place the appliance on a dry, stable, flat, heat-resistant surface.
- Allow adequate space above and on all sides for air circulation. Do not allow the appliance to come into contact with any flammable material during use, such as curtains. Do not use it under a wall cupboard.
- Turn off and unplug the appliance from the mains supply when not in use and before cleaning it. Pull from the plug, not the cord, to disconnect it from the outlet.
- Do not use the appliance if it has been dropped or if it shows any visible signs of damage.
- During and immediately after operation, the appliance is likely to get very hot. Use gloves or other convenient protection accessories in order to avoid burns and injuries.
- Do not expose or immerse the cord, plug, electrical elements or product's body in water or any other liquid. Make sure your hands are dry before handling the plug or switching on the appliance.
-
Unplug the product from the main power supply when not in use.
-
Do not twist, bend, strain, or damage the power cord in any way. Protect it from sharp edges and heat sources. Do not let it touch hot surfaces. Do not let the cord hang over the edge of the working surface or countertop.
- Extreme caution must be used when moving an appliance containing hot liquids or foods.
- Do not use the appliance on or near a gas or electric hob, in heated ovens, or near open flames.
- Do not place the product on heat-sensible surfaces. It is suggested to place an insulated mat or any other protection beneath the product in order to avoid damages.
- The base of the product is unglazed and me cause scratches or other marks if no protective material is placed.
- Do not operate the appliance if it is empty or if its lid is not placed or is cracked or damaged.
- Check the power cord regularly for visible damage. If the cord is damaged, it must be replaced by the official Technical Support Service of Cecotec in order to avoid any type of danger.
- Always allow the appliance to cool down before cleaning or storing it.
- The appliance is not intended to be used by children under the age of 8. It can be used by children over the age of 8, as long as they are given continuous supervision.
- This appliance can be used by children aged 8 and above, and persons with reduced physical, sensory or mental capabilities or lack of experience and knowledge, as long as they have been given supervision or instruction concerning the use of the appliance in a safe way and understand the hazards involved. Children shall not play with the appliance.
- Supervise young children to make sure that they do not play with the appliance. Close supervision is necessary when the appliance is being used by or near children.
WARNING: This product has undergone a quality control previous to its commercialization with the aim of ensuring its correct operating. After the quality control testing, the appliance is cleaned thoroughly, therefore, although it is unlikely to occur, there could be rests of water drops in its inner parts.
3. BEFORE USE
NOTE: A slight odour and smoke might appear when heating the device for the first time. This is due to manufacturing materials residues and does not affect the appliance's operating.
- Take the product out of the box and remove all packaging materials.
- Wash the ceramic pot and glass lid with warm, soapy water.
- Rinse and dry all the parts thoroughly before using it.
- Place the product on a dry, flat and stable surface and away from heat sources.
WARNING: make sure the product is not plugged in and turned off before cleaning it.
4. OPERATION
WARNING: during use, the glass lid and ceramic cooking pot will reach high temperatures. Always handle with care and use gloves.
- Place the ceramic cooking pot inside the slow cooker's base. Ensure the ceramic cooking pot is positioned correctly before continuing.

natural_image
Line drawing of a cooking pot with a digital display (no text or symbols)ENGLISH
- Place the ingredients inside the ceramic cooking pot. Never put food or liquid inside the slow cooker, always use the ceramic cooking pot.
Note: it is suggested to fill 2/3 of the pot, do not overfill it.
-
Place the glass lid on the ceramic pot to close it.
-
Connect the product to a power supply and set desired power level. The power indicator will light up and the cooker will start operating.
Note: the slow cooker works by building up heat and maintaining an even temperature. Do not remove the glass lid until, at least, halfway the cooking process in order to obtain best results.
The glass lid allows monitoring the cooking process without interrupting it.
-
Allow the cooked food to sit in the device at the LOW setting to keep it warm until it is served.
-
When cooking is finished, turn the device off.
-
Unplug the device from the power supply.
-
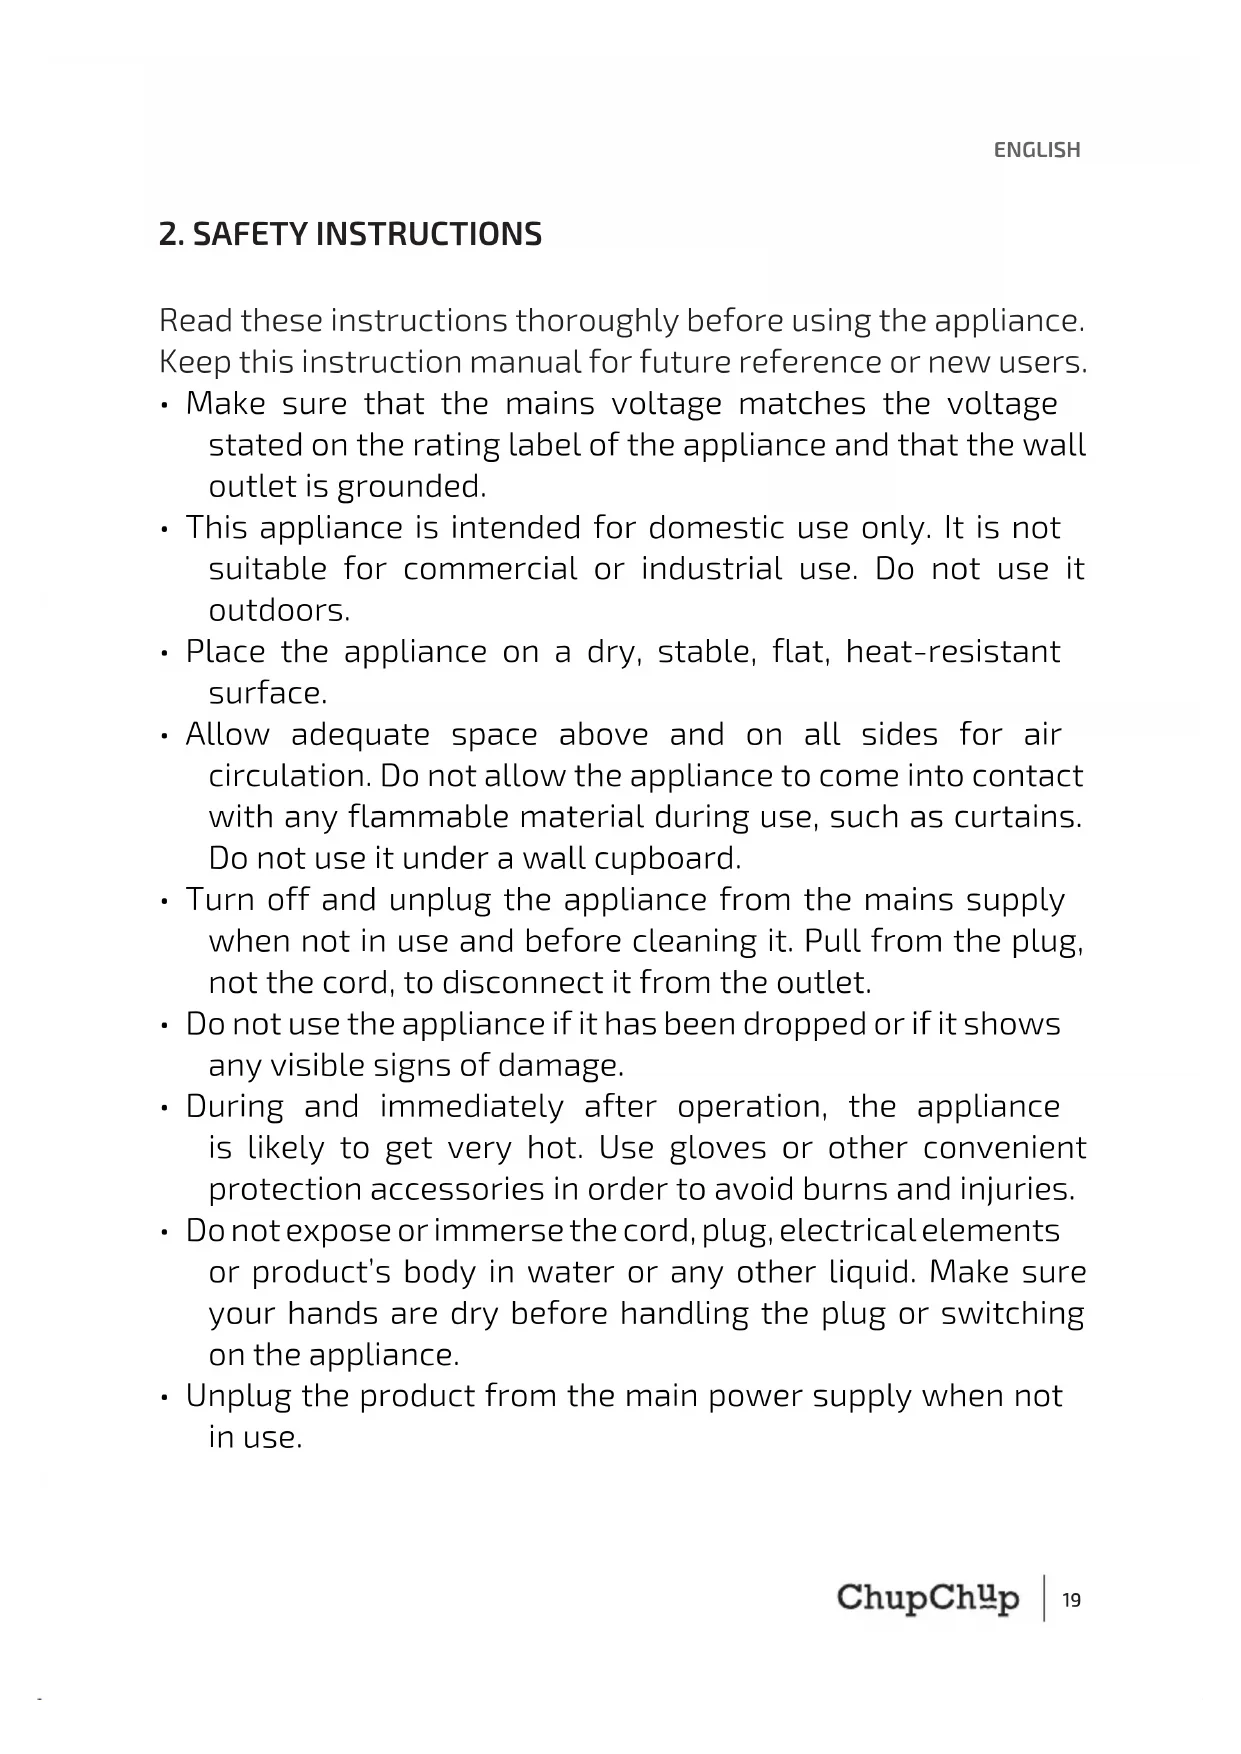
Using gloves, remove the glass lid. Make sure the steam inside the product is not directed to any body part to avoid burns.
-
Carefully lift the ceramic cooking pot out of the cooker body. Place the ceramic cooking pot on a heat-resistant


natural_image
Line drawing of a cooking pot with a power outlet connected to its side (no text or symbols)
surface. Be careful when placing the cooking pot directly onto delicate or polished surfaces because the base of the pot is unglazed and can cause scratches or other marks.
COOKING SETTINGS
There cooker has 2 power settings:
Low: allows you to simmer food for longer periods. It can also be used to keep food warm while waiting to serve the meal.
High: used to bake, cook dried beans or pulses. Cooks food in half the time the low setting. When this power setting is used to boil water, the cooking process may require extra liquid, depending on the recipe and the time in which it is cooked. It is important to check the cooking process occasionally when cooking with high power. The cooking time should vary between 4 and 8 hours.
Keep warm function: This function allows keeping previously cooked food at the ideal temperature until served. Do not try to cook food at this function.
Notes:
- It is not suggested to operate the product in warm function for more than 4 hours.
- When you have finished using the slow cooker, press the off button and disconnect it from the power supply.
- If the cooked food is not going to be served immediately, select manually the keep warm function.
- If there is a power outage, the device will turn off and the display will blink when it turns back on. If it has been turned off for a few hours, the food may not be in good conditions and it is suggested not to eat it.
SCHEDULING
The slow cooker can be scheduled in such way that it will start cooking at the desired time, allowing you to have your food freshly made when required.
- Press the △ button as many times as required to select the desired cooking power (high or medium) or the keep warm function (warm).
- Use the ∧ and ∨ buttons to select the desired cooking time in 30-minute intervals, up to a maximum of 20 hours.
- To start the cooking process at this point, press to confirm.
- If you wish to schedule the cooking process for the slow cooker to start cooking at a
ENGLISH
specific time, long press the button until "Delay" appears in the display.
- Use buttons and to select the hours to go until the start of the cooking process.
- Press to confirm.
Example: If you want to schedule a 6-hour cooking process, and you want it to start in 2 hours, first select 6 hours and then add 2 more hours to the set time. The display will show the sum of these 2 times, therefore, 8 hours.
Note: When the selected cooking time is over, the slow cooker will automatically switch to the keep warm function.
GUIDE TO SLOW COOKING
This section is designed to help you adapt your favourite recipes so they can be cooked in your slow cooker. Soups and stews are the most common dishes to be cooked in this type of appliances. Casseroles and most meats benefit from the low power and even cooking.
It is important to:
- Allow sufficient time for cooking.
- Do not add as much liquid as your recipe indicates. Generally, only half of the amount of liquid specified in the recipe needs to be added as liquids do not boil away as in conventional cooking. Should you have too much liquid at the end of cooking, remove the lid and cook with the high-power setting until the excess liquid has evaporated away.
- Many of the steps in conventional recipes may be ignored, because vegetables don't overcook, therefore everything can go into your slow cooker at the same time. However, milk, cream or sour cream should be added during the last hour of cooking.
Cooking time guide:
| Recipe time Low power High power | ||
| 15-30 mins 4-6 hours 1.5-2 hours | ||
| 35-45 mins 6-10 hours 3-4 hours | ||
| 50 mins-3 hours 8-18 hours 4-6 hours |
These times are approximate and can vary depending on the ingredients and quantities.
PREPARING MEAT AND POULTRY
When preparing meat, look for the leanest cuts. Trim any visible fat from meat slices because the slow cooking process will result in too much fat liquid. If possible, use chicken without skin. For casserole-style recipes, cut meat into cubes, approximately 2.5-cm thick.
Less tender meat cuts are ideal to use in slow cookers because prolonged cooking processes make them tender and tasty. The table below shows cuts suitable for use.
| Meat Cut | |
| Beef Brisket, shin, silverside, topside, stewing steak, braising steak | |
| Lamb Neck, forequarter, neck chops, shanks, shoulder chops | |
| Pork Leg steaks, butterfly steaks, loin chops, fillet | |
BROWNING BEFORE COOKING
Pre-browning meat and poultry prior to cooking them in the slow cooker intensifies flavour and provides more tender results.
It also achieves much more intense flavours in other foods such as onions, peppers and leeks. Pre-browning may take a little extra time, and whilst not strictly necessary, the rewards are evident in the end result. To brown, use a non-stick pan. Use minimum amount of oil. Without pre-browning, some meat and poultry may result bland when cooked in your slow cooker.
ROASTING
Roasting in your slow cooker results in tender, flavoursome meats which are easy to slice. The long, slow, covered cooking process breaks down and softens the connective tissues within the meats, therefore meat results are very successful.
The addition of liquids is not necessary for roasting. A minimal amount is required for pot-roasting. Raise the meat to be roasted on an inverted heatproof plate or saucer so the meat is kept free of any fat released throughout the cooking process. Suitable cuts for roasting include:
| Meat Cut | |
| Beef Blade, fillet, rump, sirloin, silverside, topside | |
| Lamb Leg, mid loin, rack, shank, shoulders, mini roast | |
| Pork Loin, neck, leg, racks | |
Suitable cuts for pot-roasting include:
| Meat Cut | |
| Beef Blade, chunk, round, silverside, skirt, top-side | |
| Lamb Forequarter, shank, shoulder | |
| Pork Loin, neck | |
PREPARING VEGETABLES
A characteristic of slow cooking is that vegetables generally cook much slower than most meats. Most vegetables should be cut into small-sized pieces and placed near to the sides and as close to the bottom of the ceramic pot as possible. Meat should then be placed on top of the vegetables. Carrots should be peeled and placed where they will be completely covered by liquid. Frozen vegetables should be thawed before adding to other foods.
PASTA AND RICE
If a recipe requires noodles, macaroni etc. to be added, cook them until slightly tender and then introduce them in your slow cooker for the last 30 minutes of cooking. When cooking rice, stir it with the other ingredients and add 14 cup extra of liquid for every 14 cup of rice. For better results, use long-grain rice.
HERBS AND SPICES
Leaf or whole herbs and spices are preferred. As the flavour of these is stronger, it is recommended to use half the suggested amount. If using ground or dried herbs and spices, add during the last hour of cooking. Always taste and season before serving.
MILK AND CREAM
Milk, cream and sour cream tend to break down during extended cooking. When possible, add during the last hour of cooking.
5. CLEANING AND MAINTENANCE
Recommendation: always unplug the slow cooker before cleaning it. Never immerse the cooker's body, cord or plug in water or any other liquid. Do not use harsh abrasive cleaning materials.
BEFORE CLEANING
- Ensure the slow cooker is switched off and unplugged at the mains supply.
- Allow all parts of the cooker to cool completely. To prevent damage to the glass lid and ceramic cooking pot, avoid severe temperatures changes, direct heat or sudden cooling.
CLEANING THE CERAMIC COOKING POT AND THE GLASS LID
- Remove the ceramic cooking pot and glass lid. Wash the ceramic cooking pot and glass lid in warm, soapy water. Rinse and dry thoroughly.
- To remove stubborn stains and foodstuff rests from the ceramic cooking pot, fill it 2/3 full of warm soapy water and allow it to soak. Rinse and dry thoroughly.
CLEANING THE COOKER'S BODY
The interior and exterior of the cooker body can be wiped with a soft, damp cloth.
| PART SUITABLE FOR DISHWASHER | SUITABLE FOR OVEN | |
| Lid Yes No | ||
| Inner pot Yes Yes (not griddle) |
6. TECHNICAL SPECIFICATIONS
Model: Chup-Chup Matic
Product reference: 02031
260 W, 220-240 V\~, 50/60 Hz
Made in China | Designed in Spain
7. DISPOSAL OF OLD ELECTRICAL APPLIANCES

The European directive 2012/19/EU on Waste Electrical and Electronic Equipment (WEEE), specifies that old household electrical appliances must not be disposed of with the normal unsorted municipal waste. Old appliances must be collected separately, in order to optimize the recovery and recycling of the materials they contain, and reduce the impact on human health and the environment.
The crossed out "wheeled bin" symbol on the product reminds you of your obligation to dispose
ENGLISH
of the appliance correctly. If the product has a built-in battery or uses batteries, they should be removed from the appliance and disposed of appropriately.
Consumers must contact their local authorities or retailer for information concerning the correct disposal of old appliances and/or their batteries.
8. TECHNICAL SUPPORT SERVICE AND WARRANTY
This product is under warranty for 2 years from the date of purchase, as long as the proof of purchase is submitted, the product is in perfect physical condition, and it has been given proper use, as explained in this instruction manual.
The warranty will not cover the following situations:
- The product has been used for purposes other than those intended for it, misused, beaten, exposed to moisture, immersed in liquid or corrosive substances, as well as any other fault attributable to the customer.
- The product has been disassembled, modified, or repaired by persons, not authorised by the official Technical Support Service of Cecotec.
- Faults deriving from the normal wear and tear of its parts, due to use.
The warranty service covers every manufacturing defects of your appliance for 2 years, based on current legislation, except consumable parts. In the event of misuse, the warranty will not apply.
If at any moment you detect any problem with your product or have any doubt, do not hesitate to contact Cecotec Technical Support Service at +34 96 321 07 28.
2. INSTRUCTIONS DE SÉCURITÉ
natural_image
Line drawing of a cooking pot with a power outlet connected to its side (no text or symbols)
FONCTIONS
DEUTSCH
natural_image
Line drawing of a cooking pot with a power outlet connected to its side (no text or symbols)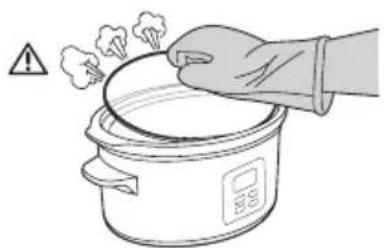
natural_image
Illustration of a hand stirring a cooking pot with steam rising (no text or symbols)
KOCHEINSTELLUNGEN
natural_image
Line drawing of a cooking pot with a power outlet connected to its side (no text or symbols)natural_image
Illustration of a hand pressing a cooking pot with steam rising (no text or symbols)
natural_image
Line drawing of a cooking pot connected to a power outlet (no text or symbols)
AJUSTES DE POTÊNCIA
natural_image
Line drawing of a rice cooker with a power outlet connected to its side (no text or symbols)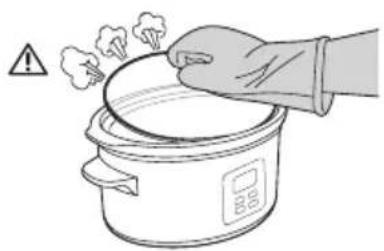
natural_image
Illustration of a hand pressing down on a cooking pot with steam rising (no text or symbols)

- INDICE
- ES
- IT
- AJUSTES DE COCCIÓN
- SAFETY INSTRUCTIONS
- BEFORE USE
- OPERATION
- ENGLISH
- COOKING SETTINGS
- Notes:
- SCHEDULING
- GUIDE TO SLOW COOKING
- It is important to:
- PREPARING MEAT AND POULTRY
- BROWNING BEFORE COOKING
- ROASTING
- PREPARING VEGETABLES
- PASTA AND RICE
- HERBS AND SPICES
- MILK AND CREAM
- CLEANING AND MAINTENANCE
- BEFORE CLEANING
- CLEANING THE CERAMIC COOKING POT AND THE GLASS LID
- CLEANING THE COOKER'S BODY
- TECHNICAL SPECIFICATIONS
- DISPOSAL OF OLD ELECTRICAL APPLIANCES
- TECHNICAL SUPPORT SERVICE AND WARRANTY
- INSTRUCTIONS DE SÉCURITÉ
- FONCTIONS
- DEUTSCH
- KOCHEINSTELLUNGEN
- AJUSTES DE POTÊNCIA
Brand : CECOTEC
Model : ChupChup
Category : Saucepan