
LIFE SD36 - Sewing machine MEDION - Free user manual and instructions
Find the device manual for free LIFE SD36 MEDION in PDF.

| Product type | Electronic sewing machine |
| Brand | Medion |
| Model | LIFE SD36 |
| Rated voltage | 100-240 V ~, 50/60 Hz |
| Power | 36 W |
| Pedal | Type ES01FC (DC 15 V, max 3 mA) |
| Protection class | II |
| Number of stitch programs | 100 (utility, decorative, letter stitches) |
| Automatic buttonholes | Yes, 5 one-step programs |
| Automatic needle threader | Yes |
| Variable speed | By pedal or manual adjustment |
| Free arm | Yes, for tubular sewing |
| Removable extension table | Yes |
| Built-in lighting | Yes (switched with main switch) |
| Included accessories | Feet (standard, buttonhole, zipper, buttons, invisible hem), 3 needles, twin needle, 3 bobbins, screwdriver, seam ripper, brush, dust cover |
| Maintenance | Regular cleaning of feed dogs and bobbin case, lubrication with special sewing machine oil |
| Safety | Unplug before maintenance, do not use outdoors, keep out of reach of children under 8 years |
Frequently Asked Questions - LIFE SD36 MEDION
User questions about LIFE SD36 MEDION
0 question about this device. Answer the ones you know or ask your own.
Ask a new question about this device
Download the instructions for your Sewing machine in PDF format for free! Find your manual LIFE SD36 - MEDION and take your electronic device back in hand. On this page are published all the documents necessary for the use of your device. LIFE SD36 by MEDION.
USER MANUAL LIFE SD36 MEDION
natural_image
White sewing machine with digital display and control buttons, no visible text or symbols on the device itself.natural_image
Line drawing of a foot pressing down on a rectangular object with a curved arrow indicating rotation (no text or symbols)
natural_image
Diagram of a vehicle door frame with bidirectional arrow indicating left and right motion (no text or symbols)natural_image
Technical line drawing of a mechanical assembly with no visible text or symbolsnatural_image
Technical line drawing of a mechanical assembly with no visible text or symbols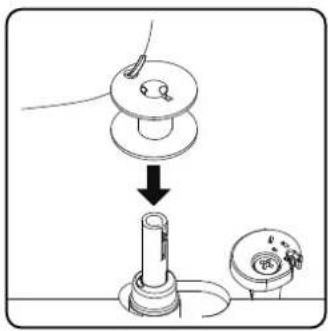
natural_image
Illustration of a hand using a tool to adjust a mechanical component (no text or symbols present)natural_image
Line drawing of a hand pressing a button on a vehicle door panel (no text or symbols)8.4.EinlegenderSpule
natural_image
Illustration of a hand using a tool to adjust or install a device, with no visible text or symbols.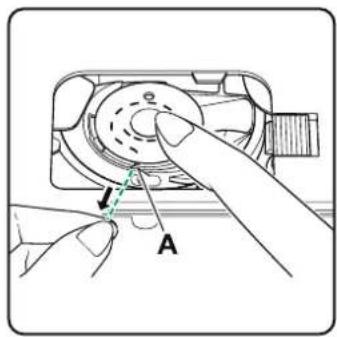
natural_image
Illustration of a hand pressing down on a device component with directional arrows indicating motion (no text or symbols)
natural_image
Illustration showing a hand holding a small object with an arrow indicating motion, alongside a close-up of the hand's curved arm (no text or symbols present)natural_image
Diagram of a sewing machine with an arrow indicating upward motion (no text or symbols)natural_image
Diagram of a camera with an arrow indicating rotation and dashed red lines suggesting alignment (no text or symbols)natural_image
Technical line drawing of a sewing machine needle with a circular component and mounting bracket (no text or symbols)natural_image
Technical line drawing of a mechanical component with an inset showing a curved pipe or lever mechanism (no text or symbols present)
natural_image
Diagram of hands operating a mechanical device with a red dashed line indicating motion or connection (no text or symbols present)natural_image
Technical line drawing of a sewing machine mechanism with no visible text or symbolsnatural_image
Technical line drawing of a sewing machine with no visible text or symbols

natural_image
Technical line drawing of a sewing machine with handle and base components (no text or symbols)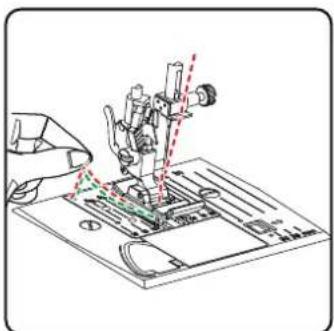
natural_image
Technical line drawing of a mechanical assembly with no visible text or symbols9. Einstellungen
natural_image
Line drawing of a sewing machine with a dial indicator and control panel (no text or symbols)
natural_image
Diagram of a sewing machine needle with directional arrows indicating motion (no text or symbols)
natural_image
Diagram of a sewing machine needle stitching fabric, showing angle and direction arrows (no text or symbols)TIPP
natural_image
Line drawing of hands operating a sewing machine with a sewing machine needle (no text or symbols)10.8.Programmwahl
natural_image
Illustration of a sewing machine needle stitching fabric (no text or symbols)natural_image
Technical illustration of a sewing machine needle stitching fabric (no text or symbols visible)natural_image
Diagram showing a curved structure with internal texture and arrows indicating direction (no text or symbols)
natural_image
Illustration of two hands operating a sewing machine, showing front and side views (no text or symbols)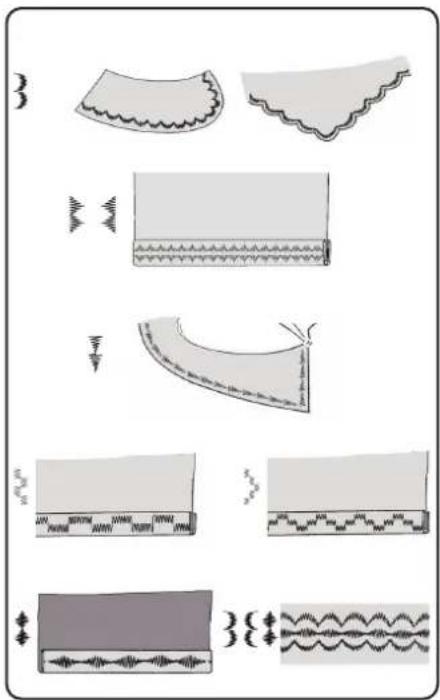

10.12. Zierstiche
natural_image
Diagram showing two mechanical assembly steps with arrows indicating motion direction (no text or symbols)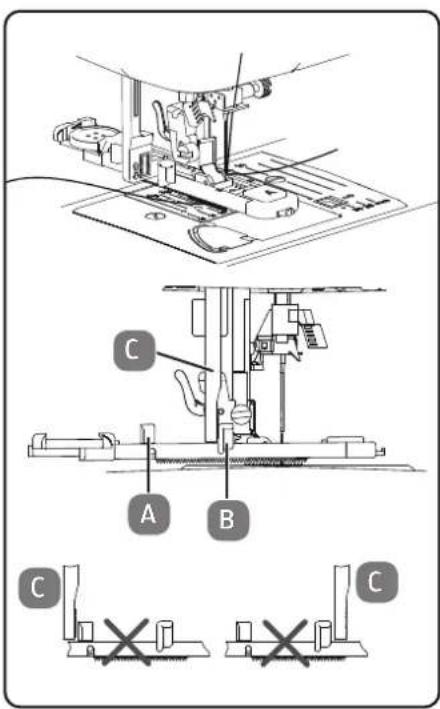

natural_image
Illustration of a hand holding a tool interacting with a small object (no text or symbols visible)10.15.2.
natural_image
Technical line drawing of a mechanical device with internal components and a close-up inset showing a switch mechanism (no text or symbols)
natural_image
Technical line drawing of two different sewing machine footings (no text or symbols)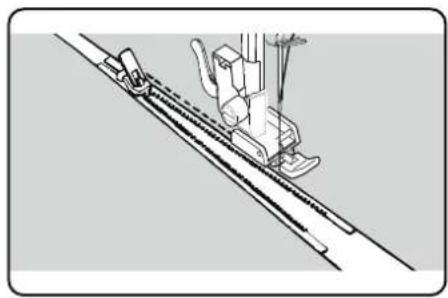
natural_image
Technical line drawing of a sewing machine needle and foot (no text or symbols)
natural_image
Technical illustration of a sewing machine needle stitching a fabric sheath (no text or symbols)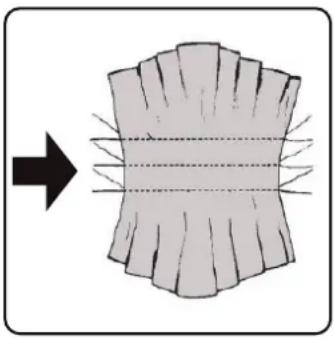
natural_image
Diagram showing a curved surface with radial lines and an arrow pointing to it, no text or symbols present.
natural_image
Illustration of a sewing machine needle stitching fabric (no text or symbols)10.18. Kräuseln
Nähfuß: Standardfuß
Nähfußindikator: J
Programm:....1
Stichlänge: 4
Stichbreite: 3
natural_image
Technical line drawing of a sewing machine with no visible text or symbols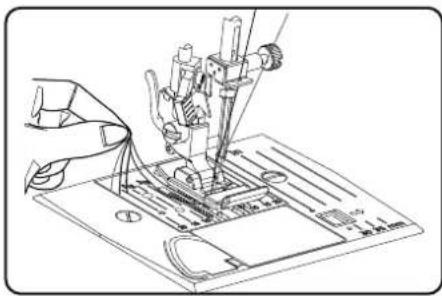
natural_image
Technical line drawing of a sewing machine needle and base plate (no text or symbols)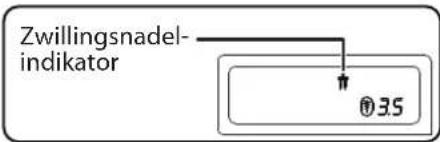

HINWEIS
natural_image
Illustration of a hand holding a small mechanical component with an arrow pointing to a mechanical assembly (no text or symbols present)
natural_image
Technical line drawing of a mechanical assembly with a hand operating a tool (no text or symbols present)
natural_image
Technical line drawing of a mechanical assembly with no visible text or symbolsnatural_image
Line drawing of a foot pressing down on a wooden block with a curved arrow indicating rotation (no text or symbols)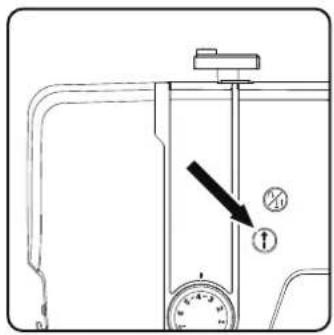
natural_image
Diagram showing a vehicle inside a vehicle door with bidirectional arrow indicating movement (no text or symbols)natural_image
Technical line drawing of a mechanical assembly with no visible text or symbolsnatural_image
Technical line drawing of a mechanical assembly with a cylindrical component and mounting base (no text or symbols)
natural_image
Illustration of a hand using a tool to adjust or install a mechanical component, with no visible text or symbols.natural_image
Line drawing of a hand pressing a button on a vehicle door panel (no text or symbols)natural_image
Illustration of a hand using a rotary tool to adjust or install a device component (no text or symbols visible)natural_image
Hand pressing a button on a device (no text or symbols visible)natural_image
Illustration showing a hand holding a tool with an arrow indicating motion (no text or symbols present)
natural_image
Diagram of a sewing machine with an arrow indicating upward motion (no text or symbols)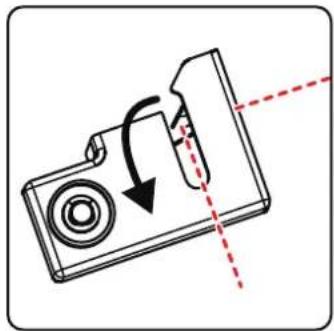
natural_image
Diagram of a camera with an arrow indicating rotation and dashed red lines suggesting alignment or alignment (no text or symbols)
natural_image
Technical line drawing of a sewing machine component with no visible text or symbolsnatural_image
Technical line drawing of a mechanical component with an inset showing a hand holding a curved arm (no text or symbols present)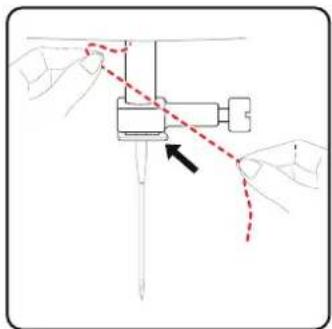
natural_image
Diagram of a mechanical assembly with hands and a red dashed line indicating a motion or path (no text or symbols present)natural_image
Technical line drawing of a sewing machine mechanism with no visible text or symbolsnatural_image
Technical line drawing of a sewing machine with no visible text or symbols

natural_image
Technical line drawing of a sewing machine with handle and base components (no text or symbols)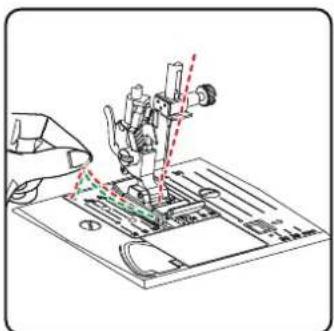
9. Réglages
natural_image
Diagram of a sewing machine needle with directional arrows indicating movement (no text or symbols)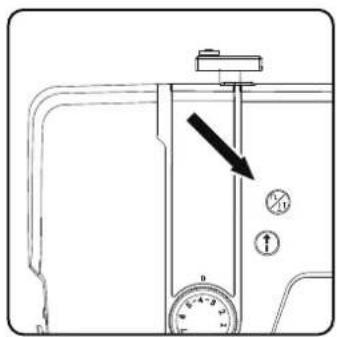
natural_image
Diagram of a sewing machine needle stitching fabric, showing motion direction (no text or symbols)natural_image
Line drawing of hands operating a sewing machine with a sewing machine needle (no text or symbols)10.7. Coupe du fi I
Pied-de-biche :....Pied standard
Pied-de-biche :....Pied standard
Pied-de-biche :....Pied standard
Pied-de-biche :....Pied standard
natural_image
Illustration of a sewing machine needle stitching fabric (no text or symbols)Pied-de-biche :....Pied standard
Pied-de-biche :....Pied standard
natural_image
Mechanical sewing machine needle stitching a piece of fabric (no text or symbols visible)10.11.9. Point losange ou point smock
Pied-de-biche :....Pied standard
Pied-de-biche :....Pied standard
natural_image
Diagram showing a curved structure with internal texture and directional arrow, no text or symbols present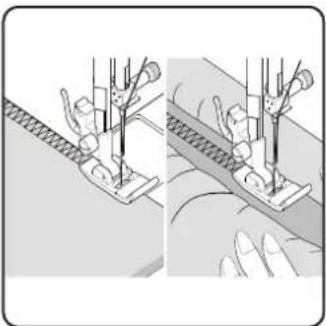
natural_image
Illustration of two sewing machine stitching techniques (no text or symbols)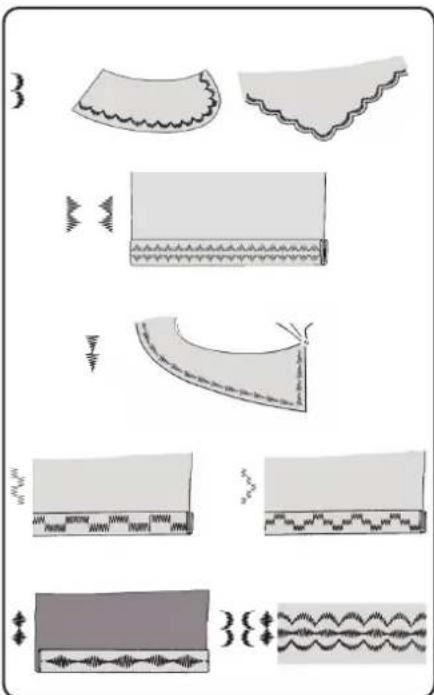
natural_image
Illustration of fabric patterns with various seam and edge designs (no text or symbols)
Pied-de-biche :....Pied standard
Pied-de-biche :....Pied standard
natural_image
Diagram showing two mechanical assembly steps with arrows indicating direction (no text or symbols)
natural_image
Illustration of a hand holding a tool with a screwdriver inserted into a clip (no text or symbols)natural_image
Technical line drawing of a mechanical device with internal components and a close-up inset showing a directional switch (no text or symbols)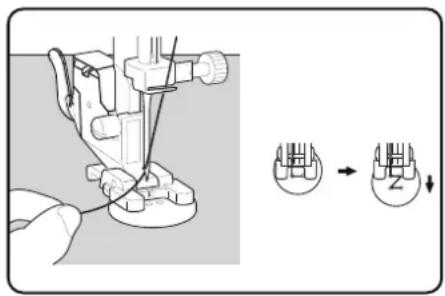
natural_image
Line drawing of two different sewing machine footings (no text or symbols)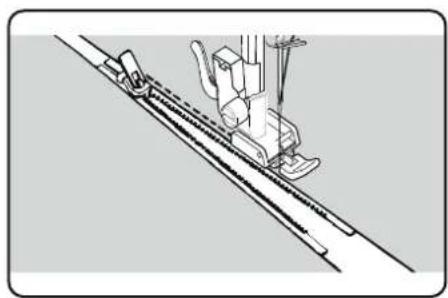
natural_image
Technical line drawing of a sewing machine needle stitching a diagonal seam (no text or symbols)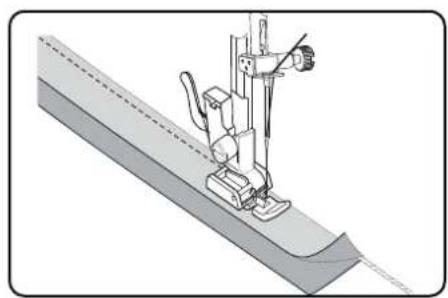
natural_image
Technical illustration of a sewing machine needle stitching a fabric sheath (no text or symbols)
natural_image
Diagram showing a curved surface with radial lines and an arrow pointing to it, no text or symbols present.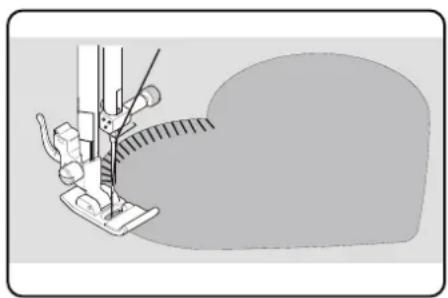
natural_image
Illustration of a sewing machine needle stitching fabric (no text or symbols)10.18. Fronçage
Pied-de-biche :....Pied standard
Pied-de-biche :....Pied standard
Pied-de-biche :.... Pied standard
natural_image
Technical line drawing of a sewing machine with a circular inset showing internal components (no text or labels)
natural_image
Illustration of a hand holding a small mechanical component with an arrow pointing to a component inside a device (no text or symbols present)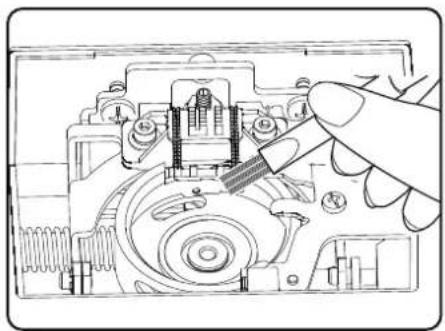
natural_image
Technical line drawing of a mechanical assembly with a hand operating a tool (no text or symbols visible)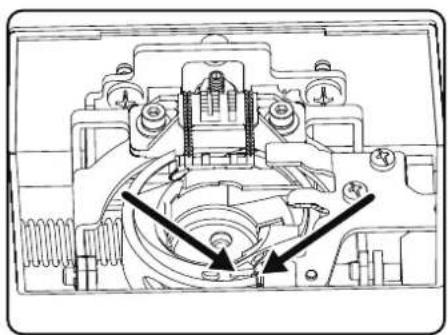
natural_image
Technical line drawing of a mechanical assembly with no visible text or symbolsnatural_image
Simple line drawing of a foot pressing down on a rectangular object, with no text or symbols present.natural_image
Diagram of a vehicle door frame with bidirectional arrow indicating left and right motion (no text or symbols)natural_image
Technical line drawing of a mechanical assembly with no visible text or symbolsnatural_image
Technical line drawing of a mechanical assembly with a cylindrical component and mounting base (no text or symbols)
natural_image
Illustration of a hand using a tool to adjust a mechanical component (no text or symbols present)natural_image
Line drawing of a hand pressing a button on a vehicle door panel (no text or symbols)natural_image
Illustration of a hand using a tool to adjust or install a mechanical component, with no visible text or symbols.
natural_image
Diagram of a mechanical device with directional arrows indicating motion or force (no text or symbols)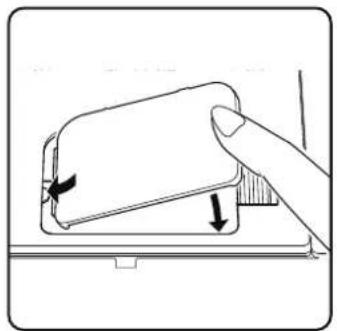
natural_image
Illustration of a hand pressing down on a device component with a scroll wheel (no text or symbols)
natural_image
Illustration showing a hand holding a small object with an arrow indicating motion, alongside a close-up of the hand's curved arm (no text or symbols present)natural_image
Diagram of a sewing machine with an arrow indicating upward motion (no text or symbols)natural_image
Diagram of a camera with an arrow indicating rotation and dashed red lines suggesting alignment (no text or symbols)natural_image
Technical line drawing of a sewing machine needle with a circular component and mounting bracket (no text or symbols)natural_image
Technical line drawing of a mechanical component with an inset showing a curved pipe or lever mechanism (no text or symbols present)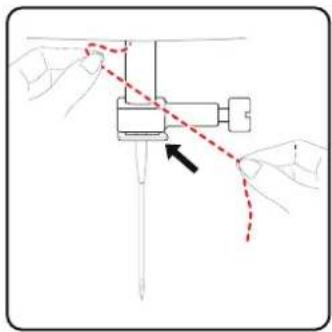
natural_image
Diagram of a mechanical assembly with hands and a red dashed line indicating a process (no text or symbols)natural_image
Technical line drawing of a sewing machine mechanism with no visible text or symbolsnatural_image
Technical diagram of a sewing machine with no visible text or symbols
natural_image
Technical line drawing of a sewing machine needle and base plate assembly (no text or symbols)9. Instellingen
9.1.Draadspanninginstellen
natural_image
Diagram of a sewing machine needle with directional arrows indicating motion (no text or symbols)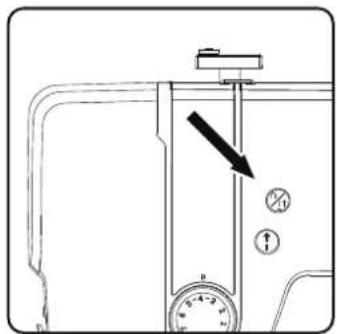
natural_image
Diagram of a sewing machine needle stitching fabric, showing angle and direction arrows (no text or symbols)TIP
natural_image
Line drawing of hands operating a sewing machine with a sewing machine needle (no text or symbols)natural_image
Illustration of a sewing machine needle stitching fabric (no text or symbols)natural_image
Mechanical sewing machine in operation, showing needle and base mechanism (no text or symbols)10.11.9. Ruitsteek of smoksteek
Programma: 11, 12 of 14
natural_image
Diagram showing a curved structure with internal texture and directional arrow, no text or symbols present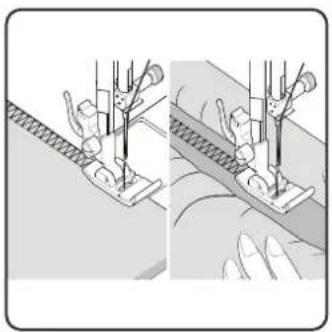
natural_image
Two-panel illustration showing a sewing machine on fabric, with no visible text or symbols.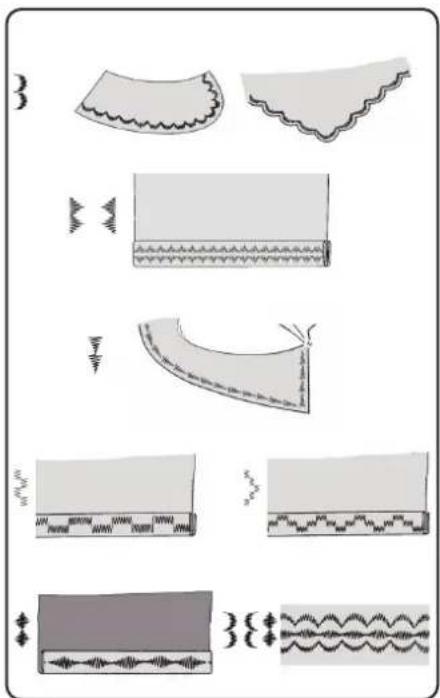

10.12. Siersteken
natural_image
Illustration of two mechanical assembly steps showing a tool interacting with a component (no text or symbols present)
natural_image
Illustration of a hand holding a tool with a pen inserted into a clip (no text or symbols)natural_image
Technical line drawing of a machine with internal components and a close-up inset showing a switch mechanism (no text or symbols)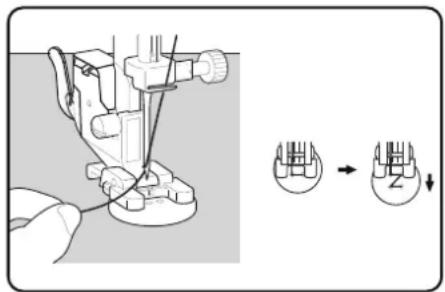
natural_image
Line drawing of two different types of hair blisters or clips, shown in side and top views with no text or symbols.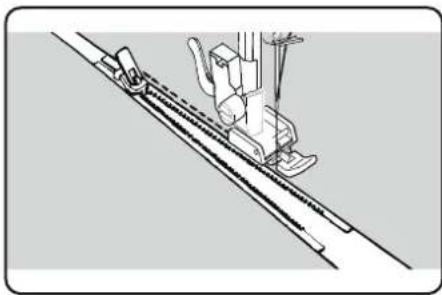
natural_image
Technical line drawing of a sewing machine needle and chain (no text or symbols)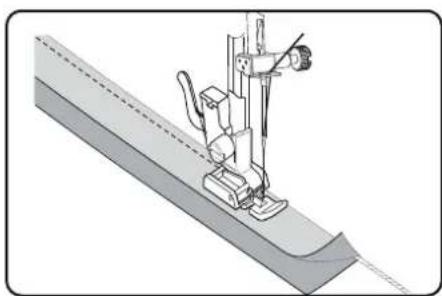
natural_image
Technical illustration of a sewing machine needle stitching a fabric sheath (no text or symbols)
natural_image
Diagram showing a curved surface with radial lines and an arrow pointing to it, no text or symbols present.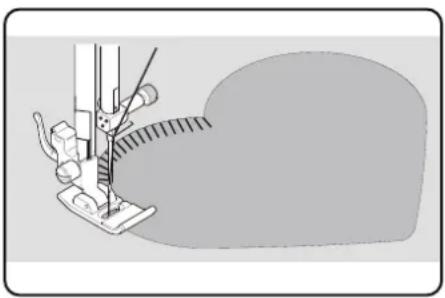
natural_image
Illustration of a sewing machine needle stitching fabric (no text or symbols)10.18. Rimpelen
natural_image
Technical line drawing of a sewing machine with no visible text or symbolsnatural_image
Technical line drawing of a sewing machine needle and base plate (no text or symbols)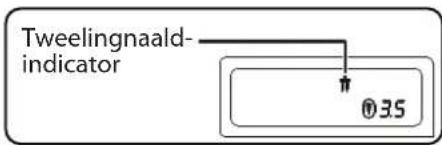
LET OP
natural_image
Diagram showing a hand holding a small mechanical component with an arrow pointing to a component inside a housing (no text or symbols present)
natural_image
Technical line drawing of a mechanical assembly with a hand operating a tool (no text or symbols present)
natural_image
Technical line drawing of a mechanical assembly with no visible text or symbolsnatural_image
Illustration of a foot pressing down on a wooden block with a curved arrow indicating rotation (no text or symbols)natural_image
Diagram of a vehicle door frame with bidirectional arrow indicating left and right motion (no text or symbols)natural_image
Technical line drawing of a mechanical assembly with no visible text or symbolsnatural_image
Technical line drawing of a mechanical assembly with a cylindrical component and mounting base (no text or symbols)
natural_image
Illustration of a hand using a tool to adjust a mechanical component (no text or symbols present)natural_image
Line drawing of a hand pressing a button on a vehicle door panel (no text or symbols)natural_image
Illustration of a hand using a tool to adjust or install a mechanical component, with no visible text or symbols.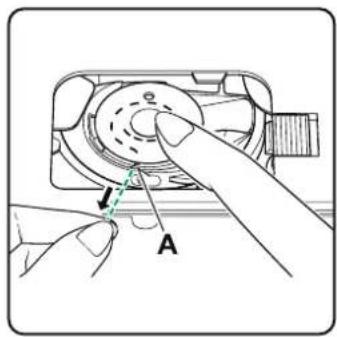


natural_image
Illustration of a hand pressing down on a device component with directional arrows (no text or symbols)
natural_image
Illustration showing a hand holding a small object with an arrow indicating motion, alongside a close-up of the hand's curved arm (no text or symbols present)8.5. Enhebrado del hilo superior
natural_image
Diagram of a sewing machine with an arrow indicating upward motion (no text or symbols)natural_image
Diagram of a camera with an arrow indicating rotation and dashed red lines suggesting alignment or alignment (no text or symbols)natural_image
Technical line drawing of a sewing machine component with no visible text or symbolsnatural_image
Technical line drawing of a mechanical component with an inset showing a curved pipe or lever mechanism (no text or symbols present)
natural_image
Diagram of hands operating a sewing machine with a red dashed line indicating the arc (no text or symbols present)natural_image
Technical line drawing of a sewing machine mechanism with no visible text or symbolsnatural_image
Technical line drawing of a sewing machine with no visible text or symbols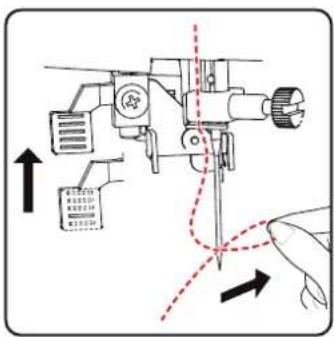

natural_image
Technical line drawing of a sewing machine with no visible text or symbols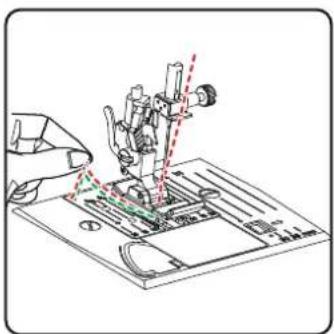
9. Ajustes
natural_image
Line drawing of a sewing machine with a dial indicator and control panel (no text or symbols)i
natural_image
Diagram of a sewing machine needle with directional arrows indicating motion (no text or symbols)
natural_image
Diagram of a sewing machine needle stitching fabric, showing motion direction (no text or symbols)
CONSEJO
natural_image
Line drawing of hands operating a sewing machine with a sewing machine needle (no text or symbols)natural_image
Illustration of a sewing machine needle stitching a fabric edge (no text or symbols)10.11.6. Puntadaelástica
natural_image
Mechanical sewing machine in operation, showing needle and base mechanism (no text or symbols)10.11.9. Puntada de rombo o puntada smock
natural_image
Diagram showing a curved structure with internal texture and directional arrow, no text or symbols present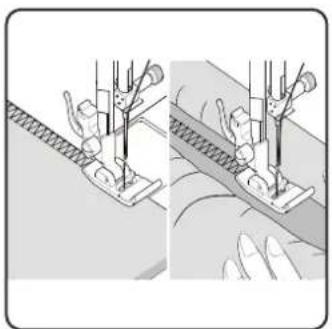
natural_image
Illustration of two sewing machine stitching techniques (no text or symbols)
natural_image
Illustration of fabric patterns and seam details (no text or symbols)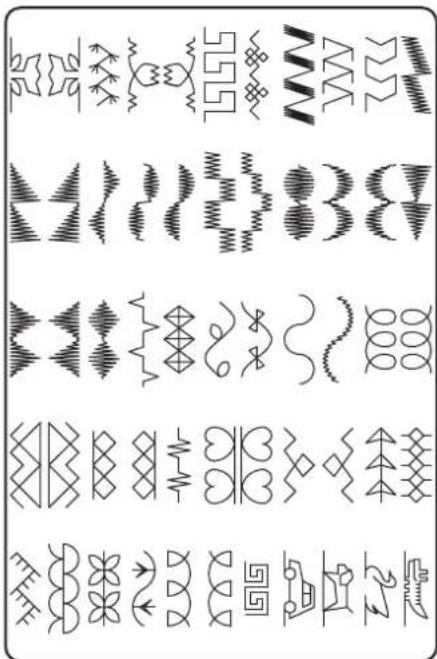
natural_image
Illustration of two mechanical assembly steps showing a tool interacting with a component (no text or symbols present)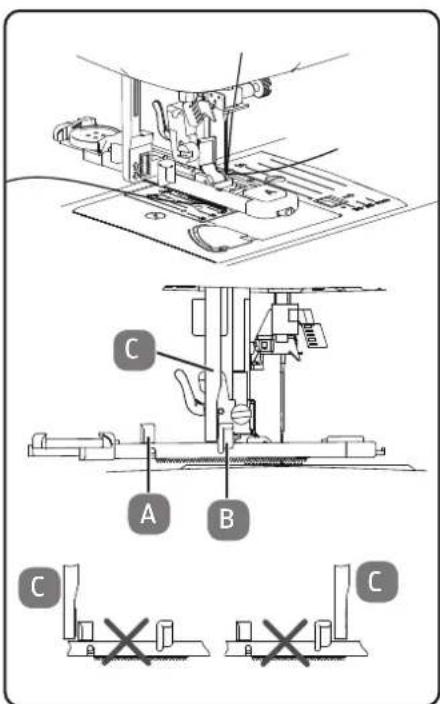
natural_image
Illustration of a hand holding a tool with a screwdriver inserted into a clip (no text or symbols)natural_image
Technical line drawing of a mechanical device with a close-up inset showing a button mechanism (no text or symbols)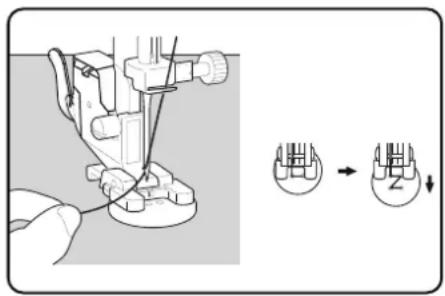
natural_image
Two technical line drawings of a sewing machine footset, showing base and side views (no text or symbols)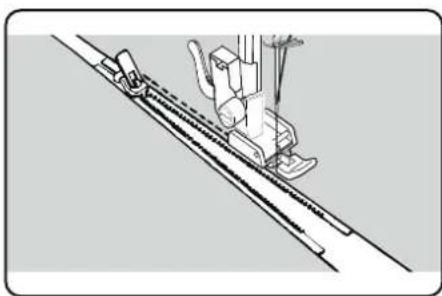
natural_image
Technical line drawing of a sewing machine needle and chain (no text or symbols)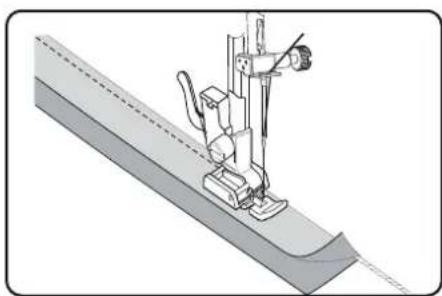
natural_image
Technical illustration of a sewing machine needle stitching a fabric (no text or symbols)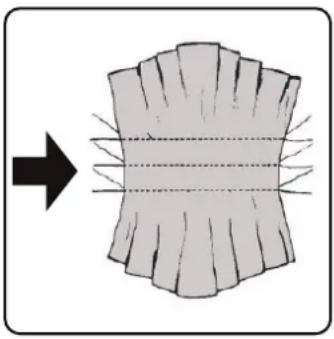
natural_image
Diagram showing a curved surface with radial lines and an arrow pointing to it, no text or symbols present.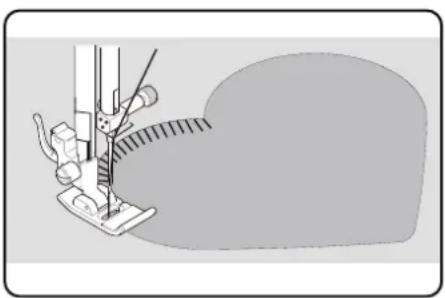
natural_image
Illustration of a sewing machine needle stitching fabric (no text or symbols)10.18. Fruncido
natural_image
Technical line drawing of a sewing machine with no visible text or symbols
natural_image
Technical line drawing of a sewing machine needle and base plate (no text or symbols)natural_image
Technical line drawing of a sewing machine needle and base plate (no text or symbols)natural_image
Diagram showing a mechanical assembly with a hand holding a tool, no text or symbols present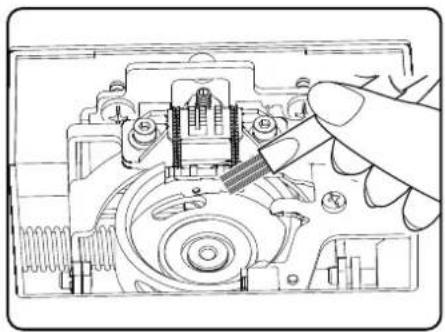
natural_image
Technical line drawing of a mechanical assembly with a hand holding a tool (no text or symbols visible)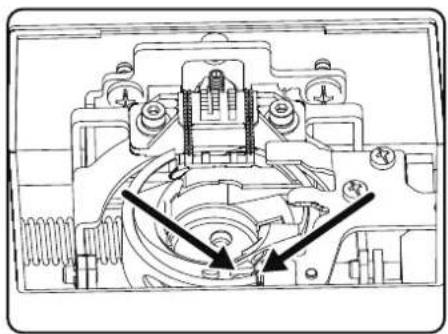
natural_image
Technical line drawing of a mechanical assembly with no visible text or symbolsnatural_image
Line drawing of a foot pressing down on a wooden block with a curved arrow indicating rotation (no text or symbols)natural_image
Diagram of a door handle with an arrow indicating bidirectional movement or alignment (no text or symbols)natural_image
Technical line drawing of a mechanical assembly or assembly (no visible text or symbols)natural_image
Technical line drawing of a mechanical assembly with a cylindrical component and mounting base (no text or symbols)
natural_image
Illustration of a hand using a tool to adjust or install a mechanical component, with no visible text or symbols.natural_image
Simple line drawing of a hand pressing a button on a vehicle door panel (no text or symbols)natural_image
Illustration of a hand operating a device with a green dashed line indicating rotation (no text or symbols)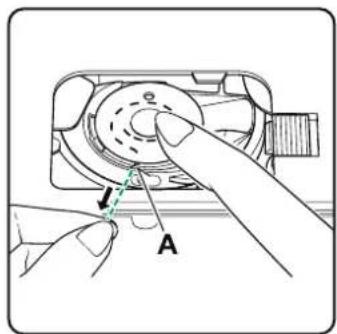
natural_image
Diagram of a mechanical device with directional arrows indicating motion or force (no text or symbols)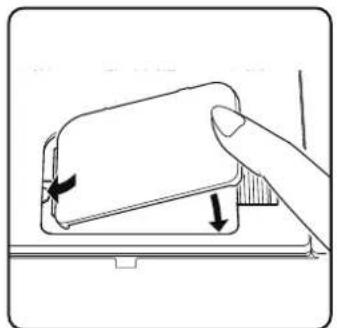
natural_image
Illustration of a hand pressing down on a device component with directional arrows indicating motion (no text or symbols)8.5.Infi latura del fi lo superiore
natural_image
Illustration showing a hand holding a tool with an arrow indicating motion (no text or symbols present)
natural_image
Diagram of a sewing machine with an arrow indicating upward motion (no text or symbols)natural_image
Diagram of a camera with an arrow indicating rotation and dashed red lines suggesting alignment or motion (no text or symbols)natural_image
Technical line drawing of a mechanical assembly with no visible text or symbolsnatural_image
Technical line drawing of a mechanical component with an inset showing a hand holding a curved arm (no text or symbols present)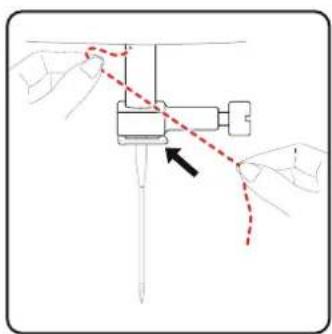
natural_image
Diagram of a mechanical assembly with hands and a red dashed line indicating a motion or connection (no text or symbols present)natural_image
Technical line drawing of a sewing machine mechanism with no visible text or symbolsnatural_image
Technical diagram of a sewing machine with no visible text or symbols
natural_image
Technical line drawing of a sewing machine needle and base plate assembly (no text or symbols)9. Impostazioni
natural_image
Diagram of a sewing machine needle and handle mechanism with directional arrows (no text or labels)
natural_image
Diagram of a sewing machine needle stitching fabric, showing angle and direction arrows (no text or symbols)
CONSIGLIO
natural_image
Illustration of hands operating a sewing machine with a sewing machine needle (no text or symbols visible)10.7. Taglio del fi lo
natural_image
Illustration of a sewing machine needle stitching a coiled fabric (no text or symbols visible)10.11.6. Puntoelastico
natural_image
Technical illustration of a sewing machine needle stitching fabric (no text or symbols visible)10.11.9. Punto a nido d'ape o punto smock
natural_image
Diagram showing a curved structure with internal texture and arrows indicating direction (no text or symbols)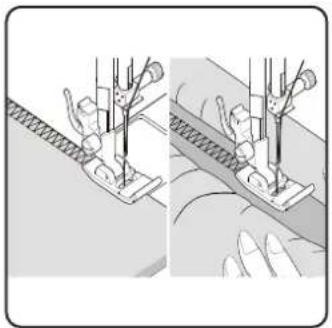
natural_image
Illustration of two fabric sewing techniques showing hand positioning and fabric cutting (no text or symbols)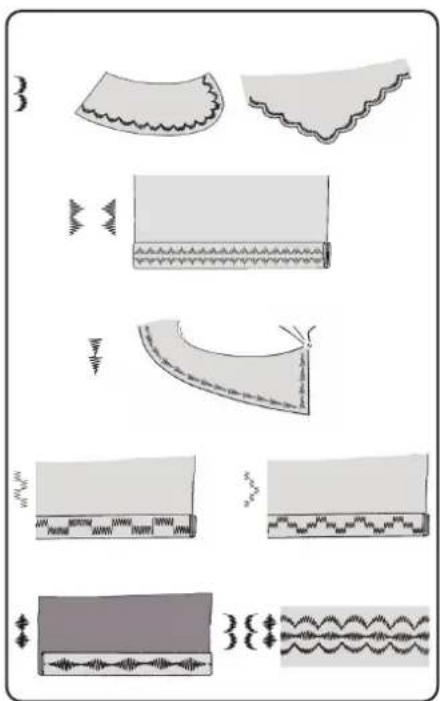

natural_image
Illustration of two mechanical components with arrows indicating motion, no text or symbols present
natural_image
Illustration of a hand holding a tool with a screwdriver inserted into a clip (no text or symbols)natural_image
Technical line drawing of a machine with internal components and a close-up inset showing a switch mechanism (no text or symbols)
natural_image
Line drawing of two different types of hair blisters or clips, shown from top and side views (no text or symbols)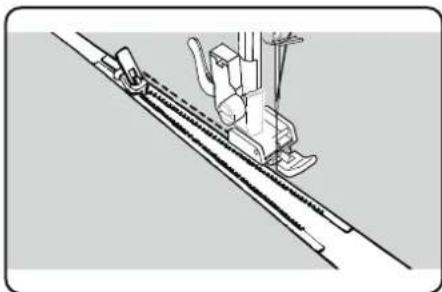
natural_image
Technical line drawing of a sewing machine needle and chain (no text or symbols)
natural_image
Technical illustration of a sewing machine needle stitching a fabric sheath (no text or symbols)
natural_image
Diagram showing a curved surface with radial lines and an arrow pointing to it, no text or symbols present.
natural_image
Illustration of a sewing machine needle stitching fabric (no text or symbols)10.18. Increspature
Piedino premistoffa:....piedino standard
natural_image
Technical line drawing of a sewing machine with no visible text or symbols
natural_image
Technical line drawing of a sewing machine needle and base plate (no text or symbols)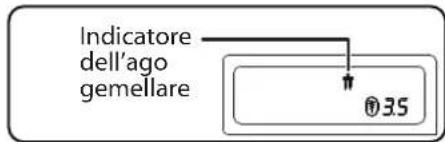
natural_image
Technical line drawing of a sewing machine needle and base plate (no text or symbols)natural_image
Diagram showing a hand holding a small mechanical component with an arrow pointing to a component inside (no text or symbols present)
natural_image
Technical line drawing of a mechanical assembly with a hand operating a tool (no text or symbols present)
natural_image
Technical diagram of a mechanical assembly with no visible text or symbols1. Information about this user manual 237
1.1. Explanation of symbols....237
2. Proper use 237
3. Declaration of conformity 237
4. Safety instructions 237
4.1. Keep children away from electrical appliances 237
4.2. Mains cable and power supply 238
4.3. General information....238
4.4. Never carry out repairs yourself....238
4.5. Handle the appliance with care 238
4.6. Cleaning and storage 239
5. Package contents....239
6. Appliance overview 240
7. Electrical connections 245
7.1. Controlling the sewing speed 245
7.2. Attaching and removing the extension table....246
7.3. Accessories 246
8. Preparatory work.... 247
8.1. Fitting a spool 247
8.2. Winding thread onto the bobbin 247
8.3. Removing the bobbin....248
8.4. Inserting the bobbin 249
8.5. Threading the upper thread .....250
8.6. Illustration of the upper thread guide 251
8.7. Automatic needle threader....252
8.8. Bringing up the bobbin thread 253
9. Settings 254
9.1. Setting the thread tension....254
9.2. Adjusting the upper thread tension 254
9.3. Checking the thread tension 255
9.4. Setting the needle end position 256
10. Sewing 257
10.1. General information....257
10.2. Selecting the right needle 257
10.3. Raising and lowering the presser foot.... 257
10.4. Reverse stitching/pattern finishing....258
10.5. Removing fabric from the sewing machine 258
10.6. Changing the sewing direction....258
10.7. Cutting the thread....258
10.8. Programme selection 259
10.9. Stitch width adjustment 259
10.10. Stitch length adjustment....259
10.11. Stitch type settings 259
10.12. Decorative stitches....264
10.13. Pattern stitches....264
10.14. Letter patterns....264
10.15. Buttonholes....265
10.16. Sewing on buttons and eyelets 266
10.17. Sewing in zips 267
10.18. Gathering 268
10.19. Sewing on appliqués....268
10.20.Sewing with a twin needle 268
10.21. Sewing with the free arm....269
11. Maintenance, care and cleaning 270
11.1. Replacing the needle ....270
11.2. Removing and fitting the presser foot....271
11.3. Removing and fitting the presser foot holder....271
11.4. Maintaining the sewing machine 271
- Faults.... 273
12.1. Helpful messages 274
- Fabric, thread and needle table 275
13.1. Useful sewing tips 275
- Programme selection 276
14.1. Stitch programmes....276
14.2. Letter programmes 277
- Disposal 278
- Technical specifications.... 278
- Declaration of conformity 278
- Service information.... 279
- Legal Notice....279
1. Information about this user manual

Thank you for choosing our product. We hope you enjoy using this appliance.
Please read the safety instructions and the user manual carefully before using the appli-
ance for the first time. Note the warnings on the appliance and in the user manual.
Always keep the user manual close to hand. If you sell the appliance or give it away, please ensure that you also pass on this user manual. It is an essential component of the product.
1.1. Explanation of symbols
If a block of text is marked with one of the warning symbols listed below, the hazard described in that text must be avoided to prevent the potential consequences described there from occurring.
Danger!
Warning: risk of fatal injury!

Warning!
Warning: risk of possible fatal injury and/or serious irreversible injuries!

Caution!
Warning: risk of minor and/or moderate injuries!

Notice!
Follow these instructions to prevent damage to the appliance!

More detailed information about using the appliance!

Follow the instructions in the user manual!

Tip
Sewing tips to make work easier

Symbol for protection class II

Symbol for tested safety
2. Proper use
Your appliance can be used in a range of ways:
The sewing machine can be used to sew together and embellish seams on light to heavy-weight material.
The material can be made of textile fibres, composite materials or lightweight leather.
- The appliance is only intended for private use and not for industrial/commercial use.
Please note that we shall not be liable in cases of improper use:
- Do not modify the appliance without our consent and do not use any auxiliary equipment that we have not approved or supplied.
- Only use replacement parts or accessories that we have supplied or approved.
- Comply with all the information in this user manual, especially the safety instructions. Any other use is considered improper and can cause personal injury or property damage.
- Do not use the appliance in extreme environmental conditions.
3. Declaration of conformity
Medion AG hereby declares that the product conforms to the following European requirements:
• EMC Directive 2014/30/EU
• Low Voltage Directive 2014/35/EU
• Ecodesign Directive 2009/125/EC
• RoHS Directive 2011/65/EU

4. Safety instructions
4.1. Keep children away from electrical appliances
This appliance can be used by children of 8 years and older, and by people with reduced physical, sensory or mental capacity, or with a lack of experience and/or knowledge, but only with proper supervision, or if they have been told how to use the appliance safely, and have understood the risks involved if they use it improperly. Children must not be allowed to play with the appliance. Do not allow children to clean the appliance or perform maintenance tasks on it unless they are aged 8 years or older, and properly supervised.
■ Do not allow children younger than 8 years old near the appliance and its power cable.
DANGER!
Risk of choking and suffocation!
Packaging film can be swallowed or used improperly, creating a risk of choking and suffocation.
- Keep packaging material such as plastic film or plastic bags away from children.
4.2. Mains cable and power supply
■ Only connect the appliance to an easily accessible socket (230 V \~ 50 Hz) that is close to where you have set up the appliance. The power socket must be easily accessible so that you can unplug the appliance from the mains quickly if necessary.
■ When unplugging, always hold the plug itself and never pull on the cable.
■ Fully unwind the cable during use.
■ You must position the mains cable and extension cable so that no one can trip over them.
■ The cable may not touch any hot surfaces.
■ If you leave the sewing machine unattended, unplug the mains plug to prevent accidents due to unintentional start-up of the machine.
■ Switch off the sewing machine and unplug the mains plug for the following tasks: threading the needle, replacing the needle, setting the presser foot, cleaning and maintenance work, at the end of sewing work and when work is interrupted.
4.3. General information
■ The sewing machine must not get wet – there is a risk of electric shock!
■ Never leave the sewing machine unattended when switched on.
■ Do not use the sewing machine outdoors.
■ Do not use the sewing machine when damp or in damp environments.
■ The appliance may only be operated with the supplied type ES01FC foot control pedal.
4.4. Never carry out repairs yourself

WARNING!
Risk of electric shock!
There is a risk of electric shock if repairs are not carried out by qualified personnel!
■ Never attempt to open or repair the appliance yourself.
In the event of a fault or if the power cable of this appliance is damaged, contact the Service Centre or another suitable specialist workshop.
■ If the appliance or power cable is damaged, remove the mains plug from the socket immediately.
■ If there is visible damage to the sewing machine, or power cable, the appliance may not be used. This is to avoid hazards.
■ If there is damage to the power cable on this appliance, it must be replaced by the
manufacturer, its customer service department, or another suitably qualified person. This is necessary to avoid hazards.
4.5. Handle the appliance with care
■ Place the sewing machine on a sturdy, level work surface.
■ When the appliance is in use, the ventilation openings must remain free: do not allow any foreign objects (e.g. dust, pieces of thread etc.) to get into the openings.
- Keep the foot control pedal free from fluff, dust and offcuts of fabric.
■ Never place anything onto the foot control pedal.
■ Use only the supplied accessories.
■ Only use specialist sewing machine oil
to lubricate the machine. Do not use any other liquids.
■ Take care when operating the moving parts of the machine, particularly the needle. There is also risk of injury when the machine is not connected to the power supply.
■ When sewing, ensure that you do not place your fingers under the needle clamp screw.
■ Do not use bent or blunt needles.
■ When sewing, do not hold the fabric tig and do not pull on the fabric. This could cause the needle to break.
■ Always place the needle in the highest position at the end of sewing work.
■ When leaving the machine and before maintenance work, always switch off the machine and unplug the mains plug from the socket.
4.6. Cleaning and storage
■ Before cleaning, pull the plug out of the mains socket. Use a soft, dry cloth to clean the appliance. Avoid the use of chemical solutions and cleaning products because these may damage the appliance surface and/or the labels on it.
■ When storing the sewing machine, always cover it with the supplied cover to protect the machine from dust.
5. Package contents
DANGER!
Risk of choking and suffocation!
Packaging film can be swallowed or used improperly, creating a risk of choking and suffocation.
- Keep packaging material such as plastic film or plastic bags away from children.
When you unpack the package, check that the following parts have been supplied:
- Sewing machine
- Extension table
- Mains cable
• Foot control pedal (type ES01FC) - Accessories in the accessory box (overview of contents on the following page)
- Short manual
6. Appliance overview
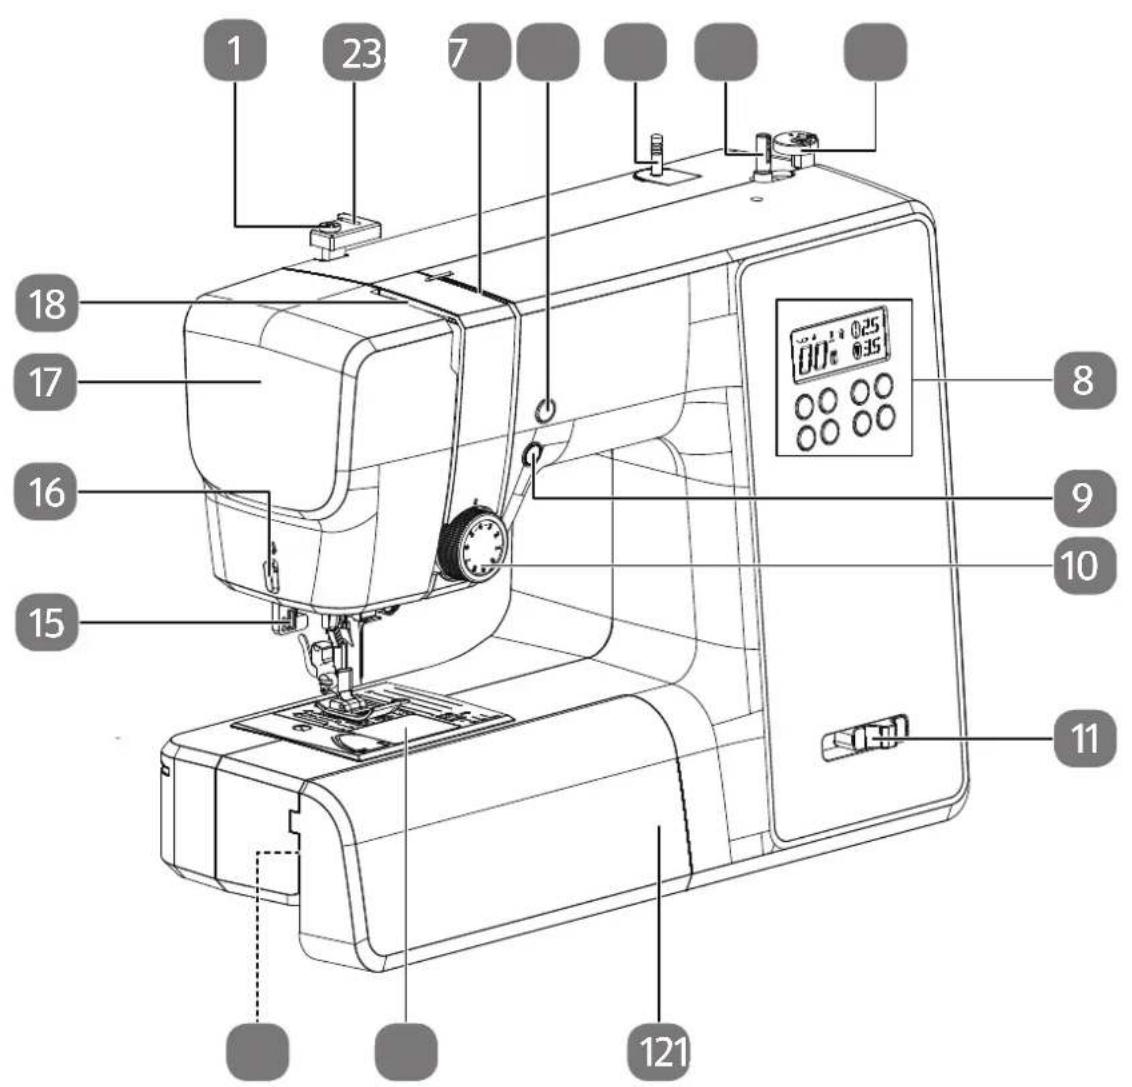
Fig. 1 - Front view
- Bobbin-winding thread guide
- Upper thread guide
- Thread guide
- Needle end position/reverse sewing button
- Spool holder
- Bobbin spindle
- Winding stop with thread cutter
- Display
-
Automatic start/stop
-
Upper thread tension regulator
- Sewing speed regulator
- Extension table
- Bobbin cartridge cover
- Free arm
- Automatic buttonhole lever
- Thread cutter
- Front flap
- Thread take-up
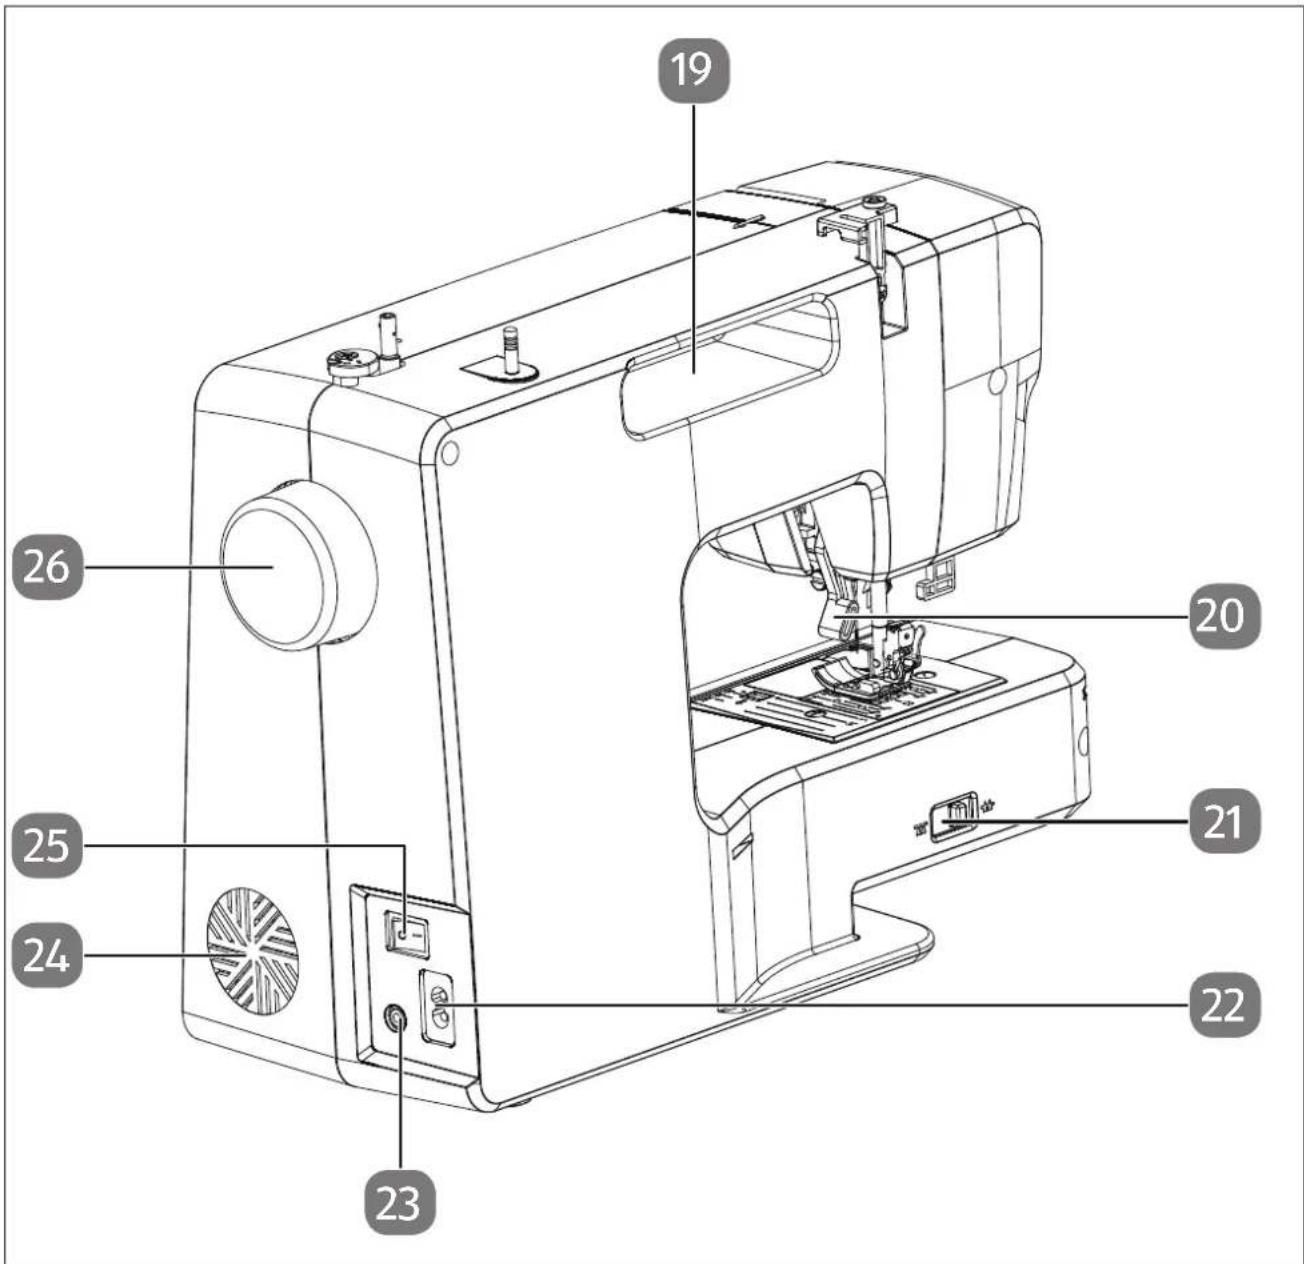
Fig. 2 - Rear view
- Carrying handle
- Presser foot lever
- Drop feed lever
-
Connector housing for mains cable
-
Connector housing for foot control pedal
- Ventilation slots
- Main switch (motor and light)
- Handwheel
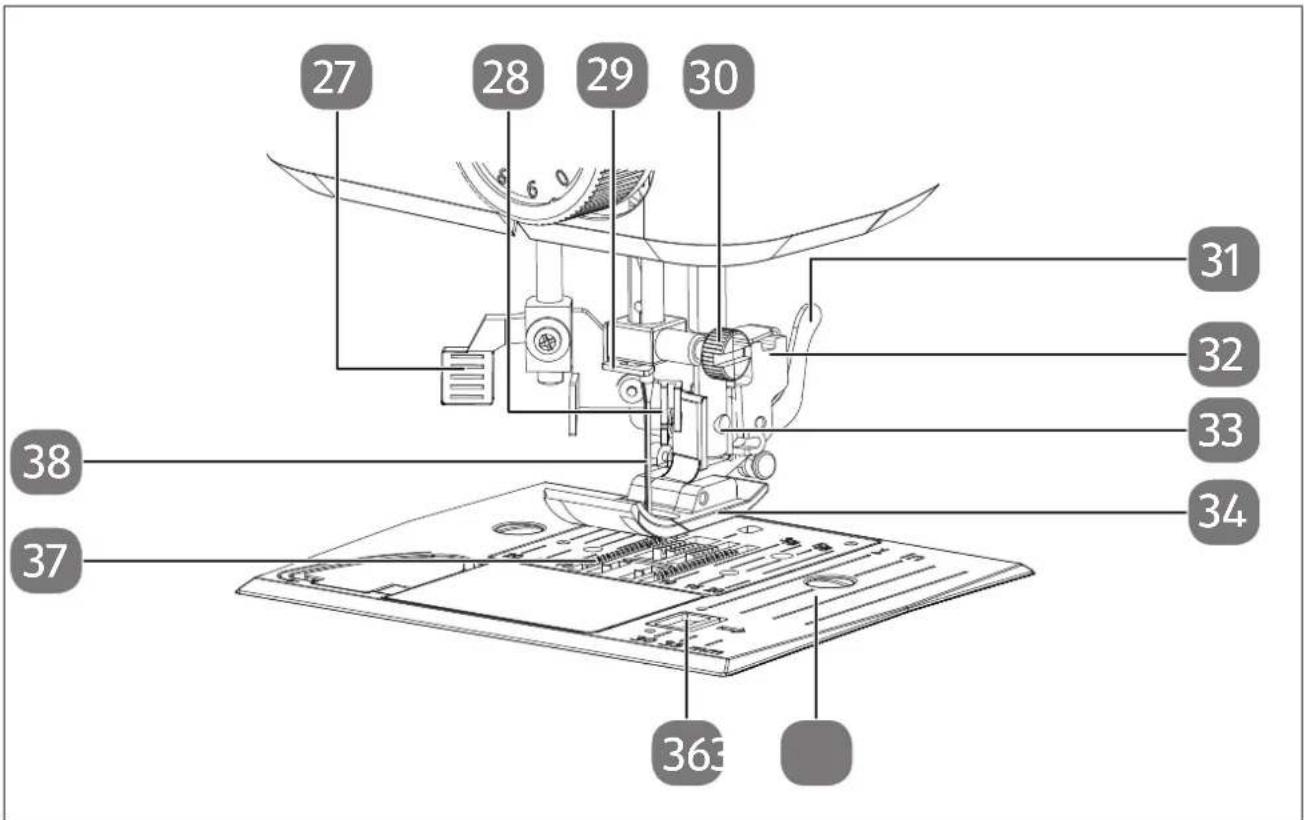
Fig. 3 - Sewing mechanics
- Automatic threading lever
- Threading mechanism
- Needle clamp thread guide
- Needle clamp screw
- Presser foot release lever
-
Presser foot holder
-
Sewing foot holding screw
- Presser foot
- Needle plate
- Bobbin cartridge cover release
- Fabric feeder
- Needle
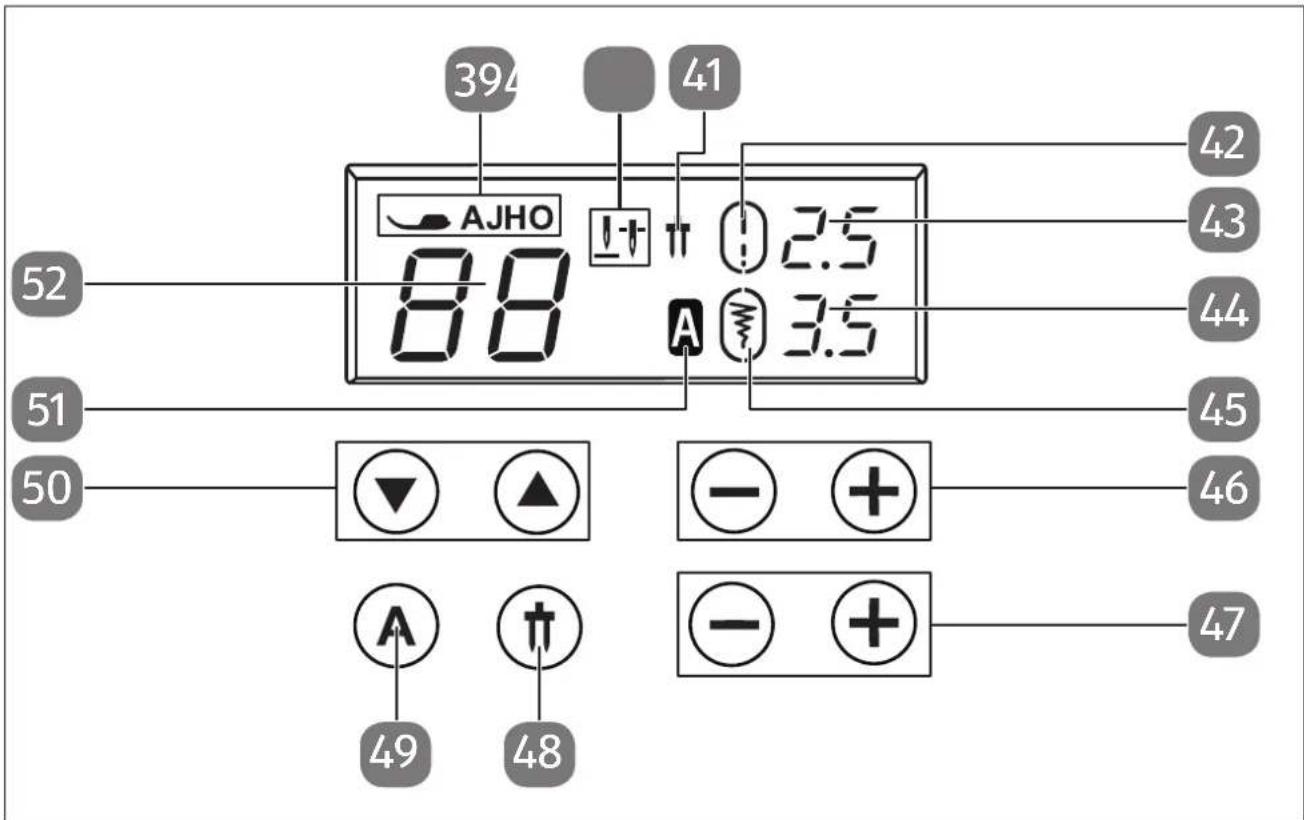
Fig. 4 - Display and control panel
- Presser foot indicator
- Needle end position indicator
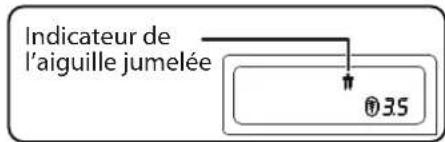
- Twin needle indicator
- Standard stitch length indicator
- Stitch length indicator
- Stitch width indicator
-
Standard stitch width indicator
-
Stitch length selection buttons
- Stitch width selection buttons
- Twin needle mode selection button
- Letter mode selection button
- Channel selection buttons
- Letter mode indicator
- Programme indicator
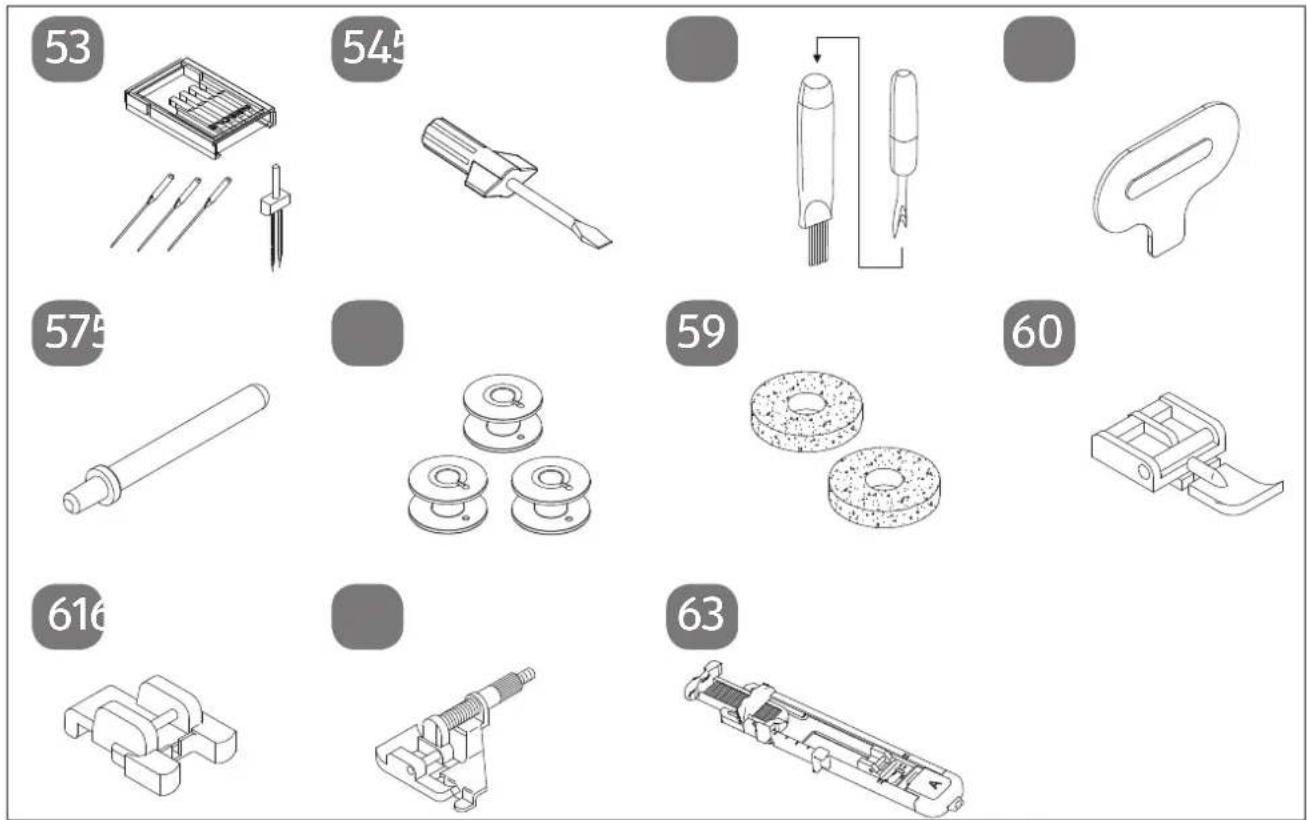
Fig. 5 - Overview of accessories
- Needle assortment
3 standard needles (one already pre-assembled)
1 twin needle
-
Screwdriver (small)
-
Cutter with cleaning brush
-
Special screwdriver for needle plate
-
Additional spool holder
The following parts are not illustrated:
- Standard foot (indicator J) (straight stitch/zigzag stitch) (already assembled)
- Cover
58.3 bobbins (one already pre-assembled)
59.2 felt gliders
-
Zipper presser foot (indicator I)
-
Button sewing foot (indicator O)
-
Blind stitch foot (indicator H)
-
Buttonhole presser foot (indicator B)
7. Electrical connections

NOTICE
Risk of damage!
The use of unsuitable accessories can cause damage to the appliance.
■ Use only the supplied foot control pedal type ES01FC.

CAUTION!
Risk of injury!
There is a risk of injury from accidental operation of the foot control pedal.
■ After finishing work or before maintenance work, always switch off the machine and unplug the mains plug from the socket.
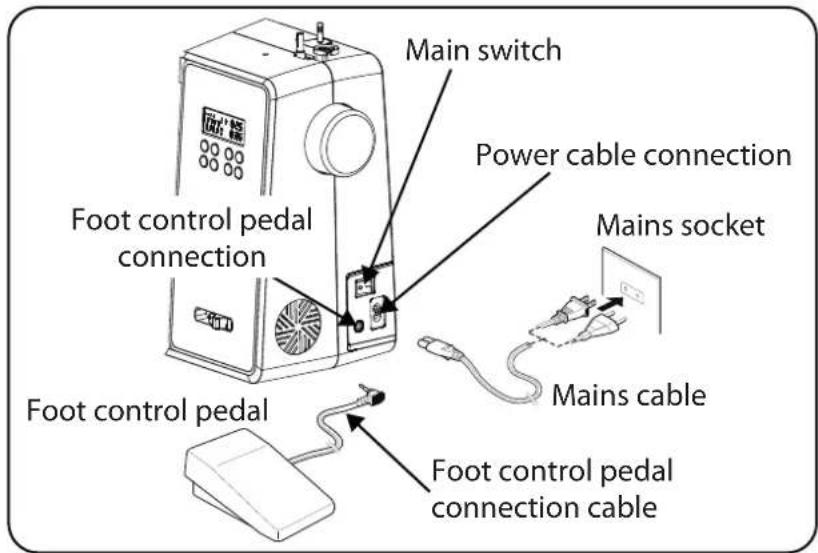
Connect the foot control pedal to the foot control pedal connection on the sewing machine.
Connect the coupling connector for the supplied mains cable to the connector housing on the machine and then plug the mains plug into the socket.
▶ Switch on the sewing machine using the mains switch (25). The on/off switch turns on both the sewing machine and the sewing light.
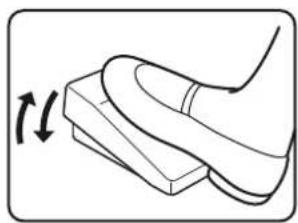
7.1. Controlling the sewing speed
7.1.1. Normal operation with foot control pedal
The sewing speed is controlled using the foot control pedal. This means that the sewing speed can be changed by exerting more or less pressure on the foot control pedal.
natural_image
Line drawing of a foot pressing down on a wooden block with a curved handle (no text or symbols)7.1.2. Manual operation without foot control pedal
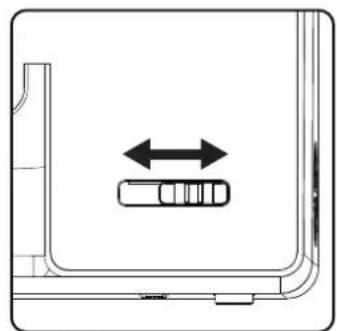
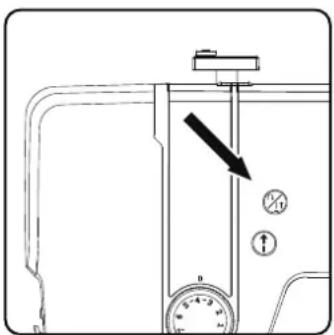
The sewing speed can also be controlled manually using the speed regulator (5).
Remove the foot control pedal to activate manual control.
▶ Press the START/STOP button ⬆ (10) on the sewing machine to start or stop the sewing process.
natural_image
Diagram showing a vehicle inside a vehicle door with bidirectional arrow indicating movement (no text or symbols)During the sewing process, slide the speed regulator to the right to increase the speed or to the left to decrease the speed.
natural_image
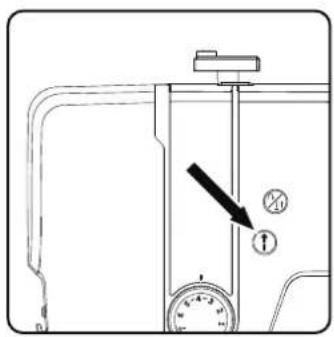
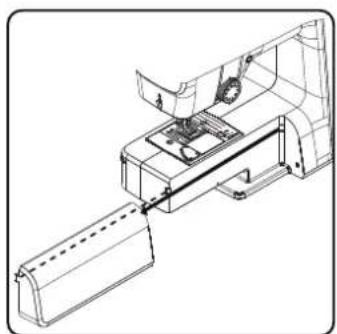
Technical line drawing of a mechanical assembly with no visible text or symbols7.2. Att aching and removing the extension table
The machine is supplied with a work table attached.
The extension table is removed by pushing it carefully to the left.
To attach the extension table, carefully place the extension table onto the machine and push it to the right until it audibly clicks into place.
7.3. Accessories
▶ You will find the accessories in a plastic bag behind the extension table.
8. Preparatory work
8.1. Fitting a spool

TIP
Most spools have a notch to hold the thread in place after use. Make sure that this notch is pointing downwards in order to ensure that the thread will run evenly and will not catch.
▶ Pull the spool holder (7) up out of the machine until it audibly clicks into place.
Place the felt glider onto the spool holder.
Place the spool onto the spool holder.
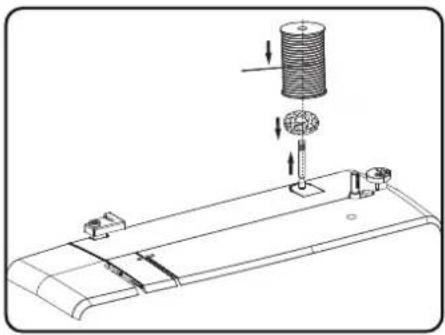
natural_image
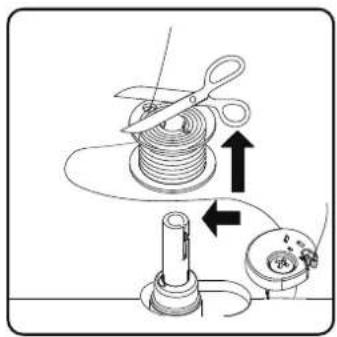
Technical line drawing of a mechanical assembly with a cylindrical component and mounting base (no text or symbols)8.2. Winding thread onto the bobbin
Bobbins can be wound onto the sewing machine quickly and easily.
To do this, guide the thread from the spool through the bobbin-winding thread guide to the bobbin.
The exact procedure for winding thread onto the bobbin is described in the following points:
Insert the additional spool holder into the corresponding opening.
▶ Guide the thread from the spool through the bobbin-winding thread guide as shown in the diagram.


▶ Feed the end of the thread through the hole in the bobbin, as illustrated, and wind the thread around the bobbin a few times by hand. Place the bobbin on the spindle with the end of the thread facing upwards to the bobbin.

natural_image
Illustration of a hand using a tool to adjust or install a mechanical component, with no visible text or symbols.▶ Move the bobbin spindle to the right towards the winding stop until it audibly clicks into place.
i
Once the bobbin spindle has engaged on the right-hand side, the LED display changes from the programme number to the symbol. At the same time, the sewing mechanism is also switched off so that the needle does not move while the thread is being wound.
Hold the end of the thread firmly and press the foot control pedal. Once some thread has been wound onto the bobbin, let go of the end of the thread. Wind until the bobbin spindle stops turning.
▶ Move the bobbin spindle to the left and remove the bobbin.
i
The LED display switches from the symbol back to the programme number indicator and the sewing mechanism is reactivated.
▶ Cut off excess threads.
8.3. Removing the bobbin
▶ Move the needle to the highest position by turning the hand wheel and the presser foot lever.
▶ Open the bobbin cartridge by pushing the release slider to the right.
Remove the bobbin cartridge cover.
Then carefully remove the bobbin from the bobbin cartridge.
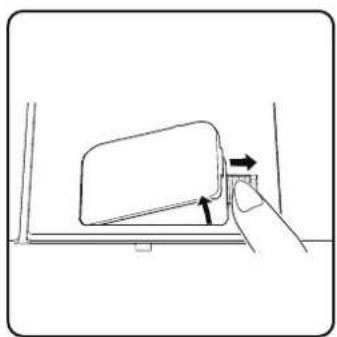
natural_image
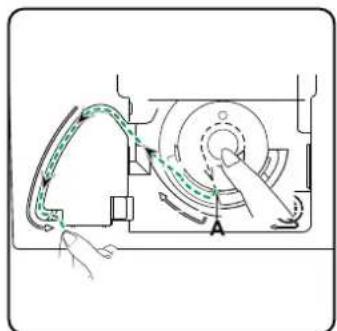
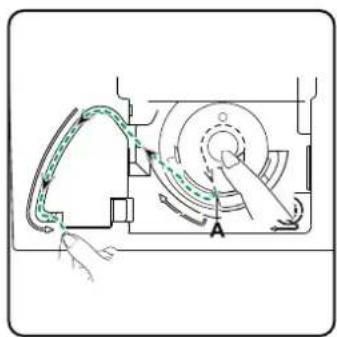
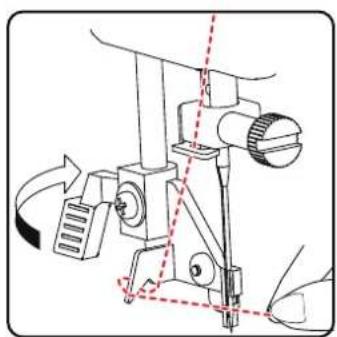
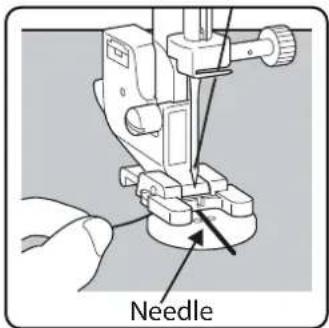
Line drawing of a hand pressing a button on a vehicle door panel (no text or symbols)8.4. Insertingthebobbin
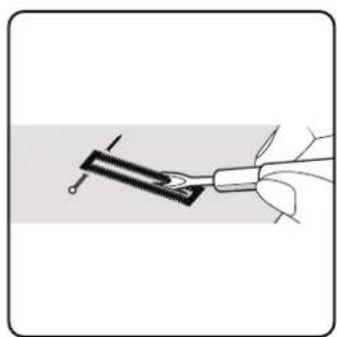
▶ Hold the bobbin between the thumb and index finger and leave about 15 cm of thread hanging out.
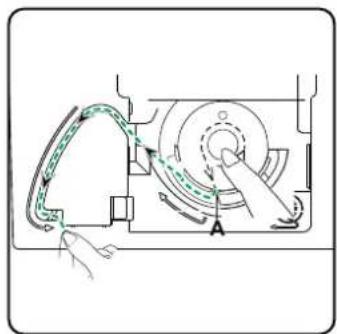
Place the bobbin carefully into the bobbin cartridge so that the thread is wound down from the bobbin and the bobbin turns anticlockwise if you pull on the thread.
Now pass the thread from right to left into the tensioning spring (slot A).
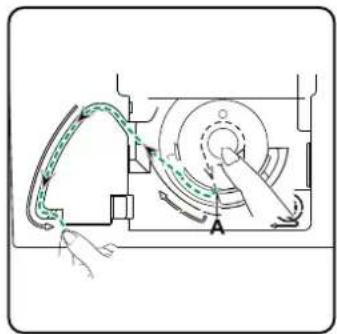
▶ Gently hold the bobbin with your fingers and guide the thread through the slot to the left of the bobbin cartridge as labelled on the needle plate.
Cut the thread at the end of the slot using the integrated thread cutter.
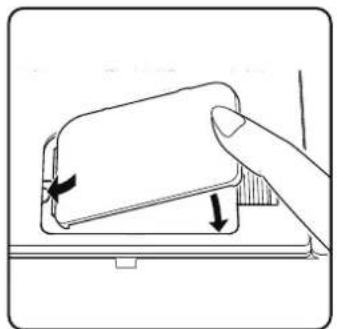
▶ Close the bobbin cartridge cover again by first inserting the cover on the left-hand side and then pressing it firmly until you hear it click into place.

natural_image
Illustration of a hand using a tool to adjust or install a mechanical component, with no visible text or symbols.
natural_image
Diagram of a mechanical device with rotating components and directional arrows (no text or symbols)
natural_image
Illustration of a hand pressing down on a device component with directional arrows indicating motion (no text or symbols)
natural_image
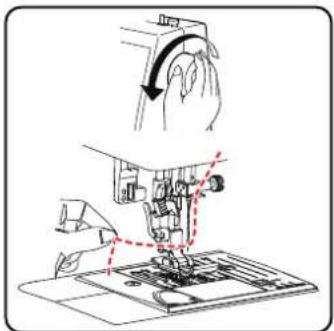
Illustration showing a hand holding a tool with an arrow indicating motion (no text or symbols present)8.5. Threading the upper thread
Please read the following instructions carefully as an incorrect sequence or thread guiding can lead to broken threads, missed stitches and gathered fabric.
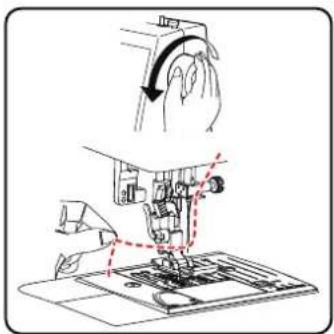
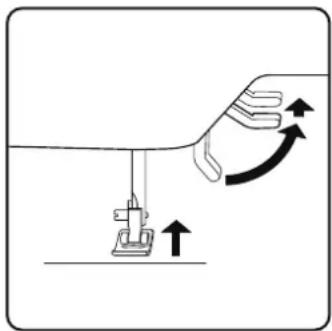
Before threading the needle, raise the needle to its top position by turning the hand wheel.
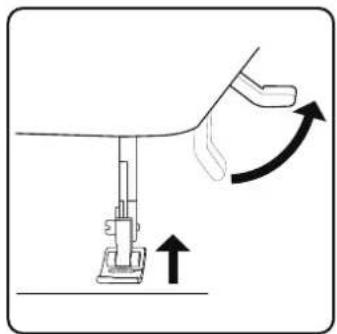
natural_image
Diagram of a sewing machine with an arrow indicating upward motion (no text or symbols)▶ Also raise the presser foot lever to its upper position: this releases the thread tension and allows easy threading of the upper thread.
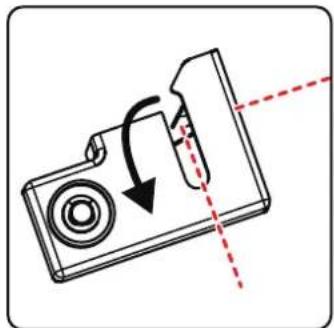
natural_image
Diagram of a camera with an arrow indicating rotation and dashed red lines suggesting alignment or alignment (no text or symbols)- Place a spool onto one of the spool holders. - Now pass the thread under the clamp spring of the upper thread guide.
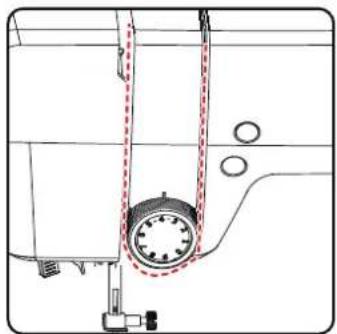
natural_image
Technical line drawing of a sewing machine component with no visible text or symbols▶ Then let the thread run through the slot to the upper thread tension regulator.

Unlike most sewing machines, the tension discs of the upper thread tension regulator are not directly visible. Therefore, be very careful that the thread lies between the tension discs and does not run through the machine anywhere else.
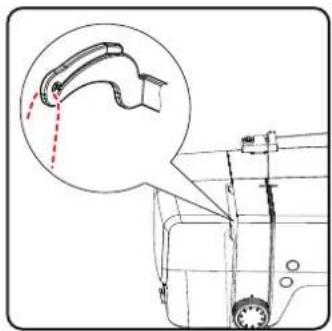
▶ Guide the thread upwards under the front thread tension regulator and the inner guide spring is automatically pushed upwards.
TIP
An upper thread tension of 3–4 is ideal for most applications.
▶ Then insert the thread from right to left into the hook of the thread take-up.

If necessary, turn the handwheel to raise the thread take-up.
Now guide the thread back down towards the needle, passing it through the needle clamp thread guide.
natural_image
Technical line drawing of a mechanical component with an inset showing a curved pipe or lever mechanism (no text or symbols present)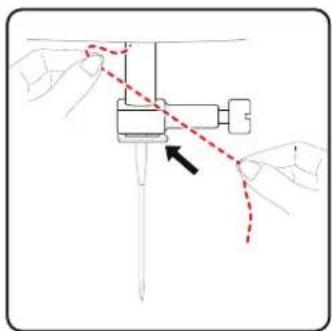
natural_image
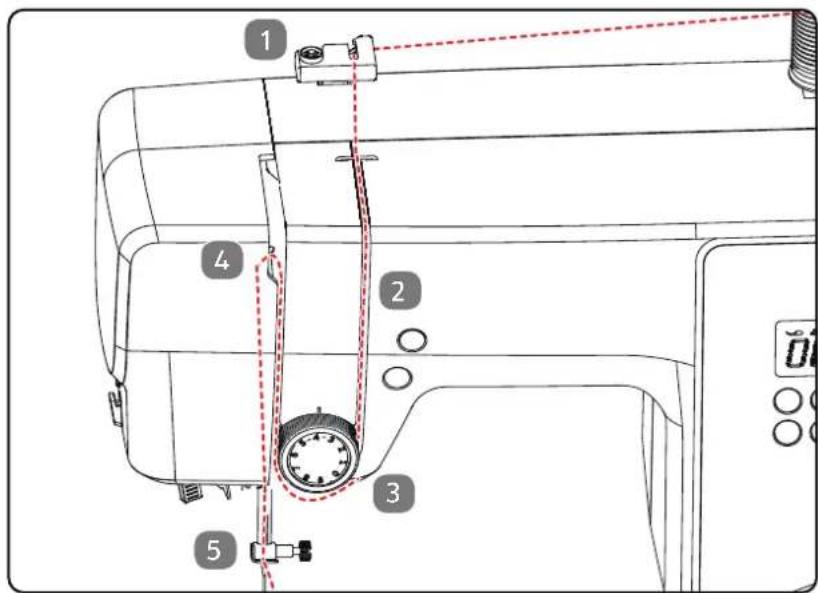
Diagram of hands operating a sewing machine with a red dashed line indicating the motion path (no text or symbols present)8.6. Illustration of the upper thread guide
For a better overview, you will find a schematic representation of the thread path of the upper thread here.
The numbers indicate the sequence of steps in the threading process. You will also find the numbers on the sewing machine housing.
8.7. Automatic needle threader
The sewing machine has an automatic threader that makes threading the upper thread easier.

NOTICE
Risk of damage!
The automatic threader can only be used to thread a normal needle.
■ A twin needle must be threaded manually.
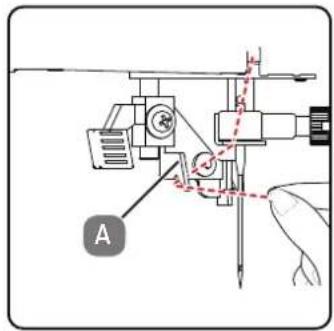
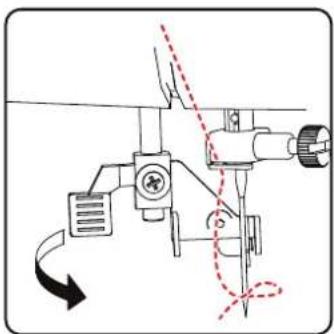
If necessary, turn the handwheel to move the needle to the upper position. Place the thread around thread guide A.
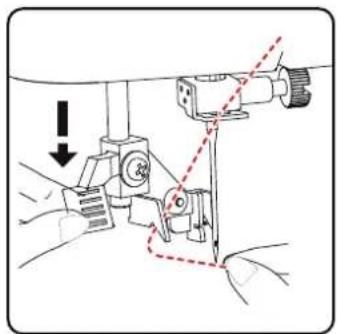
Carefully pull the lever of the threader down as far as possible.
natural_image
Technical line drawing of a sewing machine with no visible text or symbols▶ Turn the lever of the threader clockwise to the rear.
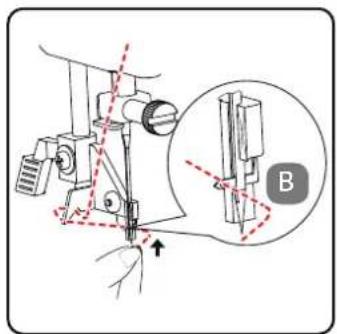
The threader hook B is automatically inserted into the needle eye. Place the thread under the threader hook B.
▶ Carefully return the lever of the threader to its original position. The threader hook A pulls the upper thread through the needle eye and forms a loop behind the needle.
▶ Push the lever of the threader back up and pull the loop completely through the eye of the needle by hand to thread the upper thread completely.
natural_image
Technical line drawing of a sewing machine with no visible text or symbols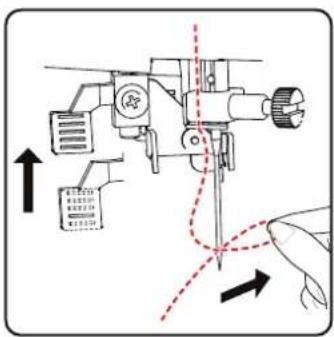
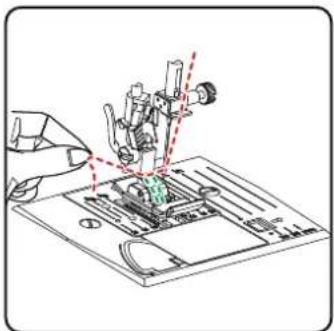
8.8. Bringing up the bobbin thread
▶ Move the presser foot to the upper position. Turn the handwheel towards you with your right hand until the needle is in the upper position.
▶ Hold the upper thread loosely with your left hand and turn the handwheel towards you with your right hand until the needle has moved down and back up again.
Stop turning the handwheel as soon as the needle has reached its highest position.
▶ Pull the upper thread upwards slightly so that the lower thread forms a loop.
▶ Pull around 15 cm of both threads out and back from under the presser foot.
natural_image
Illustration of a hand using a sewing machine to adjust or install electronic components on a circuit board (no text or symbols visible)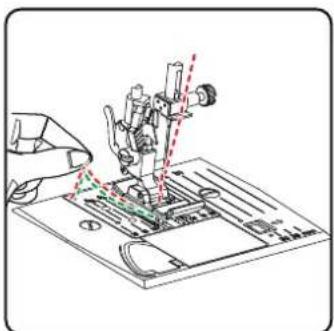
natural_image
Illustration of a hand using a sewing machine to adjust or install a printed circuit board (no text or symbols visible)9. Sett ings
9.1. Sett ing the thread tension
If the thread tears while you are sewing, the thread tension is too high. If small loops are formed when you are sewing, the thread tension is too low.
In both cases, you need to set the thread tension.
The tensions of the upper thread and bobbin thread must be in the correct proportion to each other.
9.2. Adjusting the upper thread tension
The tension is created by the discs through which the thread is guided. The pressure on these discs is controlled by the upper thread tension regulator. The higher the number, the higher the tension.
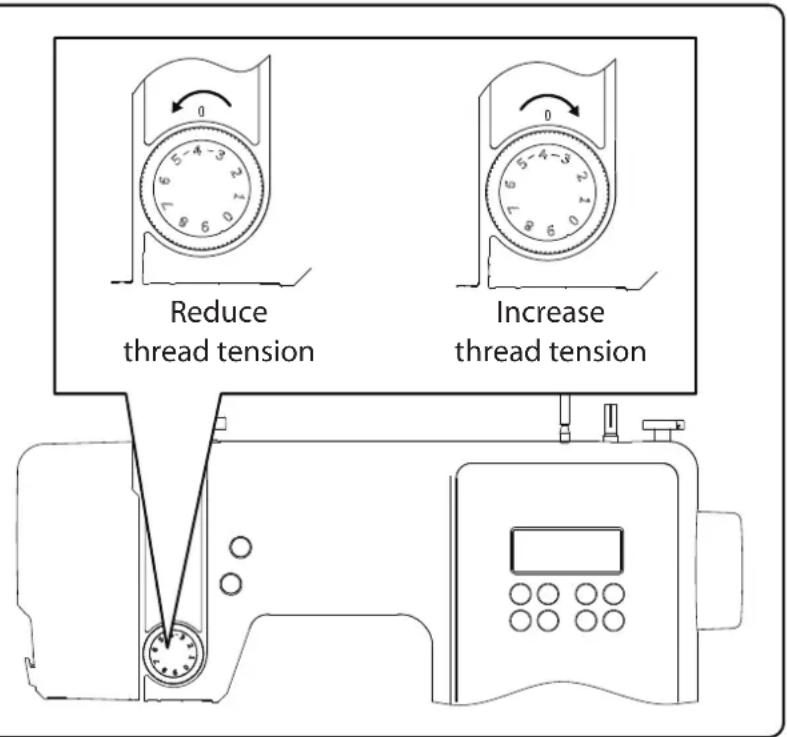

An upper thread tension of 3–4 is suitable for most sewing work.
The upper thread tension is not activated until the presser foot is lowered. There are a number of reasons why you might need to adjust the tension. For example, different tensions are required for different fabrics.
The tension required depends on the strength and thickness of the fabric, the number of layers of fabric you want to sew and the type of stitch you choose.
Please make sure that the tensions of the upper thread and bobbin thread match, as otherwise the fabric may gather.
We recommend that you carry out a test on a scrap of fabric before starting work.
9.3. Checking the thread tension
9.3.1. Correct stitching
The correct setting of upper and bobbin thread tension is achieved when the interlacing of the threads is in the centre of the fabric.
The fabric remains smooth and does not pucker.
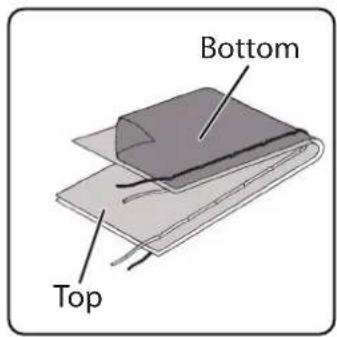
9.3.2. Incorrect stitching
Upper thread is too tight and pulls the bobbin thread up. The bobbin thread is visible on the upper fabric layer.
Solution:
Reduce the upper thread tension by turning the upper thread tension regulator to a lower number.

flowchart
graph TD
    A["Top"] --> B["Thread tension too tight"]
    C["Bottom"] --> D["Thread tension too loose"]
    B --> E["Reduce thread tension"]
    D --> F["Increase thread tension"]
Upper thread is too loose. The bobbin thread pulls the upper thread down. The upper thread is visible on the underside of the fabric layer.
Solution:
Increase the upper thread tension by turning the upper thread tension regulator to a higher number.
9.4. Setting the needle end position
The sewing machine has an automatic needle position system that always moves the needle to the top or bottom position when the sewing process is complete.
You can set whether the needle is to be moved to the top or bottom position.
At the start of every sewing task, the automatic needle position is set to the top position. This is appropriate for most jobs.
If you want to change the end position of the needle, proceed as follows:
▶ Press the multifunction button _1 once to set the position to the lowest position.
The needle is moved to the lowest position.
▶ Press the needle positioning button again to return the needle to the top position.
The display shows you the current position of the needle.

TIP
For sewing work that requires the sewing direction to be changed frequently, we advise setting the needle position to the lowest position, as this makes it easier to turn the fabric.
10. Sewing
10.1. General information
- Switch on the main switch.
- When changing the stitch type, always move the needle to its highest position. Push the fabric sufficiently far under the presser foot. Make sure there is a length of around 10 cm of upper thread and bobbin thread behind the needle.
- Lower the presser foot lever. Holding the thread with your left hand, turn the handwheel towards you and lower the needle to the point on the fabric where you want to start sewing.
- Press the foot control pedal – the further the foot control pedal is pressed, the faster the machine runs. While sewing, guide the fabric gently by hand. Sew a few reverse stitches by actuating the reverse sewing button to fix the first stitches in place.

TIP
If you are not sure whether the thread tension or stitch type, for example, is correct, test the settings on a swatch.
The fabric will run through automatically under the presser foot. It should not be held fast or pulled by hand, but should only be gently guided so that the stitches go in the desired direction.
10.2. Selecting the right needle

NOTICE
Risk of damage!
Using a defective needle can cause damage to the material.
■ Replace defective needles immediately.
The number indicating the needle thickness is written on the shaft.
The higher the number, the thicker the needle.
Stronger needles are used for thicker and more compact fabrics (see also
"13. Fabric, thread and needle table" on page 275).
10.3. Raising and lowering the presser foot
- Raising or lowering the presser foot lever moves the presser foot up or down accordingly.
In order to sew thick fabric, the presser foot can be raised a little to allow extra clearance.
natural_image
Diagram showing a sewing machine needle and its motion with curved arrows indicating rotation (no text or symbols)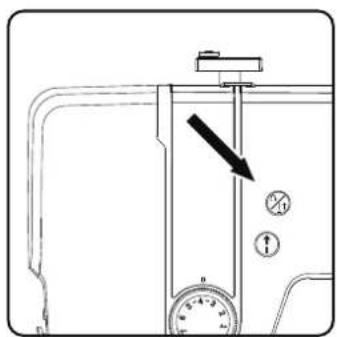
10.4.Reversestitching/patt ern fi nishing
Use reverse stitches to reinforce the first and last stitches on a seam.
10.4.1. Reverse stitching with straight and zigzag stitches
Press the multifunction button, and keep it pressed.
▶ Press the foot control pedal.
▶ If you want to change back to forward stitching, simply release the multifunction button ⚠️.
10.4.2. Pattern finishing for decorative stitches
▶ Press the multifunction button.
The machine automatically makes four small stitches to finish the pattern.
The position of these closing stitches is always exactly where the seam ends.
10.5. Removing fabric from the sewing machine
When you finish sewing, make sure that the needle is at its highest position. To remove the fabric, raise the presser foot and pull the fabric away from you out of the machine.
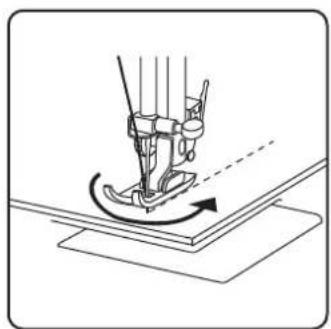
10.6. Changing the sewing direction
Proceed as follows to change direction when you reach the corners of the material:
- Stop the machine and turn the handwheel towards you until the needle is in the fabric.
▶ Raise the presser foot.
▶ Pivot the fabric around the needle to change the direction as desired.
▶ Lower the presser foot again and continue sewing.
natural_image
Line drawing of a sewing machine needle stitching fabric (no text or symbols)TIP
You can also set the needle position for the lowest position; proceed as described in section "9.4. Setting the needle end position" on page 256.
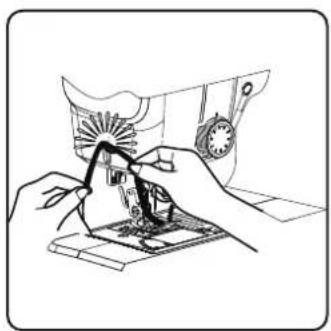
10.7. Cutting the thread
Cut the threads using the thread cutter on the back of the sewing machine or using scissors. Leave around 15 cm of the thread hanging behind the eye of the needle.
natural_image
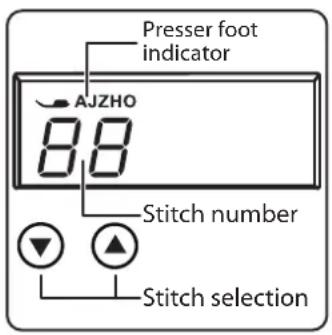
Line drawing of hands operating a sewing machine with a sewing machine (no text or symbols)10.8.Programmeselection
On this sewing machine, you can select a number of different functional and decorative stitches. You can use the program selection dial to simply select the stitch pattern you want.
Before changing the stitch, always make sure that the needle is at its highest position.
▶ Use the "▲" and "▼" buttons to set the desired stitch.
▶ If you press and hold the programme selection buttons for approx. 5 seconds, the programme numbers run through in increments of ten. When you reach the desired programme area, simply release the buttons.
An overview of all stitch types can be found on the control panel of the sewing machine or in section "14. Programme selection" on page 276.
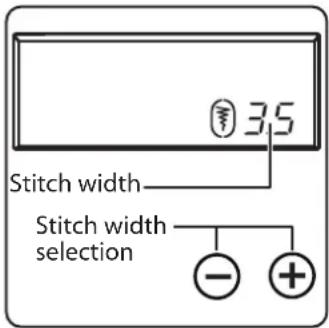
10.9. Stitch width adjustment
You can use the stitch width adjustment to select the width of the stitch pattern you have set.
Press the "-" button to decrease the stitch width or the "+" button to increase the stitch width.
The standard stitch width is indicated on the display by the symbol. If the standard stitch width is changed, the oval around the stitch width symbol disappears.
If you hear a warning tone (multiple beeps) when setting the stitch width, you have reached either the minimum or maximum stitch width.
10.10.Stitchlengthadjustment
You can use the stitch length adjustment to select the length of the stitch pattern you have set.
Press the "-" button to decrease the stitch length or the "+" button to increase the stitch length.
The standard stitch length is indicated on the display with the symbol ⚠. If the standard stitch length is changed, the oval around the stitch length symbol disappears.
If you hear a warning tone (multiple beeps) when setting the stitch length, you have reached either the minimum or maximum stitch length.
10.11. Stitch type sett ings
The stitch types are set using the programme selection buttons. Make sure that the needle is at its highest position before changing the stitch type.
Always test the stitching on a swatch before using a stitch program for your actual work.

An overview of all stitch patterns can be found in the programme table in section "14. Programme selection" on page 276.
Depending on the programme selected, an appropriate presser foot must be used. To insert and remove the presser foot, please refer to "11.2. Removing and fitting the presser foot" on page 271.

10.11.1. Straight stitch
Suitable for general sewing and for top-stitching.
Presser foot: Standard foot
Presser foot indicator:....J
Programme: 0
Stitch length: 0.5 to 4.5
Stitch width: 0.5 to 6.5

NOTICE
Risk of damage!
The wrong pivot point can lead to damage when using a twin needle.
In this case, set the needle high at the pivot point.
10.11.2.Zigzagstitch
The zigzag stitch is one of the most commonly used stitches. It can be used for many different things, for example hemming, appliqué and monograms.
Before you use the zigzag stitch, sew a few straight stitches to reinforce the stitching.
Presser foot: Standard foot
Presser foot indicator:....J
Programme: 3
Stitch length: 0.2 to 3
Stitch width: 0.5 to 7

TIPS FOR ZIGZAG STITCHES
For better results when using zigzag stitch, the upper thread tension must be lower than when sewing straight stitches.
The upper thread should be slightly visible on the underside of the fabric.
10.11.3. Satinstitch
So-called satin stitch, a zigzag stitch in which the stitches are very close together, is particularly suitable for appliqué, monograms, and various decorative stitches.
As various programmes can be used for the satin stitch, all possible programmes can be found in the programme table in section "14. Programme selection" on page 276.
Presser foot: Standard foot
Presser foot indicator:....J
Stitch length: 0.5 to 1.5
Stitch width: 0.7 to 6

TIP
Whenever you use this stitch, reduce the upper thread tension slightly. The wider the stitch, the lower the upper thread tension should be. If you are sewing very thin or soft fabrics, you should place a thin piece of paper under the fabric and sew this too. This prevents stitches being missed and the material gathering.
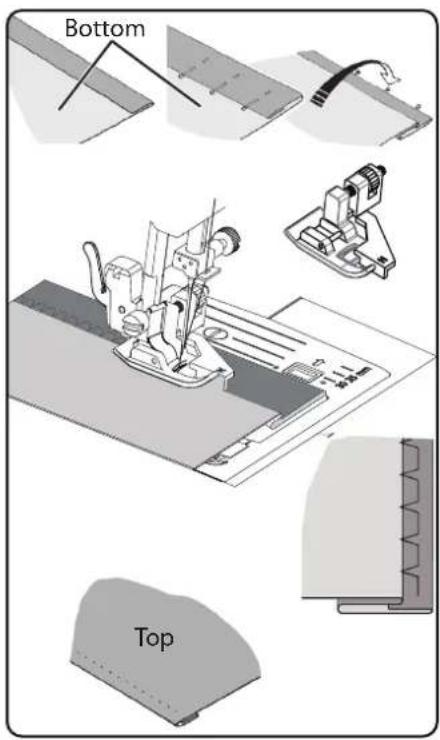
10.11.4. Blindstitch
For blind hemming.
Presser foot:......Blind stitch foot
Presser foot indicator:....H
programme: 4 or 7
Stitch length: 0.8 to 3
Stitch width: 2 to 7
Use a thread colour that exactly matches the fabric.
If you are sewing very light or transparent fabrics, use a transparent nylon thread.
▶ Fold the fabric as shown in the diagram.
▶ Set the presser foot using the adjusting screw B so that the straight stitches are sewn on the hem and the points of the zigzag stitches only penetrate the upper fold of the fabric.
Sew on the pleat as shown in the diagram.
Now take the fabric out of the machine and straighten it out.
The folded-out fabric now has a blind hem stitch.

TIP
Sewing blind stitch requires some practice and should be practised on remnants of fabric before sewing.
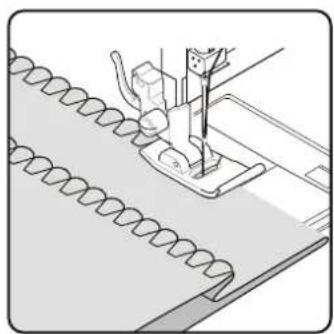
10.11.5.Shellhem
A shell hem is a blind stitch which is mirrored to form a decorative hem.
Particularly suitable for fabric cut on a bias.
Presser foot: Standard foot
Presser foot indicator:....J
Programme: 8
Stitch length:....1 to 3
Stitch width: 1 to 7
The needle should be positioned in relation to the right-hand edge of the fabric so that the stitches loop over the outer edge of the hem.
natural_image
Illustration of a sewing machine needle stitching fabric (no text or symbols)10.11.6. Stretchstitch
This stitch is particularly suitable for sewing seams (sewing two pieces of material together).
It can also be used to reinforce elastic materials and to sew on pieces of fabric. It is also suitable for sewing on elastic (e.g. elastic bands).
Presser foot: Standard foot
Presser foot indicator:...... J
Programme: 1 and 6
Stitch length: 0.2 to 2.1
Stitch width: 3 to 7

TIP
Use a synthetic thread, as this makes the stitches practically invisible.
10.11.7. Sewing on elastic bands
▶ Position the elastic band as required.
▶ Sew on the elastic band with stretch stitch, using your hands to stretch out the elastic band in front of and behind the presser foot. The more you stretch it, the more it will gather.
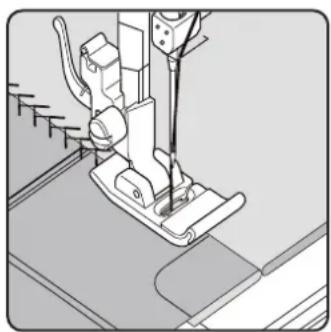
10.11.8. Featherstitch
The feather stitch can be used to butt-stitch two pieces of fabric together.
Presser foot: Standard foot
Presser foot indicator:....J
Programme: 9
Stitch length: 1 to 3
Stitch width: 3 to 6
Place the two fabric edges under the presser foot. Make sure that both edges remain together and that the needle enters the fabric on the left and right at the same distance from the centre.
natural_image
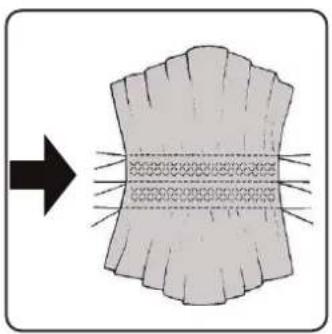
Technical line drawing of a sewing machine needle and base (no text or symbols)10.11.9. Diamond stitch or smocking stitch
Diamond stitch is versatile and decorative, e.g. for sewing on lace or elastic bands or for sewing on stretch and other elastic materials.
Presser foot: Standard foot
Presser foot indicator:....J
Programme: 10 or 32
Stitch length: 1.5 to 3
Stitch width: 3 to 6
For diamond work, please note:
▶ Gather the fabric evenly.
▶ Underlay the ruffles with a narrow strip of fabric and sew over them using diamond stitch.
▶ Finish sewing the diamond pattern before inserting the decorated part into the whole garment.
With very light fabrics, the same effect can be achieved by winding an elastic thread onto the bobbin.
This stitch is particularly suitable for sewing and mending jersey and track-suits. This stitch is as decorative as it is useful. It consists of smooth side lines with cross connections and is fully elastic.
Presser foot: Standard foot
Presser foot indicator:....J
Programme: 11, 12 or 14
Stitch length: 1.5 to 3
Stitch width: 3 to 7
Place the edge of the fabric under the presser foot so that the needle is sewing a straight stitch with the right deflection and just touching the edge of the fabric a zigzag stitch is sewn with the left deflection.
10.11.11. Scallop stitches
Scallop stitches are stitch patterns with decorative but also practical applications.
Presser foot: Standard foot
Presser foot indicator:....J
Programme: 45 to 59
Stitch length: 0.3 to 1.5
Stitch width: 3 to 7
The curved seam (programme 54 or 55), for example, is ideal for sewing decorative patterns for tablecloths, napkins, collars, cuffs etc.
natural_image
Diagram showing a curved structure with internal texture and directional arrow, no text or symbols present
natural_image
Illustration of two fabric sewing techniques showing a sewing machine and a sewing machine with a sewing machine (no text or symbols present)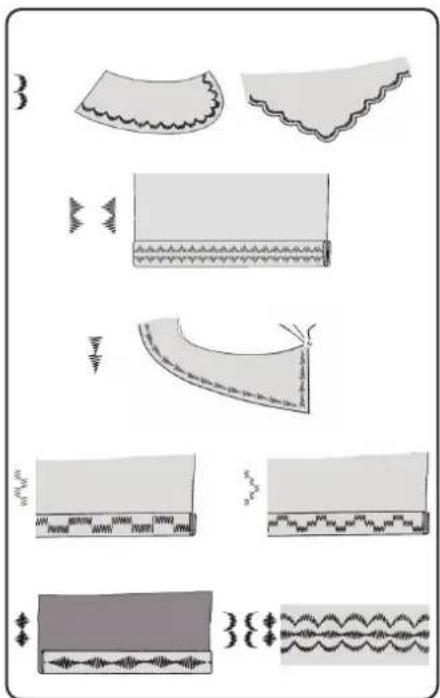
natural_image
Illustration of fabric patterns and seam details (no text or symbols)
10.12. Decorative stitches
Decorative stitches are stitch patterns with a decorative application similar to scallop stitches.
Presser foot:....Standard foot
Presser foot indicator:....J
Programme: 35 to 90
Stitch length: 0.3 to 4
Stitch width: 0.5 to 7
10.13. Pattern stitches
Pattern stitches are suitable for decorating children's clothing or as decorative stitching on sets, aprons etc.
Presser foot:....Standard foot
Presser foot indicator:....J
Programme:....74 to 89
Stitch length: 1.7 to 2.5
Stitch width: 6.5

With decorative and pattern stitches, you should experiment with different stitch widths on a scrap of fabric to achieve the best result.
10.14.Lett er patt erns

An overview of all letter stitches can be found in the programme table in section "14.2. Letter programmes" on page 277.
10.14.1. Select letters
▶ Press the Ⓐ button to switch on letter mode; the ⚠ symbol is shown on the display.
Now use the "▲" or "▼" buttons to select the desired programme or letter.
▶ Press and hold the "▲" or "▼" buttons to start a quick programme run. In the quick search mode, the programmes change in increments of ten.
▶ Start sewing slowly, the machine stops automatically after each completed letter.
10.14.2. Setting the spacing between letters
▶ You can influence the distance between the letters using the stitch length.
Press the "-" button to decrease the stitch length or the "+" button to increase the stitch length.
10.15. Butt onholes
The sewing machine has five fully automatic buttonhole programmes that sew a buttonhole in a single step.

TIP
To determine the right stitch length, width and width, we recommend sewing a sample buttonhole on a scrap of fabric.
Presser foot: Buttonhole presser foot
Presser foot indicator:......B
Programme: 92 to 99
Stitch length: 0.4 or 1.2
Stitch width: 4
▶ First place the button in the button holder of the buttonhole foot.
▶ Replace the fitted presser foot with the buttonhole foot. Make sure that the upper thread runs through the buttonhole foot.
Mark the place where the buttonhole is to be sewn and place the buttonhole foot there.
If you are sewing very fine fabric or synthetics, reduce the pressure of the presser foot and place a piece of paper on the fabric to prevent the thread from tangling.
10.15.1. Procedure
Place the buttonhole foot on the desired and marked position on your sewing material and lower the presser foot lever.
Carefully pull the lever C of the automatic buttonhole function downwards. Ensure that the lever is positioned within the limit pins A and B of the buttonhole foot.
▶ Select a buttonhole pattern and set the desired stitch length and width.
▶ Start sewing slowly, the sewing machine now creates the complete buttonhole in one sewing step.
The automatic buttonhole lever ensures that the desired length of the buttonhole is maintained and that the sewing direction is changed.
▶ Press and hold the foot control pedal until the sewing machine stops sewing by itself.
▶ Set the sewing foot lever to the highest position and remove the sewing material.
Now separate the buttonhole using the separating knife supplied.

TIP
We recommend putting a pin in front of the top bar to stop you cutting through it.
natural_image
Illustration of two mechanical components with arrows indicating motion, no text or symbols present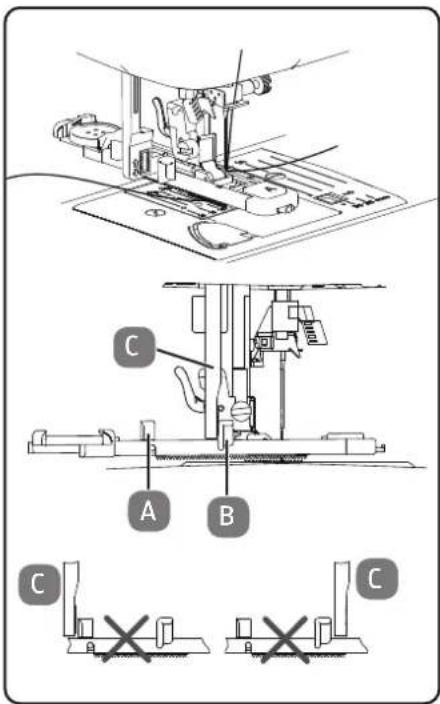
natural_image
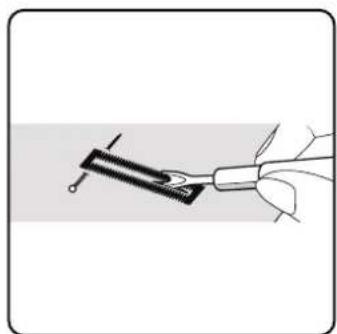
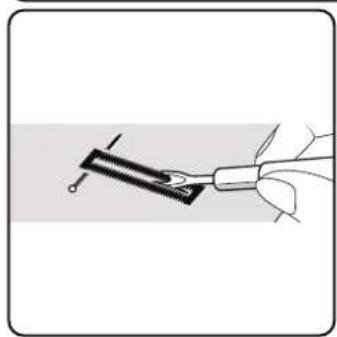
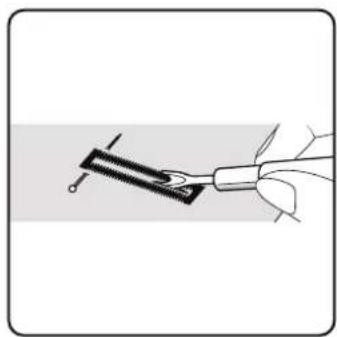
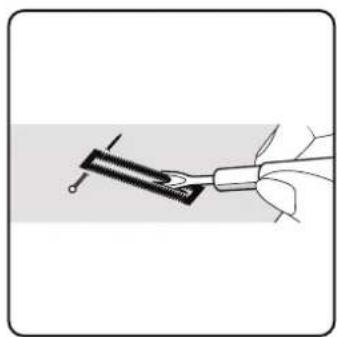
Illustration of a hand holding a tool with a pen inserted into a clip (no text or symbols)10.15.2.
Reinforced
butt onholes
We recommend reinforcing heavy-duty buttonholes with thread (crochet thread, reinforcement yarn or buttonhole yarn).

TIP
Only use the buttonhole programmes with straight ends for buttonholes with reinforcement yarn.
▶ Cut a piece of reinforcement yarn to fit the size of the buttonhole and place it around the buttonhole foot.
▶ Feed the yarn into the hook at the rear end of the presser foot and then bring the yarn forwards and fasten it on the front hook with a knot.
▶ Sew the buttonhole as usual. Ensure that the stitches catch the reinforcement yarn completely.
When the buttonhole program is finished, take the fabric out of the sewing machine and cut off the ends of the reinforcement yarn.

TIP
You should practise a few buttonholes on a piece of cloth first in order to learn how to use reinforcement yarn.
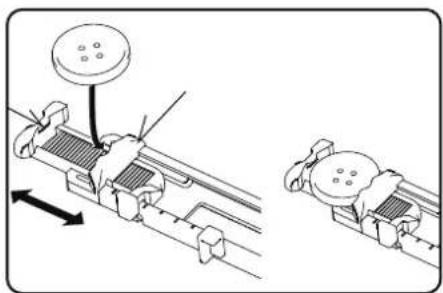
10.16. Sewing on buttons and eyelets
Buttons, hooks and eyelets can be sewn on effortlessly with the transparent blue presser foot.
▶ Select the buttonhole programme and set the stitch width so that it corresponds to the distance between the holes.
▶ Lower the fabric feeder using the lever on the back of the machine.
Presser foot: Button sewing foot
Presser foot indicator:....O
Programme: 91
Stitch length:0
Stitch width: 2 to 7

natural_image
Technical line drawing of a mechanical device with internal components and a close-up inset showing a switch mechanism (no text or symbols)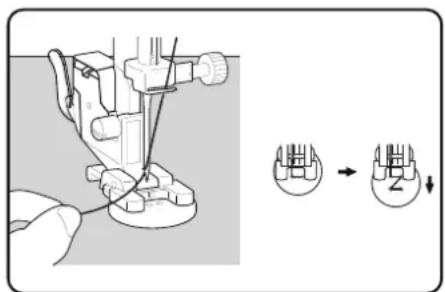
▶ Lower the presser foot and place the button between the fabric and the presser foot so that the zigzag stitch hits the holes in the button, as shown in the diagram.
▶ Check that the knob is in the correct position by turning the handwheel by hand. The needle must be inserted exactly into the holes of the button to avoid damaging the needle. If necessary, change the width of the zigzag stitch.
▶ Sew 6 to 7 stitches per hole at low speed.
For buttons with four holes, the fabric is moved with the button: 6 to 7 stitches are then also sewn in the other holes. After removing the fabric, place the generously cut top thread on the underside of the fabric and tie it to the bobbin thread.
10.16.1. Sewing on butt ons with shank
A button shank is often required for heavy materials.
Place a needle or, in the case of a thicker shank, a match on the button and then proceed in exactly the same way as for sewing on a normal button.
Remove the fabric from the machine after approx. 10 stitches.
▶ Pull the needle or the match out of the fabric.
Leave the upper thread slightly longer and cut the upper thread.
Thread the upper thread through the button and wrap it around the resulting shank a few times, then guide it to the underside of the fabric and tie it to the bobbin thread.
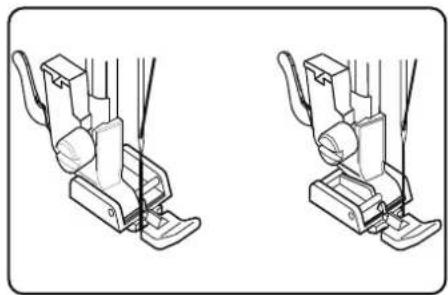
10.17. Sewing in zips
Depending on which side of the zip you are sewing, the presser foot must always rest on the fabric.
For this reason, the presser foot is attached either on the left or right side, not in the centre like all other presser feet.
Presser foot: ....Zipper presser foot
Presser foot indicator:....
Programme:....1
Stitch length: 1.5 to 3
Stitch width: 0.5 to 6.5
▶ Set the presser foot and needle to the highest position to replace the presser foot.
Pin the zip to the fabric and place the workpiece in position under the foot.
To sew on the right-hand side of the zip, set the zipper presser foot so that the needle sews on the left-hand side.
- Sew on the right-hand side of the zip, bringing the seam as close as possible to the teeth.
▶ Sew the zip around 0.5 centimetres below the teeth with a bar.
To sew on the left-hand side of the zip, change the foot position on the presser foot holder.
▶ Sew in the same way as on the right-hand side of the zip.

Before the foot reaches the slider on the zip, lift the foot upwards and open the zip, leaving the needle in the material.
10.17.1. Sewing cords
You can also easily sew in cords using the zipper presser foot, as shown in the diagram.
▶ Fold the fabric over once to create a drawstring tunnel and then sew along the drawstring with the zipper presser foot behind the drawstring.
natural_image
Line drawing of two different sewing machine foot positions (no text or symbols)
natural_image
Technical line drawing of a sewing machine needle stitching a diagonal seam (no text or symbols)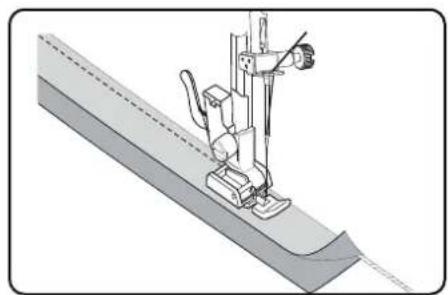
natural_image
Technical illustration of a sewing machine needle stitching a fabric sheath (no text or symbols)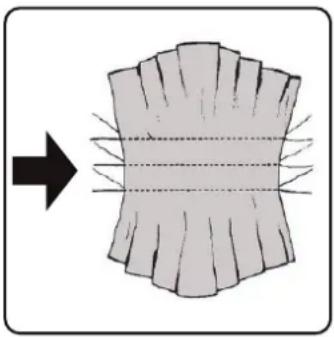
natural_image
Diagram showing a cross-sectional view of a layered structure with radial lines, no text or symbols present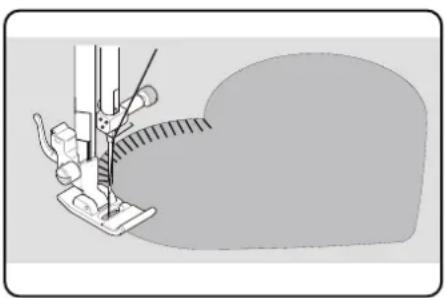
natural_image
Illustration of a sewing machine needle stitching fabric (no text or symbols)10.18. Gathering
Presser foot: Standard foot
Presser foot indicator:....J
Programme:....1
Stitch length: 4
Stitch width: 3
Reduce the upper thread tension (see Page 254) so that the bobbin thread is loose on the back of the fabric and is looped by the upper thread.
▶ Sew one or more rows of stitches. Do not cut the threads off right at the edge of the fabric but leave a length of about 10 centimetres on the ends.
▶ At the start of each row, knot the upper thread and bobbin thread.
Hold on to the fabric on the side with the knots and, on the other side, pull one or more lower threads taut at the same time. Now push the fabric together on the bobbin thread. Once the fabric has been gathered to the desired width, knot the upper and lower threads of the second side.
▶ Make sure the gathering is even.
Sew the gathers in place with one or more rows of straight stitches.
10.19. Sewing on appliqués
The appliqués can be used on tablecloths, shirts, curtains and children's clothes.
Presser foot: Standard foot
Presser foot indicator:......J
Programme: 3
Stitch length: 0.2 to 3
Stitch width: 0.5 to 7
▶ Pin the appliqué to the fabric.
▶ Sew with a tight zigzag stitch along the edge of the pinned motif. We recommend using an embroidery hoop for fine fabrics.
For corners and curves of the appliqué, do not turn the fabric until the needle is on the outside of the appliqué.
▶ Finally, remove the stitching thread.
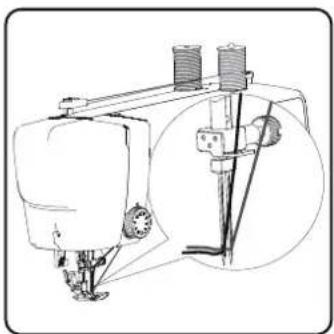
10.20. Sewing with a twin needle
The twin needle is available from well-stocked specialist retailers. When purchasing, make sure that the distance between the two needles does not exceed 4 mm.
The twin needle can be used to create beautiful two-colour patterns if you use different coloured threads for sewing.
Presser foot: Standard foot
Presser foot indicator:......J
Programme:....1
Stitch length: 1 to 4
Stitch width: 0.5 to 3
NOTICE
Risk of damage!
Using the wrong sewing programme can cause the twin needle to bend or break.
■ Only use the twin needle in the programme specified here.
Insert the twin needle in the same way as a single needle (see Page 270).
Insert the second spool holder into the recess on the back of the sewing machine.
Place two spools of thread of the same weight on the spool holders.
Thread both threads through the thread holder, as with a single thread.
▶ Guide both threads into the internal thread guide.
For the needle eyes, thread one thread on the right and one on the left.
▶ Use the button to select twin needle mode, the symbol is shown on the display.
natural_image
Technical line drawing of a sewing machine with no visible text or symbols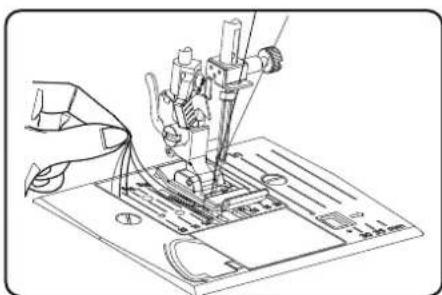
natural_image
Technical line drawing of a sewing machine needle and base plate (no text or symbols)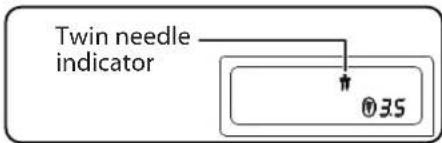

NOTICE
Risk of damage!
When sewing a corner with the twin needle, it may bend or break.
■ Always lift the needle out of the fabric.
10.21. Sewing with the free arm
The free arm enables you to sew tube-shaped pieces more easily. This function is very useful when sewing sleeves and trouser legs, for example.
You can easily turn your sewing machine into a free-arm machine by removing the extension table from the sewing machine.
The free arm is particularly useful for the following work:
• Repairing elbows and knees in garments.
- Sewing sleeves, especially in smaller garments
- Appliqué, embroidery or hemming edges, cuffs or trouser legs.
- Sewing elasticated waistbands on skirts or trousers.
11. Maintenance, care and cleaning

CAUTION!
Risk of injury!
There is a risk of injury from accidental operation of the foot control pedal.
■ After finishing work or before maintenance work, always switch off the machine and unplug the mains plug from the socket.
11.1. Replacing the needle
▶ Turn the hand wheel towards you until the needle has reached its highest position.
▶ Loosen the needle clamp screw by turning it towards you.
Remove the needle from the needle holder.
Insert a new needle with the flat side facing backwards. Push the needle upwards until it can go no further.
▶ Re-tighten the needle clamp screw.


Needles are available from specialist retailers.
Information on types and sizes can be found in section "13. Fabric, thread and needle table" on page 275.
11.2. Removing and fi it ing the presser foot
11.2.1. Removal
▶ Turn the handwheel towards you until the needle has reached its highest position.
- Raise the presser foot by pressing the presser foot lever upwards.
The presser foot will drop out if you push the presser foot release lever behind the presser foot holder.
11.2.2. Fitting
▶ Fit the presser foot so that the pin on the foot is directly under the groove of the presser foot holder. Lower the presser foot lever.
Now push the presser foot release lever upwards. The presser foot will then click into place automatically.
11.3. Removing and fitting the presser foot holder
The presser foot holder does not need to be removed unless you want to darn or embroider or make space to clean the fabric feeder.
11.3.1. Removal
▶ Move the needle to its highest position by turning the handwheel towards you and move the presser foot lever upwards.
Remove the foot from the presser foot holder and loosen the presser foot holder screw with the enclosed screwdriver.
11.3.2. Fitting
▶ Move the needle to its highest position by turning the handwheel towards you and move the presser foot lever upwards.
When you now insert the presser foot holder, push it up as far as possible and tighten the presser foot holder screw with the enclosed screw-driver.
11.4. Maintaining the sewing machine
The sewing machine is a sensitive mechanical product and requires regular maintenance to ensure it always functions perfectly.
You can carry out this maintenance yourself.
Maintenance primarily refers to: Cleaning and oiling.
i
Only use special sewing machine oils of the best quality for oiling, as other oils are not suitable.
Please note that there may be residues in the appliance after oiling. To remove these residues, sew a few stitches on a sample piece of fabric or a fabric remnant. This way you avoid soiling your fabric.
11.4.1. Cleaning the housing and foot control pedal
Before cleaning, pull the plug out of the mains socket.
Use a soft, dry cloth to clean the appliance and the foot control pedal. Avoid the use of chemical solutions and cleaning products because these may damage the appliance surface and/or the labels on it.
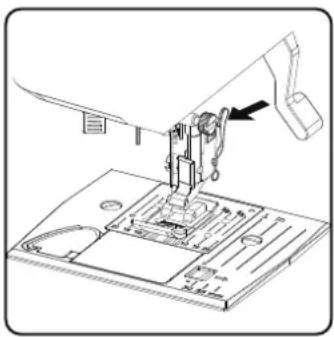
natural_image
Technical line drawing of a sewing machine needle and base plate (no text or symbols)11.4.2. Cleaning and oiling the feeder and the bobbin housing
It is necessary to keep the fabric feeder teeth clean at all times to ensure perfect stitching.
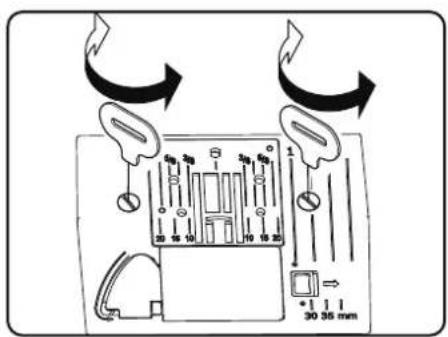
Remove the needle and presser foot (see Page 270 f.).
▶ Undo the screws on the needle plate to remove the needle plate from the machine.

natural_image
Diagram showing a hand holding a small mechanical component with an arrow pointing to a component inside a housing (no text or symbols present)Remove the bobbin from the bobbin cartridge.
▶ Remove the shuttle track ring.
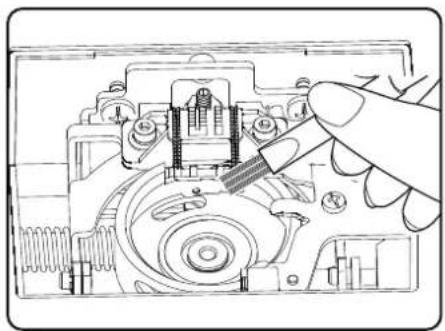
natural_image
Technical line drawing of a mechanical assembly with a hand operating a tool (no text or symbols visible)▶ Use the brush to remove dust and loose threads from the feeder teeth, the bobbin cartridge and the shuttle track ring.

natural_image
Technical line drawing of a mechanical assembly with no visible text or symbols▶ Lubricate the areas marked with the arrows with a drop of sewing machine oil.
Place the shuttle track ring back into the bobbin cartridge. When inserting, ensure that the fixing lip B is in contact with the end position of the gripper ring A.
▶ Refit the needle plate.
TIP
Depending on the frequency of use, this part of the machine is to be oiled more often.
12.Faults
If faults occur, please read this user manual to determine whether you have followed all instructions correctly.
Please only contact our customer services if none of the solutions provided are successful.
| Fault Cause Page | ||
| Machine does not run smoothly | The machine must be oiled Page 272 | |
| Dust and threads in shuttle track Page 272 | ||
| Remnants remain on the teeth of the fabric feeder | Page 272 | |
| Upper thread breaks | Upper thread not threaded correctly Page 250 | |
| Thread tension is too high Page 254 | ||
| Needle is bent or blunt Page 257 | ||
| Thread thickness not right for the needle Page 275 | ||
| Needle not inserted correctly Page 270 | ||
| Fabric not pulled through from back at end of seam | Page 258 | |
| Needle plate, bobbin or presser foot is damaged | ||
| Bobbin thread breaks | Lower thread tangles because the thread is wound on to bobbin incorrectly | Page 247 |
| Lower thread is not under the tension spring in the bobbin case | Page 249 | |
| Needle breaks | Needle is inserted incorrectly Page 270 | |
| Needle is bent Page 257 | ||
| Needle is too fine Page 275 | ||
| Fabric pulled while sewing Page 257 | ||
| Knot in the thread Page 250 | ||
| Upper thread is threaded incorrectly Page 250 | ||
| Machine misses stitches | Needle is inserted incorrectly Page 270 | |
| Upper thread is threaded incorrectly Page 250 | ||
| Needle and/or thread not suitable for fabric Page 275 | ||
| Fabric too heavy or hard | Page 275 | |
| Fabric pulled while sewing Page 257 | ||
| Puckering or gathering of seam | Upper thread tension too high | Page 254 |
| Machine threaded incorrectly | Page 250 | |
| Needle too large for the fabric | Page 275 | |
| Thread makes loops | Thread tension not adjusted Page 254 | |
| Upper thread not threaded correctly and/or bobbin thread not wound on to bobbin correctly | Page 249 | |
| Thread thickness not suitable for the fabric Page 275 | ||
| Fabric feed irregular | The stitch length is set to “0” Page 259 | |
| Thread ends are in the shuttle track Page 272 | ||
| Machine does not run | Sewing machine not connected correctly or there is no power from the socket | Page 245 |
| Thread ends in shuttle track Page 272 | ||
12.1. Helpful messages
12.1.1. Acoustic signals
| Acoustic signal Reason | |
| 1 x beep Normal operation | |
| 2 x beep Invalid operation | |
| 3 x beep Invalid machine setting | |
| 4 x beep The machine is jammed |
12.1.2. Useful display indicators
| Display | Reason | Solution |
 | The bobbin spindle is still in position for wind-ing. | Push the bobbin spindle to the left. |
 | The buttonhole lever is not lowered or raised. | Pull the buttonhole lever downwards.Slide the buttonhole lever upwards. |
 | The machine has been stopped because thread or fabric remnants are blocking the mechanism. | Switch off the machine and remove the thread or fabric remnants. |
13. Fabric, thread and needle table
As a general rule, fine threads and needles are used to sew thin fabrics, thicker threads and needles are used for heavier fabrics. Always test the thread and needle thickness on a scrap of the fabric you intend to use. Use the same thread for needle and bobbin. If you sew stretch stitches on fine fabrics or synthetics, use a needle with a blue shaft (available from specialist retailers). These prevent stitches from being missed.
| Fabric type Thread Needle | |||
| Very lightweight fabrics | Chiffon, georgette, fine lace, organza, net, tulle | 50Synthetics, silk | 65 |
| Lightweight fabrics | Batiste, voile, nylon, satin, lightweight linen | 80Cotton | 65Silk, crêpe de Ch |
| 50Silk, synthetics | |||
| Jersey, swimwear, stockinette | 60Synthetics | ||
| Suede | 80Cotton | 75(Leather needle or jeans needle) | |
| Medium fabrics | Flannel, velours, velvet, muslin, poplin, linen, wool, felt, towelling, gaberdine | 60-80Cotton, silk | 75-90 |
| Knitted fabrics, stretch fabrics, jersey | 60Synthetics | 90 | |
| Leather, vinyl, suede | 80Cotton | 90(Leather needle or jeans needle) | |
| Heavy fabrics | Denim, coating | 50Cotton | 100Jersey |
| 50Synthetics | |||
| Wool, tweed | 50Silk | ||
| Very heavy fabrics Canvas, sailcloth, upholstery fabrics | 80-100Cotton | 100 | |
13.1. Useful sewing tips
13.1.1. Sewing thin and lightweight fabrics
Lightweight and thin fabrics can ride up in the machine as these materials are not always fed through the machine evenly.
When sewing these kinds of fabrics, lay some embroidery backing (available from specialist shops) or a piece of tissue paper under the material to prevent irregular feeding.
13.1.2. Sewing elasticated fabrics
It can be easier to work with elastic materials if you sew the pieces of material together first with basting cotton or tacking yarn and then sew them together with small stitches without stretching the material.
Good results can also be obtained if you use special threads for sewing knitwear and stretch stitches.
14. Programmeselection
14.1. Stitch programmes

All stitch patterns marked with an asterisk cannot be sewn with a twin needle.
The table below shows all stitch patterns and their respective programme numbers.
| Programme number | 00 01 | 02 03 04 | 05 06 07 | 08 09 | ||||||
| Stitch pattern | [63Y2] | [44CZ] |  | [WKKD] | [10,0Z] | [03AJ] | [10SK] | [CHSA] | [22SH] | [K24T] |
| Programme number | 10 11 12 13 14 15 16 17 18 19 | |||||||||
| Stitch pattern |  | [A20D] | [A8ZX] | [7CCS] | [DYS6] |  | [K4BD] |  | [34DB] | [2TTD] |
| Programme number | 20 21 22 23 24 25 26 27 28 29* | |||||||||
| Stitch pattern | [564K] | [17CZ] | [62DZ] |  | [54H3] |  |  | [HDSW] | [WXAX] | [45WZ] |
| Programme number | 30 | 31 | 32 | 33* | 34 | 35* | 36* | 37* | 38* | 39* |
| Stitch pattern | [K460] | [STD0] | [6Y13] | [ST3C] | [OW3H] | [82BW] | [3DCT] |  | [T8VS] |  |
| Programme number | 40 41* | 42 43 44 45 46 47 | 48* | 49* | ||||||
| Stitch pattern | [0754] | [BHY5] | [H46Z] | 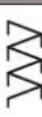 | [Y047] | [224X] | 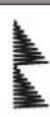 | [7DG7] |  | [AAAY] |
| Programme number | 50* | 51 52 53* | 54 55 56 57 58 59 | |||||||
| Stitch pattern | [4W7C] | [K4KH] | [31CZ] |  | [21BH] | [1WT3] | [KSZH] |  | [44DX] | [T1G3] |
| Programme number | 60 | 61 | 62* | 63* | 64* | 65 | 66 | 67 | 68 | 69 |
| Stitch pattern | [Y615] | [YW08] |  |  | [HTBH] |  | [832D] | [23HT] | [YD22] | [TWBY] |
| Programme number | 70 71 72 73 74 75 76 77 78 79 | |||||||||
| Stitch pattern | [K4A3] |  | [06KC] | [Y5BH] |  | [T54Y] | [X938] | [823T] |  | [2TWH] |
| Programme number | 80 81* | 82 83 84 | 85 86* | 87* 88* | 89* | |||||
| Stitch pattern |  |  |  |  |  |  |  |  |  |  |
| Programme number | 90* 91* | 92* 93* | 94* 95* | 96* 97* | 98* 99* | |||||
| Stitch pattern |  |  | [TX6T] | [W60S] |  |  |  | [ZXCY] |  |  |
14.2. Lett er programmes
The table below shows all letters and their respective programme numbers.
| Programme number | 00 01 | 02 03 04 | 05 06 07 | 08 09 | ||||||
| Stitch pattern | 0 | 1 | 2 | 3 | 4 | 5 | 6 | 7 | 8 | 9 |
| Programme number | 10 | 11 | 12 | 13 | 14 | 15 | 16 | 17 | 18 | 19 |
| Stitch pattern | A | B | C | D | E | F | G | H | I | J |
| Programme number | 20 | 21 | 22 23 | 24 25 26 | 27 | 28 29 | ||||
| Stitch pattern | K | L | M | N | O | P | Q | R | S | T |
| Programme number | 30 | 31 | 32 33 | 34 35 36 | 37 | 38 39 | ||||
| Stitch pattern | U | V | W | X | Y | Z | a | b | c | d |
| Programme number | 40 41 | 42 | 43 44 45 | 46 47 48 | 49 | |||||
| Stitch pattern | e | f | g | h | i | j | k | l | m | n |
| Programme number | 50 | 51 | 52 | 53 | 54 | 55 | 56 | 57 | 58 | 59 |
| Stitch pattern | o | p | q | r | s | t | u | v | w | x |
| Programme number | 60 | 61 | 62 63 | 64 65 66 | 67 68 69 | |||||
| Stitch pattern | y | z | @ | ! | ? | & | ' | " | , | |
| Programme number | 70 | 71 | 72 | 73 | 74 | 75 | 76 | 77 | 78 | 79 |
| Stitch pattern | . | - | . | / | : | ; | Ä | Å | Æ | à |
| Programme number | 80 81* | 82 83 84 | 85 86* | 87* | 88* | 89* | |||||
| Stitch pattern | ä | å | è | é | ê | ë | Ç | œ | ç | ||
| Programme number | 90 91* | 92* | 93* | 94* | 95* | 96* | 97* | 98* | 99* | ||
| Stitch pattern | Ñ | ñ | Ö | ∅ | ò | ö | ø | Ü | ù | ü |
15.Disposal

PACKAGING
Your sewing machine has been packaged to protect it from damage in transit. Packaging materials are raw materials and can therefore be reused or recycled.
APPLIANCE
All old appliances marked with the symbol shown must not be disposed of in normal household waste. In accordance with Directive 2012/19/EU, the appliance must be properly disposed of at the end of its service life.
This involves separating the materials in the appliance for the purpose of recycling as well as minimising the environmental impact and negative effects on human health.
Take old appliances to an electrical scrap collection point or a recycling centre.
Contact your local waste disposal company or your local authority for more information on this subject.
16. Technical specifications
| Sewing machine | |
| Rated voltage: | 100 ~240 V, 50/60 Hz - 0,4 A |
| Rated power: | 36 W |
| Foot control pedal | |
| Type: | ES01FC |
| Rated voltage: | DC 15 V, max. 3 mA |
| Protection class: | II |
 | |
17. Declaration of conformity

Medion AG hereby declares that the product conforms to the following European requirements:
• EMC Directive 2014/30/EU
• Low Voltage Directive 2014/35/EU
• Ecodesign Directive 2009/125/EC
• RoHS Directive 2011/65/EU
18. Serviceinformation
Please contact our Customer Service team if your device ever stops working the way you want or expect it to. There are several ways for you to contact us:
- In our Service-Community, you can meet other users, as well as our staff, and you can exchange your experiences and pass on your knowledge there.
You will find our Service-Community at community.medion.com.
• Alternatively, use our contact form at www.medion.com/contact. - You can also contact our Service team via our hotline or by post.
Opening times Hotline number UK
| Mon – Fri: 08.00 – 20.00 |
| Sat – Sun: 10.00 – 16.00 |
① 0333 3213106
Service address
MEDION Electronics Ltd.
120 Faraday Park, Faraday Road, Dorcan
Swindon SN3 5JF, Wiltshire
United Kingdom
You can download this and many other sets of operating instructions from our service portal at www.medionservice.com.
We have stopped providing printed copies of our warranty terms and conditions as part of our commitment to sustainability, but you can access the warranty terms and conditions on our service portal.
You can also scan the QR code on the side of the screen, to download the operating instructions onto your mobile device from the service portal.
19. Legal Notice
Copyright 2024
Date: 28. May 2024
All rights reserved.
These operating instructions are protected by copyright.
Mechanical, electronic and any other forms of reproduction are prohibited without the written permission of the manufacturer.
Copyright is owned by the company:
MEDION AG
Am Zehnthof 77
45307 Essen
Germany
Please note that you cannot use the address above for returns. Please always contact our Customer Service team first.

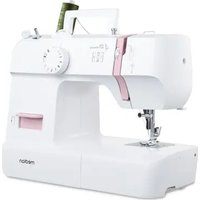
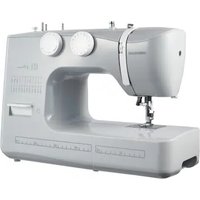

- 8.4.EinlegenderSpule
- Einstellungen
- TIPP
- 10.8.Programmwahl
- Zierstiche
- 10.15.2.
- Kräuseln
- HINWEIS
- Réglages
- Coupe du fi I
- Point losange ou point smock
- Fronçage
- Instellingen
- 9.1.Draadspanninginstellen
- TIP
- Ruitsteek of smoksteek
- Siersteken
- Rimpelen
- LET OP
- Enhebrado del hilo superior
- Ajustes
- i
- CONSEJO
- Puntadaelástica
- Puntada de rombo o puntada smock
- Fruncido
- 8.5.Infi latura del fi lo superiore
- Impostazioni
- CONSIGLIO
- Taglio del fi lo
- Puntoelastico
- Punto a nido d'ape o punto smock
- Increspature
- Information about this user manual 237
- Proper use 237
- Declaration of conformity 237
- Safety instructions 237
- Package contents....239
- Appliance overview 240
- Electrical connections 245
- Preparatory work.... 247
- Settings 254
- Sewing 257
- Maintenance, care and cleaning 270
- Information about this user manual
- Explanation of symbols
- Proper use
- Declaration of conformity
- Safety instructions
- Keep children away from electrical appliances
- DANGER!
- Risk of choking and suffocation!
- Mains cable and power supply
- General information
- Never carry out repairs yourself
- WARNING!
- Risk of electric shock!
- Handle the appliance with care
- Cleaning and storage
- Package contents
- Appliance overview
- Electrical connections
- NOTICE
- Risk of damage!
- CAUTION!
- Risk of injury!
- Controlling the sewing speed
- Normal operation with foot control pedal
- Manual operation without foot control pedal
- Att aching and removing the extension table
- Accessories
- Preparatory work
- Fitting a spool
- Winding thread onto the bobbin
- Removing the bobbin
- Insertingthebobbin
- Threading the upper thread
- Illustration of the upper thread guide
- Automatic needle threader
- Bringing up the bobbin thread
- Sett ings
- Sett ing the thread tension
- Adjusting the upper thread tension
- Checking the thread tension
- Correct stitching
- Incorrect stitching
- Solution:
- Setting the needle end position
- Sewing
- General information
- Selecting the right needle
- Raising and lowering the presser foot
- 10.4.Reversestitching/patt ern fi nishing
- Reverse stitching with straight and zigzag stitches
- Pattern finishing for decorative stitches
- Removing fabric from the sewing machine
- Changing the sewing direction
- Cutting the thread
- 10.8.Programmeselection
- Stitch width adjustment
- 10.10.Stitchlengthadjustment
- Stitch type sett ings
- Straight stitch
- 10.11.2.Zigzagstitch
- TIPS FOR ZIGZAG STITCHES
- Satinstitch
- Blindstitch
- 10.11.5.Shellhem
- Stretchstitch
- Sewing on elastic bands
- Featherstitch
- Diamond stitch or smocking stitch
- Scallop stitches
- Decorative stitches
- Pattern stitches
- 10.14.Lett er patt erns
- Select letters
- Setting the spacing between letters
- Butt onholes
- Procedure
- Reinforced
- butt onholes
- Sewing on buttons and eyelets
- Sewing on butt ons with shank
- Sewing in zips
- Sewing cords
- Gathering
- Sewing on appliqués
- Sewing with a twin needle
- Sewing with the free arm
- Maintenance, care and cleaning
- Replacing the needle
- Removing and fi it ing the presser foot
- Removal
- Fitting
- Removing and fitting the presser foot holder
- Removal
- Fitting
- Maintaining the sewing machine
- Cleaning the housing and foot control pedal
- Cleaning and oiling the feeder and the bobbin housing
- 12.Faults
- Helpful messages
- Acoustic signals
- Useful display indicators
- Fabric, thread and needle table
- Useful sewing tips
- Sewing thin and lightweight fabrics
- Sewing elasticated fabrics
- Programmeselection
- Stitch programmes
- Lett er programmes
- 15.Disposal
- PACKAGING
- APPLIANCE
- Technical specifications
- Declaration of conformity
- Serviceinformation
- Service address
- Legal Notice
Brand : MEDION
Model : LIFE SD36
Category : Sewing machine