
MultiPro - Portable power tool DREMEL - Free user manual and instructions
Find the device manual for free MultiPro DREMEL in PDF.

| Brand | DREMEL |
| Model | MultiPro |
| Product type | Rotary handheld power tool |
| No-load speed | 10,000 to 33,000 rpm |
| Speed control | Variable speed (two-speed or variable speed models) |
| Power supply | 230 V ~ 50 Hz (estimated) |
| Power | Not specified |
| Weight | Approximately 0.5 kg |
| Cable length | Approximately 2 m |
| Shaft lock | Yes, for accessory change |
| Collet | Yes, with tightening nut |
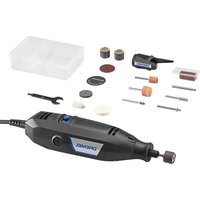
| Included accessories | Engraving bits, cutting discs, brushes, grinding wheels, etc. |
| Applications | Engraving, grinding, polishing, cutting, cleaning |
| Safety | Safety glasses, gloves, dust mask, ear protection recommended |
| Maintenance | Clean regularly, check brushes, use genuine parts |
| Warranty | 2 years (BASIC: 1 year) |
| Repairability | Entrust to a DREMEL authorized service center |
| Storage temperature | Max 50 °C |
| Sound level | 70 dB(A) |
| Hand-arm vibrations | 7.6 m/s² |
Frequently Asked Questions - MultiPro DREMEL
User questions about MultiPro DREMEL
0 question about this device. Answer the ones you know or ask your own.
Ask a new question about this device
Download the instructions for your Portable power tool in PDF format for free! Find your manual MultiPro - DREMEL and take your electronic device back in hand. On this page are published all the documents necessary for the use of your device. MultiPro by DREMEL.
USER MANUAL MultiPro DREMEL
Dremel European Sales Office - The Netherlands
02/01
2610913352
DREMEL
http://www.dremel.com
2
| J 395 | |
| K 125 W | |
| L 10000 - 33000 | |
| M 0,8 - 3,2 mm | |
| N 0,55 Kg | |
| J 285 | |
| K 125 W | |
| L 15000 & 33000 | |
| M 0,8 - 3,2 mm | |
| N 0,54 Kg | |
| J | K L | M N | |||
| GB | Model Input No Load Speed R.P.M. Collet Capacity Weight | ||||
| D | Modell | Leistungsaufnahme | Drehzahl unbelastet U/Min. | Spannkapazität | Gewicht |
| F | Type | Puissance absorbée | Vitesse à vide tr./min | Capacité pince | Poids |
| NL | Model | Opgenomen vermogen | Toerental onbelast o.p.min. | Kapaciteit spantang | Gewicht |
| S | Modell | Ingångseffekt | Hastighet obelastad varv/min. | Kapacitet spännhylsa | Vikt |
| N | Modell | Watt | Tomgangshastighet o./min. | Kapasitet chuck | Vekt |
| FIN | Malli | Teho | Kuormittamaton nopeus r/min | Hylsyn koko | Paino |
| DK | Model | Effekt | Hastighed ubels/min. | Kapacitet tang | Vægt |
| I | Modello | Potenza assorbita | Velocità a vuoto giri/min. | Capacità pinza | Peso |
| E | Modelo | Potencia | Velocidad en vacio r.p.min. | Capacidad de la boquilla de sujeción | Peso |
| P | Modelo | Potência | Velocidade RPM | Capacidade da pinça | Peso |
| GR | Movtėlo | Iσχις κινητήρα | Ταχύτητα χωρίς φορτίο/στρ. ανά λεπτό | Υποδοχή σφιγκτήρα | Βάρος |
| H | Modell | Telijesítményfelvétel | Terheletlen fordulatszám/perc | Feszítési méret | Súly |
| CZ | Typ | Příkon | Otáčky naprázdno ot./min. | Max. průměr pro upnutí | Hmotnost |
| PL | Model | Pobór mocy | Prędkość obrotowa w biegu luzem | Średnica mocowania uchwytu | Ciężar |
| TR | Model | Giriş gücü | Boştaki devir sayısı, dev/dak | Germe kapasitesi | Ağırlığı |
| RU | Модель | Потребляемая мощность | Скорость вращения без нагрузки, об/мин | Диаметр патрона | Macca |
3
GB Mounting Accessories (text page 22)
D Montieren des Zubehörs (Textseite 25)
F Montage des accessoires (page texte 28)
NL Aanbrengen van accessoires (tekstpagina 31)
S Montering av tillbehör (se sidan 34)
N Montering av utstyr (tekst side 37)
FIN Tarvikkeiden asennus (tekstisivu 40)
DK Påsætning af tilbehør (tekst side 43)
I Montaggio degli accessori (pagina di testo 46)
E Montaje de los accesorios (texto en la página 49)
P Montagem de acessórios (página 52)
GR Πώς να τοποθετήσετε τα εξαρτήματα (σελίδα κειμένου 55)
HA tartozékok felszerelése (szöveg oldal 58)
CZ Upínací příslušenství (text na straně 61)
PL Mocowanie narzędzi roboczych w uchwycie (tekst, strona 64)
TR Aksesuarın takılması (metin sayfasi 67)
RU Установка аксессуаров (см. текст на стр. 70)
4
natural_image
Hand holding a screwdriver with a small component inserted (no text or symbols visible)GB Mandrel assembly
D Dom
F Ensemble mandrin
NL Montage opspandoorn
S Sätta fast spindeln
N Montering av spindel
natural_image
Simple line drawing of a hand holding a tool with a circular component (no text or symbols)FIN Karan kokoaminen
DK Tilbehør til spindler
I Gruppo perno
E Conjunto del mandril
P Conjunto de mandris
GR Συναρμολόγηση του βιδωτού στελέχους
natural_image
Simple line drawing of a hand holding a tool with a textured cylindrical object, no text or symbols presentnatural_image
Line drawing of a hand holding a fountain pen (no text or symbols)GB Gripping styles (text page 22)
D Halten des Geräts (Textseite 26)
F Modes de prise en main (page texte 29)
NL Manieren van vasthouden (tekstpagina 32)
S Grepp (se sidan 35)
N Fastspenningsmåter (tekst side 37)
natural_image
Line drawing of a hand holding a pen or stylus (no text or symbols)natural_image
Line drawing of a hand holding a small mechanical component (no text or symbols)H Befogási módok
(szöveg oldal 59)
CZ Zpúsoby uchopení (text na straně 61)
PL Rylce zaciskowe (tekst, strona 65)
TR Tutma Tarzlari (metin sayfasi 67)
RU Типы захвата
(см. текст на стр. 71)
6
GB-Speed F-Vitesse S-Hastighet FIN-Nopeudet I-Velocità P-Velocidade H-Sebességi PL-
414 2 2 Felt Polishing Wheel
422 1 Felt Polishing Point
Polierfilz
Baton de polissage

425 1 1 Emery Polishing Wheel
Schmirgelscheibe
Disque émeri


Graphic # 5 15 40 NL S N


106 1 Graveertrees Gravyrfrås Små graveringstreser

109 1 Graveertrees Gravyrfrås Små graveringstreser

118 1 Snelfrees Snabbstålsfräs Høyhastighetsfreser

150 1 1 Boor Borren Bor

191 1 1 Snelfrees Snabbstålsfrås Høyhastighetsfreser

401 1 1 Opsandoorns
Spindel
Spindel

402 1 1 1 Ospandooms
Spindel
Spindel

403 1 Draadborstel
Tagelborste
Nylonborster

407 1 1 1 Schuurcilinder
Trumslip
Pussetrommel

408 1 2 Schuurband
Slipband
Pussetrommel

CE DECLARATION OF CONFORMITY
We declare under our sole responsibility that this product is in conformity with the following standards or standardized documents:
EN 50 144, EN 55 014, in accordance with the regulations 73-23/EEQ, 80/93A/EFO, 98/37/EFO.

01 BROWN, Canada J. F. Hohen


CE TODISTUS STANDARDINMUKAISUUDESTA
01 STONE Corp J. F. Pudan

INFORMATION ON NOISE.VIBRATION
The noise level when working can exceed 85 dB(A).
Measured in accordance with LN 50 144 the sound pressure level of the xol is 75 dB(A), and the vibration 7.5 m/s (and-sun method).
MELU-TÄRINÄTIETO
CE DÉCLARATION DE CONFORMITÉ
CE KONFORMITETSFÖRKLARING
General Operating Tips:
SAFETY INSTRUCTIONS
When using electric tools, the following basic safety precautions should always be followed to reduce the risk of fire, electric shock, and personal injury. Read all these instructions before attempting to operate this product.
Save these instructions.
-
Check voltage indicated on nameplate
-
Keep work area clean. Cluttered areas and benches invite injuries
-
Consider work area environment. Do not expose power tools to rain. Do not use power tools in damp or wet locations. Keep work area well lit. Do not use power tools in presence of flammable liquids or gasses.
-
Guard against electric shock. Avoid body contact with earthed surfaces (e.g. pipes, radiators, ranges, refrigerators).
-
Keep children away. Do not let visitors contact tool or cord; they should be kept away from work area
-
Store idle tools. When not in use, tools should be stored in a dry and locked-up place, out of the reach of children.
-
Do not force the tool. It will do the job better and safer at the rate for which it was intended.
-
Use the right tool. Do not force small tools or attachments to do the job of a heavy-duty tool. Do not use tools for purposes not intended (e.g. do not use a circular saw for cutting tree limbs or logs).
-
Dress properly. Do not wear loose clothing or jewelry; they can be caught in moving parts. Rubber gloves and non-skid footwear are recommended when working outdoors. Wear protective hair covering to contain long hair.
-
Use safety glasses. Also use face or dust mask, if cutting operation is dusty.
-
Connect dust extraction equipment. If devices are provided for the connection of dust extraction and collection facilities, ensure these are connected and properly used.
-
Do not abuse the cord. Never carry the tool by the cord, never yank the cord to disconnect it from the socket, and keep the cord away from heat, oil and sharp edges.
-
Secure work. Use clamps or a vise to hold the work; it is safer than using your hand and it frees both hands to operate the tool.
-
Do not overreach. Keep proper footing and balance at all times.
-
Maintain tools with care. Keep tools sharp and clean for better and safer performance. Follow instructions for maintenance and changing accessories. Inspect tool cords and plugs periodically and if damaged, have them repaired by a qualified person. Inspect extension cords periodically and replace them, if damaged. Keep handles dry, clean and free from oil and grease.
-
Disconnect tools. Disconnect tool when not in use, before servicing or when changing accessories such as blades, bits and cutters.
-
Remove tool keys. Form the habit of checking to see that keys and adjusting wrenched are removed from the tool before turning it on.
-
Avoid unintentional starting. Do not carry a plugged-in tool with a finger on the switch. Be sure the switch is off when plugging it in.
-
Outdoor use extension cords. When tool is used outdoors, use only extension cords intended for use outdoors and so marked.
-
Stay alert. Watch what you are doing, use common sense and do not operate tool when you are tired.
-
Check damaged parts. Before you use the tool, always carefully check the guarding and other parts to determine that they will operate properly and perform their intended functions. Check for alignment of moving parts, binding of moving parts and breakage of parts. Check for proper mounting of all parts and any other conditions that may affect their operation. A guard, switch, or other part that is damaged or defective should be properly repaired or replaced by a qualified person. Do not use tool, if switch does not turn it on and off.
-
Warning! Use the tool and its accessories in accordance with these safety instructions and in the manner intended for the particular tool, taking into account the working conditions and the work to be performed. Use of the tool for operations, different from those normally expected to be performed by the particular tool, could result in a hazardous situation.
-
Have the tool repaired by a qualified person. This electric tool is in accordance with the relevant safety rules. Repairs should only be carried out by qualified persons using original spare parts, otherwise this may result in considerable danger for the user.
GB
DREMEL TOOL SAFETY

- Read and save this instruction manual and the enclosed safety instructions
• Always keep the cord away from moving parts of the tool - When you put away the tool, switch off the motor and ensure that all moving parts have come to a complete standstill
- In case of electrical or mechanical malfunction, immediately switch off the tool and disconnect the plug
- Use completely unrolled and safe extension cords with a capacity of 16 Amps (U.K. 13 Amps)
- Only use the original DREMEL accessories which can be obtained from your DREMEL dealer.
- Before using accessories always compare the maximum allowed r.p.m. of that specific accessory with the r.p.m. of the tool
• This tool should not be used by people under the age of 16 years - Never use grinding wheels over 1 1/4" (32 mm) ∅
- Never use drill bits over 1/8" (3.2 mm) ∅
- Never use shaft lock while tool is running
- Store tool in locations where temperature will not exceed 50^
- Ensure that the collet size corresponds with the shaft size of the accessory
- Keep the air vent openings clean and uncovered
- Handle and store grinding/cutting discs carefully to avoid chipping and cracking
- Do not use damaged, deformed or vibrating grinding/cutting discs
-
For mounting/using non-Dremel accessories observe the instructions of the manufacturer concerned
• Before using the tool -
ensure that accessory is correctly mounted and firmly tightened
- check if accessory runs freely by turning it by hand
- test-run tool for at least 30 seconds at highest no-load speed in a safe position
- stop immediately in case of considerable vibration or other defects and check tool to determine the cause
- ! Never use a cutting disc for side grinding

- When grinding metal, sparks are generated; keep other persons and combustible material from work area
- Wear protective glasses and gloves, hearing protection, a dust mask, and sturdy shoes; when necessary also wear an apron
- ! The accessory continues to rotate for a short time after the tool has been switched off
When connecting new 3-pin plug (U.K. only):
- Do not connect blue (=neutral) or brown (=live) wire in the cable of this tool to the earth terminal of the plug
- If for any reason the old plug is cut off the cable of this tool, it must be disposed of safely and not left unattended
USE
-
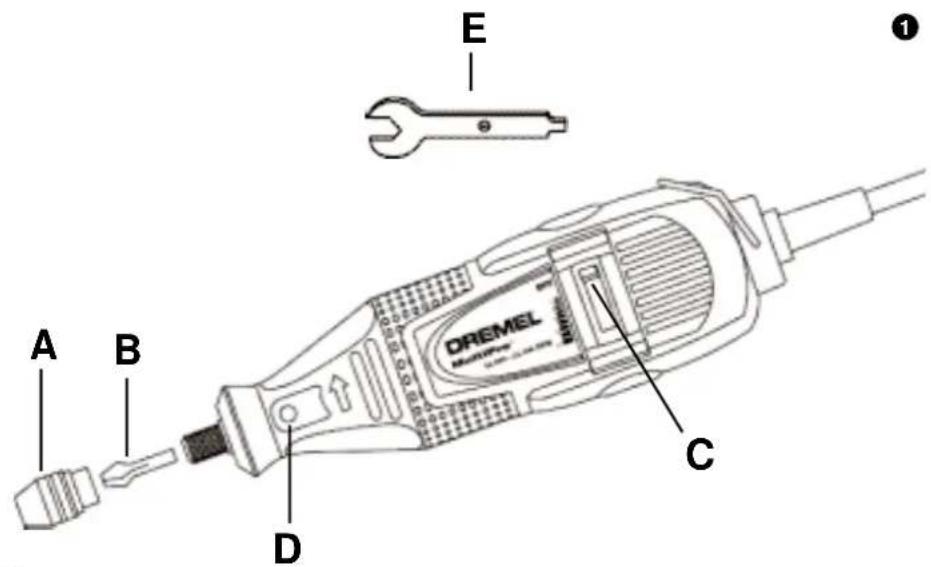
On/Off Button "C" (diagram 1)
-
Switch on the tool and select speed by pushing the lever to the desired speed range.
• Speed from 10,000 - 33,000 R.P.M.'s -
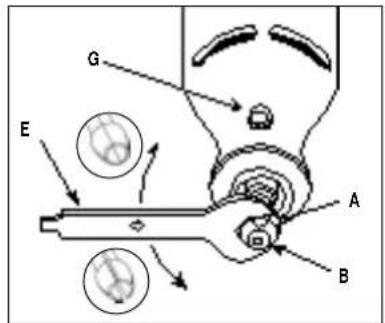
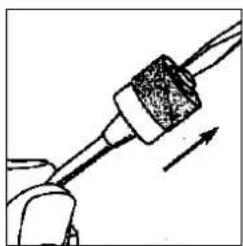
Mounting Accessories (diagram 3)

- To Loosen, push Shaft Lock button "D" and hold it, while turning the Collet Nut "A" (or chuck) by hand until the shaft locks preventing further rotation. If necessary use the Wrench, "E" to loosen the Collet Nut "A"
- Change accessories by inserting an accessory into the Collet "B" (or chuck) as far possible to minimize run out and unbalance
- With Shaft Lock button "D" engaged, tighten the Collet Nut "A"(or chuck) by hand until the accessory shank is gripped by the Collet "B". If necessary use the Wrench "E" to tighten the Collet Nut "A".
-
Avoid excessive tightening of the Collet Nut "A".
-
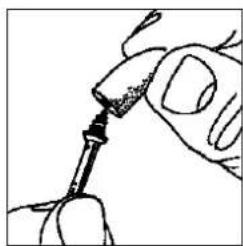
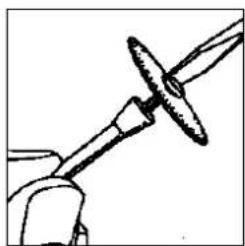
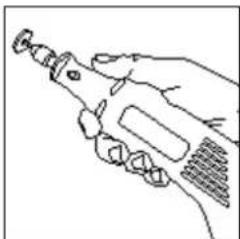
Holding and guiding the tool (see diagram 5)
-
pencil grip for precision work (engraving)
- paring knife hand grip for rough work (grinding)
- 2 hand golf grip ideal for when you need to keep the tool parallel to the work surface, i.e. using a cut-off wheel
GB
APPLICATION ADVICE
• Always practice on a piece of scrap material first to choose the right accessory and determine the optimum working speed
- Do not apply to much pressure on the tool; let the speed do the work for you
- Use only accessories that are recommended by the manufacturer for your model.
SPEED
There are 2 basic types of Rotary Tools: two-speed and variable speed models. On the two-speed model, there is a LOW and HIGH switch. When the switch indicator is on the "LOW" low setting, the tool runs at 15,000 RPM. When the switch indicator is on the "HIGH" high setting, the tool runs at about 33,000 RPM. On the variable speed model, there is a switch indicator with a black line on it. Slide to the number on the housing to select the operating speed needed from 10,000 - 33,000 RPM. You can refer to the charts on page 4,5,6 and 7 to determine the proper speed, based on the material being worked and the type of cutter or other accessory being used. These charts enable you to select both the correct accessory and the optimum speed at a glance.
The Settings for Approximate Revolutions Per Minute Rotary Tool Variable Speed Model 395
Switch Setting Speed Range
1-2 10,000 - 14,000 RPM
3-4 15,000 - 19,000 RPM
5-6 20,000 - 24,000 RPM
7-8 25,000 - 29,000 RPM
9-10 30,000 - 33,000 RPM
The speed of the rotary tool is controlled by setting this indicator on the housing.

Some rules of thumb in regard to speed:
- Plastic and materials that melt at low temperatures should be cut at low speeds.
- Polishing, buffing, and cleaning with a wire brush must be done at speeds below 15,000 RPM to prevent damage to the brush.
- Wood should be cut at high speed.
- Iron or steel should be cut at top speed if using tungsten carbide accessory, but at lower speeds if using high speed steel cutters. If a high speed steel cutter starts to chatter-this normally means it is running to slow.
- Aluminum, copper alloys, lead alloys, zinc alloys and tin may be cut at various speeds, depending on the type of cutting being done. Use paraffin or other suitable lubricant on the cutter to prevent the cut material from adhering to the cutter teeth.
To aid you in determining the optimum operational speed for different materials and different accessories, we have constructed a series of tables that appear on diagram 6. By referring to these tables, you can discover the recommended speeds for each type of accessory. Look these tables over and become familiar with them.
Ultimately, the best way to determine the correct speed for work on any material is to practice for a few minutes on a piece of scrap, even after referring to the chart. You can quickly learn that a slower or faster speed is more effective just by observing what happens as you make a pass or two at different speeds. When working with plastic, for example, start at a slow rate of speed and increase the speed until you observe that the plastic is melting at the point of contact. Then reduce the speed slightly to get the optimum working speed.
Increasing the pressure on the tool is not the answer when it is not cutting as you think it should. Perhaps you should be using a different cutter, and perhaps an adjustment in speed would solve the problem. But leaning on the tool seldom helps.
MAINTENANCE AND REPAIR
- Keep tool and cord clean (some household cleaning products and solvents can damage plastic parts; these products include among others benzine, trichloroethelene, chloride, ammonium
- Excessive sparking mostly indicates worn-out carbon brushes, therefore your tool should be brought to a service station.
- In case of an electrical or mechanical defect, hand in tool at one the DREMEL Service Stations for repair (addresses are listed on the service diagram supplied with the tool)
D
| 1-2 | 10,000 | - | 14,000 | RPM |
| 3-4 | 15,000 | - | 19,000 | RPM |
| 5-6 | 20,000 | - | 24,000 | RPM |
| 7-8 | 25,000 | - | 29,000 | RPM |
| 9-10 | 30,000 | - | 33,000 | RPM |
| 1-2 10,000 - 14,000 RPM |
| 3-4 15,000 - 19,000 RPM |
| 5-6 20,000 - 24,000 RPM |
| 7-8 25,000 - 29,000 RPM |
| 9-10 30,000 - 33,000 RPM |
1-2 10,000 - 14,000 RPM
3-4 15,000 - 19,000 RPM
5-6 20,000 - 24,000 RPM
7-8 25,000 - 29,000 RPM
9-10 30,000 - 33,000 RPM
| 1-2 | 10,000 | - | 14,000 | RPM |
| 3-4 | 15,000 | - | 19,000 | RPM |
| 5-6 | 20,000 | - | 24,000 | RPM |
| 7-8 | 25,000 | - | 29,000 | RPM |
| 9-10 | 30,000 | - | 33,000 | RPM |
VEDLIKEHOLD/REPARASJON
| 1-2 | 10,000 | - | 14,000 | RPM |
| 3-4 | 15,000 | - | 19,000 | RPM |
| 5-6 | 20,000 | - | 24,000 | RPM |
| 7-8 | 25,000 | - | 29,000 | RPM |
| 9-10 | 30,000 | - | 33,000 | RPM |
| 1-2 | 10,000 | - | 14,000 | RPM |
| 3-4 | 15,000 | - | 19,000 | RPM |
| 5-6 | 20,000 | - | 24,000 | RPM |
| 7-8 | 25,000 | - | 29,000 | RPM |
| 9-10 | 30,000 | - | 33,000 | RPM |
Nogle tommelfingerregler angående hastigheden:
1-2 10,000 - 14,000 RPM
3-4 15,000 - 19,000 RPM
5-6 20,000 - 24,000 RPM
7-8 25,000 - 29,000 RPM
9-10 30,000 - 33,000 RPM
| 1-2 | 10,000 | - | 14,000 | RPM |
| 3-4 | 15,000 | - | 19,000 | RPM |
| 5-6 | 20,000 | - | 24,000 | RPM |
| 7-8 | 25,000 | - | 29,000 | RPM |
| 9-10 | 30,000 | - | 33,000 | RPM |
| 1-2 | 10,000 | - | 14,000 | RPM |
| 3-4 | 15,000 | - | 19,000 | RPM |
| 5-6 | 20,000 | - | 24,000 | RPM |
| 7-8 | 25,000 | - | 29,000 | RPM |
| 9-10 | 30,000 | - | 33,000 | RPM |
| 1-2 | 10,000 | - | 14,000 | RPM |
| 3-4 | 15,000 | - | 19,000 | RPM |
| 5-6 | 20,000 | - | 24,000 | RPM |
| 7-8 | 25,000 | - | 29,000 | RPM |
| 9-10 | 30,000 | - | 33,000 | RPM |
| 1-2 | 10,000 | - | 14,000 | RPM |
| 3-4 | 15,000 | - | 19,000 | RPM |
| 5-6 | 20,000 | - | 24,000 | RPM |
| 7-8 | 25,000 | - | 29,000 | RPM |
| 9-10 | 30,000 | - | 33,000 | RPM |
| 1-2 | 10,000 | - | 14,000 | RPM |
| 3-4 | 15,000 | - | 19,000 | RPM |
| 5-6 | 20,000 | - | 24,000 | RPM |
| 7-8 | 25,000 | - | 29,000 | RPM |
| 9-10 | 30,000 | - | 33,000 | RPM |
1-2 10,000 - 14,000 RPM
3-4 15,000 - 19,000 RPM
5-6 20,000 - 24,000 RPM
7-8 25,000 - 29,000 RPM
9-10 30,000 - 33,000 RPM
Prędkość urządzenia
obrotowego jest
kontrolowana za
pomocą wskaźnika
znajdującego się w
obudowie.

| 1-2 | 10,000 | - | 14,000 | RPM |
| 3-4 | 15,000 | - | 19,000 | RPM |
| 5-6 | 20,000 | - | 24,000 | RPM |
| 7-8 | 25,000 | - | 29,000 | RPM |
| 9-10 | 30,000 | - | 33,000 | RPM |
1-2 10,000 - 14,000 RPM
3-4 15,000 - 19,000 RPM
5-6 20,000 - 24,000 RPM
7-8 25,000 - 29,000 RPM
9-10 30,000 - 33,000 RPM
This DREMEL product has been carefully inspected before leaving the factory and carries a guarantee of 2 years ("BASIC": 1 year) from the date of purchase during which period any defect caused by faulty material or manufacture will be corrected without charge. Damage due to normal wear and tear, overload or improper handling will be excluded from the guarantee. In case of a complaint, please, send the tool undismantled together with proof of purchase to the nearest DREMEL Service Station, postal charges prepaid. DREMEL reserves the right to decline responsibility in case of repairs made by persons other than DREMEL service staff. In no event compensation can be claimed in case of damage to the workpiece or injury to the tool user. This guarantee does not affect your statutory rights (UK only). Information on guarantee in instruction manual herewith expires.
F ) GARANTIE

Brand : DREMEL
Model : MultiPro
Category : Portable power tool