Spire BT300 - Robot vacuum Prixton - Free user manual and instructions
Find the device manual for free Spire BT300 Prixton in PDF.

| Product type | Window cleaning robot |
| Brand | Prixton |
| Model | Spire BT300 |
| Mains supply | AC 100-240V, 50/60 Hz |
| Adapter supply | DC 24V, 3.75A, 90W |
| Backup battery (UPS) | 14.8V, runtime ~20 min |
| Mains cable length | 1.2 m |
| DC cable length | 4.0 m |
| Safety rope length | 4.0 m |
| Cleaning speed | Approximately 4 min/m² |
| Max window size | 6 x 4 m |
| Min window size | 0,35 x 0,35 m |
| Cleaning modes | Automatic (zigzag) and manual (remote control) |
| Obstacle detection | Artificial intelligence with frame detection |
| Water spray | Manual or automatic via remote control |
| Cleaning pads | Microfiber, washable at 40°C (no bleach, no tumble dryer) |
| Light indications | Green (charged), Orange (charging), Blue (normal), Red (fault) |
| Operating temperature | 0°C to 40°C |
| Storage temperature | -10°C to 50°C |
| Warranty | Complies with legislation of the country of purchase. Excluding wear parts and battery |
| After-sales service | prixton.com (support) |
Frequently Asked Questions - Spire BT300 Prixton
User questions about Spire BT300 Prixton
0 question about this device. Answer the ones you know or ask your own.
Ask a new question about this device
Download the instructions for your Robot vacuum in PDF format for free! Find your manual Spire BT300 - Prixton and take your electronic device back in hand. On this page are published all the documents necessary for the use of your device. Spire BT300 by Prixton.
USER MANUAL Spire BT300 Prixton
natural_image
Symmetrical line drawing of a traditional Chinese figure with circular elements and two hands, no text or symbols present.LIMPIACRISTALES WINDOWS CLEANER
INDEX
ES 3
EN 13
FR 23
IT 33
DE 43
PT 53
NL 63
natural_image
Illustration of hands using a tool to adjust a cylindrical component (no text or symbols visible)GUÍA DE OPERACIÓN
natural_image
Close-up of a metallic chain strap securing a blue rope (no text or symbols visible)CÓMO USAR
natural_image
Diagram showing two circular rollers with grid patterns and a spray bottle (no text or symbols)PASO 2
natural_image
Diagram showing a spray bottle spraying into a circular container filled with six circular samples (no text or symbols)PASO 3
flowchart
graph TD
    A["AUTO"] --> B
    B --> C
    C --> D
    D --> E
    E --> F
    F --> G
    G --> H
    H --> I
    I --> J
    J --> K
    K --> L
    L --> M
    M --> N
    N --> O
    O --> P
    P --> Q
    Q --> R
    R --> S
    S --> T
    T --> U
    U --> V
    V --> W
    W --> X
    X --> Y
    Y --> Z
    Z --> A
flowchart
graph TD
    A["Start"] --> B{Decision}
    B -->|Yes| C["Process"]
    B -->|No| D["End"]

flowchart
graph TD
    A["AUTO"] --> B
    B --> C
    C --> D
    D --> E
    E --> F
    F --> G
    G --> H
    H --> I
    I --> J
    J --> K
    K --> L
    L --> M
    M --> N
    N --> O
    O --> P
    P --> Q
    Q --> R
    R --> S
    S --> T
    T --> U
    U --> V
    V --> W
    W --> X
    X --> Y
    Y --> Z
INDICADOR LED
natural_image
Illustration of a car wheel being held, showing sequential steps from ring opening to final wheel (no text or symbols)natural_image
Close-up of a white robotic brush applying a gray filter onto a black circular base, with a yellow arrow pointing to the brush tip (no text or symbols visible)MANTENIMIENTO DE ALMOHADILLA DE LIMPIEZA
Dear customer: Thank you for purchasing our window cleaning robot.
Please read the manual carefully before operation correctly and safely.
Please keep this manual properly for reference at any time when necessary.
TECHNICAL SUPPORT
Please consult dealer if any problem with the product which could not be solved by this manual.
DISCLAIMER
For all contents of this manual, our company does not make any statement to clarify the applicability of the product for any specific purpose. Our company will have the right to change the product and its related documents without further notice.
SAFETY PRECAUTION
Please read the manual carefully before use.
- Fasten the safety rope on robot and tie it to furniture before use to avoid fall off danger.
- Please check whether the safety rope is damaged or loose before use.
- Set warning sign under windows for people when cleaning windows without balcony. 4.
The robot must be connected to the power cord for normal use. - Please use the robot when UPS battery is fully charged (green light on). 6. Please turn on the power before placing the robot to the window glass.
- Make sure the robot is attached to the glass before letting go.
- Please remove the robot before turning off the power.
- Please make sure the clean ring installed securely to avoid air leakage before use. 10. Do not use the robot in rainy or wet weather.
- Do not spray water directly on the robot.
- Do not let children use the robot.
- This product is not a toy. Do not let children operate the robot. Be vigilant when using the robot. Keep children away from the underside of the robot work area.
- Do not use on cracked glass. Do not use on reflective or coated glass because the cleaning wheel will scratch the glass surface.
- Do not let hair, clothes, fingers and any part of the body close to the opening of the product or rotate parts.
- Do not use near flammable liquids or gases.
PRODUCT INTRODUCTION
This is a window glass cleaning robot. It has a vacuum motor to make the robot adsorb on the glass surface and walk freely on the vertical glass surface. There is an uninterruptible power supply system (UPS), which provides power in case of power failure and prevent falling.
The window cleaning robot has two clean wheels, which has the function of adsorption, walking and cleaning. The cleaning wheel can adsorband walk on the vertical glass surface. The clean pad on the cleaning wheel can be easily removed, replaced, cleaned and reused. The clean pads are made from microfiber cloth, which has a very good cleaning effect.
The robot has artificial intelligence (AI), can plan the path and automatically detect the window frame. There are automatic cleaning mode and manual cleaning mode, so that users can control the robot freely.
| Power Adapter Input AC 100~240/50~60Hz | |
| Power Adapter Output DC 24V/3.75A | |
| Rated Power 90W | |
| Power Adapter AC Cord 1.2m | |
| Power Adapter DC Cord 4.0m | |
| Safety Rope 4.0m | |
| UPS Battery Voltage 14.8V | |
| UPS Operation Time | About 20 mins |
| Clean Speed About 4 mins / m | 2 |
| Max Window Size Workable 6 | * 4 meters |
| Min Window Size Workable | 0.35 * 0.35 meters |
PACKAGE CONTENTS
Window Cleaning Robot *1
Remote Control *1
Power Adapter *1
Clean Pad *8
Clean Ring *2
Safety Rope *1
User Manual *1
Water Bottle *1
PRODUCT FEATURE
Suitable for any kind of glass
AI Auto Clean
3 Auto Clean Mode
Auto stop when clean completed
Built-in Lithium Battery UPS Anti Fall
Auto Window Frame Detection
Microfiber Clean Pad
High Strength Safety Rope
Infrared Remote Control for Spot Clean
FUNCTION DESCRIPTION
 | LED Red: Robot is abnormalLED Blue: Robot is normalLED Green: Fully ChargedLED Orange: Charging |
 | Power Button: ON/OFF/Start/Pause |
 | Power Socket |
 | Safety Rope Hole |
 | Water injection hole, inject water or glass cleaning solution in here |
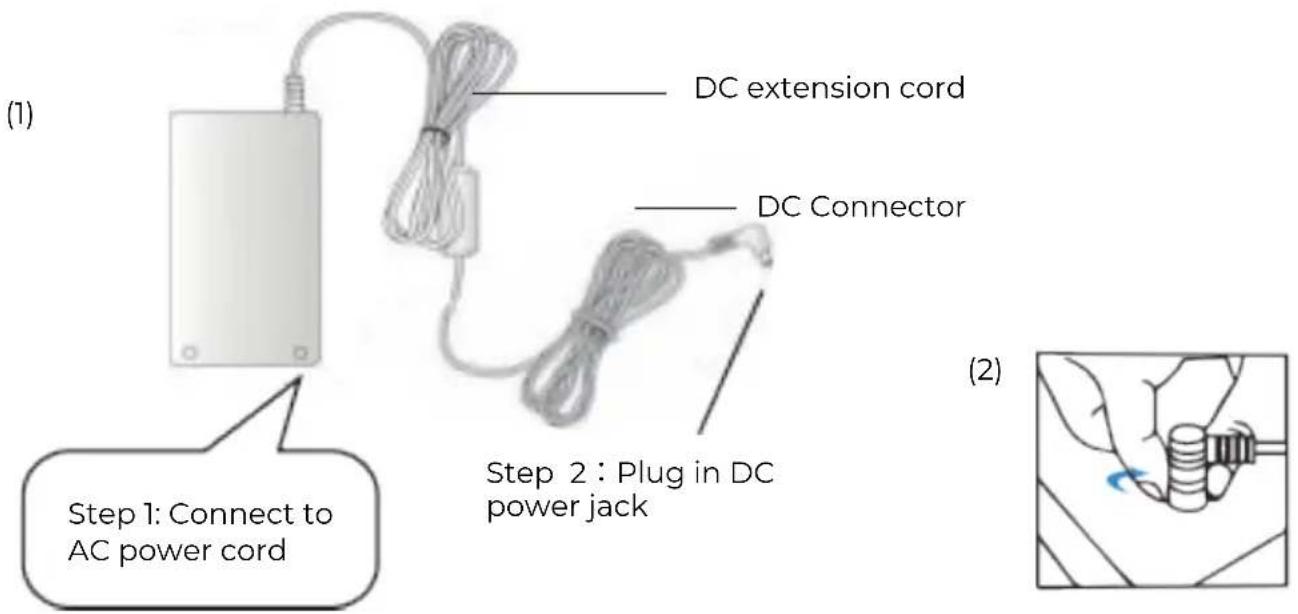
POWER ADAPTER
OPERATION GUIDE
- Please make sure the robot is fully charged before use (LED green light on). When charging the built-in battery, please turn off the switch and connect the power adapter. When the orange light is on, it represents the charging mode, and when the green light is on, it represents that it is fully charged.
-
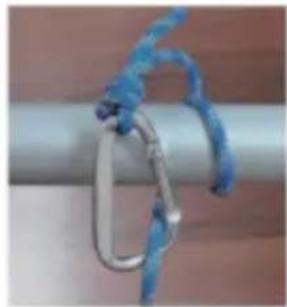
Please check that the safety rope and buckle are not damaged. Be sure to fasten the safety rope before use, and tie the safety rope to the fixtures in the house.
-
Before use, please ensure that the clean ring is fixed on the cleaning wheel to ensure good vacuum adsorption of the robot, and spray cleaning water according to the specifications.
-
When the window cleaning robot works, the power adapter must be connected before it can work normally.
natural_image
Close-up of a metallic chain strap securing a metal clip against a plain background (no text or symbols visible)HOW TO USE
-
Plugged in with power adapter, turn on the robot (LED blue) and ensure that the motor works, then attach the robot to the glass at about 10cm away from the frame (for robot self-inspection).
-
Make sure the robot is firmly attached on the glass, and ensure the safety rope and power cord are not affecting the clean path of the robot.
-
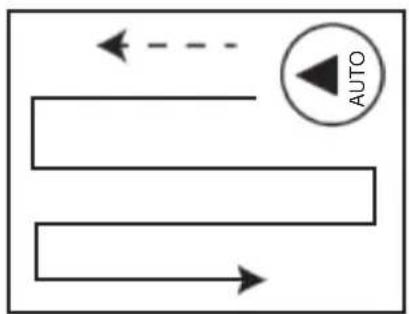
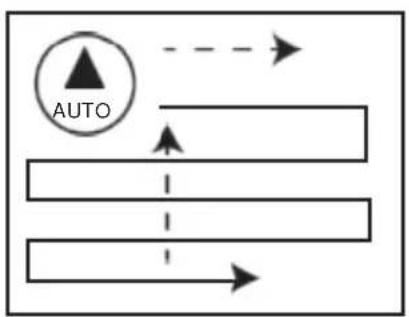
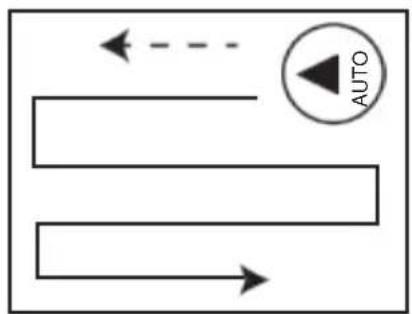
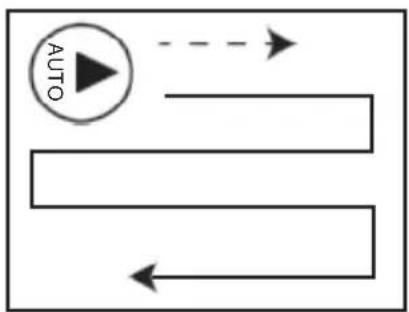
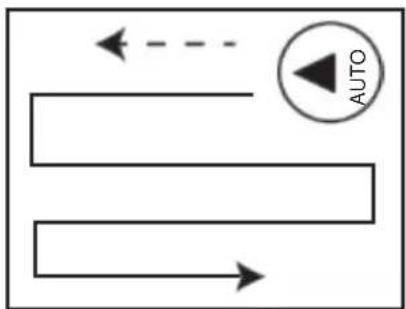
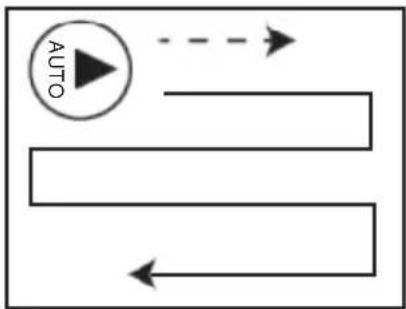
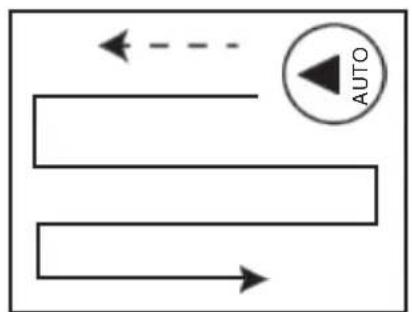
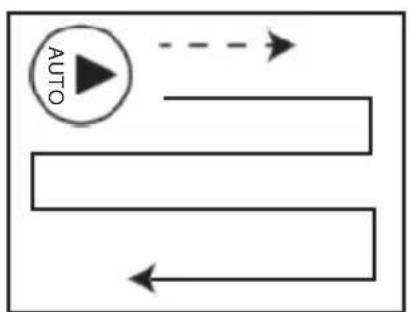
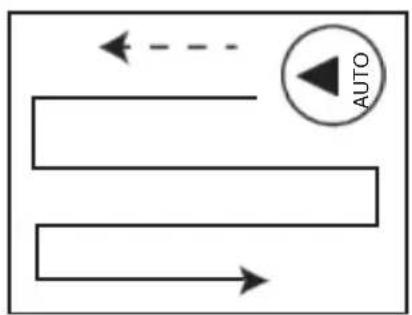
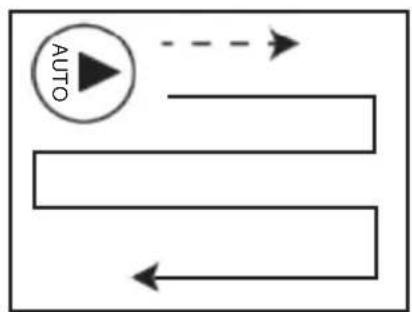
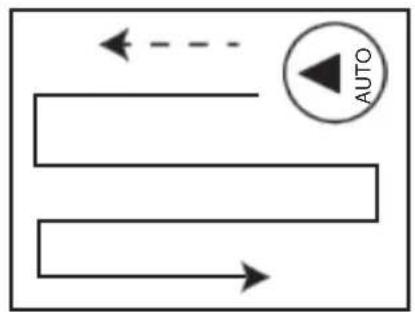
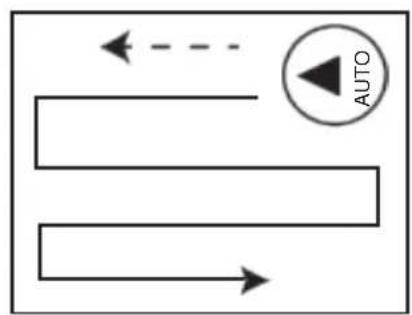
Press auto clean button on the remote control, the robot will move from bottom to top of the window, and then move in a zigzag shape, from left to right and from top to bottom to clean the window. After cleaning, the robot will return to the starting position at the bottom and make a "drip" sound.
-
If the robot stops at an inaccessible place accidentally, please gently pull back the robot by safety rope.
-
To remove the robot, please hold the safety rope with one hand, remove the robot with another hand, then turn off the power.
Note: the robot must be connected to the power adapter before it can work normally!
HOW TO CLEAN
STEP 1
- If the glass is very dirty or dusty, please clean with dry pads (do not spray any water) for the first round, so to remove the dust on the glass.
- If you spray water or detergent on the clean pads on the first clean round, the water or detergent will be mixed with sand and dust, which makes it into mud.
natural_image
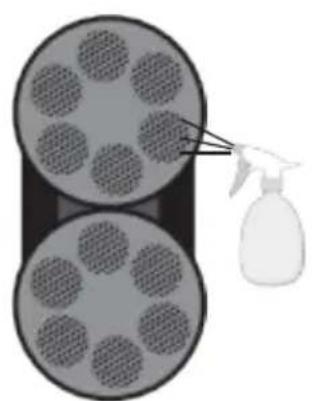
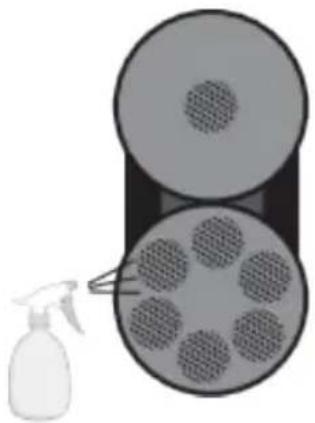
Diagram showing two circular objects with grid patterns being sprayed by a spray bottle (no text or symbols)STEP 2
• Install clean and dry clean pads on clean ring, and confirm that the clean ring is firmly installed on the clean wheel. Then spray a little water or detergent on the clean pads (2 to 3 spray). It must not be too much wet. The fully wet clean pads will affect the operation of the robot.
- If there is sand or dust on the glass, you can spray water or detergent on this area, let the water or detergent soak the area, and wait for 2 to 3 minutes before cleaning.
natural_image
Diagram showing a spray bottle spraying into a cylindrical container with six circular wells (no text or symbols)STEP 3
- Replace the clean and dry cloth, spray the water or detergent at the edge of the clean pad to improve the vacuum suction of the robot, which improves the cleaning performance.
CAUTION!
- Do not spray water into the robot, or put robot into the water.
- Do not use the robot in rainy and wet weather.
- Please use spray bottle with spray water or detergent when cleaning glass.
- It is normal that the new clean pad will leave a few traces when used for the first time. Clean and dry the dirty clean pad before using it. When spraying detergent, spray it on the clean pad or the glass directly.
- If an unexpected power failure occurs during the operation of the robot, the built-in UPS battery will start automatically. The battery could support the robot vacuum for about 20 minutes. In case of accidental power failure of the robot, the robot will automatically stop and make a warning sound. At the same time, the red light continues to flash. Please remove the robot as soon as possible to prevent the robot from falling down when the power is exhausted.
- If the robot stops outside the inaccessible range due to other conditions, please gently pullback the robot with safety rope. When pulling the safety rope, it should be close to the glass as far as possible to prevent the robot from falling.
REMOTE CONTROL WITH SPRAY WATER
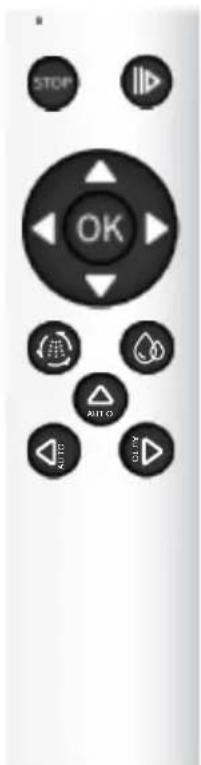
| Start Auto Clean | Manual Clean To Upward | ||
| Manual Water Spray | Manual Clean To the Left | ||
| Auto Water Spray | Manual Clean To the Right | ||
| Stop | Manual Clean To the downward | ||
| Start or Pause | Auto Clean To upward | ||
| Auto Clean Left to Right | Auto Clean Right to Left |
Noted : the remote control is used for spray water model
REMOTE CONTROL WITHOUT SPRAY WATER
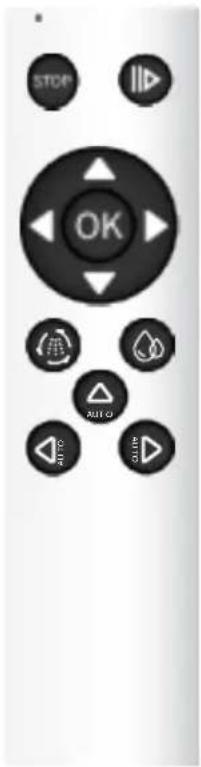
| Start Auto Clean | Manual Clean To Upward | ||
| Stop | Manual Clean To the Left | ||
| Start or Pause | Manual Clean To the Right | ||
| Auto Clean Left to Right | Manual Clean To the downward | ||
| Auto Clean To upward | |||
| Auto Clean Right to Left |
Noted: the remote control is for no spray water model
When the robot works inside or outside the window, the robot can be controlled by remote control.
flowchart
graph TD
    A["AUTO"] --> B
    B --> C
    C --> D
    D --> E
    E --> F
    F --> G
    G --> H
    H --> I
    I --> J
    J --> K
    K --> L
    L --> M
    M --> N
    N --> O
    O --> P
    P --> Q
    Q --> R
    R --> S
    S --> T
    T --> U
    U --> V
    V --> W
    W --> X
    X --> Y
    Y --> Z
    Z --> A
flowchart
graph TD
    A["Start"] --> B{Decision}
    B -->|Yes| C["Process"]
    B -->|No| D["End"]
flowchart
graph TD
    A["AUTO"] --> B
    B --> C
    C --> D
    D --> E
    E --> F
    F --> G
    G --> H
    H --> I
    I --> J
    J --> K
    K --> L
    L --> M
    M --> N
    N --> O
    O --> P
    P --> Q
    Q --> R
    R --> S
    S --> T
    T --> U
    U --> V
    V --> W
    W --> X
    X --> Y
    Y --> Z
LED INDICATOR
| DESCRIPTION LED STATUS | |
| 1. Changing | Orange light on |
| 2. Changing finished | Green light on |
| 3. Power Failure | Red light flashes "drip, drip, drip" warning sound |
| 4. Vacuum pressure is low | Red light flashes once and "drip" sound |
| 5. Air leakage during operation | Red light flashes once and "drip" sound |
| 6. Friction is too strong or too weak | Red light flashes once and "drip" sound |
Note: if LED flashes red and the robot continues to sound "drip, drip", please check if power adapter is normal or power cord is loose.
INSTALL CLEAN PAD AND RING
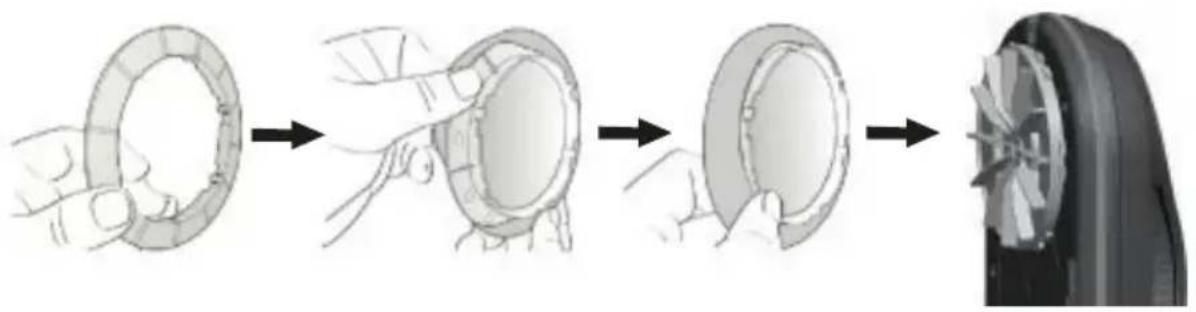
- Put the clean pad on the clean ring evenly.
natural_image
Illustration of a hand holding a circular object through four sequential steps, ending with a final close-up view (no text or symbols)- Put the clean ring on the wheel. Ensure that all 6 clips on the clean ring are installed in place to avoid air leakage.
natural_image
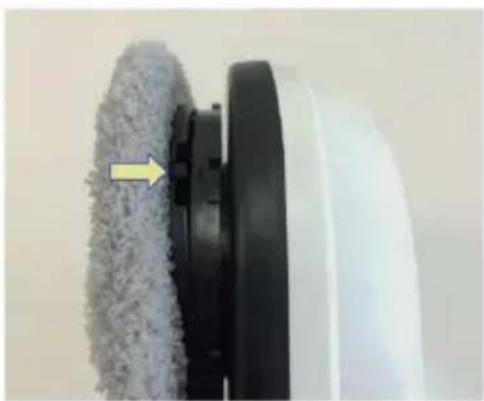
Close-up of a white cleaning brush with a textured brush and black base, showing a yellow arrow pointing to the brush's edge (no text or symbols visible)CLEAN PAD MAINTENANCE
- Washing temperature not higher than 40 °C
- Do not bleach
- Do not tumble dry
- Do not iron
- Do not dry clean
TROUBLE SHOOTING
Q: When the robot starts, it will run self-inspection first. If it cannot operate normally and the robotsends out an alarm sound, it indicates that the friction is too large or too small.
A: Please check the following problems :
(1) The clean pad is too dirty.
(2) Glass or glass stickers have high friction and they are not suitable for use.
(3) When the glass surface is already very clean, the glass will be too slippery and the friction is too small.
(4) The ambient humidity is too low and the glass will be too slippery.
Q: When pressing the key AUTO AUTO to run automatic cleaning mode, the robot cannot detect the top of the window smoothly due to slipping.
A: (1) Please press the key STOP to pause the robot, then press the key ◀ AUTO or ⬆ to run the automatic cleaning mode.
(2) If the water or detergent is sprayed too much, the clean pad is too wet or dirty, please replace the clean pad.
Q: The robot cannot finish cleaning the windows, or the window cleaning action is ended in advance.
A: press the key ◀ AUTO or AUTO to redo the unfinished work.
Q : The robot cannot climb up to the top of window.
A: (1) The friction is too small.
(2) The clean pad is wet.
(3) When the glass surface is already very clean, the glass will be too slippery. (4) The ambient humidity is too high and the glass will be too slippery.
Q : The robot does not walk smoothly.
A: (1) Check if clean pads are dirty and change for clean ones.
(2) Check if any gaps on the glass.
(3) Check if any stickers on the glass surface.
(4) Check if the screw on the clean wheel is loose, then fasten it.
(5) Check if clean ring securely installed, then install.
Q : There are marks remain on the glass after cleaning.
A: Check if clean pads are dirty. Then change for clean pads and run clean routine again.
Q: The robot stops running due to power failure, make a warning sound, and the LED flashes red. How to deal with it?
A: (1) Gently pull the robot back with the safety rope. When pulling the safety rope, it should be close to the glass as far as possible to avoid falling.
(2) Check whether the plugs of the power supply are plugged in properly, whether there is poor contact or the power cord is disconnected.
(3) Press the power key to restart the robot and double check after finishing step 1 &2.
Q: The robot stops when hitting unknown obstacles, LED flashes red but no alert sound, how to deal with it?
A: (1) Remote control the robot to a safe position, or gently pull the robot back by safety rope. When pulling the safety rope, it should be close to the glass to avoid falling.
(2) Remove obstacles from window.
(3) Check if any reason for air leakage.
Q: When robot turned on, it does not operate and there is no warning sound?
A:
| Item | LED Status Description | |
| 1 | Blue: flashesOrange: onRed light: offNo warning sound | UPS battery is too low, please charge the robot till led is green.If it still could not work when UPS battery fully charged, the UPS battery may be damaged. |
| 2 | Blue: flashesRed: flashesNo warning sound | Robot is abnormal.Please contact dealer. |
Q: The glass has scratches after cleaning.
A: (1) Please clean the glass with dry clean pads for the 1st round.
(2) For cleaning 2nd round, replace with new clean pads and keep it dry and clean. Spray a little water or detergent on the clean pads. It cannot be completely wet.
Q: The robot has cleaned all the windows, but it cannot stop automatically
A: Please press the STOP key to manually stop.
POWER SAFETY INSTRUCTION
- Use only the original power adapter included in the package. Use other power cords or adapters may cause failure or danger.
- Please use the suitable power outlet and do not place heavy objects on the power cord or adapter.
- Please turn off the power and takeoff the power adapter when not in use.
· DO NOT cover the power adapter and keep the normal heat dissipation of the power adapter.
· DO NOT use the power adapter in humid environment. DO NOT touch the power adapter with wet hands or feet.
· DO NOT use if power cord or adapter damaged. - The power adapter is high voltage. Do not try to repair it. If the adapter or power cord is damaged or exposed to excessive humidity, replace the power adapter.
· DO NOT disassemble, short circuit or throw the power adapter into fire. Discard any parts according to the local regulation.
WARNING INSTRUCTIONS
- Please keep the user manual properly.
- Be sure to observe the indicative warnings for the product.
· DO NOT expose the robot to rain or wet places, keep the robot away from liquids.
· DO NOT expose the robot to strong light and keep it away from the heat source. - Please keep the robot out of the reach of children.
· Product operating temperature: 0°C\~40°C.
· Product storage temperature: -10^ 50^ .
NON WARRANTY SCOPE
- Normal waste materials (clean pad, safety rope, etc).
- The battery is a fragile consumable, which is not covered by the warranty.
- Accidental damage caused by improper use, and failure to operate in accordance with the product instructions.
- This product is used beyond the scope of household cleaning.
- Use non factory configured parts.
- Wrong installation.
Warranty policy
This product complies with the warranty law in force in the country of purchase. When you have a problem that you can not solve, you must access the web www.prixton.com and click on the contact option to send us your assistance form.
These technical and electrical specifications are those of typical units and may be changed without prior notice in order to provide improved equipment.
Simplified EU Declaration Of Conformity
We, La Trastienda Digital located in Avenida Cervantes 49, módulo 25, Basauri 48970, Bizkaia hereby declare that the following goods, imported and selling at European market:
| BRAND | MODEL NAME DESCRIPTION | CATEGORY |
| Prixton SPIRE BT300 | Windows cleaner | Home |
Are in compliance with the EC Council Directive of 2014/53/EU (EM DIRECTIVE) and harmonized standards and with the board of the 16th of April 2014.
The complete text of the UE Declaration of conformity is available anytime at this website address:
www.prixton.com
LA TRASTIENDA DIGITAL
Window Cleaning Robot *1
Remote Control *1
Power Adapter *1
Clean Pad *8
Clean Ring *2
Safety Rope *1
User Manual *1
Water Bottle *1
PRODUCT FEATURE
Suitable for any kind of glass
AI Auto Clean
3 Auto Clean Mode
Auto stop when clean completed
Built-in Lithium Battery UPS Anti Fall
Auto Window Frame Detection
Microfiber Clean Pad
High Strength Safety Rope
Infrared Remote Control for Spot Clean
DESCRIPTION DES FONCTIONS


natural_image
Illustration of a hand holding a cylindrical object with a blue arrow indicating rotation (no text or symbols)GUIDE D'UTILISATION
natural_image
Diagram showing two circular containers with circular patterns and a spray bottle pouring liquid from a nozzle (no text or symbols)ÉTAPE 2
natural_image
Diagram showing a spray bottle spraying into a circular container with six circular wells (no text or symbols)ÉTAPE 3
flowchart
graph TD
    A["AUTO"] --> B
    B --> C
    C --> D
    D --> E
    E --> F
    F --> G
    G --> H
    H --> I
    I --> J
    J --> K
    K --> L
    L --> M
    M --> N
    N --> O
    O --> P
    P --> Q
    Q --> R
    R --> S
    S --> T
    T --> U
    U --> V
    V --> W
    W --> X
    X --> Y
    Y --> Z
    Z --> A
flowchart
graph TD
    A["Start"] --> B{Decision}
    B -->|Yes| C["Process"]
    B -->|No| D["End"]
flowchart
graph TD
    A["AUTO"] --> B
    B --> C
    C --> D
    D --> E
    E --> F
    F --> G
    G --> H
    H --> I
    I --> J
    J --> K
    K --> L
    L --> M
    M --> N
    N --> O
    O --> P
    P --> Q
    Q --> R
    R --> S
    S --> T
    T --> U
    U --> V
    V --> W
    W --> X
    X --> Y
    Y --> Z
INDICATEURS LED
natural_image
Illustration of a car wheel being held, showing sequential steps from ring opening to final wheel (no text or symbols)natural_image
Close-up of a white cleaning brush applying a gray filter onto a black circular base, with a yellow arrow pointing to the brush tip (no text or symbols visible)ENTRETIEN DU TAMPOIR DE NETTOYAGE
natural_image
Diagram showing a spray bottle spraying through a multi-layered cylindrical container with circular patterns (no text or symbols)PASSO 2
natural_image
Diagram showing a spray bottle spraying into a cylindrical container filled with circular patterns (no text or symbols)PASSO 3
flowchart
graph TD
    A["AUTO"] --> B
    B --> C
    C --> D
    D --> E
    E --> F
    F --> G
    G --> H
    H --> I
    I --> J
    J --> K
    K --> L
    L --> M
    M --> N
    N --> O
    O --> P
    P --> Q
    Q --> R
    R --> S
    S --> T
    T --> U
    U --> V
    V --> W
    W --> X
    X --> Y
    Y --> Z
    Z --> A
flowchart
graph TD
    A["Start"] --> B{Decision}
    B -->|Yes| C["Process"]
    B -->|No| D["End"]
flowchart
graph TD
    A["AUTO"] --> B
    B --> C
    C --> D
    D --> E
    E --> F
    F --> G
    G --> H
    H --> I
    I --> J
    J --> K
    K --> L
    L --> M
    M --> N
    N --> O
    O --> P
    P --> Q
    Q --> R
    R --> S
    S --> T
    T --> U
    U --> V
    V --> W
    W --> X
    X --> Y
    Y --> Z
INDICATORE LED
natural_image
Illustration of a car wheel being held, showing sequential steps from ring opening to final wheel (no text or symbols)natural_image
Close-up of a white robotic brush applying adhesive to a black circular component, with a yellow arrow pointing to the edge (no text or symbols visible)natural_image
Illustration of hands using a tool to adjust a cylindrical component (no text or symbols visible)BEDIENUNGSANLEITUNG
natural_image
Close-up of a metallic chain strap securing a blue rope (no text or symbols visible)WIE MAN ES BENUTZT
natural_image
Diagram showing two circular containers with grid patterns and a spray bottle pouring liquid (no text or symbols)SCHRITT 2
natural_image
Illustration of a spray bottle spraying into a cylindrical container with six circular outlets (no text or symbols)SCHRITT 3
flowchart
graph TD
    A["AUTO"] --> B
    B --> C
    C --> D
    D --> E
    E --> F
    F --> G
    G --> H
    H --> I
    I --> J
    J --> K
    K --> L
    L --> M
    M --> N
    N --> O
    O --> P
    P --> Q
    Q --> R
    R --> S
    S --> T
    T --> U
    U --> V
    V --> W
    W --> X
    X --> Y
    Y --> Z
    Z --> A
flowchart
graph TD
    A["Start"] --> B{Decision}
    B -->|Yes| C["Process"]
    B -->|No| D["End"]
flowchart
graph TD
    A["AUTO"] --> B
    B --> C
    C --> D
    D --> E
    E --> F
    F --> G
    G --> H
    H --> I
    I --> J
    J --> K
    K --> L
    L --> M
    M --> N
    N --> O
    O --> P
    P --> Q
    Q --> R
    R --> S
    S --> T
    T --> U
    U --> V
    V --> W
    W --> X
    X --> Y
    Y --> Z
LED-ANZEIGE
| DESCRIPTION LED STATUS | |
| 1. Changing | Orange light on |
| 2. Changing finished | Green light on |
| 3. Power Failure | Red light flashes "drip, drip, drip" warning sound |
| 4. Vacuum pressure is low | Red light flashes once and "drip" sound |
| 5. Air leakage during operation | Red light flashes once and "drip" sound |
| 6. Friction is too strong or too weak | Red light flashes once and "drip" sound |
natural_image
Illustration of a car tire being held in a steering wheel, showing sequential states of rolling and turning (no text or symbols)natural_image
Close-up of a cleaning brush head with a white plastic roller and gray filter material, showing a yellow arrow pointing to the brush (no text or symbols visible)natural_image
Illustration of a hand holding a cylindrical object with a blue arrow indicating motion (no text or symbols)GUIA DE OPERAÇÃO
natural_image
Close-up of a metallic chain strap securing a metal clip against a plain background (no text or symbols visible)CÓMO UTILIZAR
natural_image
Diagram showing two circular containers with circular patterns and a spray bottle pouring liquid from a nozzle (no text or symbols)PASO 2
natural_image
Diagram showing a spray bottle spraying into a cylindrical container with six circular patterns (no text or symbols)PASO 3
| Iniciar Limpeza Automática | Limpeza Manual para Cima | ||
| Rociado de Água Manual | Limpeza Manual para a Esquerda | ||
| Rociado de Água Automático | Limpeza Manual para a Direita | ||
| Parar | Limpeza Manual para Baixo | ||
| Iniciar ou Pausar | Limpeza Automática para Cima | ||
| Limpeza Automática da Esquerda para a Direita | Limpeza Automática da Direita para a Esquerda |
flowchart
graph TD
    A["AUTO"] --> B
    B --> C
    C --> D
    D --> E
    E --> F
    F --> G
    G --> H
    H --> I
    I --> J
    J --> K
    K --> L
    L --> M
    M --> N
    N --> O
    O --> P
    P --> Q
    Q --> R
    R --> S
    S --> T
    T --> U
    U --> V
    V --> W
    W --> X
    X --> Y
    Y --> Z
flowchart
graph TD
    A["Start"] --> B{Decision}
    B -->|Yes| C["Process"]
    B -->|No| D["End"]

flowchart
graph TD
    A["AUTO"] --> B
    B --> C
    C --> D
    D --> E
    E --> F
    F --> G
    G --> H
    H --> I
    I --> J
    J --> K
    K --> L
    L --> M
    M --> N
    N --> O
    O --> P
    P --> Q
    Q --> R
    R --> S
    S --> T
    T --> U
    U --> V
    V --> W
    W --> X
    X --> Y
    Y --> Z
INDICADOR LED
natural_image
Illustration of a car tire being held, showing sequential steps from ring opening to final wheel (no text or symbols)natural_image
Close-up of a cleaning brush head with a white plastic roller and black base, showing a yellow arrow pointing to the brush (no text or symbols visible)natural_image
Close-up of a metallic chain strap securing a metal bar (no text or symbols visible)Gebruiksaanwijzing
natural_image
Diagram showing two circular objects with internal patterns and a spray bottle pouring liquid (no text or symbols)STAP 2
natural_image
Diagram showing a spray bottle spraying into a container filled with six circular samples (no text or symbols)STAP 3
flowchart
graph TD
    A["AUTO"] --> B
    B --> C
    C --> D
    D --> E
    E --> F
    F --> G
    G --> H
    H --> I
    I --> J
    J --> K
    K --> L
    L --> M
    M --> N
    N --> O
    O --> P
    P --> Q
    Q --> R
    R --> S
    S --> T
    T --> U
    U --> V
    V --> W
    W --> X
    X --> Y
    Y --> Z
    Z --> A
flowchart
graph TD
    A["Start"] --> B{Decision}
    B -->|Yes| C["Process"]
    B -->|No| D["End"]

flowchart
graph TD
    A["AUTO"] --> B
    B --> C
    C --> D
    D --> E
    E --> F
    F --> G
    G --> H
    H --> I
    I --> J
    J --> K
    K --> L
    L --> M
    M --> N
    N --> O
    O --> P
    P --> Q
    Q --> R
    R --> S
    S --> T
    T --> U
    U --> V
    V --> W
    W --> X
    X --> Y
    Y --> Z