TW502XX - Measuring equipment Vonroc - Free user manual and instructions
Find the device manual for free TW502XX Vonroc in PDF.

| Product type | Click torque wrench |
| Brand | Vonroc |
| Model | TW502XX |
| Torque range | 5-25 Nm (0.5-2.5 mkg) |
| Accuracy | ±4% (conforms to EN ISO 6789-2) |
| Drive square size | 1/4" (6.35 mm) |
| Length | 280 mm |
| Weight | Approximately 0.5 kg |
| Material | Treated alloy steel |
| Main function | Application of precise tightening torque during final assembly |
| Recommended uses | Bicycle, motorcycle, automotive, mechanical assembly |
| Included accessories | 1/4" extension, 1/4" socket |
| Safety | Do not use for loosening; do not exceed the range; wear PPE (goggles, gloves) |
| Maintenance and cleaning | Clean with a slightly damp soft cloth and mild soap; no solvents |
| Storage | In the provided case, dry, at moderate temperature, at minimum torque |
| Calibration and maintenance | Inspection by a professional after 5000 cycles or 1 year |
| Warranty | Legal warranty against material and manufacturing defects; excludes normal wear and unauthorized modifications |
| Repairability | Do not replace parts yourself; contact VONROC customer service |
Frequently Asked Questions - TW502XX Vonroc
User questions about TW502XX Vonroc
0 question about this device. Answer the ones you know or ask your own.
Ask a new question about this device
Download the instructions for your Measuring equipment in PDF format for free! Find your manual TW502XX - Vonroc and take your electronic device back in hand. On this page are published all the documents necessary for the use of your device. TW502XX by Vonroc.
USER MANUAL TW502XX Vonroc
natural_image
White toothbrush icon on black background (no text or symbols)EN Original Instructions 04
B

natural_image
Line drawing of a handheld device with a labeled end point (7), no text or symbols present.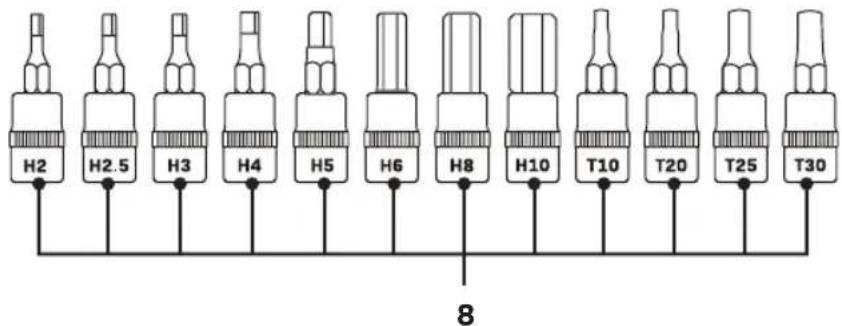
UONROC
natural_image
Technical illustration of a mechanical component with labeled parts (D and 4), showing internal spiral structure without any text or symbols.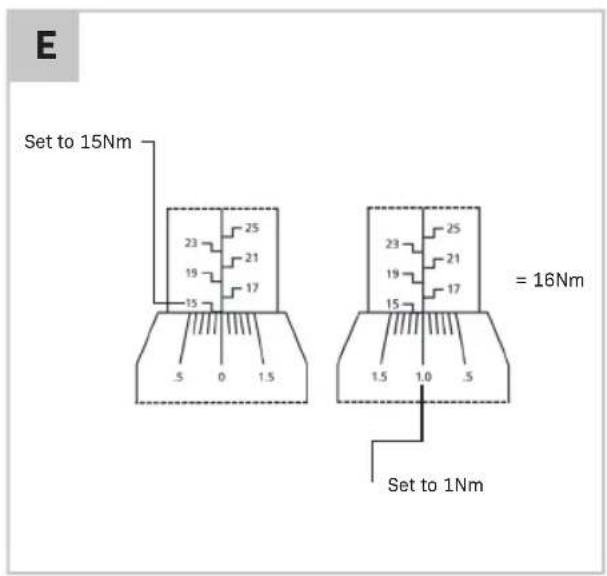
1.SAFETYINSTRUCTIONS
Read the enclosed safety warnings, the additional safety warnings and the instructions. Failure to follow the safety warnings and the instructions may result in electric shock, fire and/or serious injury. Save the safety warnings and the instructions for future reference.
The following symbols are used in the user manual or on the product:

Read the user manual.

Denotes risk of personal injury, loss of life or damage to the tool in case of non-observance of the instructions in this manual.

Wear eye protection.

Wear safety gloves.

Wear protection boots.
SAFETY WARNINGS
- TORQUE WRENCHES ARE MEASURING / TESTING DEVICES AND AS SUCH THEY MAY NOT BE USED TO LOOSEN SCREW CONNECTIONS.
- Do not use to loosen fasteners.
- Use as intended only. Do not use as hammer or pry bar.
- Do not use handle extension to increase force. Do not use as breaker bar.
- Avoid dropping or sliding the torque wrench. Dropping the torque wrench on a hard surface can cause the instrument to lose reliable calibration. If you suspect that the wrench has been dropped, have the tool inspected by the manufacturer or reputable calibration service.
- Keep away from children.
- Inspect before every use; the device must only be used when it functions properly. If the product or part of the product is defective, it must be taken out of operation and disposed of correctly.
- For your safety, service, calibration, and maintenance should be performed regularly by a qualified technician.
-
Avoid exposure to temperature extremes, high humidity, fluid immersion and corrosive environments.
-
Always store the torque wrench in the protective case provided when not in use.
- Use the tool, accessories and tool bits in accordance with these instructions and in the manner intended for the particular type of tool, taking into account the working conditions and the work to be performed. Use of the tool for operations different from those intended could result in a hazardous situation.
- Stay alert, watch what you are doing, and use common sense when using the tool.
- Beware of sharp edges. Handle sharp-edged and pointed tools with care. Ensure sharp-edged and
- pointed tools are kept sharp as this will make them easier to control.
- Do not force the tool. Always use the correct tool for your application. The correct tool will do the job better and more safely at the rate for which it was designed.
- Do not overreach. Keep proper footing and balance at all times. This will enable better control of the tool in unexpected situations.
- Always use the correct type of tool for the type of material being worked on.
NOTE The above list is non-exhaustive and is recommended as a basic level of protection for general tasks. Before starting any task, refer to your local hardware store or a professional for advice on which safety equipment would be best suited to the task at hand. - Do not exceed the recommended working range of the torque wrench. Reliable measurements are based on a percentage of the working range. In general, mechanical wrenches have a useable range from 20% to 100% of full scale.
2.MACHINEINFORMATION
Intended use
This torque wrench is specially designed to apply a specific tightening torque value during a final assembly process. This prevents the bolt or nut from being overtightened. It is not allowed to loosen screws, nuts or other fasteners with the tool. Do not use the torque wrench as the primary means of tightening fasteners, a ratchet wrench is strongly advised for this. Always store the torque wrench in lowest torque setting, to prolong the lifespan of the tool and prevent the tool from losing its accuracy.
TECHNICAL SPECIFICATIONS
| Model No. TW502XX | |
| Torque range 5-25 Nm (0.5-2.5 mkg) | |
| Square drive size 1/4" (6.35mm) | |
| Length 280mm | |
| Accuracy 4% (in accordance with EN ISO 6789-2) | |
DESCRIPTION
The numbers in the text refer to the diagrams on pages 2-3.
- Square drive
- Torque scale
- Handle
- Lock knob
- Direction switch
- Pivot point
- 1/4" extension bar
- 1/4" socket bit
3. ASSEMBLY
Mounting accessories (Fig. A, B, C)

Use only sockets with the correct drive and rated to at least the torque that will be applied to it.

Do not use accessories or socket extensions unless specifically required. The more extensions used, the less accurate the torque setting will be.

Avoid using universal joint extensions as these will give an inaccurate torque reading.
Sockets and/or accessories can be mounted on the 1/4" square drive (1) of the wrench.
1/4" extension bar
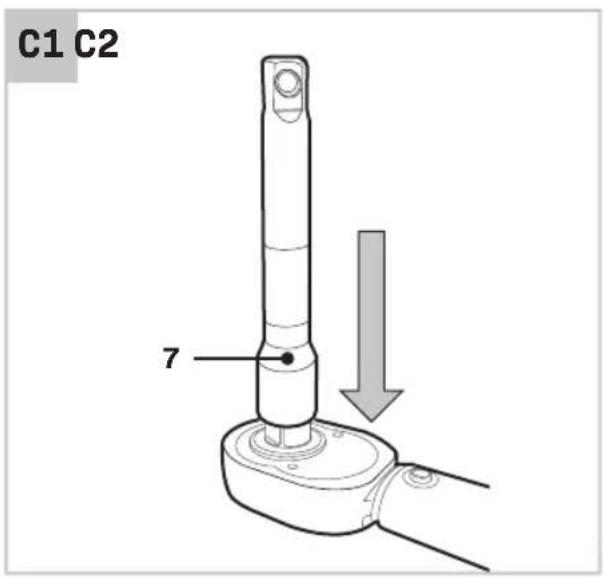
The 1/4" extension bar (7) can be used for confined spaces where there is limited space to operate the wrench. To mount the 1/4" extension bar (7), firmly press it onto the 1/4" square drive (1).
1/4" socket bits
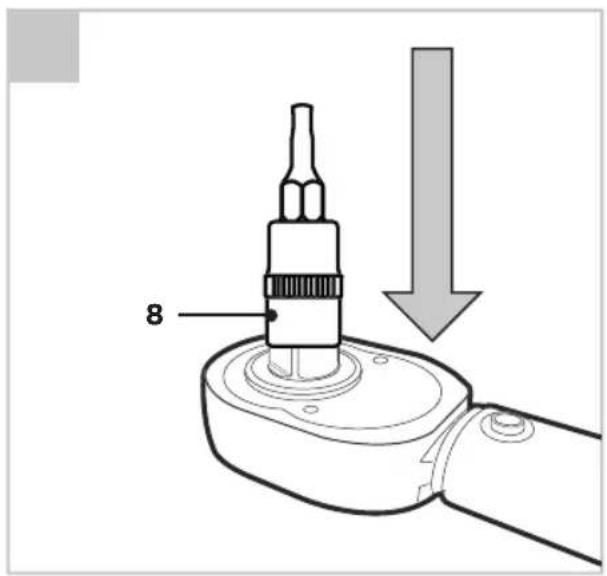
The 1/4" socket bits (8) can be used for tightening bolts, for example those of a bicycle part. To mount the 1/4" socket bit (8), press it firmly onto the 1/4" square drive (1).
4. OPERATION
Before first use (Fig. A)

Read the entire safety information section at the beginning of this manual including all text under subheadings therein before set up or use of this product.
- Before each use, inspect the general condition of the tool. Check for loose hardware, misalignment or binding of moving parts, cracked or broken parts, and any other condition that may affect its safe operation.
- As most torque wrenches are length specific, always grasp the torque wrench in the centre of the handle (3). If two hands need to be used, place one hand on top of the other.
- Before you start tightening the bolt with a torque wrench, you need to know what torque fits the bolt. This is usually stated in the manual for car and motorcycle manufacturers. If not, consult the manufacturer.
- Note that after 5000 cycles or up to one year of use, whichever comes first, it is strongly advised to have your torque wrench inspected and recalibrated by a reputable calibration service.
Using the torque wrench (Fig. A-E)
- Wear PPE-approved safety goggles and heavy-duty work gloves.
- Clean and/or repair the threads that will be tightened. Damaged or dirty threads will result in a misleading torque reading.
- Select the desired socket and verify it fits properly on the nut or bolt being tightened.
- Press the socket firmly onto the 1/4" square drive (1), as shown on Fig. C3.
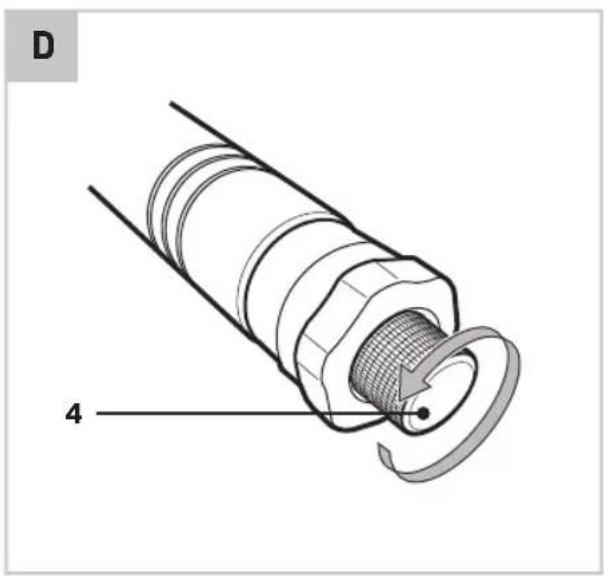
- Turn the Lock Knob (4) at bottom of the Handle counter clockwise until it stops, as shown on figure D.
- Turn the handle (3) to set the torque. For example to set to 16 Nm, as shown on Fig. E:
a. Turn the Handle (3) until top of handle lines up with bottom horizontal mark for 15 and 0 lines up with centre line.
b. Turn Handle (3) until the 1.0 lines up with the centre line.
c. The torque value is now set to 16 Nm (15 + 1 = 16).
-
Retighten the Lock Knob (4) by turning it clockwise until it stops.
-
Set the Direction Switch (5) to the 'on position' by turning it to the right.

To prevent damage to the Torque Wrench, do not use for loosening fasteners.
-
Place socket on fastener, then grasp the Handle (3) and pull smoothly and slowly until the handle breaks away and a click is heard or felt. Now stop pulling! The proper torque has been achieved. Further pulling may damage fastener.
-
Release pressure to allow the handle to reset for the next operation.
- After every use, loosen the Lock Knob (4), set to the lowest torque setting, then tighten the Lock Knob (4).
- Store Wrench inside its case, indoors, in a clean, dry location that is out of reach of children.
Optimum use
- Thread fastener with another tool until it is snug, then finish the operation with the Torque Wrench.
- Apply torque in a slow, methodical manner and avoid sudden, “jerking” movements.
- At low torque settings, pull the wrench slowly to observe the click.
5. MAINTENANCE

For your safety, service, calibration, and maintenance should be performed regularly by a qualified technician.
Clean the torque wrench regularly with a soft cloth, preferably after each use. Make sure that all gaps and openings are free of dust and dirt.
Remove very persistent dirt using a soft cloth moistened with soapsuds. Do not use any solvents such as gasoline, alcohol, ammonia, etc. Chemicals such as these will damage the components.
Do not change any parts of this product. If any problem accurs, please contact VONROC customer service.
WARRANTY
VONROC products are developed to the highest quality standards and are guaranteed free of defects in both materials and workmanship for the
period lawfully stipulated starting from the date of original purchase. Should the product develop any failure during this period due to defective material and/or workmanship then contact VONROC directly.
The following circumstances are excluded from this guarantee:
- Repairs and or alterations have been made or attempted to the machine by unauthorized service centers;
- Normal wear and tear;
- The tool has been abused, misused or improperly maintained;
- Non-original spare parts have been used.
This constitutes the sole warranty made by company either expressed or implied. There are no other warranties expressed or implied which extend beyond the face hereof, herein, including the implied warranties of merchantability and fitness for a particular purpose. In no event shall VONROC be liable for any incidental or consequential damages. The dealers remedies shall be limited to repair or replacement of nonconforming units or parts.
The product and the user manual are subject to change. Specifications can be changed without further notice.