
TS501AC - After-sales service Vonroc - Free user manual and instructions
Find the device manual for free TS501AC Vonroc in PDF.


| Product type | Table circular saw |
| Brand | Vonroc |
| Model | TS501AC |
| Supply voltage | 220-240 V~ |
| Frequency | 50 Hz |
| Rated power | 1500 W |
| No-load speed | 5000 rpm |
| Bevel angle | 0° to 45° |
| Blade diameter | 210 mm |
| Blade bore | 30 mm |
| Max. cutting height at 90° | 70 mm |
| Max. cutting height at 45° | 50 mm |
| Weight | 14.5 kg |
| Sound pressure level (Lpa) | 99.6 dB(A) (uncertainty 3 dB) |
| Sound power level (Lwa) | 112.6 dB(A) (uncertainty 3 dB) |
| Vibration value | < 2.5 m/s² |
| Main functions | Rip and cross cut, vertical and horizontal miter cut, overload protection, height and angle adjustment via 2-in-1 handle |
| Maintenance and cleaning | Clean the body with a soft slightly damp cloth (soapy water), do not use solvents. Keep ventilation slots clean. Store in a dry place. |
| Safety | Double insulation (class II), blade guard, riving knife, restart protection, emergency stop via overload switch |
| Spare parts and repairability | Only use original Vonroc parts. Repairs must be carried out by a qualified repairer. Compatible saw blade: diameter 210 mm, bore 30 mm, max speed ≥ 6000 rpm. |
| General information | Legal warranty against manufacturing defects. Intended use: solid wood and panels (without nails, screws, cement). Do not use for metal or stone. Storage temperature frost-free. |
Frequently Asked Questions - TS501AC Vonroc
User questions about TS501AC Vonroc
0 question about this device. Answer the ones you know or ask your own.
Ask a new question about this device
Download the instructions for your After-sales service in PDF format for free! Find your manual TS501AC - Vonroc and take your electronic device back in hand. On this page are published all the documents necessary for the use of your device. TS501AC by Vonroc.
USER MANUAL TS501AC Vonroc
natural_image
Simple icon of a saw cutting into a pan, no text or symbols presentEN Original Instructions 07

natural_image
Close-up of a mechanical device with metal components and a dial, no visible text or symbols

natural_image
Close-up of a mechanical assembly with a coiled hose and black clamping mechanism (no visible text or symbols)

VONROC

natural_image
Mechanical assembly with transparent plastic housing and metal base (no visible text or symbols)
natural_image
Industrial machine with clamping mechanism and metal sheet, labeled H-2 (no visible text or symbols on main subject)
1. SAFETY INSTRUCTIONS
Read the enclosed safety warnings, the additional safety warnings and the instructions. Failure to follow the safety warnings and the instructions may result in electric shock, fi re and/or serious injury. Save the safety warnings and the instructions for future reference.
The following symbols are used in the user manual or on the product:

Read the user manual.

Denotes risk of personal injury, loss of life or damage to the tool in case of non-observance of the instructions in this manual.

Risk of electric shock.
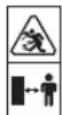
Keep bystanders away.

Wear a dust protection.

Wear ear and eye protection.

Keep hands away from the cutting area while the power tool is running. Contact with the saw blade can lead to injuries.

Danger area! Keep hands, fingers or arms away from this area.

Class II machine - Double insulation - You don't need any earthed plug.

The product is in accordance with the applicable safety standards in the European directives.

Take note of the dimensions of the saw blade. The hole diameter must fit the tool spindle without play. If it is necessary to use reducers, ensure that the dimensions of the reducer are suitable for the base blade thickness and the saw blade hole diameter, as well as the tool spindle diameter.
Wherever possible, use the reducers provided with the saw blade. The saw blade diameter must match the information specified on the symbol.
GENERAL POWER TOOL SAFETY WARNINGS
WARNING! Read all safety warnings and all instructions. Failure to follow the warnings and instructions may result in electric shock, fi re and/or serious injury.
Save all warnings and instructions for future reference.
The term “power tool” in the warnings refers to your mains-operated (corded) power tool or battery-operated (cordless) power tool.
1) Work area safety
a) Keep work area clean and well lit. Cluttered or dark areas invite accidents.
b) Do not operate power tools in explosive atmospheres, such as in the presence of fl ammable liquids, gases or dust. Power tools create sparks which may ignite the dust or fumes.
c) Keep children and bystanders away while operating a power tool. Distractions can cause you to lose control.
2) Electrical safety
a) Power tool plugs must match the outlet. Never modify the plug in any way. Do not use any adapter plugs with earthed (grounded) power tools. Unmodified plugs and matching outlets will reduce risk of electric shock.
b) Avoid body contact with earthed or grounded surfaces, such as pipes, radiators, ranges and refrigerators. There is an increased risk of electric shock if your body is earthed or grounded.
c) Do not expose power tools to rain or wet conditions. Water entering a power tool will increase the risk of electric shock.
d) Do not abuse the cord. Never use the cord for carrying, pulling or unplugging the power tool. Keep cord away from heat, oil, sharp edges or moving parts. Damaged or entangled cords increase the risk of electric shock.
e) When operating a power tool outdoors, use an extension cord suitable for outdoor use. Use of a cord suitable for outdoor use reduces the risk of electric shock.
f) If operating a power tool in a damp location is unavoidable, use a residual current device (RCD) protected supply. Use of an RCD reduces the risk of electric shock.
3) Personal safety
a) Stay alert, watch what you are doing and use common sense when operating a power tool. Do not use a power tool while you are tired or under the influence of drugs, alcohol or medication.
A moment of inattention while operating power tools may result in serious personal injury.
b) Use personal protective equipment. Always wear eye protection. Protective equipment such as dust mask, non-skid safety shoes, hard hat, or hearing protection used for appropriate conditions will reduce personal injuries.
c) Prevent unintentional starting Ensure the switch is in the off-position before connecting to power source and/or battery pack, picking up or carrying the tool. Carrying power tools with your finger on the switch or energising power tools that have the switch on invites accidents.
d) Remove any adjusting key or wrench before turning the power tool on. A wrench or a key left attached to a rotating part of the power tool may result in personal injury.
e) Do not overreach. Keep proper footing and balance at all times. This enables better control of the power tool in unexpected situations.
f) Dress properly. Do not wear loose clothing or jewellery. Keep your hair, clothing and gloves away from moving parts. Loose clothes, jewellery or long hair can be caught in moving parts.
g) If devices are provided for the connection of dust extraction and collection facilities, ensure these are connected and properly used. Use of dust collection can reduce dust related hazards.
h) Do not let familiarity gained from frequent use of tools allow you to become complacent and ignore tool safety principles. A careless action can cause severe injury within a fraction of a second.
4) Power tool use and care
a) Do not force the power tool. Use the correct power tool for your application. The correct power tool will do the job better and safer at the rate for which it was designed.
b) Do not use the power tool if the switch does not turn it on and off. Any power tool that cannot be controlled with the switch is dangerous and must be repaired.
c) Disconnect the plug from the power source and/or the battery pack from the power tool before making any adjustments, changing accessories, or storing power tools. Such preventive safety measures reduce the risk of starting the power tool accidentally.
d) Store idle power tools out of the reach of children and do not allow persons unfamiliar with the power tool or these instructions to operate the power tool. Power tools are dangerous in the hands of untrained users.
e) Maintain power tools. Check for misalignment or binding of moving parts, breakage of parts and any other condition that may affect the power tool's operation. If damaged, have the power tool repaired before use. Many accidents are caused by poorly maintained power tools.
f) Keep cutting tools sharp and clean. Properly maintained cutting tools with sharp cutting edges are less likely to bind and are easier to control.
g) Use the power tool, accessories and tool bits etc. in accordance with these instructions, taking into account the working conditions and the work to be performed. Use of the power tool for operations different from those intended could result in a hazardous situation.
h) Keep handles and grasping surfaces dry, clean and free from oil and grease. Slippery handles and grasping surfaces do not allow for safe handling and control of the tool in unexpected situations.
5) Battery tool use and care
a) Recharge only with the charger specified by the manufacturer. A charger that is suitable for one type of battery pack may create a risk of fire when used with another battery pack.
b) Use power tools only with specifi cally designated battery packs. Use of any other battery packs may create a risk of injury and fi re.
c) When battery pack is not in use, keep it away from other metal objects, like paper clips, coins, keys, nails, screws or other small metal objects that can make a connection from one terminal to another. Shorting the battery terminals together may cause burns or a fi re.
d) Under abusive conditions, liquid may be ejected from the battery; avoid contact. If contact accidentally occurs, fl ush with water. If liquid contacts eyes, additionally seek medical help. Liquid ejected from the battery may cause irritation or burns.
e) Do not use a battery pack or tool that is damaged or modified. Damaged or modified batteries may exhibit unpredictable behaviour resulting in fire, explosion or risk of injury.
f) Do not expose a battery pack or tool to fi re or excessive temperature. Exposure to fi re or temperature above 130 °C may cause explosion. NOTE The temperature „130 °C“ can be replaced by the temperature „265 °F“.
g) Follow all charging instructions and do not charge the battery pack or tool outside the temperature range specified in the instructions. Charging improperly or at temperatures outside the specified range may damage the battery and increase the risk of fire.
6) Service
a) Have your power tool serviced by a qualified repair person using only identical replacement parts. This will ensure that the safety of the power tool is maintained.
b) Never service damaged battery packs. Service of battery packs should only be performed by the manufacturer or authorized service providers.
SPECIFIC SAFETY INSTRUCTIONS
ATTENTION! When using electric tools to protect against electric shock, injury and fire the following basic safety measures must be observed. Make sure to read all of these instructions before you use this power tool, keep the safety booklet and preserve it well for later reference.
- Always keep your workplace clean and tidy.
- An untidy workplace can lead to unwanted accidents.
- Consider environmental influences.
- Do not expose the power tool to rain.
- Do not use the power tool in a damp or wet environment.
- Make sure that your working space has sufficient lighting.
-
Do not use the power tool in areas where there is a fire or explosive hazard.
-
To protect yourself from an electric shock.
- Avoid body contact with grounded parts (e.g. pipes, radiators, electric stoves, refrigerators etc.).
- Keep other people away
- Keep other people away especially children, do not let them touch your power tool or cable and keep the children away from your working area.
- Store the unused power tools safely.
- Unused power tools should be locked up or stored in a place that is dry and out of reach of children.
- Do not overload your power tool.
- You work better and safer in the specified power range.
- Use the correct power tool.
- Do not use low-power machines for heavy work
- Do not use the power tool for purposes that they are not intended for. For example you cannot cut tree limbs or a log of wood using a hand saw.
- Wear suitable clothing.
- Do not wear loose clothing or jewelry; they can be caught in the moving parts.
- When working outdoors non-skid footwear is recommended.
- For long hair, wear a hairnet.
- Use protective equipment.
- Wear protective goggles
- When doing work that generates dust, use a breathing mask.
- Connect the vacuum device
- If connection to the vacuum and catcher are available then you know that these are connected and properly used.
- Do not use the cable for purposes that it is not intended for.
- Do not use the cable to the connector to pull it out of the socket. Protect the cable from heat, oil and sharp edges.
- Secure the power tool.
- Use clamps or a vice to hold the power tool. It is safer than holding it with your hand.
- Avoid an abnormal posture.
- It ensures stability and keeps you balanced at all times.
- Keep and maintain tools with care.
- Keep the cutting tools sharp and clean, this ensures that you work better and that it is as safe as possible.
- Follow the lubricating and tool changing instructions.
- Check the connection cable of the power tool regularly and let a qualified expert repair any damages.
- Keep the cutting tools sharp and clean, this ensures that you work better and that it is as safe as possible. - Follow the lubricating and tool changing instructions. - Check the connection cable of the power tool regularly and let a qualified expert repair any damages.
EN
VONROC
- Check the extension cables regularly and replace them if they are damaged.
- Keep the handles clean, dry and free of grease and oil.
- Unplug the power tool from the power outlet.
- When you are not using the power tool, when you conduct maintenance and when you change your tools such as blades, drills and cutters.
- Do not leave the key inside the tool.
Before switching it on, make sure that keys and setup tools have been cleared - Avoid unintentionally switching the power tool on.
- Verify that while connecting the plug into the socket that the power is off.
- Use the extension cables while outdoors.
- When using the power tool outdoors make sure to use the appropriate and approved labeled extension cable.
ADDITIONAL SAFETY INSTRUCTIONS
- When using the saw blades with hard metal teeth (Carbon tipped) it is advisable to use blades with a negative or slightly positive cutting angle. Do not use any saw blades with deeply cut teeth. They can grip the protective cap.
- Attention: First carefully assemble all the parts before starting work. Follow the procedure as indicated.
- If you are not familiar with using such a machine, you would be better to be informed first by a professional, an instructor or by a technician.
- Always clamp or press the workpiece firmly against the saw guide, before you carry out the process. The use of all possible clamping setups is preferable to using your hands.
- Important: If you are holding the workpiece by hand for the process to be carried out, keep a minimum distance of 100 mm from the saw blade.
- Always press the workpiece against the bench.
- Keep the saw blade sharp and check regularly whether it rotates freely without abnormal vibrations. Replace the saw blade if necessary.
- Allow the machine to rotate freely until it reaches the maximum number of revolutions, before you start the process.
- Maintain the air inlets at the back and the bottom of the bench saw machine and electric
motor for a longer machine life. Dust piles must be removed.
- Always lock the different degree set-ups before you start processing.
- Only buy suitable saw blades with a number of revolutions of at least 6000 revolutions per minute.
- Only use the correct saw blade. Too small or too big saw blades are extremely dangerous.
- Regularly inspect the saw blade for any faults. Replace the saw blade if necessary.
- Grease the new saw blade and clean the fl angles before you assemble the new blade. Then assemble the blade in the correct direction and pull the fl angles firmly using the central bolt.
- Only use original fl anges. All other types are not suitable.
- Never work without the protective cap of the saw blade.
- The moving part of the protective cap must also remain assembled.
- Never grease the saw blade while it is rotating.
- Always keep your hands removed from the track of the saw blades.
- Never pick up the workpiece by grasping with your hands along or behind the saw blade.
- Ensure that the workpiece never touches the saw blade before the machine has been switched on.
- Never process metal or stone sorts with this machine.
- Use support aids in order to support long workpieces.
- Never use the machine in a dangerous environment, where infl ammable gases or fluids are present.
- Never leave the machine unattended without first disconnecting it from the mains voltage.
- If you hear abnormal noises, try to trace them or take the machine to a recognized fi tter, or repair company.
- If a part is broken or damaged, replace it or repair it immediately.
- Never stand in the track of the saw blade but stand to the left or the right of the saw bench.
- Your hands must likewise be placed next to the track of the saw blade.
- Always use the push stick instead of your hands to push the wood through the saw.
-
Always place the wood at the front of the saw bench and then push it further back.
-
For mitring only the adjustable guide must be used and the fence must be removed.
- Never use the fence as a linear measure for cutting off beams.
- If the saw blade is locked: first switch off the machine before you attend to the fault.
- Avoid workpieces hitting back in your direction by taking the following measures:
• Always use sharp saw blades.
Do not saw too small workpieces.
- Never release the workpiece before it has been completely pushed through the saw.
- Always adjust the guide parallel to the saw-blade.
- Never remove the saw protection.
- Before you continue sawing, ensure that you are standing firmly and that your hands are in the required position.
- Never use thinners to clean the machine. Only use a damp cloth for cleaning.
- Do not use saw blades which are damaged or deformed.
- Replace table insert when worn.
- Only use saw blades specified by the manufacturer that are intended for working with wood or similar materials according to EN847-1.
- Take care that the selection of the saw blade depends on the material to be cut.
- Connect labelsaws to a dust-collecting device when sawing.
- Use and correct adjustment of the riving knife
- Use and correct adjustment of the upper saw blade guard.
- Take care when slotting.
Make sure, when changing the saw blade, the blade width is not smaller and the main blade thickness of the saw blade is not greater than the thickness of the riving knife.
Wear personal protective equipment, these could include:
- Hearing protection to reduce the risk of hearing loss
- Eye protection
- Inhale respiratory protection to reduce the risk of harmful dust
- Gloves when handling the blades and rough materials (recommendation, saw blades, are whenever practicable, carried in a container)

Warning! Do not use HSS blades.
- Insert the push stick in its holder when not in use.
- Use a push stick or a push block to guide the workpiece.

ng! Do not use the saw for rebating or grooving.
- Only use saw blades, whose maximum speed is at least the speed indicated on the saw and is suitable for the material to be cut.
During the transport, the upper part of the saw blade has to be covered, by the guard.
Switch off the machine immediately when you discover:
- A defective mains plug or mains lead.
A defective switch.
• Overheating of the machine. - Smoke or odeur caused by scorched insulation.
Electrical safety

Always check that the voltage of the power supply corresponds to the voltage on the rating plate.
- Do not use the machine if the mains cable or the mains plug is damaged.
- Only use extension cables that are suitable for the power rating of the machine with a minimum thickness of 1.5 mm ^2 . If you use an extension cable reel, always fully unroll the cable.
Power supply
- The motor is fitted with an overload switch. If the table saw overloads, the overload switch switches the equipment off automatically to protect the table saw from overheating. If the overload switch triggers, switch off the table saw using the ON/OFF switch (8) and wait until the table saw cools down. Then press the ON/OFF switch (8) and restart the table saw.
2. MACHINE INFORMATION
Intended use
This power tool is intended as a stationary machine for making straight lengthways and crossways cuts in hard and soft wood free from foreign bodies such as nails, screws and mortar.
TECHNICAL SPECIFICATIONS
| Model No. TS501AC | |
| Voltage 220-240V~ | |
| Frequency | 50 Hz |
| Power input 1500W | |
| No load speed 5000/min | |
| Bevel angles 0° <> +45° | |
| Sawblade specifications:Diameter | ∅ 210 mm |
| Base blade thickness | 1.8 mm |
| Width of cut | 2.8 mm |
| Bore diameter | ∅ 30 mm |
| Number of teeth | 40T |
| Max. workpiece height 90° | 70 mm |
| Max. workpiece height 45° | 50 mm |
| Thickness of the riving knife 2.0 mm | |
| Weight 14.5 kg | |
| Lpa (sound pressure level) 99.6 | +3 dB(A) |
| Lwa (sound power level) 112.6 | +3 dB(A) |
| Vibration value | <2.5 m/s2 |
Vibration level
The vibration emission level stated in this instruction manual has been measured in accordance with a standardised test given in EN 60745; it may be used to compare one tool with another and as a preliminary assessment of exposure to vibration when using the tool for the applications mentioned
- using the tool for different applications, or with different or poorly maintained accessories, may significantly increase the exposure level.
- the times when the tool is switched off or when it is running but not actually doing the job, may significantly reduce the exposure level.
Protect yourself against the effects of vibration by maintaining the tool and its accessories, keeping your hands warm, and organizing your work patterns
DESCRIPTION
The numbers in the text refer to the diagrams on page 2-6.
- Saw table with two rulers
2A. Parallel guide
2B. Guide extension
2C. Wing nuts
- Extensions (2 pcs)
- Dust extraction
- Guard
- Mitre guide
- Push stick
- On/off switch
- 2 in 1 adjustment handle
- Locking knob
- Electric plug
- Ruler sawblade angle
- Extension support (4 pcs)
- Wrenches (2 pcs)
- Legs (4 pcs)
- Long bolts with nuts (8 pcs)
- Small bolts with nuts for extensions (8 pcs)
- Dust extraction connection
- Sawblade guard knob
- Riving knife
- Saw table inlay
22A. Cross strut long (2 pcs)
22B. Cross strut short (2 pcs) - Rubber feet (4 pcs)
- Additional legs (2 pcs)
- Small bolts with nuts for cross strut (16 pcs)
- Small bolts with nuts for additional legs (4 pcs)
- Connection vacuum cleaner
- Fixing screw
- Carriage-type bolts with nuts
- Holder clips
- Overload protection
3. ASSEMBLY
Assembly of the undercarriage (Fig A4)

First assemble all parts before firmly tightening all bolts.
- Put the machine upside down. Put a piece of cardboard underneath, so you don't damage the subsurface.
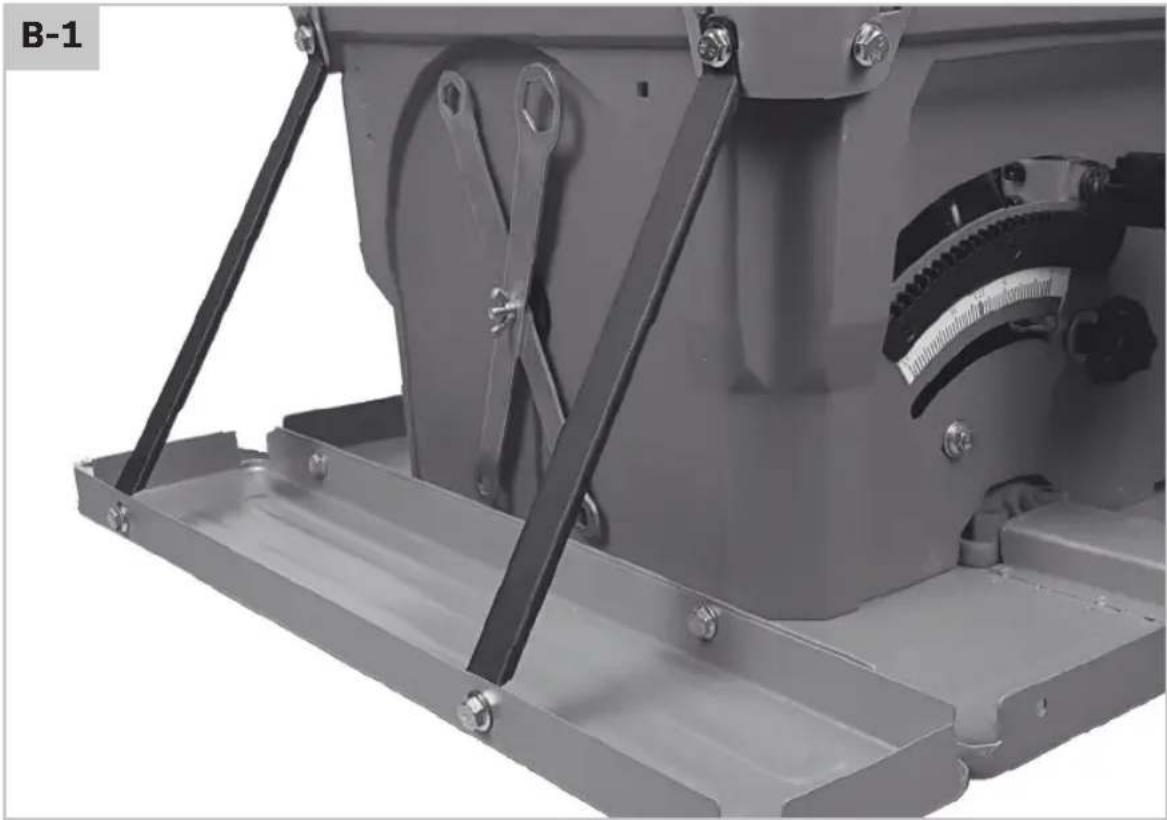
- Mount the legs (15) (4 pcs) with one extension support (13) (4 pcs) per leg on the four corners of the body, use longer bolts (16) with nuts (2 pcs per leg) (Fig.B1)
- Make sure the extension supports (13) are mounted in the same way as shown in Fig.B1
-
Mount Cross strut long (22A) (2 pcs) between the legs on the front and back side of the machine. Use small bolts (25) with nuts (8 pcs).
-
Mount Cross strut short (22B) (2 pcs) between the legs on both sides of the machine. Use small bolts (25) with nuts (8 pcs).
- Place the rubber feet (23) (4 pcs)
- Mount the additional legs (24) (2 pcs) on the backside of the machine, use small bolts (26) with nuts (4 pcs)
Assembly of the extensions (Fig B1)
Machine is still upside down
- Mount the extensions (3) (2 pcs) to the table, use small bolts (17) with nuts (4 pcs).
- Mount the extensions support (13) to the tensions (3), use small bolts (17) with nuts (4 pcs)
- Turn the machine back on its feet. Make sure the extensions are levelled with the table, by using the slots in the extensions supports.
Assembly of the riving knife (Fig A4, C)
- Remove the inlay (21) from the table, by using a screwdriver (Fig.G1).
- Loosen the fixing screw (28)(Fig.C1)
- Raise the riving knife until the depth between the saw table and the upper edge of the riving knife equals approx. 110mm (Fig.C2)
- The distance between the riving knife and the toothed rim of the saw blade must be between 3 and 5 mm (Fig.C3).
- The tip of the riving knife shall not be lower than 5 mm from the tooth peak, as shown in Fig.C3.
Attachment of the guard (Fig C4)
- Turn sawblade completely upward(instructions for height adjustment see chapter 4).
- Pull the knob (19) of the guard (5) and place it over the riving knife (20) while pulling the knob.
- Release the knob and make sure the pin slides in the hole.
- Secure the guard by tightening the knob.
Assembly of the dust extraction (Fig. D)
- Assemble dust extraction like shown on Fig.D
- Attach the vacuum cleaner to the vacuum cleaner connection (27)(Fig.D)
Attachment of the parallel guide (Fig E)
- Attach the parallel guide (2A) on the right side off the saw blade on the table.
- Lock the guide down by pushing down the handle (Fig.E)
Attachment of the parralel guide holder (Fig. I)
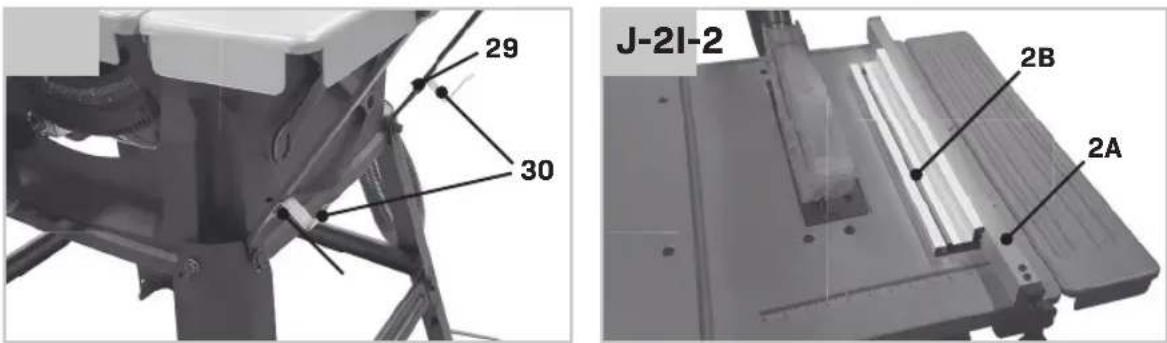
The parallel guide can be stored using the holder clips (30). Mount the holder clips (30) using carriage-type bolts with nuts (29). The holders can be mounted as shown in Fig I1 or as shown in Fig I2.
Attachment of the mitre guide (Fig A1)
- Slide the guide in the slot of the table at the left side of the sawblade Fig.A1
Assemble or change the saw blade (Fig G)
First remove the plug from the mains before the saw blade is assembled or replaced.
The arrow marked on the saw blade, which indicates the direction of rotation, must point in the same direction as the arrow marked on the machine, the saw blade teeth must point downwards on the front of the saw.
- Remove the inlay (21) from the table, by using a screwdriver. Fig.G1
- Turn the saw blade completely upwards. (Instructions for height adjustment see chapter 4)
- Loosen the nut with the wrenches (14) (Fig.G2)
- Remove the nut and the outside fl ange from the sawblade axle. (Fig.G3)
- Slide the old saw blade over the saw blade axle and put on a new saw blade.
- Put the outside fl ange back on add the nut.
- Tighten the nut by using the wrenches.
- Put the inlay back in the table and tighten the screw.
4. OPERATION
Switching on/off (Fig A1)
- Press the switch into position '1' to put your machine into operation.
- To switch off the machine the same switch needs to be pressed to position '0'
- Always keep the mains cable away from moving parts.
Overload protection (Fig. A1)
This electrical power tool is provided with an overload protection (31). In case that the overload protection was initiated, proceed as follows:
- Disconnect the power tool from the power supply.
- Allow the power tool to cool down.
EN
VONROC
- Check the power tool carefully for possible damages.
- Have damages repaired before re-starting the power tool.
- Connect the power tool to the power supply.
- Push the overload switch (31)(Fig.A-1).
- Turn on the power tool as described and put it into operation.
Using the 2 in 1 handle, Adjust the angle and height of the saw blade (Fig A2)
Using the height adjustment
- Turn the handle (9) clockwise to raise the saw-blade.
- Turn the handle counter clockwise to lower the sawblade.
- Make sure the saw blade is always approximately 2 mm higher than the total thickness of the material to be sawn.
Using the angle adjustment (Fig G4)
- Slightly loosen the knob(10)
- Press the handle(9) towards the machine and turn counter clockwise to adjust the sawblade in its angle.
- Fasten the knob(10)
Using the parallel guide (Fig A1, E, J1, J2)
The parallel guide (2A) is equipped with a guide extension (2B). The guide extension can be used in two different ways, depending on the thickness of the wood.
For thicker wood, the guide extension (2B) should be mounted as shown in figure J1.
For thinner wood, the guide extension (2B) should be mounted as shown in figure J2.
- Unlock the guide down by pushing the handle upwards (Fig.E)
- Slightly loosen the wing nuts (2C)
- Remove the guide extension (2B) from the parallel guide (2A) by sliding it away from the parallel guide
- Turn the guide extension to the desired position and slide it back onto the parallel guide
- Tighten the wing nuts (2C)
Working instructions
There are two types of sawing methods:
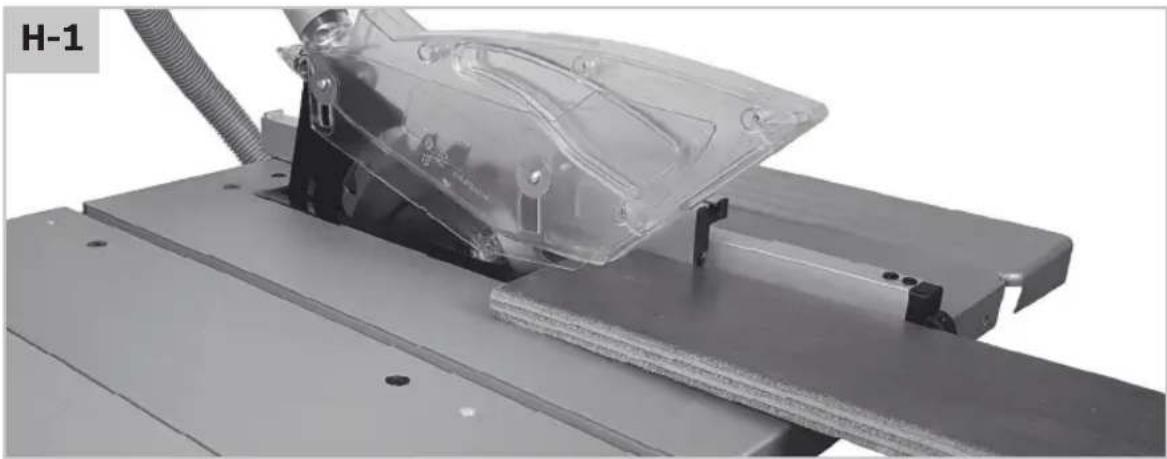
- Lengthwise sawing (Fig.H1) - Sawing the workpiece in the length of the wood grain
- Cross-cutting or cutting off, use the mitre guide (Fig.H2)
Sawing off the workpiece crosswise

For both sawing methods one of the fences must be used. Therefor never saw without a fence!
Attention! Before you start sawing, fi rst check the following:
- Is the saw blade secured?
- Are all the locking handles secured?
- Is the fence parallel to the saw blade?
- Is the protective cap working properly?
- Are you wearing safety goggles?
- Is the saw blade not rubbing against anything?

It is absolutely necessary to take these points into consideration before you start work!
Lengthwise sawing
- Secure the fence to the correct measuring position and remove the cut-off guide from the bench carriage.
- Press the wood lightly towards the bench and let it glide against the cut-off fence.

Remain at least 3 cm. from the front of the saw blade before you switch on the motor. The side of the wood which is against the fence must be completely straight. Keep your hands at least 10 cm away from the saw track to be followed.
- Switch on the motor and wait until the saw blade has reached the maximum number of revolutions before you start sawing.
- While you press the wood against the bench and the fence, you can carefully push the wood through the saw blade without forcing it.
- Never pull the workpiece backwards. If necessary, switch off the motor first without altering the position of the workpiece.
Lengthwise sawing with a (vertical) mitre
This method is practically the same, except that the saw blade is placed at the angle required.

With this type of method the fence may only be along the righthand side of the sawblade.
Lengthwise sawing of narrow workpieces

Assume that this process is extremely dangerous.
Take all the necessary safety measures and continually push the workpiece through (until behind the saw blade) using a push stick instead of by hand.
Crosswise sawing
- Remove the fence and apply the cross-cut fence in the righthand carriage.
- Adjust the height of the saw blade (see length-wise sawing).
- Press the workpiece against the cross-cut fence and keep at least 2,5 cm distance from the front of the saw blade.
- Switch on the motor and wait until the maximum number of revolutions has been reached.
- Press the workpiece against the fence and the bench. Carefully push the wood through the saw blade. Continue until behind the saw blade. Then switch off the motor and keep this position until the saw blade has stopped completely before you remove the wood.
- Never pull the wood back. If necessary, switch the motor off and keep the position until the saw blade has stopped completely.
Crosswise sawing with a vertical mitre
This method is practically the same, except that the saw blade is placed in the angle required.

Only place the cross-cut fence on the righthand side of the saw blade. Never saw too small pieces of wood. Never use your hands to carry out diffi cult operations.
Crosswise sawing with a horizontal mitre
With this method the cross-cut fence must be secured at the angle required. Keep the workpiece pressed firmly against the cross-cut fence and the bench before you start cutting off.
Transporting the table saw
Before transporting the bench saw, the following steps must be carried out:
- Pull the mains plug
- Turn the hand-wheel (9) (Fig. A2) in anticlockwise direction, lower the blade as much as possible
- Remove all accessories that cannot be mounted firmly to the power tool
If possible, place unused saw blades in an enclosed container for transport
Wind the mains cable and bind it
- For lifting or transport, carry the main table (1) (Fig.A1)

The bench saw should always be carried by two persons in order to avoid back injuries.
5.MAINTENANCE

e cleaning and maintenance, always switch off the machine and remove the mains plug from the mains.
Clean the machine casings regularly with a soft cloth, preferably after each use. Make sure that the ventilation openings are free of dust and dirt. Remove very persistent dirt using a soft cloth moistened with soapsuds. Do not use any solvents such as gasoline, alcohol, ammonia, etc. Chemicals such as these will damage the synthetic components.
ENVIRONMENT

Faulty and/or discarded electrical or electronic apparatus have to be collected at the appropriate recycling locations.
Only for EC countries
Do not dispose of power tools into domestic waste. According to the European Guideline 2012/19/EU for Waste Electrical and Electronic Equipment and its implementation into national right, power tools that are no longer usable must be collected separately and disposed of in an environmentally friendly way.
WARRANTY
VONROC products are developed to the highest quality standards and are guaranteed free of defects in both materials and workmanship for the period lawfully stipulated starting from the date of original purchase. Should the product develop any failure during this period due to defective material and/or workmanship then contact your VONROC directly.
The following circumstances are excluded from this guarantee:
- Repairs and or alterations have been made or attempted to the machine by unauthorized service centers;
DE
- Normal wear and tear;
- The tool has been abused, misused or improperly maintained;
- Non-original spare parts have been used.
This constitutes the sole warranty made by company either expressed or implied. There are no other warranties expressed or implied which extend beyond the face hereof, herein, including the implied warranties of merchantability and fi tness for a particular purpose. In no event shall VONROC be liable for any incidental or consequential damages. The dealers remedies shall be limited to repair or replacement of nonconforming units or parts.
The product and the user manual are subject to change. Specifications can be changed without further notice.
- Aperte a porca com as chaves.
Pokyny pro obsluhu pily
DECLARATION OF CONFORMITY TS501AC - TABLE SAW
(EN) We declare under our sole responsibility that this product is in conformity with directive 2011/65/EU of the European parliament and of the council of 8 June on the restriction of the use of certain hazardous substances in electrical and electronic equipment is in conformity and accordance with the following standards and regulations:
(DE) Der Hersteller erklärt eigenverantwortlich, dass dieses Produkt der Direktive 2011/65/ EU des Europäischen Parlaments und des Rats vom 8. Juni 2011 über die Einschränkung der Anwendung von bestimmten gefährlichen Stoffen in elektrischen und elektronischen Geräten entspricht. den folgenden Standards und Vorschriften entspricht:
(NL) Wij verklaren onder onze volledige verantwoordelijkheid dat dit product voldoet aan de conform Richtlijn 2011/65/EU van het Europees Parlement en de Raad van 8 juni 2011 betreffende beperking van het gebruik van bepaalde gevaarlijke stoffen in elektrische en elektronische apparatuur en in overeenstemming is met de volgende standaarden en reguleringen:
(FR) Nous déclarons sous notre seule responsabilité que ce produit est conforme aux standards et directives suivants: est conforme à la Directive 2011/65/EU du Parlement Européen et du Conseil du 8 juin 2011 concernant la limitation d'usage de certaines substances dangereuses dans l'équipement électrique et électronique.
(ES) Declaramos bajo nuestra exclusiva responsabilidad que este producto cumple con las siguientes normas y estándares de funcionamiento: se encuentra conforme con la Directiva 2011/65/UE del Parlamento Europeo y del Consejo de 8 de junio de 2011 sobre la restricción del uso de determinadas sustancias peligrosas en los equipos eléctricos y electrónicos.
(IT) Dichiariamo, sotto la nostra responsabilità, che questo prodotto è conforme alle normative e ai regolamenti seguenti: è conforme alla Direttiva 2011/65/UE del Parlamento Europeo e del Consiglio dell'8 giugno 2011 sulla limitazione dell'uso di determinate sostanze pericolose nelle apparecchiature elettriche ed elettroniche.
(SV) Vi försäkrar under vårt eget ansvar att denna produkt överensstämmer med Europaparlamentets och rådets direktiv 2011/65/EU av den 8 juni om begränsning av användningen av vissa farliga ämnen i elektrisk och elektronisk utrustning och är i överensstämmelse och enlighet med följande standarder och föreskrifter:
(DA) Vi erklærer under eget ansvar, at dette produkt er i overensstemmelse med Europa-Parlamentets og Rådets direktiv 2011/65/EU af 8. juni om begrænsning af brugen af visse farlige stoffer i elektrisk og elektronisk udstyr og overholder og er i overensstemmelse med følgende standarder og regler:
(PL) Deklarujemy na własną odpowiedzialność, że ten produkt spełnia wymogi zawarte w następujących normach i przepisach: jest zgodny z Dyrektywą 2011/65/UE Parlamentu Europejskiego i Rady z dnia 8 czerwca 2011 r. w sprawie ograniczenia stosowania niektórych niebezpiecznych substancji w sprzęcie elektrycznym i elektronicznym.
(RO) Declarăm sub responsabilitatea exclusivă că acest produs este în conformitate cu Directiva 2011/65/EU a Parlamentului și a Consiliului European din 8 iunie privind restricționarea utilizării anumitor substanțe periculoase în echipamentele electrice și electronice și în conformitate cu următoarele standarde și reglementări:
(PT) Declaramos, sob nossa exclusiva responsabilidade, que este produto está em conformidade com a directiva 2011/65/UE do Parlamento Europeu e com a do conselho de 8 de Junho sobre a restrição da utilização de determinadas substâncias perigosas em equipamento eléctrico e electrónico está em conformidade e de acordo com as seguintes normas e regulamentações:
(HU) Kizárólagos felelősségünk tudatában kijelentjük, hogy ez a termék megfelel az Európai Parlamentnek és a Tanácsnak az egyes veszélyes anyagok elektromos és elektronikus berendezésekben való alkalmazásának korlátozásáról szóló 2011/65/EU irányelvének (2011. június 8.), valamint a következő szabványoknak és jogszabályoknak:
(CS) Prohlašujeme na svou výhradní odpovědnost, že tento výrobek splňuje požadavky směrnice 2011/65/EU Evropské rady a parlamentu ze dne 8. června, která se týká omezení používání určitých nebezpečných látek v elektrických a elektronických zařízeních, a splňuje také všechny požadavky následujících norem a předpisů:
(TR) Tek sorumlusu biz olmak üzere bu ürünün Avrupa Parlamentosunun 2011/65/EU ve 8 Haziran 2011 tarihli konseyin elektrikli ve elektronik ekipmanlarda belirlenmiş tehlikeli malzeme kullanımının kısıtlanması hakkındaki talimatları ile birlikte aşağıda belirtilen standart ve yönergelere uygun ve uyumlu olduğunu beyan ederiz:
EN62841-1, EN 62841-3-1, EN 61000-3-3, EN55014-1, EN55014-2, EN61000-3-2, 2006/42/EC, 2014/30/EU, 2011/65/EU, 2012/19/EU
Zwolle, 01-04-2022

- VONROC
- SAFETY INSTRUCTIONS
- GENERAL POWER TOOL SAFETY WARNINGS
- Save all warnings and instructions for future reference.
- 6) Service
- SPECIFIC SAFETY INSTRUCTIONS
- EN
- ADDITIONAL SAFETY INSTRUCTIONS
- Electrical safety
- Power supply
- MACHINE INFORMATION
- Intended use
- Vibration level
- DESCRIPTION
- ASSEMBLY
- Assembly of the undercarriage (Fig A4)
- Assembly of the extensions (Fig B1)
- Assembly of the riving knife (Fig A4, C)
- Attachment of the guard (Fig C4)
- Assembly of the dust extraction (Fig. D)
- Attachment of the parallel guide (Fig E)
- Attachment of the parralel guide holder (Fig. I)
- Attachment of the mitre guide (Fig A1)
- Assemble or change the saw blade (Fig G)
- OPERATION
- Switching on/off (Fig A1)
- Overload protection (Fig. A1)
- Using the 2 in 1 handle, Adjust the angle and height of the saw blade (Fig A2)
- Using the height adjustment
- Using the angle adjustment (Fig G4)
- Using the parallel guide (Fig A1, E, J1, J2)
- Working instructions
- Attention! Before you start sawing, fi rst check the following:
- Lengthwise sawing
- Lengthwise sawing with a (vertical) mitre
- Crosswise sawing
- Transporting the table saw
- 5.MAINTENANCE
- ENVIRONMENT
- Only for EC countries
- WARRANTY
- DE
- Pokyny pro obsluhu pily
- DECLARATION OF CONFORMITY TS501AC - TABLE SAW
Brand : Vonroc
Model : TS501AC
Category : After-sales service