XPS 101 - Speaker HERCULES - Free user manual and instructions
Find the device manual for free XPS 101 HERCULES in PDF.

| Product Type | 2.1 speaker kit with subwoofer |
| Brand | Hercules |
| Model | XPS 101 |
| Total Power | 101 W RMS |
| Subwoofer Power | 60 W RMS |
| Satellite Power | 2 x 20.5 W RMS |
| Frequency Response | 40 Hz - 20 kHz |
| Subwoofer Impedance | 8 Ohms |
| Satellite Impedance | 4 Ohms |
| Satellite Dimensions | 15.5 cm (H) x 11 cm (W) x 11 cm (D) |
| Subwoofer Dimensions | 27 cm (H) x 24.5 cm (W) x 24.5 cm (D) |
| Magnetic Shielding | Yes |
| Recommended Use | PC, DVD, game console, CD-Audio, MP3 |
| Package Contents | 2 satellite speakers, 1 subwoofer, wired remote control, cables, cable lock, manual |
| Remote Control | Wired with multi-function button (volume, bass, treble, standby) |
| Audio Inputs | 3.5 mm mini-jack (main), 3.5 mm mini-jack (secondary/Line In) |
| Outputs | Headphone jack (disables speakers) |
| Standby Power Consumption | Less than 1 W |
| Power Supply | Mains via power cable |
| Warranty | 2 years |
| Country of Manufacture | Not specified (French brand) |
| Recycling | WEEE - Do not dispose of with household waste |
Frequently Asked Questions - XPS 101 HERCULES
User questions about XPS 101 HERCULES
0 question about this device. Answer the ones you know or ask your own.
Ask a new question about this device
Download the instructions for your Speaker in PDF format for free! Find your manual XPS 101 - HERCULES and take your electronic device back in hand. On this page are published all the documents necessary for the use of your device. XPS 101 by HERCULES.
USER MANUAL XPS 101 HERCULES
- USER MANUAL
- MANUEL DE L'UTILISATEUR
- BENUTZERHANDBUCH
-
HANDLEIDING
-
MANUALE D'USO
- MANUAL DEL USUARIO
- MANUAL DO UTILIZADOR
- РУКОВОДСТВО ПОЛЬЗОВАТЕЛ
CONTENTS
1. INTRODUCTION....2
1.1. Box contents ...... 2
1.2. Technical specifications .... 2
1.3. Recommended use....3
2. INSTALLING THE XPS 101 SPEAKER SYSTEM....4
2.1. Positioning the speaker system 4
2.2. Connecting the speaker system to an audio source 4
2.2.1. Connection to a PC 6
2.2.2. Connection to a television set equipped with a headphone jack 6
2.2.3. Connection to a DVD player/television set equipped with Left and Right audio outputs 7
2.2.4. Connection to a game console 7
3. USING THE XPS 101 SPEAKER SYSTEM ....8
4. TECHNICAL SUPPORT ...... 9
5. WARRANTY INFORMATION .... 10
1. INTRODUCTION
1.1. Box contents
■ 2 independent satellite speakers
■ 1 subwoofer
■ 1 wired remote control
■ Microphone cable: mini-jack (M) / mini-jack (F)
■ Line In cable: mini-jack (M) / mini-jack (M)
■ Mini-jack (F) / double RCA (F) cable
- Cable clamp
■ User Manual
1.2. Technical specifications
| Output power (effective power) | Subwoofer: 60W RMS8 ohms impedanceSatellite speakers: 2 x 20.5W RMS4 ohms impedance |
| Total power | 101W RMS |
| Frequency response | 30Hz – 20KHz |
| Dimensions | Satellite speakers: 15,5cm (H) x 11cm (W) x 11cm (D)Subwoofer: 27cm (H) x 24,5cm (W) x 24,5cm (D) |
| Magnetic shielding | Satellite speakers are magnetically shielded, allowing them to be placed close to a screen without disturbing the display |
| For use with | PC, Consoles, DVD, Audio CD and MP3 player |
1.3. Recommended use
— Place the satellite speakers on a flat surface, to avoid the risk of the speakers falling.
- Place the subwoofer directly on the floor (underneath your desk, for example), to allow for better diffusion of bass frequencies.
— Never open up your speaker system, as you risk damaging its internal components.
— This speaker system is intended for use in a temperate environment.
— To prevent the risk of fire or electrical discharge, keep your speaker system away from:
o rain or humidity, as well as all fluids (water, chemical products or any other liquids),
- sources of heat such as heaters and radiators, stoves or any other heat-producing devices (including amplifiers),
- direct sunlight.
— Do not expose your speaker system to drips or splashes of water.
— Never place any object filled with liquid (a glass, vase...) on your speaker system.
- Unplug the subwoofer's power cable, if you do not plan on using your speaker system for an extended period of time. To unplug the power cable, pull on the power cable's plug (never pull on the power cable itself).
- Make sure that the subwoofer's power cable remains easily accessible, when plugged into an electrical outlet. Unplug the power cable from the electrical outlet to completely disconnect your speaker system's power supply.
- Disconnect the speaker system before cleaning. Use a damp cloth and avoid using aerosol cleaners.
- The speaker system's power plug serves to power off the device and must therefore be easily accessible at all times.
- Attention: At full power, prolonged listening with headphones can result in damage to the user's hearing.
— Markings are located on the back of the speakers.
2. INSTALLING THE XPS 101 SPEAKER SYSTEM
2.1. Positioning the speaker system
- Place the satellite speakers on a desk to either side of your monitor, keeping them at least 50cm away from the side walls.
- Place the speakers at an equal distance from the listener and direct them towards the listening position.
- Place the subwoofer directly on the floor. The subwoofer driver is located on the front, and one passive woofer is located on each side: therefore, be careful not to block the sides of the subwoofer up against a wall, in order to fully enjoy the best possible bass response.

To determine the ideal placement for your speaker system, try different positions in succession.
2.2. Connecting the speaker system to an audio source
Power off the audio source (PC, TV set, DVD player or game console) to which you wish to connect your speaker system.
- General connection diagram:
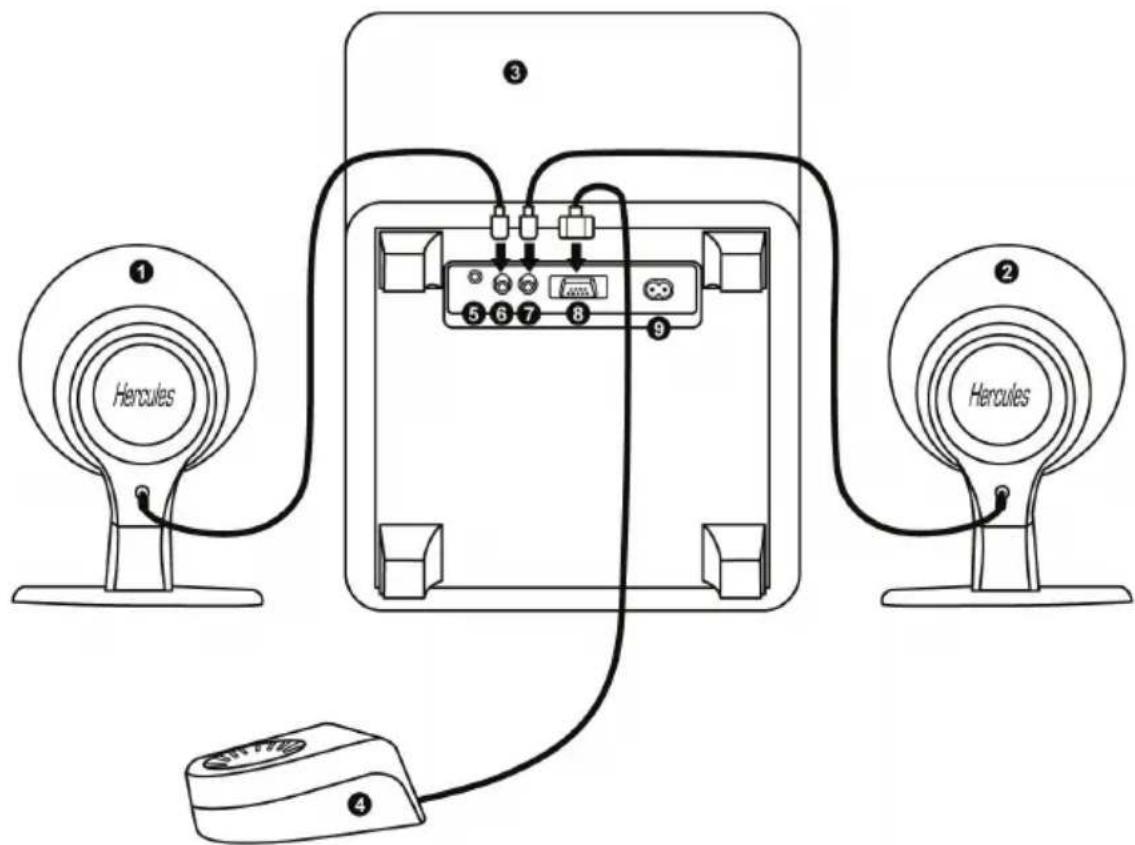
- Description of speaker system components and connectors:
1: Right satellite speaker
2: Left satellite speaker
3: Subwoofer
4: Wired remote control
5: Connector for main audio input
6: Connector for right satellite speaker
7: Connector for left satellite speaker
8: Connector for wired remote control
9: Power connector
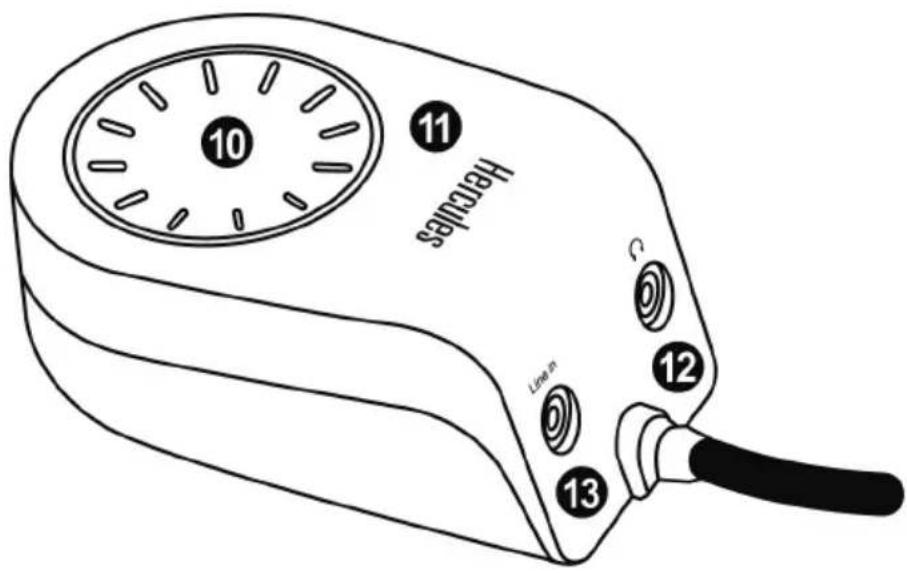
10: Knob with 4 functions, allowing you to:
(a) enable/disable standby mode
(b) adjust the master volume
(c) adjust the bass level
(d) adjust the treble level
11: Indicator LEDs: Power (on/off), Vol. (volume), Bass (bass frequencies), Treble (treble frequencies).
12: Headphone connector (the speakers are automatically disabled when headphones are connected).
13: Connector for auxiliary audio input, allowing you to connect your MP3 player or any other audio source (the main audio input is disabled when a connector is plugged into the auxiliary audio input).
natural_image
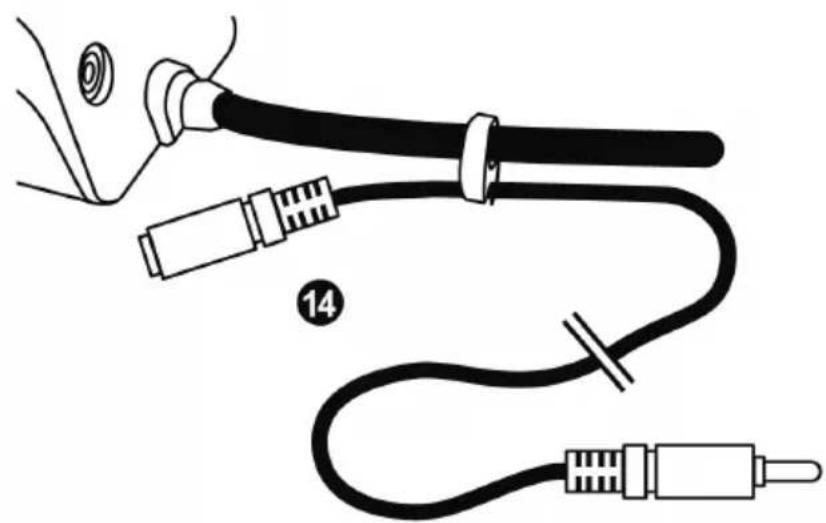
Diagram of a medical or electrical device with labeled parts, showing tubing and connectors (no text or symbols present)14: Microphone cable: pink mini-jack (M) / pink mini-jack (F) and Cable clamp
If you have a headset which includes a microphone, you can connect your headset's microphone connector to this extension. For easier management of the cables, you can clip this cable to the remote control's cable, using the included cable clamp (14) (as shown above).
natural_image
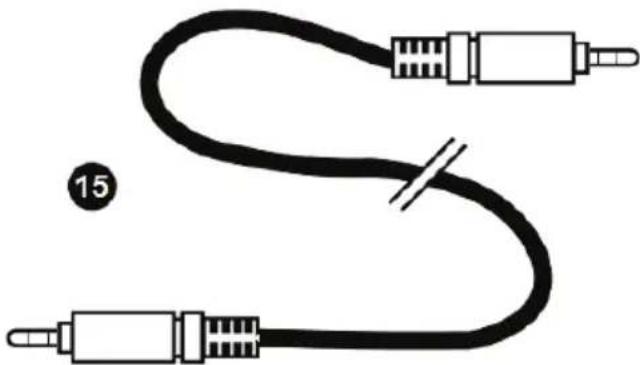
Pure electrical circuit lines without any symbols15: Cable for main audio input: mini-jack (M) / mini-jack (M).
2.2.1. Connection to a PC
- Connect the 3.5mm mini-jack connector on your speaker system's main audio input cable to the green FRONT SPEAKERS or FRONT OUT connector on your sound card or on the sound card integrated into your computer's motherboard.
2.2.2. Connection to a television set equipped with a headphone jack
- Connect the 3.5mm mini-jack connector on your speaker system's main audio input cable to the headphone jack on your television set.
2.2.3. Connection to a DVD player/television set equipped with Left and Right audio outputs

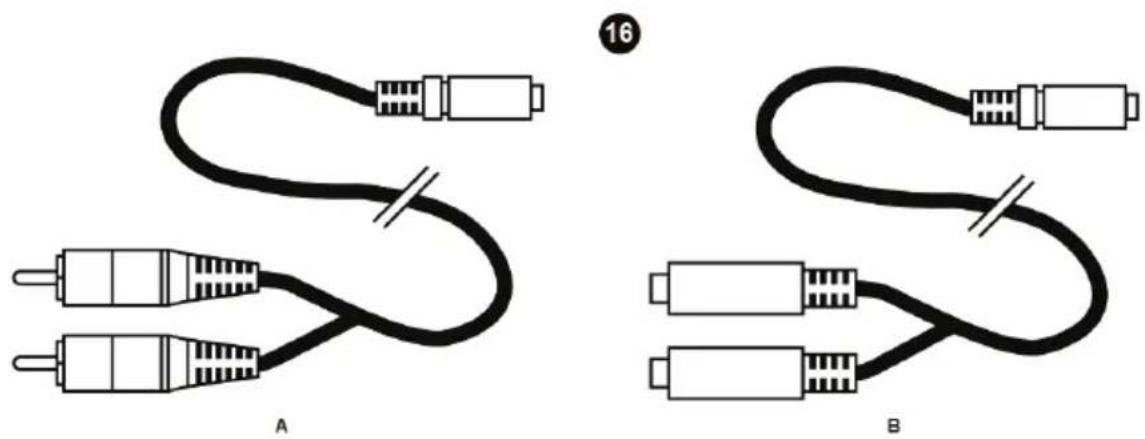
This type of connection requires a mini-jack (F) / double RCA (M) cable (not included): please see diagram 16A in this manual.
- Connect your speaker system's mini-jack connector to the mini-jack (F) / double RCA (M) cable.
- Connect the white RCA connector on the mini-jack (F) / double RCA (M) cable to the corresponding audio output on your DVD player/television set.
- Connect the red RCA connector on the mini-jack (F) / double RCA (M) cable to the corresponding audio output on your DVD player/television set.
2.2.4. Connection to a game console

This type of connection requires a mini-jack (F) / double RCA (F) cable (included): please see diagram 16B in this manual.
- Connect your speaker system's mini-jack connector to the mini-jack (F) / double RCA (F) cable.
- Connect the white and red audio connectors on your console's A/V cable to the mini-jack (F) / double RCA (F) cable.

Please refer to your console's user manual for more information on the other connections.
natural_image
Diagram showing two types of audio/video cables labeled A and B, with no text or symbols present.3. USING THE XPS 101 SPEAKER SYSTEM
- Turn on the audio source you wish to use (PC, television set, DVD player or game console).
-
Power on the speaker system by pressing the main knob on the remote control (10). The "power" and "volume" LEDs (11-Power and Vol.) light up on the remote control.
-
Adjust the volume by turning the main knob on the remote control (10): the "+" or "-" LED flashes for each step you make in increasing or decreasing the volume. If the volume is already at the maximum or minimum setting and you try to set it even higher or lower, the corresponding LED remains lit up (without flashing) while you are turning the knob, indicating that the volume can't go any further in that direction.
-
To adjust the bass level, press and release the main knob on the remote control (10): the bass LED (11-Bass) lights up.
-
Adjust the bass level by turning the main knob on the remote control (10): the "+" or "-" LED flashes for each step you make in increasing or decreasing the bass level. If the bass level is already at the maximum or minimum setting and you try to set it even higher or lower, the corresponding LED remains lit up (without flashing) while you are turning the knob, indicating that the bass level can't go any further in that direction.
-
Press the main knob on the remote control (10) again to adjust the treble level. The treble LED (11-Treble) lights up and, as described previously, the "+" or "-" LED flashes for each step you make in increasing or decreasing the treble level. If the treble level is already at the maximum or minimum setting and you try to set it even higher or lower, the corresponding LED stops flashing.
-
To switch between adjusting the volume, the bass level and the treble level, briefly press the main knob on the remote control (10). After 10 seconds of inactivity in "bass level adjustment" or "treble level adjustment" mode, the system automatically reverts to the master volume adjustment mode.
-
To put your XPS 101 speaker system in standby mode, press and hold the main knob on the remote control (10) for more than 3 seconds: the LEDs (11) go off. Your speaker system's power consumption in standby mode is less than 1W, in compliance with the EC 1275/2008 standard.
-
Your volume, bass level and treble level settings are saved; however, your settings will no longer be saved if you unplug the speaker system's power cable.

When you connect an audio source to the Line In connector on the remote control, the main audio source is disabled.
When you connect headphones to the remote control, the satellites and the subwoofer are automatically disabled, and only the headphone output is enabled.
4. TECHNICAL SUPPORT
If you encounter a problem with your product, please go to http://ts.hercules.com and select your language. From there you will be able to access various utilities (Frequently Asked Questions (FAQ), the latest versions of drivers and software) that may help to resolve your problem. If the problem persists, you can contact the Hercules products technical support service ("Technical Support"):
By email:
In order to take advantage of technical support by email, you must first register online. The information you provide will help the agents to resolve your problem more quickly.
Click Registration on the left-hand side of the Technical Support page and follow the on-screen instructions.
If you have already registered, fill in the Username and Password fields and then click Login.
By telephone:
| United Kingdom | 08450800942Chargesat local rate | Monday to Friday from Noon to 4pm and 5pm to 10pmSaturday from 9am to Noon and 1pm to 7pmSunday from 9am to Noon and 1pm to 4pm |
| United States | 1-866-889-5036Free | Monday to Friday from 7am to 11am and from Noon to 5pmSaturday from 8am to 2pmSunday from 8am to 10am(Eastern Standard Time) |
| Canada | 1-866-889-2181Free | Monday to Friday from 7am to 11am and from Noon to 5pmSaturday from 8am to 2pmSunday from 8am to 10am(Eastern Standard Time) |
| Denmark | 80887690Free | Monday to Friday from 1pm to 5pm and 6pm to 11pmSaturday from 9am to 1pm and 2pm to 8pmSunday from 10am to 1pm and 2pm to 5pm(English) |
| Sweden | 0200884567Free | Monday to Friday from 1pm to 5pm and 6pm to 11pmSaturday from 9am to 1pm and 2pm to 8pmSunday from 10am to 1pm and 2pm to 5pm(English) |
| Finland | 0800 913060Free | Monday to Friday from 2pm to 6pm and 7pm to MidnightSaturday from 10am to 2pm and 3pm to 9pmSunday from 11am to 2pm and 3pm to 6pm(English) |
5. WARRANTY INFORMATION
Worldwide, Guillemot Corporation S.A. ("Guillemot") warrants to the consumer that this Hercules product will be free from material defects and manufacturing flaws for a period of two (2) years from the original date of purchase. Should the product appear to be defective during the warranty period, immediately contact Technical Support, who will indicate the procedure to follow. If the defect is confirmed, the product must be returned to its place of purchase (or any other location indicated by Technical Support).
Within the context of this warranty, the consumer's defective product will, at Technical Support's option, be either repaired or replaced. Where authorized by applicable law, the full liability of Guillemot and its subsidiaries (including for indirect damages) is limited to the repair or replacement of the Hercules product. The consumer's legal rights with respect to legislation applicable to the sale of consumer goods are not affected by this warranty.
This warranty shall not apply: (1) if the product has been modified, opened, altered, or has suffered damage as a result of inappropriate or abusive use, negligence, an accident, normal wear, or any other cause not related to a material defect or manufacturing flaw; (2) in the event of failure to comply with the instructions provided by Technical Support; (3) to software not published by Guillemot, said software being subject to a specific warranty provided by its publisher.
Copyright
© 2010 Guillemot Corporation S.A. – All rights reserved.
Hercules® is a registered trademark of Guillemot Corporation S.A. All other trademarks and brand names are hereby acknowledged and are property of their respective owners. Illustrations not binding. Contents, designs and specifications are subject to change without notice and may vary from one country to another.
ENVIRONMENTAL PROTECTION RECOMMENDATION
At the end of its working life, this product should not be disposed of with standard household waste, but rather dropped off at a collection point for the disposal of Waste Electrical and Electronic Equipment (WEEE) for recycling.
This is confirmed by the symbol found on the product, user manual or packaging.
Depending on their characteristics, the materials may be recycled. Through recycling and other forms of processing Waste Electrical and Electronic Equipment, you can make a significant contribution towards helping to protect the environment.
Please contact your local authorities for information on the collection point nearest you.
TABLE DES MATIÈRES
1. INTRODUCTION....2
natural_image
Diagram of a medical or laboratory procedure showing a tool, connector, and tubing (no text or symbols)natural_image
Pure electrical circuit lines without any symbolsnatural_image
Diagram showing two types of connected audio/video cables labeled A and B, with no text or symbols present.3. UTILISATION DU KIT D'ENCEINTES XPS 101
STIPULATIONS ADDITIONNELLES A LA GARANTIE
natural_image
Diagram of a medical or electrical device with labeled parts, showing tubing and connectors (no text or symbols present)natural_image
Pure electrical circuit lines without any symbolsnatural_image
Diagram showing two types of audio/video cables labeled A and B, with no text or symbols present.3. GEBRAUCH DES XPS 101 LAUTSPRECHERSYSTEMS
natural_image
Symbol of a trash bin crossed with no text or labels, accompanied by a black rectangular block below (no text or symbols present)natural_image
Diagram of a medical or electrical device with labeled parts, showing tubing and connectors (no text or symbols present)14: Microfoonkabel: roze mini-jack (M) / roze mini-jack (V) en kabelklem
natural_image
Pure electrical circuit lines without any symbolsnatural_image
Diagram showing two types of audio/video cables labeled A and B, with no text or symbols present.3. HET XPS 101-SPEAKERSYSTEEM GEBRUIKEN
natural_image
Symbol of a trash bin with crossed lines indicating no waste or discharge (no text or labels)natural_image
Diagram of a medical or electrical device with labeled parts, showing tubing and connectors (no text or symbols present)natural_image
Pure electrical circuit lines without any symbols15: Cavo per ingresso audio principale: mini-jack (M) / mini-jack (M).
natural_image
Diagram showing two types of audio/video cables labeled A and B, with no text or symbols present.3. USO DEL SISTEMA DI ALTOPARLANTI XPS 101
natural_image
Symbol of a trash bin crossed with no visible text or labelsnatural_image
Diagram of a medical or electrical device with labeled parts, showing tubing and connectors (no text or symbols present)natural_image
Pure electrical circuit lines without any symbolsnatural_image
Diagram showing two types of connected audio/video cables labeled A and B, with no text or symbols present.natural_image
Symbol of a trash bin with crossed lines indicating no waste, above and below a solid black rectangle (no text or labels)natural_image
Diagram of a medical or diagnostic device with labeled parts, showing tubing and connectors (no text or symbols present)natural_image
Pure electrical circuit lines without any symbols15: Cabo da entrada de áudio principal: minijaque (M) / minijaque (M).
natural_image
Diagram showing two types of connected audio/video cables labeled A and B, with no text or symbols present.3. UTILIZAR O SISTEMA DE ALTIFALANTES XPS 101
natural_image
Symbol of a trash bin with crossed lines indicating no waste, and a solid black rectangle below (no text or labels)natural_image
Diagram of a medical or electrical device with labeled parts, showing tubing and connectors (no text or symbols present)natural_image
Pure electrical circuit lines without any symbolsnatural_image
Diagram showing two types of audio/video cables labeled A and B, with no text or symbols present.natural_image
Symbol of a trash bin with crossed lines indicating no waste, above and below a black rectangle (no text or labels)Hercules® is a division of the Guillemot Corporation