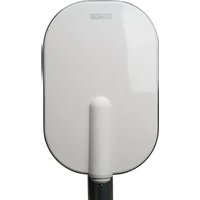
DTA4000 - TV Antenna Schwaiger - Free user manual and instructions
Find the device manual for free DTA4000 Schwaiger in PDF.


| Product Type | Active UHF outdoor TV antenna |
| Brand | Schwaiger |
| Model | DTA4000 (011) |
| Frequency Range | 470 – 790 MHz (UHF) |
| Channels | 21 – 60 |
| Impedance | 75 Ω |
| Coaxial Cable Length | 8.5 meters (with F connector) |
| Power Requirement | 5-6 V DC, 50 mA (via DVB-T/T2 receiver or external adapter) |
| Power Supply Included | Yes, 5-6 V / min. 50 mA DC |
| Auxiliary Power | Included (allows powering the antenna without using the TV's 5V output) |
| Protection Class | IPX4 (splash-proof) |
| Built-in Amplifier | Yes, to improve DVB-T/T2 signal reception |
| Mounting Types | Mast, wall or railing (balcony) – mounting hardware included |
| Orientation | Adjustable horizontally and vertically |
| Package Contents | Antenna, 8.5 m coaxial cable, power supply, auxiliary power adapter, mast mount, instruction manual |
| Reception | Digital DVB-T and DVB-T2 programs |
| Connector | F type (coaxial) |
| Cleaning | With a slightly damp, lint-free cloth; do not use abrasive products; avoid liquid penetration |
| Safety | Power plug easily accessible; use a compatible adapter; keep out of reach of children; repair by a professional |
| Intended Use | Outdoor digital terrestrial television (DTT) reception |
Frequently Asked Questions - DTA4000 Schwaiger
User questions about DTA4000 Schwaiger
0 question about this device. Answer the ones you know or ask your own.
Ask a new question about this device
Download the instructions for your TV Antenna in PDF format for free! Find your manual DTA4000 - Schwaiger and take your electronic device back in hand. On this page are published all the documents necessary for the use of your device. DTA4000 by Schwaiger.
USER MANUAL DTA4000 Schwaiger
G3 USER GUIDE AND SAFETY INSTRUCTIONS
DTA4000 011 OUTDOOR AERIAL
MODE D'EMPLOI ET CONSIGNES DE SECURITE
ANTENNE D'EXTERIEUR DTA4000 011
ISTRUZIONI PER L'USO E AVVERTENZE DI SICUREZZA
ANTENNA ESTERNADTA4000 011
HR UPUTA ZA UPORABU I SIGURNOSNE NAPOMENE
VANJSKA ANTENA DTA4000 011
INSTRUKCJA OBSLUGI I WSKAZOwKI BEZPIECZENsTWA
ANTENA ZEWNETRZNA DTA4000 011
RO INSTRUCTION DE UTILIZARE SI MENTIUNI REFERITOARE LA SIGURANTA
ANTENA EXTERIOARDA T4000 011




EINFUHRUNG
Congratulations and thank you for purchasing this DTA4000 011 outdoor aerial. This user guide is designed to help you use and operate the device. Read through the User guide carefully. Store this manual safely throughout the product's entire service life and pass it on to any subsequent users or owners.
Check that the supplied package is complete and ensure that none of the parts are defective or damaged. All devices that we distribute comply with the safety regulations valid at the time of purchase, and are safe provided they are used for the intended purpose. For simplicity, the DTA4000 011 outdoor aerial is referred to as "outdoor aerial" in this guide.
How to use this aerial
- The outdoor aerial is used to receive digital television programmes.
It must not be used for any other purpose!
Safety instructions
- The socket for the power supply must be easily accessible.
- The installation cable to the socket must be equipped with a device to disconnect the power supply.
- Please use a suitable plug-in power supply unit (see Technical Data). Make sure the polarity is correct.
- This outdoor aerial is an electronic product that must be kept away from children!
- Therefore, keep it out of the reach of children.
- Do not introduce any objects into the product's connections or openings.
- Have the outdoor aerial repaired by a technician if it is defective.
- Disconnect the power plug before cleaning.
- Clean this outdoor aerial only using a lint-free, damp cloth that is as light as possible and do not use any aggressive cleaning agents. In doing this, especially ensure that no water (no fluid or moisture) gets into the product.
| TECHNICAL DATA | |
| Frequency -/ Reception range UHF (470 -790 MHz) | |
| Channels 21 - 60 | |
| Impedance 75 Ω | |
| Coaxial cable 8,5 m included | |
| Receiver/TV connection 5-6 V DC 50 mA | |
| Electrical connection Plug-in power supply included, 5-6 V / min. 50 mA DC | |
| Protection rating IPX4 | |
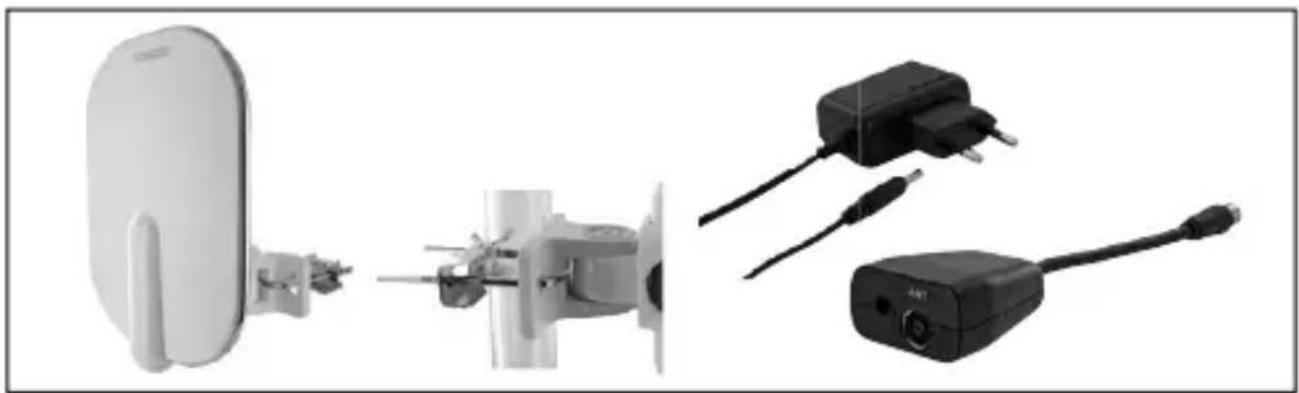
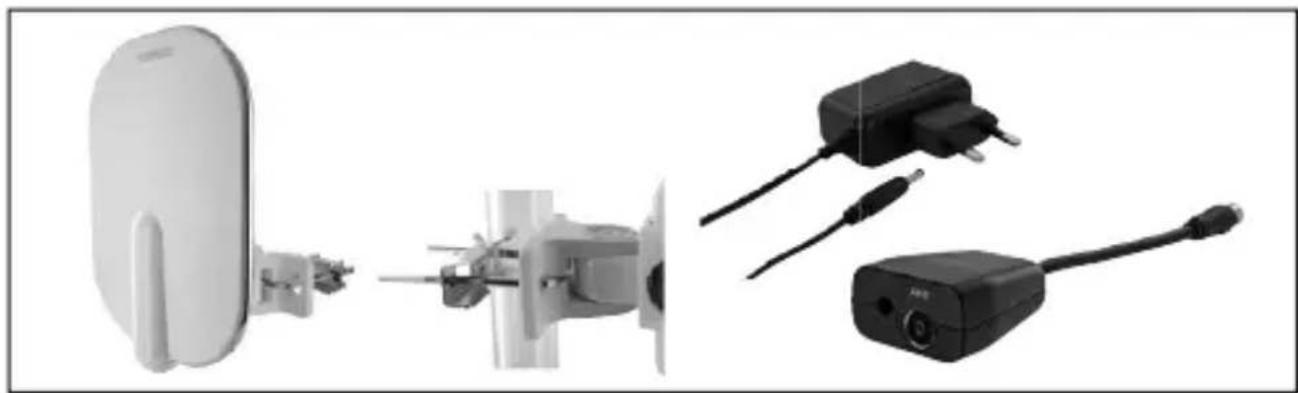
Package content
Active outdoor aerial (UHF) with integrated amplifier
Coaxial connecting cable 8.5m
Plug-in power supply
Powerinserter
- Mastinstallation
- User guide with Safety instructions
OPTIMUM LOCATION FOR THE OUTDOOR AERIAL
You should ensure that there are as few obstacles as possible which may block the signal between the transmitter and the outdoor aerial to guarantee optimum reception.
DVB-T(2) receivers often have a signal strength indicator. This indicator will help you find the best aerial position. Check different positions and signal directions before you finally site the aerial.
INSTALLING THE OUTDOOR AERIAL
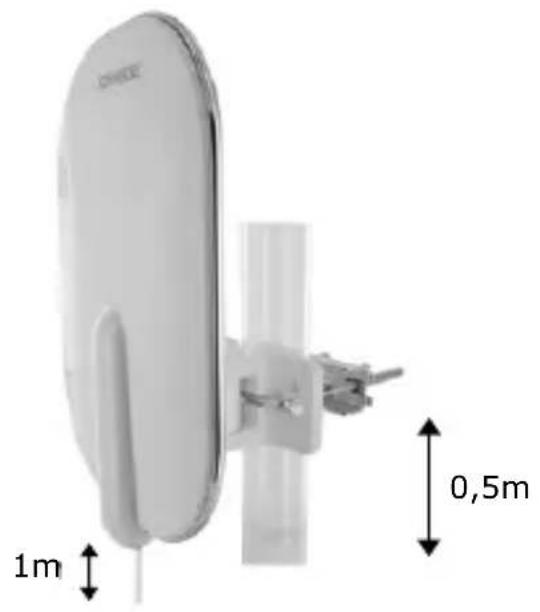
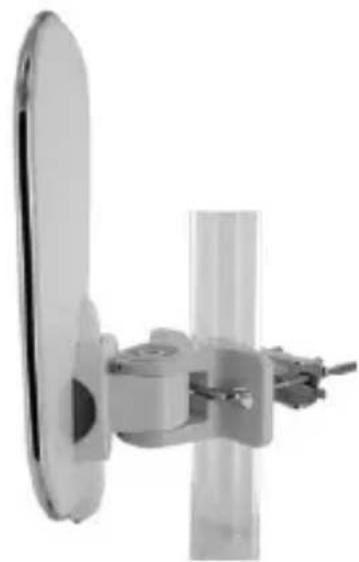
A. Installing on a mast
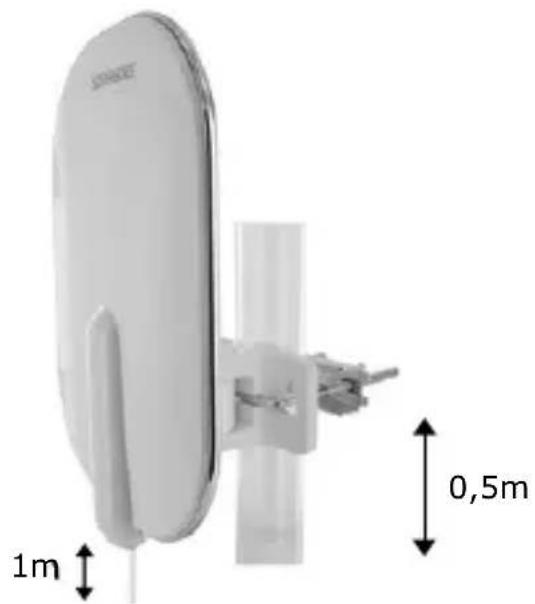
Push the U-clamp through the mast, adjust the aerial bracket and tighten the screws.
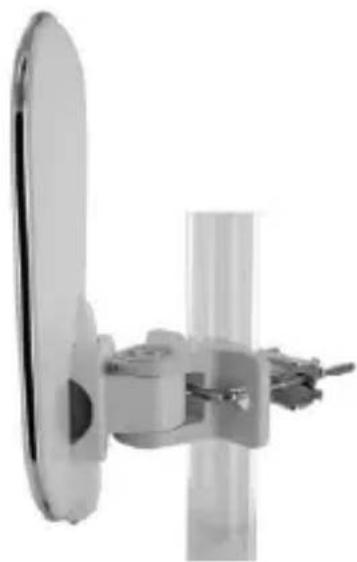
Tie about 1 metre of the coaxial cable to the fixing post at a height of about 0.5 metres, so that the aerial has enough play to allow for altering its position.
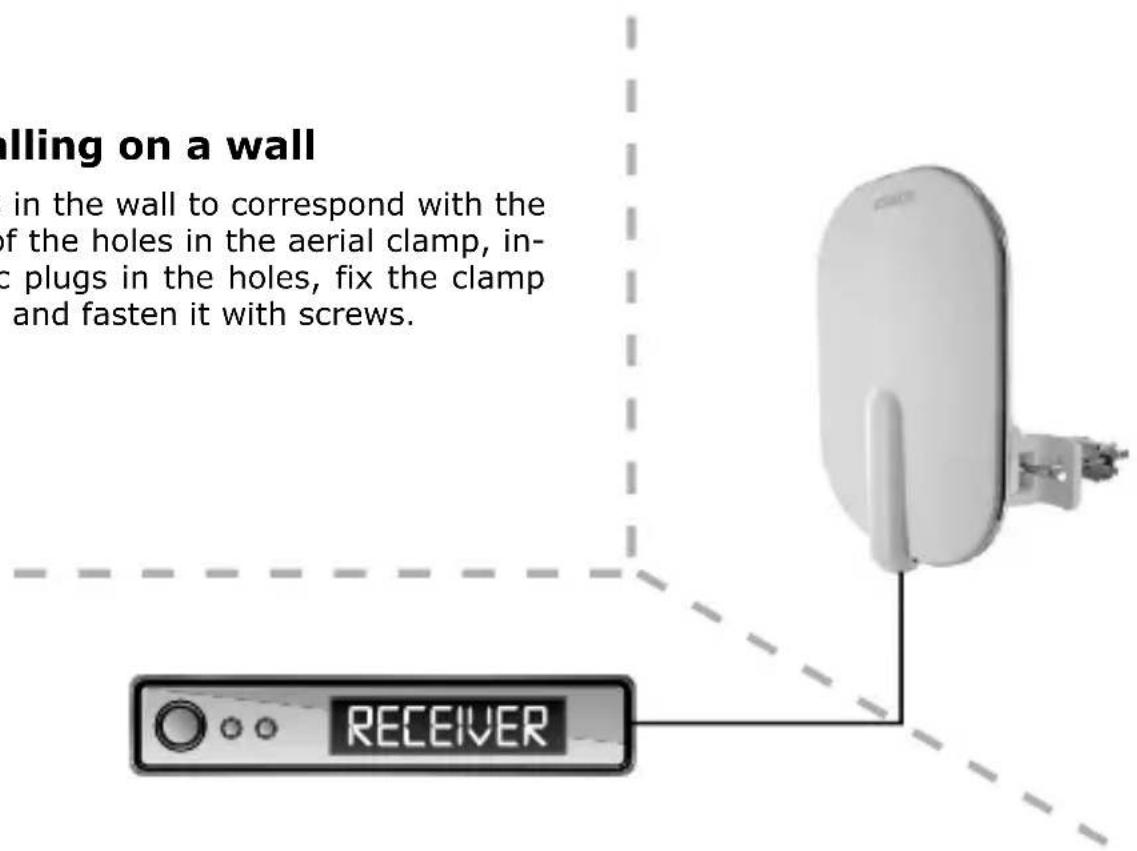
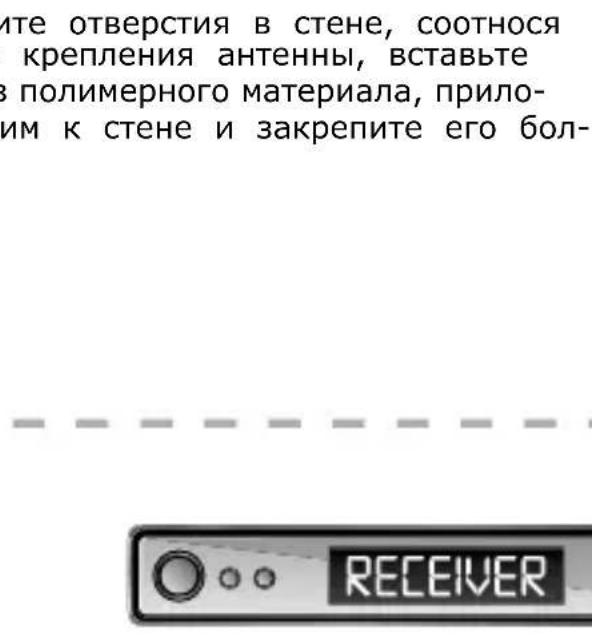
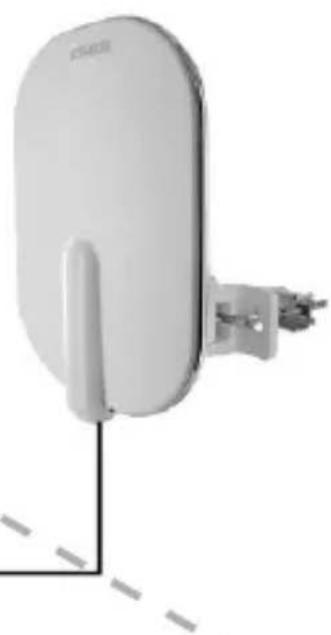
B. Installing on a wall
Bore holes in the wall to correspond with the positions of the holes in the aerial clamp, insert plastic plugs in the holes, fix the clamp to the wall and fasten it with screws.
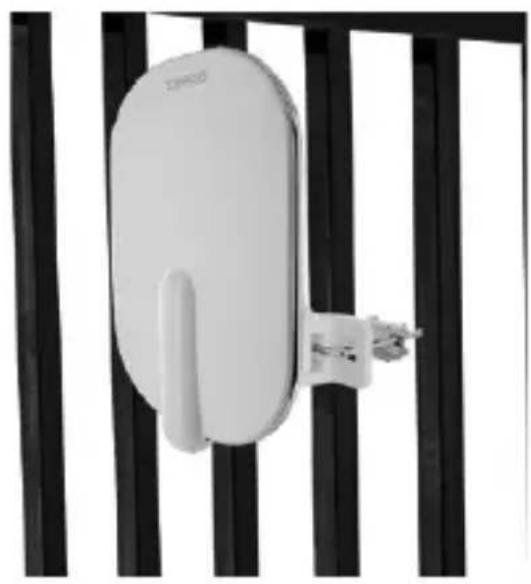
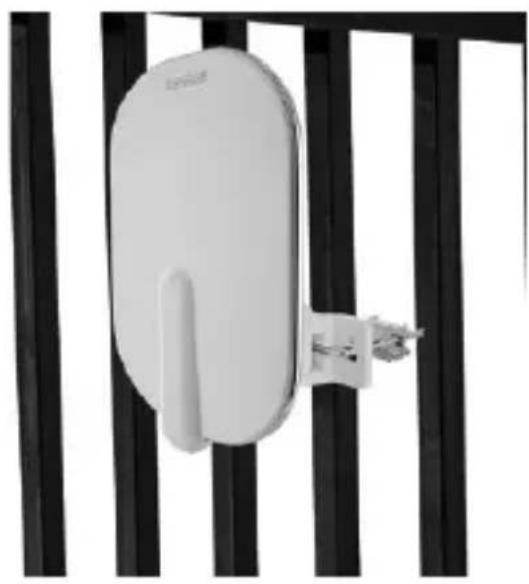
C. Fixing to a handrail (balcony)
Install the aerial mounting on the handrail using the clamp. Screw the coaxial cable to the aerial using the F-plug and fix the aerial on the swivelling base after suitable directional adjustment.
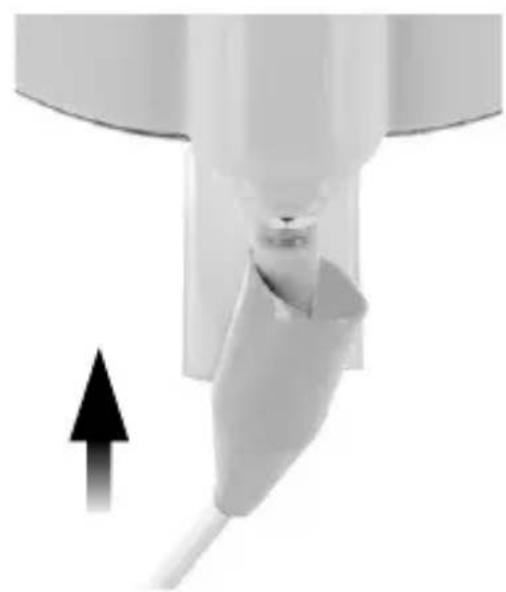
Fixing the watertight cap
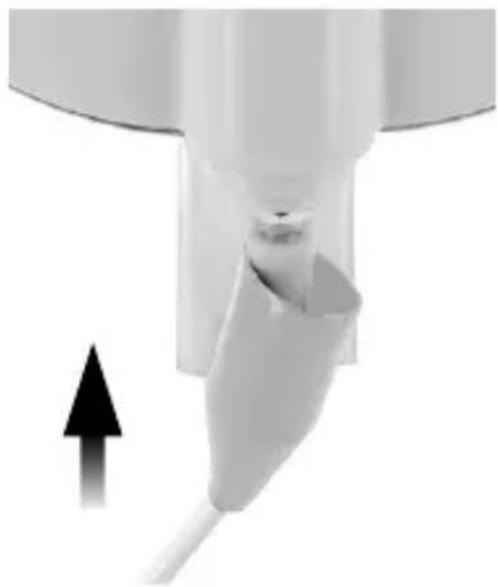
Connect the coaxial cable to the aerial's F-socket and secure the cable. Fix the watertight cap so that the connection is covered and no water can get in.
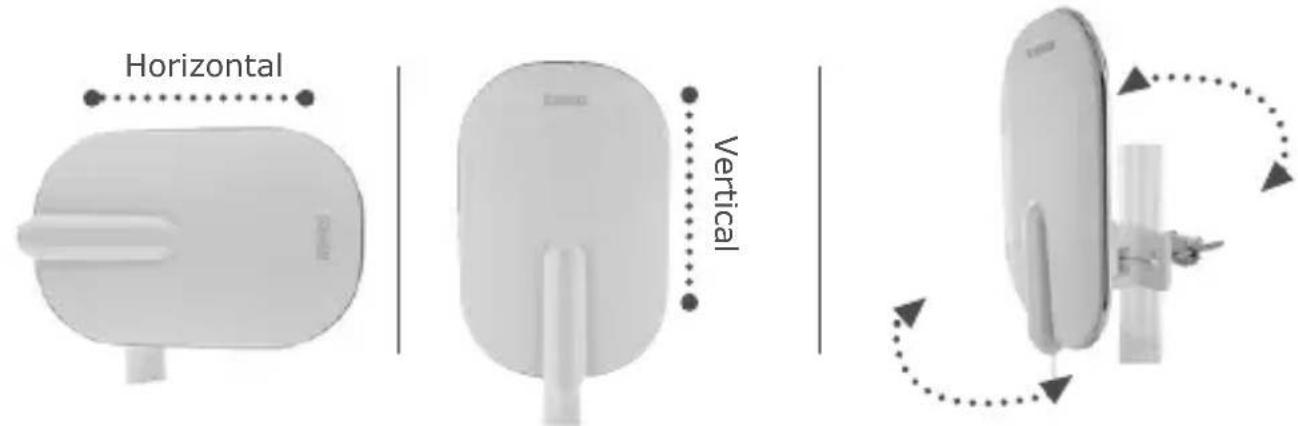
SETTING UP THE DIRECTION FOR RECEIVING SIGNALS
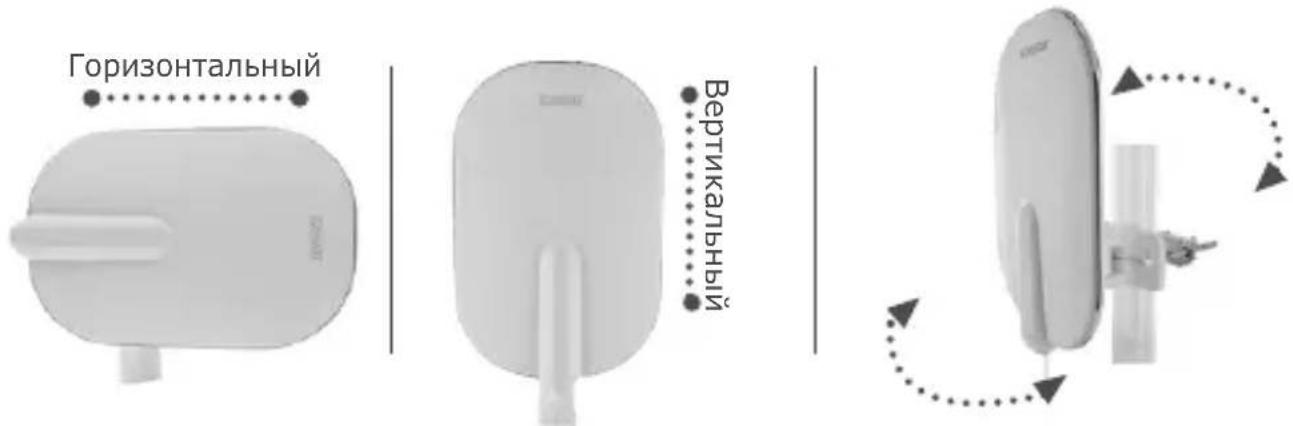
Set up the position of the aerial according to the emission of horizontal or vertical signals.
CONNECTING THE OUTDOOR AERIAL FOR TV SETS WITH INTEGRATED DVB-T(2) RECEIVER
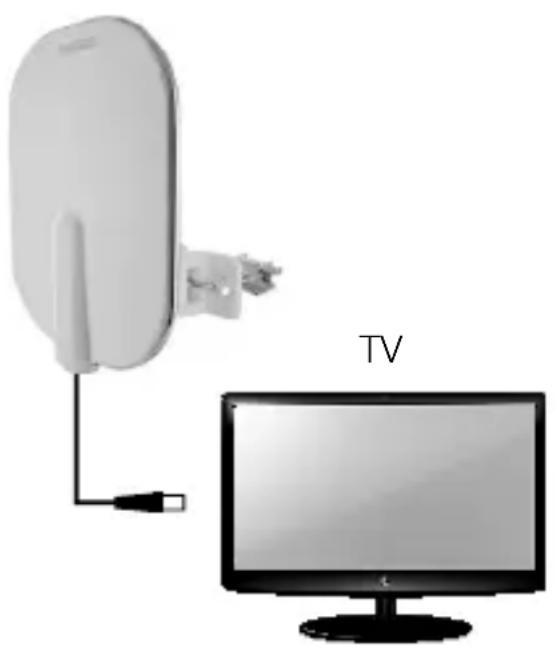
Connection example 1
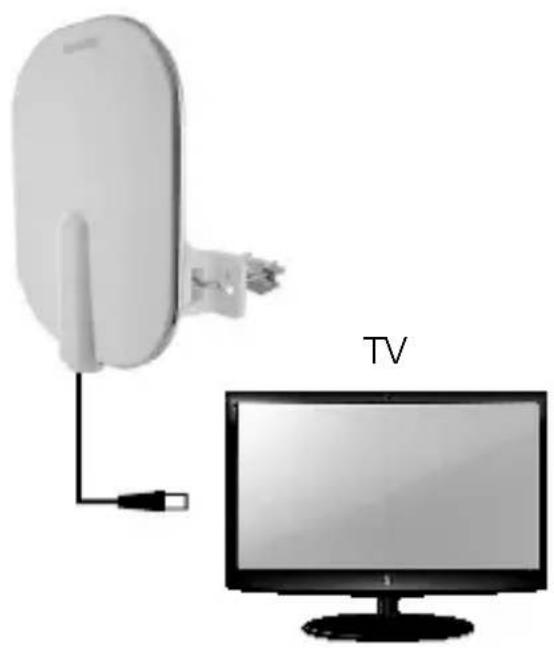
| CONNECTION EXAMPLE |
| Power supply via the built-in DVB-T(2) receiver in the TV set |
| 1. Make sure that the television set is switched off. |
| 2. Plug the outdoor aerial's coaxial cable into the aerial connection port on the television set. |
| 3. You can now turn on the television set. |
| 4. Switch on the 5 V power supply on your TV screen menu to power the external amplifier via the coaxial cable. |
| 5. You can now look for channels that you can receive. If necessary, refer to the television's user manual for guidance. |
Connection example 2
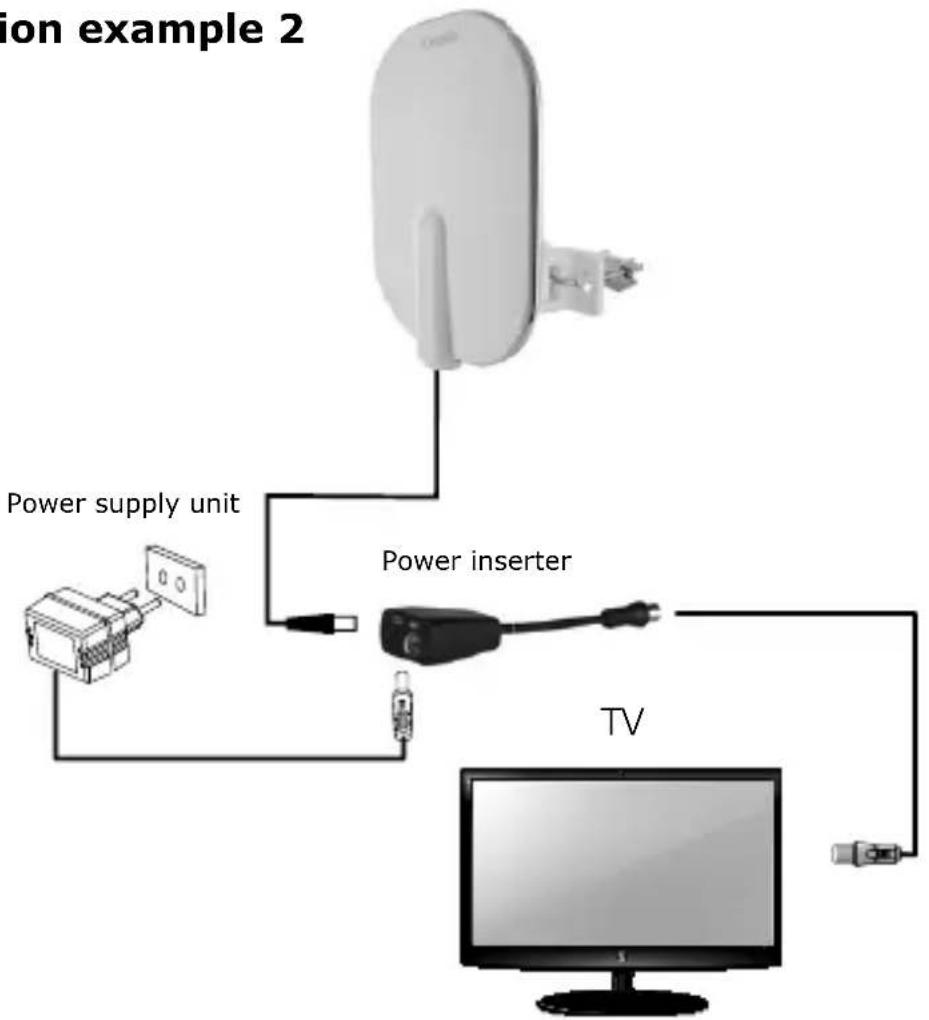
CONNECTION EXAMPLE 2
Power supply via the supplied external power supply unit
- Make sure that the television set is switched off.
- Plug the outdoor aerial's coaxial cable into the aerial connection port on the Power inserter.
- Now plug the cable of the external power supply unit in the socket in the Power inserter and the external power supply unit into a 230 V AC socket.
- Connect the short coaxial cable of the power inserter to the aerial input of your TV set.
- When making this connection, it doesn't matter whether the 5 V power supply of the TV is activated or not.
- You can now turn on the television set and look for channels that you can receive. If necessary, refer to the television's user manual for guidance.
CONNECTING THE OUTDOOR AERIAL FOR TV SETS WITHOUT INTEGRATED DVB-T(2) RECEIVER
Connection example 1
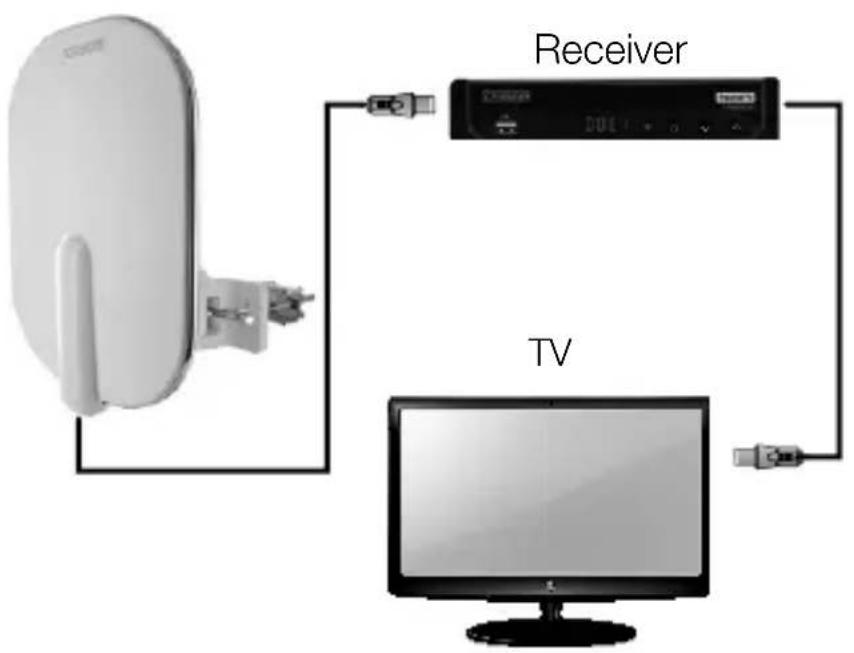
| CONNECTION EXAMPLE 1 |
| Power supply via the DVB-T(2) receiver |
| 1. Make sure that the television set is switched off. |
| 2. Plug the outdoor aerial's coaxial cable into the aerial connection port on the DVB-T(2) receiver. |
| 3. You can now turn on the television set and the receiver. |
| 4. In the menu of the DVB-T2 receiver, switch on the 5 V power supply to power the amplifier integrated in the aerial through the coaxial cable. |
| 5. You can now look for channels that you can receive. If necessary, refer to the television's user manual for guidance. |
Connection example 2
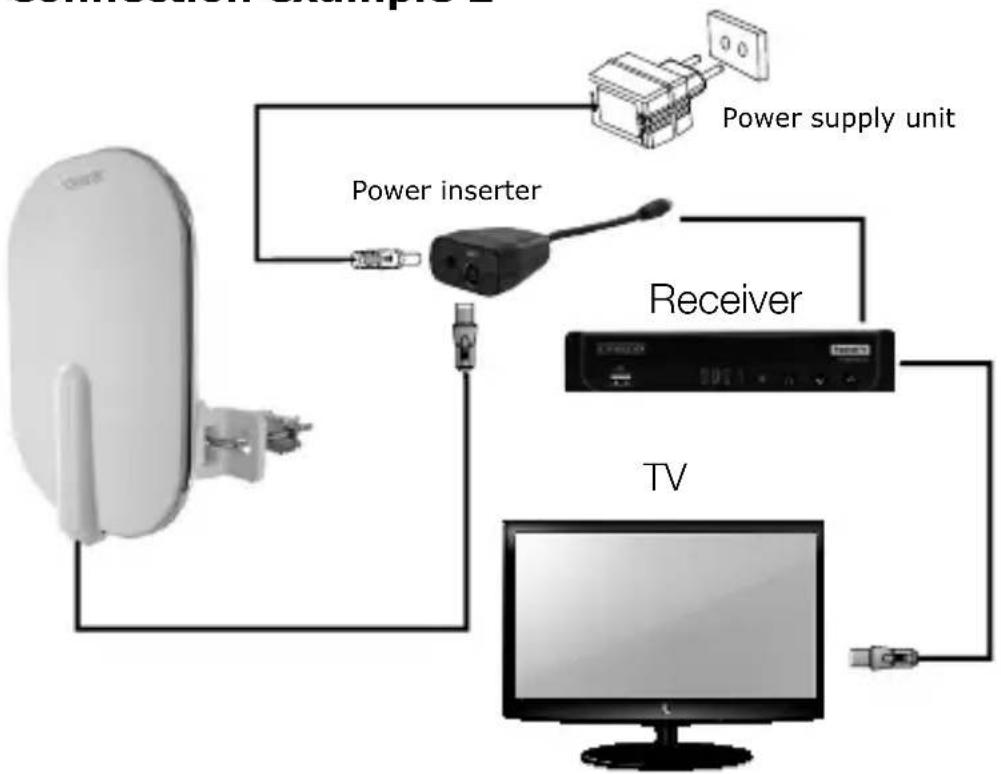
CONNECTION EXAMPLE 2
Power supply via the supplied external power supply unit
- Make sure that the DVB-T(2) receiver is switched off.
- Plug the outdoor aerial's coaxial cable into the aerial connection port on the Power inserter.
- Now plug the cable of the external power supply unit into the socket of the power inserter and the external power supply unit into a 230 V AC socket.
- Connect the coaxial cable of the power inserter to the aerial input of your DVB-T2 receiver.
- When making this connection, it doesn't matter whether the 5 V power supply of the DVB-T2 receiver is activated or not.
- You can now turn on the television set and the DVB-T(2) receiver.
- You can now look for channels that you can receive. If necessary, refer to the DVB-T2 receiver's user manual for guidance.
Disposal
Do not dispose of batteries or electric and electronic devices in the normal household waste. The consumer is legally obliged to return electrical and electronic devices and batteries that are at the end of their useful life to the point of sale or public collection points that have been set up for this pur- Legislation in the country of use governs individual details regarding dispose symbol on the product, the user guide or the packaging indicates this legal cement.
Disclaimer
Schwaiger GmbH does not accept any liability or warranty for damages that are sustained due to improper installation or mounting, improper use of the product or non-compliance with the safety instructions.
Manufacturer's information
Dear Customer, Please contact our Technical Support if you need technical advice and your retailer is unable to help you.
Simplified declaration of conformity as per the RED Directive
Schwaiger GmbH hereby declares that the radio system type complies with Directive 2014/53/EU.
The complete EU declaration of conformity is available online at: https://download.schwaiger.de
Office hours: (Technical Support in German)
Monday to Friday: 8:00 a.m. - 5:00 p.m.
Schwaiger GmbH
Würzburger Straße 17 | 90579 Langenzenn
Direct line: +49 (0) 9101 702-299
www.schwaiger.de | hotline@schwaiger.de
INTRODUCTION
CODEPXXIMOE YNAKOBKN
- AKTINBHajn HApYxHaj aHTeHHa (UHF) c INHTERpNDoBaHHbIM YCINNTeJEM
KoakcKaJIbHbI coeHHHTbHbI Ka6eJIb 8,5M
BLOK NITAHNA
PacnpedeJInteIbHbIΦnIbTp - PódBécka onopbyi
-Инchristpykua IO KcnpVaTaun C noLoXeHnMa NO 6e3oNaCHOCTN
ONTMajbHOE MECTO YCTAHOBKN HAPXHOH AHTEHbl
YTo6bI o6ecneuHTb ONTImaJIbHbI npHeM, y6eINTeCb, YTO MeKdY nepeDaTcHKOM n HApXHNo aHTeHHo IMeETcKaK MOxHO MeHbWe npEJaTCTBn, KOTOpbIe MOryT MeWaT b IPOXOXDeHNIO CnHaJia.
DVB-T(2) pecnBepbI qacto IMeIoT INHdNKaTOP INHTehCnBHOCTN CnHaJa (INHdkaTOp ypoBH). 3TOt INHdkaTOp n03BOJAE TOppeJeNTb ONTMaJIbHOe NIOJOKeHne aHTeHHbl. Icnpo6yIte pa3NIuHbIe NIOJOKeHn, IpexJe Yem OKOHaTeJIbHO yCTa-HOBITb aHTeHHy.
MOHTAX HAPYXHÖN AHTEHbI
A. Kpenlenne Ha onope
U-06pa3HbI 3axm BCTaBnTb uepe3 onopy, yCTaHOBnTb onopy aHTeHHbl n 3akpeNtB 6oTAMn.
OTMotaIte OKOIO 1 MeTp a KOaKcNkaJIbHOrO Ka6eHa rIy6nHy OKOIO O,5 M B NOInpKy, UTO6bl aHTeHHa CBO6oDHO NOBOPaUBAJacB BClyuae n3MeHeHna ee NIOJKeHn.
B. Kpenlenne Ha CTehy
Прсеверлente OTBерстяВ СтЕн, COOTHOСТОВерстя Креленя aHTeHHbl, BCTaBBTeДюбELNИЗ ПОЛIMерно MaTePNaIа, npINLOXITE 3axmK CTeHe N 3akpenite erO 6oTAMn.
C. установka на nepилax (6aikone)
YctaHOBInTe OOnpy aHTeHHbI C NOMOuBo 3axmamnepn.IpnKpyTne KoakcnKaHbNkabEnbC NOMOsbFO-WeKepea KaHTehHe n 3aΦHKcnpyTe aHTeHHy Ha BpaAouSeiNaHEnB COOTBETCTBYUoem HApabLeHn.
Kpenlenne BOD03aunTHoro KoIInaka
BCTaBbTe KOAKcKakbHbI Ka6eIb F-rHe3do aHTeHHb I 3aKpeNITE erO. YcTaHOBnTE BO-DOHEnpOnucaembl KOLnak TaKIM O6pa3OM, UTObI 3aUHTnTb y3eJ CoEINHeHna, Ha KOTOp bI He DOJXHa NOnaDaTb BODa NII Bnra.
YCTAHOBKA HANPABJIEHNЯ ППЕMA
YCTAHOBITE aHTeHHy B COOTBETCTBn C n3JnyeHnem rOpN3OHTaJIbHbIX N BepTNKaJIbHbIX CNrHaJIOB.
ПОДКЛIOЧЕHNE HAPУЖ"HО AHTEHHbI K TEJIEBN-3OPAM CO BCTPOEHHbIM DVB-T(2) PECNBEPOM
Примет подклоченя 1
IckJIIOUeHne OTBETCTBEHHOCTN
OTBETCTBeHHoCTb I rapaHTnI KOMnAHnSchwaiger GmbH He pacnpoctpaHIOrTcHa yuep6, BO3HNKwI BcIeDCTBne HeHaJIeXaUero BblOpHHeHn C6OpKn IInMOHTaJa, HeHaJIeXaUero NcPOnb3OBAHn I3DeJnI Nn HecO6JIuOJeHn YKa3aHnNo TexNke 6e3OpacHOCTn.
HΦopMaçnO npOn3BODnteIe
YBaXaEmbI NOKyNaTeIb, C BOpocAMN TexHnueCKOrO XapaKTepa, Ha KOTopbIe He MoKet OTBeTITb BaW dInIep, O6paUaIaTEcB B Hauy cLyX6y TexHnueCKo IopdEpxK.
Ynpoehnna deeknapauncootbctBna EC corlacho DnpekTne RED
Hactoim Kompana Hschaiger GmbH 3aBnAeT, yTo oNcaHoe 3decb yCTpoI-CTBO paAnocBra3n OTBeuaeT Tpe6oBaHnM dInpeKTHbbl 2014/53/EU. C noHbIM TeKCTOM cepTnΦnKaTa O COOTBeTCTBnE EC MoXHO O3HaKOMtbcr Ha Be6-caIte nO cLeyuOSeMy aDpecy: https://download.schaiger.de
BpeMa pa60TbI: (Cnyx6a TexHnuecko nOdepKKn Ha HemeKOM Ra3bKe)
C noHeeIbHnka no nIaTHnUy: c 08:00 do 17:00
Schwaiger GmbH
Würzburger Straße 17 | 90579 Langenzenn
Topya: +49 (0) 9101 702-299
www.schwaiger.de | hotline@schwaiger.de
BbBEHNE
I03dpabBaMe Bn N Bn 6laoradapm 3a 3akynybaHeTo Ha BbHnHaTa aHTeHa DTA4000
011. Ta3n nHCTpykqna 3a ekcnloataunr Bn cnykn 3a ynechraBe Ha pa6oTaTa n o6-
ClyjxBaHTo H TO3n npOdyKT. PpOyeTe BHNMaTeJHo IHCTpyKcNraT3a ekCnloatauJa.
CbxpaHbAte YnbTBAHTo ppe3 ueJnepno Ha ekCnloatauJa Ha npOdyKta n ro
npedaiTe Ha cIeDbaSIn noTppeBntel nn co6ctBeHnK.
Mol npobepeKOMnIeKTHOCTHa cBdbpXaHHeTo n Ce yBepeTe,Ye Hma Heu3npabHN nnIOBpeHn Yactn. Bcnukn npOdaBaHn OT hac ypeHn OTRObaprT Ha BaNHDHTe pni 3aKnyBaHTo yka3aHn 3a 6e3oNaChOcT n no npHnCn ca 6e3oNaChn npy UnoTpe6a n npedHa3HaueHne! 3a ylecheHne npu yeTeHTo Ha Ta3n INHCTpyKzna 3a ekCnloataun 3a BbHsHa aHTeHa DTA4000 011 ce n3NoJ3Ba HauMeHOBaHHeTo ,BbHsHa aHTeHa".
Yka3aHn 3a 6e3oNaCHOCT
-До конта за мрековая(addTepТразьда за Има leceн дocтbn.
3axpaHbuaTn pOBoHNK Ha cRpaDHaTa NHCTaJaCnI O KOHTaKa Tp8Ba Da pa3- nOlaRa C Bb3MOxHOCt 3a N3KnIOUyBaHe C ueI pa3DeJIaHE OT MpeKaTa.
- MoJy n3noJ3BaIte noJxOJaUmpexKOB aanTep (Bx. "TexHnueckn daHHN"). Cna3BaIte noJrpHOCTTa.
- Ta3n BbHnHa aHTeHa npedctablaBa eJeKtpoHe npoDyKT, KOTo He Tp86Ba da no-nda B pbuTe Ha deca!
3aTOba cbXpaHraBaiTe BbHsHaTa aHTeHa N3BbH 06cera Ha deca.
He BkapBaIte npeMeTn B n3BODnte nn OTBOPHTe Ha npOdyKTA.
- Пи Deфektu BbHsHaTа aHTeHa Tp6Ba Da ce peMOHTupa cMo OT CneuaJIaNCT.
- Прази поочье икювайт ecelа OT kontakta.
-Почистваite Вьншату с Heocstabяда влacnHkn, MaKcmaJHo Jeko HabJIakHeHa Kbpna H He n3noI3BaIte arpeCnBn nouchTbaun npenapatn. ПрTOBa Oco6eNo BHMaBaIte B npodykta da He nonada BOda (TeuHoc/TbIra).
- EINFUHRUNG
- How to use this aerial
- It must not be used for any other purpose!
- Safety instructions
- Package content
- OPTIMUM LOCATION FOR THE OUTDOOR AERIAL
- INSTALLING THE OUTDOOR AERIAL
- Installing on a mast
- Installing on a wall
- Fixing to a handrail (balcony)
- Fixing the watertight cap
- SETTING UP THE DIRECTION FOR RECEIVING SIGNALS
- CONNECTING THE OUTDOOR AERIAL FOR TV SETS WITH INTEGRATED DVB-T(2) RECEIVER
- Connection example 1
- Connection example 2
- Power supply via the supplied external power supply unit
- CONNECTING THE OUTDOOR AERIAL FOR TV SETS WITHOUT INTEGRATED DVB-T(2) RECEIVER
- Disposal
- Disclaimer
- Manufacturer's information
- Simplified declaration of conformity as per the RED Directive
- Office hours: (Technical Support in German)
- INTRODUCTION
- CODEPXXIMOE YNAKOBKN
- ONTMajbHOE MECTO YCTAHOBKN HAPXHOH AHTEHbl
- MOHTAX HAPYXHÖN AHTEHbI
- Kpenlenne Ha onope
- Kpenlenne Ha CTehy
- установka на nepилax (6aikone)
- Kpenlenne BOD03aunTHoro KoIInaka
- YCTAHOBKA HANPABJIEHNЯ ППЕMA
- ПОДКЛIOЧЕHNE HAPУЖ"HО AHTEHHbI K TEJIEBN-3OPAM CO BCTPOEHHbIM DVB-T(2) PECNBEPOM
- Примет подклоченя 1
- IckJIIOUeHne OTBETCTBEHHOCTN
- HΦopMaçnO npOn3BODnteIe
- Ynpoehnna deeknapauncootbctBna EC corlacho DnpekTne RED
- BpeMa pa60TbI: (Cnyx6a TexHnuecko nOdepKKn Ha HemeKOM Ra3bKe)
- BbBEHNE
- Yka3aHn 3a 6e3oNaCHOCT
Brand : Schwaiger
Model : DTA4000
Category : TV Antenna