RB 7026 - Robot vacuum SEVERIN - Free user manual and instructions
Find the device manual for free RB 7026 SEVERIN in PDF.

| Product type | Robot vacuum with remote control |
| Brand | SEVERIN |
| Model | RB 7026 |
| Power supply | Rechargeable lithium-ion battery, power adapter included |
| Charging time | Up to 5 hours |
| Runtime | Up to 90 minutes |
| Cleaning modes | Zigzag, spot cleaning (1.5 m), edge cleaning, turbo mode |
| Remote control | Yes, range 20 m, AAA batteries included |
| Timer | Programmable for daily start |
| Sensors | 4 drop sensors, anti-collision sensor |
| Return to base | Automatic (button or low battery), charging station included |
| Indicators | Light ring (white/orange), sound signals |
| Floor types | Hard floors, low-pile carpets |
| Dustbin capacity | Empty after each use (capacity not specified) |
| Filter | Laminated filter + foam filter, replace every 6 months |
| Brushes | 1 main brush, 2 side brushes (right/left), replace every 3-6 months |
| Maintenance | Weekly cleaning of filter and brush roll, monthly cleaning of brushes and sensors |
| Spare parts available | Remote control, battery, power adapter, charger, full dustbin, filter, brush roll, side brushes |
| Warranty | 2 years, excluding normal wear and batteries |
| Safety | Automatic shut-off in case of problem, overload protection |
Frequently Asked Questions - RB 7026 SEVERIN
User questions about RB 7026 SEVERIN
0 question about this device. Answer the ones you know or ask your own.
Ask a new question about this device
Download the instructions for your Robot vacuum in PDF format for free! Find your manual RB 7026 - SEVERIN and take your electronic device back in hand. On this page are published all the documents necessary for the use of your device. RB 7026 by SEVERIN.
USER MANUAL RB 7026 SEVERIN
natural_image
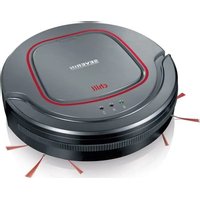
Black SEVERIN robotic vacuum cleaner with control panel and white base (no visible text or symbols on device body)ART.-NO. RB 7026
GB Instructions for use
FR Mode d'emploi
Robot vacuum cleaner with remote control 15
| Technische Daten / Technical Data / Caractéristiques techniques / Technische gegevens /Datos técnicos / Dati tecnici / Tekniske data / Tekniska data / Tekniset tiedot / Dados técnicos /Dane techniczne / Τεχνικά χαρακτηριστικά / Technická data | |
| Art.Nr. / Item no. / Art. n° / Art.nr. / Nr. ° Art. / Num. art. / Artikelnr. / Art.nr. / Tuotenro / N.° Art.° /Nr art. / Ap. πρ. / Pol. č. | RB 7026 |
| Netzteil Input / Power supply Input / Entrée du bloc d'alimentation / Netvoeding ingang /Entrada de fuente de alimentación / Ingresso alimentatore / Strømforsyning input /Nätdel Input / Verkko-osan tulo / Entrada de alimentação / Zasilacz Input /Eíσοδος τροφοδοτικού / Vstup napájecí jednotky | 100- 240 V~50/60 Hz |
| Netzteil Output / Power supply Output / Sortie du bloc d'alimentation / Netvoeding uitgang /Salida de fuente de alimentación / Uscita alimentatore / Strømforsyning output / Nätdel Output /Verkko-osan lähtö / Saída de alimentação / Zasilacz Output / 'Εξοδος τροφοδοτικού /Výstup napájecí jednotky | 19 V---0.6 A11.4 W |
| Akku / Battery / Batterie / Accu / Acumulador / Batteria / Batteri / Ackumulator / Akku / Bateria /Bateria / Μπαταρία / Baterie | 14.4 V DC2500 mAh |
| Gewicht / Weight / Poids / Gewicht / Peso / Peso / Vægt / Vikt / Paino / Peso / Waga / Báρος /Hmotnost | ≈ 3.6 kg |
| Volumen Staubbehälter / Volume dust container / Volume du réservoir à poussière /Volume stofreservoir / Capacidad del depósito de polvo / Volumi Contenitore raccoglipolvere /Støvbeholderens rumindhold / Stor dammbehållare / Pölysäiliön tilavuus /Volume do reservatório de pó / Pojemność pojemnika na kurz / Χωρητικότητα δοχείου σκόνης /Objemová nádoba na prach | ≈ 600 ml |
| Nur verwenden mit Netzteil / Use only with power supply /N'utilisez l'appareil qu'avec le bloc d'alimentation / Alleen gebruiken met netvoeding /Úselo únicamente con fuente de alimentación / Da utilizzare solo con l'alimentatore /Må kun anvendes med strømforsyning / Används bara med nätdel /Käytä vain verkko-osan kanssa / Utilização apenas com fonte de alimentação /Stosować tylko z zasilaczem / Na χρησιμοποιείται μόνο με τροφοδοτικό /Používejte pouze s napájecí jednotkou | K12S190060GSAW 15A-190-0600GDNLB060190W1U4S35 |
| Frequenzband / Frequency band / Bande de fréquence / Frequentieband /Banda de frecuencia / Banda di frequenza / Frekvensbånd / Frekvensband / Taajuusalue /Faixa de frequência / Pasmo częstotliwości / Zwyn συχνοτήτων / Frekvenční pásmo | 2,4 GHz |
| Abgestrahlte maximale Sendeleistung / Radiated maximum transmission power /Puissance de radiofréquence maximale / Maximaal uitgestraald zendvermogen /Potencia de transmisión máxima emitida / Potenza di trasmissione massima irradiata /Udstrålet maksimal transmissionseffekt / Maximal överföringskraft / Suurin säteilty lähetysteho /Potência de transmissão de irradiação máxima / Maksymalna moc nadajnika /Μέγιστη εκπεμπόμενη ισχύς / Maximální vyzářený vysílací výkon | < 100 mW |
natural_image
Line drawing of a robotic vacuum cleaner with red directional arrows indicating motion (no text or symbols)natural_image
Illustration of a hand inserting a plug into a device with a power outlet (no text or symbols)natural_image
Line drawing of a rectangular electronic device with a flat top and side panel, no text or symbols presentnatural_image
Technical line drawing of a mechanical component with no visible text or symbolsnatural_image
Line drawing of a hand holding a ruler above a mechanical component (no text or symbols)Robot vacuum cleaner with remote control
Dear Customer,
Before using the appliance, read the following instructions carefully and keep this manual for future reference. The appliance must only be used by those familiar with the instructions below.
Safety instructions
Certain groups of persons
- This appliance may only be operated by children over the age of 8 and by persons with reduced physical, sensory or mental capacities or a lack of experience and/or knowledge if they are supervised or have been instructed about the safe use of the appliance and are aware of the dangers associated with its use.
- Children are not allowed to play with the appliance or stand or sit on it. Cleaning and user maintenance may not be performed by children without supervision.
- Children under the age of 8 must be kept away from the appliance and the mains adapter.
- The packaging material must not be used for play purposes. There is a risk of suffocation.
Connecting the appliance safely
The appliance is charged with electrical current. Thus, there is a risk of electric shock.
Therefore:
- Check the appliance and mains adapter for possible damage before use. Never operate a defective appliance or an appliance with a defective mains adapter.
- Only connect the mains adapter to sockets which match the specifications on the mains adapter type plate.
- Never attempt to repair the appliance or its mains adapter yourself. To prevent hazards, repairs to the appliance and the mains adapter may only be made by our customer service. Arrange repair of a defective appliance with a specialist dealer or contact SEVERIN customer service (see contact information in appendix to this instruction manual or at www.severin.de).
-
Do not immerse the appliance or mains adapter in water or other liquids, or treat with liquids. Keep the appliance and the mains adapter away from rain and wet conditions. Do not operate the appliance and mains adapter outdoors or in rooms with high humidity.
-
Do not handle the appliance or mains adapter with wet hands. When unplugging the mains adapter from the socket, always pull directly on the plug.
- Make sure that the cable of the mains adapter is not kinked, pinched or run over and that it does not come in contact with sources of heat, humidity and sharp edges. Make sure that the cable of the mains adapter does not become a trip hazard.
- Before cleaning or servicing the appliance and before changing accessories, switch off the appliance and make sure that the mains adapter is not connected.
Safety When Handling Batteries
There is a risk of injury and explosion if batteries are handled incorrectly.
- Never replace the rechargeable battery with other types of batteries.
- Never disassemble rechargeable batteries, expose them to high temperatures or throw them into a fire.
- Do not expose rechargeable batteries to direct sunlight.
- When storing for up to 3 months, observe the following temperatures: -20 to +45°C.
- For storage periods of more than 1 year, observe the following temperatures: -20 to +20°C.
- Never short-circuit rechargeable batteries, i.e. do not touch both poles at the same time, especially not with electrically conductive objects. Store rechargeable batteries in such a way that they are not short-circuited by other batteries or metal objects during storage.
- When charging the batteries, use only the power supply unit provided. Never use another power supply unit to charge the batteries. Only use the supplied power supply unit to charge the battery of this appliance.
- At the end of its life span, remove the rechargeable battery as described. Then immediately take the battery to an appropriate collection point near you for safe and environmentally friendly disposal. Never dispose of batteries with household waste.
- If the battery is handled incorrectly, liquid may leak from it. Do not continue using a battery if it is damaged or leaking liquid.
- If there has been any leakage, avoid contact with the liquid.
- If any contact with the leaked liquid occurs, rinse off immediately with plenty of water. In the event of any symptoms (of any kind), please consult a doctor.
Intended Use
- The appliance may only be used in the household. The appliance may only be used for cleaning flat, normally soiled hard floors and short-pile carpets. The best cleaning results are achieved in small or self-contained rooms.
- Any other use is considered improper and is prohibited.
-
To prevent injury, fire and damage, the appliance must not be used for vacuuming:
-
persons, animals or plants. Always keep the suction opening away from body parts, hair and clothing.
-
glowing, burning or smouldering particles (such as ashes, coal, charcoal, cigarettes, matches).
-
explosive or highly flammable substances or toner.
- water and other liquids, e.g. damp carpet cleaners.
- sharp objects such as broken glass, nails or building rubble.
- Also prohibited is:
- unauthorised modification or repair of the appliance or its power supply.
- use without dust container, filter and lid being correctly inserted.
- use in rooms where there are fragile objects or objects that can easily topple over. Prepare rooms so that the use of the appliance cannot cause damage.
- use, storage or charging outdoors.
- placing objects on the appliance.
CE Marking
This device is compliant with the mandatory EU directives for CE marking.
Declaration of conformity
Hereby SEVERIN Elektrogeräte GmbH declares that the radio equipment type [RB 7026] complies with Directive 2014/53/EU.
The full text of the EU Declaration of Conformity is provided on our homepage: www.severin.de/RB7026/Downloads
Unpacking
- Unpack appliance and accessories.
- Check delivery for completeness (see illustration).
Structure
- Appliance
- On/Off button and "Go to station".
- Charging station with charging cable
- Nameplate
- Brush roller
- Wheel
- Round brush (2 units)
- Front wheel
- Anti-fall sensors (4 units)
- Anti-collision sensor
Not illustrated:
- Instruction manual
- Spare round brushes (2 units)
- Batteries for remote control (2 units)
Notes:
- If the round brushes are bent during transport, follow the instructions in Chapter "Cleaning the round brushes".
- Before using the appliance for the first time, carefully remove the transport locks on the right and left of the housing (see illustration). Do not use sharp objects that could damage the appliance.

natural_image
Line drawing of a robotic vacuum cleaner with red arrows indicating motion direction (no text or symbols)Setting up and connecting the charging station
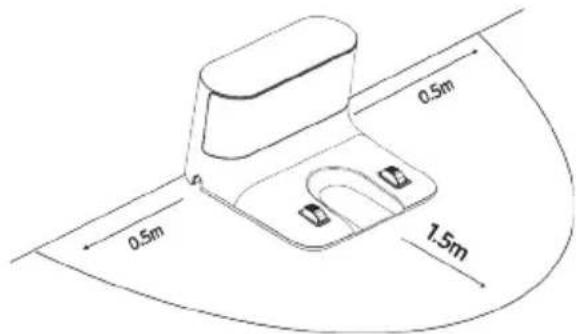
- Place the charging station with free space shown in the illustration (right/left 0.5 m; front 1.5 m) directly against a wall within reach of a power socket.
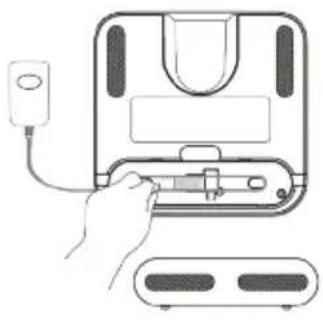
- Open the flap at the bottom of the charging station and connect the power supply unit to the charging station.
natural_image
Line drawing of a hand inserting a plug into a microwave oven (no text or symbols)- Connect the mains adapter to a power socket.
TIP:
It is advisable to check whether the appliance can find the charging station. To do this, place the appliance in the room and press the ⚙ button on the remote control or the appliance. If the appliance does not find the charging station, the charging station must be placed in a more accessible location
NOTES:
- The free space around the charging station is not cleaned by the appliance to avoid accidental contact with the charging station.
• The appliance can only find the station when the charging station power supply is connected to mains power supply.
Charging the Battery
• The appliance is equipped with a rechargeable battery that must be fully charged before first use.
- As soon as the battery need to be charged, the ring on the appliance lights up orange. The appliance returns to the charging station independently.
- Charging the battery can also be started manually:
- Place the appliance with the charging electrodes on the charging contacts at the charging station.
or
-
Press the button on the appliance or the remote control. The appliance returns to the charging station independently.
-
The ring on the appliance flashes orange when the battery charge is very low. During charging, the ring flashes white. When the appliance is charged, the ring lights up white continuously.
- Charging takes up to 5 hours.
Acoustic signals and illuminated ring
- As soon as a problem occurs, the ring flashes orange and acoustic signals are heard. Then solve the problem using the table below.
- The ring flashes orange for 10 minutes and then goes into sleep mode. If the appliance is in sleep mode, press any key on the remote control. The appropriate acoustic signal sounds again. Then solve the problem. The ring lights up white and the appliance is in standby mode.
| Number of acoustic signals | Light ring Description | |
| - off The appliance is switched off (Off mode) or in Sleep mode. | ||
| - flashes white Appliance is returning to the station. | ||
| flashes slowly Battery charging (Charging mode) | ||
| - lights up white Appliance is cleaning or in standby mode | ||
| 1 flashes orange | Dust container has been removed. | |
| Dust container must be reinserted. | ||
| Battery charge too low. Appliance returns to the charging station. | ||
| Battery charge too low. Wait until the battery is charged. | ||
| 1 - Appliance has been sent to the charging station and has reached the station. | ||
| 2 flashes orange | Brush roller is dirty.Clean the brush roller. | |
| Round brushes are dirty.Clean the round brushes. | ||
| Foreign objects/dirt on the right or left drive wheel.Clean the drive wheels. | ||
| Filter unit is dirty.Clean the filter unit. | ||
| 3 flashes orange | Appliance is entangled.Remove obstacles and free the appliance. | |
| Sensors are dirty.Clean the sensors. | ||
| 4 flashes orange | Battery charge too low.Carry the appliance to the charging station. | |
Cleaning a room
Prepare the room as follows:
- Clear away loose objects that the appliance may push in front of itself.
- Clear away cables, curtains and anything that could get entangled in the brushes.
- Clear away fragile objects or those that can easily tip over.
Switch on the appliance as follows:
• In Charge/Standby/Sleep mode:
- Briefly press the button on the appliance.
Or
- Briefly press the ▶|| button on the remote control.
- In Off mode:
- Press and hold the ⏻ button on the appliance for 3 seconds to enter standby mode. Then briefly press the ⏻ button again.
- The appliance now cleans the room zigzagging ∩.
- The appliance cleans for a maximum of 90 minutes until the room is cleaned or the battery charge is too low. The appliance returns to the station.
- When the battery is completely empty, the appliance stops and must be carried to the station.
Operating the appliance with the remote control
Insert batteries:
- Two AAA batteries are required for the remote control. Two batteries are included in the delivery.
- Open the battery compartment at the back of the remote control. Insert two batteries. Make sure the polarity is correct.
- Close the battery compartment.
Using the remote control
- The remote control can only be used within 20 m of the appliance. Obstacles such as walls, cupboards, etc. may prevent the signal from being transmitted.
• If the remote control does not work as described below,
- replace the batteries.
or
• the remote control and the appliance must be paired again:
-
Switch off the appliance completely by pressing and holding the button for approx. 3 seconds.
-
Press and hold the 📄 button on the appliance and the ▶ button on the remote control simultaneously. Keep them pressed until the appliance switches on. The remote control and the appliance are now paired.
| Symbol Description Function | ||
| ▶|| | Start/Stop Starts and stops the appliance. | |
| ▲ | Forward The appliance moves forward as long as the button is pressed. | |
| ◀ | Left The appliance turns to the left as long as the button is pressed. | |
| ▶ | Right The appliance turns to the right as long as the button is pressed. | |
| ▼ | Back The appliance turns 180° and then moves forward. | |
| Cleaning at the current location | The appliance cleans a radius of approx. 1.50 m around the current location and then stops. | |
| Cleaning corners | The appliance cleans the corners of the room and then returns to the charging station. | |
| ×× | Turbo mode | The appliance cleans in turbo mode until the button is pressed again or until the appliance returns to the station.To confirm, two acoustic signals sound when the function is switched on and one acoustic signal sounds when the function is switched off.In Turbo mode, the appliance cleans with high power, which can lead to a shorter suction time and the appliance has to be recharged more quickly. |
| Setting the time (see note * below) | Press the button. The hour display flashes and the time can be set using the▼buttons. Use thebuttons to switch to setting the minutes. Pressing thebutton again confirms the entry. | |
| Setting the timer (see note * below) | To start the appliance at a specific time, the timer can be set as described in Chapter “Setting the time”.Confirm the entered time by pressing thebutton again. The appliance starts every day at the desired time.The function is cancelled by pressing and holding thebutton for 3 seconds. | |
| Charging the appliance | The appliance is sent to the charging station for charging. | |
* Note: The remote control is set to 12-hr-mode. When setting the time and timer, observe AM (morning) and PM (afternoon) indications!
Emptying the dust container
- Empty the dust container after each vacuuming operation!
- Make sure that the appliance is switched off.
- Open the lid of the appliance and reach with your thumb and middle finger into the two openings of the dust container. The lock is released and the dust container can be removed from the appliance.
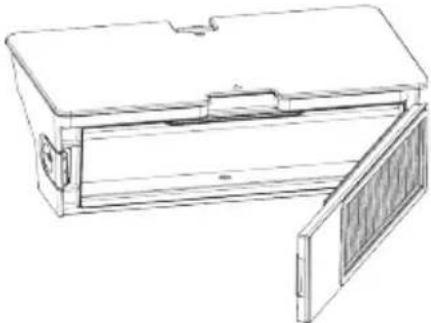
- Press the side lock and open the dust container door.
natural_image
Line drawing of a rectangular box with a side panel and lid, showing internal structure (no text or symbols)-
Empty the dust container and thoroughly tap out the filter in the flap. If necessary, use a vacuum cleaner.
-
Close the lid again and insert the dust container into the appliance. Close the lid.
If necessary, clean dust container and filter wet:
- Empty the dust container as indicated above.
- Remove the two filters from the dust container flap.
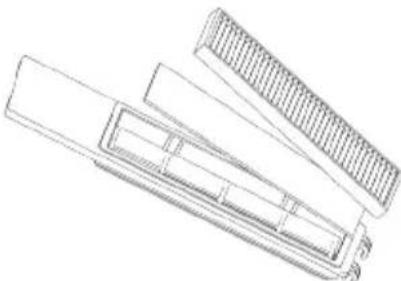
natural_image
Technical line drawing of a mechanical component with layered structure (no text or symbols)- Carefully brush or vacuum the lamellar filter.
- The foam filter can be cleaned carefully under warm water. Do not use hot water or cleaning agents!
- Allow filter and dust container to air dry for 24 hours.
- After the individual parts are completely dry, first insert the foam filter and then the lamellar filter back into the dust container flap.
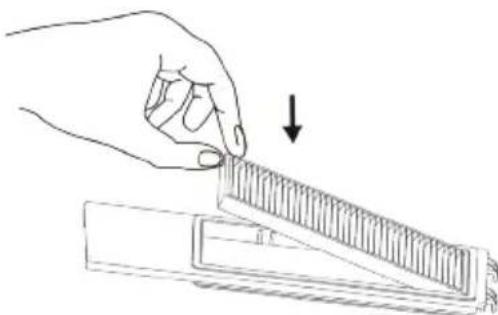
natural_image
Line drawing of a hand holding a ruler and a triangular ruler, with an arrow indicating the measurement (no text or symbols present)- Insert the dust container into the appliance. Close the lid.
Cleaning the appliance
Clean the body of the appliance and the charging station with a dry cloth if necessary.
Sensors, brushes and control wheel must be cleaned regularly. A table with cleaning and replacement intervals is provided at the end of this chapter.
Cleaning the anti-fall sensors
If the bottom of the appliance is very dirty, the anti-fall sensors must be cleaned.
- Make sure that the appliance is switched off. -
- Turn the appliance over.
- Wipe all four anti-fall sensors with a clean, lint-free cloth. -
Cleaning the brush roller
If the brush roller does not turn properly, it must be cleaned.
- Make sure that the appliance is switched off.
- Turn the appliance over.
- Squeeze the latch ( ▶◀) on the brush roller cover and remove the cover.
- Remove the brush roller.
- Remove any dirt from the brush roller. If necessary, carefully use tweezers and/or scissors.
- Vacuum the brush roller area if necessary.
- Replace the brush roller and the lock.
Cleaning the round brushes
If hair or lint is caught in the side brushes, clean them.
- Make sure that the appliance is switched off.
- Turn the appliance over.
- Unscrew the screws of the two side brushes and remove the brushes and the white felt rings.
- Remove any lint or hair.
- Gently wipe the brush hairs with a soft cloth.
- Allow the brushes to dry completely.
- Insert the white felt rings into the brush holder on the appliance.
- Screw the round brushes to the appliance. The round brush with hexagon (R) must be mounted on the right side of the appliance (position of use!) and the round brush with square (L) on the left side of the appliance (position of use!).
Note:
If the round brushes are bent, unscrew the round brushes and place them for a few minutes in 80^ C hot water. Allow to dry thoroughly before reattaching.
Cleaning the front wheel
If hair or lint has become caught in the front wheel, it must be cleaned.
- Make sure that the appliance is switched off.
- Turn the appliance over.
- Remove any lint or hair (use tweezers, if necessary).
Recommended cleaning and replacement intervals
| Component Cleaning Replacement | |
| Dust container Empty daily / clean weekly - | |
| Filter Weekly Every 6 months | |
| Brush roller Weekly Every 6 - 12 months | |
| Round brushes Monthly Every 3 - 6 months or as needed | |
| Front wheel Monthly - |
| Sensors Monthly - | ||
| Electrical contacts Monthly - |
When the appliance is not used for a longer period of time
If the appliance will not be used for a long time, empty the dust container, clean the appliance and fully charge the battery Switch off the appliance and disconnect the charger. We recommend fully charging the battery every 3 months.
Troubleshooting
Use the table below and the table "Light ring and signal tones" to check whether the problem can be solved:
| Problem Possible cause / solution | |
| Appliance will not switch on. | Battery is empty.Charge the battery. |
| Appliance is not in contact with the floor.Place the appliance on the floor. It now starts cleaning directly. | |
| The system must be restarted. To do this, open the lid of the appliance and press the Reset button (using a paperclip or similar). The appliance is then ready for use again. | |
| Appliance stops on its own. | Battery needs to be charged.Charging the Battery. |
| The appliance has a problem. See Chapter “Acoustic signals and light ring”. | |
| The appliance is not moving. Help it along manually by giving it a push. | |
| Immediately after switching on, the appliance does not move in a straight line even though the area is clear. | It is possible that one of the wheels is blocked from turning freely by dirt.Remove dirt from the wheels. If necessary, carefully use scissors or tweezers for this purpose. |
| One of the round brushes no longer rotates. | It is possible that this round brush is prevented from rotating freely by dirt.Clean the round brush. |
| The appliance will not charge. | The mains adapter is not plugged in correctly.Check if the mains plug is connected correctly. |
| The battery is completely discharged and can therefore no longer be charged.Contact our customer service. | |
| Operating time is increasingly shortened. | Dirt may be preventing the wheels from turning freely.Remove dirt from the wheels. |
| Dirt may be preventing the brush roller from rotating freely.Clean debris from the brush roller. | |
If you cannot solve the problem using the above table, call our Service Hotline (see contact details in the appendix of this instruction manual).
Together with our trained service staff, we are sure to find a solution.
| Article number Description | |
| 5816-048 Remote control | |
| 5818-048 Lithium-ion battery | |
| 5817-048 Power supply | |
| 5829-048 Charging station | |
| 5815-048 Dust container complete with filter | |
| 5826-048 Filter set | |
| 5833-048 Brush roller | |
| 5824-048 Round brushes, 1 pair |
Disposal and warranty
Removing the rechargeable battery
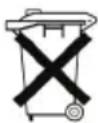
Batteries must not be disposed of in household waste.
Therefore, remove the rechargeable battery:
- Make sure that the appliance is switched off.
- Turn the appliance over.
- Unscrew the round brushes (see Chapter "Cleaning the round brushes").
- Unscrew the 5 screws that hold the housing cover in place.
- Pull the battery connector, which connects the battery and the appliance, out of the fibreglass casing.
- Disconnect the battery connector.
- Remove the battery from the battery compartment.
- The battery and the appliance must now be disposed of separately.
Disposing of the appliance and rechargeable battery separately
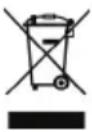
Devices and batteries marked with this symbol must be disposed of separately from household waste! Devices and batteries contain valuable raw materials that can be recycled. Proper disposal of these items protects the environment and public health. Return the device and the battery separately to the appropriate collection points for disposal.
Guarantee
This product is guaranteed against defects in materials and workmanship for a period of two years from the date of purchase. Under this guarantee the manufacturer undertakes to repair or replace any parts found to be defective, providing the product is returned to one of our authorised service centres. This guarantee is only valid if the appliance has been used in accordance with the instructions, and provided that it has not been modified, repaired or interfered with by any unauthorised person, or damaged through misuse.
This guarantee naturally does not cover wear and tear, nor breakables such as glass and ceramic items, bulbs etc. This guarantee does not affect your statutory rights, nor any legal rights you may have as a consumer under applicable national legislation governing the purchase of goods. If the product fails to operate and needs to be returned, pack it carefully, enclosing your name and address and the reason for return. If within the guarantee period, please also provide the guarantee card and proof of purchase.
The warranty also excludes batteries and accumulators that have become faulty due to normal wear and tear or incorrect handling, or those where the battery life has been reduced.
Chère cliente, Cher client,
natural_image
Line drawing of a robotic vacuum cleaner with red arrows indicating motion direction (no text or symbols)natural_image
Line drawing of a hand inserting a plug into a device with a power outlet (no text or symbols)natural_image
Line drawing of a rectangular device with a lid and side panel, no text or symbols presentnatural_image
Line drawing of a mechanical component with a flanged base and internal structure (no text or symbols)natural_image
Line drawing of a hand holding a ruler above a mechanical component, with an arrow indicating the measurement (no text or symbols present)natural_image
Line drawing of a robotic vacuum cleaner with red arrows indicating motion direction (no text or symbols)natural_image
Illustration of a hand inserting a plug into a device with a power outlet (no text or symbols)natural_image
Line drawing of a rectangular box with a lid and side panel, no text or symbols presentnatural_image
Technical line drawing of a mechanical component with no visible text or symbolsnatural_image
Line drawing of a hand using a ruler to cut a rectangular object, with an arrow indicating the measurement (no text or symbols present)natural_image
Line drawing of a robotic vacuum cleaner with red arrows indicating motion (no text or symbols)natural_image
Line drawing of a hand inserting a device into an electric oven (no text or symbols)natural_image
Line drawing of a rectangular box with a lid and side panel, no text or symbols presentnatural_image
Technical line drawing of a mechanical component with no visible text or symbolsnatural_image
Line drawing of a hand using a ruler to cut a rectangular object, with an arrow indicating the measurement (no text or symbols present)natural_image
Line drawing of a robotic vacuum cleaner with red arrows indicating motion direction (no text or symbols)natural_image
Illustration of a hand inserting a plug into a device with a power outlet (no text or symbols)natural_image
Line drawing of a rectangular electronic device with a side panel and lid (no text or symbols)natural_image
Technical line drawing of a mechanical component with no visible text or symbolsnatural_image
Line drawing of a hand using a ruler to cut a rectangular object, with an arrow indicating the measurement (no text or symbols present)natural_image
Line drawing of a robotic vacuum cleaner with red arrows indicating motion (no text or symbols)natural_image
Line drawing of a hand inserting a plug into a microwave oven (no text or symbols)natural_image
Line drawing of a rectangular box with a side panel and lid, showing internal structure (no text or symbols)natural_image
Line drawing of a mechanical component with a triangular base and textured top (no text or symbols)natural_image
Line drawing of a hand holding a ruler and a triangular ruler, with an arrow indicating the measurement (no text or symbols present)natural_image
Line drawing of a robotic vacuum cleaner with red arrows indicating motion (no text or symbols)natural_image
Line drawing of a hand inserting a plug into a microwave oven (no text or symbols)natural_image
Line drawing of a rectangular box with a lid and side panel, no text or symbols presentnatural_image
Line drawing of a mechanical component with a flanged base and internal structure (no text or symbols)natural_image
Line drawing of a hand using a ruler to cut a rectangular object, with an arrow indicating the measurement (no text or symbols present)natural_image
Line drawing of a robotic vacuum cleaner with red arrows indicating motion direction (no text or symbols)natural_image
Line drawing of a hand inserting a plug into a microwave oven (no text or symbols)natural_image
Line drawing of a rectangular box with a side panel and lid, showing internal structure (no text or symbols)natural_image
Technical line drawing of a mechanical component with layered structure (no text or symbols)natural_image
Line drawing of a hand using a ruler to cut a rectangular object, with an arrow indicating the measurement (no text or symbols present)natural_image
Line drawing of a robotic vacuum cleaner with red arrows indicating motion direction (no text or symbols)Montar e ligar a base de carregamento
natural_image
Illustration of a hand inserting a plug into a device with a power outlet (no text or symbols)natural_image
Line drawing of a rectangular box with a side panel and lid, no text or symbols presentnatural_image
Line drawing of a mechanical component with a flanged top and rectangular base (no text or symbols)natural_image
Line drawing of a hand holding a ruler above a rectangular object, with an arrow indicating the measurement (no text or symbols present)natural_image
Line drawing of a robotic vacuum cleaner with red arrows indicating force or movement (no text or symbols)natural_image
Line drawing of a hand inserting a device into an electric oven (no text or symbols)natural_image
Line drawing of a rectangular enclosure with a flat lid and a side panel, no text or symbols presentnatural_image
Technical line drawing of a mechanical component with no visible text or symbolsnatural_image
Line drawing of a hand holding a ruler and a rectangular object, with an arrow indicating the measurement (no text or symbols present)natural_image
Line drawing of a robotic vacuum cleaner with red directional arrows indicating motion (no text or symbols)natural_image
Illustration of a hand inserting a plug into a device with a power outlet (no text or symbols)natural_image
Line drawing of a rectangular box with a side panel and lid, showing internal structure (no text or symbols)natural_image
Technical line drawing of a mechanical component with layered structure (no text or symbols)natural_image
Line drawing of a hand holding a ruler and a tray, with an arrow indicating the measurement (no text or symbols present)natural_image
Line drawing of a robotic vacuum cleaner with red arrows indicating motion direction (no text or symbols)natural_image
Line drawing of a hand inserting a plug into a microwave oven (no text or symbols)natural_image
Line drawing of a rectangular electronic device with a side panel and lid, showing internal components (no text or symbols)natural_image
Line drawing of a mechanical component with a textured handle and rectangular base (no text or symbols)natural_image
Line drawing of a hand using a ruler to cut a rectangular object, with an arrow indicating the measurement (no text or symbols present)AVEDA Lifestyle EOOD
ul. Angel Kanchev 1, et. 5
BG 1124
Sofia
Croatia
Koracell d.o.o.
Donje Svetice 40
26 Oaktree Business Park
Trim Co., Meath
Tel.: 046 94 83100
Fax: 046 94 83663
Web: www.bluestone.ie
Italia
ASSISTENZA POST-VENDITA
NUMERO VERDE 800224155
E-Mail: assistenza@severin.com
Indonesia
PT. Setai Modern Elektronik
Email.: info@severin.co.id
Web.: www.severin.co.id
Jakarta
Komp. Glodok Plaza Blok F No. 9, Jl. Pinangsia Raya,
Jakarta Barat
021 65911888 / 021 6592889
Medan
Dr.Waleed Maraga commercial center, Level 1
Khalda, Amman Zip code: 11953
Tel: +962 6 5346429
Fax: +962 6 5341706
Mob Jordan: +962 797426108
Kuwait
Mohammed Abdulrahman Al Bahar
Al Bahar Building P.O. Box 148
Safat 13002 Kuwait
Tel.: +965 4810855
Latvia
SIA GTCL BALTIC
Piedrujas iela 7
LV - Riga 1073
Tel.: +371 29119989
Fax: +371 67297769
Lebanon
Khoury Home
7th Floor, Cité Dora 3 Building, Dora
P.O.Box 70611
Antelias, Lebanon
Tel.: +961 1 244200
Fax:+966 1 253535
E-Mail: info@khouryhome.com
Internet: www.khouryhome.com
Lithuania
UAB Topo Grupe
Savanoriu PR. 206A,
50193 Kaunas, Lithuania
Tel.: +370 660 00200
A.A.K & Partners L.L.C.
P.O Box:-1650, Muttrah
Postal Code - 114
Sultanate of Oman
Tel.: +968 24834470
Fax.: +968 24835186
E-Mail: aakpllc@gmail.com
Peru
SEVERIN PERU / Comercial Rebeca S.R.L
Mezzanine 1, South Center Tower
2206 Venture Street, Madrigal Business Park
Alabang, Muntinlupa City
Tel.: 809 34 41
E-Mail: severinconsumercare@colombophils.com.ph
Polska
Severin Polska Sp.z o.o.
6 Tagore Drive, #03-04
Singapore 787623
Tel.: +65 6455 0005
Fax: +65 6455 4010
Web: www.beste.com.sg
E-Mail: info@beste.com.sg
Slovenia
SEVTIS d.o.o.
Smartinska 130
1000 Ljubljana
Tel.: +386 1 542 1927
Fax: +386 1 542 1926
Slowak Republic
BVZ Commerce s.r.o.
Odbavovací centrum
Závodu míru 974/66a
360 17 Karlovy Vary
Tel.: +420 233 557 825
3rd Floor, Grove Exchange
Grove Avenue
Claremont
South Africa
7708
Tel: +27 21 674 0294
Fax: +27 21 674 0295
Web: http://www.alcdashley.co.za
Mail: service@alcdashley.co.za
Svenska
El & Digital Service AB
Folkungagatan 144
11630 Stockholm
Tel.: +46 8 845180
www.eldigital.se
E-Mail: info@eldigital.se
Switzerland
SPC Electronics AG
Mövenstrasse 12
CH-9015 St. Gallen
Tel.: +41 71 227 99 99
E-Mail: service@spcag.ch
www.spc.ch
Thailand
Verasu Ltd. part.
83/7 Wireless Rd., Lumpini,
Patumwan, Bangkok 10330
Tel.: +662 254 81 008
E-Mail: askverasu@verasu.com
Tunisie
GEI
54, rue du Mercure
Zone Industrielle 2013-BEN AROUS
TUNISIE
Ukrayina
Service for Modern Electronics LLC
Sim'i Khokhlovykh Str.8
4119 Kiev
Tel.: + 38 044 247 67 34
E-Mail: info1@photoservice.com.ua
United Kingdom
Homespares Centres Limited
Peel House
2 Chorley Old Road
BL13AA
Tel.: 01204 558160
Fax: 01204 558169
E-Mail: office@homespares.co.uk
Web: www.homespares.co.uk
Vietnam
BRAND PARTNER
CTY TNHH DOI TAC NHAN HIEU
FLOOR 8, DAG HOLDINGS
87A HAM NGHI
NGUYEN THAI BINH WARD, DISTRICT 1
HO CHI MINH CITY, VIETNAM
Tel.: +84-28-62 899 648
E-Mail: kenny.clark@brandpartner.vn
trang.hau@brandpartner.vn
Stand: 09.2021