USER MANUAL SILKAIR CONNECT Create
natural_image
Line drawing of a cylindrical air conditioner unit with ventilation grilles and mounting feet (no text or symbols)
PORTABLE AIR CONDITIONER 3 IN 1 WITH WiFi
AIRE ACONDICIONADO PORTÁTIL 3 EN 1 CON WiFi
USER MANUAL
CREATE CREATE CREATE
ATE CREATE CREATE CRE
CREATE CREATE CREATE
ATE CREATE CREATE CRE
CREATE CREATE CREATE
ATE CREATE CREATE CRE
CREATE CREATE CREATE
ATE CREATE CREATE CRE
CREATE CREATE CREATE
ATE CREATE CREATE CRE
CREATE CREATE CREATE
ATE CREATE CREATE CRE
CREATE CREATE CREATE
ATE CREATE CREATE CRE
CREATE CREATE CREATE
ATE CREATE CREATE CRE
CREATE CREATE CREATE
ATE CREATE CREATE CRE
CREATE CREATE CREATE
ATE CREATE CREATE CRE
CREATE CREATE CREATE
ATE CREATE CREATE CRE
CREATE CREATE CRE
CREATE CREATE CRE
ATE CREATE CRE
CREATE CREATE CREATE
ATE CREATE CREATE CRE
CREATE CREATE CREATE
ATE CREATE CREATE CRE
CREATE CREATE CREATE
ATE CREATE CREATE CRE
CREATE CREATE CREATE
ATE CREATE CREATE CRE
CREATE CREATE CREATE
ATE CREATE CREATE CRE
CREATE CREATE CREATE
ATE CREATE CREATE CRE
CREATE CREATE CREATE
ATE CREATE CREATE CRE
CREATE CREATE CREATE
ATE CREATE CREATE CRE
CREATE CREATE CREATE
ATE CREATE CREATE CRE
CREATE CREATE CREATE
ATE CREATE CREATE CRE
CREATE CREATE CREATE
ATE CREATE CREATE CRE
CREATE CREATE CRE
CREATE CREATE CRE
CREATE CREATE CRE
CREATE CREATE CRE
INDEX


ENGLISH
Security instructions 6
Features 8
Parts list 8
Control panel 8
Remote control 9
App connection 9
Protection functions 10
Installation and adjustment 10
Drainage instructions 12
Maintenance 13
Storage 13
Troubleshooting 14
ESPAÑOL
Thank you for choosing our air conditioner. Before using the appliance, and to ensure the best use, carefully read these instructions.
The safety precautions enclosed herein reduce the risk of death, injury and electrical shock when correctly adhered to. Keep the manual in a safe place for future reference, along with the completed warranty card, purchase receipt and package. If applicable, pass these instructions on to the next owner of the appliance. Always follow basic safety precautions and accident-prevention measures when using an electrical appliance. We assume no liability for customer failing to comply with these requirements.
SECURITY INSTRUCTIONS
When using any electrical appliance, basic safety precautions should always be observed.
- The refrigerant used in mobile air conditioners is the environmentally friendly hydrocarbon R290. This refrigerant is odorless, and compared to the alternative refrigerant, the R290 is an ozone-free refrigerant, and its effect is very low.
- Please read the instructions before use and repair.
- The drawings provided in this manual may not be the same as the physical objects. Please refer to the physical objects.
- Do not use means to accelerate the defrosting process or to clean, other than those recommended by the manufacturer.
- The appliance shall be stored in a room without continuously operating ignition sources (for example: open flames, an operating gas appliance or an operating electric heater.)
- Do not pierce or burn.
- Be aware that refrigerants may not contain an odour.
- Appliance shall be installed, operated and stored in a room with a floor area larger than 11m^2 .
- Keep any required ventilation openings clear of obstruction.
- Servicing shall be performed only as recommended by the manufacturer.
- The appliance shall be stored in a well-ventilated area where the room size corresponds to the room area as specified for operation.
- Any person who is involved with working on or breaking into a refrigerant circuit should hold a current valid certificate from an industry-accredited assessment authority, which authorises their competence to handle refrigerants safely in accordance with an industry recognised assessment specification.
- Maintenance and repair requiring the assistance of other skilled personnel shall be carried out under the supervision of the person competent in the use of flammable refrigerants.
- All working procedure that affects safety means shall only be carried by competent persons.
Notes: The air conditioner is only suitable for indoor use, and is not suitable for other applications.
- Follow local grid interconnection rules while installing the air conditioner and ensure that it is properly grounded. If you have any question on electrical installation, follow the instructions of the manufacturer, and if necessary, ask a professional electrician to install it.
- Place the machine in a flat and dry place and keep a distance of above 50 cm between the machine and the surrounding objects or walls.
• After the air conditioner is installed, ensure that the power plug is intact and firmly plugged into the power outlet, and place the power cord orderly to prevent someone from being tripped or pulling out the plug.
- Do not put any object into the air inlet and outlet of the air conditioner. Keep the air inlet and outlet free from obstructions.
- When drainage pipes are installed, ensure that the drainage pipes are properly connected, and are not distorted or bended.
- While adjusting the upper and lower wind-guide strips of the air outlet, pluck it with hands gently to avoid damaging wind-guide strips.
- When moving the machine, make sure that it is in an upright position.
- The machine should stay away from gasoline, flammable gas, stoves and other heat sources.
- Don't disassemble, overhaul and modify the machine arbitrarily, otherwise it will cause a machine malfunction or even bring harm to persons and properties. To avoid danger, if a machine failure occurs, ask the manufacturer or professionals to repair it.
- Do not install and use the air conditioner in the bathroom or other humid environments.
- Do not pull the plug to turn off the machine.
- Do not place cups or other objects on the body to prevent water or other liquids from spilling into the air conditioner.
- Do not use insecticide sprays or other flammable substances near the air conditioner.
- Do not wipe or wash the air conditioner with chemical solvents such as gasoline and alcohol. When you need to clean the air conditioner, you must disconnect the power supply, and clean it with a half-wet soft cloth. If the machine is really dirty, scrub with a mild detergent.
- The appliance can be used by children aged from 8 years and above and persons with reduced physical, sensory or mental capabilities if they have been given supervision or instruction concerning use of the appliance in a safe way and understand the hazards involved. Children shall not play with the appliance. Cleaning and maintenance shall not be made by children without supervision.
- If the supply cord is damaged, it must be replaced by the manufacturer, its service agent or similarly qualified persons in order to avoid a hazard.
- The appliance shall be installed in accordance with national wiring regulations.
- Do not operate your air conditioner in a wet room such as a bathroom or laundry room.
FEATURES
- Brand new appearance, compact structure, smooth line, simple and generous shape.
- Functions of refrigeration, dehumidification, air supply, heating and continuous drainage.
- Outdoor interface is set high to make assembly easy and keep the smooth flow of heat pipe.
- LED displays the control panel, beautiful and fashionable, with high-quality remote control. It adopts a user-friendly remote control design.
• Air filtration capability.
- Timing switch function.
- Protection function of automatically restarting the compressor after three minutes, a variety of other protection functions.
• Temperature operation range: 7-35 °C.
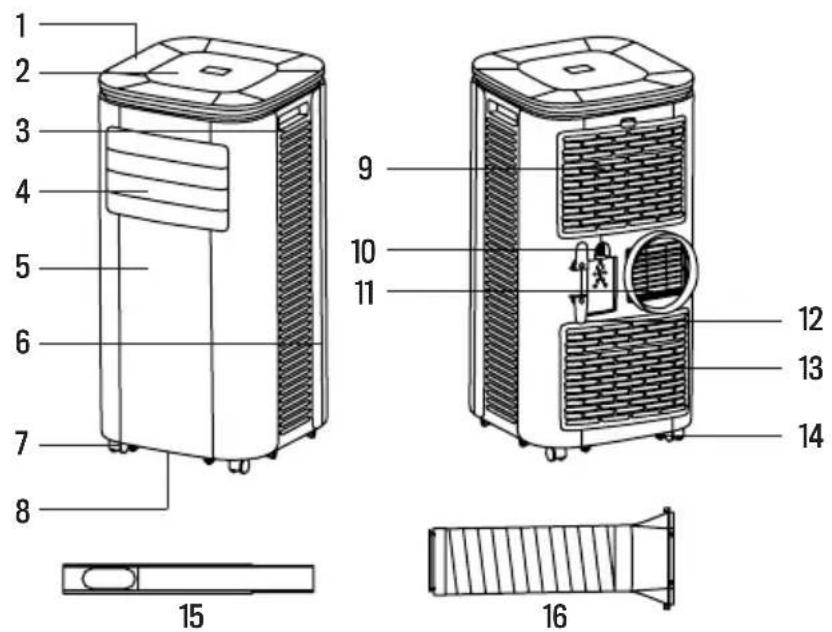
PARTS LIST
- Top cover
- Control panel
- Side panel
- Air outlet/grid
- Front housing
- Rear housing
- Caster wheels
- Base plate
- EVA filter
- Continuous drainage hole
- Air vent
- Wrapping post
- CON filter
- Drainage hole
- Windows sealing plate
- Exhaust pipe
CONTROL PANEL
- Dehumidifier
- Cooling
- Water full light
- Timer
- Up
- Power
- Fan
- Low fan speed
- High fan speed
- Sleep
- Down
- WiFi
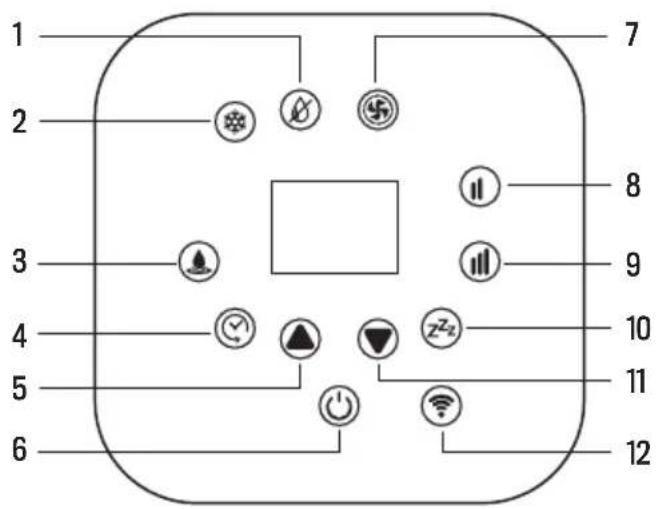
When the appliance is powered on for the first time, you will hear a short power-on music. Then the device will get into standby status.
- Up / Down keys: To change temperature and time settings. (Temperature can't be set while in dehumidifying mode.)
• Power key: To turn on and off the device.
- WiFi key: To turn on and off the WiFi connection.
- Sleep mode: The unit will work on energy-saving and quiet mode.
• High /Low fan speed keys: To set the strongest or lowest air flow automatically.
- Fan key: In cooling and fan mode you can select high or low air flow. But it may not work as set under certain conditions, as anti-cold conditions.
- Dehumidifier: Pressing any key is invalid in this mode and the fan will work on low air flow speed.
• Cooling key: To start cooling the room.
• Water full light: The device will stop working when the water tank is full and needs to be drained away.
- Timer: Press this key and when the timing light flashes press up or down keys to select the required time, from 1 to 24 hours.
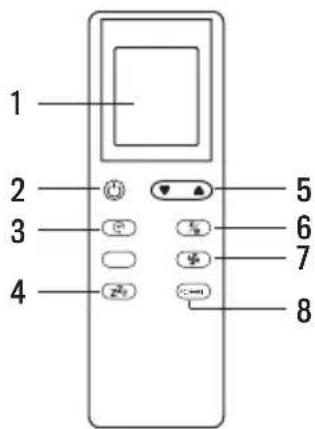
REMOTE CONTROL
-
Screen
-
Power
-
Timer
-
Sleep mode
-
Up / Down
-
Modes
-
Fan speeds
-
Temperature unit
APP CONNECTION
- CREATE HOME application is available for Android and iOS (look for the app on Google Play or App Store or scan the QR code below). Depending on the provider, there may be costs involved in downloading the app.
- This appliance allows you to operate the appliance via your home network. A prerequisite is a permanent WiFi (2.4 Gh) connection to your router and the free app CREATE HOME.
• We recommend disconnecting the appliance from the power supply when you are away from home to prevent unintentional switching on while you are away.

OS iPhone OS Android

SYSTEM REQUERIMENTS
- iOS 8.0 or higher.
- Android 4.1 or higher.
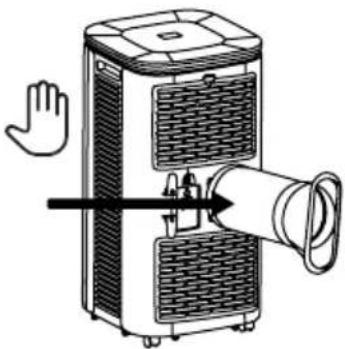
HOW TO CONNECT TO THE APP
- Install the CREATE HOME app and create a user account.
- Activate the WiFi function in the settings of your appliance.
- The appliance must be in Standby mode.
- Place the appliance at a distance of about 5 meters to your router.
- Press and hold the button 📤 on the device for about 5 seconds. It will flash rapidly.
- Launch the app and select “ + ”.
- Select the "air conditioner" menu and follow the instructions on the display.
- Once the appliance has been successfully connected, the button lights up. Now you can operate the appliance using the app.
PROTECTION FUNCTIONS
FROST PROTECTION FUNCTION
In cooling, dehumidifying or economic power-saving mode, if the temperature of the exhaust pipe is too low, the air conditioner will automatically enter protection status; if the temperature of the exhaust pipe rises to a certain temperature, it can automatically revert to normal operation.
OVERFLOW PROTECTION FUNCTION
When water in the water tank exceeds the warning level, the machine will automatically sound an alarm, and the full indicator light will flash. At this point, you need to move the drainage pipe connecting the device or the water outlet to a sewer or other drainage area to empty the water. After the water is emptied, the device will automatically return to the original state.
AUTOMATIC DEFROSTING
The machine has automatic defrosting function. Defrosting can be achieved through a four-way valve reversing system.
COMPRESSOR PROTECTION FUNCTION
To increase the service life of the compressor, it has a 3-minute delay booting protection function after the compressor is turned off.
INSTALLATION AND ADJUSTMENT
Warning: Before using this portable air conditioner, keep it upright for at least two hours.
- The air conditioner can be easily moved in the room. In the moving process, ensure that the air conditioner is in the upright position and the air conditioner should be placed on a flat surface. Do not install and use the air conditioner in the bathroom or other humid environments.
INSTALLATION OF THE HEAT PIPE
-
Take out the outer connector assembly and the exhaust pipe assembly, and remove the plastic bags;
-
insert the heat pipe assembly (the end of the exhaust joint) into the back panel vent slot (push to the left) and complete the assembly.
natural_image
Diagram of a portable air purifier with a hand waving, showing heat dissipation and ventilation duct (no text or symbols)
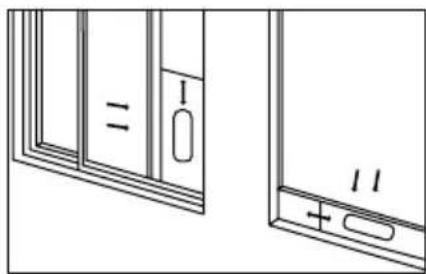
INSTALLATION OF THE WINDOW SEALING PLATE
- Half open the window and mount the window sealing plate assembly to the window. Components can be placed in horizontal and vertical direction.
- Pull the components of the window sealing plate assembly open, adjust their opening distance to bring both ends of the assembly into contact with the window frame, and fix the components of the assembly.
Notes: The flat end of the exhaust pipe joints must be snapped into place. The pipe cannot be distorted nor have substantial turning (greater than 45^ ). Keep the ventilation of the exhaust pipe not blocked.
natural_image
Technical line drawing of two window panels with labeled components (no text or symbols)
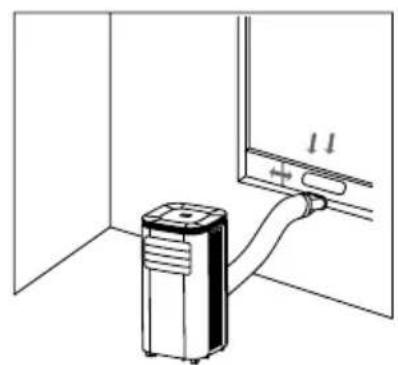
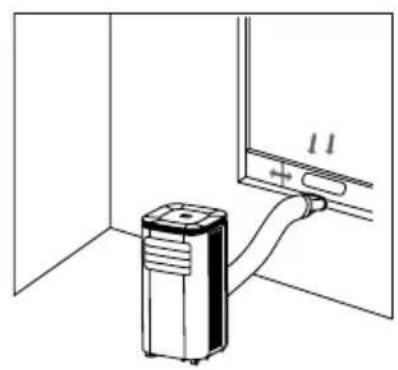
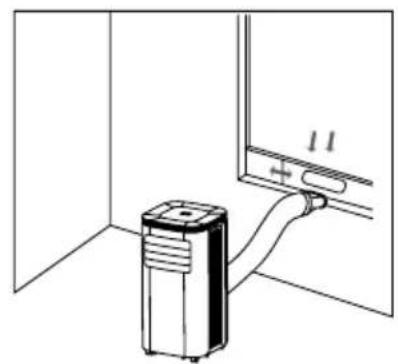
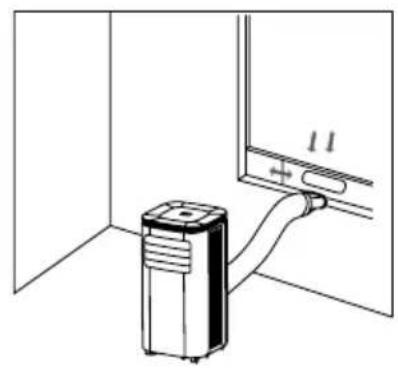
INSTALLATION OF THE APPLIANCE
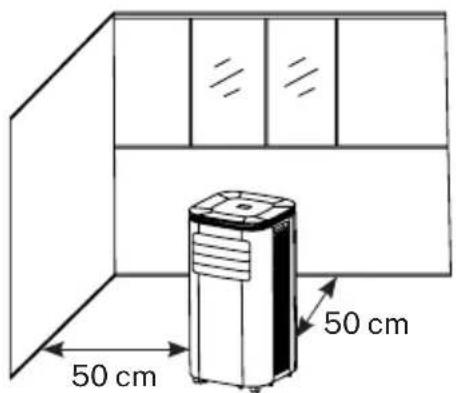
- Move the air conditioner with installed heat pipe and fittings in front of the window, and the distance between the body and walls or other objects shall be of at least 50 cm.
- Elongate the exhaust pipe and snap the flat end of the exhaust pipe joints into the hole of the window sealing plate assembly.
Important Notice: The length of the exhaust hose shall be between 280 and 1,500mm, and this length is based on the specifications of the air conditioner. Do not use extension tubes or replace it with other different hoses, or this may cause a malfunction. Exhaust host must be not blocked; otherwise it may cause overheating.

natural_image
Line drawing of a portable air conditioner unit connected to a door (no text or symbols)
natural_image
Diagram of a heating unit connected to a wall-mounted device (no text or symbols present)
DRAINAGE INSTRUCTIONS
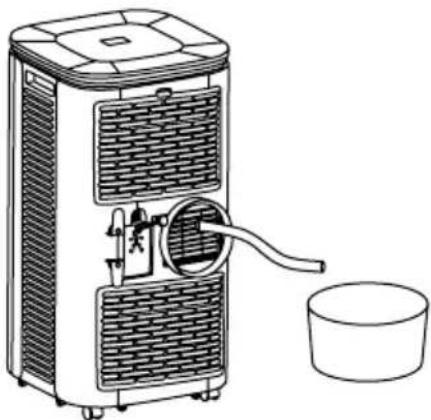
MANUAL DRAINAGE
- When the air conditioner stops after the water tank is full, turn off the machine power and unplug the power plug.
Notes: Please move the appliance carefully, so as not to spill the water in the water tank at the bottom of the body.
- Place the water container below the side water outlet behind the body.
- Unscrew the drainage cover and unplug the water plug, the water will automatically flow into the water container.
Notes: Keep the drainage cover and the water plug properly.
- During drainage, the body can be tilted slightly backwards.
- If the water tank cannot hold all the water, before it is full, stuff the water outlet with the water plug as soon as possible to prevent water from flowing to the floor or the carpet.
- When the water is discharged, stuff the water plug, and tighten the drainage cover.
CONTINUOUS DRAINAGE (OPTIONAL, ONLY APPLICABLE TO DEHUMIDIFYING MODE)
- Unscrew the drainage cover, and unplug the water plug.
- Set the drainage pipe into the water outlet.
- Connect the drainage pipe to the bucket.
natural_image
Line drawing of a portable air purifier with a bucket and water inlet (no text or symbols)
*Drainage pipe not included in SILKAIR CONNECT and CONNECT PRO.
MAINTENANCE
Before performing tasks of cleaning and maintenance, turn off the machine and unplug it.
- Clean the surface:
- Clean the surface of the machine with a wet soft cloth. Don't use chemicals, such as benzene, alcohol, gasoline, etc; otherwise, the surface of the air conditioner will be damaged or even the whole machine will be damaged.
- Clean the filter screen:
- If the filter screen is clogged with dust, and the effectiveness of the air conditioner is reduced, be sure to clean the filter screen once every two weeks.
- Clean the upper filter screen frame:
- Unscrew one screw fixed by EVA filter net and back shell with screwdriver, and take out EVA filter net.
- Put the EVA filter screen into warm water with neutral detergent (about 40/104 °C) and dry it in the shade after rinsing clean.
STORAGE
- Unscrew the drainage cover, unplug the water plug, and discharge the water in the water tank into other water containers or directly tilt the body to discharge the water into other containers.
- Turn on the machine, adjust it to low-wind ventilation mode, and maintain this state until the drainage pipe becomes
- dry, so as to keep the inside of the body in a dry state and prevent it from mildewing.
- Turn off the machine, unplug the power plug, and wrap the power cord around the wrapping post; install the water plug and the drainage cover.
- Remove the exhaust pipe and keep it properly.
- Cover the air conditioner with a plastic bag. Put it in a dry place, keep it out of the reach of children, and take dust control measures.
- Remove batteries of the remote control and keep them properly.
Note: ensure that the body is placed in a dry place and keep all machine components properly.
Do not repair or disassemble the air conditioner by yourself. Unqualified repair will lead to failure of the warranty, and may cause damage to users or their properties.
PROBLEM POSSIBLE CAUSE SOLUTION
| The air conditioner does not work. | There is no electricity. | Turn it on after connecting it to a socket with electricity. |
| The overflow indicator displays "FL". | Discharge the water inside. |
| The ambient temperature is too low or too high | Recommend to use the machine in at the temperature of 7-35°C (44-95°F). |
| In cooling mode, the room temperature is lower than the set temperature; in heating mode, the room temperature is higher than the set temperature. | Change the set temperature. |
| In dehumidification mode, the ambient temperature is low. | The machine is placed in a room with an ambient temperature of greater than 17°C (62°F). |
| The cooling effect is not good | There is direct sunlight. Pull the curtains. |
| Doors or windows are open; there are a lot of people; or in cooling mode, there are other sources of heat. | Close doors and windows, and add new air conditioner. |
| The filter screen is dirty. Clean or replace the filter screen. |
| The air inlet or outlet is blocked. Clear obstructions. |
| Big Noise | The air conditioner is not placed on a flat surface. | Put the air conditioner on a flat and hard place (to reduce noise). |
| Compressor does not work. Overheat protection starts. | Wait for 3 minutes until the temperature is lowered, and then restart the machine. |
| The remote control does not work. | The distance between the machine and the remote control is too far. | Let the remote control get close to the air conditioner, and make sure that the remote control directly faces to the direction of the remote control receiver. |
| The remote control is not aligned with the direction of the remote control receiver. |
| Batteries are dead. Replace batteries. |
| Displays 'E1'. | The pipe temperature sensor is abnormal. | Check the pipe temperature sensor and related circuitry. |
| Displays 'E2' | The room temperature sensor is abnormal. | Check the room temperature sensor and related circuitry. |
In compliance with Directives: 2012/19/EU and 2015/863/EU on the restriction of the use of dangerous substances in electric and electronic equipment as well as their waste disposal. The symbol with the crossed dustbin shown on the package indicates that the product at the end of its service life shall be collected as separate waste. Therefore, any products that have reached the end of their useful life must be given to waste disposal centres specialising in separate collection of waste electrical and electronic equipment, or given back to the retailer at the time of purchasing new similar equipment, on a one for one basis. The adequate separate collection for the subsequent start-up of the equipment sent to be recycled, treated and disposed of in an environmentally compatible way contributes to preventing possible negative effects on the environment and health and optimises the recycling and reuse of components making up the apparatus. Abusive disposal of the product by the user involves application of the administrative sanctions according to the laws.
OS iPhone OS Android

CÓMO CONECTARSE A LA APP
natural_image
Diagram of a portable air purifier with a hand gesture and ventilation system (no text or symbols)
natural_image
Technical line drawing of two window panels with labeled components (no text or symbols)
natural_image
Line drawing of an air conditioner unit attached to a door, with no text or symbols present
natural_image
Diagram of a pressure pump connected to a wall-mounted device (no text or symbols present)
INSTRUCCIONES DE DRENAJE
DRENAJE MANUAL
natural_image
Line drawing of a portable air purifier with a bucket and water dispenser (no text or symbols)
OS iPhone OS Android

natural_image
Diagram of a portable air purifier with a hand waving, showing airflow direction (no text or symbols)
natural_image
Technical line drawing of two window panels with labeled components (no text or symbols)
natural_image
Line drawing of a door with a portable air conditioner unit attached to the left wall (no text or symbols)
natural_image
Diagram of a wall-mounted air conditioner unit connected to a door panel, showing wiring and mounting bracket (no text or symbols)
INSTRUÇÕES DE DRENAGEM
DRENAGEM MANUAL
natural_image
Line drawing of a portable air purifier with a side bucket and cooling unit (no text or symbols)
PROBLEMA CAUSA POSSÍVEL SOLUÇÃO
OS iPhone OS Android

CONFIGURATION REQUISE
natural_image
Diagram of a portable air purifier with a hand waving, showing heat dissipation and ventilation duct (no text or symbols)
INSTALLATION DES COMPOSANTS DE LA PLAQUE D'ÉTANCHÉITÉ DE LA FENÊTRE
natural_image
Technical line drawing of two window frame components with labeled parts (no text or symbols)
INSTALLATION DU CORPS DE CLIMATISATION
natural_image
Line drawing of an indoor air conditioner unit connected to a door, showing airflow direction (no text or symbols)

natural_image
Diagram of a pressure pump connected to a wall-mounted device (no text or symbols present)
INSTRUCTIONS DE DRAINAGE
DRAINAGE MANUELLE
natural_image
Line drawing of a portable air purifier with a bucket and fan, no text or symbols present
PROBLÈME CAUSE POSSIBLE SOLUTION
OS iPhone OS Android

REQUISITI DI SISTEMA
- iOS 8.0 o versioni successive.
- Android 4.1 o versioni successive.
COME CONNETTERSI ALL'APP
natural_image
Diagram of a portable air purifier with a hand waving, showing heat dissipation and airflow direction (no text or symbols)
INSTALLAZIONE DEI COMPONENTI DELLA PIASTRA DI TENUTA PER FINESTRE
natural_image
Technical line drawing of two window panels with labeled components (no text or symbols)
natural_image
Line drawing of an indoor air conditioner unit connected to a door (no text or symbols)

natural_image
Diagram of a pressure pump connected to a wall-mounted device (no text or symbols present)
ISTRUZIONI DI SCARICO
SCARICO MANUALE
natural_image
Line drawing of a portable air purifier with a bucket and water inlet, no text or symbols present
OS iPhone OS Android

WÄRME AUSPUFFROHR INSTALLATION
natural_image
Diagram of a portable air purifier with a hand waving, showing heat dissipation and ventilation duct (no text or labels)
natural_image
Technical line drawing of two window panels with labeled components (no text or symbols)
EINBAU DES KLIMAKÖRPERS
natural_image
Line drawing of an indoor air conditioner unit connected to a door (no text or symbols)

natural_image
Diagram of a pressure pump connected to a wall-mounted device (no text or symbols present)
ABTROPFEN LASSEN ANWEISUNGEN
MANUELLE ENTLEERUNG
natural_image
Line drawing of a portable air purifier with a bucket and fan, no text or symbols present
OS iPhone OS Android

SYSTEEM VEREISTEN
- iOS 8.0 of hoger.
- Android 4.1 of hoger.
HOE VERBINDING TE MAKEN MET DE APP
BESCHERMINGSFUNCTIONS
VORSTBESCHERMINGSFUNCTIE
WARMTE UITLAATPIJP INSTALLATIE
natural_image
Diagram of a portable air purifier with a hand gesture and pipe insertion (no text or symbols)
DE COMPONENTEN VAN DE RAAMAFDICHTINGSPLAAT MONTEREN
natural_image
Technical line drawing of two window panels with labeled components (no text or symbols)
INSTALLATIE VAN HET AIRCONDITIONERLICHAAM
natural_image
Line drawing of an indoor air conditioner unit connected to a door, showing airflow direction (no text or symbols)
natural_image
Diagram of a pressure pump connected to a wall-mounted device (no text or symbols present)
AFVOER INSTRUCTIES
HANDMATIGE AFVOER
natural_image
Line drawing of a portable air purifier with a bucket and side arm (no text or symbols)
* Drainage buis niet inbegrepen in SILKAIR CONNECT en SILKAIR CONNECT PRO.
ONDERHOUD
OS iPhone OS Android

WYMAGANIA SYSTEMOWE
natural_image
Diagram of a portable air purifier with a hand gesture pointing to its side panel (no text or symbols present)
MONTAŻ ELEMENTÓW PŁYTY USZCZELNIAJĄCEJ OKNO
natural_image
Technical line drawing of two window panels with labeled components (no text or symbols)
MONTAŻ KORPUSU KLIMATYZATORA
natural_image
Line drawing of an indoor air conditioner unit connected to a door (no text or symbols)

natural_image
Diagram of a pressure pump connected to a wall-mounted device (no text or symbols present)
INSTRUKCJE DOTYCZĄCE DRENAŻU
RE CZNY SPUST
natural_image
Line drawing of an air purifier with a bucket and water inlet, no text or symbols present