
Gold 300 - Speaker MONITOR AUDIO - Free user manual and instructions
Find the device manual for free Gold 300 MONITOR AUDIO in PDF.


| Product type | Active subwoofer |
| Model | Gold W12 |
| Brand | Monitor Audio |
| Speaker driver | 12-inch long-throw, C-CAM cone, dual 200 mm auxiliary bass radiators |
| Amplification | 600 W Class D (Hypex) |
| Frequency response | 20 Hz - 150 Hz (-3 dB); extends to 16 Hz in-room (Music mode) |
| Dimensions (H x W x D) | Without feet: 413 x 410 x 433.5 mm; with feet: 445 x 410 x 433.5 mm |
| Weight | 26.98 kg |
| Power supply | 100-120 V ~ 60 Hz or 220-240 V ~ 50/60 Hz (manual selection) |
| Power consumption | 600 W max, standby < 0.5 W |
| Connectivity | Stereo RCA inputs, LFE RCA input, balanced LFE XLR input, RCA and XLR link outputs, 12 V trigger input (3.5 mm mini-jack), RS232 port (RJ45), USB type B, IR output |
| Room correction | APC (Automatic Position Correction) via included microphone; up to 6 positions |
| EQ presets | 4 presets: Music, Flat, Cinema, Impact; customizable via SubConnect |
| Control | Front panel with rotary dial, IR remote, PC SubConnect app, RS232, 12 V trigger |
| Advanced settings | Phase (0-360° in 15° steps), crossover (20-135 Hz in 5 Hz steps, slope 12 or 24 dB/oct), night mode (adjustable dynamic reduction) |
| Finishes | Piano black, piano ebony, satin white, dark walnut |
| Included accessories | Power cable, remote control, calibration microphone, feet/spikes |
| Warranty | Manufacturer's warranty against manufacturing defects; refer to authorized dealer |
Frequently Asked Questions - Gold 300 MONITOR AUDIO
User questions about Gold 300 MONITOR AUDIO
0 question about this device. Answer the ones you know or ask your own.
Ask a new question about this device
Download the instructions for your Speaker in PDF format for free! Find your manual Gold 300 - MONITOR AUDIO and take your electronic device back in hand. On this page are published all the documents necessary for the use of your device. Gold 300 by MONITOR AUDIO.
USER MANUAL Gold 300 MONITOR AUDIO
Spiked Foot Fixing For Carpeted Floors 3
Amplifier 4
Remote 6
Front Panel 6
Control Panel 7
Using the Gold W12 8
Power Cycle 8
Waking Up 8
Room Correction 8
Using SubConnect for Room Correction_9
Recommended Settings for AV Systems_ 9
Recommended Settings for Stereo 9
EQ Profiles 10
Infra Red Remote Codes 10
RS232 10
RS232 Wiring Configuration 10
RS232 Communication Set-Up Parameters_10
Command Protocol 10
Command List 11
Update Firmware on Sub 12
Bootloader Mode 12
Automatic Update. 12
Manual Update 13
Factory Reset 14
Warranty 14
Owner Information 14
Specifications 15
Introduction
The Gold W12 subwoofer can produce more articulate bass from a smaller cabinet than before. The powerful long throw 12" driver is augmented by two auxiliary bass radiators, precisely tuned to assist the main driver in delivering thunderous bass lines right down to 20Hz. The bass driver assembly employs a hugely powerful magnetic system and massive voice coil to deliver the immense power and scale required for serious home theatre or music reproduction.
A 600-watt Class-D amplifier (Hypex manufactured) is perfectly matched to a high current switching power supply to ensure continuous delivery of high sound pressure levels, whilst accurately reproducing peak transients. A powerful DSP has been employed to deliver the best performance and filter characteristics whilst running the unique APC system. The APC (Automatic Position Correction) system has been designed by Monitor Audio to automatically correct for different types of rooms. It uses a microphone and test tones to calculate detrimental room modes and automatically correct frequency response, optimizing it for the room and position. This ensures the user can enjoy the subwoofer without the restrictions of positioning. A sophisticated 32bit micro-controller, monitoring the sound levels thousands of times per second, ensures the woofer delivers the best possible performance.
Settings adjustment is provided by the innovative controller mounted on the cabinet top panel, or by using Monitor Audio's proprietary 'SubConnect' software. The settings provide four fully configurable user pre-sets per input, including modes for; Flat/Music/Movie and impact equaliser settings. Fine-tuning can be made by adjusting the frequency, slope, trim and equaliser filters for each pre-set. The Night Mode actively reduces the dynamic range of louder sections according to the level the listener desires.

IMPORTANT!
To achieve the very best from your subwoofer and to be able to gain access to the advanced settings and firmware updates, please download the SubConnect PC application from our website. Included within this download are full instructions of which functions can be adjusted using the SubConnect application.
Positioning
The Gold W12 should be sited in the most suitable position, preferably not directly in the corner of a room as this may cause excessive bass boom. The optimal position is along the front wall in the centre of the front left and right speakers. Obviously this isn't always going to be possible in all instances, so as close to the optimum is advisable. Once a desirable position is achieved it is important to check if the cables are long enough to reach comfortably without being under tension. Leave the Gold W12 unplugged until you are happy with its location and the feet have been fitted.
Never connect or disconnect any of the input connections with the Gold W12 switched on.
Once in position, you should fit the feet/ spike assemblies in accordance with the guidelines below. Once the feet have been fitted, connect the signal cable(s) and mains cable and turn on at the main switch.
Spiked Foot Fixing For Carpeted Floors
The spiked foot assembly incorporates a spike for use on carpeted floors and also, a soft polymer pad (for use on wooden or tiled floors).
Please ensure there are no hidden wires under the carpet, or trailing mains leads that could be damaged by the spikes.
The foot comes fully assembled for use on carpeted floors. All that is required is fixing into the cabinet. This is achieved by simply screwing the feet fully into the 4, threaded inserts in the underside of the cabinet. If your carpet has a very thick pile, remove the soft polymer pad from the foot to ensure the spike goes right through the carpet onto the floor. With great care turn your cabinet the right way up. Place the cabinet in your desired location, and check that it is level on all sides. If it is slightly uneven, unscrew the foot at the lowest point and check again. Continue this process until the cabinet is fully level. Use the locking nut on the foot to fix it in place and to stop any unwanted vibrations.
Spiked Foot Fixing For Wooden/Hard Floors
For use on solid floors or where spikes are inappropriate, it is possible to use the foot without the spike insert. To use the foot in this manner carefully grip the knurled portion of the spike and rotate anti clockwise to unscrew the spike fully.
You may find it easier to first remove the polymer pad to gain more purchase on the spike.
The pad should be replaced before carrying out the leveling operation previously described.
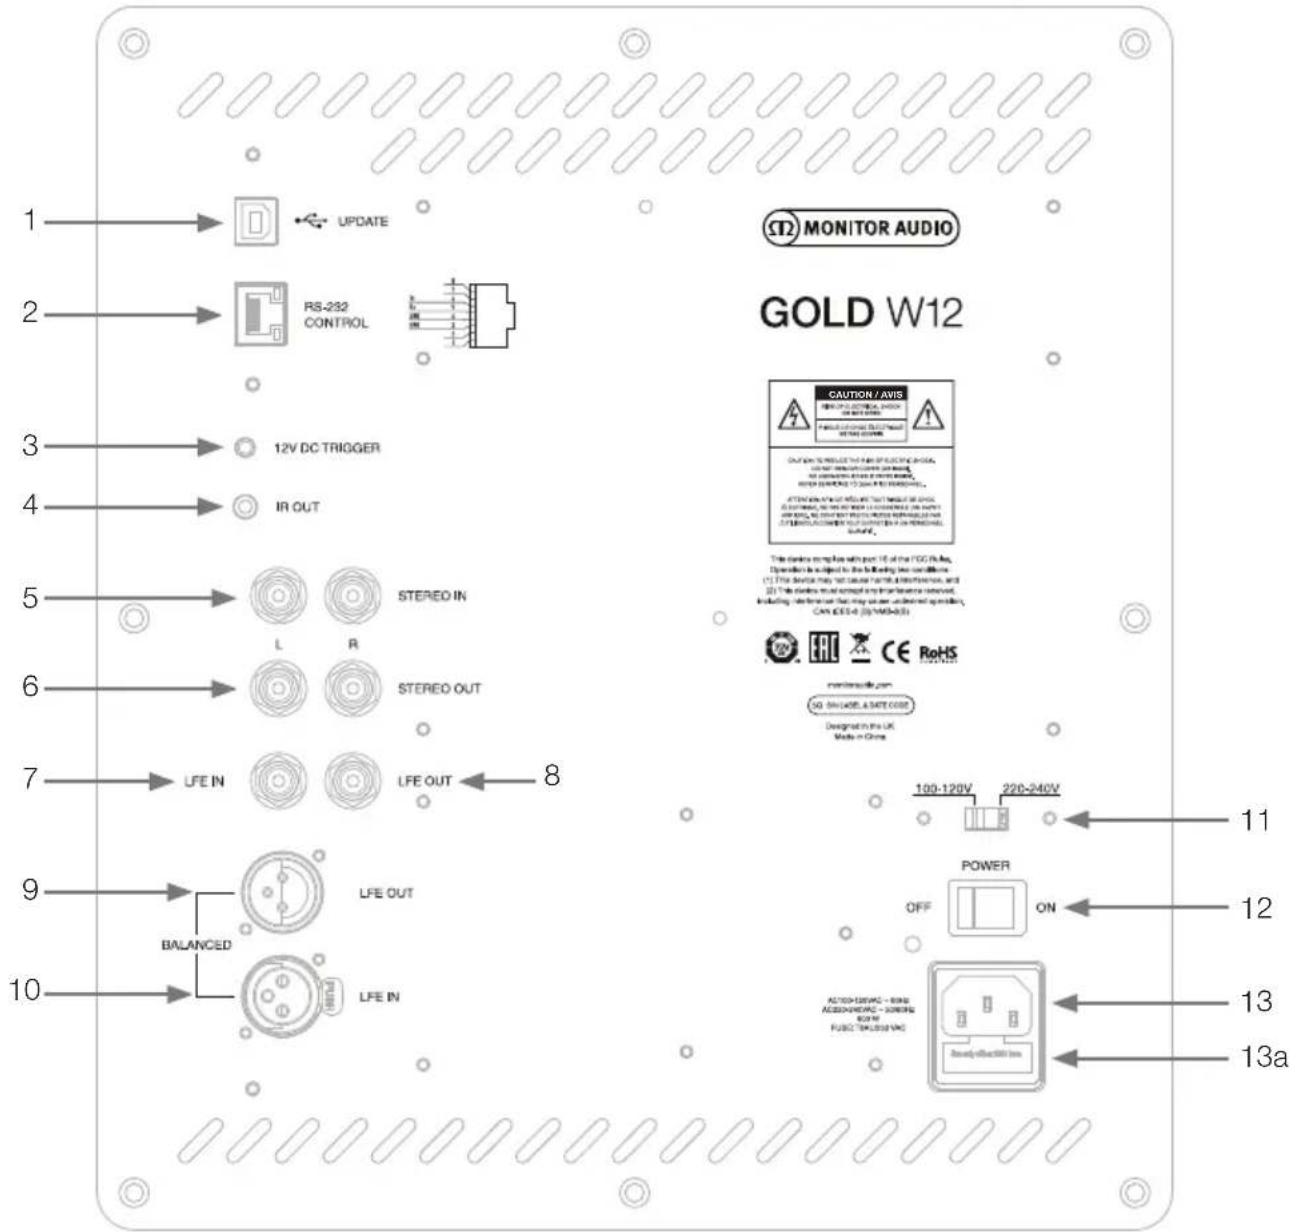
1. USB Connector
This is provided to update the firmware and settings of the Gold W12 in conjunction with the SubConnect application. A USB cable is not included, please use the appropriate USB A to USB B cable.
2. RS232 Input
For use with home automation systems through a conventional RJ45 connector.
3. 12 Volt Trigger Input \~ Centre Pin = +12Vdc.
For external power control from AV amplifier/ receiver to the Gold W12 (lead supplied), and to toggle between different presets depending on set up via the SubConnect application. The default setting controls the power. This 12 volt signal comes from the source amplifier and supplies the Gold W12 with a signal to perform a predetermined action: either to power up/ down or to switch presets. When used to power Gold W12 up or down, the trigger is a very energy efficient method of power control. The auto off timer and signal sense will not operate when the 12V trigger is connected.
4. IR (Infrared) Output
For use when controlling other IR devices via the Gold W12. Connect the Gold W12 with a second device using a mono 3.5mm jack connector and control the second device with its remote via the Gold W12. This is ideal when the device is out of sight or in another room.
5. Line Level Inputs (Stereo Left & Right)
For connection to a 2 channel/ stereo amplifier system. Connection should be provided by a pair of high-quality signal cables from the pre-out section of an amplifier.
NOTE: Cable lengths should not exceed 10 metres to avoid interference from other electrical appliances.
6. RCA Line Level Outputs (Stereo Left & Right)
To be used to feed additional sub-woofers or power amplifiers from the Gold W12 by 'daisy chain' type connection. The outputs are link-out only connections and do not provide any form of filtering or amplification. There must be a signal on the stereo input for the linked outputs to work. They can also be muted from within the application when there is a signal connected.
7. LFE Input (RCA Type)
This input is to be used when connecting the Gold W12 to an AV amplifier/ receiver. When using the LFE input, the crossover function in the menu/ set-up is not used. This is due to the crossover function being controlled by the source to which it is connected. Input between LFE and Stereo input is switched automatically by default but can select between only LFE, only stereo and both in the application.
8. LFE Output/ Link (RCA Type)
To be used to feed additional Gold W12's (or another sub woofer) by 'daisy chain' type connection. The output is a link out only connection and does not provide any form of filtering. They can also be muted from within the application when there is a signal connected.
9. Balanced LFE Output (Male XLR Type)
To be used when connecting to the balanced input on an additional sub woofer or amplifier. This is the best method of connection when using long runs of cables (over 10m, up to 100m). A balanced connection provides a much better (almost noise free) method of connection over analogue audio type connectors.
10. Balanced LFE Input (Female XLR Type)
To be used when connecting to the balanced output on the amplifier. This is the best method of connection when using long runs of cables (over 10m up to 100m). A balanced connection provides a much better, almost noise free method of connection over analogue audio type connectors.
11. Voltage Selection Switch
Factory preset to suit the voltage of the country of origin. This should not be adjusted.
12. Mains Power Switch
Mains ‘rocker switch’ providing overall power off and on/auto. In the on/auto mode, the unit will turn on when an input signal is sensed or the control dial/power button on remote is pressed. It will turn off after 20 minutes (default setting) when the signal is removed (source turned off). Alternatively, using the 12V trigger (see above) to control the power by turning the source on or off.
13. IEC Mains Power Connector/Fuse Location
The Gold W12 is supplied with a three-pin mains input socket for connection to the mains supply. Use ONLY the appropriate IEC mains lead provided with the product. Also fitted is an external mains fuse. If a fuse blows during operation a spare fuse is provided within the fuse holder for replacement. If you wish to change the fuse, you can do this by removing the IEC mains lead and carefully levering out the original fuse from its holder below the IEC mains input socket (13a, opposite). If the fuse blows again it is advisable to seek help from an authorised service agent. DO NOT attempt to re-fit a further fuse as this could result in serious damage to the amplifier unit.
Remote
Front Panel
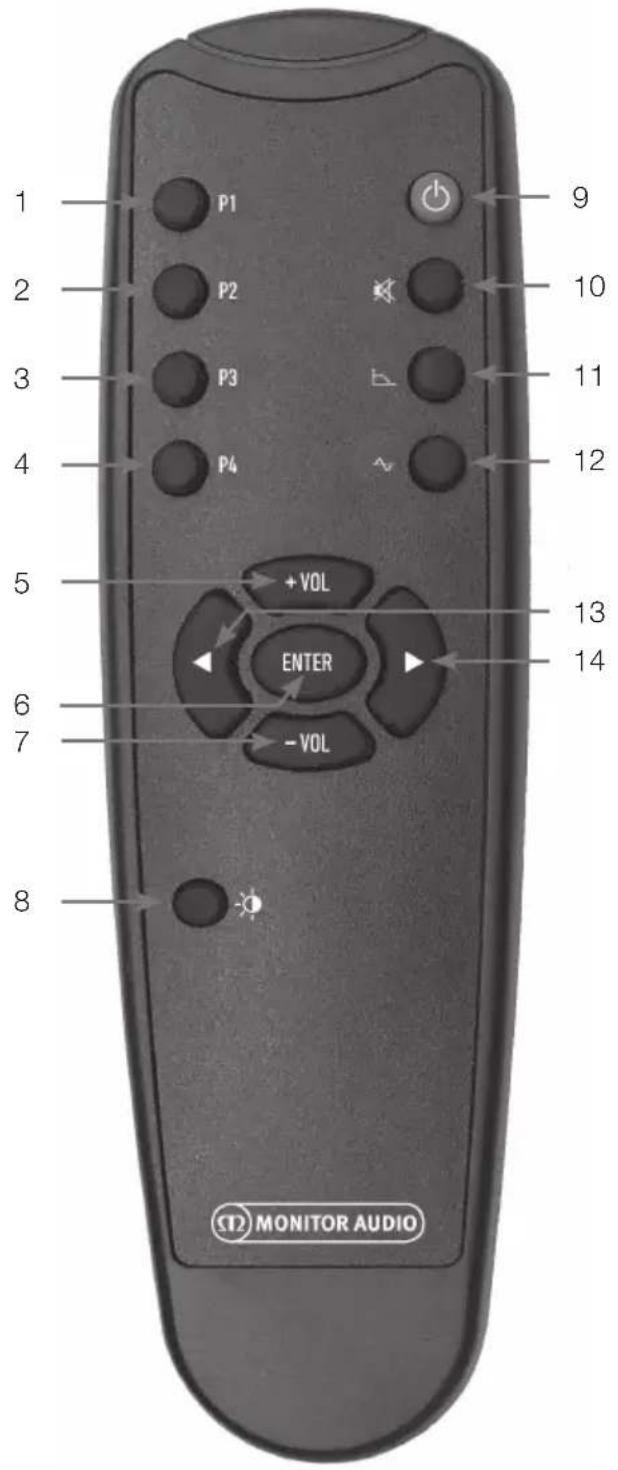
- Preset 1 Selects preset 1.
- Preset 2 Selects preset 2.
- Preset 3 Selects preset 3.
- Preset 4 Selects preset 4.
-
- Vol Increases the volume trim level.
- Enter Selects/ confirms the command.
-
- Vol Decreases the volume trim level.
- LED Brightness Toggles the LED display on or off.
- Standby Puts the Gold W12 into standby or wakes it up from standby.
- Mute Mutes all output from the Gold W12.
- Crossover Point Selects the crossover control on the Gold W12. Use the left and right arrows to adjust the crossover frequency. This is set in 5Hz steps from 20 to 135 Hz.
- Phase Selects the phase control of the Gold W12. Use the left and right arrows to adjust the phase. This is set in 15 degree increments from 0 - 360 degrees.
- Left arrow Adjusts the chosen control.
-
Right Arrow Adjusts the chosen control.
-
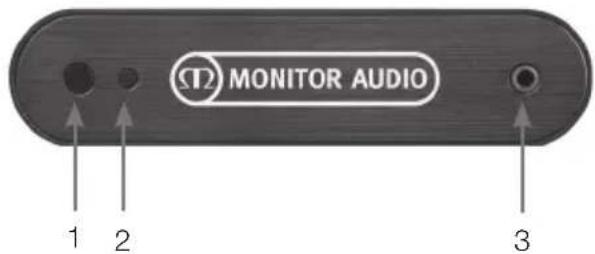
Gold W12 IR Receiver Aim the Gold W12 remote here for it to function.
-
IR LED Indicator Blinks when an IR signal is received.
-
Room EQ Set Up Microphone Connect the supplied set up microphone here and run the set up procedure detailed below.
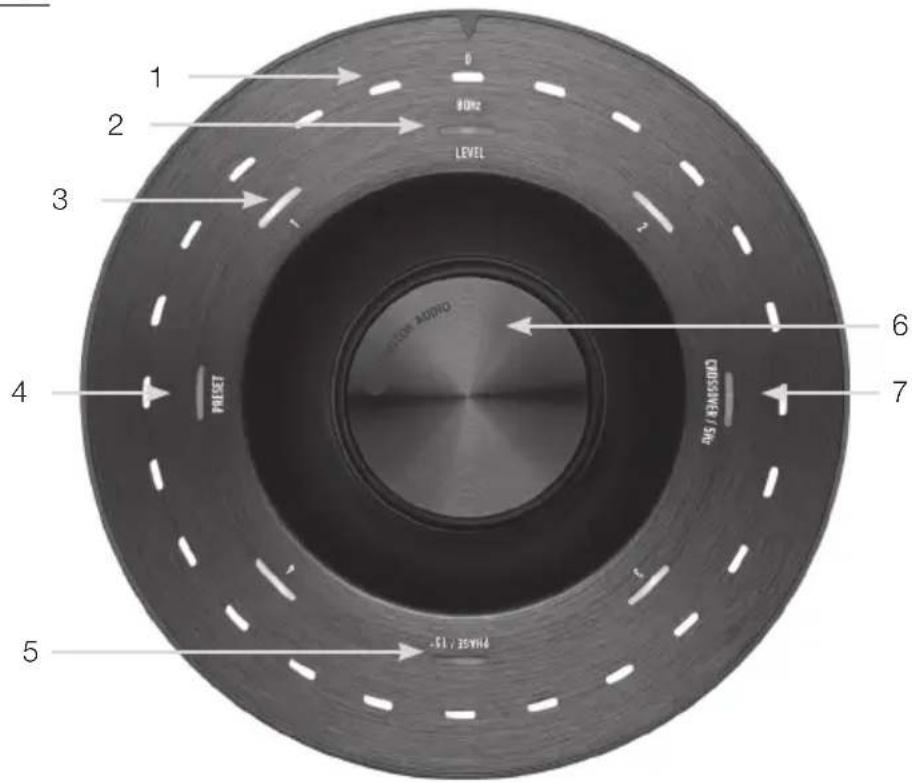
1. Main Indicator LEDs
These LEDs show the levels and the presets selected depending on the mode being adjusted. It will by default show the trim volume level. In normal operation, the volume trim level will be displayed along with the Level LED (2) and numbered preset LED 1-4 (3) will be illuminated.
2. Trim Level Indicator
When just turning the control dial, the trim level is the default mode. This can be adjusted +/- 11 dB and does not adjust the master volume control. This must be set by the SubConnect application.
3. Numbered LEDs
These are the 4 presets. Only the selected preset will be illuminated and remain illuminated whilst the preset is in use.
4. Preset Select.
By pressing down on the control dial repeatedly to illuminate the Preset LED, the preset selection mode is activated. Turn the dial to select the required preset. When adjusting the presets, the 7 Indicator LEDs around that preset will be illuminated.
5. Phase Adjustment.
Press down on the control dial repeatedly to illuminate the Phase LED. The phase is adjusted in 15 degree increments with the main LEDs illuminating to show the phase angle.
6. Control Dial
Use this to adjust the trim level (just turn the dial) or select from the crossover selection, phase or presets by pressing the dial until the required feature is illuminated.
7. Crossover Adjustment
Press down on the control dial to illuminate the Crossover LED. Here you adjust the LPF crossover frequency (when using the stereo inputs). This is adjusted in 5Hz steps from 20 to 135 Hz and is preset to 80Hz.
Using the Gold W12
The default settings of the Gold W12 are enough to get you using the product as intended. You can then tweak and adjust them using the control dial for basic settings, or more advanced settings via the SubConnect application. By default all of the presets are the same except for the EQ profiles.
Once in position and the cables have been run and connected (mains cable last), turn on the Gold W12 but do not play any music or movies yet. The room correction should be run before any further settings are changed and before any automatic setup is started on the AV receiver.
Power Cycle
When woken up from standby by one of the below methods, all of the LEDs will illuminate on the top, then fading off in a sequence leaving only the volume trim level and selected preset number LEDs illuminated. These will then fade to 10% or off, dependant on the chosen settings. The fade settings can be adjusted in the SubConnect application.
Waking Up
There are a number of different ways that the Gold W12 becomes operational:
Remote: By pressing the standby button on the remote, the Gold W12 will wake from standby. When woken in this mode, the auto turning off will function as normal. However, if the Gold W12 is turned off by the remote, it will only turn on at next use, by either the control dial (see below) or by the remote. The auto signal sensing will be disabled.
Control Dial: When woken by pressing or turning the control dial, the Gold W12 will continue to remain on while a signal is present or until the defined auto off time has been reached (default 20 minutes).
Signal Sense: This method is fully automatic. The Gold W12 will wake when it receives a signal on any of its inputs. It will then go into standby after the defined period of time (default 20 minutes).
12V Trigger: This is a method of control by the AV receiver or amplifier. Whenever the source amplifier is turned on, the Gold W12 will wake. Likewise when the source amp is turned off, the Gold W12 will also turn off.
RS232: This method of control is defined by the home automation control. Further details on this
method of control and the programming can be found.
Room Correction
The Gold W12 has a sophisticated room correction algorithm that detects any unwanted room modes and flattens them out to give the most accurate bass response possible.
NOTE
To ensure there are no interruptions in the room correction sweep tests, you must disconnect the RS232 cable (if connected) until the room correction has been completed.
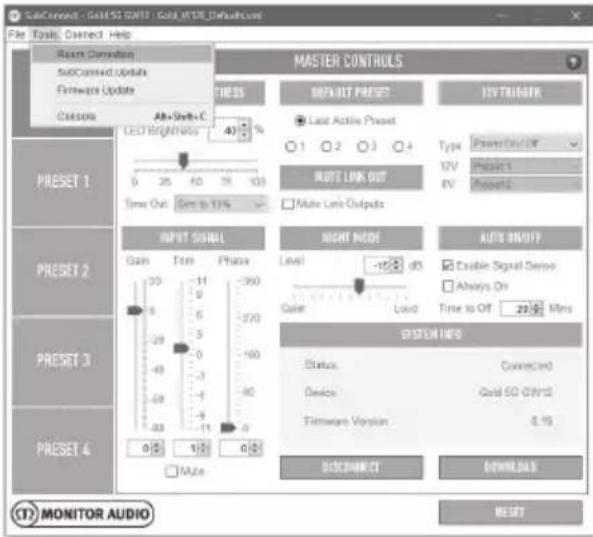
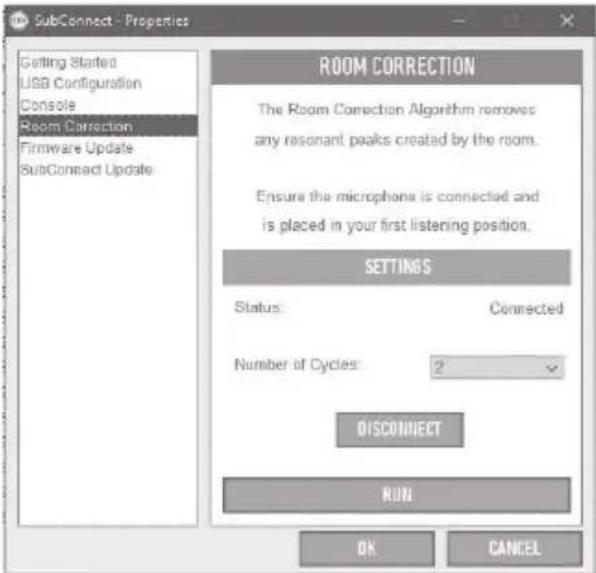
To carry out the room EQ, simply connect the supplied microphone to the input socket on the front of the Gold W12 and place the microphone in the seating position. To get the most accurate response, point the mic up to the ceiling. The Gold W12 will run 2 sweeps by default, but this can be changed in the SubConnect application under Tools > Room Correction.
NOTE
This should be run on the sub woofer before running the set up calibration on any other equipment.
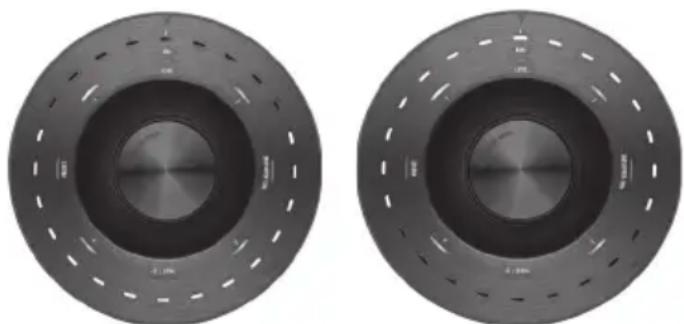
With the mic in the first position, press and hold the control dial as it counts down, it will illuminate all outer (main indicator) LEDs and then flash. When it flashes you can then release the dial. After the first sweep, there will be a pause of about 20 seconds. In this time you can either move to a new location or leave it in the same location before a second sweep is run. This pause can be cancelled by pressing the control dial again and the next sweep will start immediately.
The Gold W12 will then run through the room correction by playing a number of test tones. If the test has been successful, the LEDs will illuminate in a “happy face” arrangement. If it fails then it will be a “sad face” arrangement.
natural_image
Two identical circular mechanical components with dashed centerlines and central bore, shown from top and side views (no text or symbols visible)Successful Test Failed Test
NOTE
If the sweep is run without the microphone connected an error code will be displayed, illuminating ALL LEDs. To reset it from this error state, just turn the dial.
Using SubConnect for Room Correction
To run the room correction on the SubConnect application, follow the steps below. For information on installing the application please refer to the next page.
- With the Gold W12 switched on and connected to the PC by USB cable, open the SubConnect app on your PC and click on Tools > Room Correction
- Select the number of cycles you wish to run (default is 2) and then click on the RUN button. The sweeps will start as soon as the RUN button is pressed. There will be a pause of around 20 seconds between sweeps.
Recommended Settings for AV Systems
When using the Gold W12 in an AV system, it is recommended to use Presets 2 (Movies) or 4 (Impact) as the starting points. You can then, if you wish, tweak these slightly to get it sounding just how you want in your room. For advice on adjusting the EQ settings. When using the LFE input, the crossover adjustment feature will not work.
NOTE
If any adjustments are made by the Control Dial, they will only be remembered if the sub is left to turn off automatically or put into standby by the remote. If the mains switch on the amp is turned off or the power removed from the sub woofer, it will not remember the settings.
Recommended Settings for Stereo
When using the Gold W12 in a stereo system, it is recommended to use Presets 1 (Music) or 3 (Flat) as the starting points. You can then, if you wish, tweak these slightly to get it sounding just how you want in your room. Once the preset is selected, adjust the crossover frequency so that it blends in seamlessly with your main speakers. This may take some adjustment and the playing of various pieces of familiar music to get it sounding perfect.
NOTE
If any adjustments are made by the Control Dial, they will only be remembered if the sub is left to turn off automatically or put into standby by the remote. If the mains switch on the amp is turned off or the power removed from the sub woofer, it will not remember the settings.
EQ Profiles
line
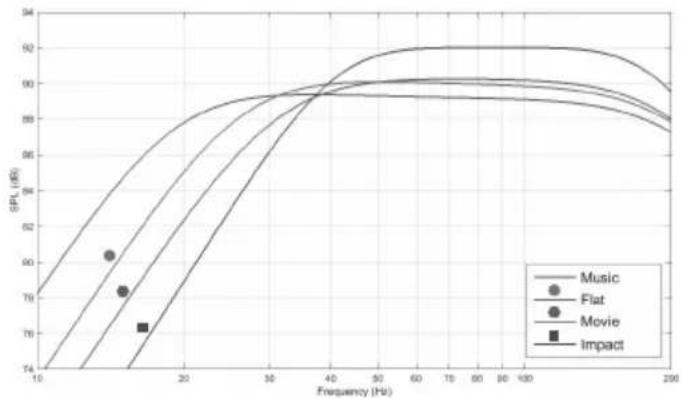
| Frequency (Hz) | Music | Flat | Movie | Impact | | -------------- | ----- | ---- | ----- | ------ | | 10 | 74 | 74 | 74 | 74 | | 20 | 86 | 86 | 86 | 86 | | 30 | 90 | 90 | 90 | 90 | | 40 | 92 | 92 | 92 | 92 | | 50 | 92 | 92 | 92 | 92 | | 60 | 92 | 92 | 92 | 92 | | 70 | 92 | 92 | 92 | 92 | | 80 | 92 | 92 | 92 | 92 | | 90 | 92 | 92 | 92 | 92 | | 100 | 92 | 92 | 92 | 92 | | 150 | 90 | 88 | 88 | 88 | | 200 | 88 | 86 | 86 | 86 |Impact: Uses the maximum natural efficiency of the drivers for explosive impact.
Flat: This is the sweet spot between a flat extended response and minimal use of DSP enhancement. A good starting point to create your own custom EQ profiles from.
Movie: The same flat response with good sensitivity, but a little more extension to create a balance between the explosive and atmospheric moments of a good film.
Music: Maximum low frequency extension to pick out the fundamental frequencies of every musical instrument.
Infra Red Remote Codes
The Gold W12 has discreet remote control commands for use with universal remote controls, along with additional commands not found on the supplied remote. The commands follow the standard NEC protocol.
Device Address: 7D28
| POWER 48 | DISPLAY 30 |
| ON D1 | ENCODER D0 |
| OFF F1 | PRESET_SELECT B8 |
| MUTE 78 | RIGHT_BUTTON E0 |
| VOL_UP A0 | LEFT_BUTTON C0 |
| VOL_DOWN 08 | PLAY_PAUSE D8 |
| PRESET_1 28 | TOGGLE_NIGHTMODE |
| PRESET_2 58 | A8 |
| PRESET_3 88 | NIGHTMODE_ON D2 |
| PRESET_4 B8 | NIGHTMODE_OFF F2 |
| TOGGLE_SOURCE 00 | ROOMEQ_ON D3 |
| VOLUME_SELECT 28 | ROOMEQ_OFF F3 |
| LPF_SELECT A8 | DISPLAY_ON D4 |
| PHASE_SELECT D8 | DISPLAY_OFF F4 |
RS232
The Gold W12 can be controlled via the RS232 port on the amplifier panel. The Gold W12 can be controlled by sending a string of characters to the RS232 connector.
RS232 Wiring Configuration
The RS232 communication socket uses a standard RJ45 connector. This should be wired as illustrated on the amp panel and below.
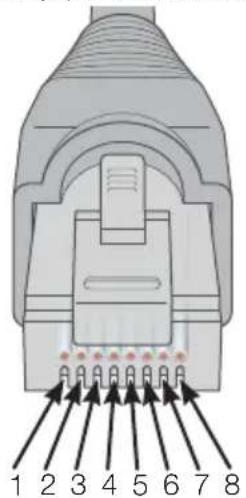
- Not Used
- Not Used
- Ground
- Ground
- Rx
- Tx
- Not used
- Not Used
RS232 Communication Set-Up Parameters
Baud Rate: 57600
Data Size: 8
Parity: None
Stop Bits: 1
Handshaking/ Flow Control: None
Command Protocol
Each string of commands sent to the Gold W12 must follow the same structural protocol. These commands are detailed in the Command List opposite. To control the Gold W12 using RS232 commands, specific strings of characters (forming a command string) must be sent via a RS232 terminal. Each command string should be terminated by both:
These are generally found in the RS232 terminal settings. The Gold W12 replies to a valid command with the updated information changed by a SET command, or the information that was requested by a GET command. If the Gold W12 receives an invalid command it will reply with
ERROR
Note: any SET command other than SET_O during Standby is deemed invalid.
The following GET commands are used to request information from the Gold W12:
| Command Description Reply from Gold W12 | ||
| GET_O | Requests the Power state of the Gold W12 (Active/ Standby) | POWER_ON:XWhere X is either 1 (Active) or 0 (Standby) |
| GET_P Requests the current Phase setting | PHASE:XWhere X is in the range 0 - 345 | |
| GET_M Requests the current Mute state | MUTE_ON:XWhere X is either 1 (Muted) or 0 (Not Muted) | |
| GET_L Requests the current Mute Link Out state | MUTE_LINK_OUT_ON:XWhere X is either 1 (Link Out Muted) or 0 (Link Out Not Muted) | |
| GET_S Requests the current Preset | PRESET:XWhere X is in the range 1 4 | |
| GET_D Requests the current Display state | DISPLAY_ON:XWhere X is either 1 (Display On) or 0 (Display Off) | |
| GET_T Requests the current Volume Trim Level | TRIM_LEVEL:XWhere X is in the range -11 - 11 | |
| GET_R Requests the Room EQ state | ROOM_EQ:XWhere X is either 1 (Room EQ On) or 0 (Room EQ Off) | |
| GET_N Requests the Night Mode state | NIGHT_MODE:XWhere X is either 1 (Night Mode On) or 0 (Night Mode Off) | |
The following SET commands control the operation of the Gold W12:
| Command Description Reply from Gold W12 | ||
| SET_O:1 Go to Power On POWER_ON:1 | ||
| SET_O:0 Go to Standby POWER_ON:0 | ||
| SET_P:X | Select Phase settingWhere X is in the range 0 - 345 | PHASE:XWhere X is in the range 0 - 345 |
| SET_M:1 | Mute output | MUTE_ON:1 |
| SET_M:0 | Unmute output | MUTE_ON:0 |
| SET_L:1 | Mute Link Out output | MUTE_LINK_OUT_ON:1 |
| SET_L:0 | Unmute Link Out output | MUTE_LINK_OUT_ON:0 |
| SET_S:X | Select the PresetWhere X is in the range 1 - 4 | PRESET:XWhere X is in the range 1 - 4 |
| SET_D:1 | Turn the Display on | DISPLAY_ON:1LF> |
| SET_D:0 | Turn the Display off | DISPLAY_ON:0LF> |
| SET_T:X | Set the Volume Trim LevelWhere X is in the range -11 11 | TRIM_LEVEL:XWhere X is in the range -11 - 11 |
| SET_R:1 | Turn Room EQ on | ROOM_EQ:1 |
| SET_R:0 | Turn Room EQ off | ROOM_EQ:0 |
| SET_N:1 | Turn Night Mode on | NIGHT_MODE:1 |
| SET_N:0 | Turn Night Mode off | NIGHT_MODE:0 |
Update Firmware on Sub
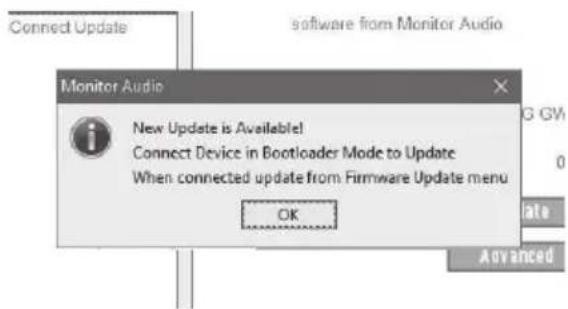
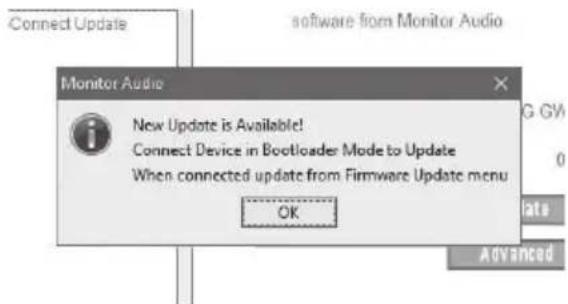
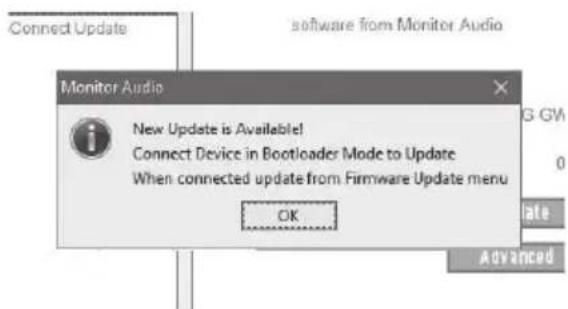
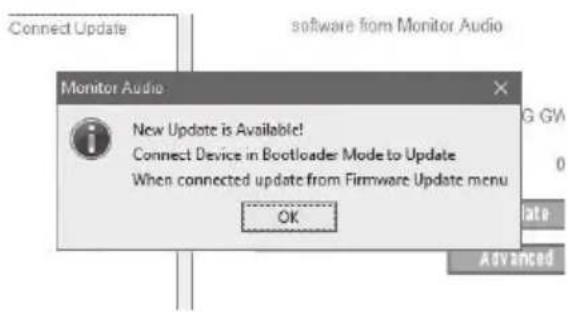
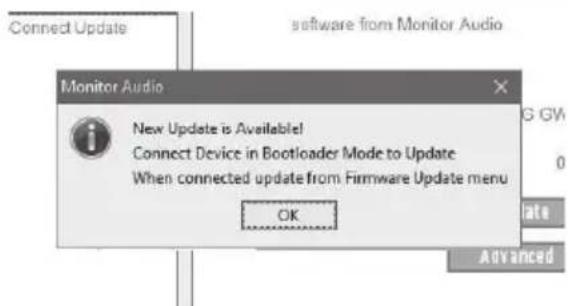
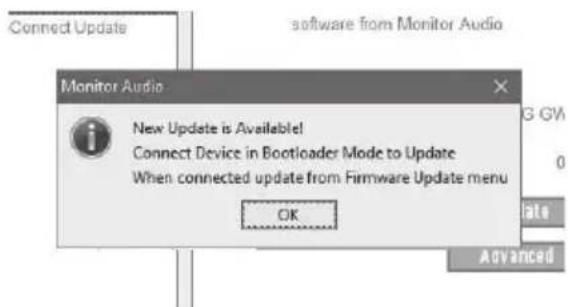
Once the SubConnect app has loaded and established connection with the sub woofer, either by automatic detection or by you manually pressing CONNECT, it will always check for a firmware update. If it finds one, you will see the below image.
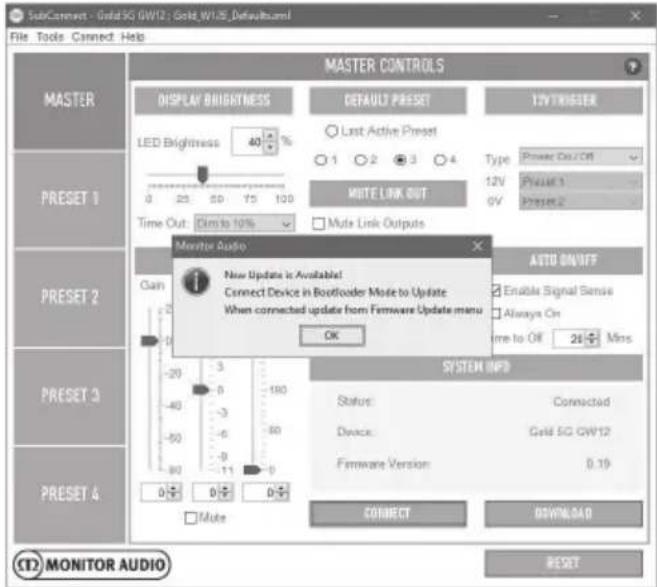
Bootloader Mode
To get the Gold W12 into bootloader mode, you must first turn the sub woofer off by the mains switch. When it has shut down, press and hold the control dial while simultaneously turning the sub woofer back on.
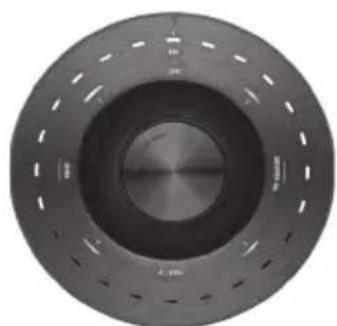
The Inner blue and cyan LEDs will illuminate with the outer white LEDs flashing in a chase sequence finishing at "Phase" (as per illustration below). This is now in bootloader mode.

natural_image
Circular mechanical component with concentric rings and central bore, no visible text or symbolsNow click on OK on the application. The "Status" will show that it is disconnected. Click on CONNECT and then when reconnected, the pop up showing there is an update available will reappear. Proceed to Automatic Update.
Automatic Update.
- To carry out the update, click on OK. You will then see another pop up showing the product, version number and a brief summary of the changes.
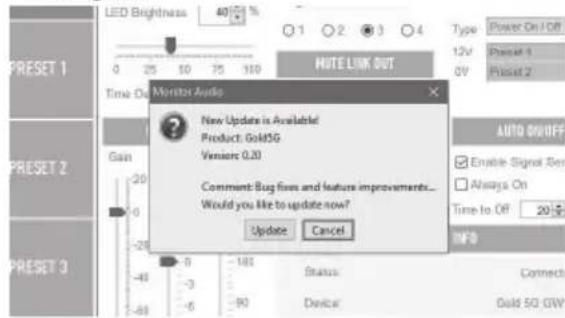
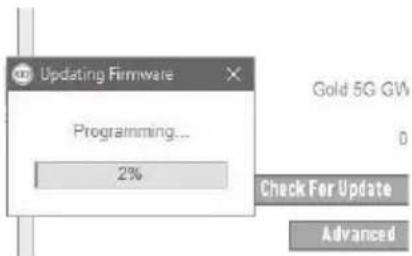
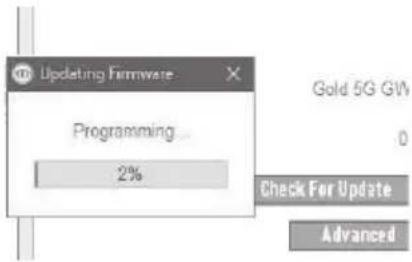
- Click on Update and you will then see a progress bar showing the status of the update.
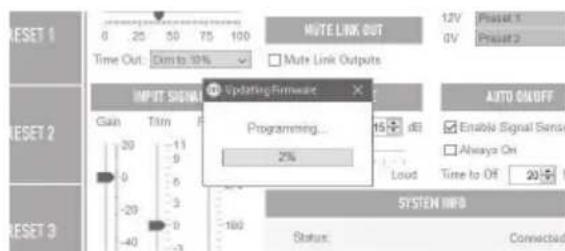
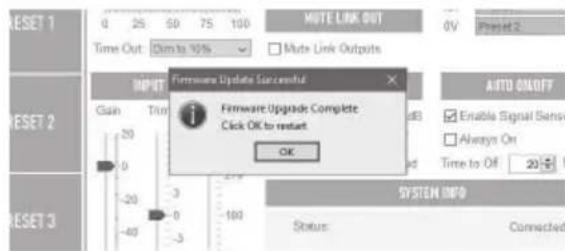
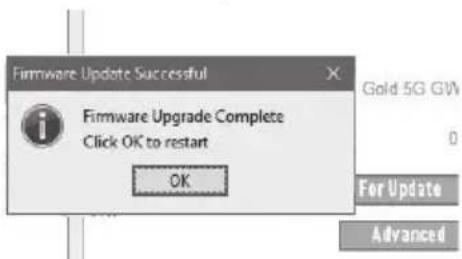
- When it is complete you will get confirmation and the sub woofer will reboot (when you click on OK). If there is a signal going into the sub woofer, it will automatically start up. If there is no signal, the sub woofer will need to be woken up by applying a signal or by pressing or turning the Control Dial.
Manual Update
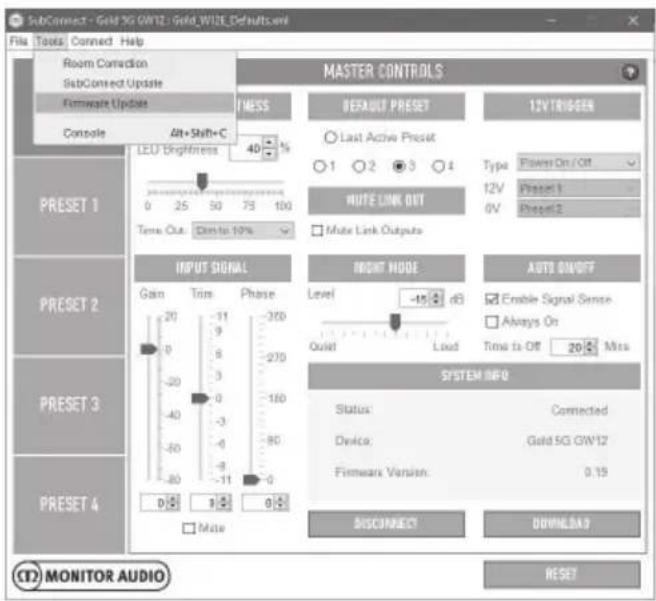
If the automatic update doesn't work, or you wish to manually check for an update, open the app and with the Gold W12 on and connected, click on Tools > Firmware Update.
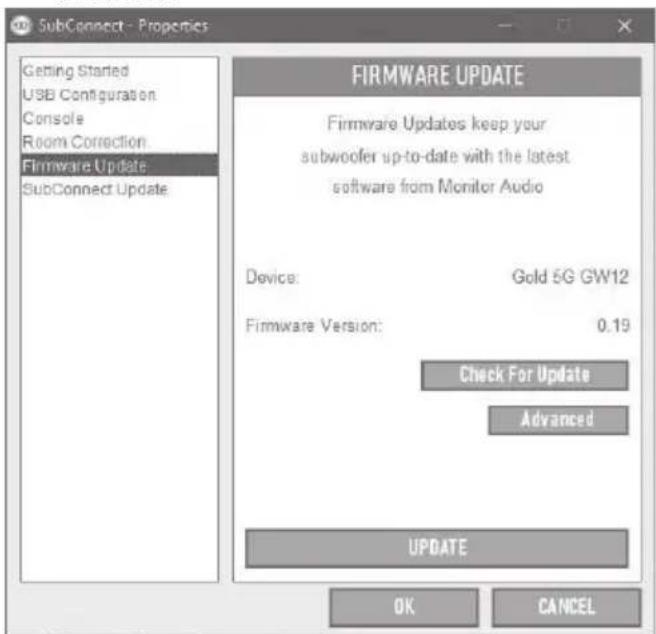
- Click check for update. If the Gold W12 is up to date, you will be informed, likewise, if there is an update available for it you will also be informed.
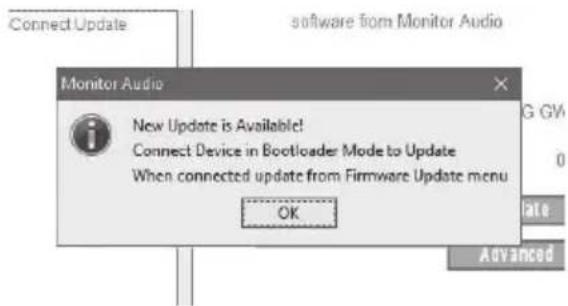
- If it isn't already, you will receive a prompt asking for the Gold W12 to be put into Bootloader mode. For information on how to do this refer to Bootloader Mode section. Follow these steps and when you have re-established connection to the Gold W12 click on Tools > Firmware Update again and you will see a new prompt. Click on Update.
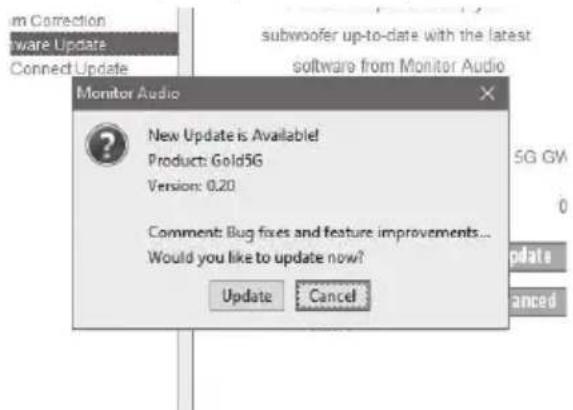
- A progress bar will now be displayed showing the status of the update.
- When it is complete you will receive confirmation and the sub woofer will reboot (when you click on OK). If there is a signal going into the sub woofer, it will automatically start up. If there is no signal, the sub woofer will need to be woken up.
Factory Reset
Sometimes it may be necessary to carry out a factory reset. If this needs to be done, it can be done by the following.
-
Enter Bootloader, refer to the Bootloader Mode section.
-
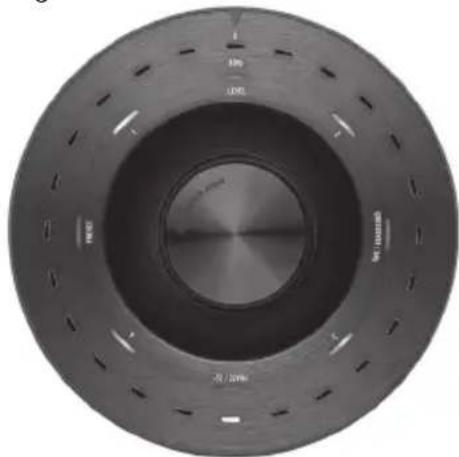
When in Bootloader mode illustrated by the below LED pattern, press and hold the Control Dial again.
natural_image
Circular mechanical component with concentric rings and central hub, no visible text or symbols- As you are holding the Control Dial down, the LEDs will count down starting with the below pattern and then finish by flashing twice. When it flashes the Control Dial can be released.
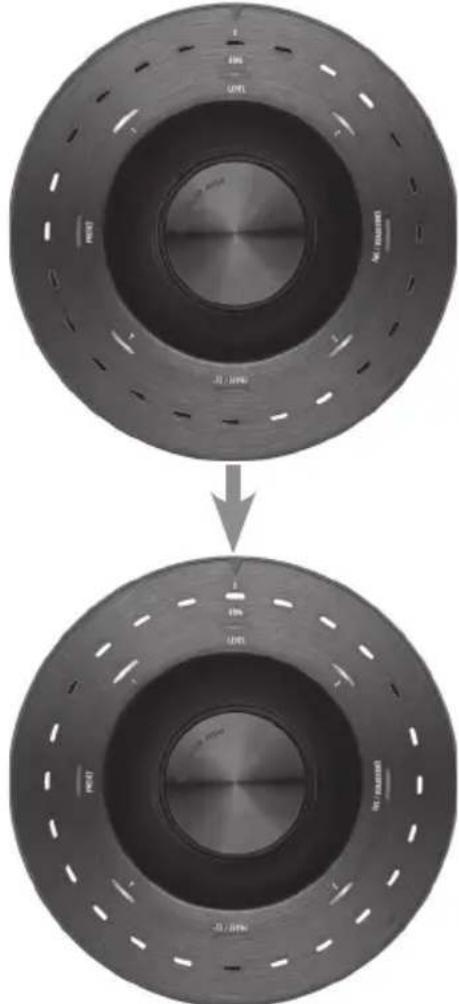
- After being reset, the Gold W12 will go into standby mode.
Warranty
Both the craftsmanship and the performance of this product is covered by the manufacturer's warranty against manufacturing defects provided that the product was supplied by an authorised Monitor Audio retailer under the consumer sale agreement. For the period of cover please refer to the product page on our website: monitoraudio.com for the product you have purchased.
When purchasing Monitor Audio products, please keep your receipt of purchase safe, as this validates your warranty.
Owner Information
Product Details
Product Serial No: ____
Date of Purchase:
Dealer Details
Dealer Name:
Address:
Post code:
E-mail address:
| Model Gold W12 Subwoofer | |
| System Format | Long-throw 12" driver featuring 'dished' C-CAM cone.Dual 200 mm ABR (auxiliary bass radiator) 25 mm M.D.F. construction with internal bracing and sealed amplifier compartment |
| Lower Frequency Limit | -3 dB @ 25 Hz/ -10 dB @ 20 Hz (Free Field)Music preset: -3 dB @ 19 Hz/ -10 dB @ 16 Hz (In Room)Assignable Low Frequency Limit Protection Filterdefault (-3 dB @ 12 Hz) |
| Upper Frequency Limit | -3 dB @ 150 Hz |
| Drive Unit Complement | 1 x 12" C-CAM subwoofer driver featuring triple suspension and 3" long throw voice coil |
| Linear Driver Excursion | 19 mm Peak to Peak. Total displacement 1.6 Litres |
| Amplifier Output (watts) | 600 W |
| Amplifier Classification | Class D with high current Switch mode power supply (SMPSU) |
| DSP | 50 MHz DSP Core with 1024 instructions per sample, 138 dB of dynamic range and 56-bit double precision processing, dynamically updated by a 40 MHz MCU |
| Digital Conversion | 24 bit/ up to 48 kHz ADCs & DACs built into ADAU1701 DSP Core |
| LED UI Control Panel | Adjustable brightness 0% - 100%, configurable auto off feature. Quick access to menu items: Trim & Mute, LPF, Phase, Preset Select |
| Global Settings (via SubConnect) | Display Brightness (0 - 100%), Dim (to 10% or to Off), Default Preset, Mute Link Outputs, 12 V Trigger Assignment (Power On/ Off or Preset select), Input gain (Master -80 to +20 dB, Trim -11 to +11 dB, Mute), Phase (0 - 360 in 15-degree steps), Night Mode Threshold (0 dB to -36 dB), Auto On/ Off (Enable Signal Sense, Always On, Time to Off 5 - 240 minutes) |
| User Presets (via SubConnect) | 4 fully configurable user Presets including, Preset Name, LPF Frequency (5 Hz Steps from 20 - 135 Hz), LPF Slope Order (-12 or -24 dB/ Oct), Input (Stereo, LFE or Both), Trim Offset (-6 to +6 dB), EQ mode (Impact, Music, Movie or Default), User EQ (6 adjustable filters applied on top of EQ mode), Room EQ (On/ Off), Night Mode (On/ Off) |
| User Equalisation (via SubConnect) | 6 fully controllable EQ filters and 4 default filters with gain offset per preset, Default settings: Flat/ Music/ Movie/ Impact |
| Room Correction EQ | 6 System controlled parametric EQ filters set using advanced detection algorithm.Measurement can be initiated from the control panel or the SubConnect with up to microphone 6 positions (default 2) |
| Night Mode | Night mode, assignable (On or Off) per Preset with global threshold (0 dB to -36 dB). Introduces dynamic range reduction lowering the level of loud sections |
| Phase Control | 0 - 360 degrees Increments of 15 degrees with a pure invert at 180 degrees |
| Low Pass Filter Alignment | 2nd or 4th order (12 or 24 dB/Octave), Increments of 5 Hz from 35 Hz to 135 Hz |
| Auto Sensing Input Requirements | Line Level >1mV on unbalanced and balanced inputs.Auto Standby feature, adjustable between 5 - 240 minutes in increments of 5 minutes |
| Digital Volume Level | -11 to +11 dB in 1 dB increments, Via the control panel. -80 to +20 in 1 dB increments, via SubConnect application |
| IR Remote Control Code | Supplied IR remote. Front facing IR receiver with red LED indication |
| SubConnect (PC Application) | Windows (7 onwards) (32/ 64 bit) compatible setup application available from the Monitor Audio website.Allows the user to control advanced subwoofer setup features.Settings can be saved while not connected to the subwoofer for off-site setup |
| Audio Input/Outputs | LFE balanced input (XLR), LFE unbalanced input (RCA), stereo unbalanced inputs (RCA)LFE balanced output (XLR), LFE unbalanced output (RCA), stereo unbalanced outputs (link RCA) |
| Connection | 12 V Trigger in (3.5 mm mono mini-jack, 6 V threshold), assignable to On/Off or Pre-set change, 3.5 mm Microphone input jack (mic supplied), RJ45 connector supporting RS232 (EIA/ TIA - 561, Tx Pin 6, Rx Pin 5, Gnd Pin 4), IR repeater – Output (3.5 mm mono mini-jack), USB – Type B, for connecting to SubConnect PC application and Firmware update |
| Electrical Certifications | CE/ CB/ ETL/ Fcc/ CCC/ ErP (Energy saving compliant) |
| Mains Input Voltage | 100 – 120 Vac ~60Hz/ 220 – 240 Vac ~50/ 60 Hz (Manually selected) |
| Power Consumption | Maximum 600 W, Standby <0.5 W (ErP compliance) |
| Fuse Type | 20 mm T8AL 250 VAC |
| Weight (Unpacked) | 26.98 kg59 lb 8.3 oz |
| External Dimensions (Including Amp, Drivers & Terminals (H x W x D)) | 413 x 410 x 433.5 mm 16^1/4 × 16^1/8 × 17^1/18" |
| External Dimensions (Including Amp, Drivers, Terminals & Feet (H x W x D)) | 445 x 410 x 433.5 mm 17^1/2 × 16^1/8 × 17^1/16" |
| Finishes | Piano Gloss Black, Piano Ebony, Satin White, Dark Walnut |
Monitor Audio reserves the right to alter specifications without notice.
GOLD W12
1. Connecteur USB
natural_image
Two identical circular mechanical components with central bore and flanges, shown from top and side views (no text or symbols visible)Mode Bootloader
natural_image
Circular mechanical component with concentric rings and central hub, no visible text or symbols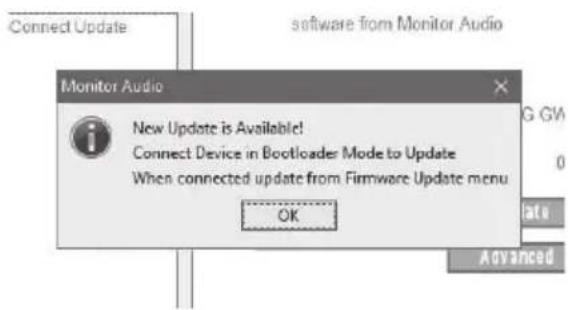
natural_image
Circular mechanical component with concentric rings and central hub, no visible text or symbolsnatural_image
Two identical circular mechanical components with dashed centerlines and central bore, shown from top and side views (no text or symbols visible)natural_image
Circular mechanical component with concentric rings and central aperture (no visible text or symbols)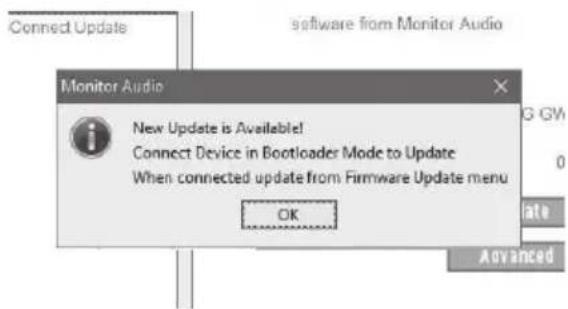
natural_image
Circular mechanical component with concentric rings and central hub, no visible text or symbols1. USB-Anschluss
natural_image
Two identical circular mechanical components with concentric rings and dashed outer surfaces, no visible text or symbols.Boot-Loader-Modus
natural_image
Circular mechanical component with concentric rings and central aperture, no visible text or symbolsManuelles Update
Werkseinstellungen
natural_image
Circular mechanical component with concentric rings and central hub, no visible text or symbols1. Conector USB
natural_image
Two identical circular mechanical components with dashed centerlines and central bore, shown from top and side views (no text or symbols visible)natural_image
Circular mechanical component with concentric rings and central hub, no visible text or symbols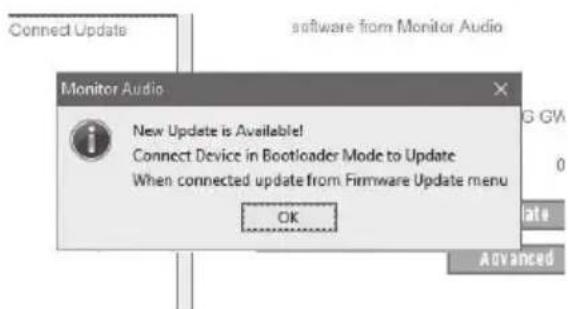
natural_image
Circular mechanical component with concentric rings and central aperture (no visible text or symbols)1. Conector USB
natural_image
Two identical circular mechanical components with central bore and flanges, shown from top and side views (no text or symbols visible)natural_image
Circular mechanical component with concentric rings and central aperture, no visible text or symbolsAtualização manual
natural_image
Circular mechanical component with concentric rings and central aperture, no visible text or symbols1. USB-aansluiting
natural_image
Two identical circular mechanical components with central bore and flanges, shown from top and side views (no text or symbols visible)Ceslaagde test. Mislukte test
OPMERKING
Bootloader-modus
natural_image
Circular mechanical component with concentric rings and radial slots, no visible text or symbolsHandmatige update
Fabrieksinstellingen herstellen
natural_image
Circular mechanical component with concentric rings and central hub, no visible text or symbols1. USB 接口
natural_image
Two identical circular mechanical components with concentric rings and dashed outer surfaces, shown from top and bottom views (no text or symbols visible)测试成功 测试失败
注意:
AV系统推荐设置
引导加载模式
natural_image
Circular mechanical component with concentric rings and central hub, no visible text or symbols手动更新
- 现在将显示进度条,显示更新的状态。
恢复出厂设置
natural_image
Circular mechanical component with concentric rings and radial slots, no visible text or symbols1. Разъём USB
natural_image
Two identical circular mechanical components with concentric rings and dashed outer surfaces, shown from top and bottom angles (no text or symbols visible)Режим загрузчка
natural_image
Circular mechanical component with concentric rings and central hub, no visible text or symbolsОбновление вручную
Сброс настроек
natural_image
Circular mechanical component with concentric rings and central hub, no visible text or symbols1. USB-раздым
natural_image
Circular mechanical component with concentric rings and dashed outer surfaces (no visible text or symbols)
natural_image
Circular mechanical component with concentric rings and central bore (no visible text or symbols)Рэжым загрузкі
natural_image
Circular mechanical component with concentric rings and central aperture (no visible text or symbols)Ручное абнаўленне
natural_image
Circular mechanical component with concentric rings and central hub, no visible text or symbolsnatural_image
Circular mechanical component with concentric rings and dashed outer ring, no visible text or symbolsnatural_image
Circular mechanical component with concentric rings and central aperture (no visible text or symbols)ECKEPTNE
кескінді көресіз.
natural_image
Circular mechanical component with concentric rings and radial slots, no visible text or symbols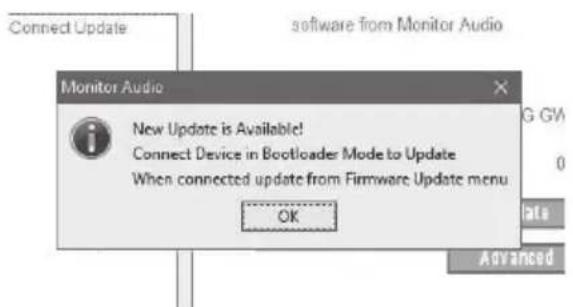
natural_image
Circular mechanical component with concentric rings and central hub, no visible text or symbols- USBコネクター
natural_image
Circular mechanical component with concentric rings and dashed outer ring (no visible text or symbols)テスト成功
natural_image
Circular mechanical component with concentric rings and dashed outer surfaces (no visible text or symbols)テスト失敗
注意
AVシステムの推奨設定
ブートローダーモード
natural_image
Circular mechanical component with concentric rings and central hub, no visible text or symbols手動による更新
ファクトリーリセット
natural_image
Circular mechanical component with concentric rings and mounting holes, no visible text or symbols販売店の詳細
販売店名:
住所:
郵便番号:____
電子メールアドレス:
仕様
natural_image
Circular mechanical component with concentric rings and dashed outer ring (no visible text or symbols)natural_image
Circular mechanical component with concentric rings and central bore (no visible text or symbols)Gold W12 استخدام
تصحيح الغرفة
- Introduction
- IMPORTANT!
- Positioning
- Never connect or disconnect any of the input connections with the Gold W12 switched on.
- Spiked Foot Fixing For Carpeted Floors
- Spiked Foot Fixing For Wooden/Hard Floors
- USB Connector
- RS232 Input
- 12 Volt Trigger Input \~ Centre Pin = +12Vdc.
- IR (Infrared) Output
- Line Level Inputs (Stereo Left & Right)
- RCA Line Level Outputs (Stereo Left & Right)
- LFE Input (RCA Type)
- LFE Output/ Link (RCA Type)
- Balanced LFE Output (Male XLR Type)
- Balanced LFE Input (Female XLR Type)
- Voltage Selection Switch
- Mains Power Switch
- IEC Mains Power Connector/Fuse Location
- Remote
- Main Indicator LEDs
- Trim Level Indicator
- Numbered LEDs
- Preset Select.
- Phase Adjustment.
- Control Dial
- Crossover Adjustment
- Using the Gold W12
- Power Cycle
- Waking Up
- Room Correction
- NOTE
- Using SubConnect for Room Correction
- Recommended Settings for AV Systems
- Recommended Settings for Stereo
- EQ Profiles
- Infra Red Remote Codes
- RS232
- RS232 Wiring Configuration
- RS232 Communication Set-Up Parameters
- Command Protocol
- ERROR
- Update Firmware on Sub
- Bootloader Mode
- Automatic Update.
- Manual Update
- Factory Reset
- Warranty
- Owner Information
- Product Details
- Dealer Details
- GOLD W12
- Connecteur USB
- Mode Bootloader
- USB-Anschluss
- Boot-Loader-Modus
- Manuelles Update
- Werkseinstellungen
- Conector USB
- Atualização manual
- USB-aansluiting
- OPMERKING
- Bootloader-modus
- Handmatige update
- Fabrieksinstellingen herstellen
- USB 接口
- 注意:
- AV系统推荐设置
- 引导加载模式
- 手动更新
- 恢复出厂设置
- Разъём USB
- Режим загрузчка
- Обновление вручную
- Сброс настроек
- USB-раздым
- Рэжым загрузкі
- Ручное абнаўленне
- ECKEPTNE
- 注意
- AVシステムの推奨設定
- ブートローダーモード
- 手動による更新
- ファクトリーリセット
- 販売店の詳細
- Gold W12 استخدام
Brand : MONITOR AUDIO
Model : Gold 300
Category : Speaker