
DCT418 - Wall scanner DEWALT - Free user manual and instructions
Find the device manual for free DCT418 DEWALT in PDF.

| Product Type | Portable Radar Wall Scanner |
| Brand | DEWALT |
| Model | DCT418 |
| Rated Voltage | 10.8 V DC |
| Battery Type | Lithium-Ion (Li-Ion) |
| Battery Capacity | 1.3 Ah (DCB121) or 1.5 Ah (DCB123) |
| Charger | DCB100 / DCB105, 230 V AC |
| Approximate Charge Time | 30 to 40 minutes |
| Weight (without battery) | 0.6 kg |
| Detectable Materials | Wood, ferrous metals, non-ferrous metals, PVC, live electrical wires |
| Max. Detection Depth (wood) | 38 mm (1-1/2") |
| Max. Detection Depth (metals/PVC/wires) | 76 mm (3") |
| Position Accuracy | +/- 13 mm (1/2") |
| Display Type | 89 mm (3.5") Color LCD |
| Display Resolution | 320 x 240 pixels |
| Available Languages | English, Spanish, French, German, Italian, Dutch, Russian, Polish |
| Operating Temperature Range | -5 °C to 45 °C |
| Storage Temperature Range | -32 °C to 50 °C |
| Auto Shut-off | After 15 minutes of inactivity |
| Maintenance | Clean with a dry, soft cloth; do not use solvents |
| Safety | Protection against overload, automatic shut-off, and temperature conditions |
| Warranty | 1 year (subject to conditions) |
| Included Accessories | 10.8V Li-Ion battery, charger, instruction manual |
Frequently Asked Questions - DCT418 DEWALT
User questions about DCT418 DEWALT
0 question about this device. Answer the ones you know or ask your own.
Ask a new question about this device
Download the instructions for your Wall scanner in PDF format for free! Find your manual DCT418 - DEWALT and take your electronic device back in hand. On this page are published all the documents necessary for the use of your device. DCT418 by DEWALT.
USER MANUAL DCT418 DEWALT
English (original instructions)
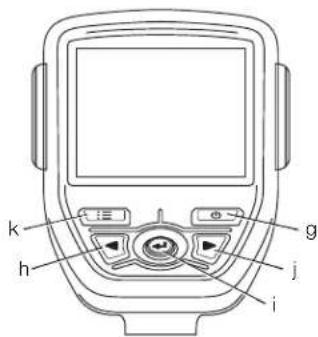
Figure 3
natural_image
Line drawing of a person holding a device with directional arrows indicating motion (no text or symbols)O. Hovedscanningsvindue
P. Tillidsmåler
Q. Materialeidentifikationsvindue
natural_image
Close-up of a textured wooden surface with vertical grooves and a central circular spot (no text or symbols)Trae
el
Strømførende
metal

Jernholdigt

natural_image
Pure electrical circuit lines without any symbolsnatural_image
Line drawing of a person using a handheld device in a 3D coordinate system with directional arrows (no text or symbols)natural_image
Abstract grayscale pattern with vertical striations and a central dark oval shape (no text or symbols)Holz

Spannungsführend

Eisenmetall

natural_image
Pure diagram of a structural beam with supports and a central support (no text or symbols)You have chosen a DEWALT tool. Years of experience, thorough product development and innovation make DEWALT one of the most reliable partners for professional power tool users.
Technical Data
| DCT418 | ||
| Voltage | V_CC | 10.8 |
| Type 1 | ||
| Battery type | Li-Ion | |
| Temperature range (Operating) | -5 °C to 45 °C(23 °F to 113 °F) | |
| Temperature range (Storage) | -32 °C to 50 °C(-25 °F to 122 °F) | |
| Weight (without battery) | kg | 0.6 |
| Scans throughceramic tile, marble andDrywall, plywood, OSB, | ||
concrete
| Detects objects | Wood studs, ferrous metal,non-ferrous metal, PVC,and live electric lines |
| Maximum wood stud sensing depth | 38 mm (1-1/2") |
| Maximum non-ferrous metal sensing depth | 76 mm (3") |
| Maximum ferrous metal sensing depth | 76 mm (3") |
| Maximum PVC pipe sensing depth | 76 mm (3") |
| Maximum live electric wire sensing depth | 76 mm (3") |
| Position accuracy | +/- 13 mm (1/2") |
| Display type | 89 mm (3.5") color LCD |
| Display resolution | 320x240 pixels |
| Language selection | English, Spanish, French,German, Italian, Dutch, |
Russian, Polish
| Battery pack | DCB121 | DCB123 | |
| Battery type | Li-Ion | Li-Ion | |
| Voltage | V_uc | 10.8 | 10.8 |
| Capacity | A_h | 1.3 | 1.5 |
| Weight | kg | 0.2 | 0.2 |
| Charger | DCB100 | DCB105 | |||
| Mains voltage | V_AC | 230 | 230 | ||
| Battery type | Li-Ion | Li-Ion | |||
| Approx. charging time | min | 40(1.3 Ah battery packs) | 40(1.5 Ah battery packs) | 30(1.3 Ah battery packs) | 30(1.5 Ah battery packs) |
| Weight | kg | 0.3 | 0.49 | ||
Fuses
| Europe | 230 V tools | 10 Amperes, mains |
| U.K. & Ireland | 230 V tools | 3 Amperes, in plugs |

WARNING: This is a Class A product. In a domestic environment this product may cause radio interference in which case the user may be required to take adequate measures.

WARNING: Increased electrostatic voltage may cause display to fail and all unsaved data will be lost. If the screen freezes, remove the 10.8 V battery pack to reset the unit. Reinsert the battery pack and press the power on button.
Definitions: Safety Guidelines
The definitions below describe the level of severity for each signal word. Please read the manual and pay attention to these symbols.

DANGER: Indicates an imminently hazardous situation which, if not avoided, will result in death or serious injury.

WARNING: Indicates a potentially hazardous situation which, if not avoided, could result in death or serious injury.

CAUTION: Indicates a potentially hazardous situation which, if not avoided, may result in minor or moderate injury.
NOTICE: Indicates a practice not related to personal injury which, if not avoided, may result in property damage.

Denotes risk of electric shock.
ENGLISH
Denotes risk of fire.

WARNING: To reduce the risk of injury, read the instruction manual.
Important Safety Instructions
- Read these instructions.
- Keep these instructions.
- Heed all warnings.
- Follow all instructions.
- Only use attachments/accessories specified by the manufacturer.
- Refer all servicing to qualified service personnel. Servicing is required when the apparatus has been damaged in any way, the apparatus has been exposed to rain or moisture, does not operate normally, or has been dropped.
SAVE ALL WARNINGS AND INSTRUCTIONS FOR FUTURE REFERENCE
Work Area Safety
a) Keep work area clean and well lit.
Cluttered or dark areas invite accidents.
b) Keep children and bystanders away while operating the hand-held radar scanner. Distractions can cause you to lose control.
Personal Safety
a) Stay alert, watch what you are doing and use common sense when operating the hand-held radar scanner. Do not use the hand-held radar scanner while you are tired or under the influence of drugs, alcohol or medication. A moment of inattention while operating the hand-held radar scanner, may result in serious personal injury.
b) Do not overreach. Keep proper footing and balance at all times. This enables better control of the hand-held radar scanner in unexpected situations.
c) Dress properly. Do not wear loose clothing or jewelry. Keep your hair, clothing and gloves away from moving parts. Loose clothes, jewelry or long hair can be caught in moving parts.
Use and Care
a) Store an idle hand-held radar scanner out of the reach of children and do not allow persons unfamiliar with the hand-
held radar scanner or these instructions to operate the hand-held radar scanner. The hand-held radar scanner may be dangerous in the hands of untrained users.
b) Use the hand-held radar scanner, accessories, etc. in accordance with these instructions, taking into account the working conditions and the work to be performed. Use of the hand-held radar scanner for operations different from those intended could result in a hazardous situation.
Battery Tool Use and Care
a) Recharge only with the charger specified by DEWALT. A charger that is suitable for one type of battery pack may create a risk of fire when used with another battery pack.
b) When battery pack is not in use, keep it away from other metal objects like paper clips, coins, keys, nails, screws, or other small metal objects that can make a connection from one terminal to another. Shorting the battery terminals together may cause burns or a fire.
c) Under abusive conditions, liquid may be ejected from the battery; avoid contact. If contact accidentally occurs, flush with water. If liquid contacts eyes, additionally seek medical help. Liquid ejected from the battery may cause irritation or burns.
Safety Information for Hand-Held Radar Scanners
WARNING: Do not disassemble or modify the hand-held radar scanner. There are no serviceable parts inside. If you need assistance, contact your local dealer.
- Do not operate the hand-held radar scanner in explosive atmospheres, such as in the presence of flammable liquids, gases, or dust. Hand-held radar scanners create sparks which may ignite the dust or fumes.
- The hand-held radar scanner should only be used with specifically designated DEWALT batteries. Use of any other batteries may create a risk of fire.
- Store the hand-held radar scanner out of reach of children and other untrained persons. Tools are dangerous in the hands of untrained users.
- Do not remove or deface warning labels.
- The hand-held radar scanner must remain in contact with the wall surface during the entire scan.
- Optimal operation of the hand-held radar scanner is possible only when the operating instructions are read and followed.
- Do not attach any stickers on name plates to the sensor area on the back of the hand-held radar scanner. Metal stickers especially could affect the measurement results.
- Before turning on the hand-held radar scanner, ensure that the back surface is not moist. If required, wipe with a dry cloth before scanning.
- Do not expose to extreme temperatures or variations in temperature. In case of large variations in temperature, allow the unit to adjust to ambient temperature before powering on. Extreme and variations in temperature can impair the display and accuracy of the tool.
• Static electricity may lead to inaccurate detection of electrical wires.

WARNING: Do not expose hand-held radar scanner or battery to excessive heat such as sunshine, fire or the like.

WARNING: Modifications not authorized by the manufacturer may void user's authority to operate this device.
WARNING: The detector alone should not be relied on exclusively to locate items below the scanned surface. Under certain circumstances, the scanner may not identify all objects or the exact location of objects. Use other information sources to help locate items before penetrating the surface. Such additional sources include construction plans, visible points of entry of pipes and wiring into walls, such as in a basement; and standard 40 cm (16") or 60 cm (24") stud spacing practices.
WARNING: You should always use caution when nailing, cutting or drilling in ceilings, walls and floors that may contain wiring or pipes near the surface. Shielded, dead or non-powered wires will not be detected as live wires. Remember that studs or joists are normally spaced 40 cm (16") or 60 cm (24") on centre and are usually 38 mm (1-1/2") in width. Beware of anything closer together or a different width.
Always turn the power off when working near electrical wires. Also, shut off gas and water supplies.

WARNING: To reduce the risk of injury and electric shock, always turn off power when working near electrical wires. Metal shielded wires or those in metal conduit will not be detected. Use extreme caution in these circumstances or whenever live AC wiring is present. Test the functionality of the AC, detect on a well known power supply prior to measurement.

WARNING: Live wires deeper than 50.8 mm (2") from the surface, in plastic conduit, behind plywood sheer wall or metallic wall coverings, cables operating at DC current or wires used in telecommunications and computer systems may not be detected. Wires that are not live may be detected as metal objects.

WARNING: Do not use the tool to detect AC voltage in un-insulated, exposed or free wires. Do not use as a substitute for a volt meter.

WARNING: Detection values can be impaired through certain ambient conditions. These include the proximity of other equipment that produce strong magnetic or electromagnetic fields, moisture, metallic building materials, foil laminated insulation materials or conductive wall paper or tiles. Use of transmitting systems such as WLAN, UMTS, radar, transmitting masts or microwaves can influence the measurements.
CAUTION: Do not use on humans or animals. This is not for human or animal use and can cause injury if used.
CAUTION: When not in use, place hand-held radar scanner on its side on a stable surface where it will not cause a tripping or falling hazard. Some tools with large battery packs will stand upright on the battery pack but may be easily knocked over.
ENGLISH
Detection Through Special Surface Conditions
WALLPAPER
The hand-held radar scanner will function normally on walls covered with wallpaper or fabric, unless the materials are metallic foil, contain metallic fibers or are still wet after application.
PLASTER AND LATH
Due to the uneven thickness of plaster, it may be difficult to locate studs. It may be easier to identify the metal nail heads in the studs. If the plaster is reinforced with wire mesh, the hand-held radar scanner will not be able to reliably detect objects behind it.
TEXTURED OR ACOUSTICAL WALLS AND CEILINGS
When scanning a wall or ceiling with an uneven surface, place thin cardboard on the surface and scan over the cardboard.
WOOD FLOORING, WOOD SUB-FLOORING AND DRYWALL OVER PLYWOOD
Due to the thickness of these materials, it may be difficult to detect a wood stud or joist. It may be easier to detect the metal nails that hold the materials to the stud or joist.
CARPETING
The hand-held radar scanner cannot detect studs or joists through carpeting. It may be easier to detect the metal nails that hold the materials to the stud or joist.
NOTE: Sensing depth and accuracy can vary due to moisture, content of the materials, wall texture and paint.
Residual Risks
In spite of the application of the relevant safety regulations and the implementation of safety devices, certain residual risks cannot be avoided. These are:
– Risk of personal injury due to prolonged use.
- Risk of personal injury due to unintentional contact with current-carrying parts during the work process.
Markings on Hand-Held Radar Scanner
The following pictograms are shown on the handheld radar scanner:

Read instruction manual before use.
DATE CODE POSITION
The date code, which also includes the year of manufacture, is printed into the housing surface that forms the mounting joint between tool and battery.
Example:
2012 XX XX
Year of Manufacture
Important Safety Instructions for All Battery Chargers
SAVE THESE INSTRUCTIONS: This manual contains important safety and operating instructions for the DCB100 and DCB105 battery chargers.
- Before using charger, read all instructions and cautionary markings on charger, battery pack, and product using battery pack.

WARNING: Shock hazard. Do not allow any liquid to get inside charger. Electric shock may result.

N: Burn hazard. To reduce the risk of injury, charge only DEWALT rechargeable batteries. Other types of batteries may burst causing personal injury and damage.

CAUTION: Children should be supervised to ensure that they do not play with the appliance.
NOTICE: Under certain conditions, with the charger plugged in to the power supply, the charger can be shorted by foreign material. Foreign materials of a conductive nature such as, but not limited to, grinding dust, metal chips, steel wool, aluminum foil, or any buildup of metallic particles should be kept away from charger cavities. Always unplug the charger from the power supply when there is no battery pack in the cavity. Unplug charger before attempting to clean.
- DO NOT attempt to charge the battery pack with any chargers other than the ones in this manual. The charger and battery pack are specifically designed to work together.
- These chargers are not intended for any uses other than charging DEWALT rechargeable batteries. Any other uses may result in risk of fire, electric shock or electrocution.
- Do not expose charger to rain or snow.
-
Pull by plug rather than cord when disconnecting charger. This will reduce risk of damage to electric plug and cord.
-
Make sure that cord is located so that it will not be stepped on, tripped over, or otherwise subjected to damage or stress.
- Do not use an extension cord unless it is absolutely necessary. Use of improper extension cord could result in risk of fire, electric shock, or electrocution.
- Do not place any object on top of charger or place the charger on a soft surface that might block the ventilation slots and result in excessive internal heat. Place the charger in a position away from any heat source. The charger is ventilated through slots in the top and the bottom of the housing.
- Do not operate charger with damaged cord or plug — have them replaced immediately.
- Do not operate charger if it has received a sharp blow, been dropped, or otherwise damaged in any way. Take it to an authorised service centre.
- Do not disassemble charger; take it to an authorised service centre when service or repair is required. Incorrect reassembly may result in a risk of electric shock, electrocution or fire.
- In case of damaged power supply cord the supply cord must be replaced immediately by the manufacturer, its service agent or similar qualified person to prevent any hazard.
- Disconnect the charger from the outlet before attempting any cleaning. This will reduce the risk of electric shock. Removing the battery pack will not reduce this risk.
• NEVER attempt to connect 2 chargers together. - The charger is designed to operate on standard 230 V household electrical power. Do not attempt to use it on any other voltage. This does not apply to the vehicular charger.
SAVE THESE INSTRUCTIONS
Chargers
The DCB100 and DCB105 chargers accept 10.8 V Li-Ion batteries.
These chargers require no adjustment and are designed to be as easy as possible to operate.
Charging Procedure (fi g. 1)
-
Plug the charger into an appropriate outlet before inserting battery pack.
-
Insert the battery pack (a) into the charger. The red (charging) light will blink continuously indicating that the charging process has started.
-
The completion of charge will be indicated by the red light remaining ON continuously. The pack is fully charged and may be used at this time or left in the charger.
NOTE: To ensure maximum performance and life of Li-Ion batteries, charge the battery pack fully before first use.
Charging Process
Refer to the table below for the state of charge of the battery pack.
State of charge
| charging | - | - | - | - |
| fully charged | —— | |||
| hot/cold pack delay | — | — | — | |
| replace battery pack | ●●●●●●●●● | |||
Hot/Cold Pack Delay
When the charger detects a battery that is too hot or too cold, it automatically starts a Hot/Cold Pack Delay, suspending charging until the battery has reached an appropriate temperature. The charger then automatically switches to the pack charging mode. This feature ensures maximum battery life.
LI-ION BATTERY PACKS ONLY
Li-Ion batteries are designed with an Electronic Protection System that will protect the battery against overloading, overheating or deep discharge.
The tool will automatically turn off if the Electronic Protection System engages. If this occurs, place the Li-Ion battery on the charger until it is fully charged.
Important Safety Instructions for All Battery Packs
When ordering replacement battery packs, be sure to include catalog number and voltage.
The battery pack is not fully charged out of the carton. Before using the battery pack and charger, read the safety instructions below. Then follow charging procedures outlined.
READ ALL INSTRUCTIONS
- Do not charge or use battery in explosive atmospheres, such as in the presence of flammable liquids, gases or dust. Inserting or removing the battery from the charger may ignite the dust or fumes.
ENGLISH
- Never force battery pack into charger. Do not modify battery pack in any way to fit into a non-compatible charger as battery pack may rupture causing serious personal injury.
- Charge the battery packs only in DEWALT chargers.
- DO NOT splash or immerse in water or other liquids.
- Do not store or use the tool and battery pack in locations where the temperature may reach or exceed 40 °C (105 °F) (such as outside sheds or metal buildings in summer).

WARNING: Never attempt to open the battery pack for any reason. If battery pack case is cracked or damaged, do not insert into charger. Do not crush, drop or damage battery pack. Do not use a battery pack or charger that has received a sharp blow, been dropped, run over or damaged in any way (i.e., pierced with a nail, hit with a hammer, stepped on). Electric shock or electrocution may result. Damaged battery packs should be returned to service centre for recycling.
CAUTION: When not in use, place tool on its side on a stable surface where it will not cause a tripping or falling hazard. Some tools with large battery packs will stand upright on the battery pack but may be easily knocked over.
SPECIFIC SAFETY INSTRUCTIONS FOR LITHIUM ION (Li-Ion)
- Do not incinerate the battery pack even if it is severely damaged or is completely worn out. The battery pack can explode in a fire. Toxic fumes and materials are created when lithium ion battery packs are burned.
- If battery contents come into contact with the skin, immediately wash area with mild soap and water. If battery liquid gets into the eye, rinse water over the open eye for 15 minutes or until irritation ceases. If medical attention is needed, the battery electrolyte is composed of a mixture of liquid organic carbonates and lithium salts.
- Contents of opened battery cells may cause respiratory irritation. Provide fresh air. If symptoms persist, seek medical attention.

WARNING: Burn hazard. Battery liquid may be flammable if exposed to spark or flame.
Battery Pack
BATTERY TYPE
The DCT418 operates on DEWALT 10.8 volt battery packs.
Storage Recommendations
- The best storage place is one that is cool and dry, away from direct sunlight and excess heat or cold. For optimum battery performance and life, store battery packs at room temperature when not in use.
- For long storage, it is recommended to store a fully charged battery pack in a cool, dry place out of the charger for optimal results.
NOTE: Battery packs should not be stored completely depleted of charge. The battery pack will need to be recharged before use.
Labels on Charger and Battery Pack
In addition to the pictographs used in this manual, the labels on the charger and the battery pack show the following pictographs:

Read instruction manual before use.


Hot/cold pack delay.

Do not probe with conductive objects.

Do not charge damaged battery packs.

Use only with DEWALT battery packs, others may burst, causing personal injury and damage.

Do not expose to water.

Have defective cords replaced immediately.

Charge only between 4 °C and 40 °C.

Discard the battery pack with due care for the environment.
Do not incinerate the battery pack.
See Technical data for charging time.
Only for indoor use.
Package Contents
The package contains:
1 Hand-held radar scanner
1 10.8 V XR Lithium-ion battery pack
1 Charger
1 Instruction manual
1 Exploded drawing
NOTE: Battery packs and chargers are not included with N-models.
- Check for damage to the tool, parts or accessories which may have occurred during transport.
• Take the time to thoroughly read and understand this manual prior to operation.
Description (fi g. 2)

WARNING: Never modify the hand-held radar scanner or any part of it. Damage or personal injury could result.
a. 10.8 V XR lithium-ion battery pack
b. Handle
c. Wheels
d. Sensor area
e. Center alignment line
f. Display
g. Power on/off button

Left/up arrow button

OK button

Right/down arrow button

Main menu button
INTENDED USE
The hand-held radar scanner is designed to help locate objects behind a wall surface. It can be used on surfaces including drywall, plywood, OSB, ceramic tile, marble and concrete.
Items detected include wood studs, ferrous metal, non-ferrous metal, live electric wires and PVC pipes.
Please read the entire manual before using the hand-held radar scanner.
The hand-held radar scanner is a professional tool.
DO NOT let children come into contact with the tool. Supervision is required when inexperienced operators use this tool.
Electrical Safety
The charger has been designed for one voltage only. Always check that the battery pack voltage corresponds to the voltage on the rating plate. Also make sure that the voltage of your charger corresponds to that of your mains.

Your DEWALT charger is double insulated in accordance with EN 60335; therefore no earth wire is required.
If the supply cord is damaged, it must be replaced by a specially prepared cord available through the DEWALT service organisation.
Mains Plug Replacement (U.K. & Ireland Only)
If a new mains plug needs to be fitted:
• Safely dispose of the old plug.
- Connect the brown lead to the live terminal in the plug.
- Connect the blue lead to the neutral terminal.

Follow the fitting instructions supplied with good quality plugs. Recommended fuse: 3 A.
Using an Extension Cable
An extension cord should not be used unless absolutely necessary. Use an approved extension cable suitable for the power input of your charger (see Technical Data). The minimum conductor size is 1 mm ^2 ; the maximum length is 30 m.
When using a cable reel, always unwind the cable completely.
ENGLISH
ASSEMBLY AND ADJUSTMENTS

WARNING: Always turn the hand-held radar scanner off before inserting or removing the battery pack.

WARNING: Use only DEWALT battery packs and chargers.
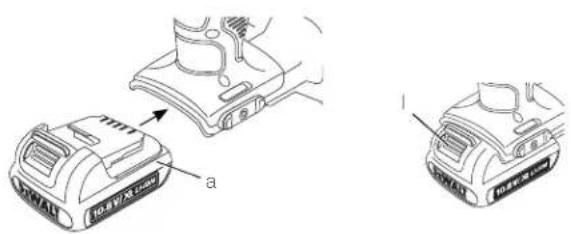
Inserting and Removing the Battery Pack from the Hand-Held Radar Scanner (fi g. 3)
NOTE: Make sure your battery pack is fully charged.
TO INSTALL THE BATTERY PACK INTO THE TOOL HANDLE
- Align the battery pack (a) with the rails inside the handle.
- Slide it firmly into place until you hear the lock snap into place.
TO REMOVE THE BATTERY PACK FROM THE TOOL
- Press the release button (I) and firmly pull the battery pack out of the hand-held radar scanner handle.
- Insert battery pack into the charger as described in the charger section of this manual.
OPERATION
Instructions for Use

VG: Always observe the safety instructions and applicable regulations.
Proper Hand Position

NG: To reduce the risk of serious personal injury, ALWAYS use proper hand position as shown.
Proper hand position requires one hand on the handle (b).
Getting Started (fi g. 2)
Power On/Off
To turn on the hand-held radar scanner, press the power on/off button (g) and hold for 0.5 seconds.
To turn off the hand-held radar scanner, press the power on/off button (g) and hold for 2 seconds. The hand-held radar scanner will also power off automatically after 15 minutes of inactivity.
INITIAL SETUP
Press the power button (g) to turn on the hand-held radar scanner.
The first time the hand-held radar scanner is powered on, it will prompt to select a language.
- Press the right/down arrow button (j) or left/up arrow button (h) to select the desired language.
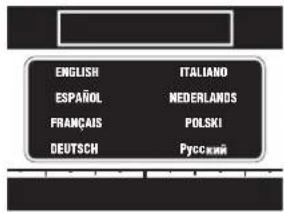
- Press the OK button (i) to confirm selection.
BASIC OPERATION
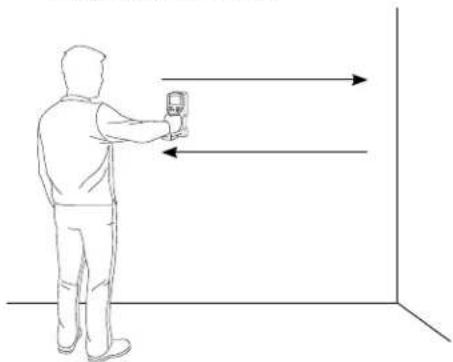
The hand-held radar scanner identifies objects behind a wall surface in three steps.
- Place unit on wall.
- Pre-scan Mapping: Move in a straight line across wall surface.
- Display scanned objects: Reverse scan direction to display identified objects.
natural_image
Line drawing of a person standing next to a device with directional arrows indicating motion (no text or symbols)The pre-scan data mapping process can begin in any direction. The hand-held radar scanner will automatically change to displaying objects when the initial scan direction is reversed.
The hand-held radar scanner can be used either horizontally or vertically.
During the first pass over the wall surface, the pre-scan data mapping occurs. The hand-held radar scanner will automatically sense and calibrate for all objects below the wall surface. When the direction of scan is reversed, the hand-held radar scanner will display the objects identified.
The hand-held radar scanner can map and analyze up to a 3 meter (9.8 foot) section of wall.
SCANNING PROCESS
- The screen below will indicate that the hand-held radar scanner is ready to start a new scan.
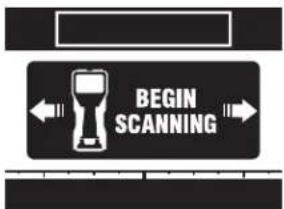
- Place the hand-held radar scanner on the wall to start a new scan.
- Move the hand-held radar scanner along the wall surface in a straight line. The screen below will appear indicating the pre-scan data mapping is in process.
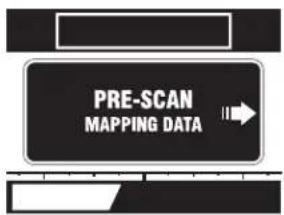
- The hand-held radar scanner has a scannable range of 3 meters (9.8 feet) of wall section. The yellow memory bar will fill, indicating how much of the available range is used. As the distance limit is approached, the memory bar will turn red.
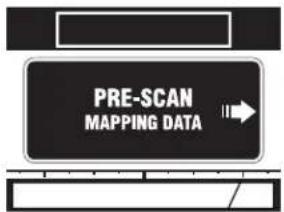
- Reverse scanning direction to read the mapped data. The main viewing screen below will appear.
flowchart
graph TD
    A["Signal"] --> B{Signal}
    B --> C["Central Target"]
    C --> D["Output"]
    style C fill:#f9f,stroke:#333
    style D fill:#ccf,stroke:#333
Ensure that the wheels are in contact with the wall surface during the entire pre-scan data mapping and scanning passes.
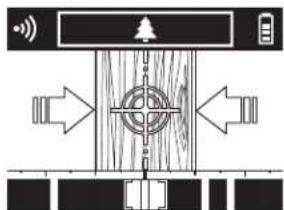
MAIN VIEWING SCREEN
The main viewing screen contains several sections of information.
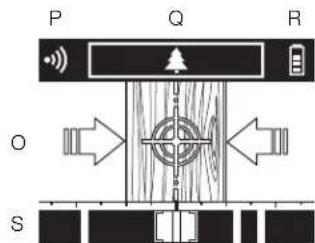
O. Main Scanning Window
P. Confidence Meter
Q. Material Identification Window
R. Battery Fuel Gauge
S. Tracking Bar
Main Scanning Window
The main scanning window (O) will give a graphical representation of the item identified below the wall surface.
Items identified include wood, ferrous metal, non-ferrous metal, plastic and live electric wires.

natural_image
Three grayscale abstract panels showing textured surfaces and patterns, no text or symbols present.Wood Live Electric Ferrous Metal
ENGLISH


Non-Ferrous Metal Plastic / PVC
Arrow indicators will appear to guide to the center of an object. Once the object center is detected, a center line icon will appear. In addition, the hand-held radar scanner can be set to beep when directly centered over an identified object. More information on turning the sound indication on or off is in the Menu Options section of the manual. The alignment lines (Fig. 2, e) on top of the hand-held radar scanner can then be used to guide marking the wall.
Confidence Meter

The confidence meter (P) gives a relative indication of signal strength.
A fully lit confidence meter indicates a strong data signal and high confidence of the material identified below the surface.
A partially lit confidence meter indicates a weaker signal and less confidence of the material identified below the wall.
To improve the signal strength, follow these tips:
- Scan in a straight line, either horizontal or vertical.
- Scan uniformly without lifting from the surface of the wall.
• Always scan SLOWLY to achieve maximum sensitivity.
- Do not touch the surface being scanned with your other hand or any other part of the body as it interferes with scanning.
- Review Detection Through Special Surface Conditions section of the manual.
Material Identification Window
The material identification window (Q) will give further detail of the item identified below the wall surface. Multiple items could be displayed if they are all directly below the hand-held radar scanner's position.
Items identified include:

Wood

Metal
(Ferrous)

Metal
(Non-Ferrous)

Plastic

Live
Electric
NOTE: When the hand-held radar scanner is directly over a live wire, the live electric icon will appear in the main scanning window (O) and the live electric icon will blink in the material identification window (Q).
When the hand-held radar scanner is near, but not directly over a live wire, the live electric icon will blink in the material identification window (Q). This indicates that there is live electric in the vicinity of the hand-held radar scanner.
Battery Fuel Gauge
The display on the hand-held radar scanner includes a battery fuel gauge (R) which consists of four yellow segments that indicate the level of charge remaining in the 10.8 V battery pack. When the level of charge in the pack. When the level of charge in the battery is below the usable limit, the last battery is below the double limit, the Ia segment of the battery fuel gauge will turn red to indicate that the battery will need to be recharged.
NOTE: The battery fuel gauge is only an indication of the charge left on the battery pack. It does not indicate product functionality and is subject to variation based on product component temperature and end-user application.
Tracking Bar

natural_image
Pure electrical circuit lines without any symbolsThe tracking bar (S) at the bottom of the main viewing screen gives a macro overview of the number of objects located during the pre-scan data mapping process.
The current position of the hand-held radar scanner is indicated by the brackets and shaded area.
The tracking bar can be helpful in indicating which way to move the hand-held radar scanner to identify additional objects behind the wall surface.
Error Messages
SCANNING TOO FAST
If the scanning speed exceeds the maximum processing speed of the hand-held radar scanner, the below error message will appear:

Remove the hand-held radar scanner from the wall.
When the BEGIN SCANNING screen appears on the display, place the hand-held radar scanner on the wall to restart the scan.
SCANNING TOO SLOW
If the scanning speed is below the minimum processing speed of the hand-held radar scanner, the following error message will appear:

Remove the hand-held radar scanner from the wall.
When the BEGIN SCANNING screen appears on the display, place the hand-held radar scanner on the wall to restart the scan.
BATTERY LOW
If the 10.8 V battery pack is about to run out of charge, the following error message will appear:
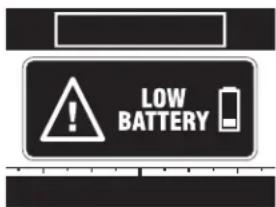
Replace or recharge the 10.8 V battery pack.
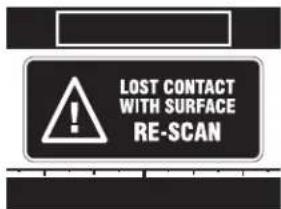
LOST CONTACT WITH THE WALL SURFACE
If the hand-held radar scanner loses contact with the wall surface, the following error message will appear:
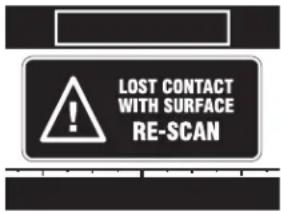
Remove the hand-held radar scanner from the wall.
When the BEGIN SCANNING screen appears on the display, place the hand-held radar scanner on the wall to restart the scan.
MAXIMUM DISTANCE EXCEEDED
The hand-held radar scanner has a maximum scanning range of 3 meters (9.8 feet). If the distance scanned exceeds the maximum distance, the following error message will appear:
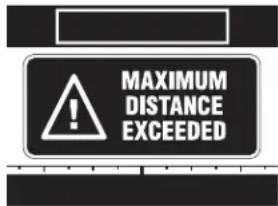
Remove the hand-held radar scanner from the wall.
When the BEGIN SCANNING screen appears on the display, place the hand-held radar scanner on the wall to restart the scan.
ENGLISH
Menu Options
Press the menu button (k) to view the menu options.
NOTE: At any time, the menu button may be pressed to navigate up one level.
- Press the right/down arrow button (j) or left/up arrow button (h) to highlight the menu option.
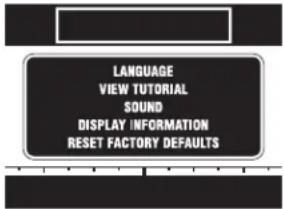
- Press the OK button (i) to confirm selection.
LANGUAGE SELECTION
- Press the right/down arrow button (j) or left/up arrow button (h) to select the desired language.
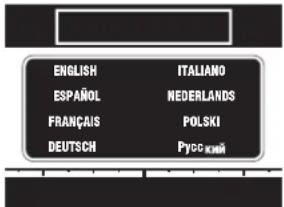
- Press OK button (i) to confirm selection.
VIEW TUTORIAL
The hand-held radar scanner includes a tutorial with tips for best practices.
After completion of the tutorial, the hand-held radar scanner will return to the main menu.
SOUND ON/OFF
- Press the right/down arrow button (j) or left/up arrow button (h) to highlight ON or OFF.
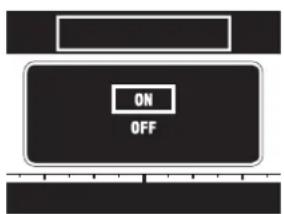
- Press the OK button (i) to confirm selection.
DISPLAY VERSION
The hand-held radar scanner will display the product software version.

Press the OK button (i) to exit.
RESET FACTORY DEFAULTS
NOTICE: Changing to default setup will erase current settings and restore factory settings.
- Press the right/down arrow button (j) or left/up arrow button (h) to highlight YES or NO.
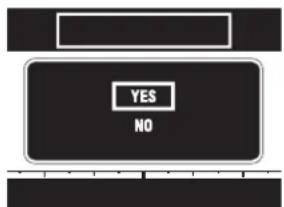
- Press the OK button (i) to confirm selection.
- If YES is selected, the hand-held radar scanner will ask for a second confirmation to restore factory defaults. Press the right/down arrow button (j) or left/up arrow button (h) to highlight YES or NO.

- Press the OK button (i) to confirm selection.
Operating Tips
- Use only DEWALT 10.8 V XR lithium-ion battery.
- Ensure the DEWALT battery is in good working condition. If the battery fuel gauge (R) on the main viewing screen has only one red segment lit, the battery needs to be recharged.
- Scan in a straight line, either horizontal or vertical.
- Scan uniformly without lifting from the surface of the wall.
• Always scan SLOWLY to achieve maximum sensitivity. - Do not touch the surface being scanned with your other hand or any other part of the body as it could interfere with scanning.
- Refer to construction plans, visible exits of wires and pipes and construction techniques. Studs are normally spaced either 40 cm (16") or 60 cm (24") on centre and are 38 mm (1-1/2") wide. Doors and windows are often constructed with studs and headers which are closer together.
- Avoid scanning through materials which have inconsistent density such as carpet with padding, excessively thick plaster and lath, freshly painted walls or metallic wall coverings.
- Avoid wearing jewelry such as rings or watches. The metal may cause inaccurate detection.
- Protect against moisture and direct sunlight.
- Do not place stickers, decals, paint or name plates, especially metal ones, on the sensor area of the back of the tool.
MAINTENANCE

WARNING: Always turn the hand-held radar scanner off before inserting or removing the battery pack.
Your DEWALT hand-held radar scanner has been designed to operate over a long period of time with a minimum of maintenance. Continuous satisfactory operation depends upon proper tool care and regular cleaning.
The charger, battery pack and hand-held radar scanner are not serviceable. There are no serviceable parts inside.

Cleaning

WARNING: Blow dirt and dust off with clean, dry air at least once a week. To minimize the risk of eye injury, always wear proper eye protection when performing this.

WARNING: Never use solvents or other harsh chemicals for cleaning the non-metallic parts of the tool. These chemicals may weaken the materials used in these parts. Use a cloth dampened only with water and mild soap. Never let any liquid get inside the tool; never immerse any part of the tool into a liquid.

WARNING: Do not apply solvents to the face as this may cause damage. Do not clean the infrared lens too vigorously as this can damage the delicate anti-reflective coating.
CHARGER CLEANING INSTRUCTIONS

IG: Shock hazard. Disconnect the charger from the AC outlet before cleaning. Dirt and grease may be removed from the exterior of the charger using a cloth or soft non-metallic brush. Do not use water or any cleaning solutions.
Optional Accessories

WARNING: Since accessories, other than those offered by DEWALT, have not been tested with this product, use of such accessories with this tool could be hazardous. To reduce the risk of injury, only DEWALT recommended accessories should be used with this product.
RECOMMENDED ACCESSORIES
Consult your dealer for further information on the appropriate accessories.
ENGLISH
Protecting the Environment

Separate collection. This product must not be disposed of with normal household waste.
Should you find one day that your DEWALT product needs replacement, or if it is of no further use to you, do not dispose of it with household waste. Make this product available for separate collection.

Separate collection of used products and packaging allows materials to be recycled and used again. Re-use of recycled materials helps prevent environmental pollution and reduces the demand for raw materials.
Local regulations may provide for separate collection of electrical products from the household, at municipal waste sites or by the retailer when you purchase a new product.
DEWALT provides a facility for the collection and recycling of DEWALT products once they have reached the end of their working life. To take advantage of this service please return your product to any authorised repair agent who will collect them on our behalf.
You can check the location of your nearest authorised repair agent by contacting your local DEWALT office at the address indicated in this manual. Alternatively, a list of authorised DEWALT repair agents and full details of our after-sales service and contacts are available on the Internet at:
www.2helpU.com.

Rechargeable Battery Pack
This long life battery pack must be recharged when it fails to produce sufficient power on jobs which were easily done before. At the end of its technical life, discard it with due care for our environment:
- Run the battery pack down completely, then remove it from the tool.
- Li-Ion cells are recyclable. Take them to your dealer or a local recycling station. The collected battery packs will be recycled or disposed of properly.
GUARANTEE
DEWALT is confident of the quality of its products and offers an outstanding guarantee for professional users of the product. This guarantee statement is in addition to and in no way prejudices your contractual rights as a professional user or your statutory rights as a private non-professional user. The guarantee is valid within the territories of the Member States of the European Union and the European Free Trade Area.
• 30 DAY NO RISK SATISFACTION GUARANTEE •
If you are not completely satisfied with the performance of your DEWALT tool, simply return it within 30 days, complete with all original components, as purchased, to the point of purchase, for a full refund or exchange. The product must have been subject to fair wear and tear and proof of purchase must be produced.
• ONE YEAR FREE SERVICE CONTRACT •
If you need maintenance or service for your DEWALT tool, in the 12 months following purchase, you are entitled to one service free of charge. It will be undertaken free of charge at an authorised DEWALT repair agent. Proof of purchase must be produced. Includes labour. Excludes accessories and spare parts unless failed under warranty.
• ONE YEAR FULL WARRANTY •
If your DEWALT product becomes defective due to faulty materials or workmanship within 12 months from the date of purchase, DEWALT guarantees to replace all defective parts free of charge or – at our discretion – replace the unit free of charge provided that:
• The product has not been misused;
- The product has been subject to fair wear and tear;
• Repairs have not been attempted by unauthorised persons;
• Proof of purchase is produced;
- The product is returned complete with all original components.
If you wish to make a claim, contact your seller or check the location of your nearest authorised DEWALT repair agent in the DEWALT catalogue or contact your DEWALT office at the address indicated in this manual. A list of authorised DEWALT repair agents and full details of our after-sales service is available on the Internet at: www.2helpU.com.
ENGLISH
Troubleshooting
| SITUATION PROBABLE CAUSE SOLUTION | ||
| Unit does not turn on | No power to unit | Make sure 10.8 V battery pack is fully chargedFully seat the 10.8 V battery pack in the handle |
| Unit does not display objects; says Pre-Scan Data Mapping | Unit is in process of mapping scanned area | Refer to Scanning Process section |
| No materials detected or difficult in detecting objects | Too narrow an area mappedDifficulty in scanning below special wall condition | Re-map larger areaScan slowlyScan in a straight lineRefer to Detection Through Special Surface Conditions sectionScan in both the horizontal and vertical directions |
| Difficulty in detection of metal | Metal items too deep | Scan in both horizontal and vertical straight lines. Metal sensitivity is increased when the metal object is parallel to the sensor. |
| Seemingly false metal detection | Metal items such as jewelry are too close to sensor area | Remove jewelry & re-scan |
| Difficulty in scanning near door or windows | Double or triple studs are common around doors and windows | Detect outer edge instead |
| Area of voltage detected is larger than anticipated | Static charge may be present on the wall surface | Scan a smaller areaTurn off the electrical circuit and identify metal wire insteadPlace your free hand on the wall to drain static |
| Electrical voltage not detected in area where it was thought to be | Wires are shielded by metal conduitWires are deeper than 76 mm (3*)Wires are not liveCannot scan below special wall condition | Review identified metal in scanning window to determine metal conduitPlug an item into a wall outlet to verify live circuitRefer to Detection Through Special Surface Conditions section |
| Low confidence meter reading | Scanning in a non-straight lineScanning too fastDifficulty scanning below special wall condition | Scan slowlyScan in a straight lineRefer to Detection Through Special Surface Conditions section |
| Received error message: Too fast | Scanning too fast Scan slowly | |
| Received error message: Lost surface contact | Hand-held radar scanner lifted off wall surface | Re-map area and repeat scanning |
| Cannot get a center line to appear | Wall is thick or dense | Refer to Detection Through Special Surface Conditions section |
| Screen freezes or won't turn on | Software lockup Insert a small object (i.e., paper clip end) into the reset button. The reset button is located on the back surface, under the label. There is a circle on the label indicating the reset location. | |
ESCÁNER DE RADAR INALÁMBRICO MANUAL DCT418
¡Enhorabuena!
natural_image
Line drawing of a person using a handheld device in a 3D coordinate system with directional arrows (no text or symbols)natural_image
Close-up of a textured wooden surface with vertical grooves and a small circular mark (no text or symbols)Madera

Cableado
eléctrico

Metal
cargado
fémico
ESPAÑOL

Metal no férrico Plástico / PVC

natural_image
Pure electrical circuit lines without any symbolsSuspension de charge.
natural_image
Line drawing of a person using a handheld device in a 3D coordinate system with directional arrows (no text or symbols)FRANÇAIS
natural_image
Abstract grayscale pattern with vertical stripes and a small circular mark (no text or symbols)Bois

natural_image
Abstract grayscale gradient image with vertical and horizontal bands (no text or symbols)natural_image
Pure electrical circuit lines without any symbolsBatterie rechargeable
natural_image
Line drawing of a person using a handheld device with directional arrows indicating motion (no text or symbols)ITALIANO
natural_image
Close-up of a textured surface with vertical striations and a small circular mark (no text or symbols)Legno
natural_image
Pure architectural or structural diagram with vertical and horizontal lines, no text or symbols presentWAARSCHUWING: Haal de multi-

WAARSCHUWING: Breng nooit

natural_image
Line drawing of a person using a handheld device in a room with directional arrows (no text or symbols)flowchart
graph TD
    A["Signal"] --> B["Central Circle"]
    B --> C["Directional Arrow 1"]
    B --> D["Directional Arrow 2"]
    B --> E["Directional Arrow 3"]
    B --> F["Directional Arrow 4"]
    B --> G["Directional Arrow 5"]
    B --> H["Directional Arrow 6"]
    B --> I["Directional Arrow 7"]
    B --> J["Directional Arrow 8"]
    B --> K["Directional Arrow 9"]
    B --> L["Directional Arrow 10"]
natural_image
Pure diagram of a vertical structure with rectangular elements and a central vertical line, no text or symbols present.GERING VERMOGEN ACCU
Vervang de 10.8 V-accu of laadt de accu op.
CONTACT MET HET OPPERVLAK VAN DE WAND VERLOREN
natural_image
Line drawing of a person standing in a 3D coordinate system with directional arrows indicating movement (no text or symbols)O. Hoved-skannevindu
natural_image
Close-up of a textured surface with vertical striations and a small circular mark (no text or symbols)Tre
natural_image
Pure electrical circuit lines without any symbolsSkift eller lad opp 10,8 V batteripakken.
TAPT KONTAKT MED VEGGFLATEN
Dersom den håndholdte radarskanneren mister kontakten med veggflaten, vil følgende feilmelding vises:
Ta den håndholdte radarskanneren bort fra veggen. Når skjermbildet START SKANNING [BEGIN SCANNING] vises på displayet, sett den håndholdte radarskanneren mot veggen og start skanningen på nytt.
MAKSIMAL DISTANSE OVERSKREDET
natural_image
Line drawing of a person using a handheld device in a room with directional arrows (no text or symbols)flowchart
graph TD
    A["Signal"] --> B["Central Circle"]
    B --> C["Directional Arrow 1"]
    B --> D["Directional Arrow 2"]
    B --> E["Directional Arrow 3"]
    B --> F["Directional Arrow 4"]
    B --> G["Directional Arrow 5"]
    B --> H["Directional Arrow 6"]
    B --> I["Directional Arrow 7"]
    B --> J["Directional Arrow 8"]
    B --> K["Directional Arrow 9"]
    B --> L["Directional Arrow 10"]
natural_image
Pure electrical circuit lines without any symbols
natural_image
Line drawing of a person using a handheld device with directional arrows indicating motion (no text or symbols)natural_image
Close-up of a textured surface with vertical striations and a small circular mark (no text or symbols)Puu

natural_image
Two vertical metallic bars with internal striped patterns, one on the left and one on the right (no text or symbols)natural_image
Pure electrical circuit lines without any symbolsVaihda tai lataa 10,8 V akku.
KONTAKTI SEINÄPINTAAN MENETETTY
natural_image
Line drawing of a person using a handheld device with directional arrows indicating motion (no text or symbols)SVENSKA
natural_image
Close-up of a wooden surface with visible grain patterns and a small circular mark (no text or symbols)Trä

natural_image
Abstract grayscale gradient image with vertical and horizontal bands (no text or symbols)natural_image
Pure electrical circuit lines without any symbolsByt eller ladda 10,8 V batteripaketet.
FÖRLORAD KONTAKT MED VÄGGYTAN
natural_image
Line drawing of a person using a handheld device with directional arrows indicating movement (no text or symbols)flowchart
graph TD
    A["Signal"] --> B{Signal}
    B --> C["Directional Arrow"]
    C --> D["Central Circle"]
    D --> E["Directional Arrow"]
    E --> F["Directional Arrow"]
    F --> G["Directional Arrow"]
    G --> H["Directional Arrow"]
    H --> I["Directional Arrow"]
    I --> J["Directional Arrow"]
    J --> K["Directional Arrow"]
    K --> L["Directional Arrow"]
    L --> M["Directional Arrow"]
    M --> N["Directional Arrow"]
    N --> O["Directional Arrow"]
    O --> P["Directional Arrow"]
    P --> Q["Directional Arrow"]
    Q --> R["Directional Arrow"]
    R --> S["Directional Arrow"]
    S --> T["Directional Arrow"]
    T --> U["Directional Arrow"]
    U --> V["Directional Arrow"]
    V --> W["Directional Arrow"]
    W --> X["Directional Arrow"]
    X --> Y["Directional Arrow"]
natural_image
Close-up of a textured gray surface with vertical striations and a small dark circular artifact (no text or symbols)Ahşap

Akımlı Elektrik

Demir İçeren
Metal
natural_image
Pure architectural floor plan lines without any text, numbers, or symbols
(DemRAZLA HIZLI TARAMA
natural_image
Line drawing of a person holding a smartphone with directional arrows indicating motion (no text or symbols)natural_image
Abstract grayscale pattern with vertical stripes and a small circular mark (no text or symbols)Ξύλο

Ηλεκτροφόρο
καλώδιο

Σιδηρούχο
ταλλο