
TX-55MXX689 - TV PANASONIC - Free user manual and instructions
Find the device manual for free TX-55MXX689 PANASONIC in PDF.

| Product type | LED Television |
| Brand | Panasonic |
| Model | TX-55MXX689 |
| Screen size | 55 inches (139 cm) |
| Resolution | Ultra HD (4K) 3840 x 2160 pixels |
| HDR Technology | HDR10, HLG, Dolby Vision |
| Smart TV | Yes (HbbTV, apps, Internet browser) |
| Voice assistant | Built-in Alexa and Google Assistant compatible |
| Tuner | DVB-T2/C/S2 (dual satellite tuner) |
| Connectivity | HDMI (x3), USB (x2), Ethernet LAN, Wi-Fi 802.11 a/b/g/n |
| ARC/eARC | Yes (HDMI 2 with eARC) |
| Audio output | 2 x 10 W (Dolby Atmos compatible) |
| Game mode | Yes (auto ALLM) |
| Power consumption | 140 W (standby < 0.5 W in normal mode) |
| Power supply | 220-240 V AC, 50 Hz |
| Weight (with stand) | 17 kg |
| Dimensions (with stand) | 221 x 1233 x 769 mm |
| Dimensions (without stand) | 66 x 1233 x 711 mm |
| Wall mount | VESA 200 x 200 mm (M6 screws) |
| Included accessories | Remote control, batteries (2xAA), power cord, stand, mounting screws |
| Security | Parental lock, auto off, image standby mode |
Frequently Asked Questions - TX-55MXX689 PANASONIC
User questions about TX-55MXX689 PANASONIC
0 question about this device. Answer the ones you know or ask your own.
Ask a new question about this device
Download the instructions for your TV in PDF format for free! Find your manual TX-55MXX689 - PANASONIC and take your electronic device back in hand. On this page are published all the documents necessary for the use of your device. TX-55MXX689 by PANASONIC.
USER MANUAL TX-55MXX689 PANASONIC
You can find instructions for your TV's features in the E-Manual. To access the E-Manual, enter Settings menu, select Manuals and press OK. For quick access press Home/Menu button and then Info button.
Markings on the Product 2
Maintenance 4
Display panel, Cabinet, Pedestal. 4
Mains plug 4
Assembling / Removing the pedestal 4
When using the wall-hanging bracket. 5
Environmental Information. 5
Features 6
Ultra HD (UHD). 6
High Dynamic Range (HDR) / Hybrid Log-Gamma (HLG) 6
Dolby Vision. 6
Accessories Included 6
Standby Mode Picture 6
Standby Notifications 7
TV Control & Operation 7
Using Main TV Menu 8
Inserting the Batteries into the Remote 9
Power Connection 9
Antenna Connection 10
Licence Notification 10
Disposal of Old Equipment and Batteries. 10
Declaration of Conformity (DoC) 11
Specification 12
Notice 13
Remote Control 14
Connections 15
Switching On/Off. 16
First Time Installation. 16
MediaPlayback via USB Input 18
Media Browser. 18
CEC 19
Game Mode 19
E-Manual 19
Settings Menu Content 20
General TV Operation 27
Using the Channel List 27
Configuring Parental Settings 27
ElectronicProgramme Guide 27
Teletext Services 28
Software Upgrade 28
Troubleshooting & Tips 28
HDMI Signal Compatibility. 29
Supported File Formats for USB Mode 30
Video File Formats 30
Picture File Formats 30
Audio File Formats 30
Subtitle File Formats 30
Supported DVI Resolutions 31
Connectivity 32
Wired Connectivity. 32
Wireless Connectivity 32
Handling of the customer information 33
Networked Standby Mode 34
Wireless Display 34
Connectivity Troubleshooting 34
Using Audio Video Sharing Network Service.....35
35
Internet Browser 35
HBBTV System 36
Alexa Ready 37
Google Assistant. 38
DVB functionality information 39
Safety Information

CAUTION
RISK OF ELECTRIC SHOCK DO NOT OPEN

CAUTION: TO REDUCE THE RISK OF ELECTRIC SHOCK DO NOT REMOVE COVER (OR BACK).
NO USER-SERVICEABLE PARTS INSIDE. REFER SERVICING TO QUALIFIED SERVICE PERSONNEL
In extreme weather (storms, lightning) and long inactivity periods (going on holiday) disconnect the TV set from the mains.
The mains plug is used to disconnect TV set from the mains and therefore it must remain readily operable. If the TV set is not disconnected electrically from the mains, the device will still draw power for all situations even if the TV is in standby mode or switched off.
Note: Follow the on screen instructions for operating the related features.
IMPORTANT - Please read these instructions fully before installing or operating
WARNING: This device is intended to be used by persons (including children) who are capable / experienced of operating such a device unsupervised, unless they have been given supervision or instruction concerning the use of the device by a person responsible for their safety.
- Use this TV set at an altitude of less than 5000 metres above the sea level, in dry locations and in regions with moderate or tropical climates.
The TV set is intended for household and similar indoor use but may also be used in public places.
For ventilation purposes, leave at least 5cm of free space around the TV. - The ventilation should not be impeded by covering or blocking the ventilation openings with items, such as newspapers, table-cloths, curtains, etc.
- The power cord/plug should be easily accessible. Do not place the TV, furniture, etc. on the power cord. A damaged power cord/plug can cause fire or give you an electric shock. Handle the power cord by the plug, do not unplug the TV by pulling the power cord. Never touch the power cord/plug with wet hands as this could cause a short circuit or electric shock. Never make a knot in the power cord or tie it with other cords. When damaged it must be replaced, this should only be done by qualified personnel.
- Do not expose the TV to dripping or splashing of liquids and do not place objects filled with liquids, such as vases, cups, etc. on or over the TV (e.g. on shelves above the unit).
-
Do not expose the TV to direct sunlight or do not place open flames such as lit candles on the top of or near the TV.
-
Do not place any heat sources such as electric heaters, radiators, etc. near the TV set.
- Do not place the TV on the floor or inclined surfaces.
- To avoid danger of suffocation, keep plastic bags out of the reach of babies, children and domestic animals.
- Carefully attach the stand to the TV. If the stand is provided with screws, tighten the screws firmly to prevent the TV from tilting. Do not over-tighten the screws and mount the stand rubbers properly.
- Do not dispose of the batteries in fire or with hazardous or flammable materials.
WARNING
- Batteries must not be exposed to excessive heat such as sunshine, fire or the like.
- Excessive sound pressure from earphones or headphones can cause hearing loss.
ABOVE ALL - NEVER let anyone, especially children, push or hit the screen, push anything into holes, slots or any other openings in the TV.
| Caution | Serious injury or death risk |
| Risk of electric shock | Dangerous voltage risk |
| Maintenance | Important maintenance component |
Markings on the Product
The following symbols are used on the product as a marker for restrictions and precautions and safety instructions. Each explanation shall be considered where the product bears related marking only. Note such information for security reasons.

Class II Equipment: This appliance is designed in such a way that it does not require a safety connection to electrical earth.

Hazardous Live Terminal: The marked terminal(s) is/are hazardous live under normal operating conditions.

Caution, See Operating Instructions: The marked area(s) contain(s) user replaceable coin or button cell batteries.

Class 1 Laser Product: This product contains Class 1 laser source that is safe under reasonably foreseeable conditions of operation.
WARNING
- Do not ingest the battery, Chemical Burn Hazard.
-
This product or the accessories supplied with the product may contain a coin button cell battery. If the coin button cell battery is swallowed, it can cause severe internal burns in just 2 hours and can lead to death.
-
Keep new and used batteries away from children.
- If the battery compartment does not close securely stop using the product and keep it away from children.
If you think batteries might have been swallowed or placed inside any part of the body, seek immediate medical attention.
A television may fall, causing serious personal injury or death. Many injuries, particularly to children, can be avoided by taking simple precautions such as:
- ALWAYS use cabinets or stands or mounting methods recommended by the manufacturer of the television set.
- ALWAYS use furniture that can safely support the television set.
- ALWAYS ensure the television set is not overhanging the edge of the supporting furniture.
- ALWAYS educate children about the dangers of climbing on furniture to reach the television set or its controls.
- ALWAYS route cords and cables connected to your television so they cannot be tripped over, pulled or grabbed.
NEVER place a television set in an unstable location. - NEVER place the television set on tall furniture (for example, cupboards or bookcases) without anchoring both the furniture and the television set to a suitable support.
- NEVER place the television set on cloth or other materials that may be located between the television set and supporting furniture.
- NEVER place items that might tempt children to climb, such as toys and remote controls, on the top of the television or furniture on which the television is placed.
The equipment is only suitable for mounting at heights ≤ 2m
If the existing television set is going to be retained and relocated, the same considerations as above should be applied.
Apparatus connected to the protective earthing of the building installation through the MAINS connection or through other apparatus with a connection to protective earthing – and to a television distribution system using coaxial cable, may in some circumstances create a fire hazard. Connection to a television distribution system has therefore to be provided through a device providing electrical isolation below a certain frequency range (galvanic isolator).
WALL MOUNTING WARNINGS
- Read the instructions before mounting your TV on the wall.
- The wall mount kit is optional. You can obtain from your local dealer, if not supplied with your TV.
- Do not install the TV on a ceiling or on an inclined wall.
- Use the specified wall mounting screws and other accessories.
-
Tighten the wall mounting screws firmly to prevent the TV from falling. Do not over-tighten the screws.
-
Using other wall-hanging brackets, or installing a wall-hanging bracket by yourself have the risk of personal injury and product damage. In order to maintain the unit's performance and safety, be absolutely sure to ask your dealer or a licensed contractor to secure the wall-hanging brackets. Any damage caused by installing without a qualified installer will void your warranty.
- Carefully read the instructions accompanying optional accessories, and be absolutely sure to take steps to prevent the TV from falling off.
- Handle the TV carefully during installation since subjecting it to impact or other forces may cause product damage.
Take care when fixing wall brackets to the wall. Always ensure that there are no electrical cables or pipes in the wall before hanging bracket. - To prevent fall and injury, remove the TV from its fixed wall position when it is no longer in use.
DAMAGES
- Exceeding cases where responsibility is recognised by local regulations, Panasonic accepts no responsibility for malfunctions caused by misuse or use of the product, and other problems or damages caused by use of this product.
- Panasonic accepts no responsibility for loss, etc., of data caused by disasters.
- External devices separately prepared by the customer are not covered by the warranty. Care for the data stored in such devices is the responsibility of the customer. Panasonic accepts no responsibility for abuse of this data.
Figures and illustrations in these operating instructions are provided for reference only and may differ from the actual product appearance. Product design and specifications may be changed without notice.
Maintenance
First, remove the mains plug from the mains socket.
Display panel, Cabinet, Pedestal
Regular care:
Gently wipe the surface of the display panel, cabinet, or pedestal by using a soft cloth to remove dirt or fingerprints.
For stubborn dirt:
- First clean the dust from the surface.
- Dampen a soft cloth with clean water or diluted neutral detergent (1 part detergent to 100 parts water).
- Wring out the cloth firmly. (Please note, do not let liquid enter the TV inside as it may lead to product failure.)
- Carefully wipe moisten and wipe away the stubborn dirt.
- Finally, wipe away all the moisture.
Caution
Do not use a hard cloth or rub the surface too hard, otherwise this may cause scratches on the surface.
Take care not to subject the surfaces to insect repellent, solvent, thinner or other volatile substances. This may degrade surface quality or cause peeling of the paint.
- The surface of the display panel is specially treated and may be easily damaged. Take care not to tap or scratch the surface with your fingernail or other hard objects.
- Do not allow the cabinet and pedestal to make contact with a rubber or PVC substance for a long time. This may degrade surface quality.
Mains plug
Wipe the mains plug with a dry cloth at regular intervals.
Moisture and dust may cause fire or electrical shock.
Assembling / Removing the pedestal
Preparations
Take out the pedestal(s) and the TV from the packing case and put the TV onto a work table with the screen panel down on the clean and soft cloth (blanket, etc.)
Use a flat and firm table bigger than the TV.
- Do not hold the screen panel part.
Make sure not to scratch or break the TV.
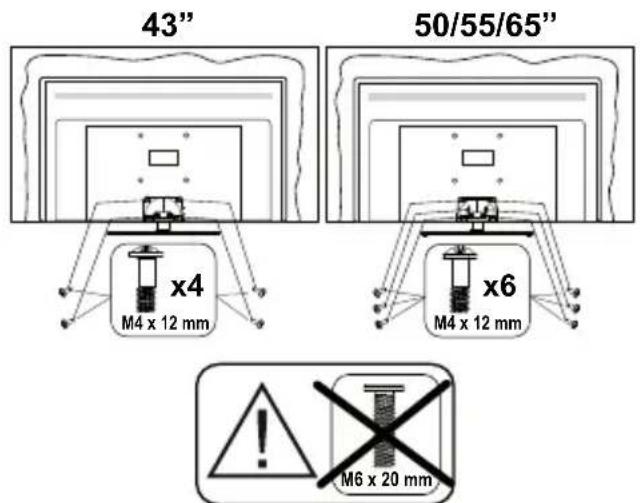
CAUTION: Please refrain from inserting pictured screws to the TV body when not using the TV stand e.g. wall hanging. Inserting screws without pedestal may cause a damage of the TV.
Assembling the pedestal
- The stand of the TV consists of 4 pieces. Install these pieces together.

- Place the stand(s) on the stand mounting pattern(s) on the rear side of the TV.
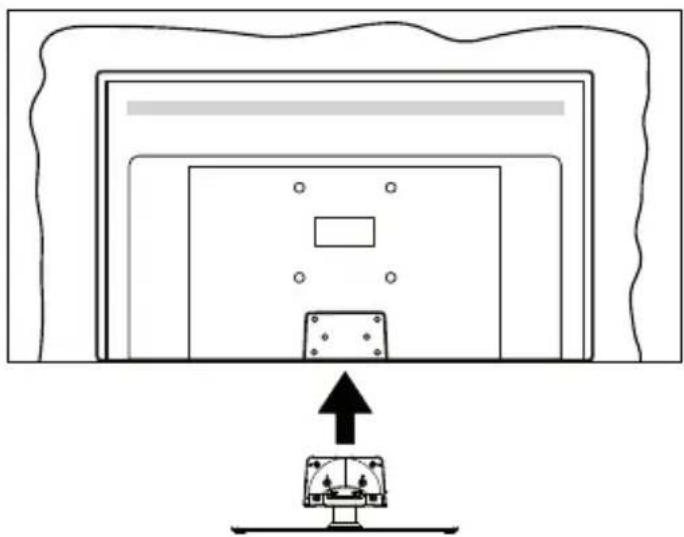
- Insert the screws (M4 x 12 mm) provided and tighten them gently until the stand is properly fitted.
Removing the pedestal from the TV
Be sure to remove the pedestal in the following way when using the wall-hanging bracket or repacking the TV.
- Put the TV onto a work table with the screen pane down on the clean and soft cloth. Leave the stand(s) protruding over the edge of the surface.
Unscrew the screws that fixing the stand(s). - Remove the stand(s).
When using the wall-hanging bracket
Please contact your local Panasonic dealer to purchase the recommended wall-hanging bracket.
Holes for wall-hanging bracket installation;
Rear of the TV
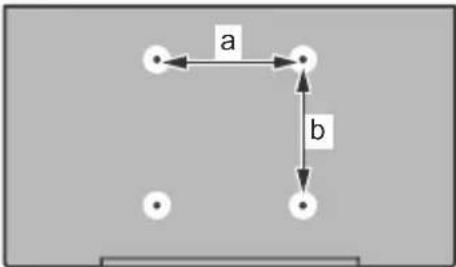
| 43" | 50" | 55" | 65" | |
| a (mm) | 100 | 200 | 200 | 400 |
| b (mm) | 100 | 200 | 200 | 200 |
View from the side
VESA
Bracket
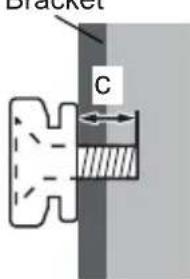
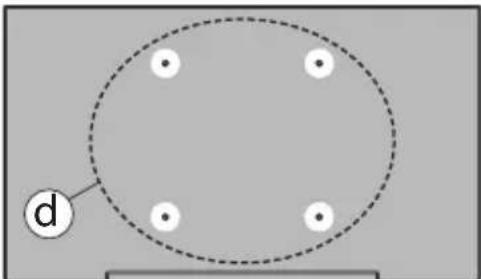
| (d) | 43” 50”, 55”, 65” | |||
| Depth of screw (c) | min. | 9 mm 12 | mm | |
| max. | 10 mm | 15 mm | ||
| Diameter M4 M6 | ||||
Note: The screws for fixing the TV onto the wall-hanging bracket are not supplied with the TV.
Environmental Information
This television is designed to be environmentally friendly. To reduce energy consumption, you can follow these steps:
If you set the Energy Saving to Minimum, Medium, Maximum or Auto the TV will adjust the energy consumption accordingly. Set as Off to turn this setting off. If you like to set the backlight to a fixed value set as Custom, highlight the Backlight (will be located under the Energy Saving setting) and then adjust manually using Left or Right directional buttons on the remote.
Note: Available Energy Saving options may differ depending on the selected Mode in the Settings>Picture menu.
The Energy Saving settings can be found in the Settings>Picture menu. Note that some picture settings will be unavailable to be changed.
You can also turn the screen off using the Screen Off option, if you want to hear the sound only and don't need to watch. If pressed Right button or Left button consecutively Screen Off option will be selected and "Screen will be off in 15 seconds." message will be displayed on the screen. Select Proceed and press OK to turn the screen off immediately. If you don't press any button, the screen will be off in 15 seconds. Press any button on the remote or on the TV to turn the screen on again.
Note: Screen Off option is not available if the Mode is set to Game.
When the TV is not in use, please switch off or disconnect the TV from the mains plug. This will also reduce or stop the energy consumption.
Features
Remote controlled colour TV
Fully integrated digital terrestrial/cable/satellite TV (DVB-T-T2/C/S-S2)
- HDMI inputs to connect other devices with HDMI sockets
USB input
- OSD menu system
- Stereo sound system
Teletext
- Headphone connection
Automatic programming system
- Manual tuning
Automatic power down after up to eight hours.
- Sleep timer
Child lock
Automatic sound mute when no transmission.
- NTSC playback
AVL (Automatic Volume Limiting)
PLL (Frequency Search)
Game Mode (Optional)
Picture offunction
- Ethernet (LAN) for Internet connectivity and service
802.11 a/b/g/n built in WLAN Support
Audio Video Sharing
HbbTV
Ultra HD (UHD)
TV supports Ultra HD (Ultra High Definition - also known as 4K) which provides resolution of 3840 × 2160 (4K:2K). It equals 4 times the resolution of Full HD TV by doubling the pixel count of the Full HD TV both horizontally and vertically. Ultra HD content is supported via native and market applications, HDMI, USB input(s) and over DVB-T2 and DVB-S2 broadcasts.
High Dynamic Range (HDR) / Hybrid Log-Gamma (HLG)
Using this feature the TV can reproduce greater dynamic range of luminosity by capturing and then combining several different exposures. HDR/HLG promises better picture quality thanks to brighter, more realistic highlights, more realistic colour and other improvements. It delivers the look that filmmakers intended to achieve, showing the hidden areas of dark shadows and sunlight with full clarity, colour and detail. HDR/HLG content is supported via native and market applications, HDMI, USB inputs and over DVB-S broadcasts. Set the related HDMI source input as Enhanced from the Sources option in the
Settings>System menu or from the Sources>Source Settings menu in order to watch HDR/HLG content, if the HDR/HLG content is received through an HDMI input. The source device should also be at least HDMI 2.0a compatible in this case.
Dolby Vision
Dolby Vision™ delivers a dramatic visual experience, astonishing brightness, exceptional contrast, and vivid colour, that brings entertainment to life. It achieves this stunning image quality by combining HDR and wide colour gamut imaging technologies. By increasing the brightness of the original signal and using a higher dynamic colour and contrast range, Dolby Vision presents amazing true-to-life images with stunning detail that other post-processing technologies in the TV aren't able to produce. Dolby Vision is supported via native and market applications, HDMI and USB inputs. Set the related HDMI source input as Enhanced from the Sources option in the Settings>System menu or from the Sources>Source Settings menu in order to watch Dolby Vision content, if the Dolby Vision content is received through an HDMI input. The source device should also be at least HDMI 2.0a compatible in this case. In the Settings>Picture>Mode menu two predefined picture modes will be available if Dolby Vision content is detected: Dolby Vision Bright and Dolby Vision Dark. Both allow the user to experience the content in the way the creator originally intended with different ambient lighting conditions.
Accessories Included
Remote Control
- Batteries: 2 × AA
- Operating Instructions
Power Cord
- Detachable stand
- Stand mounting screws (M4 x 12 mm) + (M6 x 20 mm)
Standby Mode Picture
You can use your TV as a digital picture frame using the Standby Mode Picture feature. In order to do this follow the steps below.
- Set the Standby Mode Picture option in the Settings>System>More menu as On. This option is set as Off by default. You can also define interval for standby mode picture slideshow using the Standby Mode Picture Interval option in this menu.
- Create a separate folder named as standby_picture in the USB storage device's root directory and copy the files you want to use into that folder and then connect the USB storage device to your TV.
- Press the Standby button on the remote briefly to switch your TV into standby mode picture state.
Note that once the Standby Mode Picture option is set as On, the function of the Standby button on the
remote will change. After this you will need to press and hold the button to switch the TV into standby mode while the TV is in normal operating mode.
If there are more than 1 picture file available in the folder all picture files will be displayed as a slide show in succession. If the necessary folder is not created or there isn't any picture file in the folder, a warning message will be displayed on the screen for a few seconds and then disappear.
In standby mode picture state the backlight level of the screen will be decreased by 50% and Smart Center features will not be usable, if Smart Center is available for your TV model.
To switch your TV from standby mode picture state back to normal operating mode press the Standby button on the remote briefly.
Beside the remote control you can also use the control unit on the TV to switch into standby mode picture state and back to normal operating mode. In order to do that follow the same instructions as described in the TV Control & Operation section for switching the TV into the standby mode. Note that you will not be able to switch the TV into standby mode using the control unit on the TV while the TV is in standby mode picture state.
Note: The availability of this feature depends on the TV model and its features.
Refer to the Supported File Formats for USB Mode section for the supported media file formats.
Standby Notifications
If the TV does not receive any input signal (e.g. from an aerial or HDMI source) for 3 minutes, it will go into standby. When you next switch-on, the following message will be displayed: "TV switched to stand-by mode automatically because there was no signal for a long time." You can disable this functionality by setting the Timer of No Signal option in the Settings>Devices menu accordingly.
The Auto Power Down option (in the Settings>System >More menu) could have been set to a value between 1 and 8 hours by default. If this setting is not set as Off and the TV has been left on and not been operated during the set time, it will switch into standby mode after the set time has expired. When you next switch-on the TV, the following message will be displayed: "TV switched to stand-by mode automatically because no operation was made for a long time." Before the TV switches into standby mode a dialogue window will be displayed. If you do not press any button the TV will switch into the standby mode after a waiting period of about 5 minutes. You can highlight Yes and press OK to switch the TV into standby mode immediately. If you highlight No and press OK, the TV will remain on. You can also choose to cancel the Auto Power Down function from this dialogue. Highlight Disable and press OK, the TV will remain on and the function will be set as Off. You can enable this function again by
changing the setting of the Auto Power Down option from the Settings>System>More menu.
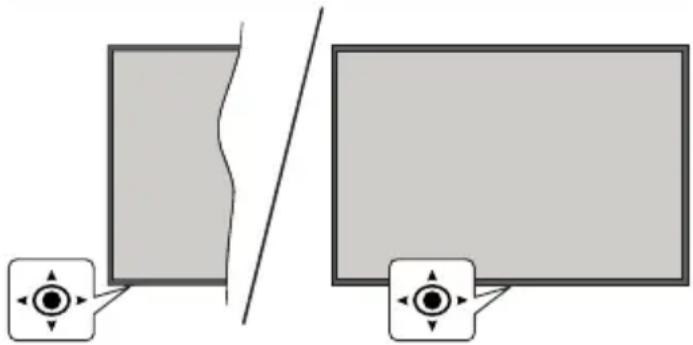
TV Control & Operation
This TV has a joystick as shown in the above drawing. It allows you to control the Volume / Programme / Source and Turn Off - On functions of the TV.
Note: The position of the joystick may differ depending on the model.
To change volume: Increase or decrease the volume by pushing the joystick right or left.
To change channel: Scroll through the stored channels by pushing the joystick forwards or pulling it towards yourself.
To change source: Press the centre of the joystick in, the sources list will appear on the screen. Scroll through the available sources by pushing the joystick forwards or pulling it towards yourself.
To turn the TV off (Hard Standby): Press the centre of the joystick in and hold it down for more than 3 seconds, the TV will turn into hard standby mode.
In hard standby mode the remote control will not function and the standby LED on the TV will not lit. The functions such as networked standby mode (if available) and timers will be disabled. You can turn on the TV from the hard standby only via joystick.
To turn on the TV: Press the centre of the joystick in, the TV will turn on.
Note: Main menu OSD cannot be displayed via joystick.
Operation with the Remote Control
Press the Home button on your remote control to display main menu. Use the directional buttons and OK button to navigate and set. Press Back/Return, Exit or Home button to quit a menu screen.
Input Selection
Once you have connected external systems to your TV, you can switch to different input sources. Press the Source button on your remote control consecutively to select the different sources.
Changing Channels and Volume
You can change the channel and adjust the volume by using the Programme + / - and Volume + / - buttons on the remote.
Reset and Power Off via Standby Button
Press and hold the Standby button to see additional actions for this button. Reset (Restart), Standby (Normal Standby), and Power off (Forced Standby) options will be available. Highlight one and press OK to perform the selected action. If a problem occurs that prevents the TV from switching into standby mode properly, you can use the Power off option to force the TV to switch into standby mode.
If your TV stops responding to commands and the actions menu can not be displayed, the TV will be forced to restart when the button is kept pressed for about 5 seconds. This will terminate the process.
Using Main TV Menu
When the Home button is pressed, the main TV menu will appear on the screen. You can navigate through the menu items using the directional buttons on the remote. To select an item or see the sub-menu options of the highlighted menu press OK button. When you highlight a menu option some of the submenu items of this menu may appear on the upper or lower side of the menu bar for quick access. To use a quick access item highlight it, press OK and set as desired using the Left/Right directional buttons. When finished press OK or Back/Return button to exit. When the Netflix application (if available) is highlighted, recommendations will be displayed in the same way as the sub-menu items. If you have already signed in to your Netflix account personalised recommendations will be seen.
You can also see information on location, weather, time and date on the main TV menu screen. The green small icons indicate the current status for time, network and sync for apps. If these icons appear in green, it means that the time information is updated, network is connected and sync is successfully completed. Otherwise the icons will appear in white.
Depending on the country selection made during first time installation, TV's life time information in hours can be displayed by pressing the Home button and then the Blue button. Concerned about the quality of our products, televisions are subject to rigorous checks before being put on the market, therefore it is possible that this value is not at 0 during the first installation.
Press Exit button to close the main menu.
1. Home
When main menu is opened Home menu bar will be highlighted. The content of the Home menu can be customised. In order to do this's go to the TV menu, highlight the Edit Home option and press OK. The Home menu will switch to edit mode. In edit mode you can delete or change the position of any item in the Home menu. Highlight an option and press OK. Select the delete or move icon and press OK. In order to move a menu item use the Right, Left, Up and Down
directional buttons to select the position that you want the item to move to and press OK.
You can also add options from other menus to Home menu. Just highlight an option and press the Up or Down directional button on the remote. If you see Add to Home option you can add it to the Home menu.
2. Search
You can search for Channels, Guide, TV menus, Applications, Web, YouTube and Videos using this option. Press OK and enter a key word using the virtual keyboard. Then highlight OK and press OK to start the search. Results will be displayed on the screen. Highlight the desired result using the directional buttons and press OK to open.
3. TV
3.1. Guide
You can access the electronic programme guide menu using this option. Refer to Electronic Programme Guide section for more information.
3.2. Channels
You can access the Channels menu using this option. Refer to Using the Channel List section for more information.
3.3. Timers
You can set timers for future events using the options of this menu. You can also review the previously created timers under this menu.
To add a new timer select the Add Timer tab using the Left/Right buttons and press OK. Set the sub-menu options as desired and when finished press OK. A new timer will be created.
To edit a previously created timer, highlight that timer, select the Edit Selected Timer tab and press OK. Change the sub-menu options as desired and press OK to save your settings.
To cancel an already set timer, highlight that timer, select Delete Selected Timer tab and press OK. A confirmation message will be displayed. Highlight Yes and press OK to proceed. The timer will be cancelled. It is not possible to set timers for two or more events that will broadcasted at the same time interval. In this case you will be informed and the timer will be cancelled.
3.4. Edit Home
You can customise the content of the Home menu using this option. Highlight and press OK. The Home menu will switch to edit mode. Refer to the Home section for details.
3.5. More Apps
In order to manage the apps installed on your TV, you can use this option. Highlight and press OK. You can add an installed app to Home menu, launch or
remove it. Highlight an app and press OK to see the available options.
3.6. Market
You can add new apps from the application market using this option. Highlight and press OK. Available apps will be displayed. You can also access the application market from within the More Apps menu.
3.7. Reset Apps
You can reset your customisations on the Home menu to defaults using this option (availability depends on TV model and its features). Highlight and press OK. A confirmation message will be displayed. Highlight Yes and press OK to proceed. Note that you will not be able to perform this operation again within the next few minutes.
3.8. Accessibility
You can access the accessibility settings menu directly using this option.
3.9. Privacy Settings
You can access the privacy settings menu directly using this option. This option may not be available depending on the model of your TV and the selected country during the first time installation process.
4. Settings
You can manage the settings of your TV using the options of this menu. Refer to Settings Menu Content section for more information.
5. Sources
You can manage your input source preferences using the options of this menu. To change the current source highlight one of the options and press OK.
5.1. Source Settings
You can access the source settings menu directly using this option. Edit the names, enable or disable selected source options. There are also Regular and Enhanced options available for HDMI sources. Regular and Enhanced options are affecting the colour settings of the selected HDMI source.
Inserting the Batteries into the Remote
Remove the back cover to reveal the battery compartment. Insert two size AA batteries. Make sure the (+) and (-) signs match (observe correct polarity). Do not mix old and new batteries. Replace only with same or equivalent type. Place the cover back on.
A message will be displayed on the screen when the batteries are low and must be replaced. Note that when the batteries are low, the performance of the remote control may be impaired.
Batteries should not be exposed to excessive heat such as sunshine, fire or the like.


Power Connection
IMPORTANT: The TV set is designed to operate on a 220-240V AC, 50Hz supply. After unpacking, allow the TV set to reach the ambient room temperature before you connect the set to the mains.
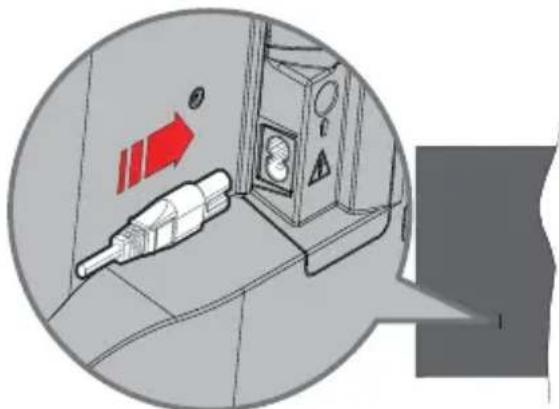
Plug one end (the two-hole plug) of the supplied detachable power cord into the power cord inlet on the rear side of the TV as shown above. Then plug the other end of the power cord into the mains socket outlet.
Note: The position of the power cord inlet may differ depending on the model.
Antenna Connection
Connect the aerial or cable TV plug to the aerial input (ANT) socket located on the left side of the TV or satellite plug to the satellite input (LNB) socket located on the rear side of the TV.
Rear side of the TV
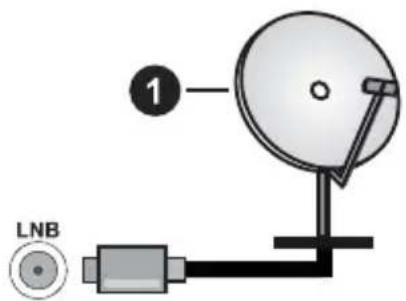
1. Satellite
Left side of the TV
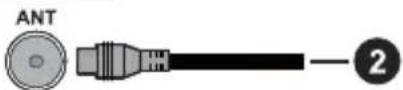
2. Aerial or cable

If you want to connect a device to the TV, make sure that both the TV and the device are turned off before making any connection. After the connection is done, you can turn on the units and use them.
Licence Notification
The terms HDMI, HDMI High-Definition Multimedia Interface, HDMI trade dress and the HDMI Logos are trademarks or registered trademarks of HDMI Licensing Administrator, Inc.

Dolby, Dolby Vision, Dolby Atmos, and the double-D symbol are registered trademarks of Dolby Laboratories Licensing Corporation. Manufactured under licence from Dolby Laboratories. Confidential unpublished works. Copyright © 2012-2022 Dolby Laboratories. All rights reserved.
Dolby Vision·Atmos
YouTube and the YouTube logo are trademarks of Google Inc.
This product contains technology subject to certain intellectual property rights of Microsoft. Use or distribution of this technology outside of this product is prohibited without the appropriate licence(s) from Microsoft.
Content owners use Microsoft PlayReady™ content access technology to protect their intellectual property, including copyrighted content. This device uses
PlayReady technology to access PlayReady-protected content and/or WMDRM-protected content. If the device fails to properly enforce restrictions on content usage, content owners may require Microsoft to revoke the device's ability to consume PlayReady-protected content. Revocation should not affect unprotected content or content protected by other content access technologies. Content owners may require you to upgrade PlayReady to access their content. If you decline an upgrade, you will not be able to access content that requires the upgrade.
The "CI Plus" Logo is a trademark of CI Plus LLP.
This product is protected by certain intellectual property rights of Microsoft Corporation. Use or distribution of such technology outside of this product is prohibited without a licence from Microsoft or an authorised Microsoft subsidiary.

Disposal of Old Equipment and Batteries

Only for European Union and countries with recycling systems
These symbols on the products, packaging, and/or accompanying documents mean that used electrical and electronic products and batteries must not be mixed with general household waste.
For proper treatment, recovery and recycling of old products and batteries, please take them to applicable collection points in accordance with your national legislation.
By disposing of them correctly, you will help to save valuable resources and prevent any potential negative effects on human health and the environment.
For more information about collection and recycling, please contact your local municipality.
Penalties may be applicable for incorrect disposal of this waste, in accordance with national legislation.
Note for the battery symbol (bottom symbol):
This symbol might be used in combination with a chemical symbol. In this case it complies with the requirement set by the Directive for the chemical involved.
Declaration of Conformity (DoC)
Hereby, Panasonic Marketing Europe GmbH, declares that this TV is in compliance with the essential requirements and other relevant provisions of the Directive 2014/53/EU.
If you want to get a copy of the original DoC of this TV, please visit the following website:
http://www.ptc.panasonic.eu/compliance-documents
Authorized Representative:
Panasonic Testing Centre
Panasonic Marketing Europe GmbH
Winsbergring 15, 22525 Hamburg, Germany
Web Site: http://www.panasonic.com
Specification
| TV Broadcasting | PAL BG/I/DK SECAM BG/DK | ||
| Receiving Channels | VHF (BAND I/III) - UHF (BAND U) - HYPERBAND | ||
| Digital Reception | Fully integrated digital terrestrial-cable-satellite TV (DVB-T-C-S) (DVB-T2, DVB-S2 compliant) | ||
| Number of Preset Channels | 11 000 | ||
| Channel Indicator On | Screen Display | ||
| RF Aerial Input 75 Ohm (unbalanced) | |||
| Operating Voltage 220-240V AC, 50Hz. | |||
| Audio A2 Stereo+Nicam Stereo | |||
| Headphone 3.5 mm mini stereo jack | |||
| Networked Standby Mode Power Consumption (W) | <2 | ||
| TX-43MXT686 TX-43MXF687 TX-43MXN688 TX-43MXX689 | TX-50MXT686 TX-50MXF687 TX-50MXN688 TX-50MXX689 | TX-55MXT686 TX-55MXF687 TX-55MXN688 TX-55MXX689 | |
| Audio Output Power (WRMS.) (10% THD) | 2 x 10 W 2 x 10 W 2 x 10 W | ||
| Power Consumption (W) | 150 W 135 W 140 W | ||
| Weight (kg) 11 Kg 14 | Kg 17 Kg | ||
| TV Dimensions DxLxH (with stand) (mm) | 221 x 964 x 614 221 x 1119 x 704 221 x 1233 x 769 | ||
| TV Dimensions DxLxH (without stand) (mm) | 68 x 964 x 560 68 x 1119 x 647 66 x 1233 x 711 | ||
| Display | 16/9 43" | 16/9 50" | 16/9 55" |
| Operation temperature and operation humidity | 0°C up to 40°C, 85% humidity max | ||
For more product information, please visit EPREL: https://eprel.ec.europa.eu. EPREL registration number is available on https://eprel.panasonic.eu/product.
Wireless LAN Transmitter Specifications
| Frequency Ranges | Max Output Power |
| 2400 - 2483,5 MHz (CH1 - CH13) < 10 | 0 mW |
| 5150 - 5250 MHz (CH36 - CH48) < 20 | 0 mW |
| 5250 - 5350 MHz (CH52 - CH64) < 20 | 0 mW |
| 5470 - 5725 MHz (CH100 - CH140) < 200 mW | |
Country Restrictions
The Wireless LAN equipment is intended for home and office use in all EU countries, the UK and Northern Ireland (and other countries following the relevant EU and/or UK directive). The 5.15 - 5.35 GHz band is restricted to indoor operations only in the EU countries, in the UK and Northern Ireland (and other countries following the relevant EU and/or UK directive). Public use is subject to general authorisation by the respective service provider.
| Country Restriction | |
| Russian Federation Indoor use only | |
The requirements for any country may change at any time. It's recommended that user checks with local authorities for the current status of their national regulations for both 2.4 GHz and 5 GHz wireless LAN's.
Standard
IEEE 802.11.a/b/g/n
Host Interface
USB 2.0
Security
WEP 64/128, WPA, WPA2, TKIP, AES, WAPI
Notice
DVB / Data broadcasting / IPTV functions
- This TV is designed to meet the standards (as of March, 2021) of DVB-T / T2 (MPEG2, MPEG4-AVC(H.264) and HEVC(H.265)) digital terrestrial services, DVB-C (MPEG2, MPEG4-AVC(H.264) and HEVC(H.265)) digital cable services and DVB-S (MPEG2, MPEG4-AVC(H.264) and HEVC(H.265)) digital satellite services.
Consult your local dealer for availability of DVB-T / T2 or DVB-S services in your area.
Consult your cable service provider for availability of DVB-C services with this TV.
This TV may not work correctly with the signal which does not meet the standards of DVB-T / T2, DVB-C or DVB-S.
- Not all the features are available depending on the country, area, broadcaster, service provider, satellite and network environment.
- Not all CI modules work properly with this TV. Consult your service provider about the available CI module.
This TV may not work correctly with CI module that is not approved by the service provider.
Additional fees may be charged depending on the service provider.
The compatibility with future services is not guaranteed.
- Internet apps are provided by their respective service providers, and may be changed, interrupted, or discontinued at any time.
Panasonic assumes no responsibility and makes no warranty for the availability or the continuity of the services.
- Panasonic does not guarantee operation and performance of peripheral devices made by other manufacturers; and we disclaim any liability or damage arising from operation and/or performance from usage of such other maker's peripheral devices.
Remote Control
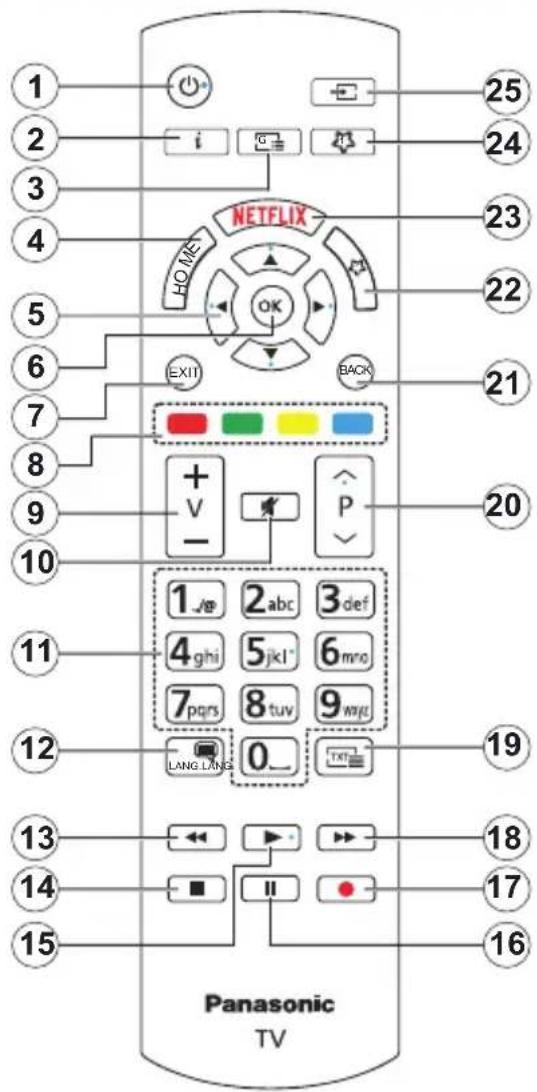
(*) Standby Button
Press and hold the Standby button to see additional actions for this button. Highlight one of the Reset (Restart), Standby (Normal Standby), and Power off (Forced Standby) options and press OK to perform the selected action. If your TV stops responding to commands and the actions menu can not be displayed, the TV will be forced to restart when the button is kept pressed for about five seconds.
Press briefly and release the button to switch the TV into standby mode or to switch it on when it's in standby mode.
(^**) My Button 1 & My Button 2
These buttons may have default functions depending on the model. However you can set a special function to these buttons by pressing on them for more than three seconds when on a desired source or channel. You can also set My Button 1 to launch an application. A confirmation message will be displayed on the screen. Now the selected My Button is associated with the selected function.
Note that if you perform First Time Installation, My Button 1&2 will return to their default function.
24. My Button 1 (^**)
- Standby (^*) : Standby / On (press briefly) Reset / Power Off (press and hold)
- Info: Displays information about on-screen content, shows hidden information (reveal - in TXT mode)
- Guide: Displays the electronic programme guide
- Home: Displays TV menu
- Directional buttons: Helps navigate menus, content, etc. and displays the subpages in TXT mode when pressed Right or Left
- OK: Confirms user selections, holds the page (in TXT mode), views Channels menu (DTV mode)
- Exit: Closes and exits from displayed menus or returns to previous screen
- Coloured Buttons: Follow the on-screen instructions for coloured button functions
- Volume +/-
- Mute: Completely turns off the volume of the TV
- Numeric buttons: Switches the channel, enters a number or a letter in the text box on the screen, switches the TV on when in standby mode
- Language: Switches among sound modes (analogue TV), displays and changes audio/subtitle language and turns subtitles on or off (digital TV, where available)
- Rewind: Moves frames backwards in media such as movies
- Stop: Stops the media being played
- Play: Starts to play selected media
- Pause: Pauses the media being played
- No function
- Fast Forward: Moves frames forward in media such as movies
- Text: Displays teletext (where available), press again to superimpose the teletext over a normal broadcast picture (mix)
- Programme + / - :Programme up-down,Pageupdown (in TXT mode), switches the TV on when in standby mode
- Back/Return: Returns to previous screen, previous menu, opens index page (in TXT mode). Quickly cycles between previous and current channels or sources
- My Button 2 (^**)
- Netflix: Launches the Netflix application
Quick menu: Displays a list of menus for quick access
Note: This button may function as My Button 1 or Quick menu depending on the model of your TV and its features. - Source: Shows available broadcast and content sources
Connections
| Connector Type | pe Cables Device | ||
| HDMI Connection (side&back) | |||
| SPDIF | SPDIF (Optical Out) Connection (back) | ||
| HEADPHONE | Headphone Connection (back) | ||
| USB Connection (side) | |||
| CI Connection (side) | |||
| LAN | Ethernet Connection (back) | LAN / Ethernet Cable |
When using the wall mounting kit (available from a third party in the market, if not supplied), we recommend that you plug all your cables into the back of the TV before mounting on the wall. Insert or remove the CI module only when the TV is SWITCHED OFF. You should refer to the module instruction manual for details of the settings. The/Each USB input of your TV supports devices up to 500mA . Connecting devices that have current value above 500mA may damage your TV. When connecting equipment using a HDMI cable to your TV, to guarantee sufficient immunity against parasitic frequency radiation and trouble-free transmission of high definition signals, such as 4K content, you have to use a high speed shielded (high grade) HDMI cable with ferrites.

If you want to connect a device to the TV, make sure that both the TV and the device are turned off before making any connection. After the connection is done, you can turn on the units and use them.
Switching On/Off
To Switch the TV On
Connect the power cord to a power source such as a wall socket (220-240V AC, 50 Hz).
To switch on the TV from standby
- Press the Standby button, Programme +/- or a numeric button on the remote control.
- Press the centre of the joystick on the TV in or push it up/down.
To switch on the TV from hard standby
Press the centre of the joystick on the TV in.
To switch the TV into standby
Press the Standby button on the remote control, the TV will switch into standby mode.
To switch the TV into hard standby
Press the centre of the joystick on the TV in and hold it down for more than 3 seconds, the TV will switch into hard standby mode.
To switch off the TV
To power down the TV completely, unplug the power cord from the mains socket.
Note: When the TV is switched into standby mode, the standby LED can blink to indicate that features such as Standby Mode Search, Over Air Download or Timer is active. The LED can also blink when you switch on the TV from standby mode.
First Time Installation
When turned on for the first time, the language selection screen is displayed. Select the desired language and press OK. In the following steps of the installation guide, set your preferences using the directional buttons and OK button.
After the language selection, you will be asked whether you want to change accessibility settings. Highlight Yes and press OK to change. Refer to System Menu Content section for detailed information on available options.
Set your country preference on the next screen. Depending on the country selection you may be asked to set and confirm a PIN at this point. The selected PIN cannot be 0000. You have to enter it if you are asked to enter a PIN for any menu operation later.
You can activate Store Mode option in the next step. This option will configure your TV's settings for store environment and depending on the TV model being used, the supported features of it may be displayed on the screen as an info banner or the pre-installed video file may be played back. This option is intended only for store use. It is recommended to select Home Mode for home use. Store mode option will be available in Settings>System>More menu and your preference for this setting can be changed later. Make your selection and press OK to continue.
Depending on the model of your TV, the picture mode selection screen may appear at this point. In order for your TV to consume less energy and be more environmentally friendly select Natural and press OK to continue. If you select Dynamic and press OK, a confirmation dialogue will be displayed. Select Yes and press OK to proceed. You can change your selection later using the Mode option in the Settings>Picture menu.
Depending on the model of your TV and the country selection Privacy Settings screen may appear at this point. Using the options on this screen you can set your privacy privileges. Highlight a feature and press OK to enable or disable. Read the related explanations displayed on the screen for each highlighted feature before making any changes. You can press the Right directional button to highlight the text and use the Programme +/- or Up/Down directional buttons to scroll up and down to read the entire text. You will be able to change your preferences at any time later from the Settings>System>Privacy>Privacy Settings menu. If the Internet Connection option is disabled Network/Internet Settings screen will be skipped and not displayed. If you have any questions, complaints or comments regarding this privacy policy or its enforcement, please contact by email at smarttvsecurity@vosshub.com.
Highlight Next and press OK button on the remote control to continue and the Network/Internet Settings screen will be displayed. Please refer to Connectivity section if you need information on configuring a wired or a wireless connection (availability depends on the model) and other available options. If you want your TV to consume less power in standby mode, you can disable the Networked Standby Mode option by setting it as Off. After the settings are completed highlight Next and press OK button to continue.
On next screen you can set broadcast types to be searched, set your encrypted channel searching and time zone (depending on the country selection) preferences. Additionally you can set a broadcast type as your favourite one. Priority will be given to the selected broadcast type during the search process and the channels of it will be listed on the top of the channel list. When finished, highlight Next and press OK to continue.
About Selecting Broadcast Type
To turn a search option on for a broadcast type highlight it and press OK, Left or Right directional button. The checkbox next to the selected option will be checked. To turn the search option off clear the checkbox by pressing OK, Left or Right directional button after moving the focus on the desired broadcast type option.
Digital Aerial: If D. Aerial broadcast search option is turned on, the TV will search for digital terrestrial broadcasts after other initial settings are completed.
Digital Cable: If D. Cable broadcast search option is turned on, the TV will search for digital cable broadcasts after other initial settings are completed. A dialogue may be displayed depending on the country selection before starting to search asking whether you want to perform cable network search. If you select Yes and press OK you can select Network or set values such as Frequency, Network ID and Search Step on the next screen. If you select No and press OK or the network search dialogue is not displayed you can set Start Frequency, Stop Frequency and Search Step on the next screen. When finished, highlight Next and press OK button to continue.
Note: Searching duration will change depending on the selected Search Step.
Satellite: If Satellite broadcast search option is turned on, the TV will search for digital satellite broadcasts after other initial settings are completed. Before satellite search is performed some settings should be made.
Depending on the model and the selected country the next step may be the selection of the installation type for satellite. You can select to start an operator installation or a standard installation at this point. If you want to perform an operator installation set the Install Type as Operator and then set the Satellite Operator according to your operator preference. Some of the following steps may differ or be skipped depending on the selected operator in this step. If you set the Install Type as Standard, you can continue with regular satellite installation and watch satellite channels. Press OK to proceed.
Antenna type selection screen may be displayed next. You can select Antenna type as Direct, Single Satellite Cable or DiSEqC switch by using Left or Right directional buttons. After selecting your antenna type press OK to see the options to proceed. Continue, Transponder list and Configure LNB options may be available. You can change the transponder and LNB settings using the related menu options.
- Direct: If you have a single receiver and a direct satellite dish, select this antenna type. Press OK to continue. Select an available satellite on the next screen and press OK to scan for services.
- Single Satellite Cable: If you have multiple receivers and a single satellite cable system, select this antenna type. Press OK to continue. Configure settings by following instructions on the next screen. Press OK to scan for services.
- DiSEqC switch: If you have multiple satellite dishes and a DiSEqC switch, select this antenna type. Then set the DiSEqC version and press OK to continue. You can set up to four satellites (if available) for version v1.0 and sixteen satellites for version v1.1 on the next screen. Press OK button to scan the first satellite in the list.
Note: Depending on the model of your TV, DiSEqC version v1.1 may not be supported and therefore the DiSEqC version selection step may not be available.
Analogue: If Analogue broadcast search option is turned on, the TV will search for analogue broadcasts after other initial settings are completed.
After the initial settings are completed the TV will start to search for available broadcasts of the selected broadcast types.
While the search continues current scan results will be displayed at the bottom of the screen. You can press the Home, Back or Exit button to cancel the search. The channels that have already been found will be stored in the channel list.
After all the available stations are stored, Channels menu will be displayed. You can edit the channel list according to your preferences using the Edit tab options or press the Home button to quit and watch TV.
While the search continues a dialogue may appear, asking whether you want to sort channels according to the LCN^(*) . Select Yes and press OK to confirm.
(*) LCN is the Logical Channel Number system that organises available broadcasts in accordance with a recognisable channel number sequence (if available).
Note: Do not turn off the TV while initialising first time installation. Note that, some options may not be available depending on the country selection.
After the first time installation is completed, HD + operator application screen may be displayed depending on selections you made during the installation process. In order to access operator services this application needs to be activated. If you activate the application, the elements of the user interface such as channel info banner and electronic programme guide, which are normally provided by the TV, will be replaced by the operator application. If you do not perform satellite or HD + installation and want to activate the application at a later time, highlight the HD + application on the Home menu and press OK. You will be directed to a screen where you can carry out the activation.
MediaPlayback viaUSB Input
You can connect 2.5" and 3.5" inch (HDD with external power supply) external hard disk drives or USB memory stick to your TV by using the USB input(s) of the TV.
IMPORTANT! Back up the files on your storage devices before connecting them to the TV. Manufacturer will not be responsible for any file damage or data loss. Certain types of USB devices (e.g. MP3 Players) or USB hard disk drives/memory sticks may not be compatible with this TV. The TV supports FAT32 and NTFS disk formatting.
Wait a little while before each plugging and unplugging as the player may still be reading files. Failure to do so may cause physical damage to the USB player and the USB device itself. Do not pull out your drive while playing a file.
You can use USB hubs with your TV's USB input(s). External power supplied USB hubs are recommended in such a case.
It is recommended to use the TV's USB input(s) directly, if you are going to connect a USB hard disk.
Note: When viewing media files the Media Browser menu can only display a maximum of 1000 media files per folder.
Media Browser
You can play back music and movie files and display photo files stored on a USB storage device by connecting it to your TV. Connect a USB storage device to one of the USB inputs located on the side of the TV.
After connecting a USB storage device to your TV Sources menu will be displayed on the screen. Select the related USB input option from this menu and press OK. Media Browser menu will be displayed on the screen. Then select the file of your choice and press OK to display or play it back. You can access the content of the connected USB device any time later from the Sources menu. You can also press the Source button on the remote and then select your USB storage device from the list of sources.
You can set your media browser preferences by using the Settings menu. Settings menu can be accessed via the information bar which is displayed on the bottom of the screen while playing back a video or an audio file or displaying a picture file. Press the Info button if the information bar has disappeared, highlight the gear wheel symbol positioned on the right side of the information bar and press OK. Picture Settings, Sound Settings, Media Browser Settings and Options menus may be available depending on the media file type and the model of your TV and its features. The content of these menus may also differ according to the type of the currently open media file.
Only Sound Settings menu will be available while playing back audio files.
| Loop/Shuffle Mode Operation | |
| Start playback and activate | All files in the list will be continuously played in original order |
| Start playback and activate | The same file will be played continuously (repeat) |
| Start playback and activate | All files in the list will be played once in random order |
| Start playback and activate | All files in the list will be continuously played in the same random order |
To use the functions on the information bar highlight the symbol of the function and press OK. To change the status of a function highlight the symbol of the function and press OK as much as needed. If the symbol is marked with a red cross, that means it is deactivated.
Custom Boot Up Logo
You can personalise your TV and see your favourite image or photo on the screen each time your TV boots up. To do this, copy your favourite image files onto a USB disk and open them in the Media Browser. Select USB input from the Sources menu and press OK. You can also press the Source button on the remote and then select your USB storage device from the list of sources. When you have chosen the desired image, highlight it and press OK to view it in full screen. Press the Info button, highlight the gear wheel symbol on the information bar and press OK. Select Options and press OK to enter. Set Boot Logo option will be available. Highlight it and press OK again to choose the image as custom boot logo. A confirmation message will be displayed. Select Yes and press OK again. If the image is suitable(*) you will see it on the screen during the TV's next boot up.
Note: You can use the Restore Default Boot Logo option in the Settings>System>More menu to restore the default boot logo. If you perform First Time Installation the boot logo will also be restored to its default.
(*) Images must have an aspect ratio between 4:3 to 16:9 and they must be in .jpeg or .jpg file formats. The image cannot be set as boot logo, if its resolution doesn't appear on the info banner.
CEC
This function allows the user to control the CEC-enabled devices, that are connected through HDMI ports by using the remote control of the TV.
The CEC option in the Settings>Devices menu should be set as Enabled at first. Press the Source button and select the HDMI input of the connected CEC device from the Sources List menu. When a new CEC source device is connected, it will be listed in Sources menu with its own name instead of the connected HDMI port's name (such as DVD Player, Recorder 1, etc.).
The TV remote is automatically able to perform the main functions after the connected HDMI source has been selected. To terminate this operation and control the TV via the remote again, press and hold the "0-Zero" button on the remote control for 3 seconds.
You can disable the CEC functionality by setting the related option under the Settings>Devices menu accordingly.
The TV supports ARC (Audio Return Channel). This feature is an audio link meant to replace other cables between the TV and an audio system (A/V receiver or speaker system).
When ARC is active, the TV will mute its other audio outputs, except the headphone jack, automatically and volume control buttons are directed to the connected audio device. To activate ARC set the Sound Output option in the Settings>Sound menu as HDMI ARC.
Note: ARC is supported only via the HDMI2 input.
Enhanced Audio Return Channel (eARC)
Similar to ARC, the eARC feature enables the transfer of the digital audio stream from your TV to a connected audio device via the HDMI cable. eARC is an improved version of ARC. It has a much higher bandwidth than its predecessor. Bandwidth represents the range of frequencies or amount of data that is being transferred at a time. Higher bandwidth translates into a higher amount of data that can be transferred. Higher bandwidth also means that digital audio signal doesn't have to be compressed and is much more detailed, rich, and vibrant.
When eARC is enabled from the sound menu, TV first tries to establish eARC link. If eARC is supported by the connected device, the output turns into eARC mode and the "eARC" indicator can be observed on the connected device's OSD. If an eARC link cannot be established (for example, the connected device is not supporting eARC but supporting ARC only) or if eARC is disabled from the sound menu, then TV initiates ARC.
For eARC to function properly;
The connected audio device should also support eARC.
- Some HDMI cables do not have enough bandwidth to carry high-bit-rate audio channels, use an HDMI cable
with eARC support (HDMI High Speed Cables with Ethernet and the new Ultra High Speed HDMI Cable - check hdi.org for latest info).
- Set the Sound Output option in the Settings>Sound menu to HDMI ARC. The eARC option in the Sound menu will be enabled. Check to see if it is set to On. If not, set it to On.
Note: eARC is supported only via the HDMI2 input.
System Audio Control
Allows an Audio Amplifier/Receiver to be used with the TV. The volume can be controlled using the remote control of the TV. To activate this feature set the Sound Output option in the Settings>Sound menu as HDMI ARC. When HDMI ARC option is selected, CEC option will be set as Enabled automatically, if it is not already set. The TV speakers will be muted and the sound of the watched source will be provided from the connected sound system.
Note: The audio device should support System Audio Control feature.
Game Mode
You can set your TV to achieve lowest latency for games. Go to Settings>Picture menu and set the Mode option to Game. Game option will be available when the TV's input source is set to HDMI. When set the picture will be optimised for low latency.
Auto Low Latency Mode
You can also enable the ALLM (Auto Low Latency Mode) option in the Settings>Devices menu. If this function is enabled the TV automatically switches the picture mode to Game when ALLM mode signal is received from the current HDMI source. TV switches back to previous picture mode setting when the ALLM signal is lost. So you won't need to change the settings manually.
If the ALLM option is enabled, picture mode can not be changed as long as ALLM signal is received from the current HDMI source.
In order for the ALLM feature to be functional the related HDMI source setting should be set to Enhanced. You can change this setting from the Sources>Source Settings menu or from the Settings>System>Sources menu.
E-Manual
You can find instructions for your TV's features in the E-Manual.
To access the E-Manual, enter Settings menu, select Manuals and press OK. For quick access press Home button and then Info button.
By using the directional buttons select a desired topic and press OK to read instructions. To close the E-Manual screen press the Exit or Home button.
Note: Depending on model, your TV may not support this function. The content of the E-Manual may vary according to the model.
Settings Menu Content
| Devices Menu Content | ||
| Virtual Remote | Enable or disable the virtual remote feature. | |
| Audio Video Sharing | This feature allows you to share files stored on your smartphone or tablet pc. If you have a compatible smartphone or tablet pc and the appropriate software is installed, you can share/play photos, music and videos on your TV. See instructions of your sharing software for more information. | |
| ALLM | ALLM (Auto Low Latency Mode) function allows the TV to activate or deactivate low latency settings depending on playback content. If this option is enabled the picture mode will be set to Game automatically when ALLM mode signal is received from the current HDMI source. Refer to Game Mode section for more information. | |
| Timer of No Signal | If your TV does not receive any input signal (e.g. from an aerial or HDMI source) for 3 minutes, it will go into standby mode. You can enable or disable this functionality by setting this option accordingly. | |
| CEC | With this setting you can enable and disable CEC functionality completely. Press Left or Right button to enable or disable the feature. | |
| CEC Auto Power On | This function allows the connected HDMI-CEC compatible device to turn on the TV and switch to its input source automatically. Press Left or Right button to enable or disable the feature. | |
| Picture Menu Content | ||
| Mode | You can change the picture mode to suit your preference or requirements. Picture mode can be set to one of these options: Cinema, Game, Sports, Dynamic and Natural. Note: Available options may differ depending on the input source. Dolby Vision Modes: If Dolby Vision content is detected Dolby Vision Dark and Dolby Vision Bright picture mode options will be available instead of Cinema and Natural modes. | |
| Contrast | Adjusts the light and dark values on the screen. | |
| Brightness | Adjusts the brightness values on the screen. | |
| Sharpness | Sets the sharpness value for the objects displayed on the screen. | |
| Colour | Sets the colour value, adjusting the colours. | |
| Energy Saving | For setting the Energy Saving to Custom, Minimum, Medium, Maximum, Auto, Screen Off or Off. Note: Available options may differ depending on the selected Mode. | |
| Backlight | This setting controls the backlight level. This option (will be located under the Energy Saving setting) will be available if the Energy Saving is set to Custom. Highlight and use Left/Right directional buttons to set. | |
| Picture Zoom | Sets the desired image size format. | |
| Picture Shift | This option (will be located under the Picture Zoom setting) may be available depending on the Picture Zoom setting. Highlight and press OK, then use directional buttons to shift the picture upwards or downwards. | |
| Advanced Settings | ||
| Dynamic Contrast | You can change the dynamic contrast ratio to desired value. | |
| Colour Temp | Sets the desired colour temperature value. Cool, Normal, Warm and Custom options are available. | |
| White Point | If the Colour Temp option is set as Custom, this setting will be available (will be located under the Colour Temp setting). Increase the 'warmth' or 'coolness' of the picture by pressing Left or Right buttons. | |
| Vivid Blue | White colour enhancement function that makes white colour more cooler in order to make more bright picture. Set as On to enable. | |
| Vivid Dimming | Low, Medium, High and Off options are available. While Vivid Dimming is active, it will enhance contrast locally for each defined zone. | |
| Noise Reduction | Low, Medium, High and Off options are available. If the signal is weak and the picture is noisy, use the Noise Reduction setting to reduce the amount of noise. | |
| Film Mode | Films are recorded at a different number of frames per second to normal television programmes. Turn this feature to Auto when you are watching films to see the fast motion scenes clearly. | |
| MEMC | Press left/right buttons to set MEMC to Low, Medium, High or Off. While MEMC is active, it will optimise the TV's video settings for motional images to acquire a better quality and readability. | |
| MEMC Demo | When MEMC option is set to Low, Medium or High, this option will be available. Press OK button to activate the demo mode. While demo mode is active, the screen will be divided into two sections, one displaying the MEMC activity, the other displaying the normal settings for TV screen. Press OK button again to cancel. | |
| Skin Tone | Skin tone can be changed between -5 and 5. | |
| Colour Shift | Adjust the desired colour tone. | |
| Colour Tuner | Opens colour tuner settings. Set the Colour Tuner as Enabled to adjust the Hue, Colour and Brightness values manually. | |
| Gamut Mapping | You can use this option to set the range of colours displayed on your TV screen. When set as On, colours are set according to the source signal. When set as Off, the TV's maximum colour capacity is used by default (recommended option).Note: This option may not be available depending on the TV model and its features. | |
| Gamma | You can use this option to set your gamma preference. Press Left/Right directional buttons to set to Normal, Bright or Dark.Note: This option may not be available depending on the TV model and its features and you may not be able to change this setting depending on the current content. | |
| HDMI Full Range | While watching from a HDMI source, this feature will be visible. You can use this feature to enhance blackness in the picture. | |
| Reset | Reset the picture settings to factory default settings (except Game mode). | |
| Sound Menu Content | |
| Dolby Atmos | Your TV supports Dolby Atmos technology. By means of this technology the sound moves around you in three-dimensional space, so you feel like you're inside the action. You will have best experience if input audio bitstream is Atmos. Auto, On and Off options will be available. If set as Auto, the TV will switch between On and Off modes automatically depending on the input audio bitstream information, if the input audio bitstream is Atmos this feature will work as if it is set as On. Set as Off to disable. |
| Mode | Smart, Movie, Music, News and Off options will be available. Set as Off to disable. Note: Some items in Sound menu will be greyed out and unavailable if set to an option other than Off. |
| Surround Sound | Enables or disables the surround sound mode. |
| Sound Output | Sets the sound output preference. TV, S/PDIF, HDMI ARC, Headphone Only and Lineout options will be available. There will be no sound output except through the selected option and the headphone jack. Note that, if this option is set as Headphone Only, TV speakers will be muted when headphone set is plugged in. When you connect an external amplifier to your TV using the headphone jack, you can select this option as Lineout. If you have connected headphones to the TV, set this option as Headphone Only. Please ensure before using headphones that this menu item is set to Headphone Only. If it is set to Lineout, the output from the headphone socket will be set to maximum which could damage your hearing. If HDMI ARC option is selected, CEC feature will be enabled. Note: Depending on the selected option some items in Sound menu will appear as greyed out and will be unavailable. |
| AVL (Automatic Volume Limiting) | Sets the sound to obtain fixed output level between programmes. If the Mode menu item is set to an option other than Off the AVL setting options will change. Auto, Night, Normal and Off options will be available. In Auto mode the TV will switch to Normal or Night mode automatically according to the current time information. If no time information is available this option will always function as Normal. When the TV switches to Night mode for the first time after setting this option as Auto, an information bar will pop up on the screen. Please note that compared to Normal mode Night mode provides more aggressive dynamic compression control which is suitable for silent environments. |
| eARC | When the Sound Output option is set to HDMI ARC, the eARC menu option will be available. Otherwise, it will be greyed out. This option will be set to On by default. Set to Off to disable. Refer to CEC section for more information. |
| Advanced Settings | |
| Equalizer | Selects the equalizer mode. Custom settings can be made only when in User mode. |
| Dynamic Bass | Enables or disables the Dynamic Bass. |
| Sound Mode | You can select a sound mode (if the viewed channel supports). |
| Digital Out | Sets digital out audio type. PCM, Auto, and Passthrough options will be available. PCM: This option provides two-channel uncompressed digital audio output. You can use this option if you experience compatibility problems such as not hearing sound. Auto: This option provides multi-channel digital audio output (up to 5.1 channel). Passthrough: This option provides original audio output as such in HDMI ARC. It is recommended to use this option if you have an A/V receiver with eARC support. If your A/V receiver does not support source audio format you may experience compatibility problems such as not hearing sound. |
| Headphone | Sets headphone volume. This option will not be available if the Sound Output option is set as Lineout. Please ensure before using headphones that the headphone volume is set to a low level, to prevent damage to your hearing. |
| Balance | Sets sound balance. This feature will be activated if Sound Output option is set as TV or Headphone Only. Balance item adjusts the balance level of the TV speakers and headphones together. |
| Reset | Resets some of the sound settings to factory defaults. |
| Network Menu Content | |
| Network Type | Disable the network connection or change the connection type. |
| Scan Wireless Networks | Start a search for wireless networks. This option will be available if the Network Type is set as Wireless Device. |
| Disconnect | To disconnect from a wireless network and delete your saved wireless network profile (if previously saved), highlight this option and press OK. This option will not be available if you did not connect to a wireless network. Refer to Connectivity section for more information. |
| Press WPS on your wifi router | If your modem/router device has WPS, you can directly connect to it using this option. Highlight this option and press OK. Go to your modem/router device and press the WPS button on it to make the connection. This option will be available if the Network Type is set as Wireless Device. |
| Internet Speed Test | Start a speed test to check your connection bandwidth. The result will be displayed on the screen when finished. |
| Advanced Settings | Change the IP and DNS configurations of your TV. |
| Networked Standby Mode | Enable or disable this feature by setting it as On or Off. |
| Note: For detailed information on the options of this menu refer to the Connectivity section. | |
| Installation Menu Content | |
| Automatic channel scan (Retune) | Displays automatic tuning options. D. Aerial: Searches and stores aerial DVB stations. D. Cable: Searches and stores cable DVB stations. Analogue: Searches and stores analogue stations. Satellite: Searches and stores satellite stations. |
| Manual channel scan | This feature can be used for direct broadcast entry. |
| Network channel scan | Searches for the linked channels in the broadcast system. D. Aerial: Searches for aerial network channels. D. Cable: Searches for cable network channels. Satellite: Searches for satellite network channels. |
| Analogue fine tune | You can use this setting for fine tuning analogue channels. This feature is not available if no analogue channels are stored and if currently watched channel is not an analogue channel. |
| Satellite Settings | Displays satellite settings. Satellite list: Displays available satellites. You can Add, Delete satellites or Edit satellite settings on the list. Antenna installation: You can change satellite antenna settings and/or start a satellite scan. |
| Installation Settings (optional) | Displays installation settings menu. Standby Mode Search (*): Your TV will search for new or missing channels while in standby. Any new found broadcasts will be shown. Dynamic Channel Update(*): If this option is set as Enabled, the changes on the broadcasts such as frequency, channel name, subtitle language etc., will be applied automatically while watching. (*) Availability depends on model. |
| Clear Service List | Use this setting to clear channels stored. This setting is visible only when the Country option is set to Denmark, Sweden, Norway or Finland. |
| Select Active Network | This setting allows you to select only the broadcasts within the selected network to be listed in the channel list. This feature is available only for the country option of Norway. |
| Signal Information | You can use this menu item to monitor signal related information such as signal level/ quality, network name, etc. for available frequencies. |
| First time installation | Deletes all stored channels and settings, resets TV to factory settings. |
| System Menu Content | ||
| Accessibility | Displays accessibility options of the TV. Some options will not be available if no channels are installed. | |
| High Contrast | Increase the contrast of the menu options and texts to make them easier to read. White Text, Yellow Text and Off options will be available. | |
| Hard of Hearing | Enables any special feature sent from the broadcaster. | |
| Audio Description | A narration track will be played for the blind or visually impaired audience. Press OK to see all available Audio Description menu options. This feature is available only if the broadcaster supports it.Note: Audio description sound feature is not available in recording or time shifting mode (availability depends on the model of your TV and its features). | |
| Dialogue Enhancement | This feature provides sound postprocessing options for speech-gated dialogue enhancement. Off, Low, Medium and High options will be available. Set according your preference.Note: This feature has an effect only if input audio format is AC-4 and this effect only applies to TV loudspeaker output. | |
| Spoken Subtitles | Default preference of spoken subtitles is selected with this setting option. To make spoken subtitles priority higher than normal ones, this option should be set to On. This option may not be available depending on the model of your TV. | |
| Magnification | Enables the use of button combinations to magnify the screen. On and Off options will be available. Set as On to enable.Magnification support will be enabled or disabled with long-press of the numeric button 5. First top-left quadrant of the screen will be zoomed. After the magnification support is enabled, long-press of the numeric buttons 2, 4, 6, 8 will move the zoomed area to up, left, right and down. | |
| Minimap | Minimap is enabled and deactivated by default. It will be activated when Magnification feature is enabled. With this option, you can prevent magnification feature from displaying the minimap. | |
| Click Sound | This option enables the key click sound on TV menu. Set to On to enable. | |
| Highlight programmes with | ||
| [S] Subtitle | If this option is enabled and if any electronic programme guide event has "Subtitle" access service, these events will be highlighted with another colour. | |
| [SL] Sign Language | If this option is enabled and if any electronic programme guide event has "Sign Language" access service, these events will be highlighted with another colour. | |
| [AD] Audio Description | If this option is enabled and if any electronic programme guide event has "Audio Description" access service, these events will be highlighted with another colour. | |
| Language | You may set a different language depending on the broadcaster and the country. | |
| Conditional Access | Controls conditional access modules when available. | |
| Privacy | ||
| Privacy Settings | Manage your privacy privileges for smart TV related applications. Press OK to enter the menu and set according to your preferences. | |
| Show All Cookies | Displays all saved cookies. | |
| Delete All Cookies | Deletes all saved cookies. | |
| Do Not Track | You can set your preference regarding the tracking behaviour for HbbTV services using this option. | |
| Parental | Enter correct PIN to change parental settings. You can easily adjust Menu Lock, Maturity Lock, Child Lock or Guidance in this menu. You can also set a new PIN or change the Default CICAM PIN using the related options. Note: Some menu options may not be available depending on the country selection in the First Time Installation. Default PIN could have been set to 0000 or 1234. If you have defined the PIN (is requested depending on the country selection) during the First Time Installation use the PIN that you have defined. | |
| Date/Time | Sets date and time. | |
| Sources | Edit the names, enable or disable selected source options. There are also Regular and Enhanced options available for HDMI sources. These options are affecting the colour settings of the selected HDMI source. To be able to watch 4K or HDR/HLG images from an HDMI source related source setting should be set as Enhanced if the connected device is compatible with HDMI 2.0 and subsequent versions. Set as Regular if the connected device is HDMI 1.4 compatible. Set accordingly or disable the related HDMI source by setting as Disabled. | |
| Netflix | If this feature is supported by your TV, you can view your ESN(*) number and deactivate Netflix. (*) ESN number is an unique ID number for Netflix, created especially to identify your TV. Note: For 4K video streaming, a minimum 25Mb/s internet connection speed is required – For an example of the requirements for streaming 4K content you may find more information on the Netflix website (https://help.nsfli.com/en/node/13444). When you start to stream video content via the internet the quality of your connection will be analysed and the full HD or 4K quality may take a short time to be realised, or in the event of a slow connection not be possible. You should check your internet capabilities with your internet provider if you are at all unsure. | |
| Samba ACR | Samba Interactive TV powers recommendations and other apps by gathering data regarding consumption of specific on-screen content to enhance your viewing experience. Using this option you can access Samba Interactive TV settings menu, review Samba TV's Terms of Service, Privacy Policy and manage your advertising preferences, etc. Internet connection will be required in order to access HTML based settings. You can enable or disable Interactive TV at any time from the Settings>System>Privacy>Privacy Settings menu by checking or unchecking the check box next to the related item. This option may not be available depending on the selected country during the First Time Installation process, the model of your TV and its features. | |
| Voice Assistant | ||
| Alexa Built-in | Starts the setup process for this feature manually. If the setup is priorly completed Alexa Language, Alexa On Standby Mode, Alexa Alarm Volume and Sign Out options will be available. Refer to Alexa Ready section for more information. | |
| Alexa Language | Sets the language preference for Alexa. | |
| Alexa On Standby Mode | Enables or disables Alexa On Standby Mode feature. If enabled Alexa will be available while the TV is in standby mode. Note: This feature may affect your TV's power consumption. | |
| Alexa Home Screen | Set as Off to disable this feature or choose one of the inactivity periods to enable. 15 min, 30 min, 1 hour and 2 hour options will be available. | |
| Alexa Alarm Volume | Sets the volume level for Alexa alarms. | |
| Sign Out | You can use this option to sign out. If you sign out Alexa Built-in feature will be disabled. | |
| Works With Alexa | Starts the setup process for this feature manually. If the setup is priorly completed Change Friendly Name and Sign Out options will be available. Refer to Alexa Ready section for more information. | |
| Change Friendly Name | You can define a new name for your TV using this option. | |
| Sign Out | You can use this option to sign out. If you sign out Works With Alexa feature will be disabled. | |
| Google Assistant | Starts the setup process to enable your TV to work with Google Assistant devices. Highlight Start and press OK. If the setup is priorly completed Sign Out option will be available. If you sign out Google Assistant feature will be disabled. Refer to Google Assistant section for more information. | |
| More | Displays other setting options of the TV. | |
| Menu Timeout | Changes timeout duration for menu screens. | |
| Standby Mode LED | If set as Off the standby mode LED will not light up when the TV is in standby mode. | |
| HBBTV | You can enable or disable this feature by setting it as On or Off. Refer to HbbTV System section for further information. | |
| Device Identification | When this option is enabled it causes a 'Device ID' to be generated internally for each Web origin visited. When disabled all the current 'Device ID's' are cleared for each Web origin that was visited. You can enable or disable this feature by setting it as On or Off. This feature is available if channels are installed and the country option is set as Norway during the first time installation. | |
| Software upgrade | Ensures that your TV has the latest software. Press OK to see the menu options. | |
| Application Version | Displays current software version. | |
| Subtitle Mode | This option is used to select which subtitle mode will be on the screen (DVB subtitle / Teletext subtitle) if both are available. Default value is DVB subtitle. This feature is available if channels are installed and the country option is set as Norway during the first time installation. | |
| Auto Power Down | Sets the desired time for the TV to automatically go into standby mode when not being operated. This option can be set from 1 to 8 hours in steps of 1 hour. You can also disable this option by setting as Off. | |
| Biss Key | Biss is a satellite signal scrambling system that is used for some broadcasts. If you need to enter Biss key on a broadcast, you can use this setting. Highlight Biss Key and press OK to enter keys on the desired broadcast. This option will appear if satellite channels are installed. Availability depends on the model of your TV and its features. | |
| Store Mode | Select this mode for store display purposes. Whilst Store Mode is enabled, some items in the TV menu may not be available. For some models Enabled with video option may also be available. If this option is set, the TV will switch to store mode and the pre-installed video file will be played back. | |
| Power Up Mode | This setting configures the power up mode preference. Last State and Standby Mode options are available. | |
| OSS | Displays Open Source Software licence information. | |
| Restore Default Boot Logo | Restores the default boot logo. A confirmation message will be displayed. Select Yes and press OK. This option may not be available depending on the model of your TV and its features. | |
| Change Friendly Name | Using this option you can change the device name that is used to identify your TV when connecting a device to the TV wirelessly. The default device name will be restored if the device name is left blank or first time installation is performed. | |
| Application Priority | You can set your preference regarding the priority between the broadcast applications and CICAM AppMMI applications using this option. In case a CICAM is inserted into the TV and a contention occurs between the applications the priority will be given to the selected type of application. | |
| Dolby Notification | Sets the notification appearance preference for Dolby content. When set as On, Dolby logo will be displayed on the screen when Dolby content is detected. | |
| Model Information | Displays information such as model name, serial number, MAC address, etc. | |
Note: Some options may not be available depending on the model of your TV, its features and the selected country in the First Time Installation.
General TV Operation
Using the Channel List
The TV sorts all stored stations in the channel list. You can edit this channel list, set favourites or set active stations to be listed by using the Channels menu options. Press the OK button to open the channel list. You can filter the listed channels or make advanced changes in the current list using the Filter and Edit tab options. Highlight the tab you want and press OK to see available options.
In order to add the channel you are currently watching to the Home menu, highlight the Add to Home option in the Edit tab in the Channels menu and press OK.
Managing the Favourite Lists
You can create four different lists of your favourite channels. Enter the TV>Channels menu or press the OK button in order to open the Channels menu. Highlight the Edit tab and press OK to see the editing options and select the Tag/Untag channel option. Select the desired channel on the list by pressing the OK button while the channel is highlighted. You can make multiple choices. You can also use the Tag/ Untag all option to select all channels on the list. Then press Back/Return button to return to the Edit menu options. Select Add/Remove Favourites option and press the OK button again. Favourite channel list options will be displayed. Set the desired list option to On. The selected channel/s will be added to the list. In order to remove a channel or channels from a favourite list follow the same steps and set the desired list option to Off.
You can use the filtering function in the Channels menu to filter the channels in the channel list permanently according to your preferences. For instance, using the options of the Filter tab, you can set one of your four favourite lists to be displayed every time the channel list is opened. The selected filtering options will be shown on the top of the Channels menu screen.
Configuring Parental Settings
The Parental menu options can be used to prohibit users from viewing of certain programmes, channels and usage of menus. These settings are located in the Settings> System>Parental menu.
To display parental lock menu options, a PIN should be entered. After coding the correct PIN, parental setting options will be displayed.
Menu Lock: This setting enables or disables access to all menus or installation menus of the TV.
Guidance: This setting enables or disables access to some of the MHEG applications. Disabled applications can be released by entering the right PIN.
Maturity Lock: If this option is set, the TV gets the maturity information from the broadcast and if this
maturity level is disabled, prohibits access to the broadcast.
Note: If the country option in the First Time Installation is set as France, Italy or Austria, Maturity Lock's value will be set to 18 as default.
Child Lock: If this option is set to On, the TV can only be controlled by the remote control. In this case the control buttons on the TV will not work.
Internet Lock: If this option is set to ON, the internet using applications will be disabled. Set to OFF to release these applications again.
Set PIN: Defines a new PIN number.
Default CICAM PIN: This option will appear as greyed out if no CI module is inserted into the CI slot of the TV. You can change the default PIN of the CI CAM using this option.
Note: Default PIN could have been set to 0000 or 1234. If you have defined the PIN (is requested depending on the country selection) during the First Time Installation use the PIN that you have defined. In case the PIN is entered incorrectly five times in succession, PIN entry will be blocked and it will no longer be possible to make a new entry for 30 minutes. However, you can unblock the PIN entry or reset the retry count to zero by turning the TV off and on.
Some options may not be available depending on the model and/or on the country selection in the First Time Installation.
Electronic Programme Guide
By means of electronic programme guide function of your TV, you can browse the event schedule of the currently installed channels on your channel list. It depends on the related broadcast whether this feature is supported or not.
To access the programme guide, press the Guide button on your remote. You can also use the Guide option under TV menu.
There are 2 different types of schedule layouts available, Timeline Schedule and Now/Next. To switch between these layouts highlight the tab with the name of the alternative layout on the upper side of the screen and press OK.
Use the directional buttons to navigate through the programme guide. Use the Back/Return button to use the tab options on the upper side of the screen.
Timeline Schedule
In this layout option, all events of the listed channels will be displayed by timeline. You can use the directional buttons to scroll through the list of the events. Highlight an event and press OK to display event options menu.
Press Back/Return button to use available tab options. Highlight Filter tab and press OK to see the filtering options. To change the layout highlight Now/Next and press OK. You can use the Previous Day and Next Day options to display the events of the previous and next day.
Highlight Extras tab and press OK to access below options.
Highlight Genre: Displays Highlight Genre menu.
Select a genre and press OK. The events in the programme guide matching the selected genre will be highlighted.
Guide Search: Displays searching options. Using these options, you can search the programme guide database in accordance with the selected criteria. Matching results will be listed.
Now: Displays current event of the highlighted channel.
Zoom: Highlight and press OK to see events in a wider time interval.
Now/Next Schedule
In this layout option, only the current and next events of the listed channels will be displayed. You can use the directional buttons to scroll through the list of the events.
Press Back/Return button to use available tab options. Highlight Filter tab and press OK to see the filtering options. To change the layout highlight Timeline Schedule and press OK.
Event Options
Use the directional buttons to highlight an event and press OK button to display Options menu. The following options are available.
Select Channel: Using this option, you can switch to the selected channel in order to watch it. The programme guide will be closed.
More Info: Display detailed information on the selected event. Use up and down directional buttons to scroll through the text.
Set Timer on Event / Delete Timer on Event: Select Set Timer on Event option and press OK. You can set timers for future events. The event will be added to Timers list. To cancel an already set timer, highlight that event and press the OK button. Then select Delete Timer on Event option. The timer will be cancelled.
Notes: You cannot switch to any other channel while there is an active timer on the current channel.
It is not possible to set timer for two or more individual events at the same time interval.
Teletext Services
Press the Text button to enter. Press again to activate mix mode, which allows you to see the teletext page and the TV broadcast at the same time. Press once more to exit. If available, sections in the teletext pages will become colour-coded and can be selected by pressing the coloured buttons. Follow the instructions displayed on the screen.
Digital Teletext
Press the Text button to view digital teletext information. Operate it with the coloured buttons, directional buttons and OK button. The operation method may differ
depending on the content of the digital teletext. Follow the instructions displayed on the digital teletext screen. When the Text button is pressed again, the TV returns to television broadcast.
Software Upgrade
Your TV is capable of finding and updating the software automatically via the broadcast signal or via Internet.
Software upgrade search via user interface
On the main menu select Settings, then navigate to Software Upgrade and press the OK button. Then select Scan for upgrade and press OK button to check for a new software upgrade. You can select the satellite, which is used for updating process by setting Edit upgrade for Satellite option. The Software Upgrade option is also available in the Settings>System>More menu.
If a new upgrade is found, it starts to download the upgrade. After the download is completed, a warning will be displayed, press OK button to complete software upgrade process and restart TV.
3 AM search and upgrade mode
Your TV will search for new upgrades at 3:00 o'clock if Automatic scanning option is set to Enabled and if the TV is connected to an aerial signal or to the Internet. If a new software is found and downloaded successfully, it will be installed at the next power on.
Note: Do not unplug the power cord while led is blinking during the reboot process. If the TV fails to come on after the upgrade, unplug, wait for two minutes then plug it back in.
All updates are automatically controlled. If a manual search is carried out and no software is found then this is the current version.
Troubleshooting & Tips
TV will not turn on
Make sure the power cord is plugged in securely to a wall outlet. Press the Standby button on the remote.
Poor picture
- Check if you have correctly tuned the TV.
- Low signal level can cause picture distortion. Please check antenna connections.
- Check if you have entered the correct channel frequency if you have performed manual tuning.
No picture
TV is not receiving any signal. Make sure the correct source has been selected.
Is the antenna connected properly?
Is the antenna cable damaged?
- Are suitable plugs used to connect the antenna?
- If the content is received through an HDMI input, try changing the related HDMI source input setting to Enhanced or Regular from the Source Settings
option in the Sources menu or the Sources option in the Settings>System menu.
If you are in doubt, consult your dealer.
No sound
- Check if the TV sound is muted. Press the Mute button or increase the volume to check.
Sound is coming from only one speaker. Check the balance settings from the Sound menu. - Check if the Sound Output option is set correctly from the Sound menu.
- If the content is received through an HDMI input, try changing the related HDMI source input setting to Enhanced or Regular from the Source Settings option in the Sources menu or the Sources option in the Settings>System menu.
Remote control - no operation
- The batteries may be exhausted. Replace the batteries.
- The batteries maybe inserted incorrectly. Refer to the section "Inserting the Batteries into the Remote".
No signal on an input source
It is possible that no device is connected.
- Check the AV cables and connections from your device.
- Check the device is switched on.
| HDMI Signal Compatibility | |||
| Source Sup | ported Signals Available | ||
| HDMI | 480i 60Hz O | ||
| 480p 60Hz O | |||
| 576i, 576p 50Hz O | |||
| 720p 50Hz,60Hz O | |||
| 1080i 50Hz,60Hz O | |||
| 1080p | 24Hz,25Hz,30Hz,50Hz,60Hz | O | |
| 3840x2160p | 24Hz,25Hz,30Hz,50Hz,60Hz | O | |
| 4096x2160p | 24Hz,25Hz,30Hz,50Hz,60Hz | O | |
(X: Not Available, O: Available)
In some cases a signal on the TV may not be displayed properly. The problem may be an inconsistency with standards from the source equipment (DVD, Set-top box, etc.). If you do experience such a problem please contact your dealer and also the manufacturer of the source equipment.
Supported File Formats for USB Mode
Video File Formats
| File Extension | Format | |
| Video Codec Audio | ||
| .mpg/.mpeg/.dat/.vob MPEG | G1/2, H.264, VC1 MPEG Layer 1/2/3, AC3 | |
| /ts/.trp/.m2ts MPEG1/2, H.264, VC1, HEVC/H.265 MPEG Layer 1/2/3, AC3, E-AC3 | ||
| .avi MPEG1/2, MPEG4, H.264, MJPEG MPEG Layer 1/2/3, AC3, AAC, WMA | ||
| .mp4/.m4a/.m4v/.mov/.qt/.3gp/.3g2/.3gpp | MPEG1/2, H.263, MPEG4, H.264,HEVC/H.265, AV1 | MPEG Layer 1/2/3, AAC LC, AC3 |
| .mkv | MPEG 1/2, MPEG4, H.264,HEVC/H.265, AV1 | MPEG Layer 1/2/3, AAC, AC3 |
| .flv Sorenson Spark, MPEG | H.264 MPEG Layer 3, ADPCM, AAC LC | |
| .asf/.wmv MPEG4, WMV3,VC1 WMA, AMR-NB | ||
| .webm VP9, VP8, AV1 OPU.S, Vorbis | ||
Picture File Formats
| File Extension Format | |
| .jpg/.jpeg JPEG, PJPEG | |
| .bmp | BMP |
| .png | PNG |
Audio File Formats
| File Extension | Format | |
| Video Codec | Audio | |
| .mp3 | mp3 | |
| .aac | AAC | |
| .wma | WMA | |
| .wav | MPEG Layer 1/2/3, AAC, PCM | |
| .m4a | M4A | AAC |
Subtitle File Formats
| External Subtitles | |
| Extension | Specification |
| .ssa | SubStation Alpha |
| .ass | Advanced SubStation Alpha |
| .srt | Subripper |
| .sub | Micro DVD / SubViewer |
| .txt | Micro DVD / TMPlayer / MPL2 |
| .smi | Sami |
| Internal Subtitles | |
| Extension Specification | |
| .mkv | VOBSub |
| .mkv | ASS / SSA / TEXT |
| .dat, .mpg, .mpeg, .vob DV | D Subtitle |
| .mp4 | DVD Subtitle, TEXT |
Supported DVI Resolutions
When connecting devices to your TV's connectors by using DVI converter cable (DVI to HDMI cable - not supplied), you can refer to the following resolution information.
| 56Hz 60Hz 66Hz 70Hz 72Hz 75Hz | |||||
| 640x480 | X | X | |||
| 800x600 | XXXX | ||||
| 1024x768 | XXXX | ||||
| 1280x768 | X | X | |||
| 1280x960 | X | ||||
| 1360x768 | X | ||||
| 1366x768 | X | ||||
| 1280x1024 | XXXX | ||||
| 1400x1050 | X | ||||
| 1600x900 | X | ||||
| 1920x1080 | X | ||||
Connectivity
Wired Connectivity
To Connect to a Wired Network
- You must have a modem/router connected to an active broadband connection.
- Connect your TV to your modem/rodter via an Ethernet cable. There is a LAN port at the rear (back) of your TV.
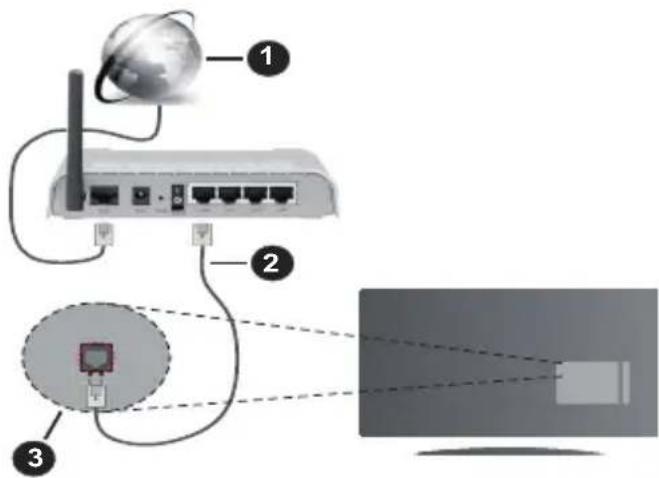
1 Broadband ISP connection
2 LAN (Ethernet) cable
3 LAN input on the rear side of the TV
- You might be able to connect your TV to your LAN depending on your network's configuration. In such a case, use an Ethernet cable to connect your TV directly to the network wall outlet.
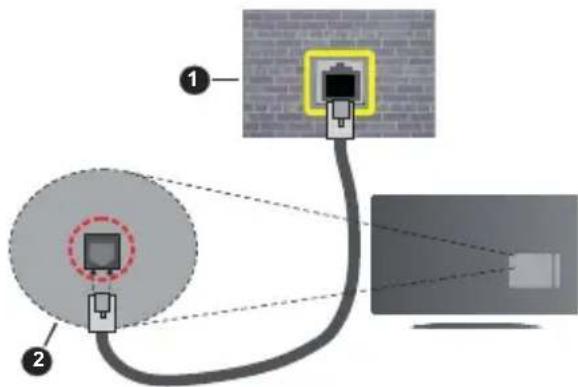
1 Network wall socket
2 LAN input on the rear side of the TV
Configuring Wired Device Settings
To configure wired connection settings go to the Settings>Network menu.
Network Type
Set Network Type as Wired Device if you are connecting via an Ethernet cable.
Internet Speed Test
Highlight Internet Speed Test and press the OK button. TV will check the internet connection bandwidth and display the result when complete.
Advanced Settings
Highlight Advanced Settings and press the OK button. On the next screen you can change the IP and DNS settings of the TV. Highlight the desired one and press Left or Right button to change the setting from Automatic to Manual. Now you can enter the IP and / or DNS values manually. Select the related item in the drop down menu and enter the new values using the numeric buttons of the remote. Highlight Save and press the OK button to save settings when complete.
Other Information
The status of the connection will be displayed as Connected or Not Connected and the current IP address, if a connection is established. The MAC address of your TV will also be displayed on the screen.
Wireless Connectivity
To Connect to a Wireless Network
- You must have a wireless modem/rodter connected to an active broadband connection.
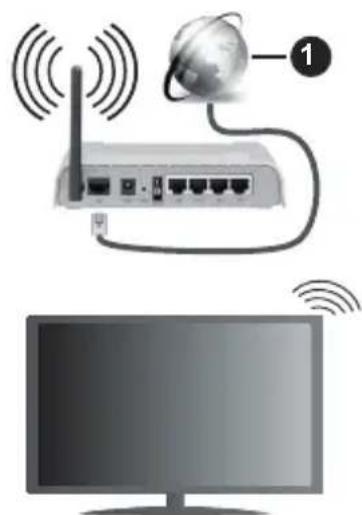
1 Broadband ISP connection
A Wireless-N router (IEEE 802.11a/b/g/n) with simultaneous 2.4 and 5 GHz bands is designed to increase bandwidth. These are optimised for smoother and faster HD video streaming, file transfers and wireless gaming.
The frequency and channel differ depending on the area.
The transmission speed differs depending on the distance and number of obstructions between the transmission products, the configuration of these products, the radio wave conditions, the line traffic and the products that you use. The transmission may also be cut off or may get disconnected depending on the radio wave conditions, DECT phones or any
other WLAN 11b appliances. The standard values of the transmission speed are the theoretical maximum values for the wireless standards. They are not the actual speeds of data transmission.
The location where the transmission is most effective differs depending on the usage environment.
The TV supports 802.11 a, b, g & n type modems. It is highly recommended that you should use the IEEE 802.11n communication protocol in order to avoid any possible problems while watching videos.
You must change your modem's SSID when there are any other modems around with the same SSID. You can encounter connection problems otherwise. Use a wired connection if you experience problems with a wireless connection.
Configuring Wireless Device Settings
To configure wireless connection settings go Settings>Network menu.
Network Type
Set Network Type as Wireless Device to start connection process.
Scan Wireless Networks
Highlight Scan Wireless Networks option and press OK to start a search for available wireless networks. All found networks will be listed. Highlight your desired network from the list and press OK to connect. network with hidden SSID can not be detected by other devices. If you want to connect to a network with hidden SSID, scroll down the list of detected wireless networks, highlight the Add New Network option and press OK. Enter the name of the network and select the security type using the related options to connect.
Note: If the modem supports N mode, you should set N mode settings.
If the selected network is password-protected, enter the correct key by using the virtual keyboard. You can use this keyboard via the directional buttons and the OK button on the remote control.
Wait until the IP address is shown on the screen. This means that the connection is now established.
Disconnect
If you have connected to a wireless network Disconnect option will appear in the Network menu and your wireless network profile will also be saved, thus your TV will connect to the same network automatically whenever you switch to wireless connection. To disconnect from a wireless network and delete saved wireless network profile, highlight Disconnect and press OK.
Press WPS on your wifi router
If your router has WPS, you can directly connect to the modem/rodter without entering a password or adding the network first. Highlight Press WPS on your wifi
router option and press OK. Go to your modem/rodert device and press the WPS button on it to make the connection. You will see a connection confirmation on your TV once the devices have paired. Select OK to proceed. No further configuration is required.
Internet Speed Test
Highlight Internet Speed Test and press the OK button to check your internet connection speed.
Advanced Settings
Highlight Advanced Settings and press the OK button to open the advanced setting menu. Use directional and numeric buttons to set. The procedure is the same as explained for wired connectivity. Highlight Save and press the OK button to save settings when complete.
Networked Standby Mode
You can enable or disable the Networked Standby Mode feature by setting this option accordingly. Refer to Networked Standby Mode section for further information.
Other Information
The status of the connection will be displayed. Connected or Not Connected and the current IP address, if a connection is established. The MAC address of your TV will also be displayed on the screen.
Connecting to your mobile device via WLAN
If your mobile device has WLAN feature, you can connect it to your TV via a router, in order to access the content in your device. For this, your mobile device must have an appropriate sharing software.
Connect your TV to your router by following the steps mentioned in the sections above.
Afterwards, connect your mobile device to the router and then activate the sharing software on your mobile device. Then, select files that you want to share with your TV.
If the connection is established correctly, you be able to access the shared files installed on your mobile device via the Audio Video Sharing feature of your TV.
Highlight the Audio Video Sharing option in the Sources menu and press OK, available media server devices in the network will be displayed. Select your mobile device and press the OK button to continue.
- If available, you can download a virtual remote controller application from the server of your mobile device application provider.
the Note: This feature may not be supported on all mobile devices.
Handling of the customer information
When using Internet connecting function of this TV, after agreeing to Panasonic's terms of service / privacy policy (hereinafter referred to as terms and conditions etc.), Customer Information on the use of this unit
may be collected and used according to terms and conditions etc.
For details of terms of service / privacy policy, refer to [HOME] Settings>System>Privacy>Privacy Settings
Customer's personal information may be recorded on this TV by broadcasting organisation or application provider. Before repairing, transferring or discarding this TV, erase all the information recorded on this TV according to the following procedure.
[HOME] Installation>First time installation
Customer information may be collected by provider via application provided by third parties on this TV or website. Please confirm the terms and conditions etc. of provide in advance.
- Panasonic will not be held responsible for collecting or using customer Information via application provided by third party on this TV or website.
- When entering your credit card number, name, etc. pay special attention to the trustworthiness of the provider.
- Registered information may be registered in the server etc. of provider. Before repairing, transferring or discarding this TV, be sure to erase the information according to the terms and conditions etc. of provider.
Networked Standby Mode
Networked Standby Mode is a standard that allows a device to be turned on or woken up by a network message. The message is sent to the device by a program executed on a remote device connected to the same local area network, such as a smartphone.
To enable this feature set the Networked Standby Mode option in the Network menu as On. It is necessary that both the device, from which the network message will be sent to the TV, and the TV are connected to the same network. Networked Standby Mode feature is only supported for Android OS devices and can only be used via YouTube and Netflix applications.
In order to use this feature the TV and the remote device should be connected at least once while the TV is on. If the TV is powered off, the connection should be re-established, the next time it is switched on. Otherwise this feature will be unavailable. This does not apply, when the TV is switched into the standby mode.
If you want your TV to consume less power in standby mode, you can disable this feature by setting the Networked Standby Mode option as Off.
Wireless Display
Wireless Display is a standard for streaming video and sound content. This feature provides the ability to use your TV as wireless display device.
Using with mobile devices
There are different standards which enable sharing of screens including graphical, video and audio content between your mobile device and TV.
Plug the wireless USB dongle to TV first, if the TV doesn't have internal WLAN feature.
Press the Source button on the remote and switch to Wireless Display source.
A screen appears stating that the TV is ready for connection.
Open the sharing application on your mobile device. These applications are named differently for each brand, refer to the instruction manual of your mobile device for detailed information.
Scan for devices. After you select your TV and connect, the screen of your device will be displayed on your TV.
Note: This feature can be used only if the mobile device supports this feature. If you experience problems with the connection check if the operating system version you use supports this feature. There may be incompatibility problems with the operating system versions which are released after the production of this TV. Scanning and connecting processes differ according to the program you use.
Connectivity Troubleshooting
Wireless Network Not Available
- Ensure that any firewalls of your network allow the TV wireless connection.
Try searching for wireless networks again, using the Network menu screen.
If the wireless network does not function properly, try using the wired network in your home. Refer to the Wired Connectivity section for more information on the process.
If the TV does not function using the wired connection, check the modem (router). If the router does not have a problem, check the internet connection of your modem.
Connection is Slow
See the instruction book of your wireless modem to get information on the internal service area, connection speed, signal quality and other settings. You need to have a high speed connection for your modem.
Disruption during playback or slow reactions
You could try the following in such a case:
Keep at least three metres distance from microwave ovens, mobile telephones, bluetooth devices or any other WLAN compatible devices. Try changing the active channel on the WLAN router.
Internet Connection Not Available / Audio Video Sharing Not Working
If the MAC address (a unique identifier number) of your PC or modem has been permanently registered, it is possible that your TV might not connect to the internet. In such a case, the MAC address is authenticated
each time when you connect to the internet. This is a precaution against unauthorised access. Since your TV has its own MAC address, your internet service provider cannot validate the MAC address of your TV. For this reason, your TV cannot connect to the internet. Contact your internet service provider and req information on how to connect a different device, such as your TV, to the internet.
It is also possible that the connection may available due to a firewall problem. If you think this causes your problem, contact your internet service provider. A firewall might be the reason of a connectivity and discovery problem while using the TV in Video Sharing mode or while browsing via Audio Video Sharing feature.
Invalid Domain
Ensure that you have already logged on to your PC with an authorised username/password and also ensure that your domain is active, prior to sharing any files in your media server program on your PC. If the domain is invalid, this might cause problems while browsing files in Audio Video Sharing mode.
Using Audio Video Sharing Network Service
Audio Video Sharing feature uses a standard eases the viewing process of digital electronics and makes them more convenient to use on a hor network.
This standard allows you to view and play photos, music and videos stored on the media server connected to your home network.
1. Server Software Installation
The Audio Video Sharing feature cannot be used if the server program is not installed onto your PC or if the required media server software is not installed onto the companion device. Prepare your PC with a proper server program.
2. Connect to a Wired or Wireless Network
See the Wired/Wireless Connectivity sections for detailed configuration information.
3. Enable Audio Video Sharing
Enter the Settings>Devices menu and enable the Audio Video Sharing option.
4. Play Shared Files via Media Browser
Highlight the Audio Video Sharing option in Sources menu by using the directional buttons and press OK. Available media server devices network will be listed. Select one and press OK to continue. The media browser will then be displayed. Refer to the Media Browser menu section for further information on file playback.
If a problem occurs with the network, switch your television off at the wall socket and back on again.
PC/HDD/Media Player or any other devices that are compatible should be used with a wired connection for higher playback quality.
Use a LAN connection for quicker file sharing between other devices like computers.
Note: There may be some PC's which may not be able to utilise the Audio Video Sharing feature due to administrator and security settings (such as business PC's).
Apps
You can access the applications installed on your TV from the Home menu. Press the Home button on the remote, Home menu will be displayed. Highlight an app and press OK to launch.
In order to manage the apps installed on your TV, you can use the More Apps option in the TV menu. You can add an installed app to Home menu, launch or remove it. Highlight an app and press OK to see the available options.
You can add new apps from the application market. To access the market highlight the Market option in the TV menu and press OK. Available apps will be displayed. You can also access the application market from within the More Apps menu.
You can reset your customisations on the Home menu, including app-related ones, to defaults using the Reset Apps option in the TV menu (availability depends on TV model and its features). Highlight this option and press OK. A confirmation message will be displayed. Highlight Yes and press OK to proceed. Note that you will not be able to perform this operation again within the next few minutes.
Notes:
Possible application dependent problems may be caused by the content service provider.
Third party internet services may change, be discontinued or restricted at any time.
Internet Browser
To use the internet browser, enter the Home menu first.
Then launch the internet browser application has an orange coloured logo with earth symbol on it. In the initial screen of the browser, the thumbnails of the predefined (if any) links to web sites available will be displayed as Speed Dial options along with the Edit Speed Dial and the Add to Speed Dial options. To navigate the web browser, use the directional buttons on the remote or a connected mouse. To see the browser options bar, move the cursor to the top of the page. History, Tabs and Bookmarks options and the browser bar which contains previous/next buttons, the refresh button, the address/search bar, the Speed Dial and the Vewd buttons are available.
To add a desired website to the Speed Dial list for quick access, move the cursor to the top of the page. The browser bar will appear. Highlight the Speed Dial button and press the OK button. Then select Add to
Speed Dial option and press the OK button. Fill in the blanks for Name and Address, highlight OK and press the OK button to add. Whilst you are on the site you wish to add to the Speed Dial list, highlight the Vewd button and press the OK button. Then highlight Add to Speed Dial option in the submenu and press the OK button again. Name and Address will be filled automatically according to the site you are visiting. Highlight OK and press the OK button to add.
You can also use the Vewd menu options to manage the browser. Highlight the Vewd button and press the OK button to see available page specific and general options.
There are various ways to search or visit websites using the web browser.
Enter the address of a website(URL) into the search/ address bar and highlight the Submit button on the virtual keyboard and press the OK button to visit the site.
Enter keyword/s into the search/address bar and highlight the Submit button on the virtual keyboard and press the OK button to start a search for the related websites.
Highlight a Speed Dial thumbnail and press the OK button to visit the related website.
Your TV is compatible with USB mice. Plug your mouse or wireless mouse adaptor into the USB input of your TV for easier and quicker navigation.
Some web pages include flash content. These are not supported by the browser.
Your TV does not support any download processes from the internet via the browser.
All sites on the internet might not be supported. According to the site; content problems may occur. In some circumstances video content might not be able to be played.
HBBTV System
HbbTV (Hybrid Broadcast Broadband TV) is a new industry standard that seamlessly combines TV services delivered via broadcast with services delivered via broadband and also enables access to Internet only services for consumers using connected TVs and settop boxes. Services delivered through HbbTV include traditional broadcast TV channels, catch-up services, video-on-demand, electronic programme guide, interactive advertising, personalisation, voting, games, social networking and other multimedia applications.
HbbTV applications are available on channels where they are signalled by the broadcaster. The broadcaster marks one application as "autostart" and this one is started by the platform automatically. The autostart applications are generally launched with a small red button icon to notify the user that there is an HbbTV application on that channel. Press the red button to open the application page. After the page is displayed you can go back to the initial red button icon state by pressing the red button again. You can toggle between the red button icon mode and full UI mode of the application via pressing red button. It should be noted that the red button switching capability is provided by the application and some applications may behave differently (other colour buttons such as green, yellow, blue, may be defined for some other functions, e.g. shortcuts).
If you switch to another channel while an HbbTV application is active (either in red button icon mode or full UI mode), the following scenarios can occur.
The application can continue running.
The application can be terminated.
- The application can be terminated and another autostart red button application can be launched.
HbbTV allows the applications to be retrieved both from broadband or broadcast. The broadcaster may enable both ways or one of them. If the platform does not have an operational broadband connection, the platform can still launch applications transmitted on broadcast.
The autopost red button applications generally provide links to other applications. The user then can switch to other applications by using the links provided. The applications should provide a way to terminate themselves, usually Exit button is used for this.
HbbTV applications use keys on the remote control to interact with the user. When an HbbTV application is launched, the control of some keys are owned by the application. For example, numeric channel selection may not work on a teletext application where the numbers indicate teletext pages.
HbbTV requires AV streaming capability for the platform. There are numerous applications providing VOD (video on demand) and catch-up TV services. The user can use play, pause, stop, forward, and
rewind keys on the remote control to interact with the AV content.
If you need to change the audio description settings of your TV you should do it before a HbbTV playback starts. You will not be able to access related settings during a playback. Go to the Settings>System>Accessibility>Audio Description menu and adjust according to your need.
Note: You can enable or disable this feature from the More menu in Settings>System menu. Depending on the model of your TV and the selected country option in the First Time Installation this feature might be available in the Settings>System>Privacy>Privacy Settings menu instead of the Settings>System>More menu.
Alexa Ready
Alexa is Amazon's cloud-based voice service available on many voice controlled assistant devices. By means of the Alexa Built-in and Works With Alexa features you can use your TV as an Alexa device and control the functions of your TV with Alexa.
Alexa Built-in
You can use your TV as an Alexa device. In order to do this, a Microphone Box(*) will be required. After connecting your Microphone Box to your TV the setup process should be completed. The setup can be carried out in the ways described below.
(*) The Microphone Box can be purchased separately if not supplied with the TV. For more information contact your local dealer or retail outlet where you bought your TV.
- Connect your Microphone Box to your TV
- Use the Alexa Built-in option in the Settings>System>Voice Assistant menu
- Carry out first time installation on your TV. The setup wizard will be displayed after the installation process is completed
The wizard will guide you through the setup process. Refer to the user manual of the Microphone Box for detailed information.
Alexa Home Screen
Once the setup is complete, Alexa Home Screen feature will be integrated. This feature is an ambient screen which appears when no user activity is detected. A background image, time and date information and voice command suggestions will be displayed on the Alexa Home Screen.
You can use the Alexa Home Screen option in the Settings>System>VoiceAssistant>AlexaBuilt-in menu to configure the settings of this feature. You can set to one of the inactivity periods to enable or set to Off to disable.
Alexa Home Screen is displayed only when web browser or any other video on demand application except Netflix is running. It appears when no user activity is detected during the predefined inactivity period unless
a media playback is in progress. Watching a movie, for example, is not considered as user inactivity.
You can press remote control buttons to make it disappear. As an exception you can use the Volume +/- buttons to control volume level even when Alexa Home Screen is running.
Works With Alexa
You can control the functions of your TV with Alexa. In order to do this, the setup process should be completed. The setup can be carried out in the ways described below.
- Use the Works With Alexa option in the Settings>System>Voice Assistant menu
- Carry out first time installation on your TV. The setup wizard will be displayed after the installation process is completed
Setup process
The wizard will guide you through the setup process.
If you carry out first time installation on your TV, the Alexa setup wizard will be displayed after the installation process is completed. On the first screen highlight Learn More option and press OK. On the next screen you will be informed about the feature. Highlight Start and press OK to proceed.
If you skip the setup wizard after the first time installation you can use the Works With Alexa option in the Settings>System>Voice Assistant menu to carry out the setup later manually. On the first screen you will be informed about the feature. Highlight Start and press OK to proceed.
- An authentication code will be created and displayed on the screen. Use your computer or any other device with internet access to go to the internet address (URL) shown on the screen. You will be directed to a page where you can sign in to your Amazon account first, if you are not already signed in. Then you will be directed to a page where you can enter the authentication code you see on the TV and link your TV to your Amazon account.
- If the linking process was successful you will be asked to determine a name for your TV, called 'Friendly Name'(FN). A 'Friendly Name' is a name that reminds you of your TV, such as 'Living Room TV', 'Kitchen TV', 'Dining Room TV', etc. Choose an easy-to-say name. You will say this name to tell Alexa which TV to control. When you are done, highlight OK and press OK.
Examples about the use of the feature will be displayed on the next screen. Press OK to finish the setup.
If you carried out the setup after the first time installation you will return to the first screen of the setup wizard when you press OK. In that case press Exit
or highlight Setup Later and press OK in order to exit the setup.
Once the setup is complete, you will be able to control the functions of your TV with Alexa.
Note: Make sure that the devices are connected to the internet.
Example Commands
Here are some voice commands that you can use:
| Command Function | |
| Alexa, turn on 'FN' Powers on the TV | |
| Alexa, turn off 'FN' Powers off the TV | |
| Alexa, play 'FN' Starts media playback | |
| Alexa, pause 'FN' Pauses media playback | |
| Alexa, resume 'FN' Resumes media playback | |
| Alexa, stop 'FN' Stops media playback | |
| Alexa, fast forward on 'FN' | |
| Alexa, rewind on 'FN' Rewinds media | |
| Alexa, set the volume of 'FN' to 50 | |
| Alexa, turn the volume up on 'FN' | |
| Alexa, turn the volume down on 'FN' | |
| Alexa, mute 'FN' Mutes sound | |
| Alexa, unmute 'FN' Unmutes sound | |
| Alexa, change the input to "input_name" on 'FN' | |
| Alexa, change channel to "channel_number" on 'FN' | |
| Alexa, change channel to "channel_name" on 'FN' | |
| Alexa, channel up on 'FN' | |
| Alexa, channel down on 'FN' | |
| Alexa, next channel on 'FN' | |
FN is the abbreviation for 'Friendly Name'.
Google Assistant
Your TV works with Google Home for voice control of your connected devices and appliances.
Works With Google Home
By means of this feature you can control the functions of your TV with Google Assistant devices. In order to do this, the setup process should be completed.
Before the setup
Complete the following procedures before you start the setup on your TV.
- Install the Google Home application on your mobile phone and login to your account
- Add the assistant device to your account
- Select the Vsmart TV action from the list of actions within the application
- A screen will be displayed where you will enter the authentication code which will be created during the setup process on your TV in order to link your TV to your account. Continue with the setup on your TV to get the authentication code
Setup process
The setup can be carried out by using the Google Assistant option in the Settings>System>Voice Assistant menu. The wizard will guide you through the setup process.
- On the first screen highlight Start and press OK to proceed
- You will be asked to determine a name for your TV on the next screen, called 'Friendly Name' (FN). A 'Friendly Name' is a name that reminds you of your TV, such as 'Living Room TV', 'Kitchen TV', 'Dining Room TV', etc. Choose an easy-to-say name. When you are done, highlight OK and press OK
- An authentication code will be created and displayed on the screen. Enter the code you see on the TV on the Google Home application
Once the setup is complete, you will be able to control the functions of your TV with Google Assistant.
Note: Make sure that the devices are connected to the internet. You can link only one TV to your account.
Example Commands
Just say "Hey Google" or "Ok Google" to control your TV using just your voice.
| Command Function | |
| turn on 'FN' Powers on the TV | |
| turn off 'FN' Powers off the TV | |
| pause on 'FN' Pauses media playback | |
| resume on 'FN' Resumes media playback | |
| stop on 'FN' Stops media playback | |
| volume up on 'FN' Increases volume | |
| volume down on 'FN' Decreases volume | |
| set mute volume on 'FN' Mutes sound | |
| switch input to "input_name" on 'FN' | The TV switches to the input source with the spec-ified name (e.g. HDMI 1) |
| switch to "input_name" on 'FN' | |
| change channel to "channel_number" on 'FN' | The TV switches to the channel with the specified number (e.g. channel 200) |
| change channel to "channel_name" on 'FN' | The TV switches to the channel with the specified name |
| channel up on 'FN' | The TV switches to the next higher channel, if any available |
| channel down on 'FN' | The TV switches to the next lower channel, if any available |
FN is the abbreviation for 'Friendly Name'.
Google is a trademark of Google LLC.
DVB functionality information
This DVB receiver is only suitable for use in the country which it was designed to be used in.
Although this DVB receiver conforms to the latest DVB specifications at the time of manufacture, we cannot guarantee compatibility with future DVB transmissions due to changes that may be implemented in broadcast signals and technologies.
Some digital television functions may not be available in all countries.
We continually strive to improve our products; therefore, specifications may change without prior notice.
For advice on where to purchase accessories, please contact the store where you purchased your equipment.
Inhalt
Panasonic Testing Centre
Panasonic Marketing Europe GmbH
Winsberging 15, 22525 Hamburg, Germany
Website: http://www.panasonic.com
Technische Daten
WEP 64/128, WPA, WPA2, TKIP, AES, WAPI.
Hinweis
Premiere Installation 17
Lecture de media via entrée USB. 19
Panasonic Testing Centre
Panasonic Marketing Europe GmbH
Winsberging 15, 22525 Hamburg, Germany
Site Internet: http://www.panasonic.com

Specifications
WEP 64/128, WPA, WPA2, TKIP, AES, WAPI
Remarque
Panasonic Testing Centre
Panasonic Marketing Europe GmbH
Winsberging 15, 22525 Hamburg, Germany
Sitio Web: http://www.panasonic.com
Especificaion
WEP 64/128, WPA, WPA2, TKIP, AES, WAPI
Aviso
Con这对于 the media, this is a good idea. It is important to note that the media should be treated with respect and dignity. The media should be treated with respect and dignity.
4. Impostazioni
Panasonic Testing Centre
Panasonic Marketing Europe GmbH
Winsberging 15, 22525 Hamburg, Germany
Sito web: http://www.panasonic.com
WEP 64/128, WPA, WPA2, TKIP, AES, WAPI
Avviso
DVB/Transmission data/Funzioni IPTV
Panasonic Testing Centre
Panasonic Marketing Europe GmbH
Winsberging 15, 22525 Hamburg, Germany
Website: http://www.panasonic.com
Specificationer
| TV-udsendelse | PAL BG/I/DK/ SECAM BG/DK | ||
| Modtagende kanaler | VHF (BAND I/III) - UHF (BAND U) - HYPERBAND | ||
| Digital modtagelse | Fuldt integreret digital antenna-kabel-satellit TV(DVB-T-C-S) (i overensstemmelse med DVB-T2, DVB-S2) | ||
| Antal forudindstillede kanaler | 11 000 | ||
| Kanalindikator Skærm menu | |||
| RF antenneindgang 75 Ohm (ubalance) | |||
| Driftspænding 220-240V AC, 50Hz. | |||
| Audio A2 Stereo+Nicam Stereo | |||
| Hovedtelefon 3.5 mm mini stereo jack | |||
| Netværksbaseret standby-elforbrug (W) | <2 | ||
| TX-43MXT686 TX-43MXF687 TX-43MXN688 TX-43MXX689 | TX-50MXT686 TX-50MXF687 TX-50MXN688 TX-50MXX689 | TX-55MXT686 TX-55MXF687 TX-55MXN688 TX-55MXX689 | |
| Audio udgangseffekt (WRMS.) (10% THD) | 2 x 10 W 2 x 10 W 2 x 10 W | ||
| Strømforbrug (W) 150 W 135 W 140 W | |||
| Vægt (kg) 11 Kg 14 Kg | 17 Kg | ||
| TV-dimensioner BxHxD (med stativ) (mm) | 221 x 964 x 614 221 x 1119 x 704 221 x 1233 x 769 | ||
| TV-dimensioner BxHxD (eden stativ) (mm) | 68 x 964 x 560 68 x 1119 x 647 66 x 1233 x 711 | ||
| Skærm | 16/9 43" | 16/9 50" | 16/9 55" |
| Brugster temperatur og driftsluftfugtighed | 0 °C op til 40 °C, maks. 85 % luftfugtighed | ||
For mere produit information besoge EPREL: https://eprel.ec.europa.eu.
EPREL-Registraringsnummer findes på https://eprel.panasonic.eu/product.
Tradlose LAN-Specificationer
| Frekvensområder | Maksimal udgangseffekt |
| 2400 - 2483,5 MHz (CH1 - CH13) < 10 | 0 mW |
| 5150 - 5250 MHz (CH36 - CH48) < 20 | 0 mW |
| 5250 - 5350 MHz (CH52 - CH64) < 20 | 0 mW |
| 5470 - 5725 MHz (CH100 - CH140) < | 200 mW |
Landebegraensninger
WEP 64/128, WPA, WPA2, TKIP, AES, WAPI
Angaende
For at slukke for TV'et.
1. Server software installation
Panasonic Testing Centre
Panasonic Marketing Europe GmbH
Winsberging 15, 22525 Hamburg, Germany
WEP 64/128, WPA, WPA2, TKIP, AES, WAPI
Huomautus
Antennanslutting. 10
Licensmeddelande 10
Panasonic Testing Centre
Panasonic Marketing Europe GmbH
Winsberging 15, 22525 Hamburg, Germany
Websida: http://www.panasonic.com
Specifikationer
| TV-Sändning | PAL BG/I/DK SECAM BG/DK | ||
| Mottagande Kanaler | VHF (BAND I/III) - UHF (BAND U) - HYPERBAND | ||
| Digital Mottagning | Fullt integrerad digital markbunden babel-satellit-TV (DVB-T-C-S) (DVB-T2, DVB-S2-kompatibel) | ||
| Antal Förinställda Kanaler | 11 000 | ||
| Kanalindikator Visning | på skärmen | ||
| RF-antenningång 75 | Ohm (obalanserat) | ||
| Driftsvolt 220-240V AC, 50Hz | |||
| Ljud A2 Stereo+Nicam | Stereo | ||
| Hörlunar 3,5 mm minis | stereo-uttag | ||
| Nätverkets strömforbrukning i standby-läge (W) | < 2 | ||
| TX-43MXT686 TX-43MXF687 TX-43MXN688 TX-43MXX689 | TX-50MXT686 TX-50MXF687 TX-50MXN688 TX-50MXX689 | TX-55MXT686 TX-55MXF687 TX-55MXN688 TX-55MXX689 | |
| Ljudutgängsström (WRMS.) (10 % THD) | 2 x 10 W 2 x 10 W 2 x 10 W | ||
| Strömforbrukning (W) | 150 W 135 W 140 W | ||
| Vikt (kg) 11 Kg 14 Kg | 17 Kg | ||
| TV-dimensioner BxHxD (med stativ) (mm) | 221 x 964 x 614 221 x 1119 x 704 221 x 1233 x 769 | ||
| TV-dimensioner BxHxD (utan stativ) (mm) | 68 x 964 x 560 68 x 1119 x 647 66 x 1233 x 711 | ||
| Skärn | 16/9 43" | 16/9 50" | 16/9 55" |
| Driftstemperatur och driftsfuktigkeit | 0 °C upp till 40 °C, 85 % fuktighet max | ||
WEP 64/128, WPA, WPA2, TKIP, AES, WAPI
Obs:
3.7. Tilbake still apper
Panasonic Testing Centre
Panasonic Marketing Europe GmbH
Winsbergring 15, 22525 Hamburg, Tyskland
Nettsted: http://www.panasonic.com
Spesifikasjon
| Fjernsynssending | PAL BG/I/DK/ SECAM BG/DK | ||
| Mottak av Kanaler VHF | (BAND I/III) - UHF (BAND U) - HYPERBAND | ||
| Digitalt mottak | Fullt integrett digital bakkesendt-kabel-satellitt TV(DVB-T-C-S) (kompatibel med DVB-T2, DVB-S2) | ||
| Antall Forhåndsstilte Kanaler | 11 000 | ||
| Kanalindikator Skjermvisning | |||
| RF-antenneinngang 75 Ohm (ubalansert) | |||
| Operasjonsspenning 220-240V AC, 50Hz. | |||
| Lyd A2 Stereo+Nicam Stereo | |||
| Hodetelefon 3,5 mm stereo-minijackplugg | |||
| Nettverksbasert ventemodus Strømforbruk (W) | < 2 | ||
| TX-43MXT686 TX-43MXF687 TX-43MXN688 TX-43MXX689 | TX-50MXT686 TX-50MXF687 TX-50MXN688 TX-50MXX689 | TX-55MXT686 TX-55MXF687 TX-55MXN688 TX-55MXX689 | |
| Audio Utgangseffekt (WRMS.) (10% THD) | 2 x 10 W 2 x 10 W 2 x 10 W | ||
| Strømforbruk (W) 150 W | 135 W 140 W | ||
| Vekt (kg) 11 Kg 14 Kg 17 | Kg | ||
| TV-dimensjoner DlxLxH (med stativ) (mm) | 221 x 964 x 614 221 x 1119 | x 704 | 221 x 1233 x 769 |
| TV-dimensjoner VxHxD (uten stativ) (mm) | 68 x 964 x 560 | 68 x 1119 x 647 | 66 x 1233 x 711 |
| Skjerm | 16/9 43" | 16/9 50" | 16/9 55" |
| Driftstemperatur og driftsluftfuktigkeit | 0 °C optil 40 °C, 85 % fuktighet maks. | ||
For mer produitinformasjon, vennligst besok EPREL: https://eprel.ec.europa.eu.
EPREL-Registraringsnummer er tilgengelig pa
https://eprel.panasonic.eu/product.
WEP 64/128, WPA, WPA2, TKIP, AES, WAPI
Merknad
For a sette TV-en i hard standby
Enhanced Audio Return Channel (eARC)
Auto Low Latency Mode
Du kan ogsa aktivere alternativet ALLM (Auto Low Latency Mode) iimenyen Innstilling>Enheter. Hvisijke funksjonen er aktivert, bytter TV automatisk bildemodus til Spill nar ALLM-modussignal mottas fra gjeldende HDMI-keiten. TV gär tilbake til forrige bildemodusinnstilling när ALLM-siqalet gär tapt. Sä du trenger ikke à endre innstillingene manuelt.
Hvis alternatively ALLM er aktivert, kan/DDke bildemodus endres sa lenge ALLM-signalet mottas fra den gjeldende HDMI-kilden.
TV-bediening & Operation 8
CLASS 1 LASER PRODUCT
WAARSCHUWING
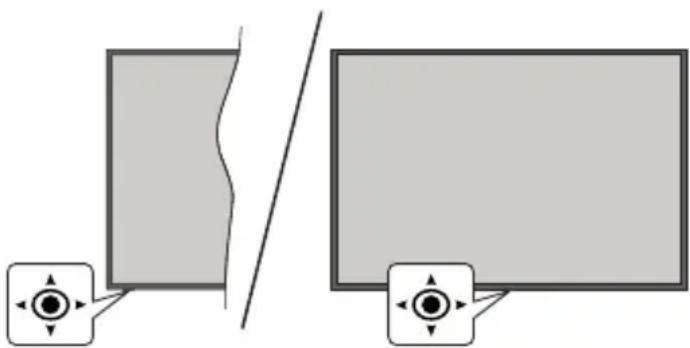
TV-bediening & Operation
Covered by patents at patentlist.accessadvance.com
Panasonic Testing Centre
Panasonic Marketing Europe GmbH
Winsberging 15, 22525 Hamburg, Germany
Web Site: http://www.panasonic.com
Specificaties
| TV-Uitzending | PAL BG/I/DK/SECAM BG/DK | ||
| Kanalen ontvangen | VHF (BAND I/III) - UHF (BAND U) - HYPERBAND | ||
| Digitale ontvangst | Volledig geintegreerde digitale aardse/kabel-satelliet TV (DVB-T-C-S) (in overeenstemming met (DVB-T2, DVB-S2 ) | ||
| Aantal instelbare kanalen | 11 000 | ||
| Kanaalindicator Weergave op het scherm | |||
| RF Antenne-Input 75 | Ohm (niet gebalanceerd) | ||
| Werkingsspanning 2 | 20-240V AC, 50Hz. | ||
| Geluid A2 Stereo+Nicam Stereo | |||
| KoptelefooN 3,5 mm | mini stereo jack | ||
| Netwerk stand-bymodusenergieverbruik(W) | < 2 | ||
| TX-43MXT686TX-43MXF687TX-43MXN688TX-43MXX689 | TX-50MXT686TX-50MXF687TX-50MXN688TX-50MXX689 | TX-55MXT686TX-55MXF687TX-55MXN688TX-55MXX689 | |
| Geluidsuitgang stroom (WRMS.) (10% THD) | 2 x 10 W 2 x 10 W 2 x 10 W | ||
| Stroomverbruik(W) | 150 W 135 W 140 W | ||
| Gewicht (kg) 11 Kg 14 Kg 17 Kg | |||
| TV afmetingen BxLxH (met voet) (mm) | 221 x 964 x 614 221 x 1119 x 704 221 x 1233 x 769 | ||
| TV afmetingen BxLxH (met voet) (mm) | 68 x 964 x 560 68 x 1119 x 647 66 x 1233 x 711 | ||
| Beeldscherm | 16/9 43" | 16/9 50" | 16/9 55" |
| Operationele temperatuur en operationele vochtigkeit | 0°C tot 40°C, 85% max. vochtigkeit | ||
WEP 64/128, WPA, WPA2, TKIP, AES, WAPI
Bericht
Enhanced Audio Return Channel (eARC)
Covered by patents at patentlist.accessadvance.com
Panasonic Testing Centre
Panasonic Marketing Europe GmbH
Winsberging 15, 22525 Hamburg, Germany
Sítio web: http://www.panasonic.com
WEP 64/128, WPA, WPA2, TKIP, AES, WAPI
Observação
Enhanced Audio Return Channel (eARC)
Panasonic Testing Centre
Panasonic Marketing Europe GmbH
Winsbergring 15, 22525 Hamburg, Germany
WEP 64/128, WPA, WPA2, TKIP, AES, WAPI
Poznámka

Covered by patents at patentlist.accessadvancemc
Panasonic Testing Centre
Panasonic Marketing Europe GmbH
Winsberging 15, 22525 Hamburg, Germany
Strona internetowa: http://www.panasonic.com
WEP 64/128, WPA, WPA2, TKIP, AES, WAPI
Uwaga
Auto Low Latency Mode (ALLM)
| Zawartość menu instalacji | |
| Automatyczne Skanowanie Kanałów(ponowne strojenie) | Wyświetla opcie automatycznego strożenia. Antena cyfrowa: Wyszikuje i zapisuju stacje DVB. Televizija kablowa cyfrowa: Wyszikuje i zapisuju kablowe stacje DVB. Analogowy: Wyszikuje i zapisuju stacje analogowe. Satelita: Wyszikuje i zapisuju stacje satelitarne. |
| Ręczne Skanowanie Kanałów | Funkcja taMZu wy)—zyta w)—z)—nie dla przyka bezpo"—redniego. |
| Wyszukiwanie kanałów sieciowych | Wyszikuje kanały pol)—zone ze st)—canti. Antena cyfrowa: Wyszikuje kanały sieciowe odbierane przy)—ant)—e. Televizija kablowa cyfrowa: Wyszikuje kanały sieciowe odbierane przy)—kabel. Satelita: Wyszikuje kanały sieciowe odbierane przy)—ante"—satel—itarny. |
| Preczyjne dostrajanie analogowe | FunkcjaMZu wy)—zywna do dostrajania kana)—ów analogowych. Ta fungcja nie jest dost)—pna, jesti ni zapisano"—d)—nych. kana)—ów analogowych i jesti aktualnie ogl)—dany. kana—I nie jest kana—Iem analog)—ym. |
| Ustawienia satel—itarnye | Wy)—t—Iustawiania sate—itarnye. Lista satel—it)—w: Wy)—t—Iustawiania sate—it—m: M)—z—Iustawiania anteny sate—itarney j/Iub Roz)—m: M)—z—Iustawiania anteny sate—itarny j/Iub Roz)—m: M)—z—Iustawiania anteny sate—itarny j/Iub Roz)—m: M)—z—Iustawiania anteny sate—itarny j/Iub Roz)—m: M)—z—Iustawiania anteny sate—itarny j/Iub Roz)—m: M)—z—Iustawiania anteny sate—itarny j/Iub Roz)—m: M)—z—Iuste"—s—Ile—Ib—Ite—Ile—Ite—Ile—Ite—Ile—Ite—Ile—Ite—Ile—Ite—Ile—Ite—Ile—Ite—Ile—Ite—Ile—Ite—Ile—Ite—Ile—Ite—Ile—Ite—Ile—Ite—Ile—Ite—Ile—Ite—Ile—Ite—Ile—Ite—Ile—Ite—Ile—Ite—Ile—Ite—Ile—Ite—Ile—Ite—Ile—Ite—Ile—Ite—Ile—Ite—Ite—Ile—Ite—Ite—Ite—Ite—Ite—Ite—Ite—Ite—Ite—Ite—Ite—Ite—Ite—Ite—Ite—Ite—Ite—Ite—Ite—Ite—Ite—Ite—Ite—Ite—Ite—Ite—Ite—Ite—Ite—Ite—Ite—Ite—Ite—Ite—Ite—Ite—Ite—Ite—Ite—Ite—Ite—Ite—Ite—Ite—Ite—Ite—Ite—Ite—Ite—Ite—Ide—Ite—Ite—Ite—Ite—Ite—Ite—Ite—Ite—Ite—Ite—Ite—Ite—Ite—Ite—Ite—Ite—Ite—Ite—Ite—Ite—Ite—Ite—Ite—Ite—Ite—Ite—Ite—Ite—Ite—Ite—Ite—Ite—Ite—Ite—Ite—Ite—Ite—Ite—Ite—Ite—Ite—Ite—Ite—Ite—Ite—Ite—Ite—Ite—Ite—Ice—Iz)—m: M)—z—Iustawiania z)—d)—nych. Zmienić"—ustawiania sate)—noj"—l)—s.—s.—s.—s.—s.—s.—s.—s.—s.—s.—s.—s.—s.—s.—s.—s.—s.—s.—s.—s.—s.—s.—s.—s.—s.—s.—s.—s.—s.—s.—s.—s.—s.—s.—s.—s.—s.—s.—s.—s.—s.—s.—s.—s.—s.—s.—s.—s.—s.—s.—s.-—s.—s.—s.—s.—s.—s.—s.—s.—s.—s.—s.—s.—s.—s.—s.—s.—s.—s.—s.—s.—s.—s.—s.—s.—s.—s.—s.—s.—s.—s.—s.—s.—s.—s.—s.—s.—s.—s.—s.—s.—s.—s.—s.—s.—s.—s.—s.—s.—s.—s—. Dodać, Us)—Iustawiania sate)—t—Ile—Ite—Ite—Ite—Ite—Ite—Ite—Ite—Ite—Ite—Ite—Ite—Ite—Ite—Ite—Ite—Ite—Ite—Ite—Ite—Ite—Ite—Ite—Ite—Ite—Ite—Ite—Ite—Ite—Ite—Ite—Ite—Ite—Ite—Ite—Ite—Ite—Ite—Ite—Ite—Ite—Ite—Ite—Ite—Ite—Ite—Ite—Ite—Ite—Ide—Ile—Ite—Ite—Ite—Ite—Ite—Ite—Ite—Ite—Ite—Ite—Ite—Ite—Ite—Ite—Ite—Ite—Ite—Ite—Ite—Ite—Ite—Ite—Ite—Ite—Ite—Ite—Ite—Ite—Ite—Ite—Ite—Ite—Ite—Ite—Ite—Ite—Ite—Ite—Ite—Ite—Ite—Ite—Ite—Ite—Ite—Ite—Ite—Ite—Ice—I)—m: M)—z—Iustawiania z)—d)—nych. Zmienić"—ustawiania sate)—noj"—l)—s.—s.—s.—s.—s.—s.—s.—s.—s.—s.—s.—s.—s.—s.—s.—s.—s.—s.—s.—s.—s.—s.—s.—s.—s.—s.—s.—s.—s.—s.—s.—s.—S—. Dodać, Us)—Iustawiania sate)—t—Ile—Ite—Ite—Ite—Ite—Ite—Ite—Ite—Ite—Ite—Ite—Ite—Ite—Ite—Ite—Ite—Ite—Ite—Ite—Ite—Ite—Ite—Ite—Ite—Ite—Ite—Ite—Ite—Ite—Ite—Ite—Ite—Ite—Ite—Ite—Ite—Ite—Ite—Ite—Ite—Ite-Ite—Ite—Ite—Ite—Ite—Ite—Ite—Ite—Ite—Ite—Ite—Ite—Ite—Ite—Ite—Ite—Ite—Ite—Ite—Ite—Ite—Ite—Ite—Ite—Ite—Ite—Ite—Ite—Ite—Ite—Ite—Ite—Ite—Ite—Ite—Ite—Ite—Ite—Ite—Ite—Ite—Ite—Ite—Ite—Ite—Ite—Ite—Ite—Ite—Ite-Ite—Ite—Ite—Ite—Ite—Ite—Ite—Ite—Ite—Ide—Ile—Ite—Ite—Ite—Ite—Ite—Ite—Ite—Ite—Ite—Ite—Ite—Ite—Ite—Ite—Ite—Ite—Ite—Ite—Ite—Ite—Ite—Ite—Ite—Ite—Ite—Ite—Ite—Ite—Ite—Ite—Ite—Ite—Ite—Ite—Ite—Ite—Ite—Ite—Ite-Ite—Ite—Ite—Ite—Ite—Ite—Ite—Ite—Ite—Ite—Ide—Ile—Ite—Ite—Ite—Ite—Ite—Ite—Ite—Ite—Ite—Ite—Ite—Ite—Ite—Ite—Ite—Ite—Ite—Ite—Ite—Ite—Ite—Ite—Ite—Ite—Ite—Ite—Ite—Ite—Ite—Ite—Ite—Ite—Ite—Ite—Ite—Ite—Ite—Ite-Ite—Ite—Ite—Ite—Ite—Ite—Ite—Ite—Ite—Ite—Ite—Ide—Ile—Ite—Ite—Ite—Ite—Ite—Ite—Ite—Ite—Ite—Ite—Ite—Ite—Ite—Ite—Ite—Ite—Ite—Ite—Ite—Ite—Ite—Ite—Ite—Ite—Ite—Ite—Ite—Ite—Ite—Ite—Ite—Ite—Ite—Ite—Ite—Ite—Ite-Ite—Ite—Ite—Ite—Ite—Ite—Ite—Ite—Ite—Ite—Ite—Ite—Ide—Ile—Ite—Ite—Ite—Ite—Ite—Ite—Ite—Ite—Ite—Ite—Ite—Ite—Ite—Ite—Ite—Ite—Ite—Ite—Ite—Ite—Ite—Ite—Ite—Ite—Ite—Ite—Ite—Ite—Ite—Ite—Ite—Ite—Ite—Ite—Ite—Ite-Ite—Ite—Ite—Ite—Ite—Ite—Ite—Ite—Ite—Ite—Ite—Ite—Ite—Ide—Ile—Ite—Ite—Ite—Ite—Ite—Ite—Ite—Ite—Ite—Ite—Ite—Ite—Ite—Ite—Ite—Ite—Ite—Ite—Ite—Ite—Ite—Ite—Ite—Ite—Ite—Ite—Ite—Ite—Ite—Ite—Ite—Ite—Ite—Ite—Ite-Ite—Ite—Ite—Ite—Ite—Ite—Ite—Ite—Ite—Ite—Ite—Ite—Ite—Ite—Ide—Ile—Ite—Ite—Ite—Ite—Ite—Ite—Ite—Ite—Ite—Ite—Ite—Ite—Ite—Ite—Ite—Ite—Ite—Ite—Ite—Ite—Ite—Ite—Ite—Ite—Ite—Ite—Ite—Ite—Ite—Ite—Ite—Ite—Ite—Ite-Ite—Ite—Ite—Ite—Ite—Ite—Ite—Ite—Ite—Ite—Ite—Ite—Ite—Ite—Ite—Ide—Ile—Ite—Ite—Ite—Ite—Ite—Ite—Ite—Ite—Ite—Ite—Ite—Ite—Ite—Ite—Ite—Ite—Ite—Ite—Ite—Ite—Ite—Ite—Ite—Ite—Ite—Ite—Ite—Ite—Ite—Ite—Ite—Ite—Ite-Ite—Ite—Ite—Ite—Ite—Ite—Ite—Ite—Ite—Ite—Ite—Ite—Ite—Ite—Ite—Ite—Ide—Ile—Ite—Ite—Ite—Ite—Ite—Ite—Ite—Ite—Ite—Ite—Ite—Ite—Ite—Ite—Ite—Ite—Ite—Ite—Ite—Ite—Ite—Ite—Ite—Ite—Ite—Ite—Ite—Ite—Ite—Ite—Ite—Ite-Ite—Ite—Ite—Ite—Ite—Ite—Ite—Ite—Ite—Ite—Ite—Ite—Ite—Ite—Ite—Ite—Ite—Ide—Ile—Ite—Ite—Ite—Ite—Ite—Ite—Ite—Ite—Ite—Ite—Ite—Ite—Ite—Ite—Ite—Ite—Ite—Ite—Ite—Ite—Ite—Ite—Ite—Ite—Ite—Ite—Ite—Ite—Ite—Ite—Ite-Ite—Ite—Ite—Ite—Ite—Ite—Ite—Ite—Ite—Ite—Ite—Ite—Ite—Ite—Ite—Ite—Ite—Ite—Ide—Ile—Ite—Ite—Ite—Ite—Ite—Ite—Ite—Ite—Ite—Ite—Ite—Ite—Ite—Ite—Ite—Ite—Ite—Ite—Ite—Ite—Ite—Ite—Ite—Ite—Ite—Ite—Ite—Ite—Ite—Ite-Ite—Ite—Ite—Ite—Ite—Ite—Ite—Ite—Ite—Ite—Ite—Ite—Ite—Ite—Ite—Ite—Ite—Ite—Ite—Ide—Ile—Ite—Ite—Ite—Ite—Ite—Ite—Ite—Ite—Ite—Ite—Ite—Ite—Ite—Ite—Ite—Ite—Ite—Ite—Ite—Ite—Ite—Ite—Ite—Ide—Ile—Ite—Ite—Ite—Ite—Ite—Ite—Ite—Ite—Ide—Ile—Ite—Ite—Ite—Ite—Ite—Ite—Ide—Ile—Ite—Ite—Ite—Ite—Ite—Ite—Ide—Ile—Ite—Ite—Ite—Ite—Ite—Ide—Ile—Ite—Ite—Ite—Ite—Ide—Ile—Ite—Ite—Ite—Ide—Ile—Ite—Ite—Ite—Ide—Ile—Ite—Ite—Ide—Ile—Ite—Ide—Ile—Ite—Ide—Ile—Ite—Ide—Ide—Ile—Ite—Ide—Ide—Ile—Ite—Ide—Ide—Ile—Ite—Ide—Ide—Ile—Ite—Ide—Ide—Ide—Ide—Ide—Ide—Ide—Ide—Ide—Ide—Ide—Ide—Ide—Ide—Ide—Ide—Ide—Ide—Ide—Ide—Ide—Ide—Ide—Ide—Ide—Ide—Ide—Ide—Ide—Ide—Ide—Ide—Ide—Ide—Ide—Ide—Ide—Ide—Ide—Ide—Ide—Ide—Ide—Ide—Ide—Ide—Ide—Ide—Ide—Ide—I de—Ide—Ide—Ide—Ide—Ide—Ide—Ide—Ide—Ide—Ide—Ide—Ide—Ide—Ide—Ide—Ide—Ide—Ide—Ide—Ide—Ide—Ide—Ide—Ide—Ide—Ide—Ide—Ide—Ide—Ide—Ide—Ide—Ide—Ide—Ide—Ide—Ide—Ide—Ide—Ide—Ide—Ide—Ide—Ide—Ide—Ide—Ide—Ide—Ide—I/de—Ide—Ide—Ide—Ide—Ide—Ide—Ide—Ide—Ide—Ide—Ide—Ide—Ide—Ide—Ide—Ide—Ide—Ide—Ide—Ide—Ide—Ide—Ide—Ide—Ide—Ide—Ide—Ide—Ide—Ide—Ide—Ide—Ide—Ide—Ide—Ide—Ide—Ide—Ide—Ide—Ide—Ide—Ide—Ide—Ide—Ide—Ide—Ide—Ide—IDE—m—m—m—m—m—m—m—m—m—m—m—m—m—m—m—m—m—m—m—m—m—m—m—m—m—m—m—m—m—m—m—m—m—m—m—m—m—m—m—m—m—m—m—m—m—m—m—m—m—m— m—m—m—m—m—m—m—m—m—m—m—m—m—m—m—m—m—m—m—m—m—m—m—m—m—m—m—m—m—m—m—m—m—m—m—m—m—m—m—m—m—m—m—m—m—m—m—m—m—m—n—m—m—m—m—m—m—m—m—m—m—m—m—m—m—m—m—m—m—m—m—m—m—m—m—m—m—m—m—m—m—m—m—m—m—m—m—m—m—m—m—m—m—m—m—m—m—m—m—m——m—m—m—m—m—m—m—m—m—m—m—m—m—m—m—m—m—m—m—m—m—m—m—m—m—m—m—m—m—m—m—m—m—m—m—m—m—m—m—m—m—m—m—m—m—m—m—m—m—M—m—m—m—m—m—m—m—m—m—m—m—m—m—m—m—m—m—m—m—m—m—m—m—m—m—m—m—m—m—m—m—m—m—m—m—m—m—m—m—m—m—m—m—m—m—m—m—m—m—c—m—c—c—c—c—c—c—c—c—c—c—c—c—c—c—c—c—c—c—c—c—c—c—c—c—c—c—c—c—c—c—c—c—c—c—c—c—c—c—c—c—c—c—c—c—c—c—c—c—c—c—C—c—c—c—c—c—c—c—c—c—c—c—c—c—c—c—c—c—c—c—c—c—c—c—c—c—c—c—c—c—c—c—c—c—c—c—c—c—c—c—c—c—c—c—c—c—c—c—c—c—b—b—b—b—b—b—b—b—b—b—b—b—b—b—b—b—b—b—b—b—b—b—b—b—b—b—b—b—b—b—b—b—b—b—b—b—b—b—b—b—b—b—b—b—b—b—b—b—b—b—c—c—c—c—c—c—c—c—c—c—c—c—c—c—c—c—c—c—c—c—c—c—c—c—c—c—c—c—c—c—c—c—c—c—c—c—c—c—c—c—c—c—c—c—c—c—c—c—c—t—t—t—t—t—t—t—t—t—t—t—t—t—t—t—t—t—t—t—t—t—t—t—t—t—t—t—t—t—t—t—t—t—t—t—t—t—t—t—t—t—t—t—t—t—t—t—t—t—t—c—c—c—c—c—c—c—c—c—c—c—c—c—c—c—c—c—c—c—c—c—c—c—c—c—c—c—c—c—c—c—c—c—c—c—c—c—c—c—c—c—c—c—c—c—c—c—c—c—d—d—d—d—d—d—d—d—d—d—d—d—d—d—d—d—d—d—d—d—d—d—d—d—d—d—d—d—d—d—d—d—d—d—d—d—d—d—d—d—d—d—d—d—d—d—d—d—d—d— d—d—d—d—d—d—d—d—d—d—d—d—d—d—d—d—d—d—d—d—d—d—d—d—d—d—d—d—d—d—d—d—d—d—d—d—d—d—d—d—d—d—d—d—d—d—d—d—d—d—c—c—c—c—c—c—c—c—c—c—c—c—c—c—c—c—c—c—c—c—c—c—c—c—c—c—c—c—c—c—c—c—c—c—c—c—c—c—c—c—c—c—c—c—c—c—c—c—c—g—g—g—g—g—g—g—g—g—g—g—g—g—g—g—g—g—g—g—g—g—g—g—g—g—g—g—g—g—g—g—g—g—g—g—g—g—g—g—g—g—g—g—g—g—g—g—g—g—g—c—c—c—c—c—c—c—c—c—c—c—c—c—c—c—c—c—c—c—c—c—c—c—c—c—c—c—c—c—c—c—c—c—c—c—c—c—c—c—c—c—c—c—c—c—c—c—c—c—h—h—h—h—h—h—h—h—h—h—h—h—h—h—h—h—h—h—h—h—h—h—h—h—h—h—h—h—h—h—h—h—h—h—h—h—h—h—h—h—h—h—h—h—h—h—h—h—h—h—c—c—c—c—c—c—c—c—c—c—c—c—c—c—c—c—c—c—c—c—c—c—c—c—c—c—c—c—c—c—c—c—c—c—c—c—c—c—c—c—c—c—c—c—c—c—c—c—c—f—f—f—f—f—f—f—f—f—f—f—f—f—f—f—f—f—f—f—f—f—f—f—f—f—f—f—f—f—f—f—f—f—f—f—f—f—f—f—f—f—f—f—f—f—f—f—f—f—f—c—c—c—c—c—c—c—c—c—c—c—c—c—c—c—c—c—c—c—c—c—c—c—c—c—c—c—c—c—c—c—c—c—c—c—c—c—c—c—c—c—c—c—c—c—c—c—c—c— c—c—c—c—c—c—c—c—c—c—c—c—c—c—c—c—c—c—c—c—c—c—c—c—c—c—c—c—c—c—c—c—c—c—c—c—c—c—c—c—c—c—c—c—c—c—c—c—c—c—r—t—t—t—t—t—t—t—t—t—t—t—t—t—t—t—t—t—t—t—t—t—t—t—t—t—t—t—t—t—t—t—t—t—t—t—t—t—t—t—t—t—t—t—t—t—t—t—t—t— t—t—t—t—t—t—t—t—t—t—t—t—t—t—t—t—t—t—t—t—t—t—t—t—t—t—t—t—t—t—t—t—t—t—t—t—t—t—t—t—t—t—t—t—t—t—t—t—t—t—T Czysz—to—which is a good way to get the most beautiful and most beautiful things from the company. The company is a good way to get the most beautiful and most beautiful things from the company. The company is a good way to get the most beautiful and most beautiful things from the company. The company is a good way to get the most beautiful and most beautiful things from the company. The company is a good way to get the most beautiful and most beautiful things from the company. The company is a good way to get the most beautiful and most beautiful things from the company. The company is a good way |
A CI Plus logo a CI Plus LLP védjegeye.
Covered by patents at patenilist.accessadvance.com
Panasonic Testing Centre
Panasonic Marketing Europe GmbH
Winsbergring 15, 22525 Hamburg, Germany
Web Site: http://www.panasonic.com
WEP 64/128, WPA, WPA2, TKIP, AES, WAPI
Megjegyzés
Conectivitate wireless. 36
Manipularea informatiilor despere consumatori... 38
Networked Standby Mode (Mod Standby in retea) 38
Afisaj wireless 38
Depanare Conectivitate 39
CLASS 1 LASER PRODUCT
Proclus laser de clasa 1: Acest produs contine o sursa laser de clasa 1 care este sigura in condiiti de fonctionare rezonabile si previzibile.
AVERTISMENT
Imagine in Modul Standby
Puteti folosi televizorul dumneavoastracarama digitalafolosindcharacteristica Imagine in Modul Standby.
Pentru a face asta, urmati pasi ide mai jos.

Covered by patents at patentlist.accessadvancemc
Aruncarea echipamentelor 山 baterilor vechi

Panasonic Testing Centre
Panasonic Marketing Europe GmbH
Winsberging 15, 22525 Hamburg, Germany
Specifications transmitator LAN wireless
| Intervale freventa | Putere ileșire maximă |
| 2400 - 2483,5 MHz (CH1 - CH13) < 10 | 0 mW |
| 5150 - 5250 MHz (CH36 - CH48) < 20 | 0 mW |
| 5250 - 5350 MHz (CH52 - CH64) < 20 | 0 mW |
| 5470 - 5725 MHz (CH100 - CH140) < | 200 mW |
WEP 64/128, WPA, WPA2, TKIP, AES, WAPI.
Observatie
DVB/Transmitereadatelor/IPTV
- Acest TV este conceput saynthesispeasca standardele (din Martie, 2021) DVB-T / T2 (MPEG2, MPEG4-AVC(H.264) si serviciile digitale terestre HEVC(H.265)), DVB-C (MPEG2, MPEG4-AVC(H.264) si serviciile digitale prin cablu HEVC(H.265)) si DVB-S (MPEG2, MPEG4-AVC(H.264) si serviciile digitale prin satelit HEVC(H.265)).
Ghid electronic de programme (GEP)
Conectivitate wireless
Conectare la o retea wireless
Networked Standby Mode (Mod Standby in retea)
Puteti activa sau deactiva caracteistica Networked Standby Mode (Mod Standby in retea) prin setarea corespunzatoare a acesti optiuni. Pentru informati detaliate, consultati sectiunea Networked Standby Mode (Mod Standby in retea).
Alte informaţii
Starea conxiunii va fi afisata ca Connected (Conectat) sau Not Connected (Neconnectat) si adresa IP actuala, dac a este initiata o conexiune. Adresa MAC a televizorului dvs. va fi de asemenea afisata pe ecran.
Conectarea la telegramul mobil prin WLAN
[HOME] Installation>First time installation ([HOME] Instalare>Prima instalare)
Networked Standby Mode (Mod Standby in retea)
Aeouap TnTepiIaIaIabovtai 7
Eikova etoupyia Avouvns 7
Eiooioeic oxetikα TnV avauovn 8
XeipiooC kai λεitoupyia Tns tnaéopaan8
XpnoTou Kupiou evou TnAeopaon. 9
Toio8Etnon twv mntapaiow oTo tnlambdaepiopnpio..11
Σύνδεση ρεύματος 11
Euvdoon Kepaiac 11
CLASS 1 LASER PRODUCT
Ppoiov Katnyopia
Covered by patents at patentlist.accessadvance.com
Teiikn diaeon xpoiootinuevw ouokuwv kai mataipiow


Móvo yia tny Eupwpiäk'n Evwn kai xwpeç μe ouotnμata avakukkwong
Auta ta Ota TPOIOVTA,OTN OUKEUAOIA KAI/NTOA UUVODUTIKA EyypaqaOnmaiveOI OI XpnoiIpToINUEVC NkTPKIEc KAI NkTPOVIKc OUsKEUc KAI OITATAPIEc DEV PPETeIvaavaeiyvovTAt E TA YEVIA OKIAKa AToppmuata.
Tia Tn Owatn ETEEpyaOia, avaktnoN kai avakukwon Tuv naiwv Ppoovtwv kai mTatapiwv, npadidet Ta oTa TPOBETnOeva anueia uAloync oupwva e Tnv Ethetaia.
Me tn owtn atoppiun tou, 0a bonnoeTe OTnv Egoikovounn TOnutimwv Tnpwv kai 0a anotpewte duvtikc apvntikc ETTTWOEIGOTN vavpwnuyeia kai OTO TEPIBaalov.
Tia Tepioootepe TAnpoopopec oxetik aE tn ouAloyn kai Tnv avakukwon, aneueuovtheiTe OTNV toTIkn oac dnoitik npx.
EvexTai va exouv evapuoyn Toivc yia akataaenn an topu Tou tuou aTTOBNTW, ouwva e Tnv Eovikn vooeoi.
Panasonic Testing Centre
Panasonic Marketing Europe GmbH
Winsberging 15, 22525 Hamburg, Germany
WEP 64/128, WPA, WPA2, TKIP, AES, WAPI
Eπiαμανο
DVB/△δoévwo/v/αioupyieC IPTV
Autn n tnlaopaoon exi oxediostei va TAnpoi ta Tpota (aTov Maptioc 2021) npiaKwv Eiiyew uTnpoeiw DVB-T / T2 (MPEG2, MPEG4-AVC(H.264) kai HEVC(H.265)), npiaKwv kaawikw v Tnpoeiw DVB-C (MPEG2, MPEG4-AVC(H.264) kai HEVC(H.265)) kai npiaKwv dopuopipikowv utnpoeiw DVB-S (MPEG2, MPEG4-AVC(H.264) kai HEVC(H.265)).
Σuβouλeuteite TOV TOTIKO Oaç avTIPPOoWTO OXETIKA με η δiaθεσιμóTητα UTNpεσiωv DVB-T / T2 η DVB-S Θην περiox̂σaç.
TOV TOTIKo OaC TAPOXO UTTNPEoiW KALWIOAKNS TnEOPaONG YIA TNI BIAOeOIOTNTa UTNPeoiw DVB-C ME autn Tnv TnEOPaON.
Autn n tnlaopaoen evexetai va un lamitoupyei oomega ta e onma to otioo 6ev nnpoi ta npotun DVB-T / T2, DVB-C n DVB-S.
ev iivai dia theoic oAe oI aeitoupyie, avaloya tn xwpa, Tnv Tepiox, Tnv eTapieia EkToutns, Tov npoxo utnpesoiw, Tn dopupopikn hyn kai To TepiBaalov diktou.
- ev i oupyo u v o ta apoepwata Cl owaTa autn tnv tnAeopaon. utei to ouvepyaOevo npoxo utnpoeiwv oxetikαe To diathetao apoepwcaI.
Autn n tnaopaoen evexetai va un lamitoupyei oomega ta e apoewa CI nou dev ivai yekepiévo aTTOV TApoxo UTTnpoeiwv.
Mtopei va eTlBaalovtai TpooTeEs xpewoeic, avaloya ToV Tapoxo Utnpeoiwv.
H ouβaToTnTa με μελλovtikες utnpεoicε δεν εivα Εεασφαλισενη.
- Eφαρογές Αντερνει παρέχονται από touς αντίστοιχους παρόχους Απηρεσιών και μπόρειν τροποτοιηθουύν, διακοτούν ἡκαταργήθουύν οποίαδήποτε στιγμή.
H Panasonicic avala avei kai euovn kai Tapexi kai yunon yia n diaoeiotnta n touvexia twv utnpoeiwv.
H Panasonic 3ev yyyuatai tn 1eitoupyia kai Tnv aToboo n TepiepeiaKwov oukeuwv aaawkataoKEuaotwv. Eianc aTTOIOUaote OTIOAHTOTE uOuvn n Znmu TPOPKUTTEI aTTo tn 1eitoupyia kai/n aToboo n aTto tn xpon TEOTIWV TepiepeiaKwov oukeuwv aaawv kataoKEuaOTWv.

Póvypμa Twpa/Enóμevo
Σε autn tvv επiloyn diappuθμion, θα εμφaviζovtai
μóvo ta Tpexovta kai ta επομεva συμβávta twv
kavλiων tns λiotac. Mtopeite va xρησιοιnoεte
ta πλκtpa katéuθuvanc yia μetakivnon otn λioTa
twv συμβávtwv.
Aogpuatn oOvN (Wireless Display)
H Aóμαtn oθovn (Wireless Display) εivai εva προτuTO yia αóμαtn μετáðoON περιεxμévων βíVTEO kAI nXou. H λειουpyia autn oac επιρεTIeI vα χρσιμοTTOInoSETe TNY tNλεópaON oac ωs σuσkeun aóμαtnc oθovnc.
Xpnon KIVNTeOuKEueC
Yπápxouv δiαφopa προτιπa Tnou επιtpéπouv TnV Koivn xpno n oθovw, περλαβavopéwv Tuv πεpiexoévww ypaikw, βivteo kai nxou, μεταú Tns Kivntnc aσc oukeunkai tnc tnλeopaan.
Sigma TpoTAtnV nAeopaon Tov Pooapoyea USB aupmuTc ouvOeOnc, av n tAeopaon dEv diaTeI Aetoupyia WLAN evomegaatwevn.
KatoTIV TIEOTo TAnktpo Nyn oTo TAnExeiPiotnpio Kai eTaBeite Otnv Tnyn Aoumuat noBovn.
Euaviciatia oovn otou avaepetai ottnaopaaenivai etoim yia uvdoeon.
AvoiTe Tnv Eapuoyn Koivns Xpnoans Otnv KIVntn Oac oukeun. Autc oI Eapuoyec Exouv diaopetikn ovuaia yia kaThe mApka. Ia 5eTTOpeic nI npopoepiecs, avatpeTe OTo EYxepidio obnyiw Tnc KIVNTN cag oukeun.
PpaypaTOnIOInote Oapwn yia unnpoeic. Apou EIIeEETnV tnAeopaon oac kai ouvOeTe, otnv tnAeopaon 0e paviEtaI n oovn Tns oukeunc oac.
N3noJ3BaHe Ha INaBHOTo MeHko Ha TeNeBn3opa.....9
IocTabaHHe Ha 6aTeepnB DnCTaHcNoHHOTO ynpabVeHne. 11
Cbbp3BaHe KbM eJEnKtpnueckaTa MpeXa 11
AHTeHeH BXoI 11
YBeDomJIeHne 3a JInueH3. 11
I3XbBpIaHe Ha cTapUte ypeu n 6aTepuNTe.....12
Декларачnia 3a cBoTBeTCTBnE (DoC) 12
Cneunphiauu 13
3a6eJekka: 14
IinCTaHcnoHHo ynpabHeHne 15
Bpb3kn 16
BkIIOUbaHe/V3KIOUbaHe 17
PbPbBa HcTaJaun 17
MeiHOBb3pOu3BekdaHe ppe3 USB BxOJ 19
MeiHOBb3Pon3Bexkahe 19
CEC 20
Pexum "Irga" 21
EneKtpoHNO pBkoBOcTBo. 21
POnuHa MeHTo, "HaCtpoKn" 22
O6uynka3aHnna 3a ekcnnoatauaHa TeleBn3opa31
H3noJ3BaHe Ha cncbKa c KaHaJIi 31
KoHpIpynpaHe Ha poIteJIcknte HacTpoKn.....31
EneKtpoHEn cnpaBOuHnK Ha nporpaMnte 32
TeTKeKCT yCnyr 32
CoTpyep 3a akTuann3aunna 33
OTctpaHbAHe Ha HEn3npaBHOCTN & cbBeTn. 33
HDMI CunhaHa CbBMeCTUMOcT 34
IopdbpxaH paHOB opMaT BpeKIM USB. 35
Bndeo fainobn fopMaTu 35
PexMM Ha roTOBHOCT B MpeXa. 39
Bezkunen dincpnei 39
OTCTpaHraBaHe Ha Heu3nPaBHOCTN, CBbp3aHc CbC CBbp3BaHeTo 40
I3noJ3BaHe HaMpexKoBaTa ycLyra 3a cNoJeIHa ha ayDIO BnDeo faiNoBe.40
PpniloxeHn 41
IHTepHET 6pay3bp 41
HBBTV cncTeMa 42
Alexa e rotoBa 42
Google AcncteHT 44
Hopmaa3a DVB yHKnOHaHocTta. 45
HhOpMaun3a6e3onacnOCT

BHIMAHNE
ONACHOCT OT TOKOB YAP HE OTBAPY

BHIMAHHE:3A DA HAMALNITE ONACHOCTTA OT TOKOB UdAP HE CBALIYTE KAIKA (NJIN TbP6A).
BbTPE HMA YACTN, KOUTO NOTPBENTJRT DA CEPBUN3NPA. INPEIOCTABETE PEMOHNTUPAHETO HA KBALINPHUAPAHNA CEPBUN3EH IEPCOHAI.
Pn loo BpeMe (6pyr, rpbMOTeBnC) n Dbltn nepnoDn 6e3 non3BaHe (3amHabaHe B noYbKa), n3KIOUcTe TeIeBu3Opa ot 3axpaHbAHeTo.
UencenbHa Ka6eNa Ce n3non3Ba 3a n3KnHoyBaHe Ha TeNeBn3Opa OT eNkTpnuYeCKaTa MpeXa N 3aTOBa ToT py6Ba Da e BnHarn rOedn 3a yNoTpe6a. Ako TeNeBn3OpbT He e N3KnIOueH OT eNkTpnuYeCKaTa MpeXa, ToB BCE OSe Ie KOHCymipa eNkTPOeHeprna BB BCNUKc CNTyaUN, DOpN TeNeBn3OpbT Da e BpeXm HA rTOOBHOCT NIN Da e N3KnIOueH.
BeneKka: Cnebaune uHcmpykuuume Ha ekpaHa, 3a da 3adeucbame cbombeHume yHKuu.
BAxHO - MoI npOyeTe BHNMaTeJIHo Te3n INcTpkykUn npei Da INcTaJnpaTe IINn IN3NoJ3BaTe ypeia
BHIMAHHE:ToBa e npedHa3NaueHo 3a ynoTpe6a ot nua (BKNIOHTeHNO deua), KOINTO ca cnoco6HN/IMat ONNTa da N3N0J3BAT TAKnBa yCTpoiCTBa 6e3 Ha3Op,OCBeH aKO He ca 6nHn Ha6IIOdaBAHN IIN HHCTpykTnpaH NOTHO yNoTpe6aTa Ha yCTpOiCTBOTO OT JInCe,OTROBOPHO 3a TAnHATA 6e3OnaCHOCT.
- I3noJ3BaIeTo3n TeJIeBUNOp Ha BnCOUHHa HauMaJko ot 5000 metpa NaH aHaMOpCKOTO paBHnSe, Ha cyxN MeCTa n paOHn C yMepeH INn TpONHeckn KInMaT.
TeIeBn3OpbT e npedHa3Hauhen 3a DomaSHA nOdo6Ha ynoTppe6a Ha 3akpnto, Ho MOxe da ce H3NoJ3Ba N HA o6ueCTBeHN MeCTa.
3a Do6pa BeHTnlaucn, octaBete nohe 5 cm CBO6oJHO npocTpaHCTBO OKOIO TeNeBu3opa. - BeHTnlaqraTa He 6nBa Da ce npeKbcBa qpe3 NoctabYe Ha npEaMeTu KaTo BecTHNu, NOKpNBKn, IeKa Me6eI, nepTeA, KINIMN INPouHne Bbpxu NIn 6bokpaHe Ha BeHTnlaQHOHHTE OTBOpN.
- ΜεncenbT ha 3axpaHbaunKa6e n Tp8Ba da e nechodocTbneH. He nocTabnTe TepeBn3opa, Me6e nn npyro Bbpxy 3axpaHbaun Ka6e. NOBpeDen 3axpaHbaun Ka6e/uncen MoKe da npedn3Bnka noXap nn Da BN ydpn TOKOB ynap. Xbaaute 3axpaHbaun Ka6e 3a unceena, He n3KNuYBaIte TepeBn3opa KATO dbPnate 3axpaHbaun Ka6e. Hnkora He dOKocBaute 3axpaHbaun Ka6e/uncenCa MOKpn Pbue, TbN KATO TOBA MOKe da npedn3Bnka Kbco CbeDInHeHne
HIN TOKOB yap. HnKora He npaBeTe Bb3eJ Ha 3axpaHbaun Ka6en I He Bpb3BaIte C Hero npynn Ka6eJN. Ako ca NOBpeDeHN, CMeHeTe rN He3a6abHO, KOeTO Tp86Ba Da ce N3BbpNI OT KBAJIuΦnIupan nepcoHaI.
He n3naraTe TeJeBn3Opa Ha KaNk N npbckn OT TeuHOCTn H He NoCTaBraTe ppeMeTu, NbLNH C TeuHOCTn, KATO HApPIMep Ba3N, YaAn, N T.H. BbpXy Unn Had TeJeBn3Opa (Ha npimep Ha paΦTOBe Ha d TeJeBn3Opa).
He n3naraTe TeneBn3Opa Ha npraKa CbHueBa CBETnHa Hn He NoCTaBnTe OTKpNTn PnAmbU, KATO HnnpImep 3anaJIeHn CBeuN, Bbpxy rOpHaTa YacT Ha nn6n3o Do TeneBn3Opa.
He noctabraye n3ToUHnU Ha TOnnHa, KaTo Hanpimep eNeKtpuYeCKn NeuKn, paNaTOpu N dp. 6n3o do TeIeBn3opa.
He noctabraIte TeIeBn3opa Ha noJa nn Bbpxy HAKJIOHEH NOBbpxHOCTN.
3a Da H36erHeTe onachocTta OT 3adyuBaHe, DpbjTe HaJIOHOBtE Top6nKHa MeCTa, TpyHNOOcTBnHn 3a 6e6eta, Deua n Domaunn KINBOTNI.
BHHMaTeJIHO npIKpene TcOkata KbM TeJIeBN3Opa. Ako cToiKaTae DoCTABc 6oNTObe, 3aterHeTe 6oTobete 3npaBO, 3a da npedna3nte TeIeBN3opa OT naDahe. He npes3aTgaiTe 6oTobete mOHTnpaTe npabnHOr rymenTe noDnOxKn.
He n3xBpIyTe 6aTeepnIte BOrbH nn 3aeDHO c onaChn H 3anaJIMM MaTePnaJI.
BHIMAHNE:
BaTePnIte He Tp6Ba Da ce n3naT Ha IpeKoMePHa ToJIInHa, KaTO CJIbHcEBA CBETJIInHa, OgBn I npyN noO6Hn.
-п配电мерно 3BykoBO HaЯгHe OT CnyuJaNKTe Mokeда пчHH 3ary6aHa cnyuxa.
IPEIN BCNUKO - HNKORA He no3BOJBAaTe Ha HNKORO,OCo6eHO Ha Deca, Da HAtNcKAT Nn ydpT ekpaHa, Da NOCTaBrt PpeDMETN B DynKnte, CLOTOBete Nn dpyrnte OTbOpN B TeJeBu3opa.
DyNk3aMOHTax CbCCKo6n3aOKaYBaHeHaCTeHa;
Pb6HaTeNeBn3opa
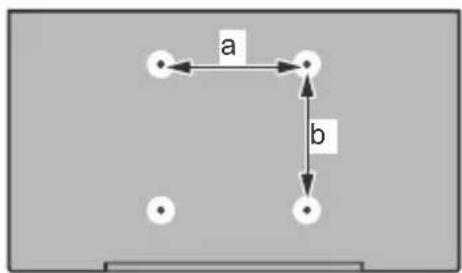
| 43” 50” 55” 65” | ||||
| a (mm) | 100 | 200 200 | 0 400 | |
| b (mm) | 100 200 200 | 0 200 | ||
N3rneOToCTpaHn
VESA
Cko6a

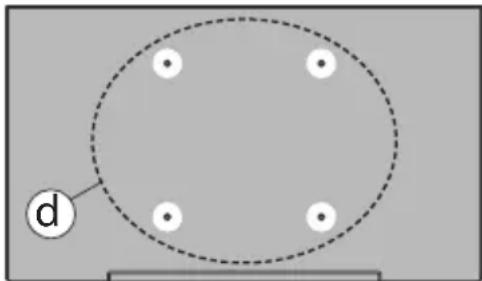
| (d) | 43" 50", 55", 65" | ||
| Дыбочина На Вnett (c) | Минимуm 9 | mm 12 mm | |
| Мakсимуm 1 | 10 mm 15 mm | ||
| Диаметьр M4 M6 | |||
3a6eTeXka: BuHmOeMe 3a 3aKpEnBaHe Ha meJeu3opa Ha ckobama 3a OkueBaHe Ha cmeHama He ca EKnIOueHu e o6ema Ha docmaekama Ha meJeu3opa.
HΦopMaζηa 3a OKoJHaTa cpeDa
To3n TeIeBn3Op e npoeKtnpaH da ona3Ba OKoNHaTa cpea. 3a da HamaJIte KOHCyMaunra Ha eHepn, MoKeTe Da n3NbJHIne CneDHNTE CTbKN:
Ako Hactponte Nectene Ha eNeKtpoEnerpna I03uIa MmHMaIHo, CpeHOb, MaKcMmaIHO nn
ABTOMAUHO,TeJIeBN3OpbT ⅢpepyIIPA cBOTBEHOKOHcymaunraHa eHepn.. HAcTpOte B no3nueN3KJ.,3a Da n3KnUoynte Ta3n HAcTpOka.AkoNCKaTe Da HAcTpOte NODCBETkata Ha qHKcnpaHaCToHocT,3aAdenaHa Kato NepcoHaUN3npaHa,MapKnpaTe NDCBETkata (pa3noJKeHa NoHAcTpOka TecTeHe Ha eJekTpoEheprn) i CJeTTOBa peYIpaIte pbyHo C NOMOHTa Ha 6yToHtE 3aNOCoka HAnBO NN HAJaCHO Ha DInCTAHIOHHOTO.
3a6eJekka: HanuHume onuu 3a Necthe Ha eNeKtpoeHepnra ce pa3nu4aam 3abucumocm om u3bpaHua pekum e MeHIO Hacmpouku>U3o6paxHeue.
Hactpoiknte NceTeHe Ha eJeKtpoeHeprn MoTaT da 6bDaT OTkPHTN B MeHIO HactpoKn>3o6paXeHne.
Mojn mai Te npedBnD, Ye HAKON HacTroKn Ha n3o6paXeHneTo He Morat Da ce npomeHrT.
MoKTe cIIO Da I3KNIOHTe ekpaHa, KaTO I3NOJ3BaTe OIzra Ta N3KNIOUeH ekpaH, AKO NCKaTe Da YyeTe cAmO 3Byka n He e HEO6XoDIMO da rJeDAte. AKO HATNCHE TocNeIOBAteHNO DECHNIA JIN NEBn 6yToH, Ue 6bDe I36pHa OnuN I3KNIOUeH ekpaH n "EkpaHbT uE I3rache cIeD 15 cekHydN. "Ha ekpaHa uE ce NOBn Cbo6ueHneTo". I36peTe PpOdbLnKn HATNCHe OK, 3a Da I3KNIOHTe ekpaHa He3a6abHO. AKO He HATNCHe TnTO eDNH 6yToH, EkpaHbT uE ce I3KNIOUcCneD 15 cekHydN. HATNCHe TnKoN ot 6yToHnTE HaIInCTaHIOHHOT OynpaBHeHne IIN TeJIeBN3Opa, 3a Da BKIOHTe OTHOBO TeJIeBN3Opa.
3a6eIekka:OnuuraMnKIOU8aHeHaekpaHa He e HauHa, ako pekumbmeHacmpoeh n03uuaNapa.
MOnI N3KIOUeTe TeneBn3Opa IIN N3BaTe Te Ucncela OT KOHTaKTA, KOrATo He To I3NoI3BaTe. TOBa CbIo Ue HAmann IIN CNpe NOTpe6JIeHHeTo Ha Tok.
Функци
LBeTeH TeJIeBn3Op cIncTaHcNoHHO npaBneHne
- HanbJIno INHTerpnpaHa cUΦpoBa Ha3eMHa/ka6eHHa/cateJIInTHa TeIeBn3nA (DVB-T-T2/C/S-S2)
HDMI BXOIOBE 3a Cbbp3BaHe Ha npyrn yctpoiCTBa c HDMI KOHEKTopu
USBBxoD
CnCTemaekpaHMeHToTa
- Ctepeo 3BykoBa cnTeMa
TeNeteKCT
Bpb3ka 3a cnyuwaankn
- ABTomatnua CnCTema 3a nporpaMnpaHe
PbUHa HacTpoIka
- ABTomatuHNO n3KIOUvaHe cIeN OKOJIO OCEM Yaca.
- TaMep 3a n3KnHouBaHe
-Блokировka 3a Deua
- ABTomatnHNO n3KJIIOUBAHe Ha 3Byka npn JInnca Ha n3JbYBaHe.
NTSC Bb3npOn3BExKaHe
AVL (aBTOMaTnUHO orpaHnUaBaHe Ha cunata Ha 3Byka)
- PLL (Tbpche Ha yectota)
- Pekim Irga (onu)
-ФункциИЗКЛIOUВаHeHaKapTNHaTa
- EtepHT (LAN) 3a cBbP3BaHe KbM INHTepHET n 3nON3BaHe Ha ycIyI
802.11 a/b/g/n BrpaIeHa WLAN noIdpbXka
CnoJeIHe Ha ayDnO BnDeo faiNoBe
HbbTV
Ultra HD (UHD)
TeJeBn3OpbT noDbPka Ultra HD (Ultra High Definition - cbUo no3HaTa KaTo 4K), KoATo npEIOCTaBA pa3dEnIteHa cnOc6HocT ot 3840 x 2160 (4K:2K). ToBa ce paBnBa Ha 4 nbTu OT pa3deJnteHaTa cnOc6HocT Ha Full HD TeJeBn3nra Ta KaTo ce yDBoaT 6pOra Ha TOnkIne Ha Full HD TeJeBn3nra Ta KaTO no Xopn3oHTaJa, Taka n no BepTnKaAna. CbDbPkaHneTo Ha Ultra HD ce noDbPka Upe3 MeCTHn n na3apHn npNIOXeHn, HDMI, USB BxOd (n) n n3JIbYBaHnRA DVB-T2 n DVB-S2.
BnCok DnHaMnueH 06XBaT (HDR) / Hybrid Log-Gamma (HLG):
C nOmoUta Ha Ta3n fynKzna Ha TeJeBn3Opa MoKe Da ce Bb3npOn3BExJa nO-roJAM dINHAMueH o6xBaT Ha OCBTeHOCt, KaTO yIaNBA n CneD TOBA KOM6HnHa RaKoJIko pa3NUnHn EKcNo3uZnn. HDR/HLG oBeUaBa Na-Do6po KaueCTBO Ha KapTuHaTa, 6laRoaPeHne Ha No-APKn I N0-peAInCTNuHN aKcEHTN, NO-peAInCTNuEH UBrT n DpyrN IOo6peHn. Toi OcnrypRa BVda, KOITcB3dAteJInte Ha fNIma Ce cTpeMrt Da NocTHHaT, NOKa3BaKn cKpnTnte ObLnactn Ha TbMHnTe CEKN i CbHueBa cBETnHa C nblnHa rCHota, ZBRT n DeTaun. HDR / HLG cbDbPxAHne Ce nOdlbPxa Ype3 MeCTHN n Na3apHn npINOxHeHn, HDMI, USB BXoObe n HaID DVB-S n3IbYBaHn. 3aJaTe CbBp3AHn BxOD 3a HDMI n3ToyHK kato YcbBbPseHCTBaH OT ONuHn t N3ToyHnC n MeHIO To HAcTPOKn> CnCTema nnOT MeHIO To N3ToyHnC n HAcTPOKn Ha n3ToouHnKa, 3a Da IngeATE HDR / HLG cbDbPxAHne, aKO HDR / HLG cbDbPxAHneTo ce noLyuaba Ype3 HDMI BXoD. B To3n Cnyauy yctPoJCTBTO-N3ToyHK Tpr6Ba da e Ha-NMaJIko HDMI 2.0a cbBMeCTmO.
Dolby Vision
Dolby Vision™ ocnrypЯBaДраматиHo BV3ayJIHO n3KINBЯBaHe, ydNtEnHa rKoCT, HeCpaBHM KOHTpact n 3aBnaIbRAuцrT, KoITO BDbXBA JxIBOT. ToI NOCTIra TOBa 3aWemETBaAIO KaueCTBO Ha n306paXeHneTo, kaTO KOMbHnpa HDR n IWPOKOOxbATn TexHONOrn 3a n306pa3BaHe Ha cBeTOpe. YBEJInuHabHe Ha rKocTTa Ha OpiRnHaHnR CnHaN I N3NoI3BaHeto Ha IO-BvOCk DnHAMUeH cBrt N O6xBaT Ha KOHTpAcTa, Dolby Vision npedctABr 3aWemETBaAun n306paXeHnB peALHO BpeMe C HeBepoTHn NODPO6HOctN, KOITO dpyrN TexHONOrn 3a NocNeDBAuA O6pa6OtKa B TeJeBnOpa He Morat. Dolby Vision ce noDlbpxa qpe3 ecTeCTBeHn I na3apHN npiloxeHn, HDMI nUSB BxODoBe. 3aJaTe CBbp3AnHn BxOd 3a HDMI n3ToCHNK Kato YcBbPseHCTBaH OT OnCuYTA n3ToCHNu B MeHTo HAcTpoKn> CnCTema nIiOT meHIoTO n3ToCHNu> HAcTpoKn Ha n3ToCHNu, 3a Da rIeDate Dolby Vision cbDbpxaHne, aKO Dolby Vision cbDbpxaHneTo ce noLyuaba qpe3 HDMI BXoJ. B To3n CnyauyycTpoIcTBOTO-n3ToCHNK Tpr6Ba da e Han-MaNko HDMl 2.0a cBBmecTmo. B MeHOb HAcTpoKn> N3o6paXeHne> Pexm HaJInce ue 6bDat Dba npedBapntEInHO onpeDeJIeHn pexIma Ha KaptnHaT, aKO ot Dolby Vision 6bJe OTKpIto cbDbpxaHne: Dolby Vision Bright n Dolby Vision Dark. IN DBete No3BOJRaBt Ha notpe6nteJra npeKJBee cbDbpxaHneTo B NaUnHa, NO KOITo cb3DaTeJIAT nbpBOHaJALHO e npedHa3HaueH npri pa3JIuHn ycIOBna HA OCBeTIeHne.
BkIoueH ancecoapn
-ДиctaHcnoHNOynpabJIeHne
BaTePn:2xAA
- INHCTpykun 3a ynoTpe6a
3axpaHbau Ka6eI
-ПОДВИЖнСТОИКА
- BuHTOBe 3a MoHTaJHa cToiKaTa (M4 x 12 mm) + (M6 x 20 mm)
Pexim Ha rTOBHOCT KapTHa
MoKeTe Da n3NoI3BaTe TeNeBn3Opa Cn KaTo cNΦpOba pAMKa 3a KapTnHa, KaTO n3NoJ3BaTe yHKcIyTa 3a KapTnHa B peXIM Ha rOtOBHOCT. 3a Da hAnpaBtTe TOBa, CneDbAte CTbKnITE NO-DOy.
3aadaTe onueta N3o6paXeHne B pexnHa rTOBHOCT B MeHIO HAcTPOKn> CnCTema> MeHIO OSe KaTo BKn. Ta3n Onuera 3aadaHa no nOpa3bupane KaTo N3Kn. Moxete cbuo da DePhiHHpate INHTepBaJ 3a cnaDwoy Ha CHIMKn B pexnHa rTOBHOCT, KATO N3NoJ3BaTe ONUraTa INTEpBaJ Ha KapTHHaTa B pexnHa rTOBHOCT B TOBA MeHIO.
Cb3daTe OTdEHa nAnka, HapeeHa N3o6paKeHne BpeKIM Ha rTOBHOCT B OCHOBHaTaNpeKTOpnHa USB ycToIcTBOTO 3a cbXpaHeHne i KOnnpaTe fainobete, KonTO nCKaTe Da n3NoJ3BaTe, B Ta3n npka i cNei TOBa CbPkeTe USB ycToIcTBOTO 3a cbXpaHeHne KbM Baunr TeJeBn3Op.
- Hatnchete 3a KpaTko 6yToHa 3a RotOBHocT Ha DnCTaHcNoHHoto ynpaBHeHne, 3a Da npeBKnUOHTe TeJIeBn3Opa cn B pexIM Ha rotOBHocT Ha KapTHHaTa.
Obphe Te BnmaHne, ye cIe KaTo onuTa
N3o6paKeHne B pexm Ha rTOBHOCT e 3aJaDeHa KaTO
BKn., FyHKunra Ta Ha 6yToHa B pexm Ha rTOBHOCT
Ha DnCTaHcNoHHOT ynpabJIeHne Ie Ce npOMEHN.
CJeT TOBa ige Tp6Ba Da HATNCHEt N 3aDbpxKITe
6yToHa, 3a Da npeBknIOHTe TeNEBn3Opa B pexm
Ha rTOBHOCT, DOkato TEJEBn3OpbTe B HopMaJIeH
pa6oTeH peXIM.
Ako nma noBce 0T 1 paJc n3o6paXeHnB nankata, BCnKn paJIOBE c n3o6paXeHn ige ce nOKa3BaT nocJeOBaTeHNO kaTo cnaDiooy. Ako Heo6xOIMATA naKa He e Cb3daHeHa nIn B nankata HmAs paJc n3o6paXeHn, Ha ekpaHa ige ce nOKaKe 3a HrKOkO ceKyHn npedynpeDntEnHO cbO6uEHe n cIeTobA ue n3Ye3He.
B pexim Ha rotOBHoc KAPTHHa TnHbTo Ha nOcBeTKaTa Ha ekpaHa ige Hamaee c 50% nФyHKuInTe Ha Smart Center Hma Da 6bDat npINOxIMn, aKO Smart Center e Hauyneh 3a Baunr MoeJn Ha TeJIeBn3Op.
3a Da npeBKnIOuHTe Baunr TeJeBu3Op OT peXIM Ha rotOBHOCT Ha KapTuHaTa 06paTHo B HopMaJIeH
pa6oTeH pexm, HATNCHeTe 3a KpaTko 6yToHa 3a roTOBHOCT Ha DCtAHcNoHHOTO.
OcBeH nIcTaHcUHOHTo ynpaBJIeHne MoXeTe da
n3noJ3BaTe n KOHTpOHNHa 6NoK Ha TeJeBn3Opa, 3a
da npEKBIOUHTe B pEXIM HA rOTOBHOCT Ha KapTHHaT a
B pEXIM Ha rOTOBHOCT n Da Ce BbPHeTe B HOpMaJIeH
pa6oTeH pEXIM. 3a Da HAnPaBNTe TOBa, CneDbaIte
CbJnte INHCTpyKUnn, ONNCaHn B pa3dEJa 3a KoHTpO
n pa6oTa Ha TeneBn3Opa 3a npEKBIOUChBaHe Ha
TeneBn3Opa B pEXIM Ha rOTOBHOCT. ImaIte npEdbNid,
Ye HЯMa Da MOXeTe Da npEKBIOUHTe TeJEBn3Opa B
peKIM Ha rOTOBHOCT, KaTO n3NoJ3BaTe KOHTpOHNHa
6NoK Ha TeneBn3Opa, DOKaTO Tete B
cbCToAHne Ha rOTOBHOCT Ha n3OpaXeHHeTO.
3a6eIeKka: HanuyeMo ha ma3u 0yHKuur 3abucu om Modena Ha meeeu3opa u He2oBume 0yHKuu.
Hanpaeeme cnpka c pa3deena NooBpKaHu fauNoBu fOpamu 3a USB pexum s3a noDbpxkAHume fOpamu Ha meduHume faunoe.N3ecmua 3a pekuma Ha zomOBHocm
Ako TeleBn3OpbT He noJyH BxOeH CnHAn (Hanp. ot aHTeHa nnn HDMI n3ToUHnK) 3a 3 MInHyTN, TeleBn3PbT ige npemHe B pexn Ha rotOBHOCT. Korato NO-KbCHO BKIOuHTe TeteBn3Opa, Ha ekpaHa ige ce NORBn CneHOTo cbo6ueHne: "TeleBn3OpbT ATOmatuHo npemHaBa B pexn Ha rotOBHOCT, TbN KaTo Dblro BpeMe He n3JIbYBa CnHAn." MoXeTe da DeAKTINBpuATE Ta3n fynKcNoHaJIHOCT, KATO 3aJaTe CbOTBEHO ONUraTa TaMep 3a JInca Ha CnHAn B MEHOTO HAcTPOKn>YcTpoNCTBa.
OnuTa 3a ABTomatUHO n3KnOyBaHe (B MeHOTo HAcTpoKn> CnCTema> Oue) moXeWe da 6bDe 3aAdEHa Ha cToHocT MExdy 1 n 8 yaca no NopDaP3bnpAne. Ako Ta3n HAcTpoKa He e HacTpoEHa "N3Kn." n TeLEBn3OpBt e 6nI OCTaBeH BKNIOyeH He e 6nI n3NoJ3BaH nO BpeMe Ha 3aJaDEHO OBpeMe, ToJ ΠpeMnHE B pEXm HA rTOBHOCT Cnei n3TuHaHe Ha 3aJaDEHoTO BpeMe. Korato noKbCHO BKNIOHTe TELBn3Opa, Ha ekpHa Ie Ce NOBn CneHDto Cbo6uHHe. "TeLEBn3OpBt ABTomATuHO npemHHa B pEXm HA rTOBHOCT, Tb Kato He e 6nI EKcNlOaTHpan 3a Dblr nepNOd OT BpeMe." PpeIN TELBn3Opa Da npeMnHE B pEXm HA rTOBHOCT, Ie ce NOKae JdaIanorOB IpO3opeuC. Ako He HATNCheTe HTO eDIn 6yToH, TELBn3OpBt Ie npEMHe B pEXm HA rTOBHOCT Cnei nepNOd Ha n3aKBAHe OT OKO 5 MNHyTN. MoXeTe Da mApKnpate Da n Da HATNCheTe 6yToHa OK, 3a Da npeBKnIOuHTe TELBn3Opa He3abABHO B pEXm HA rTOBHOCT. Ako MapKnpate He n HatncHete OK, TELBn3OpBt Ie octaHe BKIOueH. MoXeTe cbIo Da n3bepete Da OTMeHnte YHKunraTa 3a aBTOMATUHO n3KnIOUbaHe OT TO3n DnaIarOB npO3opeuC. MapKnpaTe DeakTbnpaTe HATNCHEt OK, TELBn3OpBt Ie OCTaHe BKIOueH n FYNKUnraTa Ie 6bJe 3aJaDeHa KaTO n3KnIOueHa MoXeTe OTHBO Da AKTbnpate Ta3n YHKUn, KATO npomEHte HAcTPOkata Ha onCuaTA ha ABTomATuHO n3KnIOUbaHe OT MeHOTo HAcTpoKn> CnCTema> Oue.
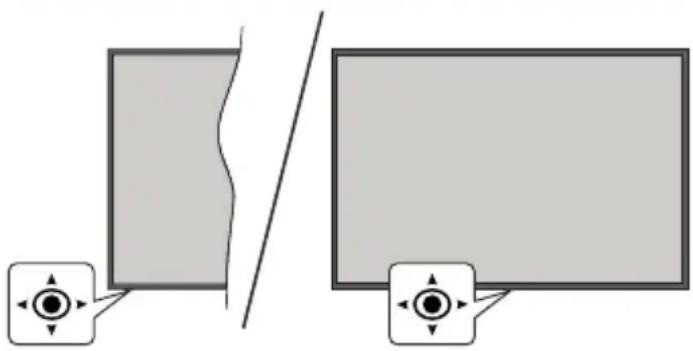
YnpaBneneHaTeJeBu3opa & pa6ota
TeJEBN3OpbT NMa JxKoIcTNK, KaKTo e NOKa3aHo Ha Yeptexa No-rope. I03BoJyBa Bn Da KOHTpOIpaTe CnJaTa Ha 3ByKa / npOrpaMaTa / n3ToUHnKa i Da BKJIIOuYBaTe NIn N3KJIIOvBaTe ΦyHKUnTe Ha TeJEBN3Opa.
Bélekka: Πоцуma Na dхосмka Moke da ce pa3nua8 3a8ucumocm om modena.
3a npomraHa cnilataHa 3Byka: YBeiueTe cnilataHa 3Byka Upe3 HaTnCKaHe Ha JKOInCTnKa HAnCHO.
3a CmHa Ha KaHana: PpeBbptTe 3anameTeHnTe KaHaN KATO HAtNcKate JKOINCTnKa HAnpeNnIro DbpNaTe KbM Ce6e cn.
3a da cmeHnte n3TOUHnka:HaTncHeTe ueHTbpa Ha JxOJCTnKa,Ha ekpaHa ige ce IoRbN CnncbKa C n3TOUHnCITE. PpeBbPteTe 3anamTeHnte KaHaJI KATO HAtnCKaTe dXoJCTnKa HAnpei NII r OdbpNaTe KbM Ce6e cn.
3aДаИЗКЛЮЧИТeТeLEВИЗОРа(TBbрДpeхИМHa roTOBHOCT):HATINCHETeцENTbpaHaДжоICTNkaиro 3aIpbKTe 3aIOBEueOT3cekyHn,TeLEBIV3OpbTüe ceпpeMHe BpexIM Ha CTPorpexIM Ha rTOBOHOCr.
B TBbpD pexnM Ha rTOBHOCT dNCTaHcNoHOTO ynpabIeHne Hma Da pa6OTn N CBeTOnoDbT B pexnM Ha rTOBHOCT Ha TeJIeBN3opa Hma Da CBETN. ΦyHKUInTe KaTO MPEXOB pexnM Ha rTOBHOCT (aKo e HaIIueH) n TaIMepn Ue 6bDat DeakTNBupaHn. MoXeTe Da BKNIOHTe TEJIeBN3opa OT TBbpDnA pexnM Ha rTOBHOCT cMo Upe3 dJOONCTNK.
3a Da BKNIOHTe TeneBn3opa:HaTNCHeTe cEHbpa Ha JKOCTNka, TENEBN3OpbT Ie Ce BKNIOH.
BeneKka: IaHOMo MeHIO He MoKe da ce nokae Ha ekpaHa 4pe3 dkoUcmuKa.
Pa6oTa c dncTaHcNoHHOTO ynpaBnHeH
HaTnCHete 6yToHa Home ot DnCTaHcNoHHOT O npabHeHne, 3a Da BnIte TnABHOTo MeHIO. N3noJ3BaIte 6yToHTe 3a Nocoka n 6yToHa OK, 3a da HABnIpaTe n HactpOte. HaTnCHete 6yToHa Ha3aD /Bpb7aHe, N3xoJ nn Haayano, 3a Da n3Ne3eTe OT ekpaHa Ha MeHIO.To
U36op Ha BxOa
CJIeI KaTo BeHbX CTe CbBp3aII N BbHUn CnCTEm KbM Baunr TeJeBn3Op, MoKeTe Da IpeBKnUOHTe
KbM pa3NHy BxOHN H3TOOHNI. HaTnCHTe 6yToHa N3TOHn Ka BaWeTo nCTaHcNOH O npabHeHne NocJeDoBaTeJHO 3a Da n36epe pa3NHyHnTe N3TOHNI.
CmHa Ha KaHaJIte I npOMHa Ha cHnTa Ha 3Byka
MoKTe Da npOMeHnTe KaHana n Da HAcTpOnTe CnJaTa Ha 3ByKa KaTo n3NoJ3BaTe 6yToHnTe Programme +/- n Volume +/- Na DnCTaHcUHOHhOTo ynpabNeHne.
HyinpaHne Hn3KJIIOUbaHe Ype3 6yToH 3a roTOBHOCT
HaTnCHete 3aDpBxTe 6yToHa 3a roTOBHOCT, 3a da BVnITe DOnbHnHTeHN DeiCTBnA 3a To3n 6yToH. Ue 6bDat HaJIuHn ONuIN 3a HylnPaHE (peCTapTnpaHE), pexHM Ha rTOBHOCT (HOPMaJEN pexHM Ha rTOBHOCT) n3KlIOUBAHe Ha 3axpaHbaHETo (PnHydnteJeH pexHM Ha rTOBHOCT). MapKnpaIte eJHo n HaTnCHete OK, 3a Da n3BbpWNTe n36paHOTo DeiCTBne. Ako Bb3HnKHe npo6Iem, KOTo He n03BOJRA Ba HA TeJeBn3Opa Da npemHe npabNJHO B pexHM Ha rTOBHOCT, MoXeTe Da n3NOJ3BaTE OUNrTa 3a n3KJIIOUBAHe, 3a Da npHynITE TeJeBn3Opa Da npemHe B pexHM Ha rTOBHOCT.
Ako BaunrTeJeBn3Op Cnpe Da OTRObAp Ha KOMaHnI MeHOTo 3a DeNCTBnA He MoKe Da ce NOKaKe, TeJeBn3OpbT 6bDe PnHyDn Da ce pecTapTnpa, KOrato 6byToHbT 6bDe HATNCHaT 3a OKONo 5 cekyHn. Toba ige npeKpatn npoueca.
N3I0NJ3BaHe Ha TJIaBHOTo MEHIO Ha TEJIeBn3Opa
Ako 6yToHbT Home (HaJaIO) e HaTnCHaT, TnaBHOto MeHIO Ha TeJeBn3Opa Ie Ce NOBu B Ha ekpaHa. MoXeTe Da HABnIrpate npe3 elemEHTnte Ha MeHOTo, KaTO n3NoJ3BaTe 6yToHnte 3a HacOUBaHe Ha yCTpOJCTBOTo 3a DnCTaHcNtOHo YnpabNeHne. 3a Da n36epTe elemEHTnte NIN Da BVnITE OOnNTte Ha NOMeHOTo HA MapKnPaHOTo MeHIO, HATNCHEte 6yToHa OK. Korato MapKnPate ONUra OT MeHOTo, HAKON OT elemEHTnte Ha NOdMeHOTo HA TOBA MeHIO MORAT Da CE NOBRT B rOpHata INI DOJHATA CTPaHa HA JeHTata C MeHOTA 3a 6bp3 DoCTbN. 3a Da n3NoJ3BaTe No3nUraTa 3a 6bp3 DoCTbN, MapKnPaTe R, HATNCHEte OK i NaCTPOIe CNOpeD PpeDnOHTAHnRA Ta BN C 6yToHnte HaJIaBO/HaJrACHO. CJeD KATO npNKlOChTE, HATNCHEte OK INI Ha3a/DBpUaHe, 3a Da n3Ne3eTe. KORAto ce NOdYeptae pInIoXeHneTo Netflix (ako e HAnuHo), npenopbknte Ie Ce NOKa3Bat IO cbUma Haunn KaTO elemEHTnte B NOmEHIO.To AKO Beue cTe BnEznn B akayhta cn B Netflix, Ie ce BVkDaT nepcoHaJIINsPahn npenopbkn.
Moxete cBto Da Bnnte HOpmaun 3a MeCTONOLOXEHNETo, BpeMeTO, Yaca N daTata Ha ekpaHa Ha TlAbHOTo TeJeBn3N0HHO MeHIO. 3eJeHnte MaJKN IKOHN POKa3BaT TEKUoTO CbCTOraHne Ha BpeMeTO, MpeKaTa u CnHXPOHn3UnpaHeTo 3a npInOxHeHna. Ako Te3N IKOHn Ce NOBRT B 3eJIeHO, TOBa O3NaUaBA, Ye INΦopMaunrTa 3a BpeMeTo e aKtuaN3UnpaHa, MpeKaTa e Cbbp3aHa n CnHXPOHn3UnpaHeTo e
3aBbpoheHO yCneuHo. B npOTnBeH cnyaH nKoHnte 1ce ce noBbT B 6raNo.
B 3aBnCmOcT OT n36opa Ha nbpKaba, HappaBEN no BpeMe Ha nbpBaTa IHCTaIauZna, INHOpMaunraTa 3a EKcPiOaTAuONHHJ XNBOT Ha TeJIeBN3Opa B YacOBe MOKe Da 6bJe NOKa3aHa Ype3 HaTnCKaHe Ha 6yToHa Home I Cnei TOBa CNHJ 6yToH. 3aRpnKeHN 3a KaueCTBOTo Ha NaWte PPOdYKTn, TeJIeBN3OpNTe Ce NODJarat Ha CTporn IpOBepKn, PpeN Da 6bDat NychaHn Ha Na3apa, NopAdn KoETo e Bb3MOxHO Ta3N CTOHocT Da He e paBHa Ha O No BpeMe Ha NbpBnA MOHTaxk.
HaTnchHeTe 6yToHa N3xOa, 3a Da 3aTBOpnte n 3ne3eTe.
1. Haujano
Korato rnaBHOTo MeHoe o OTBopeHo,JeHTaTa Ha MeHIO Hauano,ue ce mapknpa.CbDpbXaHneTo Ha MeHIO To Hauano MoKe Da 6bDe npcoHaun3npuHO.3a Da HappaBNTe TOBa,OTndete B MeHIO To HA TeJIeBN3Opa, MapknpaTe OUnra Ta PeJaKTnPaHe Ha Hauano n HataChete OK.MehIo To Hauano ue npebKnUoyn B pexmHa peJaKTnPaHe.BpexmHa peJaKTnPaHe MOKeTe Da n3TpneTe nn IpomEnIte No3uTnTa Ha KOITOn Da e enEmeHT B MeHIO To Hauano. MapknpaTe OUnry n HataChete OK.N36epete NkoHata 3a n3TPBAHe nn PpeMeCTBaHe n HataChete OK.3a Da npemecnte eneMeHT OT MeHIOTo, n3noJ3BaNte 6byTOHnte 3a Nocoka HaJcCHO,HaJRABO,HarOpe n HADOny,3a da n36epete No3uTnTa,B K0rTO NCKaTe Da ce PpeMeCTe ENeMeHTbT, n HataChete OK.
MoKeTe cBIO da do6aBnTe onCIN OT dpYr MeHOTa KbM HaayJIHOTo MeHIO. PpOCTo MapKnpaIte OOny HHaTuscHete 6yToHa 3a Nocoka Harope nn HaOny Ha DInCTaHNoHHOTO.AKO BnDITE ONuRA Ta Do6aBHe KbM Haayano, MoKeTe da ydo6aBnTe B HaayJIHOTo MeHIO.
2. TbpcHe
Moxete da Tbpcnte KaHaJI, nbTeBOInTeI, TeBn3NoHH MeHOTa, npINOxKeHna, ye6, YouTube n BnDeOKnIOBe, KATO n3NOJ3BaTe Ta3N OOnu. HaTncHe TE OK n BBBeDeTe KlnOyOBa dyma ype3 BnPTyaJIHATA KJIaBnATypa. CneT TOBA mApKnpaIte OK n HATNCHeTE OK, 3a Da 3anOChTe TbpceHTo. Ha ekpaHa Ie ce NOKaXt "Pe3yIITAtu". N36epete JeJaHn pe3yIITat c NOMoUta Ha 6yTOHnte Cbc CTpeKNi HaTncHeTE OK, 3a Da ce OTbOpn.
3. TV
3.1.PbKOBOCTBO
C nomouTa Ha Ta3n onuM oKeTe da noJyUte doCTbI DO MeHIOTo 3a eNeKTPoHHNc npaBOuHNK Ha nporpaMITE. 3a DonbHNHTeHa INΦopMauN BxKTe pa3dE NEnKTPoHeN nporpAmEn cnpaBOuHNK (ENC).
3.2.KaHaJIu
C nomouTa Ha Ta3n ONuRA IMATE DOCTbN DO MEHIO KaHAn. 3a DOnbHNHTeHa HOpMauaB BIXTe pa3deI N3non3BaHe Ha CNcBka C KaHAn.
3.3. TaMepn
Moxete da 3adaTe TaMepn 3a 6bdeu Cb6ntna, KaTO n3noJI3BaTe OIcHnte B TOBA MeHIO. MoXete cBto Taka da npereJeate Cb3daeHnte NO-paHO TaMepn B TOBA MeHIO.
3a da do6abnte HOB TaMep, n36peTe pa3deI Do6abAHe Ha TaMep c NOMOuTa Ha 6yToHa HAJIABo/HaJrCHO HATnCHete 6yToHa OK. HAcTpoIte XeJAHnte OT Bac ONUInTe HA NOmEHOTOn CNeD ToBa HATnCHete OK. Uc ce cb3daJe HOB TaMep.
3a da pedaKTnpaTe npednshO cb3daen TaMep, Mapknapte ro, n36epete pa3deI PeDAKTnpaHe Ha n36paH TaMep HATNCHEt OK. IpomeHeTe ONuNTe Ha NODMeHOTo Cnped IpeDnOHTaHnraTa Bn HATNCHEt OK, 3a da 3anametnte BaunTe HacTpoKn.
3a da OTMeHnTe Beue 3aJaDeH TaIMeP, MapKnpaIte ro, n36epete pa3deHa N3tpnBaHe Ha n36paH TaIMep HnATnCHete OK. Ie ce noRbE kpaH ce noRBAcbO6uHne 3a notBbpxkDHe. MapKnpaTe DA n HAtncHete OK, 3a Da npoDbJnxTe. TaIMepbT Ie ce OTMeHn.
He e Bb3MOxH0 Da 3aJaTe TaMepn 3a DBe nIIN NOBuee Cb6HTN, KOINTO Ie Ce N3NbYBaT NO eHaKBN KaHJI IN EeINH INCbUIN INTEpBAJ OT BpeMe. B To3N cNyaui Ye 6bDeTe HΦOpMnpaHn TaimepbT Ue 6bJe OTMeHen.
3.4.PedaKtnpaHe Ha NaayalHaTa cTpaHua
Moxete da nepcoHaHn3npaTe cbDbpxKaHneTo Ha
Haayalno To MeHIO, KaTO n3NoJ3BaTe Ta3N onuY.
MapknpaTe n HatncheTe OK. MeHIoTo Hauano
Ie npEbkIouy B pexm Ha pedaKTnpaHe. 3a
NoDpo6HoCTn BVxTe pa3deJa Hauano.
3.5.OuE npnIOxHn
3a da ynpablaBaTe npnloxehnaTa, nHCTaInpaHn Ha Baunra TeNeBn3Op, MoKeTe Da n3noN3BaTe Ta3n ONu. MapkpauTe nHaTnche TE OK. MoKeTe Da do6abnte IHCTaInpaHO npnloxehne B hauaHOTo MeHIO, Da ro cTaptnpate nn npemaxhete. MapkpauTe npnloxehne nHaTnche TE OK, 3a Da BnDnTE BCNUKn HAnuHN OUIN.
3.6. Na3ap
Moxete da do6abrte HOBn npINOxehn O T Ma3nHa 3a npINOxehn n3no13Baikn Ta3n onu. MapkupaTe n HataChete OK. Ie ce nokaxat HaunHnte npINOxehn. Moxete cIto Taka da noNyute DocbTn Do na3apa ot MeHIOTo OSe npINOxehn.
3.7.HynpaHa npnloKeHHa
MokTe Da Bb3CTaHOBnTE HAcTPOKnTE CN B MeHIOTo Haanao Do HAcTPOkNTe No Npda36npaHe, KaTO n3PON3BaTe Ta3n OOnu (HaNnUHOCTTa 3aBnCt OT MoJeLa Ha TeJIeBn3Opa N HerOBnTE FyHKcnn). MapKnpaTe n HATnCHete OK. Ue ce nOraBn ekpan ce nOraBBA CbO6IeHne 3a NotBbPjXdHne. MapKnpaTe DA n HATnCHete OK, 3a Da npOdbJxKnte. ObpHete BHMaHne, Ye Hama Da MOKTe Da N3BbPwnte Ta3n ONepaunr OTHOBo B pAMKnTE Ha CJIeDbaIuTe HRAKO KMOHyTu.
3.8.ДocTbNHOCTTa
MoXeTe Da NOLyUHTe DOCTbN Do MEHOTo 3a HAcTPOKn Ha DOCTbNHOCTTa DInpeKTHO C NOMOuTa Ha Ta3n ONUJRA.
3.9.Пични NaCTрочк
Mokete da noJyHte DoctbN do MeHIOTo 3a HacTPOKn Ha nobepnteJIHOCTTa dIpeKTHO c NOMoUta Ha Ta3n onu. Ta3n onu MoKe Da He e HAnuHa B 3aBucmOcT OT MOneJa Ha BaShra TeJeBn3Op n N36paHaTa DpbKaba No Bpeme Ha NpBBOHaaJHOTo IHCTaJIIPAhe.
4. HactpojuKu
MokTe Da ynpabJIbBaTe HAcTpoKnTe Ha Baunr TeNeBn3Op, KaTO n3PON3BaTe ONuNTe B TOBa MeHIO. 3a DonbJHnTeJIHa INΦOpMaunr BnXTe pa3dJe CbDbpxaHne Ha MeHOTo 3a HAcTPOKn.
5. N3TOUHnU
Mokete da ynpablaBate npednoHTaHra Ta H BxOHNTE n3TOUHnC, KaTo n3NOJ3BaTe ONuNTe B TOBA MeHIO. 3a Da CMeHnte TEkyunr N3TOUHnK, MapknapaTe HAKoR OT ONcNtE HaTNCHeTe OK.
5.1.HactpoNHaN3ToUHnKa
Mokete Da noJyHnte DoCTbN DO MeHOTC HAcTPOIK Ha n3TOUHnKa DnpeKTHO C NOMoUta Ha Ta3n Ou. PedaKtnpaTe NMeHata, AKTNBpuAte Nn DeakTBNpaTe n36paHnte ONcN 3a n3TOUHnKa. CbueCTByBat n oncN PeoBeH, YcunEn nn DeakTBNpaTn 3a HDMI n3TOUHnUte. OncInTe PeoBEN yCUnEn BnnaT Ha HAcTPOkKaTa Ha UBeTa Ha n36paHnHDMI n3TOUHnK.
NoctabrHe Ha 6aTePmB DnCTaHcHOnHTo ynpaBJeHne
CbaIe 3aHnKaK, 3a Da IMaTe DoCTbN Do OTdeneHneTo 3a 6aTePnITE. NocTaBeTe DBe 6aTePN pa3Mep AA. YBepTe ce, ye 3HaunTe (+) n (-) cBnadat (cna3e TnpabnHnnoJnPaTET). He n3NoJ3BaIte EDHOBpeMeHHO CTapn HOBn 6aTePN. 3aMeHnTe CAMo Cbc CbUIny INn EKBnBaJIeHTeH TIN. NocTaBeTe o6paTHo KanaKA.
Ha ekpaHa ige ce nOBn cbo6eHne, KOrato
6aTeepnte ca n3ToeHN u Tp8Ba da 6bDat CmeHEn.
ImaTe npedN, ye KOrato 6aTeepnte ca n3ToeHN,
pa6oTata Ha dInctaHcNOHHOTO ynpabJIeHne MOKe da
ce HapuN.
BaTepeHnTe He Tp6Ba Da ce n3NaRaT Ha npeKoMePHa TOJInHa, KaTo CJIbHueBa CBETJInHa, OYH N DpyrN NOO6Hn.

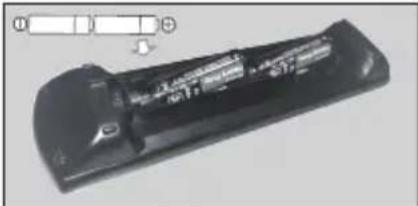
Cbbp3BaHe KbM eJKeTpNueckaTa MpeXa
BAKHO: TeJIeBn3OpbTe npoeKtnpaH da pa6oTn npn HAnpeXeHne 220-240V AC c yeCToTa 50 Hz. CneI KaTO n3BaJnte TeJIeBn3Opa OT onaKOBkata, OCTaBeTe r Da IOCTnHHe CTaHa TempePaTypa, ppei Da r BOKJIIOHTe KbM eJIeKTPnueCKaTa MpeXa.
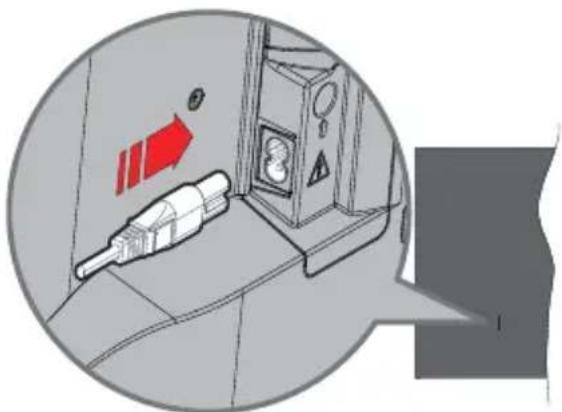
BkHouTe eHnHnKpa (UeCencaDbAOTbopa)Ha npedeocTabeHHpa3rIIO6yem 3axpaHbau Ka6eN BvB BxOda 3a 3axpaHbau Ka6eN Ha 3aDHaTa CtpaHa Ha TeJeBn30pa, KaTO e NOKa3aHo no-rope. CneTToBa BkHouTe Dpynna Kpa H a 3axpaHbau nKa6eN E KOHTaTa.
3a6eJekKa: Ioouura Ha 8xoda Ha 3axpaHauua Ka6e MoKe da ce pa3nuea e 3aeucumocm om Modena.
AHTeHEn BXoJ
CbbpkTe 3a aHTeHa Nn Ka6eHa TeJeBn3nKaM rHe3dTo AHTEHHn BXOD (ANT), pa3noJKeHO OT JnBaTa CtpaHa Ha TeJeBn3Opa Nn CaTeJIInTHn Ka6eN, KbM rHe3dTo CateJIIn (LNB), pa3noJoxEHO OT 3aHnTa CtpaHa Ha TeJeBn3Opa.
Pb6HaTeNeBn3opa
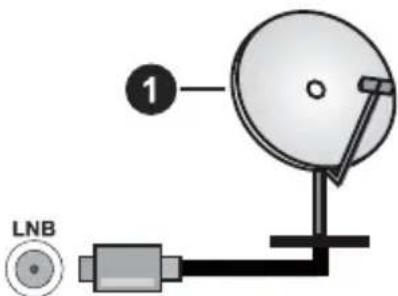
1. CateJNT
JaBaTa CtpaHa Ha TeJeBu3Opa
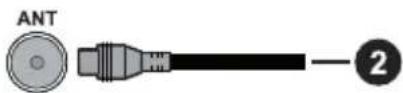
2.AHTeHa nn Ka6en

Ako Jenaete da Cbpxkete yctpoicBO KbM TeJeBn3opa, yBepeTe ce, ye nTo nTeJeBn3opa ca n3knouehn npdAn da OcbuectBnte KaKaBaTo n da 6nlo Bpb3ka. Cnei npnknohyaHe Ha CbBp3BaHeto,
MOKTe Da BKNIOUHTe YcTPOINCTBaTa N da Tn N3NOJ3BaTe.
YBeDOMJIeHne3aJIINcEHN3
TepMNHTeHDMI, HDMIMyTTmEneH INTEPpeC C BncoKa pa3dEnIteHa cNoCo6HoCT, TbproBckn BnD HaHDMI norata Ha HDMICA tProBCKn MapKn nI npereNCTpnpaHn TbproBckn MapKn Ha HDMLicensing Administrator, Inc.

Dolby, Dolby Vision, Dolby Atmos, n CnMBOJIbT c DboHaN Da TbproBcN MapKn Ha Dolby Laboratories. Licensing Corporation. POn3BeDen no NInceH3 Ha Dolby Laboratories. NobepntEn Hny6nkyBaHn npOn3BeHn. Copyright © 2012-2022 Dolby Laboratories. BcnKn npaba 3ana3eHn.
Dolby Vision·Atmos
YouTube n I noroto Ha the YouTube ca 3ana3eHa Mapka Ha Google Inc.
To3n npoodykT cbdbpka TexHOnIorna, o6ekt Ha onpeDeJIeHN npaba Ha nHTeJIeKtyaHaHa c06CTBeHOCT
Ha Microsoft.ИЗнOL3BaHTo Ип pa3npocTpahHeHneTo Ha Ta3n TexHOJOrnIи3BbH To3n npOyKTe 3a6paHHeHa 6e3 cbOTBeTHn(Te) nIueH3(n) ot Microsoft.
CobCTBHeHnUte Ha cbDbpXaHne n3NoJ3BaT Microsoft PlayReadyTM TexHoJOrnTa 3a DoCTbn Do cbDbPxAHne, 3a Da 3aunTAT INTEKeTyaJHaTc CN Co6CTBeHOCT, BKIOuHTeNHO cbDbpXaHne 3a ABTOPCKOTO npABO. Toba ycToIcTBO n3NoJ3Ba PlayReady TexHoJOrnJa 3a DoCTbn Do PlayReady-3aUnTeHO cbDbPxAHne n/Inn WMDRM-3aUnTeHO cbDbPxAHne. Ako yCTpoiCTBOTO He ycnee Da npINoJN npAwnH OprAHueEHnra Ta Bbpxy n3NoJ3BaHeTo Ha cbDbPxAHne, Co6CTBHeHnUte Ha cbDbPxAHne To Morat Da n3nckat OT Microsoft Da npemaxHe Bb3MOxHocTTa Ha yCTpoiCTBOTO Da n3NoJ3Ba PlayReady-3aUnTeHO cbDbPxAHne. OTmHaTata He Tp8Ba Da 3acra He3aUnTeHO CbDbPxAHne nll CbDpXaHne, 3aUnTeHO OT dpyrN TexHoJOnRn 3a DoCTbn Do cbDbPxAHne. Co6CTBHeHnUte Ha cbDbPxAHne Morat Da n3nckBat OT Bac Da aKtuaJn3npuTe PlayReady 3a DoCTbn Do TAXHOTo cbDbPxAHne. Ako OTkaxeTe Da HAnpaBnte AKTuJn3aunrTa, Hma Da nOlyuHte DoCTbn DO CbDbPxAHne, KOEtO n3NCKBa aKtuaJn3aujraTa.
Joroto "CI Plus" e TbproBcka Mapka Ha CI Plus LLP.
To3n npodykt e 3aunTeH ot onpeJeHn npaba Ha nHTeJekTyanHa co6ctBeHocT ha Microsoft Corporation. N3noJ3BaHeTO nn pa3npocTpapanHeHTo Ha TaknBa TexHOJOrn N3BbH To3n npodyKT e 3a6paHeNo 6e3 NiueH3 ot Microsoft nn Otopn3napaH ot Microsoft dbuepHo dpyjxcTB0.

Advance
Covered by patiens at patienlist.accessadvancemc
I3XbIpbIaHe Na cTapnte ypeiN 6aTePnnte

Camo 3a EbponeeCKnca bIO3 nDbpxKaBnte cbc cnCTemN 3a peuKnpahe
Te3n cIMBOJN Bbpxy npOdyKTnTe, onaKOBkata n / nnn npndpykaBaUnte DOKymeHTN O3HaayBaT, Ye N3NOJ3BaHNTe eJeKTPpuYeCKn EJIeKTPoHHn npOdyKTn N 6aTePN He Tp8Ba Da ce CmecBa C OCTaHaJInte 6bTOBn OTnaDbu.
3a npabnHTo TpeTnpaHe, OON3OTBOPBaHe n pezuknpaHe Ha CTapn npOyKtn N 6aTeepu, MoJ, da rN 3aHeceTe Do CbOTBeTHnte NyHKTOBE 3a Cb6npaHe B CbOTBeCTBne C MeCTHOTO 3aKOHOdaTeJIcTBO.
I3XbBpIaIKn rnpaBnHIO; NO To3Na HauH NcI NOMOrHete 3a 3ana3BaHeTo Ha cEHnTe pecypcn Ie npedOTbpaTnte eBeHTyaHn OTPuCaTeHN Bb3DeiCTBnB bpxy YoBeIshKOTO 3dpabe N OKoHnTa CpeJa.
3a noBue He HOpMaun 3a Cb6npaHTo n peuKnnpaHTo, MoJ, CBpKeTe ce c MeCTHaTa O6uHa.
Morat Da Bn 6bDat HanoXeHrno6n 3a He npabnHO n3XBpJnHe B 3aBNCIMoCT OT MeCTHOTo 3aKOHOdaTeNCTBO.
3a6eJexka 3a cMbOJa 6aTePnA (doJeH cMbOJ):
To3n CmBOJ MOKe Da Ce H3NOJ3Ba B KOM6uHaCnA C XmMueeCKn CmBOJ. B To3N Cnyaai Toe B CbOTBETCTBne C H3NCKBaHnIa, YcTaHOBeHN B DInpeKTHBaTAta 3a yUactBaIuNTe XmNKaJI.
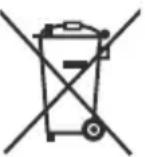
ДeКларачиЗасвтБETСТВЕ(DoC)
"C hactoio To Panasonic Marketing Europe GmbH Deklapipa, ye To3n TeIeBn3op OTROBApHa cBseCTBeHnte N3NCKBaHnI n Dpyrnte npNJIOxMn pa3npoe6n Ha DnpeKtNbA 2014/53/EU."
Ako JxelaTe Da NOLyUHTe KOINHe Ha OPUNHaJIHata DeKlapaun 3a CbOTBETCTBnE Ha TO3N TeJEBn3Op, MoJr nocTeTe CneDnrye6caNT:
http://www.ptc.panasonic.eu/compliance-documents
YnblHOMOueH npedCTaBNTeI:
Panasonic Testing Centre
Panasonic Marketing Europe GmbH
Winsberging 15, 22525 Hamburg, Germany
ИntepnetctpaHnca:http://www.panasonic.com
Cneunphiau
| Телевионно Изльчане | RAL BG/I/DK/ SECAM BG/DK | ||
| Пр装配ио Пр装配ио | HF (BAND I/III) - UHF (BAND U) - HYPERBAND | ||
| Цфpoю Пр装配ио | Наллно Иntеррирана цфpoва нааземнa/кабелna/cateлг纳а телевион TV (DVB-T-C-S) (DVB-T2, DVB-S2 сьвмесима) | ||
| Броч празваритelно настоеги Каналу | 11 000 | ||
| Индikатор На Каналу | Екрано мени | ||
| RF Вхod за Anteноа 75 Ohm (небалансирано) | |||
| РавOTно надрекене | 220-240V AC, 50Hz | ||
| Адно A2 Stereo+Nicam Stereo | |||
| Слшалки 3,5 MM Мли Steteо жak | |||
| Консу��ия на эnéгия в реким на готовост в мрека (W) | <2> | ||
| TX-43MXT686 TX-43MXF687 TX-43MXN688 TX-43MXX689 | TX-50MXT686 TX-50MXF687 TX-50MXN688 TX-50MXX689 | TX-55MXT686 TX-55MXF687 TX-55MXN688 TX-55MXX689 | |
| Изхаята Адно Мошист (WRMS.) (10% THD) | 2 x 10 W 2 x 10 W 2 x 10 W | ||
| Консу��ая Мошист (W) | 150 W 135 W 140 W | ||
| Тergл (kr) 11 Kg 14 Kg | 17 Kg | ||
| Разmersи на телевиора ШхДхВ (сбс стойкata) (MM) | 221 x 964 x 614 221 x 1119 x 704 221 x 1233 x 769 | ||
| Разmersи на телевиора ШхДхВ (бeз стойкata) (MM) | 68 x 964 x 560 68 x 1119 x 647 66 x 1233 x 711 | ||
| Дисп ley 16/9 43" 16/9 50" 16/9 55" | |||
| Разotingа Temпература и Влажноct | 0°C до 40°C, 85% м akс. Влажноct | ||
3a noBue HnΦopMaun 3a npOyKta, MoJ, nocetete EPREL: https://eprel.ec.europa.eu.
PernctpaunOHnT Homep Ha EPREL e oocbneH ha https://eprel.panasonic.eu/product.
Cneunkaun Ha 6e3KuHn LAN TpaHmTep
| Чебтан спектей | Мак. ИсторICAL MOДНОСТ |
| 2400 - 2483,5 MHz (CH1 - CH13) < 10 | 0 mW |
| 5150 - 5250 MHz (CH36 - CH48) < 20 | 0 mW |
| 5250 - 5350 MHz (CH52 - CH64) < 20 | 0 mW |
| 5470 - 5725 MHz (CH100 - CH140) < | 200 mW |
BbpxKaBn OrpaHnYeHn
Be3xuHOTo LAN obOpyDbAHe e npedHa3HaueHo 3a DomaunHa n oOncHa yIOTpe6a BbB BCnKn CTpaHn OT EU, OBeiHHeHTo KpAICIbTO n CeBepHa NpIaNn (n Dpyr n cTpaHn, KOtTO CneBaT cbOTBeTHaTa dIpeKTHBa Ha EU n/nnn OBeiHHeHTo KpAICIbTO). YecOTHaT a IeHTa 5.15 - 5.35 GHz e orpaHnueHa do onepaunn Ha 3akPnto camo B cTpaHnTe ot EU, B OBeiHHeHTo KpAICIbTO n CeBepHa NpIaNn (n Dpyr n dIpXkABn, KOtTO CneBAt CbOTBeTHaTa dIpeKTHBa Ha EU n/nnn OBeiHHeHTo KpAICIbTO). Np6IInuHTo n3NoI3BaHe nOdJIeXn Ha o6Io pa3peWeHne ot CbOTBeTHn DaocTabYHK Ha ycnyr.
WEP 64/128, WPA, WPA2, TKIP, AES, WAPI
3a6eJexka:
DVB/IM3JIbYBaHeHaDaHHN/IPTVФуHKnnte
To3n TeIeBn3Op e npoeKtnpaH da OTroBaPna HcTaHApTnTe (KbM MapT 2021r) Ha cnppoBnTe Ha3emn yCnyr n DVB-T / T2 (MPEG2, MPEG4-AVC(H.264) n HEVC(H.265)), cnppoBnTe ka6enHn ycnyr n DVB-C (MPEG2, MPEG4-AVC(H.264) n HEVC(H.265)) n cnppoBnTe caTeNtHn ycnyr n DVB-S (MPEG2, MPEG4-AVC(H.264) n HEVC(H.265)).
KoHcyItpaIte ce c Baunn dIbnp OTHOCHO HauuHnTe DVB-T / T2 nn DVB-S ycnyr Bbb BaunpaOH.
KoHcyTnpaIte ce c Baunna Ka6eneh onepaTop oTHocHO hAnuHnTe DVB-C ycnyr 3a To3n TeJebn3Op.
To3n TeJebn3Op MoKe Da He yHKcNoHnpa npabNlHO CbC cnHaJI, KOITo He n3IbJHBA cTaNaptnte 3a DVB-T / T2 nn DVB-S.
He BCnUKN cyHKnCuN ca HauuHn, B 3aBncMoCT OT dIbpxKaBaTa, paOHa, n3JIbYBaTeJra, DocTaNka Ha ycnyr, cnbHuNTe n MpeKOBTo o6kpXKeHne.
He BCnUKN Cl MoDyIn ΦyHKuOHNpaT npaBnHoc TOni TeJeBn3Op. KoHcyTnpaIte ce c Baunia DOCTaBvNK Ha ycNt OTHOCHO HAnuHnte CI MoDyIn.
To3n TeIeBn3Op MoKe Da He yHKnOHa npabInHo C CI MoyI, KoTo He e Odo6peH ot DoCTaBvNka Ha ycIyI.
- Moxe Za Ima DoIbJIHHTeJIHn TaKcN, B 3aBNCIMOCT OTO DCtABuNKa Ha ycnyr.
CbBmectnmoctTa c 6bdeu ycnyn He e rapaHTnpaHa.
- INHTepHET npnIOXeHnaTa ce npedocTabT OT CbOTBeTHnTe mdoCTaBnIuHa ycnyn I Morat da 6bDat npomeHeH, npeKbChatn nnnpekpateHn NO BcRAKO BpeMe.
Panasonic He noema HnkaKba OTROBOPHOCT N He daBa rapaHcnn 3a HaNCHOCTTa INIHNpeKbCHATOCTTa Ha ycnyrnte.
Panasonic He rapaHTnpa pa60Ta n npo3BODnteJIHOCT Ha nepuΦepHn yCTpoIcTBa, npo3BeJeHn OT dpyrnpo3BODNTeJI; Hne OXTBpJMaMe BcKaKBa OTROBOPHOCT NII NtN, npo3TNaUO T ekCnloaTaun/ NII npo3BODNTeJIHOCT OT n3NoI3BaHeTo Ha nepuΦepHn yCTpoIcTBa Ha TaKBB npo3BODNTeJI.

(*) ByToH B rTOBHOCT
HaTnCHete 3aApbXte 6yToHa 3a roTOBHOCT, 3a Da BnNTe DOnbHnTeHN DeIcTBnA 3a To3n 6yToH. MapKnpaTte eHa OT onCnnte HynnpaHe (PecTaptnpAne), Pexm Ha roTOBHOCT (HopMaJIeH peKIM HA rOTOBHOCT) nN3KnIOUbaHe Ha 3axpanBaHETo (PInHyDnTEJenpe KEMm Ha rOTOBHOCT) nHaTnCHete OK, 3a Da N3BbPunTe N36paHOT deIcTBne. Ako BaUNrT TeNEBn3Op cnpe da OTROBAPHa KOMAHIN MeHIOTo 3a DeIcTBnH He MoKe Da ce NOKaKe, TeNEBn3OpBT Ue 6bJe npHydEn Da ce pectaptnpa, Korato 6yToHBt 6bJe HATnCHat 3a OKONo NET CekyHn.
HaTnchete 3a KpaTko n OcBo6oJeTe 6yToHa, 3a da npEeKnIouHte TeNeBn3Opa B pexHM Ha rTOBHOCT IIN Da rO BKIOUHTe, KOraTo e B pexHM Ha rTOBHOCT.
(^**) MoT 6yToH 1 & MoT 6yToH 2
Te3n6ytoHnMoraTdaHMaTfynKuINNoNopda36npaHe B 3aBncmOCTOTMOdeHa.BbnpeknTOBa Moxete Da 3adaTe CneuaHnHa yHKuNHa Te3n6yToHn, KaTo HATNCHE TBpxy T8X B npoDbNxKeHnE Ha TprceKyHn, KOrato CTe Ha JKeJAAHnI N3TOUHKn IIn npINOxKeHn. Moxete cbuoTaKa dHa nactpoTe MoT 6ytoH 1 Da cTaptnpa npINOxKeHn. Ha ekpaHa ige ce noRBN cb06ueHnE 3a NotBbpXJeHnE.Cera n36paHnT MOr7 ByTOH ce aocunpa c n36paHata fynKuN.
ImaTe npedBnD,Ye no BpeMe Ha IbpBa Hnctanaun MOrT bYToH 1&2 ue ce BbPhe KbM fynKuInTe cn no nOpa3bupaHe.
- B roTOBHOCT(*):PexKIM Ha roTOBHOCT / BkIIOUBAHe (HaTNCHETe 3a KpaTKO), HynipaHe / N3KIOUBAHe (HaTNCHETe n 3aDpBXKTe)
- HOpmaun: Oka3Ba HOpmaun 3a CbDbpKaHHeTo Ha ekpaHa, Oka3Ba CKpnta HOpmaun (pa3KpNaBe - B TEKT peKm)
- CnpaBoUHnK: Poka3Ba eJekTpoHHnCnpaBoUHnK 3a nporpaMnte
- Home (HaujIo): Noka3Ba MeHIO Ha TeVeBn3Opa
- BytoHn 3a HacoUbaHe: Nomara da Habunupate n3 MeHOTata, CbIbpXaHNTo n T.H. IN NOKa3Ba IoNCTpaHnCHTe B TeJIeTEKCT pexm, KOrato HAtnCKaTe JAcHO nn JIABO
- OK: NOTBbpxkdaBa n36opa Ha noIpe6nTeen, 3aIbpxka cTpaHncaTa (B peKm TeIeTeKCT), Noka3Ba MeHIO KaHaII (DTV peKm)
- 3xo: 3aTbapn n3n3aOT NOKa3AHTE MeHIOTa nnBpbuca KbM npeduHnEkpaH
- LBeTHN 6yToHn: CneIaBaiTe HnHCTpyKuInTe Ha ekpaHa OTHOCHO yHKUInTe Ha LBeTHIne 6yToHn
- Cnla Ha 3Byka +/-
- ɪnʌkɪnəʊbʌhaɪnʌbɪnəʊnʌkɪnʌbɪnəʊbʌhaɪnʌbɪnəʊbʌhaɪnʌbɪnəʊbʌhaɪnʌbɪnəʊbʌhaɪnʌbɪnəʊbʌhaɪnʌbɪnəʊbʌhaɪnʌbɪnəʊbʌhaɪnʌbɪnəʊbʌhaɪnʌbɪnəʊbʌhaɪnʌbɪnəʊbʌha
- UcpoBn 6yToHn: PpeBKnIOUcb KaHaJInte, BbBeJa Cnppa NIn ByKBa B TeKCTOBaTa KytNa Ha ekpaHa, BKIOUcb TeJeBn3Opa, KOrToa e B CbCToRHe Ha NOKoI.
- E3nk: IpeBknIOyBa MExdy 3ByKObI peXnIMN (AHaJorOB TeJeBn3n), NOKa3Ba n CMeHra e3NkA Ha ayDnOTo/Cy6TntPnte IN BKNIOUyBa INN IN3KNOUyBa cy6TntPnte (UnppoBA TeJeBn3n, aKe e HAnuHa)
13.ПпeнавиBaHe:ПревьрТаHa3aД KaДрИTe Ha MeДЯТа,HaNP.HaФИМ - Cton: Cnnpa Bb3npoN3BExKaHeTo Ha MeDnraTa
- Bb3 npOn3Bexdane: CtaptnpaBb3npOn3BexdAHeTo Ha n36paHaTa Meiura
- Pny3a: Cnnpa BpeMeHHo Bb3npOn3BexJaHeTo Ha MeDnraTa
- HamaФyHKnna
18.Бьрз0 HanpeI:ПпeВьрТа HанрeI KaДрИte Ha MeDЯТa,HaNP.HaФИМ - TeKCT: Ioka3Ba TeJeTeKCTa (KbDeTo e HaJIuYeH), HAITNCHeTe OTHOBO, 3a Da BINOKeNte TeJeTeKCTa B N3o6paJKeHneTO Ha Bb3IpOn3BExKaHaTa B MOMeHTa Iporpama (MnKcnpaHe)
- Pporpama +/-: Pporpama Harope-HaOny, CtpaHnua Harope-HaOny (B peXm TeneTeKCT), BKIOUcBa TeJeBu3Opa, KOraTo Toe B peXm Ha ITOBOHOCT
- Hazad/Bpuzane: Bpbza KbM npednwnna ekpan, npedniHOTo MeHIO, OTBapr INHeKCHaTa CtpaHnla (B pexm TeJeTeKCT) Bbp30 npebbpta Mexdy npednunna n Tekyunna KaHaII nnN3ToHnIu
- MoT ByToH 2 (^**)
- Netflix: Cтартура Netflix залиоженныTo
- MoT ByToH 1 (^**)
Bb30 MeHIO POKa3Ba CnncbK C MeHOTa 3a 6bp3 DOCTbI
BeneKka: To3u 6ymon MoKe da fynkuohupa kamo Moam 6ymoH 1 unu Bbp30 MeHIO e 3abucumocm om ModeJa Ha bawu meNeBu3Op u He2oume xapakmepucmu. - N3ToHMK: Ioka3Ba HaJIInuHInTe n3JIbUbaHnA n3TOUHNi Ha cBdIbPkaHne
Bp3kn
ABTomatueH peKIM c HnCKa JnteHTHOCT
Mokete cbo da aKTHBnape Ounra ALLM (ABTOMaTuHepexm C HnCKa NaTeHTHOCT) B MeHIO To HAcTpOKn>YcToPcTB.AKO Ta3n FyHKuN e aKTHBnpaHa, TeJIeBN3OpbTaBt ABTOMaTuHOp NpeBkIIOUBa
pekmaHa KaptnaB Urpa, Korato ce noJyun cnHan ot pekm ALLM ot Tekyuua HDMI n3touHK. TeJeBn3OpbT ce Bpbsa KbM npednHaTa HAcToPKa Ha pekma Ha KaptnaTa, KoraTo ce 3ary6n ALLM cnHanbT. Taka Ye Hama Da e Heo6xOdmo da npomeHte HAcToPKnte pbHQ.
Ako onueta ALLM e aKtBupaHa, pexmbl Ha Kaptna He moKe da 6bde npomeHe, Dokato ce nolyaba ALLM cHnAn ot TekyuiHDMI n3ToHnK.
3a daФyHKUOHnpaФyHKUraTALLMcBbp3HaTa HactpoKa HaHDMI n3ToCHnKa Tpr6Ba Da 6bDe 3aJaDeHa HaIOno6peHo. MoKTe Da npomEnTe Ta3n HactpoKa OT MeHIOTo N3ToCHnU> HActpoKn Ha n3ToCHnKa nIN OT MeHIO To HActpoKn> CnCTema> N3ToCHnU.
EneKtpoHNo pBkoBOdCTBO
MoKeTe Da oTKpneTe uHCTpyKuNn 3a cyHKUInTe Ha Baunr TeIeBn3Op B eIeKtpoHHOTo pkoBOcTBO.
3a da noJyHte doCTbI Do eJektpoHHOTO pkoBOcTBo, Bne3Te B MeHIO HacTpoKn, n36epete PkoBOcTBA n HaTNCHeTe OK. 3a 6bp3 DocTbn Hatnche Te 6yToHa Hauano n Cnei ToBa 6yToHa INhOpMaun.
C nOMOHTa Ha 6yToHnTe 3a nocoka n36epeTe JekHaHata TeMa n HATnCHETe OK, 3a Da npoTeTe INCTpyKUInTe. 3a da 3aTbOpHTe ekpaHa Ha eNekTPOHHn HApBuHNK, HATnCHETe 6yToHa N3xOd nn Haayano.
3a6eIekka: B 3abucumocm om modena meJeEu3Opb m Bu moKe da he noobpka ma3u fynkuur. CbobpxKaHuemo Ha eNeKmpoHomo pbkoedeCmeo moKe da ce pa3nuuaea e 3abucumocm om modena.
Позцин ha MeHTo,HaCTpoiKn"
3aKJIIOUvBaHe Ha MeHIO: Ta3n HAcTpoIka pa3peuBa
IIIN 3a6paHЯBa DoCTbNa Do BCNUKN MeHOTa INN
INHCTaJIaCNoHHM MeHOTA Ha TeJIeBn3Opa.
YnbTbaHe: Ta3n HactpoKa NO3BOJRA NJI
DeakTNbIpa DOCTbNa Do HAKON OT npINOxKeHnra
MHEG. DeakTNbIpaHnTe npINOxKeHnra Morat Da ce
aKTNbIpa Ype3 BbBExKaHa NINH KoJa.
3aKIOUbaHe 3a HENbJHOJeTHN: AKO CE BKNIOuTa3n OIunr, TeJIeBn3OpbT B3mHa INHΦOpMaunrTa 3a HENbJHOJeTHN OT nporpaMaTa n aKO Ta3n nporpama He e pa3peSeHa, He NOKa3Ba KapTuHa n 3ByK.
Bekka: Ako onuyma "Ibpxaa" no epeme Ha IbpboHaanHomo uHcmanupane e hacmpoHa ha PhaHua, Umanu unAecmpur, cmoHocmma Ha Podumenckua KOHpmo nue 6bde hacmpoHa no npda3bupahe Ha 18.
3akJIOUvBaHe 3a Deua: Ako Ta3n OOnu e HAcTpoeHa B no3nue BKJI., TeJeBn3OpbT MoKe da ce ynpabIraBa cAmO OT dNCTaHcNoHHOTo ynpabIeHne. B To3n Clyaay ynpabIraBaunTe 6yToHn Ha TeJeBn3OpbT HMa Da yHKUHOHpaT.
3aKIOUbaHe Ha HHTepHe: Ako Ta3n OOnu e HAcTpoeHa Ha BKl., yCTpoiCTBaTa, n3NoJ3BaUn HHTepHe, ige 6bDaT DeakTNBupaH. HAcTpoIe Ha N3Kl., 3a da pa3peWnte OTHOBo npInoJKeHneTo.
HactpoBbAhe Ha INH: DeOpHnpa HOB INH KOJ.
CICAM INH KOD no noDpa36upahe: Ta3n onuia ue ce noBn nocBena, aKO CI moyIbT 6bJe nbxHaT BCI cNoTa Ha TeNeBn3opa. MoKeTe da npomeHnte INH KoDa no noDpa36upahe Ha CI CAM c nomOuTa Ha Ta3n onuia.
BeneKka: INH Kodm no noda3bupahe e hacmpoeh Ha 0000 unu 1234. Ako cme hacmpouu INH KOD (uzuckea ce e 3aueucmocm om u36paHama dbpxaea) no speme Ha IbpBOHaunHO HcTAnPae, u3non3Baume bBeedeHua om bAc INH KOD. B cnuyau, ye INH Kodbm 6bde 6beedeH HenpaBunHo nem nbmu nocnedeobameHNO, 8bEeXdAHeMo HA INH ue 6bde 6lokupaHO u eeYe HMa da e eb3moxHO da ce HanpaBu HOBO 8beEeXdAne E npodbJxKeHue Ha 30 Muhymu. MoXeme obaue da de6bnokupame 8bEeXdAHeMo HA INH unu da hynpame 6pOra Ha noeMopHume onmu Ha Hyna, kamo u3KnIOUme u ekIIOUme meNeEu3opa.
HЯко onuuu Moxe da He ca Ha pa3noJoxHe 6 3a8ucumocm om Modena u/Unu u36opa Ha dbpxaea npu PpBOHaayanHTo IHCTaInpahe.
EneKtpoHeH cnpaBOuHnK Ha nporpaMnte
Upe3ФyHKnraTa 3a eNeKtpoHNO nporpamHo HacooyBaHe Ha TeJIeBn3opa MoKeTe Da nperIeDaTe rpaФnka Ha cb6nTna Ta Ha INCTaJInpaHnte NOHaCToJcEM KaHAn B CnICbKa CN C KaHAn. 3aBncn OT TOBa, daJIu Ta3nФyHKnra Ce NODbPka IJIi He.
3a da Bne3eTe B pkoBOcTBOTO 3a nporpaMn, Hatnche Te 6yToHa PkoBOcTBo Ha BaWeTo Da nCTaHUnOHo ynpaBHeHne. OCBEN TOBa moKete Ta N3NoJ3BaTe ONuYrTa PkoBOcTBo B MeHIO TeneBu3Op.
Ima 2 Iba pa3nHn Bnda rpaqHn OopMneHna, XpoHOnrnuHa rpaNka n Cera/CneBauch. 3a da npBknUoyBaTe Mekdy Te3n OOpMneHna, MapKnpaTepa3deJa C HMeTO Ha aNTepHaTNBHOTo OOpMneHne B rohpata Yact Ha ekpHa n HATNCheTe OK.
I3noJ3BaIte 6yToHITe 3a NocOka, 3a Da npemHHeTe npe3 pbKOBOdCTBOTO 3a nporpaMn. I3noJ3BaIte 6yToHa Ha3aBpBuahe, 3a Da I3noJ3BaTe OOnuInTe Ha pa3deJa B rophata Yact Ha ekpaHa.
Iporpama no BpeMe
B Ta3n OnuJra 3a OopOpMneHne BCnUKN Cb6HTnO rN36poEHNTE KaHaJI N Ie Ce NOKa3BaT NO BpeMeBaIHHra. MoKeTe Da n3NoJ3BaTe 6yToHnTe 3a Nocoka, 3a Da npemHeTe ppe3 cnncbKa cbc Cb6HTnra. MapKnpaaiTe Cb6HTne HnatNCheTe OK, 3a da ce NOKaKe MeHIO TO COnUIN 3a Cb6HTnJr.
HaTnCHTe 6byToHa Ha3aBpBuaHe, 3a Da n3noI3BaTe HahnUHnTE onuB pa3deJa. MapkpaiTe pa3deJa nTbp n HATnCHTe OK, 3a Da BnDInTe ONuNTe 3a nnTpnpaHe. 3a Da npomEnTe oOpMneHnEto MapkpaiTe Cera/cneDbauN HA TnCHTe OK. MoKeTe Da n3noI3BaTe ONuNTe PpeiWeH den N CneDbauchen, 3a Da ce nokaxat cbbTuTa 3a npeduHnue nn CpeDbaunr DeH.
MapknpaTe pa3dena EKCTPNn HATNCHEt OK, 3a da nOlyuHTe DoCTbN Do ONUNTe No-DoNy.
MapKnpaH XaHp: NOKa3Ba MeHHTO MapKnpaH XaHp. ɪn36epeTe XaHaP a N HaTnCHeTe 6yToHa OK.
Cb6ntnraT B pkoBODCTBOTO Ha nporpamata, CbOTBeTcTBaun Ha n36paHn JaHp, ige 6bDat MapKnpaHn.
PbkoBocBo 3a TbpceHe: Poka3Ba onuHnte 3a TbpceHe. KaTo n3noJ3BaTe Te3n OUcN, MoKeTe Da npereJaTe 6a3ata DaHHN C nporpaMHnte Yka3aHnB B cBOTBeTCTBnE C n36paHnte KpHTepnn. CbBnadaaHte pe3yJrTaTn Ue 6bDat n36poEHn.
Cera: Ioka3Ba TekyuTo Cb6nTne Ha MapKupaHna KaHaJ.
Ma7a6npahe: MapKnpaIte nHaTncHete OK, 3a Da BnInTe Cb6ntyTa B WnPOK BpeMeBn INHTepBaI.
Tekyua/CneBbua nporpama
B Ta3n OOnzna 3a oOopmJIeHne Ie Ce noka3BaT cAmo TeKyuIuTe N CNeDbaUInTe Cb6ntnA OT n36pOeHnTe
KaHaJI. MoKeTe Da n3nOJ3BaTe 6yToHInTe 3a Nocoka, 3a Da npemHeTe npe3 cnncbKa cbc cb6ntra.
HaTnCHete 6yToHa Ha3aI/BpBuaHe, 3a da n3noN3BaTe HaInuHnTe onuB pa3deJa. MapkpaiTe pa3deJa HnITb np HAtnCHete OK, 3a da BnDnTe OOnuNTe 3a cHnTpnpaHe. 3a da npomeHnTe oOpMneHneTo MapkpaiTe BpeMeBu cnncbk n HaTnCHete OK.
OnuHa c6bntnraTa
I3noJ3BaIte 6yTOHITe 3a NOCOKITE, 3a da MapKnpaTe Cb6HTne HATNCHETe 6yToHa OK, 3a da NOKaKeTe MeHIO OnuN 3a Cb6HTneTo. Ha pa3noJoxHeHne ca CNeiHNTE OUIN.
H36Op Ha KaHaJ: H3noJI3BaIKN Ta3n 4yHKuIa BHe MoKeTe Da IpeBKnIOUHTe Ha H36paH OT Bac KaHaJ, 3a Da ro rIeIate. PbKOBoIDCTBOTO 3a nporpaMnte Uc 6bJe 3aTBOpeHo.
IOnbHnTeJHa HhOpMaun: Noka3BaHe Ha Iopobha HOpMaun 3a n36paHOTocb6ntne. I3noJIbaIte 6yToHtE 3a nocoka Harope n HadoNy, 3a da npebpTITe TekTa.
HactpoBaHe Ha TaMep 3a Cb6ntne / N3tpnBaHe Ha TaMep 3a Cb6ntne: N36epTe onueta HactpoKa Ha TaMepa 3a Cb6ntne n HataChete OK. MoKeTe Da 3aAdTe TaMepn 3a 6bDeu Cb6ntn. Cb6ntneTo ige 6bDeIO6aBeHO KbM CNCbKa C TaMepn. 3a Da OTMeHnte Beue HacTpoEH TaMep, MapKnpaTe TOBa Cb6ntne n HataChete 6yToHa OK.CJeTOBa N36epTe N3TpNaBeHa TaMepOT OnuTa Cb6ntne.TaMepbT ige ce OTMeHN.
3a6eJeku: He moKeme da npEeKnHoyame KbM KoUmo u da e dpyz KaHaI, Dokamo Uma akmueen maUmep 3a mekyuura KaHaI.
He e 3MOxHO da 3auweme unu hacmpoume maMep 3a dee unu noee omdeHn c6umur Ha edun u cbu, unhepean om speme.
TeTeTeKCTycJyrgn
HaTnchete 6yToHa TeKCT,3a Da BnE3eTe.HaTnchete OTHOBO,3a Da aKTINBnpatc CMeceHnpeXIM, KOITo BN N03BOJRA Da rIeJaTe eNHOBpeMeHHo TEJIeTEKCT CTpaHnCATAu NTeJEBN3NOHOTnpedAbaHe. HaTnchete NOBTOPO,3a Da N3Je3eTe.AKOeHa pa3NoLoXeHne,OTdENHN CeKUIn OT TeNeTeKCT CTpaHnCHTe Ue Ca CBETHO KoDnPaHn N Ze MoRat Da ce N3bupat C HATnCKaHc Ha OcBeTeHnTe 6yToHn. CJeDbaiTe INhCTpyKUnTe, nokaahn Ha ekpaha.
Ucpob TeIeTeKCT
HaTnchete 6yToHa TeKCT, 3a Da BnDInTe HnΦopMaζηa 3a ζnΦρOBn TefeTeKCT. Pa6oTeTe C ζBETHnte 6yToH, KypCopHnTe 6yToH n 6yToHa OK. MeToDbT 3a Habnraζη MoKe Da ce pa3nUaBA B 3aBnCmOcT OT cbDbpxaHneTO Ha ζnΦρOBn TeIeTeKCT. CneBaIte NHCtpkζnTe, Noka3aHn Ha ekpaHa Ha ζnΦρOBn TeIeTeKCT. Korato 6yToHbT TeKCT 6bJe HA tncchat OTHOBO, TeJIeBn3OpbT Ce BpBzA KbM Bb3npOn3BexKaHe Ha TeJIeBn3NoHHOT npEdaBaHe.
CofTyep 3a akTyaIIHa3aIaIa
Baunr TeneBn3Op MoKe Da TbpCn N O6HOBA abTomauHcOoTyeepa Cn npe3 cnHaHa Ha CTAHUra Tnn npe3 nHTepHeT.
TbpcHe Ha akTyaHn3aunype3 noTppe6nteNcKna HnTepeic
B rIaBHOTo MeHIO n36epete HaCTpoiKn, cIeT TOBa OTnTe Do HAdCTPOiKa Ha coΦTyepa n HATNCHe 6yToHa OK. CneT OBA n36epete CkaHnpahe 3a AKTyAIN3aunu I HAInCHeTe 6yToHa OK, 3a da npOBepNTe 3a HOBn AKTyAIN3aunu Ha coΦTyepa. MoKTe Da n36epete catEnIta, KOITc CE n3NoI3Ba 3a aKTyAIN3aunrTa, HAcTPOiBaIKN ONUnrTa ,PeJaKTnPaHe Ha AKTyAIN3aunrTa 3a CATeJIInrTe". OnUnrTa 3a NaIrpaxdAne Ha coΦTyepa e HAnuHa n B MeHIO To HAcTpoiKn> CnCTema> OSe.
Ako ce OTKPne HOBa aKTyaIIN3aIa, CbUaTa 3AnOuBa da ce cBaJIa. CneI npKIIIOUBAHe Ha CBaJIaHTo, Ha ekpaHa Ie Ce NOBn PpeDynpEiTeIHO CbO6UeHHe, HATNCHE Te 6yToHa OK, 3a Da npKJIIOUHTe C aKTyaIIN3aIauTHa Ha coOpTyepaN da pectapTnpaTe TeneBn3opa.
3 AM TbpcHe n peKm Ha aKTyaJn3aun
Baunr TepeBn3Op 3a HOBn aKTuH3aunn B 3:00 yaca, ako onuTAt ABTomatNHy O cKaHnpaHe e B No3nua Pa3peSeHo n aKO TepeBn3OpbTe CbP3Ah KbM Ha3eMeH ePhipeh CnHaJ nn KbM INHTepHeT. Ako 6bJe HamepeH HOB coOfTyep n Toi 6bJe CBaJIeH ycneUHO, TOn 5e 6bJe IHCTaIIpaH npn CNeDbaUTo BEkIIOvBaHe Ha TepeBn3Opa.
3a6eJekKa: He u3KlIOUcBAuMe 3axpaHbauu Ka6en, doKamO cemoduoobm Muza no epeme Ha npoueca Ha pecmapupaHe. Ako meJeSu3OpbM He ycnee da ce BkIouu cneakmyaun3upaHe, u3KIOUcHeme 3axpaHbAHEmo, u3yakaumdeMuHymu U omHOe 6KIOUcHeme 3axpaHbAHEmo.
Bcuu ka myanuaaue ce KOHmpoIupam azmomamuhyo. Ako ce u3bpu pbuHO mpche u He ce hamepu cofmyep, moea e mekyama cepura.
OTcTpaHЯBaHe Ha Hen3npaBHOCTn & cYbETn
TeIeBn3OpbT HMa da ce BkJIIOUH
YBepete ce, ye 3axpaHbau nka6e e BkIouen npabnlo B KOHTa. Hatnche 6ytoHa ha rTOBOHOC T Ha NCTaHcNHOHOTO ynpabNeHne.
Лоба Kapтуна
- YBepete ce, Ye npaBnHcTe HacTpounI TeNeBn3opa.
HnCKOTO HnBO Ha CnHaJa MoKe Da npuHHm CmyUeHnB KApTHHaT. MoJ npOBepTe aHTEHnTe Bp3Kn. - Поверете далс Te BbBEN npabINHaTa YecToTa на KaHana, akO CTe n3BbPbBaIn pBuHa NaCTpoNka.
HЯma n3o6paxeHne
- TeneBn3OpbT He nOlyuYaBa CnHaN. YBepeTe, Ye cTe n36paNn npabNnHnT BxOd Ha n3ToUHnKa.
-Дали aHTeHaTae npaBnJHo Cbbp3aHa?
-Даи e noBpeH Ka6eJbT Ha aHTeHata?
-Даиca n3noJ3BaHn noJxOJaU nIeKePn 3a CBbp3BaHe Ha aHTehata?
Ako cIbIbpJxHHeTo e noJyEHO ype3 HDMIBXoI, ONITaIte Da npOMeHInTe HAcTpoNkaTa 3a BXODeH n3TOUHK Ha HDMI Ha NDo6peH nn PeDObEH OT OUnrTa HAcTpoKn Ha n3TOUHnKa B MeHIOTo N3TOUHNi nn OnuRtA N3TOUHnCn B MeHIOTo HAcTpoKn> CnCTema. - Ako ImaTe cBmHeHn, CbpxKeTe ce c Baun TbproBeu.
HЯma 3Byk
- Пюверете дали 3Byкьт Ha Teлевизopa He e n3KJIIOUeH. Hatnche 6yToHa Mute uIN yBelenuTe cnlaTа Ha 3Byka, 3a dI npOBepNTe.
3BykT ce YuBa cAmO OT eINHnBnCOKOrOBOpntJ. PpOBepTe HactpoKnTe Ha 6aHaHca OT MeHIO "3Byk". - PpOBepeTe DaHn Ounra Ta N3XoJ Ha 3ByKa e 3aJaDeHa npabuJHo OT MeHTo 3ByK.
- Ako cbDbpXaHHeTo e noJyHeO ype3 HDMI BxOd, onItaIe Da npomeHte HacTpOiKaTa 3a BXoDeH n3ToUHnK Ha HDMI Ha NDo6peH nIN PeDObEH OT OnuYra HAcTpOiKn Ha n3ToUHnKa B MeHIOTo n3ToUHnCn nIN OUnrTa N3ToUHnCn B MeHIOTo HAcTpOiKn> CnCTema.
HaTnucheTe WPS Ha Baunia wifi pyTeP
Ako moEmbT/pyTeBn nma WPS, moXeTe DnpeKTHo Da ce CbpxKeTe KbM Hero 6e3 Da BbbExkdaTe npOa nn PbBO Da doabAte MpeJa. MapkpaiTe onuTa "HaTncHe T WPS Ha Baunn wifi pyTe" n HaTncHeT OK. OTnDeTe Ha Baunn moE/mpyTe n HaTncHeT 6yToHa WPS Ha Hero, 3a da ocBueCTBnTe CBp3BaHe. Ie BnITe NOTBbPxKeHne Ha Bp3KaTa Ha TeNeBn3Opa, cIe KaTO yCTPOINCTBaTA ca CDBOEHN. N36epTe OK, 3a Da npOdbJnxTe. He ce n3nckBa DonblHInHe KaOHnrypaun.
Tect 3a ckopoCTTa Ha nHTepHET Bpb3kata
MapknpaTe Tect 3a ckopoCT Ha nHTepHET n HATncHeTe 6yToHa OK, 3a da npOBepTe ckopoCTTa Ha BaWata nHTepHET Bpb3Ka.
Pa3wnpeHn HacTpOKn
MapkpauTe Pa3wnpeHn HacpoKn n HaTNCheTe 6yToHa OK, 3a da OTBOpTE MeHIOTo 3a pa3wnpeHn HactpoKn. N3noN3BaIte HacoUBaun n cnpobn 6yToHn, 3a HactpoKaTa. PpoeDypata e cbuata, KaKTo e o6rCheHa 3a Ka6eHn CaBp3aHOCT. MapkpauTe 3ana3BaHe n HATNCheTe 6yToHa OK, 3a Da 3anaMeTnte HActpoKnTe, KOrato ca 3aBbPseHn.
PexmHa rTOBHOCT B Mpeka
MoxTe Da aKTHBnpuTe NIN DeaKTbNpuTe cyHKnraTa 3a MpeXOB peXIM Ha rTOBHOCT, KaTO 3aJaTeCboTBHeTo Ta3n Onu. BuxTe pa3deJa PeXIM Ha rTOBHOCT B MpeXa 3a DoNbJIHHTeJHa INOpMaucy.
Dpyra HOpmaun
CTaTycbT Ha Bpb3kata 6e 6bde NOKa3an KaTO Cbbp3aHnn He e cBbp3aHn Tekyuun IP aDpec, ako Bpb3kata e oCbIeCTBeHa. MAC aDpeCt Ha Baun TeneBn3Op cbso 9e Ce NOKaKe Ha ekpaHa.
Cbbp3BaHe KbM BaWeTo Mo6HnHo ycTpoiCTBO 4pe3 WLAN
AkoMO6nHOTOBu yctpoiCTBO nma WLAN, MoXeTe Da CbbpKTe TeIeBn3Opa Ipe3 pyTep, 3a Da NOLyHTe DOCTbN Do CbDbPkaHNTo BV yctpoiCTBO.ToBaWteTO MO6nH0 yctpoiCTBO Tp8Ba Da pa3nONara c NoDxOJau CoΦTyep 3a CnoJeIHe.
Cbpxte TeIeBn3opa cn KbM MapIpytn3aTopa cn, cJeBaNKn CTbPknte, IocOueH N B rOpHnTe pa3dJI.
CneToba,CbbpKTeBaUeToMO6nH0yCTPOINCTBO KbMpyTepaN CneTTOBAaKTNBpuAtecofTyepa3a cnOeJnHeHaMO6nHOToBn yCTPOINCTBO.CneT TOBa n36epTe paIIOBete, KOINTo 6nxTe nckan da cnOeJInte c Baunr TeJeBn3Op.
AkoBpb3katae yctaHOBeHa npabuHIO,ue IMate DoCTbI DO cnoDeHEnTe paHOBe, HnCTaHnpAH Ha BaWeTo MO6nH0 ycTpoiCTBO, Upe3 cyHKunra AVS (cnoJeHHe Ha ayDnO Bndeo) Ha BaWnTeJeBu3Op.
MapKnpaIte onuTAt AVS B MeHIO N3ToUHnIu HATNCHeTe OK, HAIuHnTe yCTpoiCTBa Ha MeiHnHa CbPbBp B MpeKaTa Ue ce nOABr. N36epTe BaWetOMo6nHNO yCTPOiCTBO u HA TNCHeTe 6yToHa OK, 3a Da npOdbJXnTe.
Ako e HauHNO, ot DoCTaBvNka Ha npINOxKeHneTo 3a BaneTo MObINHO yCTPOJcTBO MoXeTe Da n3TeIInTe npINOxKeHne 3a BuPTyAnHO dNcTaHcNoHnO ynpabJIeHne.
BeneKka: Te3u fynkuu MoKe da He ce noodbpxam om 8cuKu MO6JHn Yu cmpoucma.
06pa6oTka Ha nHΦopMaζηrTa 3a KnneHTa
Ipn n3noJ3BaHe Ha cyHKuJaTa 3a Cbbp3BaHe KbM INHTepHET Ha To3n TeJeBn3Op, CneD CbflacyBaHe c ycNoBnraHa yCnyrata / JeKnapaun 3a NOBepntenHocT Ha Panasonic (HapuHaN no-dony "O6uynycNoBn" n T.H.), INΦopMaunraTa 3a KIneHTa OTHOCHO n3noJ3BaHTo Ha TOBa YcTpoiCTBO MOKe da 6bJe Cb6paHa n n3noJ3BaHa CbflacHO ycNoBnTa n T.H.
3a noDpo6HocTn OTHOCHO yCNoBnraHa ycnyrata /deKnapaunraTa 3a NOBepnteJHoCT BnXTe [HOME]
HactpoKn > Cnctema > NOBepntennoct > HactpoKn 3a nobepntennoct.
HnHata HOpMaun Ha KIneHa MoKe da 6bde 3aHcAna Ha To3n TeBn3Op OT n3bUbaaOpraHn3aun nn DoCTabuHK Ha npINOKeHn. Ppei Da pemOHnpate, npExBpNte nIN n3XBpNTE TO3n TeBn3Op, n3TpNte cIaNaTaNOpMaun, 3aHcAna Ha To3n TeBn3Op, cbIacHo CneHnata IpOeDypa.
[HOME] INhctanaqra>NbpbBOHaayanHa INhCTaIaqra
HOpMaunTa 3a KIneHTa MoKe da 6bde Cb6paHa OT DoCTaBvNka Upe3 PnIIOXeHne, PpeIoCTaBeHo OT TpeTn Nua Ha To3n TeJeBn3Op Nn Ye6caiT. MoJr, NotBvpTe cPOKoBete n ycNoBnTa n T.H. 3a PpeDbapnteHa 3aBkA.
Panasonic He Hocn OTROBOPHOCT 3a Cb6npaHTo nn n3noJ3BaHeTO Ha INOpMaunr 3a KIneHTnte Upe3 npINOxKeHne, ppeOCTaBeHO OT TpeTa cTpaHa Ha To3N TeJIeBN3Op nn Ye6caNT.
Korato BbBexdaTe Homepa Ha KpeiHTHaTa cn KapTa, IMETO N.T.H., 06bpHete CneuJaHOB BHImaHne Ha NaExdHOCTTa Ha DOCTaBvNka.
PernctppapaHata HOpmaun MoKe da ce peHCTpnpa Ha cbpBbpa T.H. Ha doctabvnka.
Ipei Da pemontpate, npexBpIte nInn3XbPJIte To3n TeNeBu3Op, He 3a6paBraTe daN3Tpne HOpMaunrTa Cnped ycNoBnraTa n dp. Ha DoCTabuHa.
Pexmm Ha rTOBHOCT Bmpexa
PexmbT Ha roTOBHOCT B MpeXa e cTaHdapT, KOITo PO3BOJRA BaDeHO yCTPOINCTBO Da 6bJe BKIOUeHO INN Cb6ydeHO OT MpeXOBO Cbo6uEHe. Cbo6uEHnETo ce N3npaHa HA yCTPOINCTBO TO nporpMa, N3NbJIHeHa OT DnCTaHcUNHO yCTPOINCTBO, CBbp3aHO KbM CbUaTa IOKajHa MpeXa, KaKTo CmAPr TeJefoHa.
3a da akTbupaTe Ta3n fynKUy, 3daJte ONUyTA PexIM Ha rTOBHOCT B mpeXa B MeHOTo MpeXa KaTO BKn. Heo6xOdImo e DBeTe yCTpoiCTBa, OT KOnTO Ue 6bDe n3PpATEHO MPeXOBOTO CbO6UeHne KbM TeJeBn3Opa, IN TeJeBn3OpBT Da 6bDaT Cbbp3AHN KbM edHa N cbUa MPeXa. FyHKUraTa B peXIM Ha rTOBHOCT B mpeXa ce NoDlbpxa cAmo 3a yCTpoiCTBa c Android OS n MoKe da Ce n3NoJ3Ba cAmo Ype3 npInIoXeHnTa YouTube n Netflix.
3a da n3noJ3BaTe Ta3n Функця, TeJIeBn3OpbT nДиCTaHcNoHHOTO yCTpoIcTBo Tp6Ba Da ca CBbp3aHINoHe BeHbJ, DOKaTO TeJIeBn3OpbT e 6nI BKNIOUyeH.
Ako TeJebu3OpbTe n3KlnoueH, Bpb3KaTa Tpr6Ba Da ce Bb3CTaHOBn npc CneDbaUTo BKIOUvaHe. B npOTuBeH CnyaH cyHKunra Hma Da e aKTNBHa. ToBa He BaKn, Ako TeJebu3OpbTe BpeXIM Ha rTOBBOCT.
Ako nckate TeneBn3OpbT Bn Da KOHCympa NoMaJIKO eHepnB PexkM Ha rotOBHOCT, MoKTe daDeakTNbupate Ta3n cyHKUra, KaTO 3aJaTe OIcNtA PeXm HA rotOBHOCT B MpeKa KATO N3Kn.
Be3xuueH ducnne
БeЗкчнят дисплей e стандгт 3a ctrpinMHr Ha Bndeo n aydno cbдржанeto. Ta3n no3BOJRAu N3NoI3BaHepTo Ha TeNeBu3Opa n KaTO 6e3KUyeH dncnpei.
YnOtnpe6a c Mo6uInH yCtpoiCTBa
CbueCTByBaT pa3nHn CTaHdapTN, KOITO n03BOJRAB CnoJeIHe Ha ekpaHn, BKNIOHTeNHO Ha rpaΦuHOb, BVdeo n ayDnO cbDbpxKaHne Mekdy BaUeTo moBnHo yCTPOIcTBOn TEJIeBu3Opa.
Пьрв Вкючete 6e3хичня USB ппемнв TeNeBn3opa,ako TeNeBn3OpbT He pa3noIarac BbTpewHa WLANФункци.
HaTnchete 6yToHa Source Ha nctaHcNoHHOTn npBknOHTe KbM Wireless Display source.
IOnBraCeekpaH,KOITOnNOKa3Ba,YeTeJIeBN3OpbTe roTOB 3a Bpb3ka.
OTBopTe npJIOXeHHeTo 3a CNoDeJIHe Ha MO6NJHOTo Bn yCTpoIcTBo. Te3n npJIOXeHn HocrTaP3NHyHO HanMeHOBaHne 3a BCra Ka MapKa, 3a NpOpaHa INΦOpMaUaBnKTe pKOBODCTBOTO 3a EKCnNoaTauaHa BaWeTo MO6NJHo yCTpoIcTBo.
TbpcTe yctpoiCTBa.CneI KaTo n36epTe Baunr TeJeBn3Op I ro cBbpxKeTe,ekpaHbT Ha BaWeTo yctpoiCTBO ige ce nOKaKe Ha TeJeBn3Opa.
BeneKa: Ta3u fynkuu MoKe da ce u3noJ3Ba cAmo, aKo Mo6unHomo ycmpoUcMo cbuo naodbpxa. Ako umame npoblemuCepb3kama, npoepeMe daNu eepcuMa ha onepauOnHama cucmema, kOmo u3non3eame, noDbpxa ma3u fynkuu. MoKe da um npoblemuC bC cBeMecmumocmma Ha cepcuume Ha onepauOnHama cucmema, koumo ca nychamu cned npou3bOcmeoHa mo3u meNeBu3Op. Ipouecume Ha cKaHupaHe u c6bp3BaHe ce pa3nUaBam 3abucUMocm om npoapamama, kOmo u3non3eame.
OTCTpaHЯBaHe Ha HEN3npaBHOCTn, CBbp3aHn CbC CBbp3BaHTo
Be3KnUHaTa MpeKa He e HaJIuHa
- YBepete ce, Ye 3aunTHnte cTeHn Ha BaWata mpeka, no3BOJRAbT 6e3KUnHa Bpb3Ka KbM TeJeBu3Opa.
- OntaTe OTHObTbpcHe Ha 6e3KuHm MpeKn, n3NoJ3BaKn ekpaHa Ha MeHIOTo MpeKa.
Ako 6e3KnUHaTa MpeKa He cyHKuOHnpa npaBnH0, onntaTe da n3no3BaTe ka6enHaTa MpeKa B doma BN. BxTe pa3deJa XnHo CBp3BaHe 3a nobuey INΦopMaunr OTHOCHO pOceca.
Ako TeIeBn3OpbT He cyHKuOHnpa c Ka6enHaTa Bpb3Ka, npOBepTe MoDema (pyTepa). Ako MapwpyTu3aToPbT He e npo6Jem, npOBepTe INTEpHET Bpb3kata Ha Baunr moDem.
Cbbp3BaHeTo e6aBHO
BnKTe KnHrata C nHcTpkyuHa Baunia 6e3KuueH MoDEM, 3a Da nOlyuHte NOpOpMaunia 3a BbTpeShHaTa 3oHa Ha o6CnyXbaHe, cKOpocTtHa BaPb3KaTa, KaueCTBOTO Ha cnHana I npTu HacTpoKn. Tp6Ba Da imate BnCOKOcKOpocTHa Bp3Ka 3a BaUnia MoDEM.
Hapyuene no BpeMe Ha Bb3npoN3BekdaHe nn 6abn peakun
Mоже до опntaTe следноTo,В тakв слуан:
CbXpaHbAaTe Ha-NMaJIKO TpN MeTppa pa3CToHne OT MmKPOBbJHOBn NeuKN, Mo6NJHn TeJeΦoHN, Bluetooth ycTpoiCTBa nIN dpyr WLAN cbBMecTmN ycTpoiCTBa. OntaIte Da npomeHnte AKTNBHn KaHaJ Na WLAN pyTeP.
He e haIuHa nHTepHET Bpb3ka / CnoJeIaHe Ha aydno BVdeo faiNoBe He yHKUOHnpa
Ako MAC aDpeca (yHnKaIeH nDeHTuΦnKaTOp, Homep) Ha Baun KOMnIObTp npnn MoEm e NoCToHHa pernctpaun, To e Bb3MoXHo, Ye Baunr TJeBn3Op He moKe Da ce CbPke C nHTepHe. B TaKb CnyaH, MAC aDpec Ce 3aBepBaT BCEKn NbT, Korato ce CbPkeTe KbM nHTepHe. Toba e npednaHa mRpka cpeuy Heotopn3npan Doctbn. Tb KaTo Baunr TJeBn3Op Ima CBOA co6cTBeH MAC aDpec, Baunr nHTepHe DOCTabvnk He moKe Da npobepn MAC aDpeca Ha Baunr TeJebn3Op. Iopadn Ta3n npuHn, Baunr TJeBn3Op He moKe Da ce CbPke C nHTepHe
Cbpxte ce c Baunia doctaBukn Ha INHTepHcnyn n da noncka HOpMaun 3a TOBa KaK da ce Cbpxe c npyro yctpoicTBO, kaTO hAnpImep Baunr TeneBn3Op, INHTepHET.
Bb3MOxHo e cbso, Ye Bpb3KaTa He MoKe da 6bJe Ha pa3NoToXeHne npaDn npo6IeMn 3aunTHa CTeHa. Ako cMaTate, Ye TOBa npuHra Ba npo6IeMa BN, CBpKTe Ce C Ba7nA DoCTaBvNK Ha nHTepHET yCJyN. FauByoJbT MoKe Da e npuHata 3a npo6IeMa CbC CBp3aHOCTTa N OTKpNBaHeTO Ha dpyrN yCTpoiCTBa, DOKATO n3noJ3BaTe TeJIeBn3opa B pexm CnoJeJHe Ha aydno N BInDeO faiNoBe nn KOrato pa3FnxJaTe faiNoBeTe qpe3 Ta3n FyHKU.
HenpaBnEn domeH
YBepTe ce, ye Buee Cte BnE3JN B CnCTemata Ha Baunia KOMNIObP c OTOpN3npaHO nOTpe6nteJIcko Ime / napona, a cbIo Taka ce yBepTe, ye Bauniat DomeH e AKTINBEH, npEn Da cnOJeIne Te paInObe Upe3 BaWATA nporpama 3a MeDHeh CbpBbP ha Baunia KOMNIObP. Ako DomeiHbT e HeBaJIndE, TOBa MoKe Da npEn3BnKa npo6IeMn, DOkato pa3rJexKdAte PaInOBe B pexIM Ha cnOeJIne Hc ayDINO BVideo.
N3noJ3BaHe Ha MpeXkoBata ycnyra 3a cnOdeJHHe Ha ayDnO BnDeo fainobe
Функцята 3a aydno Bndeo cnoJeIHe n3noI3Ba CTaHapT, KOITO obLeKyaba npoueca Ha IJIeDahe Ha UΦpOBaTa eNEKtpOHka n rN npabN no-yDObHn 3a N3NoI3BaHe B DOMaUHa MpeKa.
To3n cTaNdapt Bn no3BOLJBA da npereJexdaTe n Bb3npoN3BExdaTe cHIMKn, My3nka N BuDeO3aIncn, CbxpaHraBaHn Ha MeiHnna CbPbP, CbP3aH KbM BaWata DomaSha MpeXa.
1.ИнсталupaHeHa codTyepaHa cbpBbpa
ФункцяТа Aудно/Bид�о споделян He може Да ce n3noJ3Ba, akO cbpBbPHaTа nporpaMa He e nHCTaIInpaHa Ha BaWnKOMNtbp NIn aKO Heo6XODIMncofTyep Ha MeDnHnCbPbP He e nHCTaIInpaHa nPnPdpyKaBaUTo ycTpoIcTBo. ПОДROTBeTe KOMNtbpa Cn C NOxOJaA cBpBbPHa nporpama.
2. Cbbp3BaHe KbM Ka6eHa HnN 6e3XnUHa MPexa
BnxTe pa3deneIte 3a Ka6eHnHa/6e3KnUHa Bpb3ka 3a noDpo6Ha INΦopMaunra 3a KOHΦnHypaunraTa.
3. AkTbBpaHe Ha cNoJeJHHeTo Ha aydno n BnDeo paINoBe
Bne3Te B MeHIOTo HAcTpoiKN>YcTpoiCTBa n aKTUBpaIte onueta CnoJeJHe Ha aydno N BnDeo.
4. Bb3npo3Bexdahe Ha cnopeHn paJnoBe npe3 mednHn 6pay3bp
MapknpaTe onuTa AVS B MeHIO N3ToHnU, n3no13BaTe 6yToHnte 3a NoCoka H aTncHeTe OK. Ue 6bDat n36poEHn HaNHyTE MeDnHH CbpBbpHn
yctpoicBa B MPexkata. 36epete eINH nHaTnCHeTe OK, 3a da npodbJnxKe. Ie ce noaBn MeiHnrt 6pay3bp.
BnK pa3dela 3a MeHIO MedneH 6pay3bp 3a DOnbHnTeJHa HOpMaunr OTHOCHO Bb3npoN3BExJaHe Ha paJna.
Ako ce noaBn npo6nem C mpekata, n3KnHouTe TeJeBn3opa OT KOHTaKTA N FO BKIOUeTe 6paTHO.
PC / HDD / Medienen pIeBp nII npIpyn ycTpoNCTBa, KOINTO ca cbbMeCTIMN, Tp6Ba Da ce n3NoJ3Bat C Ka6eHb Bpb3Ka 3a No-BucOKo KaueCTBO Ha Bb3npOn3BExJaHe.
I3noJI3BaIe LAN BpB3ka 3a no-6bp3o cnoJeIHe Ha
paJIOBE MEXy dpyu yCTPOIcTBA KaTO KOMHOTpn.
Benekka: Moke da uma komnompu, Koumo He mozam da u3non36am fynkujma Cnodenhe Ha ayduo eudeo fauiose e pe3yimam Ha hacmpouku Ha admuhucmpamopa u hacmpoukume 3a cuayphocm (Hanpumep 6u3hec komnompu).
PpnoKeHn
MoKTe Da nOlyuYInTe DoCTbN Do npINoXeHnraTa, HcTaNpAHH Ha Baunr TeNeBn3Op OT MeHIO Hauano.. HaTNCHeTe 6yToHa HauaNo Ha DnCTaHcUOnHnOTo, Ice ce NOKae MEHOTo HauaNo. MapKnpaTe npINoXeHne HATNCHeTe OK, 3a Da cTapTnpaTe.
3a Da ynpabJbBaTe npINOxKeHnTa, HnCTaInpaHn Ha Baunr TeJIeBn3Op, MoKTe Da n3NoJ3BaTe OUnraTc OSe npINOxKeHnBa MeHIOTo Ha TeJIeBn3Opa. MoKTe Da IOnBaNte INCTaInpaHO npINOxKeHne B NaJHOTo MeHIO, Da rO CTapTnPaTe NIn IpemaxHete. MapKnpaTBe npINOxKeHne HHaTncHeTe OK, 3a Da BNITe BCNUKN HAnuHN ONUIN.
MoxTe Da do6abTte HOBn npINOxKeHna OT MaRa3Ha 3a npINOxKeHna. 3a DoCTbN DO MaRa3Ha MapKnpaIte OunraTa Market B MeHIO To Ha TeJeBnOpa N HATNCHeTc OK. Ie ce nokaxat hAnuHIne npINOxKeHna. MoXTe CbIo Taka Da nOlyuHtE DoCTbN DO Na3apa OT MeHIOTo OSe npINOxKeHna.
Moxete da Bb3ctahOBITE HactpoKITE CNB HauaHHTO MeHIO, BKJIouHTeJIHO CBbp3aHNTe C npINOxKeHHeTO, NO NODpa36bnpaHe, KATO n3NOJ3BaTe onuTata Reset Apps B MeHTo HA TeJIeBn3opa (HaIINuHocCTTa 3aBNCn OT MOdeJa HA TeJIeBn3opa n HerOBtpe FyHKcun).MapKpaIte Ta3n ONUa n HaTCHETe OK. 1e ce noRbN ekpan Ce NOBBA cbOSeHne 3a NotBbPjXdHne. MapKpaIte DA n HaTCHETe OK, 3a Da npoDbJnxITE. O6bpHeTe BHIMaHne, Ye Hama da MoXeTe Da n3BbpJnte Ta3n ONepaIGN OTHOBO B pAMKITE Ha CNEiBaUHTe HAKONKO MNHyTN.
3a6eJexKu:
EeHmyaHomo npuna2aHe 3aeucu npo6nmu Mozam da bdam npuunenu om docmaueka Ha cbobpxaHue, ycnyu.
Hmephem ycnyume Ha mpemu cmpaHu Mozam da ce npomeharn, da ce npekpanu ulu opaHuyam no 6cko epeme.
INHTepHeT 6pay3bp
3a Da n3no3BaTe nHTepHET 6pay3bpa, nbpBO Bne3Te B MeHIO Hauano CneI TOBa cTaptnpaTe npINOKeHnETo Ha nHTepHET 6pay3bpa, KOeTO mA opAHKeBO Ioro Cbc CmB0J Ha 3emrTa.
Ha npbohaunnaekpaH a 6pay3bpa,CHIMKNTe Ha npedBapntelno 3aadaenite (ako nma TaKNBa) IINHKOBe KbM hAnuHn y6caNT,ue ce nOKaKat KaTO ONU HbP3o H6npaHe,3aeDHO C ONUHTe PedaTnpaHe Ha 6bp3OTo H6npaHe N Do6abRHe KbM 6bp3O Ha6npaHe.
3a da ynpabnbaTe ye6 6pay3bpa, n3non3BaIte 6ytoHnte cbc CTpeJKN OT dNCTaHcUNHOHOTO ynpabJIeHne nn CBbp3HaT MaUka. 3a da BnDInTe IeHTata COnuHa 6pay3bpa, IpemecTe Te Kypcopa B rohpata YacT Ha cTpaHuaTa. OnuNTe NctOpna, PaKn IOtMeTKn IeHTata Ha 6pay3bpa, KOrTO cbDbpKa 6yToHnte previous/next, 6yToHbT refresh, aDpeChata NeHTa/NeHTata 3a TbpcHe, 6yToHnte Speed Dial Vewd ca HauHH.
3a da do6abnte xeJeaHata cTpaHnca KbM cnncbka Bbp3o HabnpaHe 3a 6bp3 Doctbn, PpeMeceTe Kypcopa B rohpata qact Ha cTpaHncaTa. Ue ce IONBn IENTATA Ha 6pay3bpa. MapKnpaTe 6byToHa
Бьр30 n36иpaHnHaTnCHTe OK.CneTToBa n36epeTe onuYa Do6abRhe KbM 6bp3o H6npaHnHaTnCHTe 6yTOHa OK. NOnbNHeTe npa3HnTE MeCTa 3a IMe nAdesc,MapKpauTe OK nHaTnCHTe 6yTOHa OK,3a DaNo6abNTe.DOKATO CTHe HA CTPaHnCtAtniNCKate Da No6abNTe KbMCnncbKa Bp3o Ha6npaHnMapKpauTe 6yTOHa Vewd nHaTnCHTe OK.CJeT OToBA MapKpauTe OnuYa D6abRHe KbM 6bp3o Ha6npaHnHaTnCHTe 6yTOHa OK.PonetataIMe n Adpec ige Ce NOnbJnHT abTomatnHo CnopeD caHTa, KOHTO NoceUbaTe. MapKpauTe OK n HaTnCHTe 6yTOHa OK,3a DaNo6abNTe.
OcBeH ToBa MoXeTe Da n3nOJ3BaTe OUcNITE OT MeHIO Vewd, 3a Da ynpabIbAte 6pay3bpa. MapKnpaIte 6yToHa Vewd n HaTncHete OK, 3a Da BnCITe CneuΦnkata Ha HAnuHaTa CTpaHnua n ObuNTe ONUIN.
CbueCTByBat pa3nHn HauHH da TbpCnte n noceaaBate ye6 caTObe c nomoTa ha ye6 6pay3bpa.
BbBeTe aDpeca Ha ye6 caIa (URL) BJeHTaTa 3a TbpceHe/aDpeChata NeHTa N MapKnpaTe 6yToHa Submit OT BnPTyaJHATA KnaBnAtypa N HATNCHeTe 6yToHa OK, 3a Da NoCetNTe CtpaHnUata.
BbBeTe KNoOBA(n) Dyma(n) B NeHTaTa 3a TbpceHe/aDpeChata JeHt a N MapKnpaIte 6yToHa Submit OT BnPTyaJHaTaNlaBnaTpy N HaTNCHeTe 6yToHa OK, 3a Da IocETnte CtpaHnUata.
MapknpaTe MNHaTOpata 3a 6bp3o Ha6npaHe n HATNChe 6yToHa OK, 3a Da Nocetnte cBOTBeTHna ye6caNT.
TeJEBN3OpBT Bn e CbBMeCTHM c USB MUska. CbpxKeTe BaWata MUska Nn aDAnTep 3a MUska KbM USB BXOHa Ha BaWNr TeJEBN3Op 3a no-do6pa n 6bp3a HABURAua.
HЯкоубстраици BKЛIOUВаTФлаш cblbpkaHne. Te He ce noДьржТOT 6pay3bpa.
Baunr TeIeBn3Op He noDbPka npoecn Ha n3TerJnHe OT nHTepHET npe3 ye6 6pay3bpa.
Bb3MOxHo e He BCnUKN HHTepHET CtpaHnCn Da ce noDbpxkat. Cnopei cTpaHnCATA MoKe da Ce nOBn npo6Jem Cbc CbDbPkaHNeto. Pnp HAKO 6cToTeNCTBa BnDeOcBDbPxAHNeTO MoKe da He 6bJe Bb3pOn3BeDeHO.
HBBTV cncTeMa
HbbTV (Hybrid Broadcast Broadband TV) e HOB INdyctpnajen cTahdapt, KoITo 6e3npo6JemHo KOMbHnupa TeJeBn3NoHn ycnyr, npedocTabaHn Upe3 npedabahe C ycnyr, npedocTabaHn Upe3 WnpOKoJIeHTOBA Bpb3Ka n DaBa Bb3MOxHocCT 3a DoCTbN DO nHTepHET ycnyr 3a NOTpe6nteJIte, N3NOJ3BaUcNBp3AHn TJeBn3Opu n DeKOJepn. YcnyrTe, npedocTabaHn Upe3 HbbTV BkIouCbat TpaIuCIOHHTE KaHaII 3a TJeBn3NoHn npedabAHn, HOBINHapCKyTu, BVdeO no nopbUka, eNEKTPOHeH nporpamEn cnpaBOUHk, INTEpaKTHBHa peKlama, nepcoHaII3aun, ynpaxHBAhe Ha npabOTO Ha INaC, Irpn, CoUaNHN MpeXn I dpyrM MyTImeDeHH npINOKeHH.
HbbTV npinnoxehnra ta haJIuHn 3a KaHaII, KbTeTo ce CnIHann3npat OT TeNEBn3IOHnra OepaTop. OepaTopbT MapKnpa eIHO npinnoxehne KaTO "ABTomATnueh CTapT" n TO CTapTnpa ABTomATnUHO. NpInu npinnoxehneTo ce CTapTnpa ABTomATnUHO ot IKOHATA Ha MaIKnA YepBEN 6yTOH 3a yBeDOMBAHe Ha Notpe6nten, ye To3n KaHn IMA HbbTV npinnoxehne. Hatnche TepBEN 6yTOH, 3a Da OTBOpNTe cPnIOXeHNeto. Cled Kato Ce IONBn CTpaHnCATA, Bne MoKeTe Da CE BbpHeTe KbM nbPBOHaunHTo NOIOxehne Ha IKOHATA C cepBEN HA ToH KAto HATNCHE TOBTOPHO YepBENs 6yTOH. Bne MoKeTe Da PpeBKnIOvBaTe MExdy peKIMa Ha IKOHATA Ha YepBENs 6yTOH n PexkMa IOTpe6nteNcKn INTEpEeC pEe3 HATnCKaHe Ha YepBENs 6yTOH. Tp6Ba Da ce OTBeJEnK, ye cnocobHocTTa 3a npEKBJIIOvBaHe Ha YepBENs 6yTOH e OcnrypeHa OT npinnoxehnTo n HAKoN npinnoxehnra MORa Ta da Ce DbpKxat no pa3NIueH NaHH (dpyr nCBETHn 6yTOH KATO 3eJIeHO, XbIto, CINbO, MORa Da 6bDat DeΦmHpaHn 3a HApON dpyr fynHKuNN, HAnp. KpaTbK nBt).
Ako npBkIIOHTe Ha dpYr KaHaJ,doKaTo e aKTHBHO HbbTV npINOxHeHne (nIn B pexm Ha IKoHaTa Ha cepBeHHa 6yToH nIn B pexm IOpTeJIckn INTEPpeic),MOKe Da ce Cnyu CJeIHOto.
- PpIIOXeHneTo MoKe Da npOdbJnx Da pa6oTn.
-
Ппложенeto може за бъдп р配电саTo.
-
Ппложенeto може да ьдe пекьсано и OTчервеня 6утон дa ce nuche HOBO пложени с abTomatун стapT.
HbbTV no3B0JBA npIIOXeHnra Ta da ce Bb3CTaHOBBaT OT uNpOKoJIeHTOBaTa Bp3Ka nINOT n3NbUbaHeTo. OnepatOpT MoKe Da n36pe Dbata nn CaMo eDInHnauH. Ako PnAToPOMaTa Hma pa6Oteua uNpOKoJIeHTOBa Bp3Ka, TЯ MOnke cMoAo da CTapTnpIIOXeHnra, pPeDaBaHN Upe3 n3NbUbaHe.
PpInOKeHnra Tc ABToMaTHueH CTapT, 3aDeiCTBaHn C chepBHeHs 6yToH, 6bIKHOBeHo IpeIOCTABrT IpeIpaTK KbM dpyr npInOKeHn. IotpeBnteIrT MoKe Da npEbkNIOUH Ha dpyro npInOKeHne Upe3 npEnpTaKNTe. PpInOKeHnra Tp8Ba Da IpeIOCTABrT HauH da 6bDat cnpaHn, 6bIKHOBeHo Upe3 HaTuCKaHe Ha 6yToHa N3XoJ.
HbbTV npnIOxKeHHaTe ce ynpabBnBaT ot 6yToHnTe Ha nCTaHcNoHHoTo ynpaBHeHne. Korato e cTapTupHo HbbTV npnIOxKeHne, ynpabHeHneTo Ha hKOn 6yToHn CTaba OT npnIOxKeHHeTo. HanpImep n36OpbT Ha cnΦpOB KaHaI MOKe Da e HeBb3MOXeH B TeJTeKT npnIOxKeHne, KbDeTo cNΦpHTe INDnKnpat TeJTeKT CTPaHnCi.
HbbTV n3nCKBa AV ctpnIMnHr Bb3MOxHOCTn 3a nnatopMaTa. IMa MHO rnpINOKeHn, npednaAun VOD (Bndeo no nopBuKa) n HOBNAPCK TeJeBn3NOHHn ycnyr. NOTpe6nteT MoKe Da n3noI3Ba 6yToHnte Ha dNCTaHcNoHHOT OynpaBHeHne 3a Bb3POn3BeKdAHe, cnIPAhe, HAnpei Ha3aI, 3a da ynpabJIraBa AV ycnyrata.
Ako Tp86Ba Da npomeHnte HactpoKnte 3a aydno OncacHne Ha Baunr TeJeBn3Op, Tpr6Ba Da ro HanpaBNTe npedn Da 3anoHe Bb3npOn3BeXdaHeTo Ha HbbTV. Hma Da nMaTe DocTbn Do CBbp3aHn HactpoKn no BpeMe Ha Bb3npOn3BeXdaHe. OTndete B MeHIO To HactpoKn> CnCTema> DocTbNHOCT> AyINO OncacHne N KopuRupaTe cNopeD BaWnte Hyxdi.
3a6eKka: Moxeme da akmuepame uu deakmuupame m3u fynkuu om meHIO „Dpyu" e MeHIO HAcmpouku>Cucmema. B 3abucumocm om modena ha meeneu3opa u u3paHama om Bac onu3a nbpeoHaayna HcmaJupane, ma3u fynkuu moKe da e Hauue e MeHOMO Hacmpouku> Cucmema> LnuHu hacmpouku emecmo e MeHIMO Hacmpouku>Cucmema> DonbIhumeiHu.
Alexa e rotoBa
Alexa e rnaocobata ycnyra Ha Amazon, 6a3npaHa Ha oblaunte, Ha pa3nojoxeHne Ha Mhoro anapatn C rnaocO BO ynpablenHe. Ype3 BrpaedHATA yHKuia Alexa n pa6oTu c Alexa moKeTe Da u3noJ3BaTe TeNEBn3opa cn KaTo ycTpoiCTBO 3a Alexa n da ynpabJbBaTe yHKunTe Ha Baunr TeJEbn3Op c Alexa..
Alexa BrpaedeHaФyHKnIa
Moxete da n3noJ3BaTe TeJIeBn3Opa cn KaTo Al exa yCTpoiCTBO. 3a Da HAnpabITE TOBa, ue Bn e Heo6xoDIma MmKPOΦOHHa KyTna (*). CLeI cBbp3BaHe
Ha MInKpofoHHaTa KytTn KbM TeJIeBn3Opa IpouecbT Ha HAcTpOka Tp6Ba Da npNKIOuH. HAcTpOkaT MoKe Da ce N3BbpNn No HauHnHTe, ONncAHN NO-dOny.
(*) Mukpofohama kymu moke da 6bde 3akyneha omdenho, ako he ce docma8c meJeBuzopa. 3a noeue uhopmaue ce c6bpkeme C Bawu mecmen ducmpup6ymop unu mbp0eubm, om kozomo cme 3akynu mu neEuzopa.
CbpxKeTe Baata KaTna 3a MnkpooH KbM Baunr TeJebn3Op
- N3noJ3BaIte BrpaIeHaTa onuHa Alexa B MeHIOTo HAcTpoKn> CnCTema> ΓJaCOB acNCTeHT
- HanpaBete nbpBaTaNHCTaNaunHa Baunr TeIeBn3Op.CbBETNkBT 3a HAcTpOJa ige ce nokaxe cNei npNKNoUbaHe Ha IHCTaNauOHnna Ipouec
CbBETNkbl 3a nHCTaIInpaHe ige Bn BOI no BpeMe Ha npouceca Ha HacTpoJa. 3a noDpo6Ha HHOpMaunr BnXTe pbKOBOcTBOTo 3a Ntpe6nteHa MKNpOoHHata Kytnia.
Haçaπeн ekpaH ha Alexa
CJIeI KaTo HAcTpoiKaTa npKIOUCh, fYHKcIyTA 3a NaHauJIe HekpAH HaAlexa ige 6bJe nHTerPnpaHa. Ta3n fynKcIy e OKoJIeH ekpaH, KOITc ce NOBRA, KOrato He ce OTKpHe aKTHBHOCT Ha nOTpe6nteJHa NaHauJIHHa ekpaH HaAlexa ige ce noka3BaT fOHOBO n3OpaXeHne, INΦOpMauN 3a Yac N daTa I npEINOKeHn 3a rIacOBu KOMaHdN.
MoxTe Da n3noJ3BaTe onuTata haUaJIeH ekpaH Ha Alexa B MeHIOTo HAcTPOKn> CnCTema> ΓIacOB acNCTeHT> BrpaDeHa Alexa, 3a Da KOHcHypnpaTe HAcTPOkNTe Ha Ta3n fynKcua. MoXeTe Da 3aJaTe eINH OT nepNoITe Ha HeAKTUBHOCT, 3a Da ro AKTNBpATE, INI Da N3KNIOHTe, 3a Da DeAKTUBpATE.
HaayaJIHnIeKpaH HaAlexa Ce NOKa3Ba cMo KOraTo pa6oTn ye6 6pay3bp nnn dpyro npinloXeHne 3a BnDeO No 3aBbKa, C n3KnUoyeHne Ha NetfliX. IOnBaCe, KOrato He e OTkPnTa aKTNBHOCT Ha Notpe6nteJr NO BpeMe Ha npEdBapuTeNHO 3aJaDeHnepNoD Ha 6e3dEiCTBHe, OCBEN Ako He e B XOD Bb3npOn3BExJaHe Ha MeDInr. JIeDaHTo Ha QnIM HAnpImep He ce ChNTa 3a 6e3dEiCTBHe Ha Notpe6nteJr.
Moxete da HaTnCHete 6yToHnte 3a DnCTaHcNoHNO ynpabIeHne, 3a Da n3ye3He. KaTo n3KJIIOUeHne MOxete Da n3NoI3BaTe 6yToHnte 3a Cnla Ha 3Byka +/- 3a Da KOHTpOIIpaTe HIBOTO Ha CnIaTa Ha 3Byka, DOpN KOraTO pa6OTn HauaJIHHrE kpaH Ha Alexa.
Pa60Tu c Alexa
Mokete da KOHTPOINPATE cyHKcHnTe Ha BaWnA TeJIeBn3Op c Alexa. 3a Da HAnpabnte ToBa, npoecbT ha HacTpoIka Tpr6Ba da 6bDe 3aBbPWeH. HAcTpoIkata MoKe da ce n3BbPun No HauHnTe, onncAHn NO-dOJy.
- ɪnʒənɪzBænɪte onɪzɪrta Pa6oɪn c Alexa B MeHIO HactpɔŋkN> CncTeMa > Γλacob acncteHT
HanpaBte npbBaTn HcTaIaIaIHa BaIy TeIeBn3Op.CbBeTHNKbT 3a HacTpOJa Ie Ce nokaxe CneI npKIOUbaHe Ha IHCTaJIaIauHOHHn npoec
Ppoec Ha HacTpoKa
CbBETNkBt 3a nHCTaJIpaHe ige Bn BOJn no BpeMe Ha npOeca Ha HAcTPOJa.
Ako n3BbPwnte nbpBaTa NHCTaJaunna Ha Baunra TeJeBn3Op, cIeJ 3aBbPWBaHe Ha IHCTaJaUNHOHnna Ipouec ue ce NOKaxe CbBETNKnBT 3a HAcTPOJaHa Alexa.Ha NbpBnra ekpan MapKpaaiTe OOnyra Ta HayeTe NOBeue n HAtncheTe OK. Ha cIeDaunna ekpan ue 6bDeTe INΦopMnpaHn 3a φyHKnYta. MapKpaaiTe CTapt n HAtncheTe OK, 3a da npoDbJIknte.
Ako nponycheTe cBBeTHnka 3a HacTpoiKa CJIeI NBpBaTa INcTanaun, MoKeTe Da n3NoN3BaTe onuYra Works With Alexa B MeHTo HAcTpoiKni>CncTeMa > ΓlacOB acnCTeHT 3a Da n3BbPwnte HacTpoiKaTa NO-KbCHO pBuHO. Ha nbpBnE kpan ue 6bDeTe INHΦOpMnpAHn 3a ΦyHKnIyTa. MapKnpaIte CtapT n HATNCheTe OK, 3a Da npOdbJXnTe.
- Μe ce c63daJe KoJ 3a yOocTObepraBaHe n Ze ce nokaxe Ha ekpaHa. N3noJ3BaIte CBOr KOMnIObpr HInn dpyro yCTpoiCTBO C DoCTbn DO INTEpHET, 3a Da OTnDETe Do INTEpHET aDpeca (URL), noka3aHa ekpaHa. Ze 6bDeTe HacOeyH NkM CTpaHnUa, KbDeTo MOKeTe PpBO Da BJIe3eTe B akayHTa CNB Amazon, aKo Beue He cTe Bne3nn. CNeI ToBa Ze 6bDeTe HACOeyH KBM CTpaHnUa, KbDeTo MOKeTe Da BbBeDeTe KOJa 3a yOocTObepraBaHe, KOITo BnKdAte Ha TeJIeBN3Opa, n Da CBbpKeTe TEJIeBN3Opa CN KbM Baunr akayHT B Amazon.
Ako npocecbt Ha cBbP3BaHe e 6bn ycneweH,ue 6bnde TOMOJIe Hn Da ONpeJeIte Ime 3a BaIIra TeJEBN3Op, Hapehen ,Friendly Name" (FN).. "IpnaTeNcKO IMe" e IMe, KoETo Bn HAnOMHra 3a TeJEBN3Op BA, KaTO "TeJEBN3Op B DHeBHa CTAra", "KxHra C TeJEBN3Op", "TeJEBN3Op B Tpane3apnraTa" nT.H. N3bpaaiTe IecHOIOCTbIHO Ime. Ie KaKeTe TOBa Ime, 3a Da KaKeTe Ha Alexa Koi TeJEBN3Op da KOHTpOIInpa. Korato cTe rOTOBn, MapKnpaaiTe OK n HAtnchete OK.
-Примети 3a n3noJ3BaHeTo Ha ФункцЯТа Уе 6bДАТпokазани Ha следвашия ekpan.Ηтисе OK,зда 3aBbpшITE HactpoКATA.
Ako cTe n3BbPunHn HAcTpoKaTa CneI NbPbTa
HCTaHa, 1e Ce BbPHeTe Ha NpBnE ekpaH
CbBcTHnKa 3a HAcTPOKa, KOrato HAtncHeTe OK.
B To3n CnyaHnATncHeTe N3XoD nn MapKnpaTe
HAcTpoBaHe NO-KbCHO n HAtncHeTe OK, 3a Da
n3Je3eTe OT HAcTpoKaTa.
Cne KaTo npOuecbT Ha OTKpNBaHe npNKIOHcN, Ie MoKeTe Da KOHTpONIPAte TeJIeBUN3Opa Cn IJIacOBO.
3a6eJekka: Yeepe me ce, ye ycmpoucmeama ca cebp3aH u Hmephem.
Ppimepn KOMaHdN
ETo HAKoN rIacOBn KOMaHdN, KOUTo MOKeTe Da n3NoJ3BaTe:
| Команда Функция | |
| Alexa, turn on 'FN' Вклочва | телевизора |
| Alexa, turn off 'FN' Излочва | телевизора |
| Alexa, play 'FN' | Статура медино вбз-пponзвекдане |
| Alexa, pause 'FN' | Спima мединою вбз-пponзвекдане |
| Alexa, resume 'FN' | Вьзстановая мединою вьзронзвекдане |
| Alexa, stop 'FN' | Спima мединою вьз-пponзвекдане |
| Alexa, fast forward on 'FN' | Вьлочва медино в pe-jжим на брзо превърта-he наразд |
| Alexa, rewind on 'FN' | Вьзронзвекдане на медята наразд |
| Alexa, set the volume of 'FN' to 50 | Зада сина та на звуka на сьответено НИВО |
| Alexa, turn the volume up on 'FN' | Уvetteсява сина та на звуka с 10 edинии |
| Alexa, turn the volume down on 'FN' | Hamалява сина та на звуka с 10 edинии |
| Alexa, mute 'FN' Излочва | Звуka |
| Alexa, unmute 'FN' Пуха зауka | уka |
| Alexa, change the input to "input_name" on 'FN' | Телевизоры певклочва на BXODня ИЗтоchnik с поочено иme (нарри-MерНДМ 1) |
| Alexa, change channel to "channel_number" on 'FN' | Телевизоры певклочва на Канала с указан�ю homeр (нарр. Канал 200) |
| Alexa, change channel to "channel_name" on 'FN' | Телевизоры певклочва на Канала с указаното иme |
| Alexa, channel up on 'FN' | Телевизоры певклочва на сlementвашия Канал, ако e нали老人家 |
| Alexa, channel down on 'FN' | Телевизоры певклочва на р佩дишney Канал, ако e нали老人家 |
| Alexa, next channel on 'FN' | Телевизоры певклочва на сlementвашия Канал от списьк с канали |
N e ckbpaueHuemo Ha 'PpuameIcKO UMe'.
Google AcncteHT
TeJIeBn3OpbT Bn pa6OTn c Google Home 3a rIacOB KOHTpOHa CBbp3aHInTe Bn yCTpoiCtBa n UpeNi.
Pabotn c Google Home
C NOMOuTa Ha Ta3n FyHKUma MOKeTe Da ynpaBIABaTe FyHKUInTe Ha BaUra TeNeBu3Op C ycTpoiCTBa C Google Assistant. 3a Da HAnpaBIne TOBa, npouecbT Ha HAcTPOiKa Tp6Ba Da 6bJe 3aBbpweH.
PpeHn HacTpoKaTa
I3nblHeTe cIeHInTe npOeDpyu, npei Da 3aNoCHte HacTpoKaTa Ha BaIIMr TeNeBn3Op.
- Инстадирайт e плобжениTo Google Home haMOбингя сп телефон И Вьe3Te B aKayHTa cN
-Добавete NOMOHTO yCTPOIcTBO KbM BaUNaKayHT - I36peTe DeiCTBnETo Vsmart TV ot cnncbKa c DeiCTBnB B npNJIOKeHneTO
- Μe ce nokaxe ekpaH, B KOIto ige BBBeDeTe NdeHTnKauNHOHHa KOD, KOIto ige 6bJe Cb3daHe H NO BpeMe Ha npouceca Ha HAcTpoiKa Ha Baunr TeJIeBn3Op, 3a Da CBbpXeTe TEJIeBn3Opa C Baunr akaynt. PpOdbJxKeTe c HAcTpoiKaTa Ha Baunr TeJIeBn3Op, 3a Da nonyUHTe KOD 3a yDcOCTOBepraBaHe
Ppoec Ha HacTpoKa
Hactpoikata MoKe Da ce N3BbpWn C NOMOuTa Ha onuTgta Google AcnteHTB MeHOTo HActpoKn> Cntema> Tlacob acnteHT. CbBeTHNKbT 3a HcTanipaHe Ue Bu Bodn no Bpeme Ha npoueca Ha Hactpoika.
Ha npBnE ekpaH MapKupaTe Start n HataChete OK, 3a da npodbJxnte
Ha cIeBauu eKpAn 6bTe Te NOMOJIeHn da onpeJeNTe IMe 3a Baunr TeLeBuN3Op, HapeueH "PnraTeJcKO IMe" (IN). "PnraTeJcKO IMe" e IMe, KoTo Bn HaONMn 3a TeLEBuN3Op BA, KaTo "TeLeBuN3Op B DHeBHa CTAJ", "KxHn C TeLeBuN3Op", "TeLeBuN3Op B TpanEzapnTa" n T.H. N3bnpaTne NeCHOIOCTbNHO IMe. KOrATo CTe rOTOBn, MapKnpaTne OK n HATNCHEt EOK
- Μe ce c3daJe KoJ 3a yOocToBepBaHe nIe Ce nokae Ha ekpaHa. BbBeJeTe KoJa, KOITo BnKdAte Ha TeJIeBn3Opa B npInIOKeHneTo Google Home
Cne KaTo HAcTpoNkata npNKIOUH, BHe Ue MoXeTe Da KOHTpOJIpaTe FyHKcUNTe Ha Baunr TeJIeBN3Op C Google AcnCTeHT.
3a6eJekka: Yeepeme ce, ye ycmpoucmeama ca cebp3au H KbM uHmephem. Moxeme da cebpxeme camo eun H meeneu3op KbM bawua akayhm.
PnmepnKoMaHn
ПрocTo кжete „Hey Google" Ии „Ok Google", 3aда управлбате Baшсят телевизор само кato ИЗПОЛЗВATE Глaca сн.
| Команда Функция | |
| turn on 'FN' Вкlioчва телев | ИЗора |
| turn off 'FN' Излioчва телев | ИЗора |
| pause on 'FN' | Спира медийото вьз-пponизвекдане |
| resume on 'FN' | Вьзстановая медийото вьзпponизвекдане |
| stop on 'FN' | Спира медийото вьз-пponизвекдане |
| volume up on 'FN' | Уvesлоча с升降а на 3ыка |
| volume down on 'FN' | Hamалява с升降а на 3ыка |
| set mute volume on 'FN' Из | ИзLOЧВа 3Бука |
| switch input to "input_name" on 'FN' | ТeLEVEN3OPBJ певкlioчва на вхODня ИЗTOUнIC с пооченOTО иme (нарри-MерНДМ 1) |
| switch to "input_name" on 'FN' | |
| change channel to "chan-nel_number" on 'FN' | ТeLEVEN3OPBJ певкlioчва на канала с уkaЗанЯ Homep (нарр. Канал 200) |
| change channel to "chan-nel_name" on 'FN' | ТeLEVEN3OPBJ певкlioчва на Канала с уkaЗанOTOMe |
| channel up on 'FN' | ТeLEVEN3OPBJ певкlioчва на слобвашия Канал, akо e нали老人家 |
| channel down on 'FN' | ТeLEVEN3OPBJ певкlioчва на predecessor Канал, akо e нали老人家 |
N e ckbpaueHuemo Ha 'PpuameIcko Ume'.
Google e 3ana3eHa Mapka Ha Google LLC.
HOpMaun 3a DVB yHKnOHaHnocTa
To3n DVB npneMnK e noDxOJaEeINHCTBeHO 3a H3noJ3BaHe BDbpXaBaTA, 3a KOrTO e npedHa3HaueH.
Bbnpekn ye To3n DVB npneMHNK OTROBapra Ha Han-HOBNTe DVB cneuФkaun, He moKem da rapaHTnpame cbbmecTUMocT c 6bdeun DVB npedabAHn, nopadn npomeHnte, KONTO MORa Tda HactbnT B n3IbYBaHnTe paDnOcNrHaJI N TEXHOJOrn.
HЯкофункин Haцфрobata TeJIeBn3moKe Da He caHa pa3NoIoxKeHne BbB BCNcKn IbpxkAbN.
IocToaHNo ce cTpeMnMa nOo6pnm npOdyKTnte cn; npaAn Ta3n npuHa cneunkaunTe Morat Da ce npomeHr 6e3 npedBapntenHO npedn3BecTne.
3a cBbTe n OTKbIe Da 3aKyIInTe akceCoapn, MoJr CBbpxKeTe Ce C MaRa3nHa, OT KOITo CTE 3aKyIINn O6OpyDbaHeTo.
Obsah
Covered by patents at patentlist.accessadvance.com
Likvidácia starého zariadenia a batérii

Iba pre Europsku uniu a krajiny s recyklacnou schémou
Panasonic Testing Centre
Panasonic Marketing Europe GmbH
Winsberging 15, 22525 Hamburg, Germany
WEP 64/128, WPA, WPA2, TKIP, AES, WAPI
Upozornenie:
DVB / DátOVé vysielenie / IPTV
- Tento televizor je navrhnuty tak, aby spinal normy (k Marcu 2021) digitálnych pozemnych sluzieb DVB-T / T2 (MPEG2, MPEG4-AVC (H.264) a HEVC (H.265)), DVB-C (MPEG2, digitáne káblóve sluzby MPEG4-AVC (H.264) a HEVC (H.265)) a digitáne satelitné sluzby DVB-S (MPEG2, MPEG4-AVC (H.264) a HEVC (H.265)).