BP 3.2 - Water pump CMI - Free user manual and instructions
Find the device manual for free BP 3.2 CMI in PDF.


User questions about BP 3.2 CMI
0 question about this device. Answer the ones you know or ask your own.
Ask a new question about this device
Download the instructions for your Water pump in PDF format for free! Find your manual BP 3.2 - CMI and take your electronic device back in hand. On this page are published all the documents necessary for the use of your device. BP 3.2 by CMI.
USER MANUAL BP 3.2 CMI
natural_image
Industrial pump device with black frame and metallic housing (no visible text or symbols)2007-07
1
text_image
Labeled diagram of a portable pump with numbered components for identification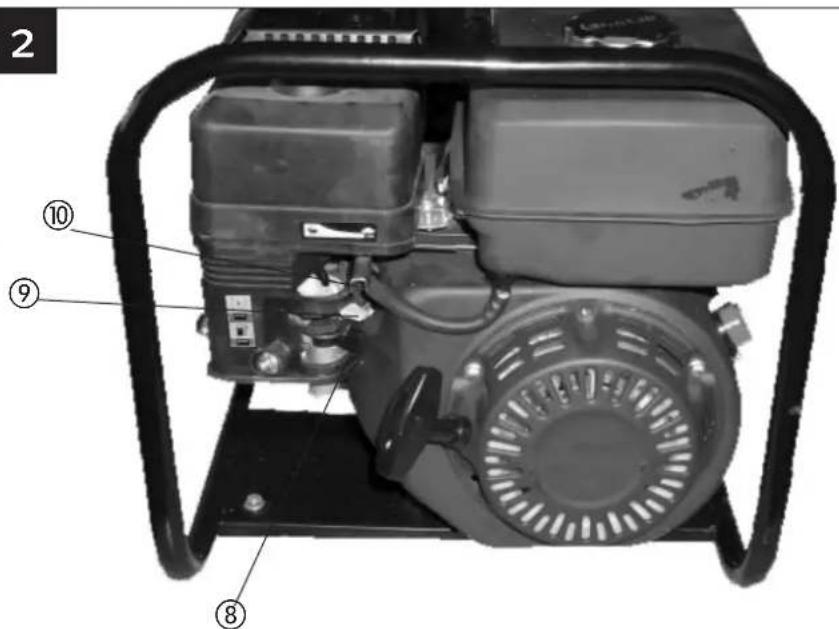
text_image
2 ⑩ ⑨ ⑧3
natural_image
Mechanical pump device with labeled components (no visible text or symbols)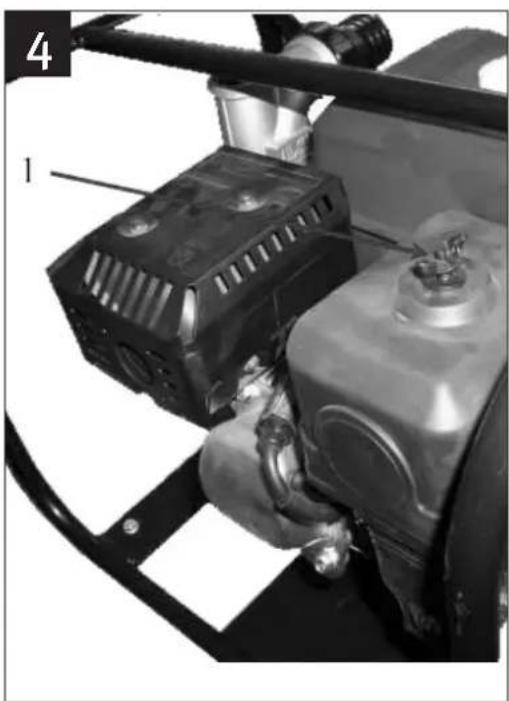
natural_image
Close-up of industrial machinery components with no visible text or symbols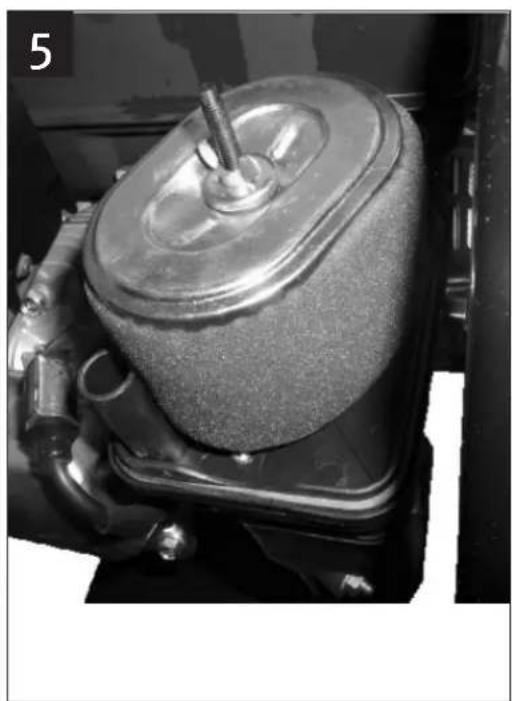
natural_image
Close-up of a mechanical component with a metallic housing and screw, no visible text or symbolsD
Pressione max. 3,0 bars
Portata max. 21960 l/h
Prevalenza max. 6 m
Please read the directions for use carefully and observe the information provided. It is important to consult these instructions in order to acquaint yourself with the machine, its proper use and safety precautions.
Important!
For safety reasons, the petrol water pump is not to be used by children, young people under 16 years of age, or any other persons who are not acquainted with these directions for use.
● This pump is only intended for use with clear water. It is not suitable for use with petrol, oil, diesel, fuel oil, milk or other liquids.
● The diameter of the pressure hose should be 2 inches. A loss of friction is likely to arise if smaller hoses are used.
● Never operate the pump without a suction strainer. ● Unauthorized modifications to the motor or improper use of the motor can negatively affect the functions and/or operational safety and operating life of the motor. Therefore, only use approved replacement parts and approved accessories on the motor.
- Petrol is extremely flammable and must therefore be handled with particular care.
- Only fill the fuel tank out in the open. Avoid overfilling.
● Avoid topping-up fuel during operation at all costs.
- Do not smoke when refueling or during maintenance works. Maintain a sufficient distance between the appliance and open fires. There is a risk of fire and of explosion!
● Touching the mufflers or the cylinder head during operation can result in burns.
- Spilt petrol must be mopped up immediately and before the motor is started. Never start the motor if you notice any petrol fumes. There is a risk of fire and of explosion!
● Make sure that there are no flammable or explosive materials located in the immediate vicinity.
● Always arrange the exhaust of the motor in such a way that good air circulation is ensured.
- When the fuel tank is filled, never store the pump in closed buildings in which the petrol fumes can be ignited by open fires or sparks.
- Allow the motor to cool before you store the pump.
- Drain out the fuel before you transport the petrol-motor pump.
● Never operate the motor above its maximum rated speed since to do so would increase the risk of injury. The motor speed set by the manufacturer of
the petrol-motor pump must not be changed.
● Make sure the cooling fins are kept free of any foreign bodies (foliage, grass etc.).
- Never touch the spark plug connector when the motor is running. Caution – danger of electric shock!
- Keep you hands and feet away from any rotating parts.
● Always pull out the spark plug connector and remove the spark plug before any maintenance work in order to avoid any undesired start-ups of the motor.
● Never hit the flywheel with a hammer or suchlike as this could lead to the flywheel bursting during operation.
● The generation of noise from the pump may exceed 85 dB (A). The user will require noise and hearing protection measures if this is the case.
- Check all nuts, screws and fastening elements regularly, and tighten if necessary, in order to ensure optimum operational safety.
- Keep your work area free of any objects which can be caught in rotating parts.
● Never operate the motor in enclosed or constricted areas. Danger of poisoning!
- Only close off the pressure pipe momentarily. Danger of overheating!
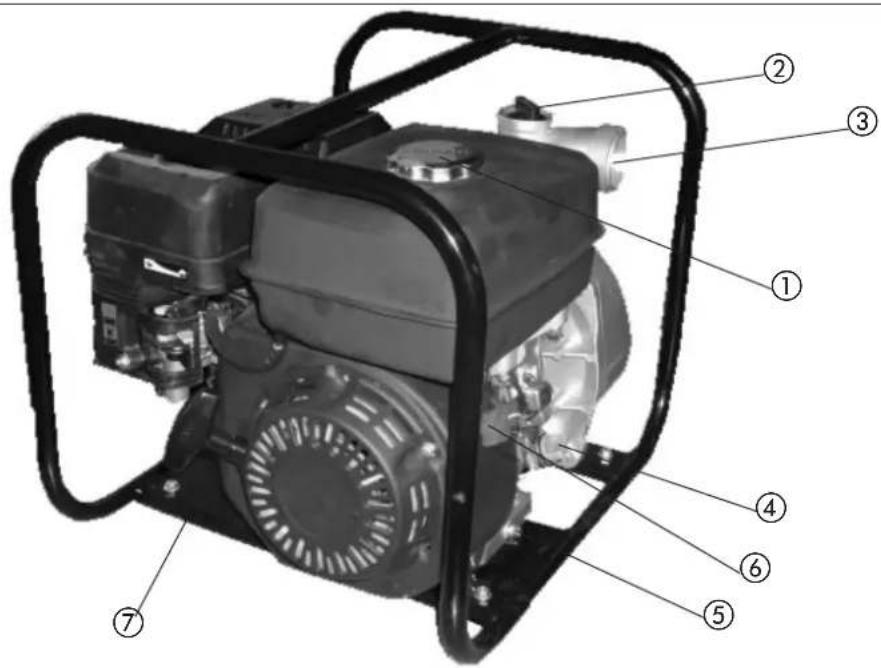
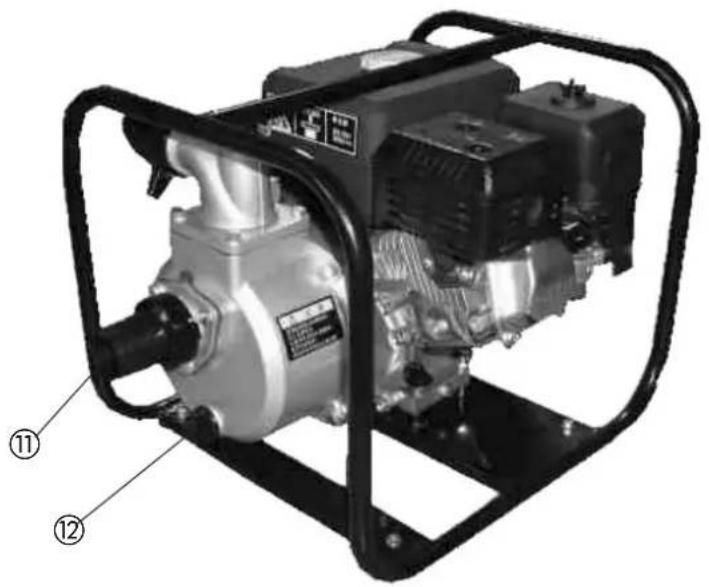
2. Layout (Fig. 1-3)
- Tank cover
- Refilling nozzle with screw
- Pressure connection
- Oil filler plug
- Oil drain plug
- ON/OFF switch
- Reversing starter
- Petrol cock
- Choke lever
- Throttle control
- Suction connection
- Water emptying plug
3. Technical data
Four-stroke motor 4,35 PS / 3,2 kW
Displacement 163 cm
Max. speed 3600 min
Fuel Regular unleaded petrol
Tank capacity 3,6 l
Oil quantity 0,6 l
Spark plug NGK BPR5ES
LPA sound pressure level 86 dB(A)
LWA sound power level 102 dB(A)
Max. pumping height 30 m
Max. pressure 3,0 bar
Max. pumping rate 21960 l/h
Max. suction height 6 m
Suction and pressure connection 2"
4. Resistance
For continuous operation, the maximum temperature of the liquid being pumped should not exceed +35°C. Liquids which are flammable or explosive, or which generate gas, must not be delivered with this pump. The pumping of aggressive liquids (acids, alkalis, silo seepage etc.) as well as liquids with abrasive substances (sand) must likewise be avoided.
5. Intended use
Areas of application
To be used for watering parks, vegetable patches and gardens.
To be used for the operation of sprinklers.
To be used, with a preliminary filter, for the removal of water from ponds, brooks, water butts, rainwater cisterns and fountains.
Pumping medium
For the pumping of clear water (fresh water), rainwater or light suds/service water.
6. Operating instructions
As a basic principle, we recommend the use of a preliminary filter and a suction set with suction hose, suction strainer and return valve, in order to prevent long priming periods and unnecessary damage to the pump as a result of stones and solid foreign bodies.
7. Before putting the machine into operation
The pump is self-priming. Before putting into operation for the first time, the pump must be filled, using the filling nozzle, up to overflowing with pumping liquid.
Connection of a suction pipe:
- Position the suction pipe so that it rises from the water withdrawal point to the pump. Avoid positioning the suction pipe higher than the pump, as this would delay the escape of air bubbles from the suction pipe and impede the priming process.
● Suction and pressure pipes are to be mounted in such a way that they do not exert any mechanical pressure on the pump.
● The suction valve should be located at a depth in the water which is sufficient to avoid dry running of the pump when the water level falls.
● A leaky suction pipe impedes the suction of water due to air intake. - Avoid the suction of foreign bodies (sand etc.). A preliminary filter is to be used if necessary.
8. Starting up
- Fill with approx. 0.6 l of engine oil (15W40) (see "Changing the oil").
● Place the pump on a level and secure surface. - The pressure pipe must be connected to the pump's pressure pipe connection (3) either directly or via a threaded nipple.
- Mount the suction pipe so that it is ready for operation.
● Fill the pump with water at the filling nozzle (2).
Important: If you operate the pump with the supplied reducers, the pump output is reduced.
To start up: (see Fig. 1)
- Fill the tank with petrol (1).
- Open the petrol cock (8).
- Position the throttle control (10) in the center.
- In the case of a cold start, close the choke lever (9).
- Set the ON/OFF switch (6) to the "ON" position.
- Pull forcefully on the cable pull-starter (7).
- After a running time of approx. 1 minute, re-open the choke lever (9).
- In the case of a warm motor, you can leave
GB
the choke lever in the open position for start-up.
● During the priming process, the shut-off devices present in the pressure pipe (spray nozzles, valves etc.) must be completely open so that the air in the suction pipe can escape freely.
- Depending on the suction height and the air quantity in the suction pipe, the initial priming process can last for approx. 0.5 min. - 5 min. In the case of longer priming periods, top up again with water.
- If the pump is disconnected again after use, then it is imperative that the water is refilled before the pump is connected and put into operation again.
Switching off:
- Set the ON/OFF switch (6) to the "OFF" position.
- Close the petrol cock (8).
Running-in period:
For the first 20 hours of operation, the motor must not be operated at full throttle for too long.
Misfires, start-up difficulties:
Check whether
- fuel is flowing into the carburetor;
● the fuel filter is clean;
● the carburetor air valve is open;
● the air filter is clean;
● the spark plug is clean and the electrode gap is between 0.6 and 0.7mm.
9. Maintenance instructions
Important! Pay close attention to the service manual!
The spark plug
Dismantle the spark plug and clean away any deposits every 50 hours of operation.
Set the electrode gap to approx. 0.6 - 0.7mm.
Air filter
The air filter should be dismantled every 50 hours of operation and cleaned (Fig. 4-5).
To do this:
- open the fastening nut by hand;
- remove the filter cover;
- remove the air filter;
- clean the air filter by tapping it;
- mount the parts by following the sequence in reverse order.
Important! Never use household cleaners or petrol for the purposes of cleaning.
Fuel filter
The fuel filter should be dismantled and cleaned with petrol either after approx. 100 hours of operation or if the pump is not used for long periods.
10. Changing the oil
The motor oil is best changed when the motor is at working temperature.
● Only use motor oil (15W40).
● Place the appliance on a slightly inclined surface so that the oil drain plug is at the lower end.
- Open the oil filler plug (4).
- Open the oil drain plug (5) and let the hot engine oil drain out.
● After the old oil has drained out, close the oil drain plug and place the appliance on a level surface.
● Pour in engine oil up to the overflow.
● Dispose of the old oil properly.
11. Ordering spare parts
Please provide the following information on all orders for spare parts:
● Model/type of machine
● Article number of the machine
● ID number of the machine
● Number of the required spare part
For our latest prices and information please go to www.isc-gmbh.info
We explicitly point out that, in accordance with the German Product Liability Act, we are not liable for any damages caused by our appliance if they result from improper repairs to the product, if parts are replaced by items other than our original parts or parts approved by us, or if repairs are not carried out by our customer services department.
GB
12. Troubleshooting
Pump fails to prime:
| Cause Remedy | |
| Suction valve is not in the water Ensure that the suction valve is in the water | |
| Pump chamber is without water Pour water into the intake connection | |
| There is air in the suction pipe Check the suction pipe for leaks | |
| Suction strainer (suction valve) is clogged Clean the suction strainer | |
| Maximum suction height has been exceeded Check the suction height | |
Insufficient pumping rate:
| Cause Remedy | |
| Suction height is too high Check the suction height | |
| Suction strainer is dirty Clean the suction strainer | |
| Water level is falling rapidly Position the suction valve deeper in the water | |
| Pump performance reduced by foreign bodies Clean the pump and replace wearing parts | |
Important!
The pump must not be allowed to run dry.
CZ
1. Důležité pokyny
2000/14/EG_2005/88/EG: L_WM = 98.4 dB; L_WA = 102 dB P = 3.2 kW
X 2004/108/EG
95/54/EG:
90/396/EWG
X 97/68/EG: e1*97/68SN3-IIA*2004/26*0288*00
89/686/EWG
EN 809; EN ISO 3744; EN 55012; EN 61000-6-1; KBV V
Subject to change without notice
D
The reprinting or reproduction by any other means, in whole or in part, of documentation and papers accompanying products is permitted only with the express consent of ISC GmbH.
©2
All of our products undergo strict quality checks to ensure that they reach you in perfect condition. In the unlikely event that your device develops a fault, please contact our service department at the address shown on this guarantee card. Of course, if you would prefer to call us then we are also happy to offer our assistance under the service number printed below. Please note the following terms under which guarantee claims can be made:
- These guarantee terms cover additional guarantee rights and do not affect your statutory warranty rights. We do not charge you for this guarantee.
- Our guarantee only covers problems caused by material or manufacturing defects, and it is restricted to the rectification of these defects or replacement of the device. Please note that our devices have not been designed for use in commercial, trade or industrial applications. Consequently, the guarantee is invalidated if the equipment is used in commercial, trade or industrial applications or for other equivalent activities. The following are also excluded from our guarantee: compensation for transport damage, damage caused by failure to comply with the installation/assembly instructions or damage caused by unprofessional installation, failure to comply with the operating instructions (e.g. connection to the wrong mains voltage or current type), misuse or inappropriate use (such as overloading of the device or use of non-approved tools or accessories), failure to comply with the maintenance and safety regulations, ingress of foreign bodies into the device (e.g. sand, stones or dust), effects of force or external influences (e.g. damage caused by the device being dropped) and normal wear resulting from proper operation of the device.
The guarantee is rendered null and void if any attempt is made to tamper with the device.
-
The guarantee is valid for a period of 2 years starting from the purchase date of the device. Guarantee claims should be submitted before the end of the guarantee period within two weeks of the defect being noticed. No guarantee claims will be accepted after the end of the guarantee period. The original guarantee period remains applicable to the device even if repairs are carried out or parts are replaced. In such cases, the work performed or parts fitted will not result in an extension of the guarantee period, and no new guarantee will become active for the work performed or parts fitted. This also applies when an on-site service is used.
-
In order to assert your guarantee claim, please send your defective device postage-free to the address shown below. Please enclose either the original or a copy of your sales receipt or another dated proof of purchase. Please keep your sales receipt in a safe place, as it is your proof of purchase. It would help us if you could describe the nature of the problem in as much detail as possible. If the defect is covered by our guarantee then your device will either be repaired immediately and returned to you, or we will send you a new device.
Of course, we are also happy offer a chargeable repair service for any defects which are not covered by the scope of this guarantee or for units which are no longer covered. To take advantage of this service, please send the device to our service address.

ZÁRUČNÍ LIST
| Strabe / NR: | Telephone: |
| PLZ OR | Mobile: |