SP 1000 - Water pump CMI - Free user manual and instructions
Find the device manual for free SP 1000 CMI in PDF.


User questions about SP 1000 CMI
0 question about this device. Answer the ones you know or ask your own.
Ask a new question about this device
Download the instructions for your Water pump in PDF format for free! Find your manual SP 1000 - CMI and take your electronic device back in hand. On this page are published all the documents necessary for the use of your device. SP 1000 by CMI.
USER MANUAL SP 1000 CMI
GOBB Operating instructions
Dirty-water pump with floating switch

natural_image
Close-up of a GMI brand hairdryer with black and silver casing (no visible text or symbols)OBI Merchandise Center GmbH
text_image
Labeled diagram of a cleaning or cleaning device with numbered parts for identification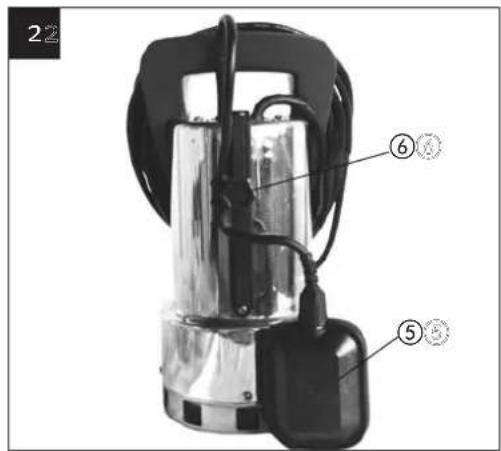
text_image
22 ⑥ ⑤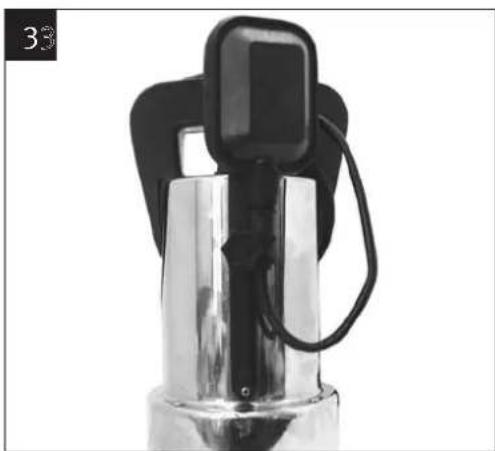
natural_image
Close-up of a metallic cylindrical device with black components and wires, no visible text or symbolsAttention! Important!
1. Before start-up, note the following!
●The pump can be connected to any shock-proof plug which has been installed according to regulations. The plug must have a supply voltage of 230 V \~ 50 Hz. Fuse min. 6 Amp.
Caution!
When the pump is to be used near swimming pools or garden ponds and in their area of protection, it must be equipped with a ground-fault circuit interruptor with a nominal trip current of max. 30 mA (according to VDE 0100, part 702 and 738).
The pump must not be operated while people are in the swimming pool or in the garden pond! Please contact your electrician!
Attention!
(Important for your own security)
Before starting to run your new submersible pump, please have the following items checked by an expert:
●Ground connection
●Zero conductor
● Fault current breaker switch must correspond the safety regulations of the power plants and they must work faultessly.
●The electrical connections must be protected from moisture.
- If there is danger of looding, the electrical connections must be taken to higher ground.
●Circulation of aggressiv fluids, as well as the circulation of abrasive materials must be avoided at all costs.
●The submersible motor-driven pump must be protected from frost.
●The pump must be protected from running dry.
●Access on the part of children should also be prevented with appropriate measures.
2. Layout (Fig. 1 -2)
1 Handle
2 Integrated cable rewind
3 Universal hose connection
4 Intake cage
5 Floating switch
6 Screw for height adjustment
3. Consistency
Your submersible pump is designated for the circulation of water with a maximum temperature of 35^ C.
This pump may not be used for other fluids, especially motor fuels, cleaning fluids, and other chemical products!
4. Installation
The submersible motor pumps is installed as follows:
●In a stationary position with fixed pipeline or
●in a stationary position with a flexible hose pipe.
Please note!
You should never install the pump by suspending it unsupported from its delivery pipe or power cable. The submersible motor pump must be suspended from the specially provided handle or be placed on the bottom of the shaft. To guarantee that the pump works properly, the bottom of the shaft must be kept free of sludge and dirt of all kinds.
If the level of water sinks too far, any sludge in the shaft will dry out quickly and stop the pump from starting up. It is necessary, therefore, to check the submersible motor pump regularly (by carrying out start-up tests).
The floater is adjusted in a way that the pump can immediately be started
Note!
The pump shaft should have minimum dimensions of 40 x 40 x 50 cm, so that the floating switch can move freely.
5. Mains supply
Your new submersible pump is equipped with a shock-proof plug according to regulations. The pump is designed to be connected to a 220/230 V \~ 50 Hz safety socket. Make sure that the socket is sufficiently secured (min. 6 Amp.) and is in excellent condition. Introduce the plug into the socket and the pump is ready to go.
Important Note!
If the mains cable or plug suffers any damage from external action, repairs to the cable are prohibited.
Important!
This work may only be performed by a qualified electrician or your ISC GmbH Customer Service.
6. Areas of use
This pump is used primarily as cellar pump. When installed in a shaft, this pump provides protection from flooding. They are also used wherever water has to be moved from one place to another, e.g. in the home, agriculture, horticulture, plumbing and many other applications.
7. Setting to work
After having read these instructions carefully, you can set your pump to work, reconsidering the following items:
- Check if the pump rests on the ground of the shaft.
●Check of pressure cord has been attached properly.
●Check if electrical connection is 230 V \~ 50 Hz. - Check if socket is in good condition.
●Make sure that water and humidity can never come to the mains supply.
●Avoid pump running dry.
8. Maintenance guidelines
This submersible pump is an approuved, maintenance-free high quality product, which is subject to severe final controls.
We recommend, regular inspection and maintenance to ensure long equipment life and uninterrupted operation.
Important! Note!
- Remove the mains plug before all maintenance work.
●In the event that the pump is often transported in the course of operation, it should be cleaned out with clear water after every use.
●In case of stationary installation, the function of the loating switch should be checked every 3 months.
●All fibrous particles which may have built-up inside the pump housing should be removed with a water jet.
●Every 3 months the shaft ground and as should be cleaned from mud. - Remove deposits on the floater with clear water.
Cleaning the impeller
If excessive deposits collect in the pump case you must dismantle the bottom part of the pump as follows:
- Undo the 4 screws from the bottom of the intake cage.
- Remove the intake cage from the pump case.
- Clean the impeller with clear water. Important! Do not put down or rest the pump on the impeller!
- Assemble in reverse order
9. Setting the ON/OFF switching point
Automatic operation:
The ON/OFF switching point can be infinitely adjusted with the height adjustment facility. For this purpose you must first slacken the screw (Fig. 2, Point 6). The switching differential can be infinitely adjusted by extending or shortening the floating cable.
Before you put the pump into operation, please check the following:
●The float switch must be installed so that the level of the ON operating point and the level of the OFF operating point can be reached easily and with little force. To check this, place the pump in a vessel filled with water, raise the float switch carefully by hand and then lower it again. As you do so, note whether the pump switches on and off.
●Make sure that the distance between the float switch head and the latching holder is not too small. Proper operation is not guaranteed if the gap is too small.
- When you set the float switch, make sure that it does not touch the base before the pump switches off. Caution! Risk of dry-running.
Manual operation:
Mount the float switch as illustrated in Figure 3. The pump is in constant operation.
10. Guarantee note:
Not covered by guarantee:
● Destruction of rotating mechanical seal by dry running or addition of foreign bodies in water
●Transport damage
●Damage caused by unauthorised persons
11. Ordering replacement parts
Please quote the following data when ordering replacement parts:
- Type of machine
● Article number of the machine
● Identification number of the machine
● Replacement part number of the part required
For our latest prices and information please go to www.isc-gmbh.info
12. Technical data
| Power supply | 230V ~ 50Hz |
| Power consumption | 1000 Watt |
| Delivery rate max.. | 20.000 l/h |
| Delivery height max | 8 m |
| Immersion depth max. | 5 m |
| Water temperature max. | 35°C |
| Hose connection | 1 1/2" threaded end |
| Foreign bodies up to | dia. 20 mm |
| Switching point height: ON | max. approx. 62 cm |
| Switching point height: OFF | min. approx. 5 cm |
13. Performance data
| Delivery head | Delivery rate |
| 1m | max.: 19.000 l/h |
| 2m | max.: 18.200 l/h |
| 3m | max.: 16.500 l/h |
| 4m | max.: 14.800 l/h |
| 5m | max.: 12.500 l/h |
| 6m | max.: 10.400 l/h |
GGB
- Incidents – Causes – Remedies
| Incidents | Causes | Remedies |
| Pumpe does not start | - No mains supply- Floater does not switch | - Check mains supply- Bring floater in a higher position |
| No flow | - Inlet sieve is clogged- Pressure hose in bent | - Clean inlet sieve water jet- Reset hose |
| Pump does not switch off | - Floater cannot sink down | - Place pump properly on shaft ground |
| Insufficient flow | - Inlet sieve is clogged- Reduced pumping capacity by dirty and abrasive water | - Clean inlet sieve- Clean pump and replace worn-out parts |
| Pump switches of after short operating period | - Thermal cutout stops pumps due to dirty water- Water too hot. Thermal-cutout stops pump | - Remove mains plug. Clean pump and shaft- Make sure that a water temperature of max. 35°C is not exceed |
ISC GmbH
Eschenstraße 6
D-94405 Landau/Isar
D erklärt folgende Konformität gemäß EU-Richtlinie und Normen für Artikel
© declares conformity with the EU Directive
GB and standards marked below for the article
F déclare la conformité suivante selon la directive CE et les normes concernant l'article
NL verklaart de volgende conformiteit in overeenstemming met de EU-richtlijn en normen voor het artikel
● declara la siguiente conformidad a tenor de la directiva y normas de la UE para el artículo
declara a seguinte conformidade de acordo
com a directiva CE e normas para o artigo
förklarar följande överensstämmelse enl. EU-direktiv och standarder för artikel
ilmoittaa seuraavaa Euroopan unionin direkti-ivien ja normien mukalsta yhdenmukalsuutta tuotteelle
erklærer herved følgende samsvar med EU-direktiv og standarder for artikkel
©DIS
заявляет о соответствии товара
следующим директивам и нормам ЕС
HR izjavljuje sljedeću uskladjenost s odredbama i normama EU za artikl.
® declară următoarea conformitate cu linla directoare CE și normele valabile pentru articolul.
x 73/23/EWG_93/68/EEC
R&TTED 1999/5/EG
97/23/EG
2000/14/EG:
x 89/336/EWG_93/68/EEC
95/54/EG:
90/396/EWG
97/68/EG:
89/686/EWG
EN 60335-1; EN 60335-2-41; EN 50366; EN 55014-1; EN 55014-2; EN 61000-3-2; EN 61000-3-3;
Eschenstraße 6 · D-94405 Landau/Isar (Germany)
Info-Tel. 0180-5 120 509 · Telefax 0180-5 835 830
The product described in these instructions comes with a 2-year warranty covering defects. This 2-year warranty period begins with the passing of risk or when the customer receives the product.
For warranty claims to be accepted, the product has to receive the correct maintenance and be put to the proper use as described in the operating instructions. Your statutory rights of warranty are naturally unaffected during these 2 years.
This warranty applies in Germany, or in the respective country of the manufacturer's main regional sales partner, as a supplement to local regulations. Please note the details for contacting the customer service center responsible for your region or the service address listed below.
natural_image
Symbol of a trash bin crossed with a diagonal line, no text or numbers present⑥ Nur für EU-Länder
For EU countries only
Never place any electric tools in your household refuse.
To comply with European Directive 2002/96/EC concerning old electric and electronic equipment and its implementation in national laws, old electric tools have to be separated from other waste and disposed of in an environment-friendly fashion, e.g. by taking to a recycling depot.
Recycling alternative to the demand to return electrical devices:
As an alternative to returning the electrical device, the owner is obliged to cooperate in ensuring that the device is properly recycled if ownership is relinquished. This can also be done by handing over the used device to a returns center, which will dispose of it in accordance with national commercial and industrial waste management legislation. This does not apply to the accessories and auxiliary equipment without any electrical components which are included with the used device.
The reprinting or reproduction by any other means, in whole or in part, of documentation and papers accompanying products is permitted only with the express consent of ISC GmbH.

Made for OBI / www.obi.de