
Milano - Coffee machine LA PAVONI - Free user manual and instructions
Find the device manual for free Milano LA PAVONI in PDF.

| Product type | Manual lever espresso machine |
| Brand | La Pavoni |
| Model | Milano |
| Boiler capacity | 0.8 L (8 cups) or 1.6 L (16 cups) depending on version |
| Power supply | 220-240 V, 50/60 Hz |
| Power | 1000 W (estimated) |
| Operating pressure | 0.8 - 1.0 bar |
| Weight | Approximately 5 kg |
| Dimensions (W x D x H) | Approximately 30 x 25 x 32 cm |
| Main functions | Espresso preparation, steam and hot water dispensing, cappuccino making |
| Body material | Stainless steel and ABS plastic |
| Cleaning and maintenance | Regular cleaning of the filter holder, steam wand, and drip tray with a damp cloth |
| Safety | Safety thermostat, safety valve, automatic shutdown in case of overheating |
| Spare parts available | Filters, gaskets, filter holder, steam wand, automatic cappuccino kit |
| Included accessories | Dosing spoon, tamper, single-shot filter, double-shot filter, Cappuccino Automatic (depending on version) |
| Warranty | 2 years (parts and labor) |
Frequently Asked Questions - Milano LA PAVONI
User questions about Milano LA PAVONI
0 question about this device. Answer the ones you know or ask your own.
Ask a new question about this device
Download the instructions for your Coffee machine in PDF format for free! Find your manual Milano - LA PAVONI and take your electronic device back in hand. On this page are published all the documents necessary for the use of your device. Milano by LA PAVONI.
USER MANUAL Milano LA PAVONI
natural_image
Exterior view of a modern espresso machine with visible branding and control panel (no text or symbols on the device itself)EUROPICCOLA
STRADIVARI
EXPO-MILANO
PROFESSIONAL
STRADIVARI PROFESSIONAL
A
D
natural_image
Illustration of a hand using a mechanical tool to adjust a component, showing a rotating mechanism (no text or symbols present)B
C
natural_image
Mechanical assembly diagram showing a lever and pin with an arrow indicating direction (no text or symbols)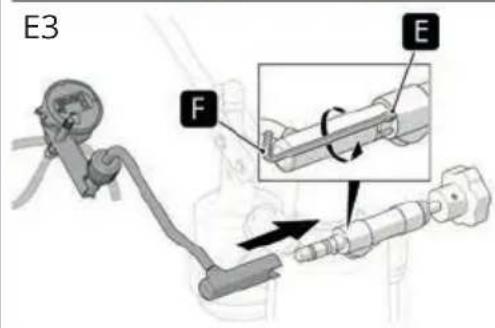
E
F

MODELLO EUROPICCOLA/STRADIVARI
PROBLEMA CAUSA SOLUZIONE
Instructions for use of models
EUROPICCOLA / PROFESSIONAL / STRADIVARI STRADIVARI PROFESSIONAL / EXPO

Dear Customer,
Thank you for having purchased one of our products, which has been manufactured using the latest technological innovations. By carefully following some simple instructions regarding the correct use of our product in compliance with the essential safety instructions indicated in this manual, you will be able to obtain the best performance and enjoy the remarkable reliability of this product over the years. In case of faults, please contact one of our Service Centres that are at your disposal from now on.
SYMBOLS USED IN THIS MANUAL
Important information is indicated by these symbols. It is imperative that you comply with these instructions.

Please read the instructions manual carefully before using the appliance.

Caution! Particularly important and / or dangerous operations.

Information (useful for using the appliance).

Advice.

Operations that can be carried out by the user.

Operations that should only be carried out by a qualified technician.
PRODUCT END-OF-LIFE INSTRUCTIONS
Electrical appliances must not be disposed of together with household waste. Devices marked with this symbol are subject to European Directive 2012/19/EU All waste electrical and electronic appliances must be disposed of separately from domestic waste and taken to authorised waste disposal facilities. Disposing of the used appliance correctly, will help to safeguard the environment and human health. For further information regarding the disposal of used appliances, please contact your local authorities, the waste disposal department or the shop where the appliance was purchased.
CONTENTS
1. INTRODUCTION TO THE MANUAL 20
1-1. INTRODUCTION 2
1-2. MACHINE FUNCTION 20
1-3. INTENDED USE OF THE MACHINE 20
1-4. IDENTIFICATION PLATE 20
2. INSTRUCTIONS 20
2-1. SAFETY INSTRUCTIONS 20
2-2. IMPROPER U S E
2-3. RESIDUAL RISKS 22
2-4. INSTRUCTIONS REGARDING THE POWER CABLE 22
2-5. IMPORTANT INSTRUCTIONS 23
3. DESCRIPTION 23
3-1. PRODUCT DESCRIPTION 23
4. USE 23
4-1. ELECTRICAL CONNECTION 23
4-2. INSTALLING COMPONENTS 24
4-3. STARTING THE MACHINE FOR THE FIRST TIME 24
4-4. STARTING THE MACHINE 24
4-5. DISPENSING COFFEE 25
4-6. TOPPING UP THE BOILER WITH WATER 26
4-7. DISPENSING STEAM 26
4-8. PREPARING A CAPPUCCINO WITH THE STEAM PIPE 27
4-9. PREPARING A CAPPUCCINO WITH THE AUTOMATIC CAPPUCCINO MAKER 27
4-10. PREPARING OTHER HOT DRINKS 28
4-11. HOT WATER 28
5. CLEANING AND MAINTENANCE 28
5-1. CLEANING THE OUTSIDE OF THE MACHINE 28
5-2. CLEANING THE FILER HOLDER 29
5-3. CLEANING THE STEAM PIPE 29
5-4. CLEANING THE AUTOMATIC CAPPUCCINO MAKER 29
6. TROUBLESHOOTING 30
1. INTRODUCTION TO THE MANUAL
1-1. INTRODUCTION
This instructions manual is an integral part of the machine. It should be read carefully and kept readily available for reference for the entire service life of the machine.
If the manual is lost or damaged, you can request a replacement from an authorised SERVICE CENTRE.
The manual contains information regarding the proper use of the machine, its cleaning and maintenance. It also provides information about operations to be carried out that require particular attention and possible residual risks.
The manual reflects the technological innovations at the time it was drafted. The manufacturer reserves the right to make any necessary technical modifications to its products and to update the manuals with no obligation to revise previous versions.
LA PAVONI S.p.A. declines any liability for damage or injury that may be caused directly or indirectly to people or property due to:
•the failure to comply with all the requirements of current safety regulations;
- incorrect installation,
• defective power supply;
- improper or incorrect use of the machine;
- uses other than those specified in this manual;
- lack of or incorrect maintenance,
- unauthorised modifications or repairs,
•the use of non original or non model-
specific spare parts;
- complete or partial failure to follow the instructions,
- exceptional events.
1-2. MACHINE FUNCTION
This machine has been designed for the home preparation of espresso coffee using coffee blends, the production of hot water and/or steam, and the preparation of hot milk.
In order to use the machine properly, the user must carefully read and understand the instructions provided in this manual.
1-3. INTENDED USE OF THE MACHINE
The LEVA models can dispense:
- drinks made from ground coffee
- hot water and steam for preparing and warming drinks
- warm milk
- milk and coffee drinks.
1-4. IDENTIFICATION PLATE
The identification plate bears the technical data, serial number and brand name of the appliance. Do not remove the identification plate for any reason.
2. INSTRUCTIONS

2-1. SAFETY INSTRUCTIONS
This appliance is intended for household use. Moreover, it cannot be used:
- in kitchen areas provided for employees in shops, offices and other working environments;
- in farms/farm stay facilities
- by guests in hotels, motels and residential environments;
- in bed and breakfasts.
•The user must comply with the safety regulations in force in the country where the machine is used, in addition
to using common sense and the instructions provided in this manual.
•To ensure that machine works correctly and provides a long service, we recommend that you make sure that the environmental conditions are correct (room temperature should be between 5°C and 35°C). Avoid using the machine in places where jets of water are used or in outdoor environments that are exposed to the weather (sun, rain etc.).
•After removing the machine from its packaging, make sure that it is intact and has not been damaged.
- The packaging should be taken to a proper waste disposal centre. Under no circumstances should it be left unattended where children, animals or unauthorized persons may have access to it.
- Before switching on the machine, make sure that the power supply indicated on the data plate, located under the base of the machine, is the same as the one used in your country.
- Put the machine in a safe position on a solid surface, away from heat sources and out of the reach of children.
- The machine must not be used in a recess.
- Before connecting or disconnecting the machine, make sure that the ON/OFF switch is in the OFF position.
- Unplug the machine from the power outlet when it is not in use and before cleaning it, without pulling the power cable.
- Do not use the machine if it is not working properly or if the power cable or plug are damaged; if the power is damaged, contact an authorised SERVICE CENTRE.
- Do not touch the hot surfaces (boiler, group head, filter holder, steam supply nozzle) to avoid burns.
•The surfaces (boiler, group head, filter holder, steam nozzle) remain very hot after use due to residual heat. Do not touch the hot surfaces in order to avoid burns.
- Do not remove the filter holder while coffee is being dispensed to avoid possible burns.
- Do not open the boiler cap when the machine is in operation or still under pressure to avoid possible burns. First switch the machine off, then slowly unscrew the steam knob and wait until all the steam has been discharged via the relative pipe. Then remove the cap.
• Under no circumstances place your hands under the group head or the steam supply nozzle as the liquids or steam delivered are hot and may cause burns.
- Do not remove the filter holder immediately after having dispensed coffee, wait for a few seconds to allow any residual pressure to be released in order to avoid possible burns.
- Make sure there is water in the reservoir before switching on the coffee machine to avoid damaging the heating element.
- To avoid damaging the machine, only use accessories or replacement parts approved by the manufacturer.
•In the case of faults or malfunction, switch of the machine. Do not attempt to repair it yourself. Contact an authorised SERVICE CENTRE to have any worn or damaged parts replaced.
- Unauthorized repairs or the use of non-original spare parts will void the warranty and relieve the manufacturer of all liability.
- Do not use the machine outdoors.
•To avoid fire, electric shock or injury, do not immerse the machine, the power cable or any other electrical
components in water.
- Before carrying out cleaning or maintenance, switch off the machine by placing the ON/ OFF switch on the OFF position and remove the plug from the power socket without pulling the power cable.
- This espresso machine has been designed for household use only. Any servicing or repairs, with the exception of normal cleaning and maintenance must be carried out by an authorized Service Centre.
- Do not fill the reservoir with warm or hot water. Use cold water only.
- Do not immerse the machine in water.
- This appliance may be used by children from the age of 8 provided they are supervised or instructed on the safe use of the appliance and they understand the associated risks.
- Cleaning and maintenance may be performed by children from the age of 8 as long as they are appropriately supervised.
- Keep the appliance and its cord out of reach of children under the age of 8 years.
- Children must never play with the appliance.
•The appliance may be used by people with reduced physical, sensory or mental capabilities or who lack experience and knowledge if they are supervised or instructed on the safe use of the appliance by someone who is responsible for their safety and if they understand the hazards involved.
2-2. IMPROPER USE

Any improper use of the machine will void the warranty and relieve the manufacturer of all liability for damage to property and / or injury to persons.
Improper use includes:
- any use other than the one specified in the instructions manual;
- any intervention carried out on the machine that does not comply with the instructions given in this manual;
- any use following unauthorized modifications to components or safety devices;
• use of the machine outdoors.
2-3. RESIDUAL RISKS

It is not possible to safeguard the user against direct jets of steam or hot water. He/she should therefore be extremely careful when using the machine to avoid scalds or burns.
- The manufacturer declines any liability for damage to property or injury to people or animals, due to interventions on the machine by unqualified or unauthorized persons.
2-4. INSTRUCTIONS REGARDING THE POWER CABLE
A short power-supply cable is provided to reduce the risk of it becoming twisted or tripping over it.
Any extension cables should be used with great care. If an extension cable is used, make sure that:
- The voltage indicated on the extension cable is at least equal to the voltage of the appliance.
- It is fitted with a three-pin grounded plug (if the appliance cable is of this type).
- The cable does not hang from the table to avoid the risk of becoming caught in it.

The base mat is fastened to the machine with a special Torx screw to prevent tampering with
electrical parts. For any type of maintenance or if the power cable has to be replaced, please contact an authorised SERVICE CENTRE.
2-5. IMPORTANT INSTRUCTIONS
When using household electrical appliances, several precautions should be taken to reduce the risk of fire, electric shock, and/or accidents.
- Do not touch hot surfaces.
- To avoid fires or electric shock do not immerse the power cable, plugs, or the appliance in water or in any other liquid.
- Take special care when using the espresso machine when children are present.
- Remove the plug from the power outlet when the machine is not in use and before cleaning. Allow the appliance to cool before installing or removing parts and before cleaning.
- Do not use the machine if it is faulty or malfunctioning or if the power cable or plug is damaged. Have the appliance checked or repaired at the nearest service centre.
- The use of accessories not approved by the manufacturer may cause damage or personal injury.
- Make sure that the espresso machine is switched off before putting the plug into the power outlet. To switch it off, make sure that the relative switch has not been pressed (button flush with the frame).
- Take great care when using steam.
- When the machine is switched off and cooling down, the lever may move upwards by itself. This is caused by a vacuum forming inside the boiler.
- If the machine is not used very often, switch it off by placing the ON/OFF switch in the OFF position
and remove the power plug from the outlet without pulling the cable.
3. DESCRIPTION
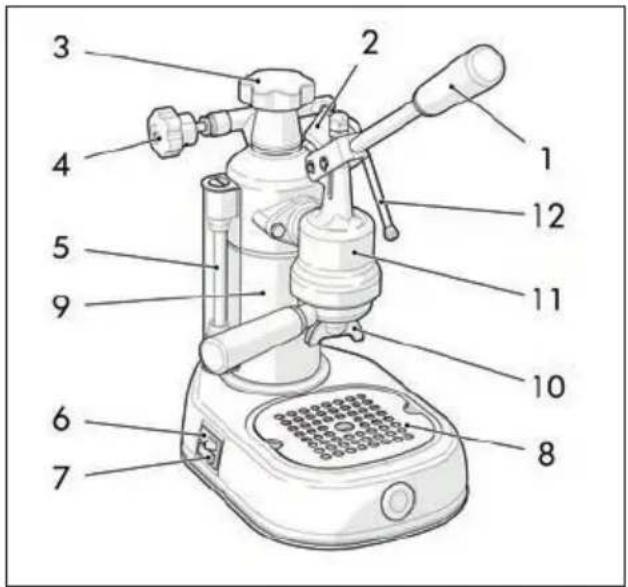
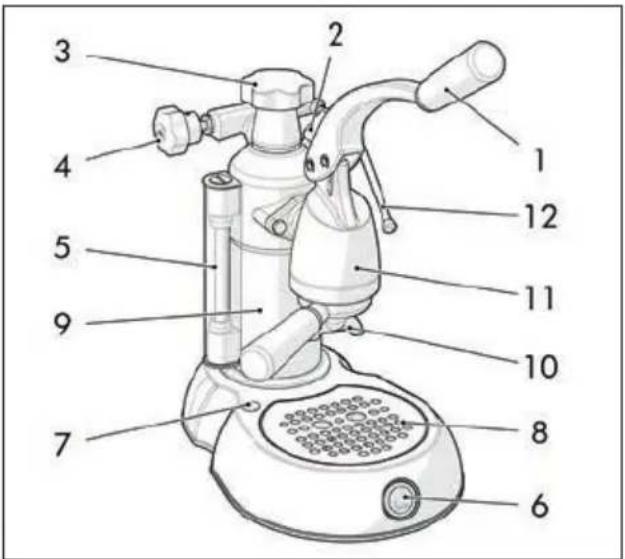
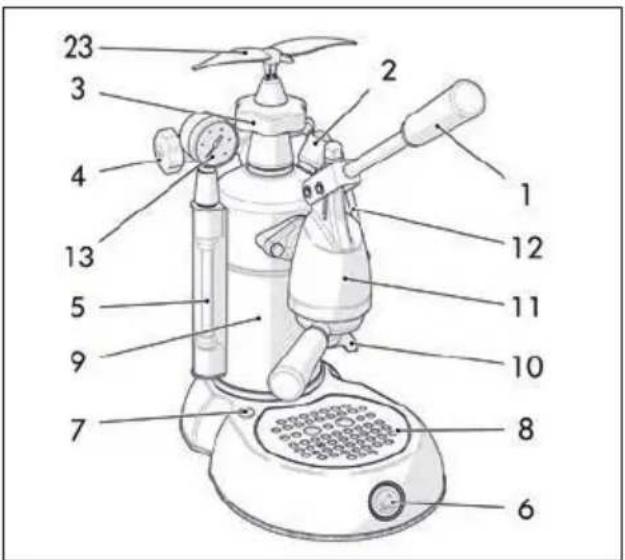
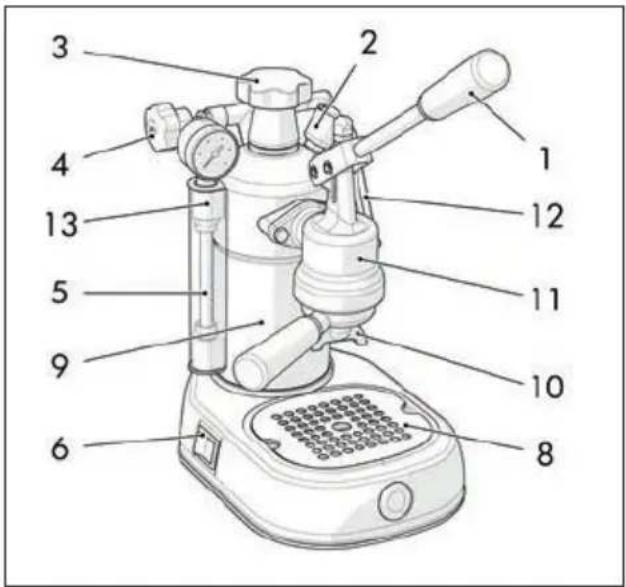
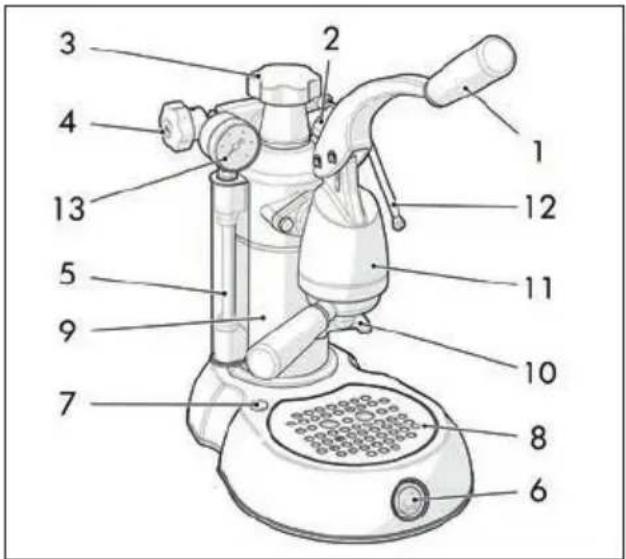
3-1. PRODUCT DESCRIPTION
- Lever
- Safety valve - condensation basin
- Boiler cap
- Steam knob
- Water level indicator
- ON/OFF switch
- Indicator light
- Grid and drip tray
- Boiler
- Filter holder
- Group head
- Steam pipe
- Pressure gauge
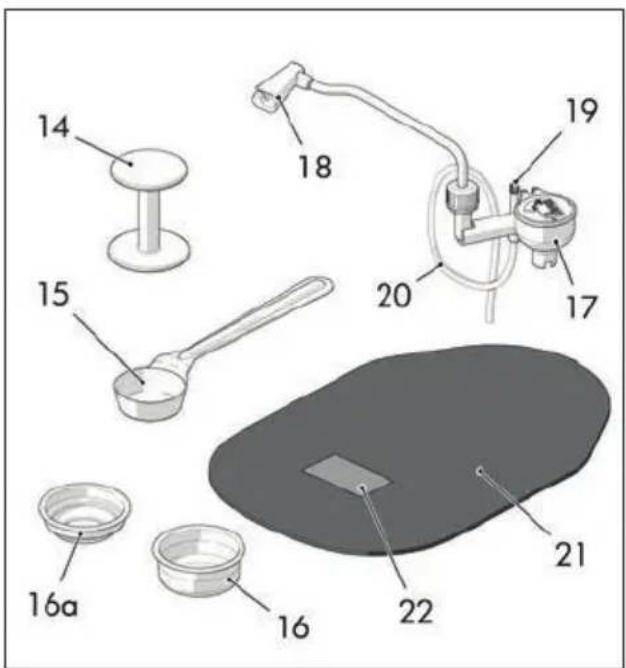
- Coffee tamper
- Measuring scoop for one cup of coffee
- Filter basket for 2 cups
16a Filter basket for 1 cup - pods - Automatic Cappuccino maker
- Automatic Cappuccino maker support
- Automatic Cappuccino maker regulation bar
- Silicone tube for the Automatic Cappuccino maker
- Base mat cover
- Data plate
- Eagle cover
4. USE
4-1. ELECTRICAL CONNECTION

Before connecting the appliance, make sure that the mains power voltage is the same as the one indicated on the data plate located under the base of the machine.
4-2. INSTALLING COMPONENTS
- Place the grid (8) on the base of the product, making sure that the notch faces towards the body of the machine.
- Screw the knob onto the lever by turning it clockwise.
4-3. STARTING THE MACHINE FOR THE FIRST TIME
- Unscrew the boiler cap (3) by turning it anticlockwise.
- Prepare a solution of water and two teaspoons of bicarbonate of soda in a container. Wait for the bicarbonate of soda to dissolve completely; then pour the solution into the boiler (9). Alternatively, instead of using bicarbonate of soda, prepare a solution of water with one tablespoon of white vinegar in a container and pour it into the boiler.
- Make sure that the lever (1) is down; if necessary pull it down fully.
- Screw the boiler cap (3) onto the boiler by turning it clockwise and make sure that the cap and the steam knob (4) are properly closed.
- Place the filter holder (10) into the group head (11) and secure it by moving it from right to left.
- Insert the power plug into an electric socket having a suitable voltage.
- Place the switch (6) to ON and wait for the machine to reach the required pressure (approximately 5 minutes).
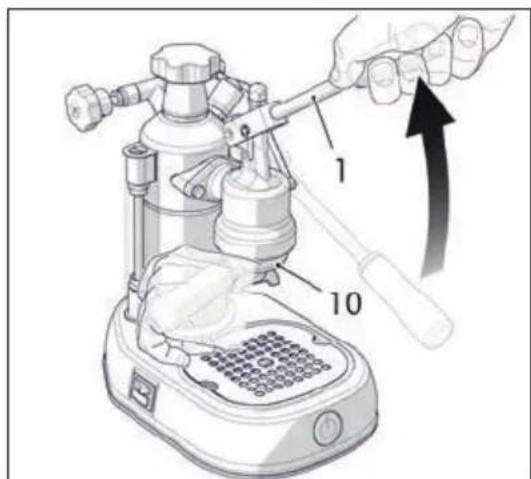
- Place a container under the group head (11) and slowly lift the lever (1) until it is fully raised. Hold it in this position in order to discharge all the water contained in the boiler.
- Next, switch the machine off and remove the plug from the power outlet. Turn the steam knob (4) anticlockwise and wait until all the steam has been discharged from the steam pipe (12).
- Fill the boiler again with clean water and rinse the inside of the machine to eliminate any residues left by the solution.
4-4. STARTING THE MACHINE
- Fill the boiler (9) with a sufficient quantity of water for the amount of coffee you wish to make (Europiccola and Stradivari models: machine capacity 0.8 litres, equivalent to 8 cups of espresso coffee; Professional and Stradivari professional models: machine capacity 1.6 litres, equivalent to 16 cups of espresso coffee).

The water should not exceed the top of the level glass (5) and should not fall below the lower part of the level glass.
EUROPICCOLA / STRADIVARI MODEL
- Press the switch (6). It will light up to indicate that the machine is powered. At the same time, the indicator light (7) will also switch on to indicate that the heating element has been activated.
- Wait for the light (7) to turn off. Once it has turned off, slowly open the steam knob (4) by turning it anticlockwise to discharge the "false pressure" caused by air left in the boiler. Then close it by turning it clockwise. The indicator light comes back on, wait for it to switch off.
- The machine has now reached the correct pressure and is ready to dispense coffee and steam.
PROFESSIONAL / STRADIVARI PROFESSIONAL / EXPO MODEL
- Press the switch (6). It will light up to indicate that the machine is powered. At the same time, the indicator light (7) will also switch on to indicate that the heating element has been activated.
- When the pointer of the pressure gauge (13) reaches the green zone,
slowly open the steam knob (4) by turning it anticlockwise to discharge the "false pressure caused by air left in the boiler. Then close it by turning it clockwise and wait for the pointer of the pressure gauge to move back into the green zone.
•The machine has now reached the correct pressure and is ready for use.

- It is normal for the light (7) to switch on and off. This is due to the pressure switch that is automatically regulating the pressure of the boiler.
- If the machine runs out of water while in operation, the safety thermostat will trigger and disconnect power to the machine. In this case, the thermostat has to be reset (see section 6 - Troubleshooting).
4-5. DISPENSING COFFEE
- Select the correct filter basket, small (16a) for 1 cup and large (16) for 2 cups and place it into the filter holder (10). Insert the filter holder and wait for the machine to reach the correct temperature. In the meantime, get the cups, coffee, milk ready.
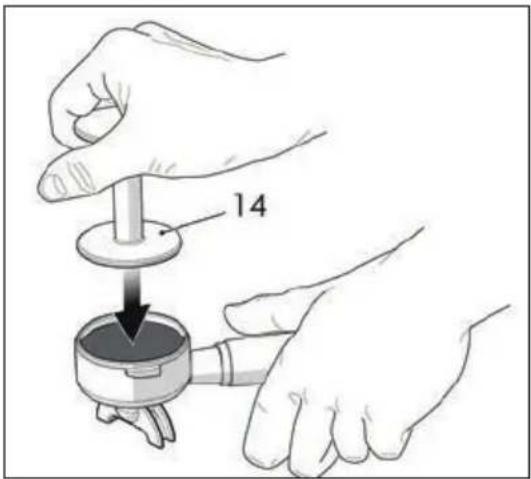
•After it has reached the right temperature, remove the filter holder (10) and fill a filter basket (16 or 16a) with ground coffee using the measuring scoop provided (15). Consider one scoop for each cup of coffee.
- Press the coffee the coffee using the tamper (14) provided and clean any residue from the edge of the filter (Fig. A).

The 1-cup filter basket (16a) is suitable for pods. When putting the pod into the filter basket, make sure that the filter paper
does not extend beyond the edge of the filter holder.
- Hold the machine steady by holding the handgrip of the lever (1) and insert the filter holder (10) into the group head (11). Secure it by turning it slightly from right to left.
- Position the cup or cups under the spouts of the filter holder.
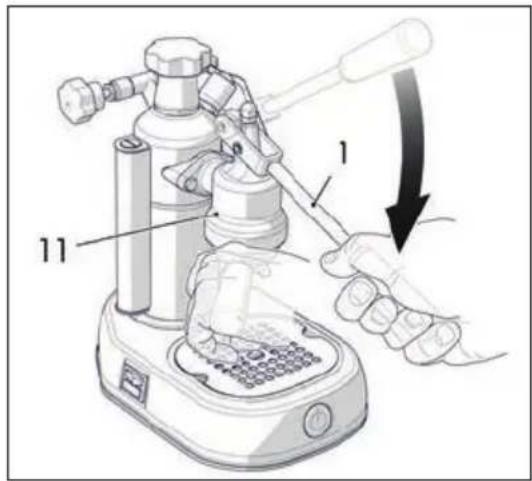
- Move the lever (1) upwards (while holding the handle of the filter holder with your left hand to keep the machine steady). Hold it in this position for a few seconds (Fig. C).
- Then lower it as far as it will go in order to dispense coffee (Fig. D). Repeat this procedure according to the amount of coffee required.
•After having prepared the coffee, leave the lever (1) in the down (rest) position so that any water remaining in the boiler does not leak out from the group head (11), and switch the machine off.
•After having dispensed 3-4 consecutive coffees, it is recommended to wait a few minutes to allow the group head to return to the right temperature in order not to dispense burnt coffee.

Before dispensing one or more cups of coffee, make sure that the level of the water in the boiler does not fall below the minimum.

- To obtain a good cup of coffee, it is important that you use a good quality, well roasted and correctly ground coffee.
- The espresso coffee machine requires finely ground coffee. If the coffee is too coarsely ground, the coffee will be light coloured and weak without froth and if the coffee is too finely ground the espresso will be dark and strong
and have little froth.
- To obtain steady coffee delivery, the pressure exerted on the lever must be proportional to the resistance met by the lever when the coffee is dispensed.
- Before dispensing the first cup of coffee, we suggest that you lift the lever (1) completely and dispense a cup of hot water. This will heat the group head (11), the filter holder and the filter.
- It is normal for water to drip from the filter holder after the coffee has been dispensed.

- Do not remove the filter holder immediately after dispensing coffee. Wait a few seconds to allow any residual pressure between the filter and the shower screen to discharge.
•After a coffee has been dispensed, the filter holder (10) should be slowly removed from the group head (11), moving it from left to right and exerting a light downwards pressure, to help release any residual pressure and avoid possible burns.
4-6. TOPPING UP THE BOILER WITH WATER
Once the water in the boiler has run out, refill it as follows:
- Place the switch (6) in the off position before unscrewing the cap (3).
- Slowly turn the steam knob (4) anticlockwise and wait for all the steam in the boiler to be discharged from the specific pipe (12).
- Remove the filter holder (10) and slowly lift the lever (1). Keep the lever up to allow the steam and water contained in the boiler to discharge through the group head.
•We recommend that you use a
container to collect the steam and water and that you take great care since the steam and water that are discharged are very hot and may cause scalding.
- When the steam and water stop discharging, slowly unscrew the boiler (3). Then fill the boiler.
- Before screwing the boiler cap (3) back on, move the lever (1) to the rest position and close the steam knob (4) by turning it clockwise.

- Do not open the boiler cap (3) when the machine is in operation or still under pressure in order to avoid possible burns.
- Regularly check the amount of water in the boiler through the level glass (5). The lack of water when the machine is in operation may cause the heating element to burn out.
4-7. DISPENSING STEAM
•After having made sure that there is the correct amount of water in the boiler and having followed the procedure for bringing the machine to the correct pressure, make sure that the lever (1) is in the down (rest) position and leave it in this position.
Before heating any drinks:
- Place a container under the steam pipe (12).
- Turn the steam knob (4) anticlockwise to eliminate any condensation that has formed in the boiler.
- Then open the steam knob further to allow the required amount of steam to be dispensed (Fig. B).
- When finished, close the steam knob by turning it clockwise.

•To obtain a large amount of steam, the level of the water in the
boiler should be about halfway up the level glass (5).
- We recommend that you dispense steam for a maximum of 2 minutes to obtain maximum steam delivery performance.

- The user is not protected against direct jets of steam or hot water. Take great care when carrying out these operations.
- The temperature of the steam is approximately 100^ . Take great care when carrying out this procedure, to avoid possible scalding.
4-8. PREPARING A CAPPUCCINO WITH THE STEAM PIPE
- Half fill a tall narrow container with the milk to be prepared.
- Immerse the steam pipe (12) until it touches the bottom of the container and slowly turn the steam knob (4) anticlockwise.
- Move the container slowly up and down for a few seconds until you obtain a froth.
•To make a cappuccino, add the hot frothed milk to the coffee that is already in the cup.
4-9. PREPARING A CAPPUCCINO WITH THE AUTOMATIC CAPPUCCINO MAKER
INSTALLING THE AUTOMATIC CAPPUCCINO MAKER
The traditional steam pipe (12) should be replaced with the Automatic Cappuccino maker (17) (an optional accessory on the models with a black base) before starting the machine. Proceed as follows:
- Make sure the machine is switched off
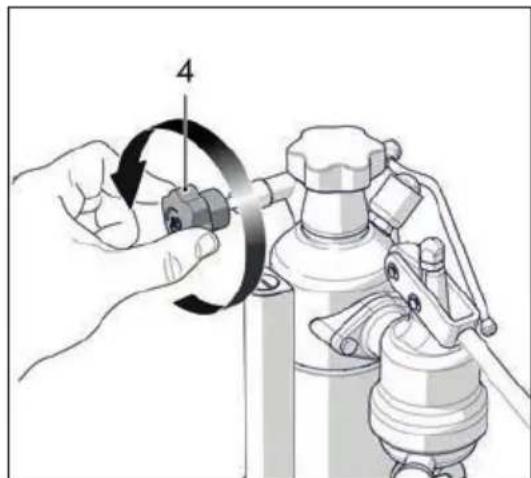
- Make sure that the steam knob (4) is closed.
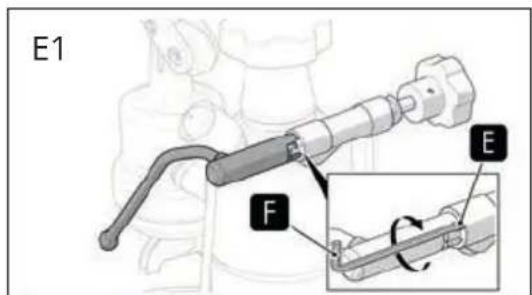
- Using the tool (F) provided, turn the headless screw on the tap body clockwise (Fig. E1) to release the steam nozzle.
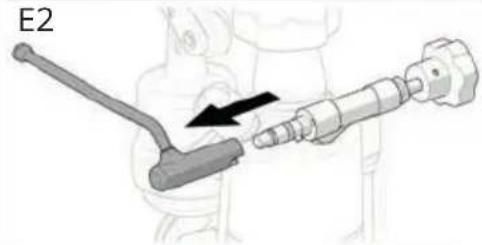
- Turn the steam pipe (12) clockwise until it stops. Then remove the steam pipe from its seat by pulling it towards the right (Fig. E2).
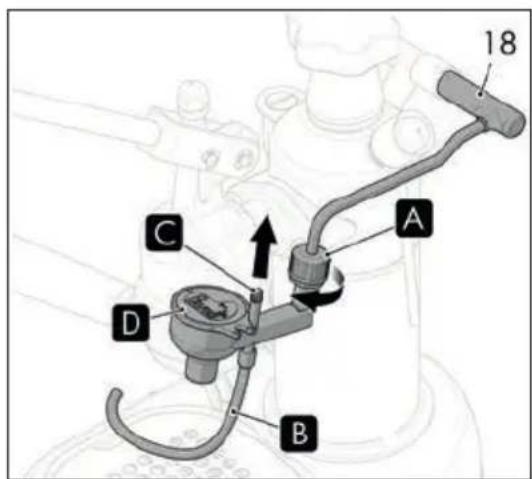
- Insert the Automatic Cappuccino maker onto the steam supply nozzle (18), pushing it upwards until the nozzle rests against the fitting. Then tighten the locking ring by turning it clockwise.
- Insert the Automatic Cappuccino maker (17) into its seat by pushing it towards the left (Fig. F). Turn the Automatic Cappuccino maker (17) anticlockwise until it stops.
- Using the tool (F) provided, turn the headless screw on the tap body (E) anticlockwise (Fig. E3) to lock the automatic cappuccino maker in position.

Make sure that the headless screw (F) is always in the locked position during operation.
CAPPUCCINO PREPARATION
After the machine has reached the required pressure, as described in section 4.4, proceed as follows:
- Insert the suction tube (20) (B-Fig. F) into the milk container next to the machine.
- Place the cup containing the previously prepared coffee under the nozzle of the Automatic Cappuccino maker and open the steam knob (4) by turning it anticlockwise. This will start to dispense hot milk, with abundant froth.
- To stop dispensing, close the steam knob (4) by turning it clockwise.

- You can regulate the froth by adjusting the pin (C) (Fig. F), of the Automatic Cappuccino maker to get the required consistency of the froth.
- Move the pin upwards to obtain a froth with a greater volume.
- Remove any milk residues each time the Automatic Cappuccino maker is used.
To replace the steam pipe (12), carry out the same procedure described above for installing the automatic cappuccino maker.
4-10. PREPARING OTHER HOT DRINKS
Before heating any drinks:
- Place a container under the steam pipe (12).
- Turn the steam knob (4) anticlockwise to eliminate any condensation that has formed in the boiler.
TEA, CAMOMILE TEA
- Place the amount of water needed for the required drink into a container.
- Immerse the steam pipe (12) into the liquid and slowly turn the steam knob (4) anticlockwise.
- Then open the steam knob completely to allow a large quantity of steam to be dispensed, which will bring the liquid to boiling point.
- Then add the contents of sachet of the drink you wish to prepare.
HOT CHOCOLATE
- Place the contents of the sachet, already dosed, into a container and slowly add a cup of milk a little at a time whilst mixing carefully.
- Immerse the steam pipe (12) until it touches the bottom of the container, slowly turn the steam knob (4) anticlockwise and bring the drink to boiling point.
- Allow the drink to boil longer if you wish to make it denser.

The temperature of the steam is approximately 100^ C. Do not for any reason place your hands under the steam pipe. Take great care when doing this in order to avoid possible scalding.
4-11. HOT WATER
- When the machine has reached the correct pressure, in addition to using the steam pipe (12), hot water can also be obtained by using the Automatic Cappuccino maker (17).
•After having installed the device as described in section 10 4.9, insert the suction tube into a recipient containing water. Place a container under the nozzle of the Automatic Cappuccino maker and open the steam knob (4) by turning it anticlockwise. - Once the required amount of hot water has been dispensed, close the steam knob.

Do not for any reason place your hands under the Automatic Cappuccino maker because the hot liquid may cause scalding.
5. CLEANING AND MAINTENANCE

Before carrying out any cleaning or maintenance, unplug the power cable from the power outlet without pulling the cable.
5-1. CLEANING THE OUTSIDE OF THE MACHINE
Clean the outside of the machine, the drip tray (8) and the drain well on the base into which it is inserted using a damp cloth and then dry it. Do not use alcohol, solvents, abrasives or
detergents, in order to avoid damaging the treated surfaces.
5-2. CLEANING THE FILER HOLDER
Regularly clean the filter holder (10), the filter (16) and the shower screen located in the group head (11) with warm water and a neutral detergent to prevent scale and to remove any coffee deposits.

Warning: To prevent damaging the machine, do not use the blind filter for cleaning the group head.
5-3. CLEANING THE STEAM PIPE
To avoid altering the taste of the drinks to be heated and to prevent the holes in the end of the steam pipe from becoming clogged, clean the steam pipe thoroughly with a damp cloth after every use.
5-4. CLEANING THE AUTOMATIC CAPPUCCINO MAKER
Remove any milk residues each time the Automatic Cappuccino maker is used.
- Place a full glass of water next to the machine in which to immerse the Suction tube.
•Proceed as if you were preparing a normal cappuccino, allowing the dirty water to drain into a suitable container. - To replace the steam pipe (12), follow the instructions in section 4.9.
• In addition to cleaning the Automatic Cappuccino maker after each use, every now and again clean it more thoroughly. - Turn the threaded locking ring (A) anticlockwise until the steam nozzle is released (Fig. F).
- Remove the cover (D), the pin (C) and the pipe (B) and wash them thoroughly under warm running water to eliminate residues or hardened lumps of milk. Then replace the components in the reverse order.
6. TROUBLESHOOTING
PROBLEM CAUSE SOLUTION
| The machine does not work and the light of the ON/OFF switch does not turn on | 1. No power.2. The machine is not plugged in correctly3. The power cable is damaged | 1. Switch the power on2. Insert the power plug correctly into the power socket3. Contact the SERVICE CENTRE for replacement |
| The light on the ON/OFF switch is lit and the water does not heat up | 1. The safety thermostat needs to be reset2. The heating element is broken or burnt out | 1. Remove the base mat cap and press the red button to reset the thermostat2. Contact the SERVICE CENTRE |
| No coffee is dispensed 1. There is no water in the boiler.2. The coffee is too finely ground3. There is too much coffee4. The coffee has been compacted too much | 1. Put water into the boiler2. Replace with a coarser coffee blend3. Reduce the amount of coffee in the filter basket4. Tamp the coffee less | |
| The coffee is dispensed too quickly | 1. The coffee is too coarsely ground2. There is not enough coffee3. The coffee has not been compacted enough4. The coffee is stale or unsuitable | 1. The coffee should be ground more finely2. Increase the amount of coffee3. Tamp the coffee more4. Replace the coffee |
| The coffee is dispensed in drops | 1. The coffee is too finely ground2. There is too much coffee3. The coffee has been compacted too much | 1. The coffee should be ground more coarsely2. Reduce the amount of coffee3. Tamp the coffee less |
| The coffee leaks between the boiler unit and the filter holder | 1. The filter holder is not inserted correctly2. There is too much coffee in the filter basket3. The edge of the filter holder has not been cleaned4. The gasket of the boiler unit is worn | 1. Insert it properly2. Reduce the amount of coffee3. Remove coffee residues from the edge of the filter holder4. Contact the SERVICE CENTRE |
| No froth forms on the coffee 1. The coffee blend is not suitable for this type of machine2. The grinding is unsuitable3. There is not enough coffee | 1. Replace the coffee2. Adjust the coffee grind3. Increase the amount of coffee |
| The coffee is too cold 1. The machine had not reached the correct temperature2. The filter holder had not been pre-heated3. Scale on the heating element4. Heating element partially burnt out5. The pressure switch is not working within the required range | 1. Follow the instructions given in section 4.42. The filter holder should be heated at the same time as the water3. Descale the machine4. Contact the SERVICE CENTRE5. Contact the SERVICE CENTRE |
| The coffee is too hot 1. The pressure switch is not working within the required range | 1. Contact the SERVICE CENTRE |
| The safety valve whistles and steam is exiting from the valve or from the condensation basin | 1. The spring that regulates the safety valve is blocked2. The pressure switch is not working within the required range |
| The machine does not dispense steam | 1. The machine has not reached the correct pressure2. The holes at the end of the steam pipe are clogged3. There is no water in the boiler4. The steam pipe has not been inserted properly5. There is scale on the heating element |
| The machine is noisy (vibrates) | 1. The coils of the heating element are too close2. There is scale on the heating element |
1. INTRODUCTION AU MANUEL 34
1-1. INTRODUCTION 3
1-2. FONCTION DE LA MACHINE 34
1-3. USAGE PRÉVU DE LA MACHINE 34
1-4. PLAQUE D'IDENTIFICATION 34
2. AVERTISSEMENTS 34
2-1. AVERTISSEMENTS DE SÉCURITÉ 34
2-2. USAGE IMPROPRE 36
2-3. RISQUES RÉSIDUELS 36
2-4. INSTRUCTIONS SUR LE CÂBLE D'ALIMENTATION 37
2-5. PRÉCAUTIONS IMPORTANTES 37
3. DESCRIPTION 38
3-1. DESCRIPTION DU PRODUIT 38
4. UTILISATION 38
4-1. BRANCHEMENT ÉLECTRIQUE 38
4-2. MONTAGE DES COMPOSANTS 38
4-3. PREMIÈRE MISE EN SERVICE 38
4-4. MISE EN SERVICE DE LA MACHINE 39
4-5. DISTRIBUTION DE CAFÉ 39
4-6. RÉTABLISSEMENT DE L'EAU DANS LA CHAUDIÈRE 41
4-7. DISTRIBUTION DE VAPEUR 41
4-8. PRÉPARATION DU CAPPUCCINO AVEC LE TUYAU DE VAPEUR 42
4-9. PRÉPARATION DU CAPPUCCINO AVEC LE CAPPUCCINO AUTOMATIC 42
4-10. PRÉPARATION D'AUTRES BOISSONS CHAUDES 43
4-11. DISTRIBUTION D'EAU CHAUDE 43
5. NETTOYAGE ET ENTRETIEN 44
5-1. NETTOYAGE DU CORPS 44
5-2. NETTOYAGE DU PORTE-FILTRE 44
5-3. NETTOYAGE DU TUYAU DE VAPEUR 44
5-4. NETTOYAGE DU CAPPUCCINO AUTOMATIC 44
6. CAUSES DE DYSFONCTIONNEMENT OU ANOMALIES 45

1. INTRODUCTION AU MANUEL
1-1. INTRODUCTION
MODÈLE EUROPICCOLA/STRADIVARI
6. CAUSES DE DYSFONCTIONNEMENT OU ANOMALIES
PROBLÈME CAUSE SOLUTION
MODELL EUROPICCOLA/STRADIVARI
2. WAARSCHUWINGEN 66
2-1. VEILIGHEIDSWAARSCHUWINGEN 66
2-2. ONEIGENLIJK GEBRUIK 68
2-3. RESTRISICO'S 69
2-4. INSTRUCTIES VOOR HET ELEKTRISCHE SNOER 69
2-5. BELANGRIJKE VOORZORGSMAATREGELEN 69
3. BESCHRIJVING 70
3-1. BESCHRIJVING VAN HET PRODUCT 70
4. GEBRUIK 70
4-1. ELEKTRISCHE AANSLUITING 70
4-2. MONTAGE ONDERDELEN 70
4-3. EERSTE INBEDRIJFSTELLING 70
4-4. INBEDRIJFSTELLING VAN DE MACHINE 71
4-5. KOFFIEAFGIFTE 71
4-6. WATER IN DE KETEL BIJVULLEN 72
4-7. STOOMAFGIFTE 73
4-8. BEREIDING VAN CAPPUCCINO MET HET STOOMPIJPJE 73
4-9. BEREIDING VAN CAPPUCCINO MET DE CAPPUCCINO AUTOMATIC 74
4-10. BEREIDING VAN ANDERE WARME DRANKEN 74
4-11. AFGIFTE VAN HEET WATER 75
5. REINIGING EN ONDERHOUD 75
5-1. REINIGING VAN DE BEHUIZING 75
5-2. REINIGING VAN DE FILTERDRAGER 75
5-3. REINIGING STOOMPIJPJE 75
5-4. REINIGING CAPPUCCINO AUTOMATIC 75
6. OORZAKEN VAN GEBREKEN OF STORINGEN 76
1. INLEIDING OP DE HANDLEIDING
1-1. INLEIDING
2-1. VEILIGHEIDSWAARSCHUWINGEN
3-1. BESCHRIJVING VAN HET PRODUCT
PROBLEEM OORZAAK OPLOSSING
MODELO EUROPICCOLA/STRADIVARI
MODELO EUROPICCOLA/STRADIVARI
PROBLEMA CAUSA SOLUÇÃO
INNEHÅLLSFÖRTECKNING
1. INTRODUKTION TILL BRUKSANVISNINGEN
1-1. INTRODUKTION 1
1-2. MASKINENS FUNKTION 112
1-3. AVSEDD ANVÄNDNING AV MASKINEN 112
1-4. IDENTIFIKATIONSDEKAL 112
2. ANVISNINGAR 112
2-1. SÄKERHETSFÖRESKRIFTER 112
2-2. FELAKTIG ANVÄNDNING 114
2-3. KVARSTÄENDE RISKER 114
2-4. INSTRUKTIONER GÄLLANDE STRÖMSLADDEN 115
2-5. VIKTIGA SÄKERHETSÅTGÄRDER 115
3. BESKRIVNING 115
3-1. BESKRIVNING AV PRODUKTEN 115
4. ANVÄNDNING 116
4-1. ELEKTRISK ANSLUTNING 116
4-2. MONTERA KOMPONENTERNA 116
4-3. FÖRSTA DRIFTSÄTTNINGEN 116
4-4. SÄTTA MASKINEN I DRIFT 116
4-5. TILLAGA KAFFE 117
4-6. ÅTERSTÄLLA VATTENNIVÅN I KOKAREN 118
4-7. MATA UT ÅNGA 119
4-8. TILLAGA CAPPUCCINO MED ÅNGRÖRET 119
4-9. TILLAGA CAPPUCCINO MED CAPPUCCINO AUTOMATIC 119
4-10. TILLAGA ANDRA VARMA DRYCKER 120
4-11. MATA UT VARMT VATTEN 120
5. RENGÖRING OCH UNDERHÅLL 121
5-1. RENGÖRA HÖLJET 121
5-2. RENGÖRA FILTERHÅLLAREN 121
5-3. RENGÖRA ÅNGRÖRET 121
5-4. RENGÖRA CAPPUCCINO AUTOMATIC 121
6. ORSAKER TILL FELFUNKTION OCH ANOMALIER 122
1. INTRODUKTION TILL BRUKSANVISNINGEN
1-1. INTRODUKTION
MODELL EUROPICCOLA/STRADIVARI
for at frigøre dampdysen.
4-7. WYDOBYWANIE PARY
MALLI EUROPICCOLA/STRADIVARI
MODELLO EUROPICCOLA/STRADIVARI
Cappuccino Automatic rengjøres for melkerester.

- MODELLO EUROPICCOLA/STRADIVARI
- PROBLEMA CAUSA SOLUZIONE
- EUROPICCOLA / PROFESSIONAL / STRADIVARI STRADIVARI PROFESSIONAL / EXPO
- SYMBOLS USED IN THIS MANUAL
- PRODUCT END-OF-LIFE INSTRUCTIONS
- CONTENTS
- INTRODUCTION TO THE MANUAL 20
- INSTRUCTIONS 20
- DESCRIPTION 23
- USE 23
- CLEANING AND MAINTENANCE 28
- TROUBLESHOOTING 30
- INTRODUCTION TO THE MANUAL
- 1-1. INTRODUCTION
- 1-2. MACHINE FUNCTION
- 1-3. INTENDED USE OF THE MACHINE
- 1-4. IDENTIFICATION PLATE
- INSTRUCTIONS
- 2-1. SAFETY INSTRUCTIONS
- 2-2. IMPROPER USE
- 2-3. RESIDUAL RISKS
- 2-4. INSTRUCTIONS REGARDING THE POWER CABLE
- 2-5. IMPORTANT INSTRUCTIONS
- DESCRIPTION
- 3-1. PRODUCT DESCRIPTION
- USE
- 4-1. ELECTRICAL CONNECTION
- 4-2. INSTALLING COMPONENTS
- 4-3. STARTING THE MACHINE FOR THE FIRST TIME
- 4-4. STARTING THE MACHINE
- EUROPICCOLA / STRADIVARI MODEL
- PROFESSIONAL / STRADIVARI PROFESSIONAL / EXPO MODEL
- 4-5. DISPENSING COFFEE
- 4-6. TOPPING UP THE BOILER WITH WATER
- 4-7. DISPENSING STEAM
- 4-8. PREPARING A CAPPUCCINO WITH THE STEAM PIPE
- 4-9. PREPARING A CAPPUCCINO WITH THE AUTOMATIC CAPPUCCINO MAKER
- INSTALLING THE AUTOMATIC CAPPUCCINO MAKER
- CAPPUCCINO PREPARATION
- 4-10. PREPARING OTHER HOT DRINKS
- TEA, CAMOMILE TEA
- HOT CHOCOLATE
- 4-11. HOT WATER
- CLEANING AND MAINTENANCE
- 5-1. CLEANING THE OUTSIDE OF THE MACHINE
- 5-2. CLEANING THE FILER HOLDER
- 5-3. CLEANING THE STEAM PIPE
- 5-4. CLEANING THE AUTOMATIC CAPPUCCINO MAKER
- TROUBLESHOOTING
- INTRODUCTION AU MANUEL 34
- AVERTISSEMENTS 34
- DESCRIPTION 38
- UTILISATION 38
- NETTOYAGE ET ENTRETIEN 44
- CAUSES DE DYSFONCTIONNEMENT OU ANOMALIES 45
- INTRODUCTION AU MANUEL
- MODÈLE EUROPICCOLA/STRADIVARI
- CAUSES DE DYSFONCTIONNEMENT OU ANOMALIES
- MODELL EUROPICCOLA/STRADIVARI
- WAARSCHUWINGEN 66
- BESCHRIJVING 70
- GEBRUIK 70
- REINIGING EN ONDERHOUD 75
- OORZAKEN VAN GEBREKEN OF STORINGEN 76
- INLEIDING OP DE HANDLEIDING
- 1-1. INLEIDING
- 2-1. VEILIGHEIDSWAARSCHUWINGEN
- 3-1. BESCHRIJVING VAN HET PRODUCT
- MODELO EUROPICCOLA/STRADIVARI
- INNEHÅLLSFÖRTECKNING
- INTRODUKTION TILL BRUKSANVISNINGEN
- ANVISNINGAR 112
- BESKRIVNING 115
- ANVÄNDNING 116
- RENGÖRING OCH UNDERHÅLL 121
- ORSAKER TILL FELFUNKTION OCH ANOMALIER 122
- 1-1. INTRODUKTION
- 4-7. WYDOBYWANIE PARY
- MALLI EUROPICCOLA/STRADIVARI
Brand : LA PAVONI
Model : Milano
Category : Coffee machine