Fidi Plus - Breast pump Lionelo - Free user manual and instructions
Find the device manual for free Fidi Plus Lionelo in PDF.

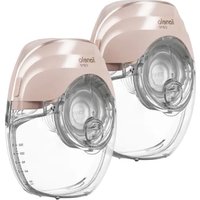
| Product type | Double electric breast pump |
| Brand | Lionelo |
| Model | Fidi Plus |
| Main body dimensions | Approximately 18 x 10 x 7 cm |
| Main body weight | Approximately 250 g |
| Power supply | Rechargeable lithium-ion battery, USB charging 5V DC 1A |
| Operating modes | Massage (9 levels), Expression (9 levels), Mixed (9 levels) |
| Main functions | Automatic switch from massage to expression after 2 min, memory of last setting, automatic stop after 30 min, pause, milk collector for the other breast |
| Included accessories | Silicone funnel 28 mm + 2 tips 24 and 20 mm, silicone membrane, suction valve, bottle, USB cable, cap, storage bag adapter, 2 storage bags, milk collector |
| Materials | Body: ABS plastic; parts in contact with milk: BPA-free silicone and polypropylene |
| Care and cleaning | Clean parts in contact with milk with soapy water + disinfect by boiling for 10 min. Wipe main body with a soft cloth |
| Safety | CE certified, overvoltage protection (displays E1 if >5V), automatic shutdown, instructions to avoid any risk |
| Spare parts and repairability | Spare parts available on request via customer service (help@lionelo.com). Repair only by an authorized center |
| Warranty | Legal warranty of conformity; detailed conditions on the manufacturer's website |
| General information | Portable breast pump, seated use, suitable for personal use. Supplied with multilingual manual (140 pages) |
Frequently Asked Questions - Fidi Plus Lionelo
User questions about Fidi Plus Lionelo
0 question about this device. Answer the ones you know or ask your own.
Ask a new question about this device
Download the instructions for your Breast pump in PDF format for free! Find your manual Fidi Plus - Lionelo and take your electronic device back in hand. On this page are published all the documents necessary for the use of your device. Fidi Plus by Lionelo.
USER MANUAL Fidi Plus Lionelo
In case of any questions or comments on the purchased product, please contact us:
help@lionelo.com
Producer:
BrandLine Group Sp. z o. o.
A. Kriegewskiego 1, 61-248 Poznań, Poland
IMPORTANT INFORMATION
Please read this manual before using the product to familiarize yourself with its functions and use it as intended.
Failure to follow the safety instructions and use not in accordance with the instructions may cause harm to health.
Keep this instruction manual for future reference.
- Do not repair or modify the device. These operations can only be performed by an authorized service center.
- This device is not a toy. Do not allow children to play with it. Keep the device out of the reach of children. Cleaning and maintenance should not be performed by children without supervision.
- The device may be used by children at least 8 years old and persons with reduced physical, sensory or mental capabilities, as well as persons without relevant knowledge and experience in the use of the device, if they are supervised or have been previously instructed in the safe use of the device and the risks involved.
- Do not start the device if you notice any damage. This applies both to the device itself and its accessories, such as the USB cable.
- Do not use the device if it begins to malfunction, has been dropped or submerged in water, becomes excessively hot, discoloration or bulging appears, or if other abnormal phenomena occur. Contact the manufacturer's authorized service center.
-
Never leave the device plugged into a power outlet unattended. Only charge the device with a 5V DC 1A output charger.
-
Use the device away from heat sources, high temperatures, hot surfaces, direct sunlight, sources of sparking, open flames, oils and sharp edges.
- Do not use chemicals to clean the device. Do not wash the main motor unit with water.
- Turn off the device after each use.
- Do not immerse the entire device in water or other liquids. Do not use near water.
- Do not disinfect the device with a steam sterilizer.
- Do not use the device improperly.
- Do not use the device or touch the power supply with wet or damp hands.
- Before cleaning or moving the device, turn it off and disconnect it from the power source.
- Before and after each use, wash and disinfect all parts that will adhere to the body and come into direct contact with milk.
- Thoroughly dry each component before use.
- For hygienic reasons, the device should be used by one person.
- If using the breast pump causes discomfort or pain, stop using the device immediately.
- Do not use the device throughout your pregnancy.
- Do not use the device if you are tired or while sleeping.
- If breast milk does not appear for more than 5 minutes while using the device, stop using the breast pump and consult a doctor.
Precautions for batteries
- Do not disassemble, hit, crush or throw into fire.
- Do not leave in high temperature environments.
- If severe swelling of the battery occurs, do not continue using it.
- Do not attempt to replace the battery yourself, as this may cause damage to the battery and cause overheating, fire and injury.
- Do not disassemble the battery, some lithium battery components are flammable, harmful and may cause injury, fire, cracking or explosion.
- It is forbidden to disassemble, open, cut or scratch the battery with metal.
-
Use only a standard adapter that meets charging standards, otherwise charging is dangerous.
-
Do not charge the battery for a long period of time.
- Lithium batteries should only be replaced by the company or authorized service providers, and replacing them with a battery of the wrong model involves the risk of explosion. Turn off the device before removing the battery.
- Dispose of batteries in accordance with national environmental regulations.

The product complies with the requirements of European Union directives. In accordance with Directive 2012/19/EU, this product is subject to separate collection. The product should not be disposed of with municipal waste as it may pose a risk to the environment and human health. Return the used product to the recycling centre for electrical and electronic equipment.
Device diagram (fig. A)
- Protective cover
- Silicone funnel (28 mm)
2a. Funnel (24 mm)
2b. Funnel (20 mm) - T-piece of the breast pump
- Milk bottle
-
Main body
-
Silicone diaphragm
- Suction valve
- USB cable
- Milk bottle cap
- Adapter for milk storage bag
- Milk storage bag
- Milk collector
Touch screen diagram (fig. B)
- Reduction of intensity level
- Increase of intensity level
- Switching the operating mode
- On/off switch
-
Battery level indicator
-
Massage mode
- Mixed mode
- Milk pumping mode
- Time indicator
- Mode intensity level indicator
Breast pump modes
- Massage mode - 9 levels. Massage simulates the initial sucking phase of the baby during breastfeeding. The device automatically switches from massage mode to pumping mode after two minutes.
- Pumping mode - 9 levels. This mode simulates the deeper sucking phase of the baby during breastfeeding.
- Mixed mode - 9 levels. Combination of massage and pumping modes
to simulate the final sucking phase of the baby. It is used for pumping leftover milk.
Installation of the breast pump (fig. C)
NOTE
Make sure all parts of the device in contact with milk are disinfected with boiling water. Wash your hands before assembly.
- Place the silicone funnel (2, fig. A) on the breast pump T-piece (3, fig. A). Make sure that the collar of the funnel is properly hooked (1, fig. C). You can also choose one of the two 24 or 20mm funnels (2a or 2b, fig. A) to insert into the silicone funnel (2, fig. A).
- Place the silicone membrane (6, fig. A) on the breast pump T-piece (3, fig. A). Make sure that the collar of the diaphragm is properly hooked and does not slip when using the breast pump (2, fig. C).
- Insert the suction valve (7, fig. A) into the lower opening of the breast pump T-piece (3, fig. A). Make sure the valve is fully inserted (3, fig. C).
- Attach the milk bottle (4, fig. A) to the lower hole of the breast pump T-piece (3, fig. A). Make sure the bottle is tightened securely (4, fig. C).
- Connect the main body (5, fig. A) to the breast pump T-piece (3, fig. A) at the location of the silicone membrane (6, fig. A). Make sure that the body is installed correctly (5, fig. C).
- If you want to take milk directly into the breast milk bag for storage for later, attach the adapter (10, fig. A) to the milk storage bag (11, fig. A), and then connect the whole thing to the breast pump T-piece (3, fig. A).
Method of use (fig. D)
NOTE
Charge the device before the first use.
Wash your hands before use. Make sure all parts of the breast pump are properly installed according to the installation instructions.
During use, maintain a normal sitting position and relax.
- Press the breast pump tightly against your breast to avoid sucking in air (fig. 1).
- Turn on the device by holding the switch for 2 seconds. The device will automatically turn on the massage mode when it starts. After 2 minutes
of operation in stimulation mode, the device will automatically switch to pumping mode (fig. 2).
- To change the mode during use, press the mode switch button (3, fig. B).
- The mode intensity level indicator displays the current operating level of the device. Press the decrease and increase intensity level buttons to switch mode intensity levels from 1 to 9 (fig. 3).
- When using the breast pump, the breast milk collector (12, fig. A) allows you to collect milk while it is spontaneously flowing out of the other breast.
- When, at the end of pumping, it's no longer as effective, switch to the mixed mode to pump the leftover breast milk.
- Press the switch to stop the device (pause mode). Press again to resume its operation. If the pause mode is maintained for a longer time, the device will automatically turn off after 5 minutes.
- To turn off the device press and hold the switch for about 2 seconds (fig. 4).
The device will automatically turn off after 30 minutes of operation and no action taken.
The product has a memory function. The device automatically remembers the operation mode and intensity level of the mode after switching off and changing the operation mode.
The time indicator (9, fig. B) displays the current usage time of the device. If the device is stopped (pause mode), the current usage time will be displayed until the device resumes operation or is turned off.
Storage and heating of milk
Storage
- After collecting the milk, immediately close the container tightly and put it in the refrigerator.
- Do not store milk at room temperature (16-29°C).
- In the refrigerator (4^) , the milk can be stored for 3 to 5 days.
- The milk can be stored in the freezer (-16^) for up to 6 months.
- Do not store milk on the refrigerator door.
Defrosting and reheating
- To freeze milk, fill the container 3/4 full, as milk expands in volume when frozen.
- To preserve the nutritional value of milk defrost it naturally in the refrigerator
or under warm running water with a maximum temperature of 37^ .
- Before feeding, shake the milk container gently to mix the milk evenly.
- Do not defrost frozen milk in the microwave or boiling water to avoid losing nutritional value and burning your baby.
- Never re-freeze milk that has already been defrosted once and store it either at room temperature or in the refrigerator.
Charging (fig. E)
- Connect the DC plug of the cable to the device's power socket on the side of the main body, and connect the other end with the USB plug to the USB adapter (not included).
- During charging, the battery level indicator flashes green. When it stops flashing, it indicates that the device is fully charged.
- The device automatically detects the battery level. When the battery level is high, the battery level indicator lights up green. When more than half of the battery is used up, the battery level indicator lights up yellow. When the battery level is low, the battery level indicator starts to glow red, and when the indicator starts to blink, the device will turn itself off after a while.
NOTE
You can use the breast pump while the battery is charging, but extreme caution is recommended. However, please note that frequent use of the device while it is charging may result in reduced battery life.
Use a DC5V/1A adapter for charging.
Troubleshooting
| Problem Solution | |
| The device does not switch on | ·The device's battery may have discharged or entered a protective state caused by long storage. Connect the device to the adapter to activate the battery. ·Fully charge the battery before using the device for the first time and after long-term storage. |
| Insufficient suction power | ·Check that the silicone funnel of the device fits snugly to the breast. ·Check whether all parts of the device are correctly and fully installed. ·If the room temperature is below 15°C, leave the device running for about 30 seconds before using it. |
| The device displays the message “E1” | If the adapter used to charge the device has a voltage higher than 5V, it will display the message “E1” and will be protected from over voltage and cannot be charged. After using the 5V adapter to charge the device, it will resume standard charging. |
| Pain or discomfort | Adjust the intensity level or change the mode of operation. Change the position or alignment of the breast. In the event of unremitting pain or discomfort, consult a doctor. |
Cleaning and disinfection of the device
NOTE
Do not clean or disinfect the main body or power cord of the device. These parts do not come into contact with food. They can be wiped clean with a soft cloth. Wash all parts in contact with the body and milk separately to avoid drying out food residue and prevent the growth of bacteria.
1. Before the first use
Before using the device for the first time, wash with a cleaning agent and then sterilize with boiling water all its parts except the main body. Please follow the cleaning and disinfection instructions in steps 2 and 3 below.
2. After each use
- Disassemble the device into its individual parts and rinse with cool water all parts in contact with the body and milk to remove food residues.
- Soak all separated parts in water with mild detergent for 5-10 minutes. Then wash them with a clean cloth or gentle brush and rinse them separately under clean running water.
- Leave all parts of the device to dry in a clean place.
- Store the device parts in a clean bag or container for the next use.
NOTE
Clean the parts that have been in contact with the body once a day and after each use. The device does not require maintenance. Be careful not to damage the device when cleaning it.
3. Daily disinfection
- After use, disassemble the breast pump and clean the main device with a dry and soft cloth.
- Before using it for the first time, disinfect all components that will come into contact with milk (milk bottle, T-piece, valve, diaphragm, silicone funnel and collector).
- To disinfect, put all components in boiling water for 10 minutes. Make sure all components are immersed in the water and none touches the dry part of the pot, as the components may melt.
- Before the next use, rinse all elements under running water to remove food residue.
- Leave all items to dry completely on a clean dish cloth or dish dryer.
NOTE
Do not use sharp tools to clean silicone components, as this may result in damage to them.
Be careful not to damage the suction valve and silicone diaphragm when cleaning. If they are damaged, the device will not work properly.
Remove the suction valve from the device carefully. When cleaning it, rinse in clean water without inserting your finger or any objects into it, as this may result in damage.
The photos are for reference only, the actual look of the products may differ from the ones shown in the pictures.
PL
Drogi Kliencie!
HecobJIOJeHHe INcTpyKcIyNo 6e3OpacHOCTN N IcNoJIb3OBaHne He B COOTBeTCTBnC INHcTpyKcIYe MoXeT npINBeCTN K HaHeceHIO BpeJa
3ДОРOBьH.
CoxpaHnTe daHHoe pyKOBoDcTBO dIaJIbHeIeRo nCpOJIb3OBaHnI.
- He pemontnyteи He moiФицуte yctpoicTBO.Даньe DeICTBnA MOKET BbIOJIHЯТb TOLbKO aBTOpN3OBaHHbI CepBnCHbI ZeHTp.
- ΘTO yCtpoiCTBO He nIrpUsha. He nO3BoJnTe DeTAm nIgpaTb C Hm. XpaHnte yCtpoiCTBO B HeIoCTyInHom dJa DeTei MeCTe. YnCTka N TexHnueckoe o6cIyKnbAHne He DoJIxHbI BbIIOJNHaTbcr DaETbMn 6e3 npincMOtpa.
- YcIpoIcTBo MoJKeT IcNoJIb3OBA TbBcA DeTbMn B Bo3pAcTe He MeHee 8 JeT n JInzamn C OgrpaHnueHHbIMn Φn3NueCKnMn, CeHCOPHbIMn nJIn yMCTBeHHbIMn BO3MOxHocTAmn, a TaKJKe JInZaMn, He NMeIOUImn COOTBcETCTByUoX 3HaHn iOnbIta IcNoJIb3OBAHnYcTPOcTBA, PnI YcIobn, YTO 3a HmN YcTAHOBLeH KOHTpOJIb nJIn Jx e OHN 6bln IpnOHcTpPyKTIpuOBaHbI O 6e3OpaCHOM IcNoJIb3OBAHn YcTPOcTBA n CBraHHbIX C Hm pNcKax.
- He BклюаиTe ycTpoiCtBO, ecn 3aMeTnIn KaKne-Ли6o NOBpeJKeHnIy. ΘTo KacaetcKaK caMOrO ycTpoiCtBa, TaK n erO akceccyapOB, HaprIMep USB-Ka6eJIy.
- He nCloB3yIte yCtpoiCtBO, ecn OHO hauaLo pa6oTaTb co c6oMNI, erO poHJI nn IoppykaII B BOy, OHO cnJIbHO HaRpeBaIocb, o6ecuBeuHaBaoCb, IopBlaIOcB B3dYTne nn BO3HnKaII npyTne Heo6bIuHbIe YBLeHnA. O6paTeCB aBTOpN3OBaHHbI cepBnCHbI ueHTp npOn3BODnteJI.
6.国民党a He octablan Te yctpoiCTBO, BKJIoueHHoe B po3eTKy, 6e3 npncMOtpa. 3apjkaTb yctpoiCTBO MOxHToIbKO 3apJdHbIM yctpoiCTBOM C BbIXoHNbIMn napametpamn 5B noCtOJHHoro ToKa 1A. - Истору щостра typ, Рожи постору щоста щоста щostа щostа щostа щostа щostа щostа щostа щostа щostа щostа щostа щostа щostа щostа щostа щostа щostа щostа щostа щostа щostа щostа щostа щostа щostа щOSTТВО BДАЛN OT Исторны Келлд,在 Сторы ВИСТЕ ПОПЕРУСТВО BДАЛN OT Исторны ВИСТВО BДАЛN OT Исторны ВИСТВО BДАЛN OT Исторны ВИСТВО BДАЛN OT Исторны ВИСТВО BДАЛN OT Исторны ВИСТВО BДАЛN OT Исторны ВИСТВО BДАЛN OT Исторны ВИСТВO BДАЛN OT Исторны ВИСТВО BДАЛN OT Исторны ВИСТВО BДАЛN OT Исторны ВИСТВО BДАЛN OT Исторны ВИСТВО BДАЛN OT Исторны ВИСТВО BДАЛN OT Исторны ВИСТВО BДАП NOTI OTHRA, Масla N OSTpbIX KpaEB.
- He nCloIb3yIe XIMnueckne BeIecTBA dIa OUnCTKn ycTpoIcTBA. He MoIte OCHOBHOJ 6JOK DBrIgATEJIa BODOI.
- BbikljuoyaTe ycTpoiCtBO nocLe kaKdoTo nCpOJIb3OBaHnJ.
-
He norgykaite Bce yctpoicTBo B Body nll dpyrne kndkoctn. He nCpOJIb3yIte B6JIu3n BoIbl.
-
He de3nHΦnCnpyTe yCTpO'cTBo c nOMoCbNo napOBOro cTeprnIIn3aTopa.
- He nCloIb3yIte ycTpoIcTBo He no Ha3NaYeHnIO.
- He IncnoIb3yIte yCTpoIcTBo n He npKacaiTeCb K nCTOuHnky nITaHnMOKpbIMn nII BlaJXHbIMn pyKaMn.
- Перацстков симперашеним устюctва вikлочиные по OTcoedHHTE OT nCTOCHKA птаня.
- До и посте каждого Incрпьзовая моITE и DeэнфицуйтЕВсе зелем entы, КOTOPьIE 6yДуТ ппкреленbl K KОрпucу И 6yДуТ HeNoCpeIcTBeHNO KOHTaKTpOBAtB C MOLOKOM.
- TzataTeIbHO BbICyUHrTe KaJdbI ppeMeT nepeNcNoJIb3OBAHNHeM.
- Из соображень Гигиени устюством дожен польозоватся однун человек.
18.Еслncpoь3OBaHneMOLOKooTcoCa BbI3bIBaetДИСКOMΦopТ nll 6OJIb, HeMeДлeHHo ПpeKpaTnTe Исpoь3OBaHne yCTpoIcTBA. - He nCloIb3yIe npI6Op Ha npoTjKeHn Bcei 6epMeHHocTn.
- He nCloIb3yIte yCTpOiCtBO, KOrda Bbl yCTaII nn cPiTe.
21.ЕслиВОВРЕМИСПОЛБЗOBAHNYUCТРОИСТВa ГPyДhoeMOLOKOHeNoCTyPnaeT 6OJIeE5 MInHyT,пpeKpaTnTe ИСПОЛБЗOBAHNe MOLOKOOTcoCaиобразITeCsBКВрЧу.
MepbI ppeOCTOpOXHOCTHn pni nCNoJIb3OBaHN 6aTapeN
- 3a npeuaetcpa36npaTb, 6ntb, daBnTb n 6pocatb B orOhb.
- He octablaIe B yCIOBnIX BbICOKO TeMnpaTpybl.
3.Еслпронзошел сильнь В3дутne akКумлЯТopa, He пpoДолжайTe erO nCNoЛb3OBaTb. - He nbitaiTecb 3aMeHntb 6aTapeo camocToIeIbHo, TaK KaK 3TO MOKeT npNBecTN K NOBpeJdeHIO 6aTapeu, nepeRpeBy, BO3rOpAHIO I TpaBMam.
- He pa3bpaIte 6aTapeH, HeKOToPbIe KOMNoHeNTbI IInTneBbIX 6aTaapeJ IeKOBocPJIaMeHЯUOJIeC8, BpeIbIe N MOrYt CTAb TprUnHOJ TpaBM, IooKapa, pa3pbIbA nII B3pbIbA.
- 3aŋpeɪəeɪcɪ paɪsɪpɑt b, oɪkɒpɪbɑt b, peɪsʌn iːn iʒaɪpɑnʌt b aɪkʌmɪyɪrTOp Meɪaɪlɪm.
- Исторуши Толбко Стандартуни радапетер, соютBEТСВУОПИСН STANДAPТAM зapяdkи, Иначе зapяdkа может 6ыть onachoI.
-
He 3apjkaIte aKKyMylaTOp B TeueHne IInTeJbHO BpeMeHn.
-
Литnevbie 6aTapeu MoTy 6bItb 3aMeHebI Tobilko KOMpaHnei nIaBToPn3OBaHHbIMN NOCTaBuznkamN yClyr, a 3aMeHa nx Ha 6aTaapeHo He npabInbHOJ MOeJI N BLeueT 3a co6oN pNcK B3pbIBa. Пржde yem n3BLeKaTb 6aTaapeU, BbIKJIouHTe yCTpoNCTBO.
10.БатAPEn cIeIyET yTINI3IropBaTb B COOTBETCTBmN C HauNoHaJIbHbIMN 3KoJIoΓnueCKnMn HopMaMn.

Прдукт соotВeTCTByet Tpe6OBaHЯm ДиpeKТВЕрoneяСКOrO CoI03a. B coOTBeTCTBnCДиpeKТВОь 2012/19/EC эТOT прдукт подeжNT OTdJIbHOyTuIN3aци. Изделп HeIb3Я Bbl6paCbIBaTb BMeCTe C 6bITOBbIMN OTXOДamN, TaK KaK OHO можET п徳ставлгУгposу Дя Okpyжанше Срды N 3ДоровьчelOBeKa. ИспohlбЗOBaHHьй прдукт сеДуeТ ВерHyТь ВpyнKT Nepepa6OTkn эЛeКТрИчecKOrO иэЛeКТрОнHOrO obOpudOBaHЯ.
Cxema yctpoiCTBa (pnc. A)
- 3aunTHna KpbIwka
2.Силиковая Воронka(28mm)
2a. BopoHka (24 MM) - BopoHka (20 MM)
- TpoHnK IJIa MoJOKOOTcoca
4.Бутблкадя MONOKa -
OCHOBHaЯ YacTb
-
CnlinkoHOBa MEmbpaHa
- BcabsBaHouJN KlaNaH
- USB-ka6eJIb
- Kpbiuka oT 6yTBilkn IJRA MOJoka.
- AaanTep nla naKeTa Iy MoIoka.
- Пакет Длихареня молoka.
- KolnkekTop eBbl
Cxema ceHcOpHoro 3KpaHa (pnc. B)
1.Уменихуровая nHTeHcNbHOCTn
2. Повышени уровниHTEHCNBHOCTN
3.переклочене ржима pa6oТы
4.ПepeKJIIOUaTeIbВКЛIOUeHnIy/ BbIKJIIOUeHnIy.
5. INДиКaTOp ypoBnЯЗapЯda
6aIapen.
- Pekim Maccaka
- Cmeuahhbu pexum
- Pekim əkcpceccn
9.ИнданkaTOpВрemeHn - ИнданаTop уровая Интусуновские рекиma.
Pexnmbi MOJOKOOTcoca
- Pexkim maccaKa - 9 ypOBHei. MaccK imNTnpyeT hauJIbHyO a3y cocAHnpe6eHka BO BpeM rpydHoro BCKapMlnBaHn. YcTroPocTBO
aBTOMaTnueckn nepeKJIouaetcra n3 peXIMa MaccaKa B peXIM cIeXINBaHnA MOJOKaYepe3 DBe MNHyTbI.
- Pekim ekcapceccn - 9 ypOBHei. 3ToT peKIM nMItnpyeT fo3y 6oJIe e Iny60KOrO cocAHnpe6eHka BO BpeMra rpydHOrO BCKapMlnBaHnIa.
- CmeuHbI pexm - 9 ypOBHei. CoeTaHne peKIMoB maccaHa n cUeKIBaHnI dIy IMTuZnI NocJeDHei a3bI cocAHnI pe6eHka. Ero IcNoJIb3yOT dIy I3BLeueHnI OCTaTKOB PnIzN.
YcTaHOBKa MoJokooTcoCa (pnc. C) BHIMAHNE
O6a3aTeIbHNo npoJe3nHΦuNpyuTe KInpTkoM Bce yactn yctpoiCTBa, KOHTaKTHpyUoIe c MoLokOM. Ipeed c6opKOy BBIMoIte pyKn.
- HadeNBte cnIIkoHObyo BOpOHky (2, PnC. A) Ha TpoHnK MoIokooTcoCa (3, PnC. A). Y6eDntecb, yTO BOpOTnK BOpOHKn npaBnIbHo 3akpeIen (1, PnC. C). Bbl TaKke MoJKeTe BbIbpaTb OndHy n3 DByx BOpOHOK pa3Mepom 24 nll 20 MM (2a nll 26, PnC. A), KoTopyu cJeDuye TBCTaBnTb B cnIIkoHObyo BOpOHky (2, PnC. A).
- HadehTe cnilkoHoyo Mem6paHy (6, Pnc. A) Ha TpoHnK MoIokOToCoc a (3, Pnc. A). Y6eHntecb, yTO BOpOTnK dnaΦpaMbl npaBnIbHo 3akpeIen n He cockaJIb3bIbAet npn NcNoJIb3OBaHnn MoIokOToCoc a (2, Pnc. C).
- BcTaBbTe BCaCbIBaHouzni KlaPAn (7, PnC. A) B HnJxHee OTBepCTne TpoHnKa MoIokooTcoCa (3, Pnc. A). Y6eIITecb, yTO KlaPAn NOpHocTbO BCTaBJIeN (3, Pnc. C).
- Bkpytnte 6bybIIOUky c MoJOKOM (4, PnC. A) B HnJHHee OTBepCTne TpoHnka MoJOKoOTcOca (3, PnC. A). Y6eIITecb, yTO 6bybIIOUka HaJeXHo 3aKpyeHa (4, PnC. C).
- CoeДиНITE OCHOBнОI KOpnyc (5, Pnsc. A) c TpoHnKOM MoLOKOOTcOca (3, Pnsc. A), rnde haxoDntcra cnlinkoHObaj Mem6paHa (6, Pnsc. A). Y6eDiNTecb, yTO KOpnyc yCTaHOBJIeH npaBnJIbHo (5, pnsc. C).
- EcIn Bbl XOTnTe co6paTb MOLOKo HeNocpeIcTBeHNO B paKeT dJa XpaHeHnMoLOKa dJa NocJeDyHOSeTo IcNoJIb3OBAHn, pRiKpyTnte aIaIpTe (10, pnc.A) K paKeTu dJa XpaHeHn MoLOKa (11, pnc.A), a 3aTeM pRiKpyTnte BCE 3TO K TpoHnky MoLOKOOTcoca (3, pnc.A).
Cnoc06 nCnoJb3OBaHn (pnc. D) BHIMAHNE
3apndte yctpoicTBO neped nepBbIM nCnoJb3ObaHneM.
ВыIMоTe pyки пeredи спобьованem.УбeДИТecь,чTo Bce DeTaJI MОлOKOOTcoca npaBnIbHO co6paHbI B COOTBeTCTBnC ИнСТPyKцeN IO c6OpKe. Bo Время IncopoIb3OBaHЯ coXpaHЯITE HopMaJIbHoe cnJaYee ПОLOЖЕНе n paccla6bTeCb.
- Плотно прижмITE молokOOTcC K Гуди, УТоби ИЗБекаТь BCасыВаня ВОздуха (пс. 1).
- Вклочи Te yctpoicTBo, удержьая кногку питаня в т uehoe 2 cekynd. Посл e Вклоченя рибор aВТOMaTичесК n BклочNT peЖIM maccajka.Чepe3 2 мнуны pa6OTbI B peЖIMe CTИмУлЯцIN aПпapaT aВТOMaTичесК nпepexODIT B peЖIM сцжьаня молoka (pnc. 2).
- Дяизмени ржима pa60ы BO Время Испьзовая нажмITE конку пereклюецни ржима pa60ы (3,psc. B).
- Инданатор уровая InteHTeHcNBHocTи ржима оTo6paJkaet TeKyuIyupobeh pa6Otbl yctpoIcTba.HaЖIMaIte KhoIKN yMeHbIeHnIyBeJIuHEnIyaPOBHЯ InteHTeHcNBHocTи ДЯпepeKJIuHeyENI MexdY uPOBHЯmNInteHTeHcNBHocTи ржима ot 1do9(pnc.3).
- Прии Incnoьзовани молokоOTcoca молokoc6opнк (12, рис. A) поЗвяет сбирath молokо по меpe ero caMOnpOu3ВOLbHOrO BbITEkaHЯ n3 Друю Гуди.
- Koriga no OKOHuaHn cUeKuBaHn eΦΦeKTHBHOCTb cUeKuBaHn ypaTe, nepeKJIouHTecb Ha cMeUaHHbI pexm, YTObI cUeJNTb OCTaBWeecr MOJOKO.
- Haxmte KhoNky nItaHnay, yTo6bIOCTaHOBnTb yCTpO'CTBO (peKIM nay3bl). Haxmte eIe pa3, yTo6bIOZo6HOBnTb pa6Otu. EcIn naY3a B pa6Ote coXpaHЯETcB TteHne 6OJIee dIITeJIbHOrO nepNoJa BpeMeHN, yCTpO'CTBO aBTOMaTnueckn BBIKJIOnHTcR uepe3 5 MInHyT.
8.Чтобы Вьклочиь устюстwo, нажмITE и уdeckжвайт eноку ппаня поимерно 2 секунды (pnc. 4).
YcIpoIcTBo aBTOMaTnueckn BbIKJIHouHTcЯ nocIe 30 MmHyT pa6Otbl 6e3 KaKnx- IIn6o DeIcTBn.
I3dJIe IMeET yHKcHIO namrTn. NocIe BbIKJUoyehnI nN3MeHeHnpeKIma pa60tbyycTroYCTBO aBTOMaTHueCKn 3aONMHaet peKIM pa60tblu npOBeHb
HHTeHCnBHOCTnpeXkIma.
OuHsaiTe yacTn, coPnKacauoIeC TcIOM, oINH pa3 B DeHb I NocLe KaJdoRo
ncPoJIb3OBaHnY. UcToPiCTBO He Tpe6yET obcIyXnBaHnY. ByIbTe ocTopoXhbl,
UTo6bI He NobPeiNTb ycToPiCTBO npN YnCTKe.
3. ExeDHeBHaJe3nHΦekzna.
- Послесноьзоваяразберпет молokOOTcOи оунctпг OCHOBHOe yctpoIcTBO cyXoMЯrkOТkaHbIO.
- Перацпьим Испльзоваим рpoideинфицуп Te BCE щелемтbl, КOTOPые 6удУТ кОHTaКТИрOBaТ b C MOLOKOM (6yTbIлку ДЯ мOLOKa,
TpoHnK, KlaanH, MembpaHy, cnIKHOBOYU BOpOHky i KoJIeKTOp).
- Дя.Dee3nHΦekuIn NOMeCTIte BCE 3JIeMeHTbIB KINJaUHO BODy Ha 10 MInHyT. Y6eIITecb, YTO BCE KOMNoHEtbl IOnpyJKeHbIB BOdy HN OdInH IN3 HIX He KaCaETcra CyXoJ qAcTPhOJI, NocKoJIbky KOMNoHEtbl MOrY T paCpIaBNTbcra.
- ПераcléduoHIM nCNoIb3OBAHHeM npOMoIe BCE əJIeMeHTbI NOI npOTouHO BDOH, yTO6bI ydaIHTb OCTaTKN PIIuH.
- Даитевсем педметам полесью Выcoхны на чисов Травке ини сухильке дая посуда!.
BHIMAHHE
He nCnoIb3yIte ocTpbIe IHCTpyMeHTbI dIy ChcTK cIIINKOHOBbIX 3JIeMeHToB, TaK KaK 3TO MoJKeT pNBeCTn K Ix NOBpeJDeHIO.
Будь осторожен,
YTO6bI He NOBpeiITb BCaCbIBaHOUm KlaPAn H CnLIKHOHByO Mem6paHy BO BpeM YnCTKn. EcIn OHN NOBpeJKeHbI, yCtpoiCTBO He 6yJeT pa6oTaTb DoJIxHbIM 6pa3OM.
Bcabsbauoui Klaanacne dyet octopoxho cHrytbc yctpoicTba. Pn uocTe MOte eTo B uCTOn BoJe, He BCTabJra B HrO paIeU nn KaKHe-JIn6o ppeMeTbI, TaK KaK 3TO MoKET npNBecTN K NOBpeXdEHHIO.
ΦOTOrpaΦnI npedHa3HaueHbI TOLbKO dIy IINIOCTpaCnI, peaIbHbI BHeuHn BnI pOdyKcN MoKeT OTInuA TbCBr OIT npedCTaBJIeHHoro Ha φOTOrpaΦnIax.
IT
Egregio CLIENTE!
BrandLine Group Sp. z o.o.
A. Krieglewskiego 1, 61-248 Poznań, Polonia
INFORMACION IMPORTANTE
BrandLine Group Sp. z o.o.
Vennligst bruk DC5V/1A-adapteren for lading.
Feilsøking
BrandLine Group Sp. zo.o.o.
A. Kręglewskiego 1, 61-248 Poznań, Puola
TÄRKEITÄ TIETOJA
Detailed warranty conditions are available on the website: