Fidi Go - Breast pump Lionelo - Free user manual and instructions
Find the device manual for free Fidi Go Lionelo in PDF.
| Product Type | High chair and baby swing 2 in 1 |
| Brand | Lionelo |
| Model | Fidi Go |
| Recommended age (high chair) | From 6 months to 3 years (up to 15 kg) |
| Recommended age (swing) | Until the child can sit up unaided or weighs 9 kg |
| Power supply | 5V DC mains adapter (included) |
| Rocking functions | 3 speeds, timer 15/30/45 min, Comfort mode (cry detection) |
| Built-in lullabies | Yes, play/volume/selection |
| Seat adjustments | Height (5 positions), backrest (3 positions), footrest (3 positions), tray (2 positions) |
| Safety harness | 5-point, height-adjustable (2 positions) |
| Rocking lock | Yes, by installing locks and placing in seated position |
| Wheel brakes | Yes |
| Removable tray | Yes, dishwasher-safe (top part) |
| Upholstery | Clean with a cloth and mild products (do not machine wash, dry clean, or iron) |
| Cushion | Hand washable at 30°C max |
| Materials | Metal frame, plastic tray, textile upholstery |
| Folding | Yes, with side folding buttons |
| Spare parts | Use only original parts, mains adapter included |
| Compliance | EU directives (EMC, LVD, RoHS) |
| Manufacturer information | BrandLine Group Sp. z o.o., contact: help@lionelo.com |
Frequently Asked Questions - Fidi Go Lionelo
User questions about Fidi Go Lionelo
0 question about this device. Answer the ones you know or ask your own.
Ask a new question about this device
Download the instructions for your Breast pump in PDF format for free! Find your manual Fidi Go - Lionelo and take your electronic device back in hand. On this page are published all the documents necessary for the use of your device. Fidi Go by Lionelo.
USER MANUAL Fidi Go Lionelo
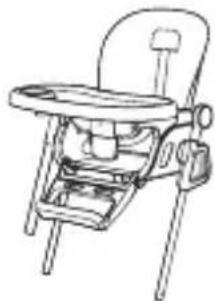
High chair and baby swing
Krzesetko do karmienia i bujaczek
natural_image
Simple line drawing of a rounded rectangular shape with a circular hole on top (no text or symbols)23
natural_image
Simple line drawing of a coiled cable or tube with connectors (no text or symbols)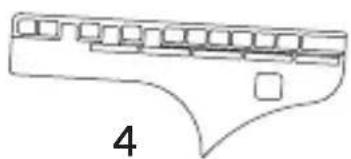
natural_image
Line drawing of a mechanical part with slots and a square hole, labeled '4' (no text or symbols on the diagram itself)5
natural_image
Line drawing of a baby boom chair with seat, legs, and front panel (no text or symbols)6

natural_image
Technical line drawing of a mechanical support structure (no text or symbols)7
natural_image
Line drawing of two identical mechanical clamps with no text or symbolsB
text_image
1 2 3 4 5 6 7 8 C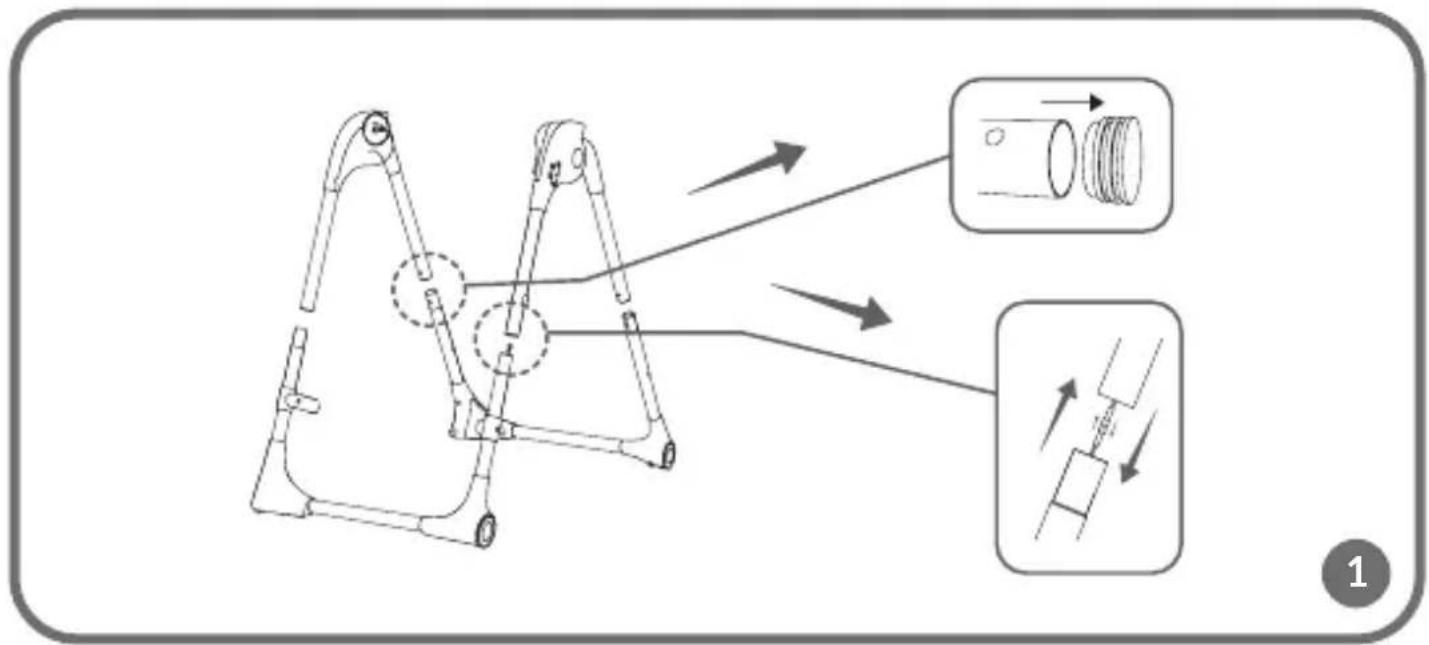
text_image
Technical diagram illustrating mechanical assembly steps with labeled components and directional arrows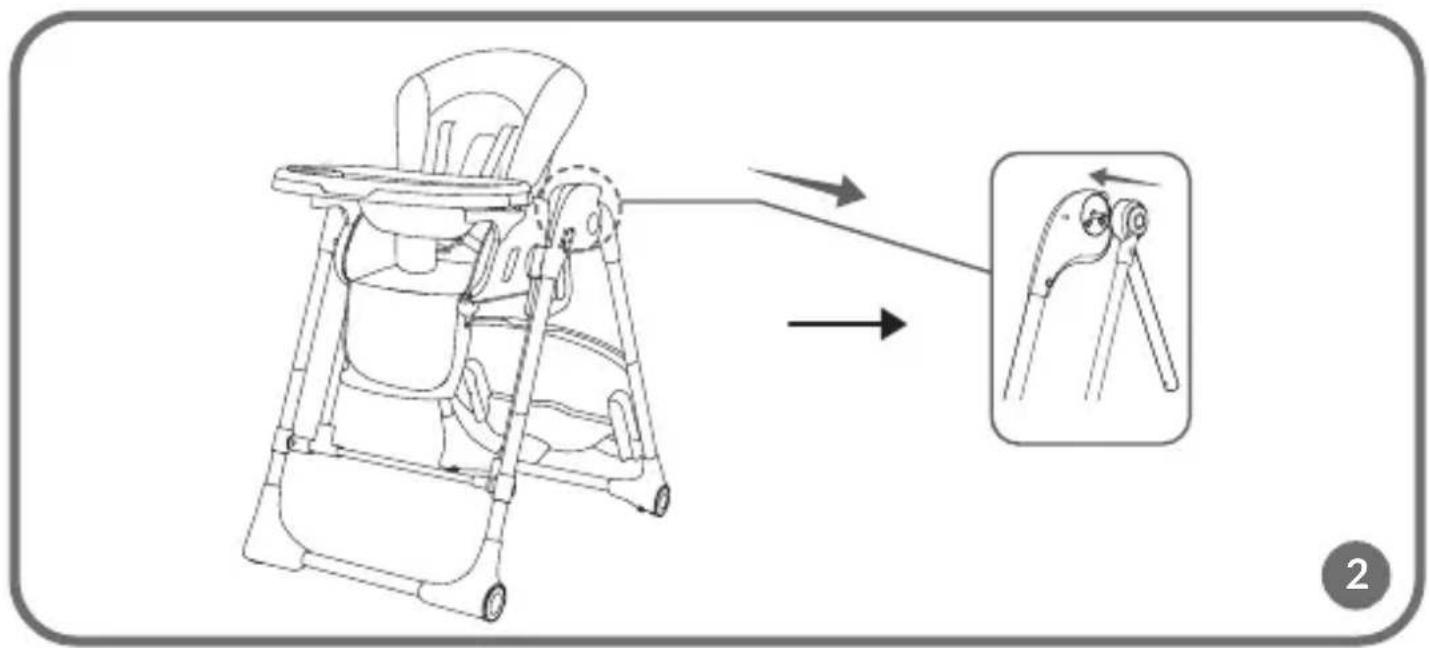
text_image
Diagram illustrating the step-by-step assembly of a baby's height jump device, showing before-and-after disassembly and final insertion.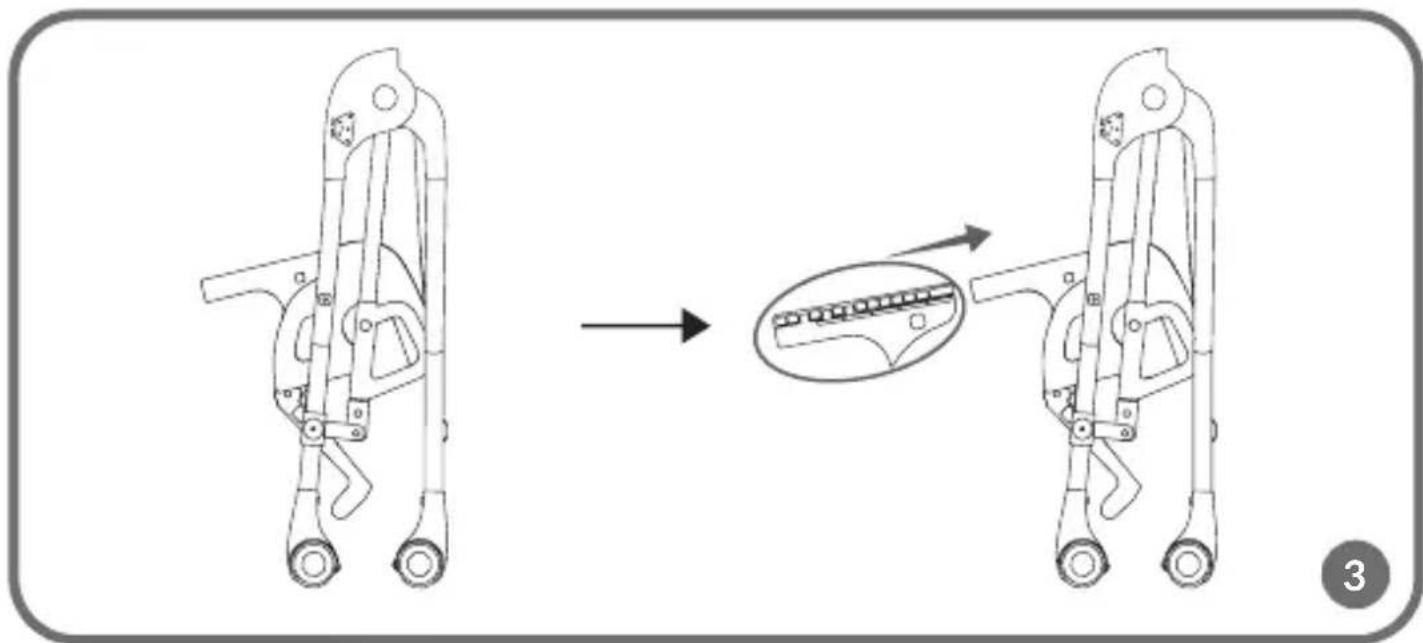
natural_image
Diagram showing a mechanical device being processed, with an inset close-up of the internal component (no text or symbols present)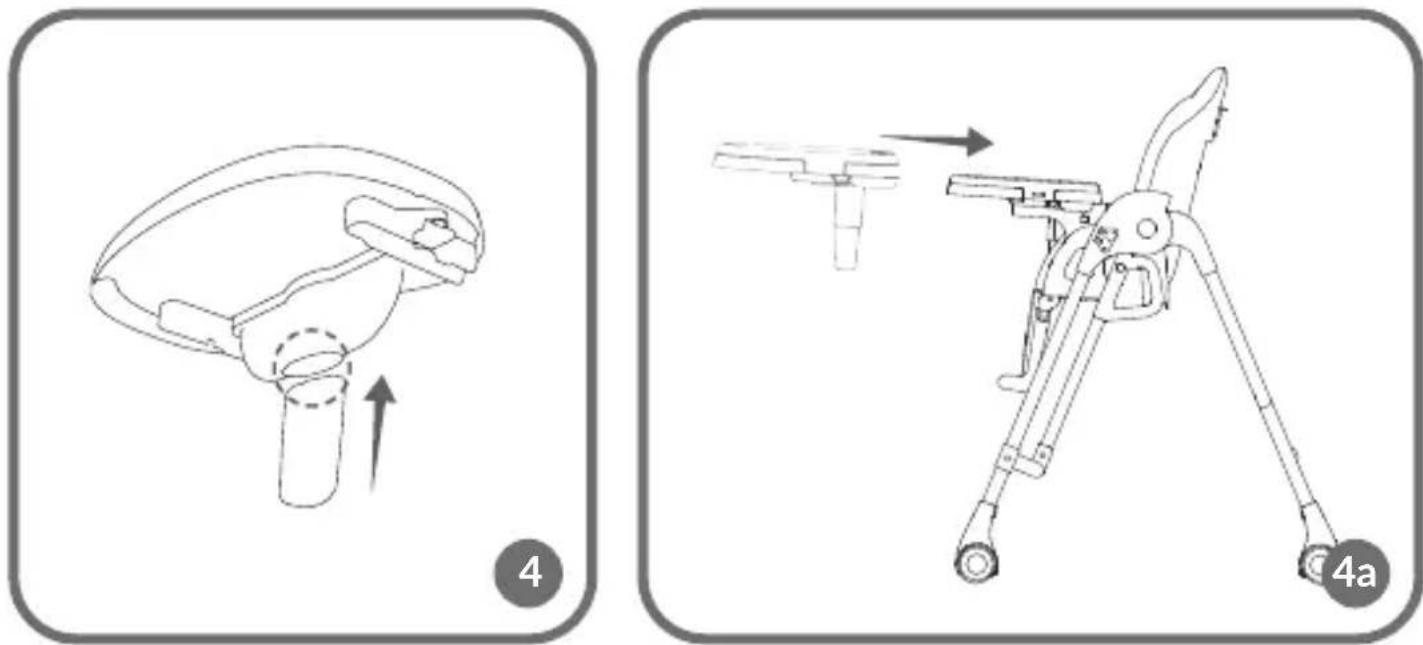
natural_image
Two-step diagram showing a mechanical assembly with an arrow indicating motion, no text or symbols present.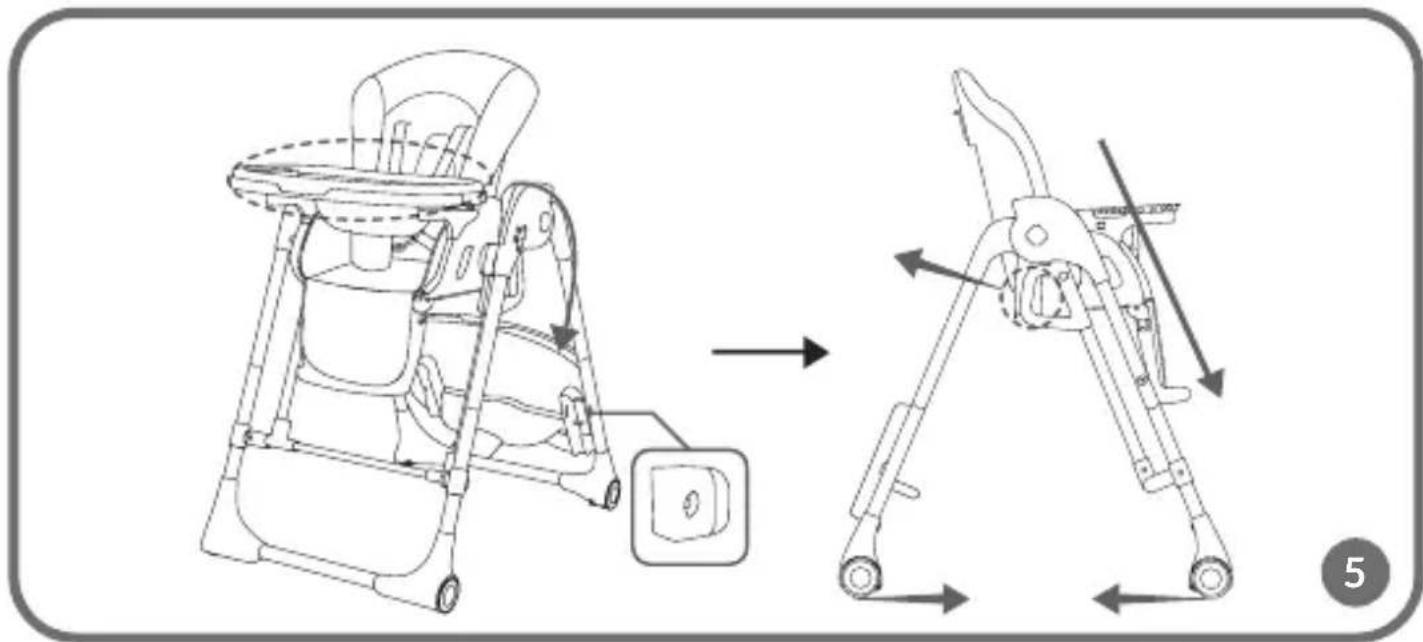
text_image
Diagram illustrating the assembly of a baby boom lift with labeled parts and directional arrows indicating motion.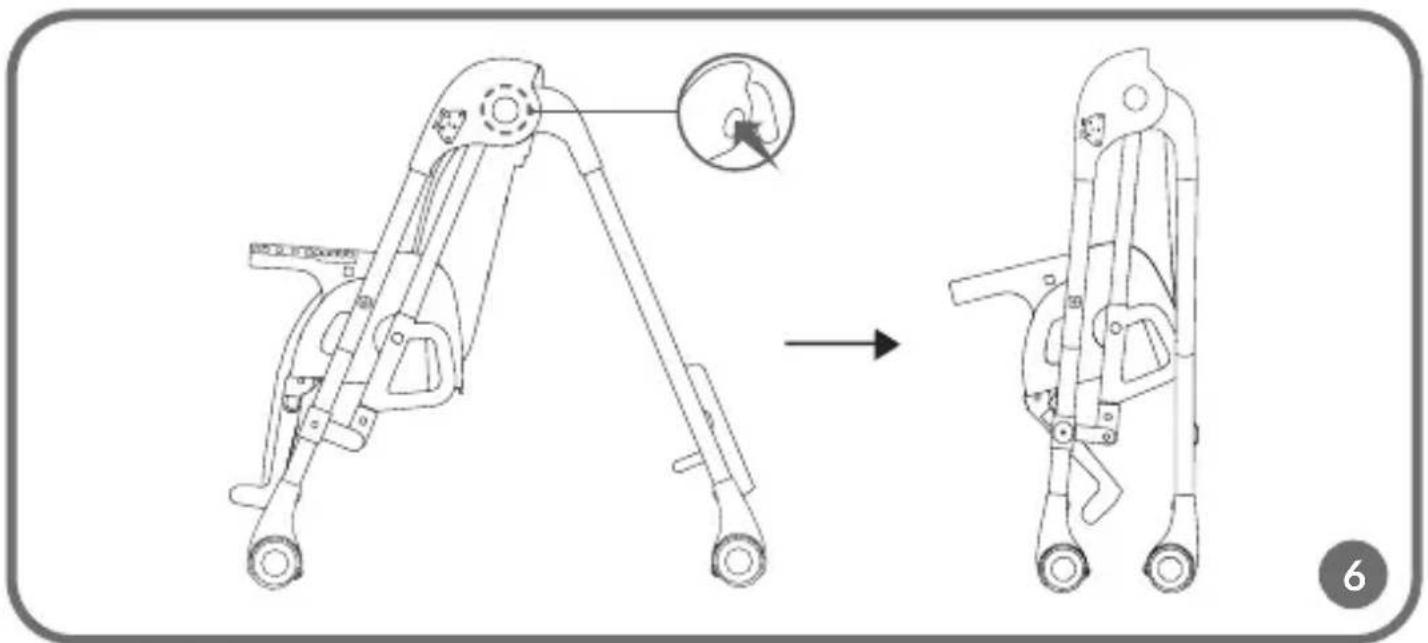
text_image
Technical diagram showing a mechanical device before and after assembly, with an inset close-up highlighting a specific component.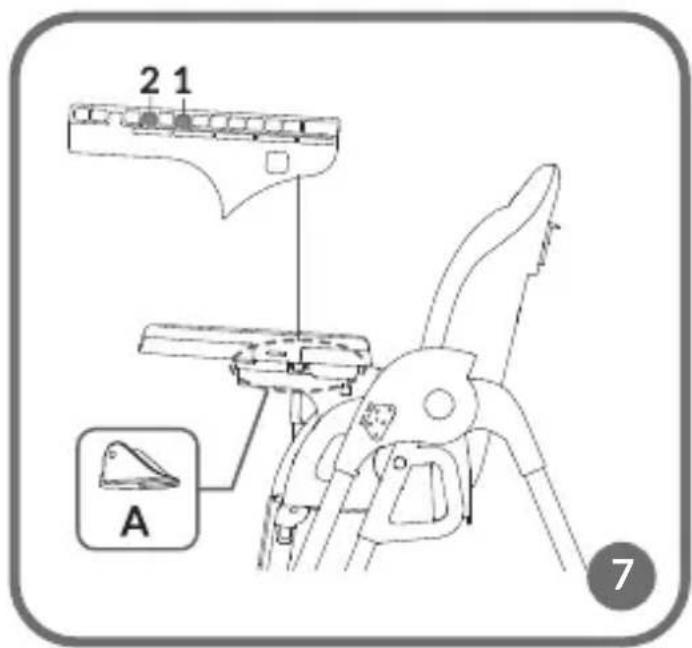
text_image
2 1 A 7
natural_image
Diagram of a folding chair with labeled parts and rotation arrow (no text or symbols beyond labels)
natural_image
Technical line drawing of a bipedal mechanical device with labeled parts and motion arrows (no text or symbols)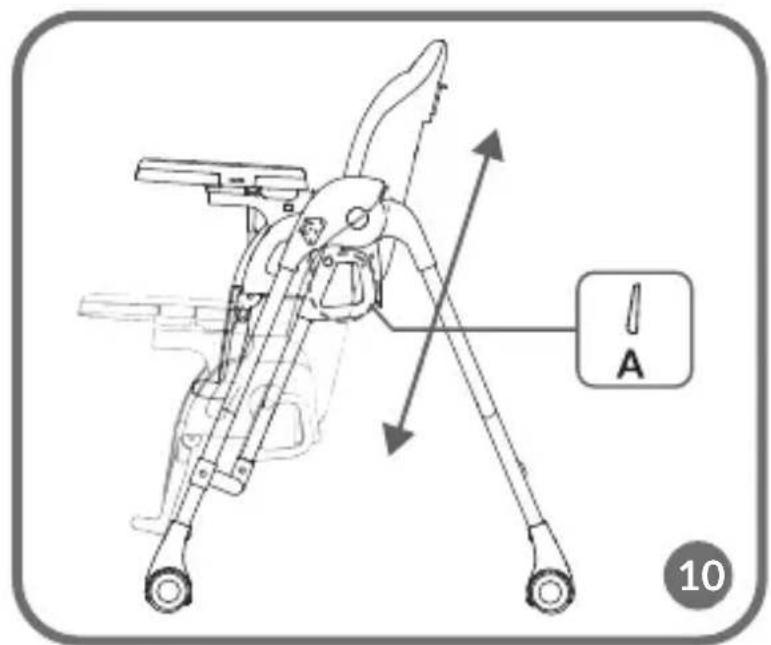
text_image
A 10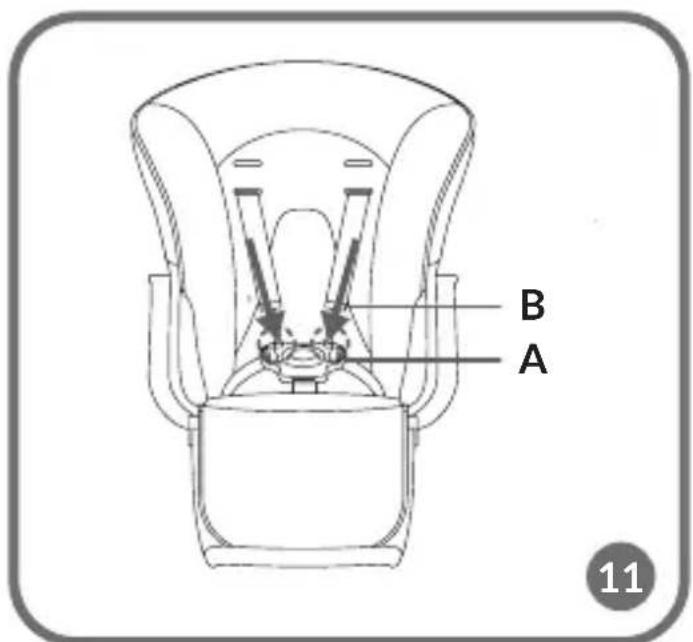
text_image
B A 11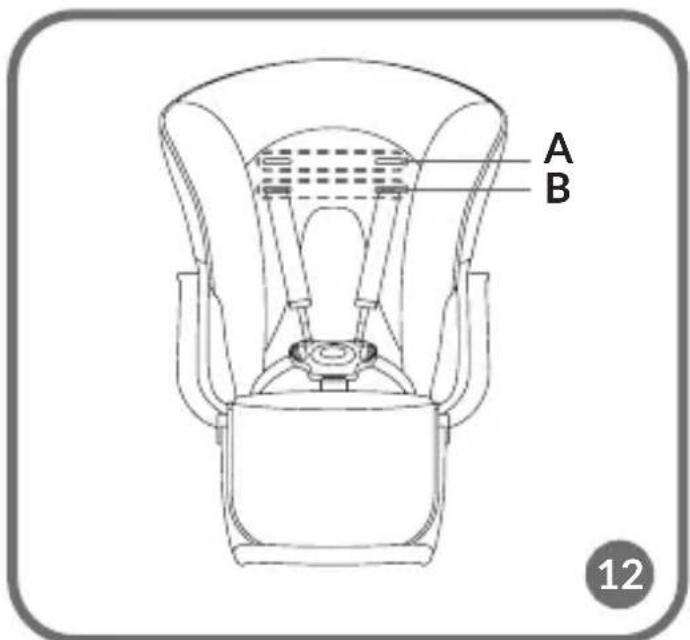
text_image
A B 12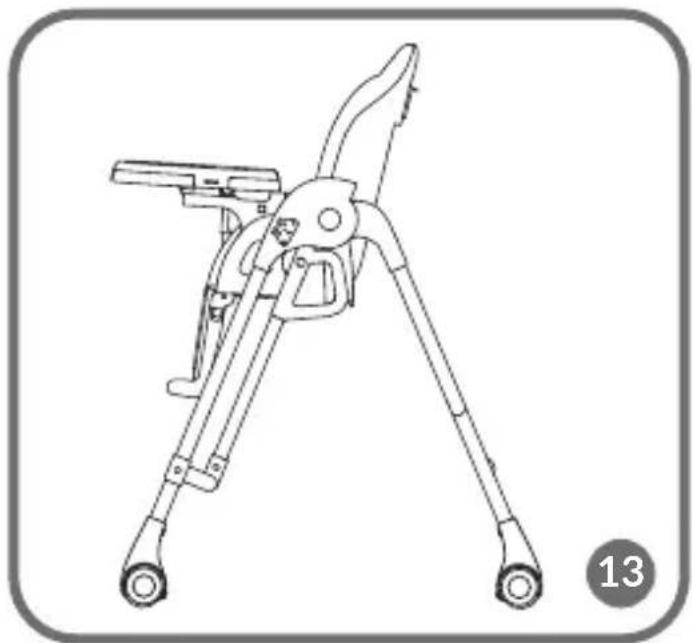
natural_image
Line drawing of a bipedal folding device with two legs and a handle, labeled with number 13 (no text or symbols on the device itself)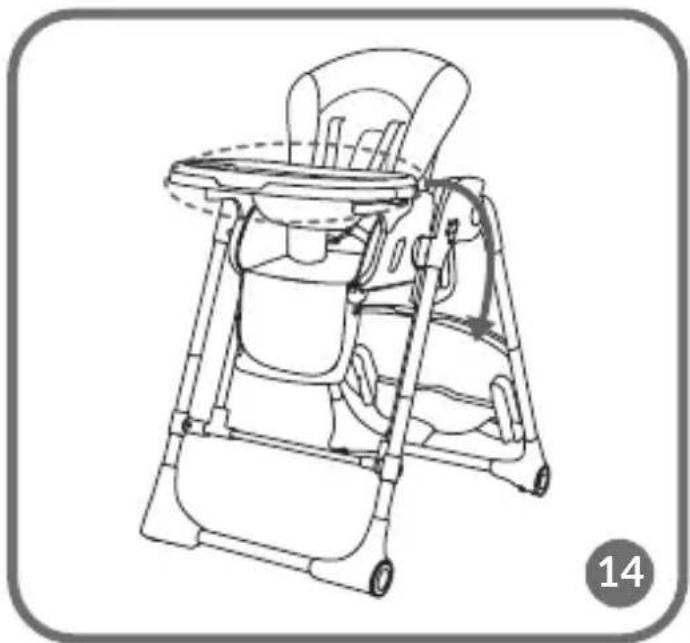
natural_image
Line drawing of a baby boom lift with seat, legs, and side panel (no text or symbols)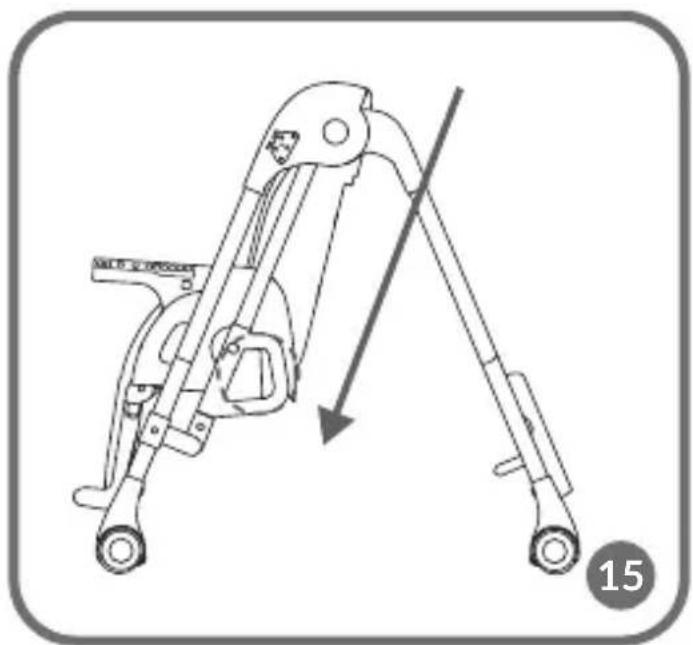
natural_image
Technical line drawing of a mechanical device with a lever and guide mechanism, no text or symbols present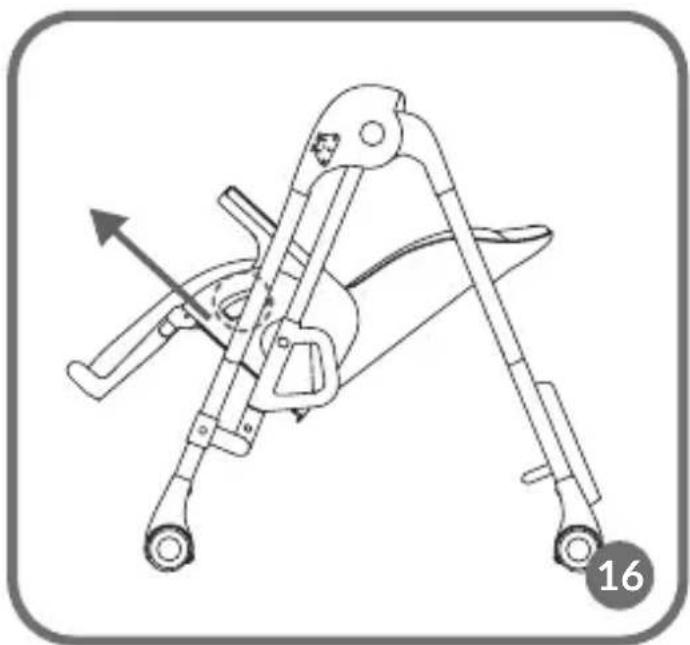
natural_image
Line drawing of a mechanical device with two legs and a central handle, showing no text or symbols.
natural_image
Technical line drawing of a mechanical device with a handle and lever mechanism (no text or symbols)17
natural_image
Line drawing of a baby seat with adjustable arms and wheels (no text or symbols)18
Dear Customer!
In case of any questions or comments on the purchased product, please contact us:
help@lionelo.com
Producer:
BrandLine Group Sp. z o. o.
Warnings for the high chair
IMPORTANT! READ CAREFULLY AND KEEP FOR FUTURE REFERENCE
WARNING
- Never leave the child unattended.
- Always use the restraint system.
- Falling hazard: Prevent your child from climbing on the product.
- Do not use the product unless all components are correctly fitted and adjusted.
- Be aware of the risk of open fire and other sources of strong heat in the vicinity of the product.
- Be aware of the risk of tilting when your child can push its feet against a table or any other structure.
- Do not use the product if the child cannot sit on its own.
- Do not use the product if any of its parts is missing or any of its components is damaged or torn.
- Do not let the child get close when you are folding and unfolding this product to avoid injuries.
- The product is intended for children who can sit up on their own.
-
The product can be used by children aged 0,5-3, whose weight does not exceed 15 kg.
-
Use original spare parts only.
- Always use the parking mechanism while using the product when you do not move the product to any other place.
Warnings for the baby bouncer
IMPORTANT! READ CAREFULLY AND KEEP FOR FUTURE REFERENCE
WARNING
- Never leave the child unattended.
- Do not use this product once your child can sit up unaided or weighs more than 9 kg.
- This product is not intended for prolonged periods of sleeping.
- Never use this product on an elevated surface (e.g. a table).
- Always use the restraint system.
- To avoid injury ensure that children are kept away when unfolding and folding this product.
- Do not let children play with this product.
- Do not move or lift this product with the baby inside it.
- This product cannot replace a cot or bed. If your child needs to sleep, place it in a relevant cot or bed.
- Do not use the product if any of its components is damaged or missing.
- Do not use accessories or spare parts other than approved by the manufacturer.
- Use only the power cable included in the set.
- Unplug the power cable in case you do not use the product for a long time.
- Regularly make sure the power cable, its wire or plug or its other parts are not damaged. Never use the damaged power cable.

The product complies with requirements of EU directives.
Pursuant to the Directive 2012/19/EU, this product is subject to selective collection. The product must not be disposed of together with domestic
waste because it may pose a threat to the environment and human health. The worn-out product must be handed over to the electrics and electronics recycling center.
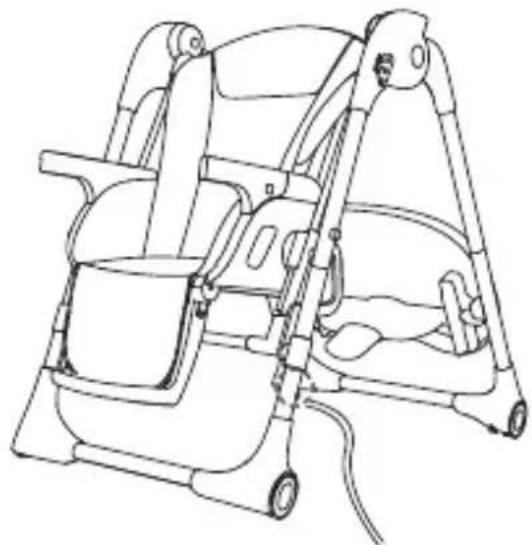
List of parts (fig. A)
- Covering
- Backrest adjustment key
- Folding key
- Height adjustment key
- Tray holder
- Wheels
- Harness
Set (fig. B)
- Tray
- Crotch guard
- Power cable and wire
- Tray guide x2
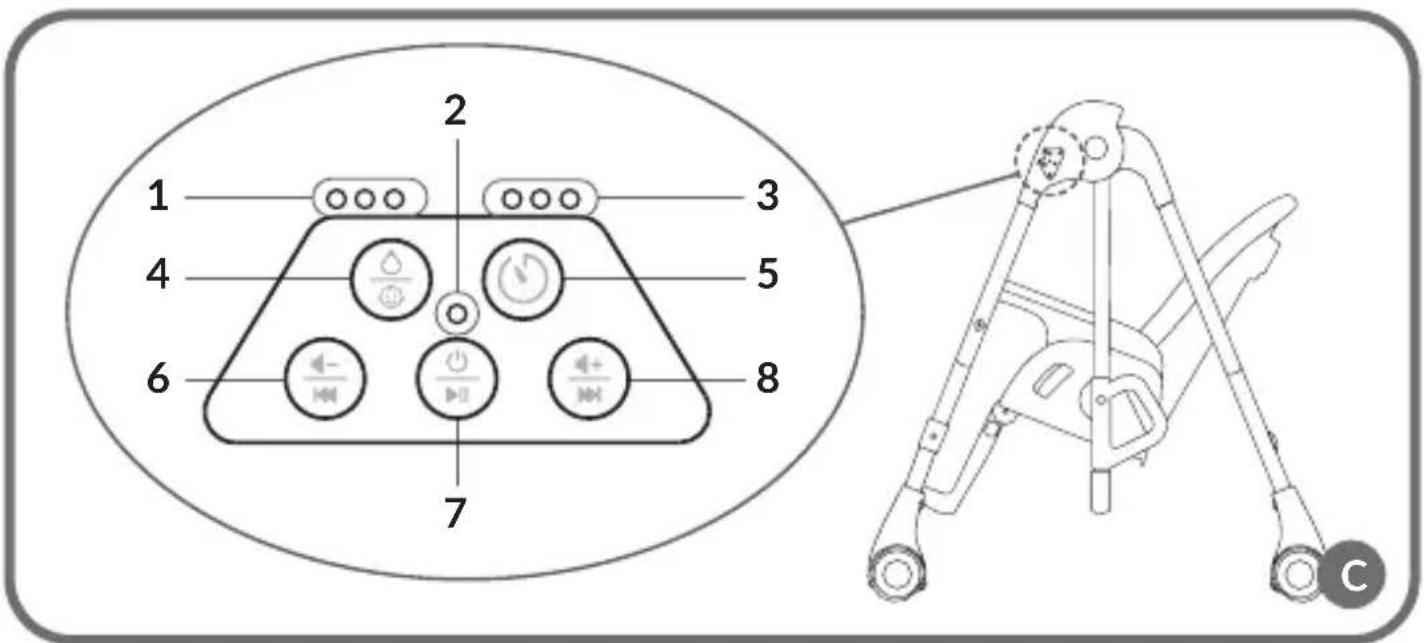
Control panel (fig. C)
- Rocking speed indicator (3 levels)
- Power LED light
- Time indicator
-
Rocking ON switch / Comfort Mode ON switch
-
Tray
- Seat angle adjustment key
- Footrest adjustment key
- Power supply port
- Rocking lock
-
Brake
-
Seat
- Frontal and rear part of the frame
-
Left and right part of the frame
-
Timer (15 / 30 / 45 min)
- Volume down / previous track
- ON/OFF / play key
- Volume up / next track
How to install
- Remove plug buttons in the frontal and rear part of the frame. Connect inner wires and then slide the upper part of the frame in (fig. 1).
- Position the seat vertically and then connect the upper part of the frame to relevant holes in the seat (fig. 2).
- Insert tray guides in relevant holes in the seat (fig. 3).
- Fix the crotch guard in the lower part of the tray, then slide the tray on the tray guides (fig. 4). The tray must be installed only when the chair frame is unfolded (fig. 4a).
How to fold and unfold
- Before folding the chair, please remove the tray which you can fix on the tray holder at the back of the high chair (fig. 5).
- To fold the chair, press folding keys on both sides of the frame (fig. 6). Manually unfold the chair again until you can hear a distinctive click.
How to adjust the tray
- Press both adjustment keys (A, fig. 7) on the inner side of the tray.
- There are two tray positions which you can choose (fig. 7). Set the desired position of the tray and make sure it has been properly secured.
How to adjust the footrest
- Press adjustment keys (A, fig. 8) on both sides of the footrest.
- Set the footrest in one of three positions (fig. 8).
How to adjust the backrest
- Press the backrest adjustment key (2, fig. A).
- Set the backrest in one of three positions (fig. 9).
- Make sure the backrest has been secured in the position you have chosen. The installation is correct when you can hear a click.
How to adjust the seat height
- Press the height adjustment key (A, fig. 10).
- Choose one of five heights (fig. 10).
- Make sure the seat has been properly secured. The installation is correct when you can hear a click.
- You can make use of five heights when the product serves as the chair.
Safety belts
- Put safety belts into relevant holes in the seat and covering.
- Connect hip belts to the main buckle (A, fig. 11). Installation is correct when you can hear a click.
- To undo hip belts (A, fig.11), press the key on the main buckle.
-
Hook fasteners on relevant holes of the main buckle (B, fig. 11). Make sure they have been properly anchored.
-
Belts can be installed in two positions (A, B, fig. 12). Never adjust the safety belts height if the child is in the chair.
How to turn the high chair into baby bouncer
- You can use the product as the bouncer only when the seat is positioned as low as possible.
- Set the seat backrest in a vertical sitting position (fig. 13).
- Remove the tray and place it on the tray holder at the back of the chair (fig. 14).
- Use height adjustment keys (4, fig. A) to lower the seat to the lowest position (fig. 15).
- Press the backrest adjustment key and tilt the backrest to the back as far as possible.
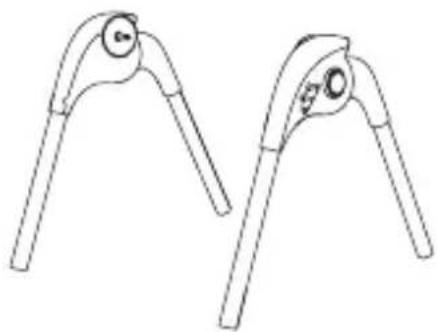
- Use the seat angle adjustment key (9, fig. A) to set the backrest in the most tilted position to be able to remove rocking locks (fig. 16).
- Remove rocking locks (fig. 17).
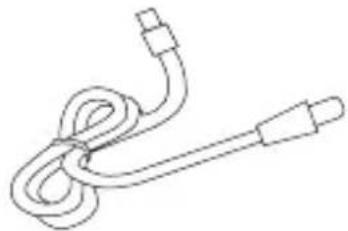
- Connect the product to the source of power 5V DC (fig. 18).
- Activate the product, press ON/OFF key (7, fig. C).
- Press the key (4, fig. C) to start rocking. Press again to choose one of three rocking speeds.
Lullabies
- To play the lullaby, press ON/OFF key (7, fig. C).
- To select a next track, press the key (8, fig. C). Press and hold to turn the volume up.
- To select a previous track, press the key (6, fig. C). Press and hold to turn the volume down.
Comfort Mode
- Comfort Mode allows you to automatically activate rocking for 15 minutes when the child starts crying and making sudden moves.
- Press and hold Comfort Mode key (4, fig. C).
Timer
- Press the timer key (5, fig. C) to set rocking for 15, 30 or 45 minutes.
- Press the timer key (5, fig. C) to set playing lullabies for 15, 30 or 45 minutes.
How to lock rocking
To lock rocking in the product, fit rocking locks again (fig. 18) and then change the seat angle into the sitting position. Only the aforesaid setting is able to lock rocking.
How to clean and maintain
- You can wash the outer part of the tray in the dishwasher.
- You can clean the covering with a cloth and soft cleaning agents. Do not wash the covering in the washing machine, do not dry clean or iron.
- You can wash the liner manually at the temperature of max. 30^ C.
- Do not expose the product to direct sunlight for a long time.
The pictures are for reference only. The real design of the products may differ from the pictures presented.
PL
Drogi Kliencie!
Bedieningspaneel (afb. C)
EN: Simplified EU declaration of conformity
BrandLine Group Sp. z o. o. hereby declares that the “LAURICE” product complies with the directive:
2014/30/EU - EMC Directive, 2014/35/EU - LVD Directive, 2011/65/EU - RoHS Directive.
Full content of EU declaration of conformity is available on the following website:
Detailed warranty conditions are available on the website:
Thank you for purchasing our product