MYtiny - Slicer GRAEF - Free user manual and instructions
Find the device manual for free MYtiny GRAEF in PDF.

| Brand | Graef |
| Model | MYtiny |
| Product type | Universal slicer |
| Dimensions (folded) | 80 x 182 x 402 mm |
| Dimensions (unfolded) | 234 x 182 x 340 mm |
| Weight | 3.3 kg |
| Power supply | 230 V, 50 Hz |
| Rated power | 45 W |
| Maximum cutting height | 150 mm |
| Cutting length | 237 mm |
| Continuous operation time | 5 minutes (cooling 1 hour) |
| Blade material | Stainless steel, smooth blade |
| Included accessories | Plastic tray, stainless steel tray, food press |
| Thickness adjustment | Progressive with anti-power-on safety |
| Operating modes | Pulse and continuous |
| Safety | Thumb guard, lockable carriage, safety stop |
| Appropriate use | Bread, cold cuts, cheese, vegetables, fruits (not frozen or hard foods) |
| Maintenance | Cleaning with damp cloth; regular lubrication with food-grade petroleum jelly |
| Cleaning | Do not immerse, do not put in dishwasher |
| Repairability | Spare parts available from GRAEF customer service |
| Warranty | 24 months (statutory warranty) |
| Storage | Vertical or flat position, with cable winder |
Frequently Asked Questions - MYtiny GRAEF
User questions about MYtiny GRAEF
0 question about this device. Answer the ones you know or ask your own.
Ask a new question about this device
Download the instructions for your Slicer in PDF format for free! Find your manual MYtiny - GRAEF and take your electronic device back in hand. On this page are published all the documents necessary for the use of your device. MYtiny by GRAEF.
USER MANUAL MYtiny GRAEF
natural_image
Technical line drawing of a GRAEF medical imaging device (no text or symbols on the device itself)EN Operating Instructions
PRODUKTBESCHREIBUNG
natural_image
Technical line drawing of a mechanical device with no visible text or symbols


natural_image
Technical line drawing of a mechanical device with no visible text or symbolsGERÄT ANSCHLIESSEN
natural_image
Technical line drawing of a mechanical device with a cable inserted, showing internal components and a separate view (no text or symbols)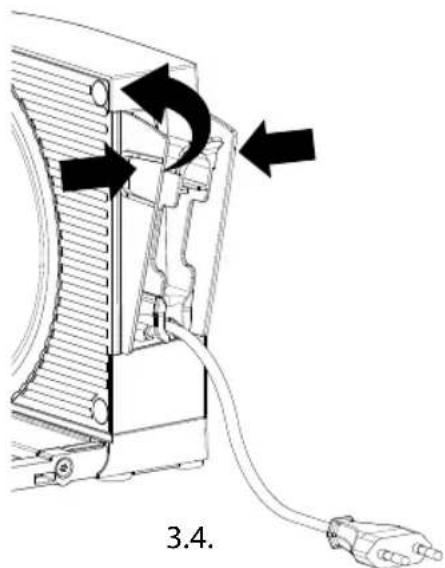

natural_image
Diagram showing a cable inserted into a device housing with an outlet plug, no text or symbols presentSCHNEIDEN
! WARNING!
Verletzungsgefahr!
natural_image
Technical line drawing of a mechanical component with a black arrow pointing to a striped section (no text or symbols)Momentanbetrieb
Dauerbetrieb
natural_image
Hand pointing at a mechanical component with an arrow indicating upward motion (no text or symbols)natural_image
Diagram of a mechanical component with rotating arrow and circular features (no text or symbols)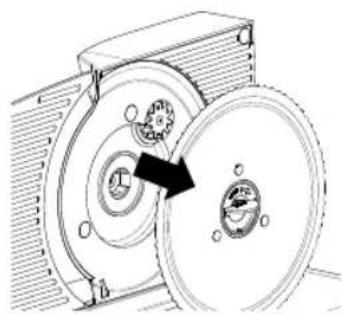
natural_image
Mechanical diagram showing a rotating mechanical component with a highlighted arrow indicating rotation direction (no text or symbols present)1.2.
General aspects....28
Information on these operating instructions....28
Intended use 28
Limitation of liability....28
Warning notes and symbols....29
Safety 29
General safety instructions....29
Danger caused by electric current....31
Safety instructions for the electrical connections....31
Unpacking the unit 32
Requirements on the installation location 32
Prior to first use 33
Basic cleaning....33
Initial operation and use....33
Swing open the unit....33
Connect the unit....34
Cutting operation....35
Shutdown and storage....36
Folding up the unit....37
Storage 39
Cleaning and maintenance....39
Cleaning the unit on the outside 39
Removal and cleaning the slide....40
Removing, cleaning and greasing the blade.... 40
Ensuring value preservation of the blade 41
After-sales service 42
Disposal 42
Disposal of packaging 42
Disposal of unit 42
Warranty 42
Troubleshooting....43
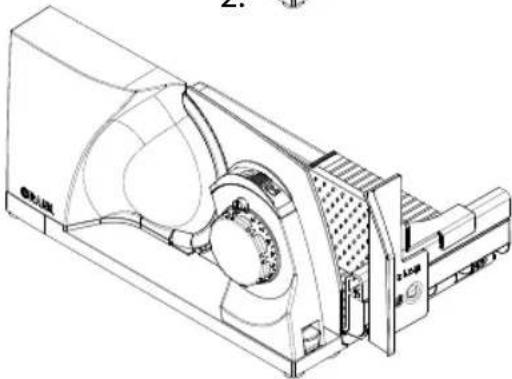
PRODUCT OVERVIEW
Illustration of unit folded up
(Illustrations may differ from the original)
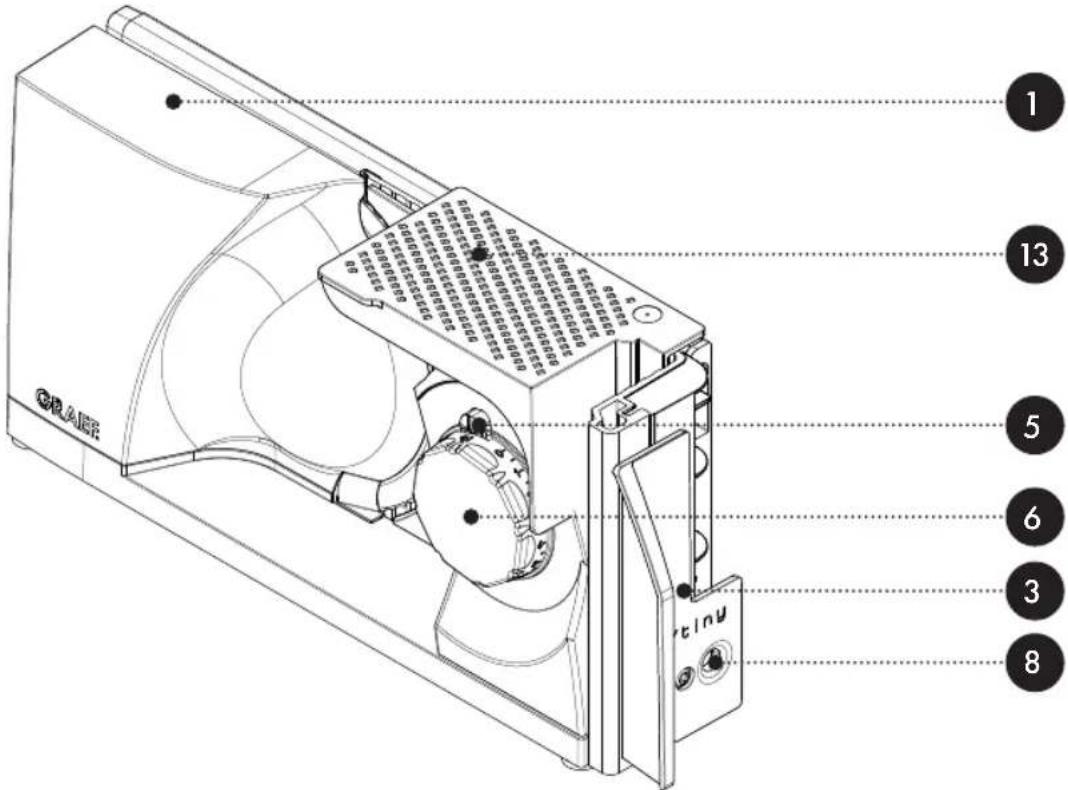
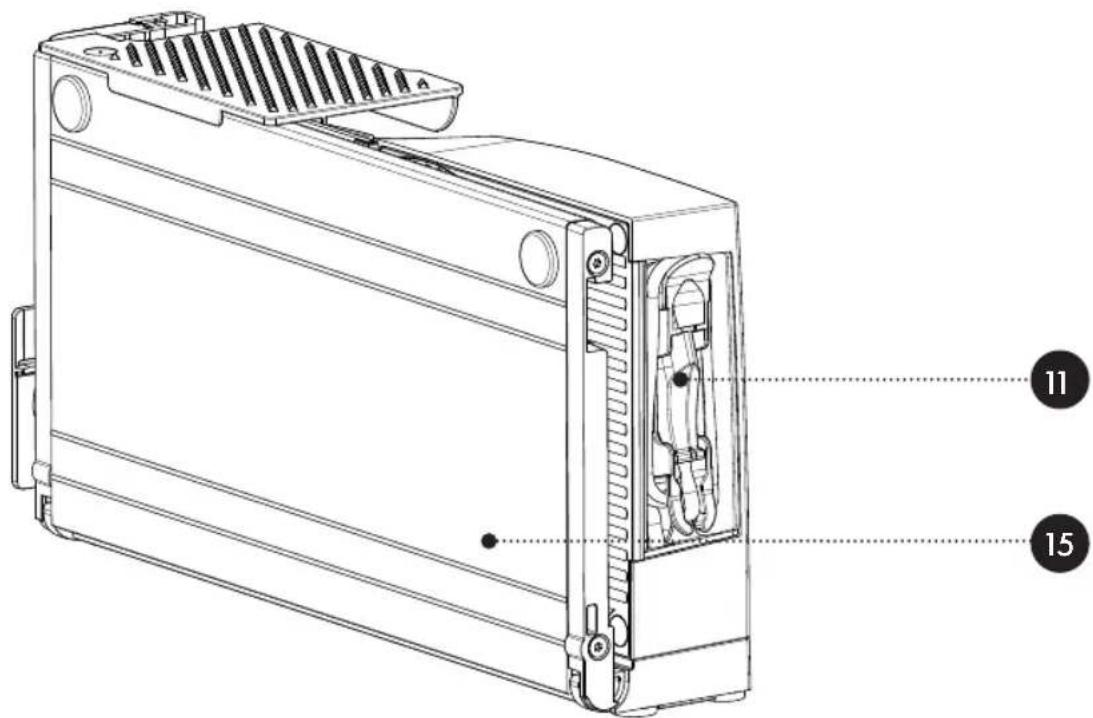
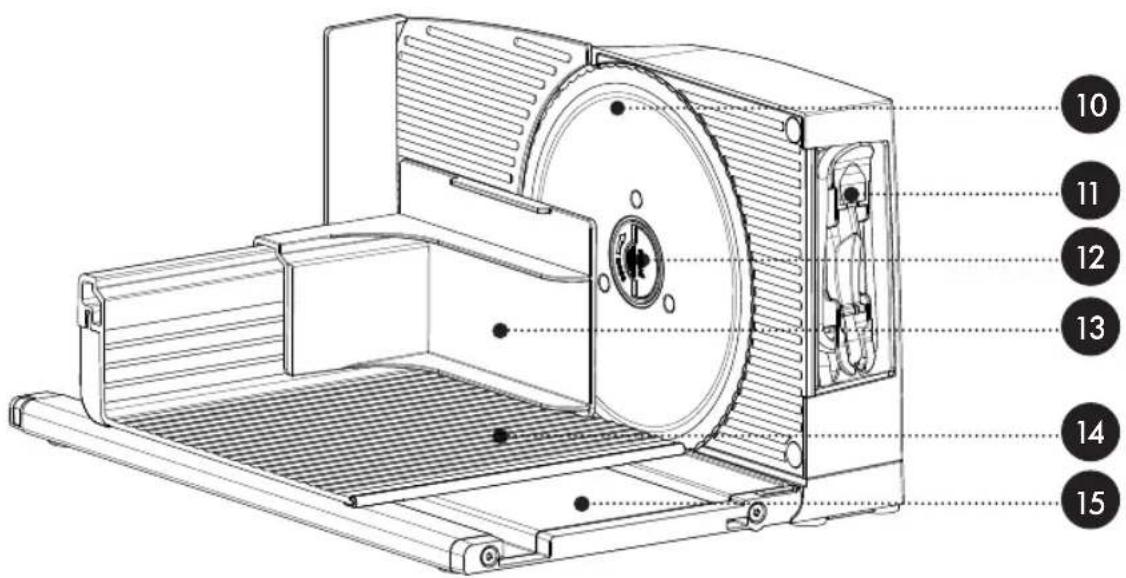
Illustration of unit folded back
(Illustrations may differ from the original)
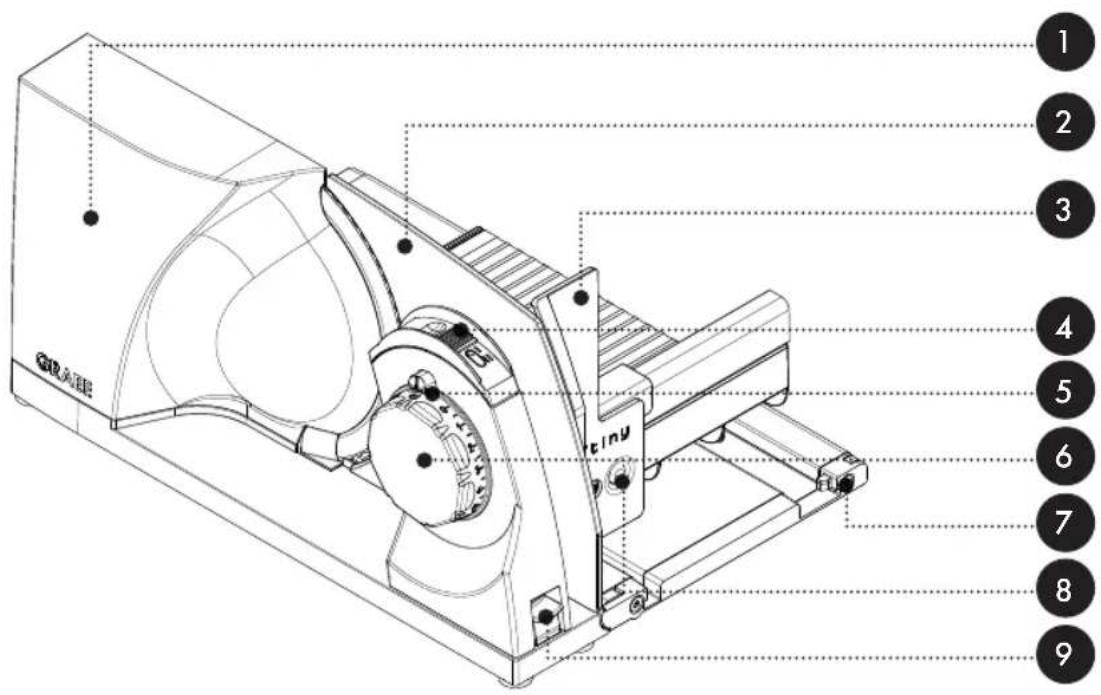
PRODUCT DESCRIPTION
1 Motor body
2 Stop plate
3 Thumb protection
4 On / Off switch
5 Safety catch
6 Setting of cutting thickness
7 Slide unlocking
8 Release button for thumb guard
9 Release button for folding mechanism
10 Blade
11 Integrated cable rewind
12 Blade screw
13 Holder for remainders
14 Slide
15 Cutting table
TECHNICAL DATA
Dimensions (W × H × D): 80 × 182 × 402 mm(folded up)
234 × 182 × 340 mm(ready for use)
Weight: approx. 3.3 kg
Connection: 230V / 50Hz AC
Rated output: 45 W
Slicing height: 150 mm
Slicing length: 237 mm
Short-time operation: 5 minutes
ACCESSORIES
(accessories are included in the delivery or available separately, depending on the version)
- Plastic - tray
- Stainless steel - tray
- Smooth stainless steel blade
Place the tray next to the unit. The tray is used to place the food to be cut.
Please refer to the chapter "Cleaning and maintenance" to replace the blade.

natural_image
Technical line drawing of a mechanical device with no visible text or symbolsYou can order additional accessories in our on-line shop www.graef.de or from your specialist dealer.
GENERAL ASPECTS
Dear Customer,
You have made a good choice by buying this Mytiny all-purpose slicer. You have purchased a highly appreciated quality product. Thank you for your purchase, and we hope you will enjoy using your new all-purpose slicer.
INFORMATION ON THESE OPERATING INSTRUCTIONS
These operating instructions provide important information on putting into operation, safety, intended use and the maintenance of the all-purpose slicer (hereinafter referred to as unit). It must always be available when using the unit. The instructions have to be read and applied by every person who deals with
- putting into operation,
- operation,
- troubleshooting and/or
- cleaning
of the unit. Keep these operating instructions and pass them on to the next owner along with the unit.
These operating instructions cannot take into consideration every conceivable use. For further information or in case of problems which are not dealt with or not dealt with sufficiently in these instructions, please get in touch with GRAEF customer service or your specialist dealers.
INTENDED USE
This unit is not intended for commercial use. Use the all-purpose slicer in closed-up rooms only. It can be used to cut bread, ham, sausage, cheese, carrots, cucumber, fruit, vegetables, et cetera. By no means cut hard matter, such as frozen food, bones, wood, sheet metal, or the like. This unit is intended for use in a household. Another or any exceeding use shall not be considered intended. The unit can be dangerous if it is not used as intended.
• Use the unit exclusively as intended.
- Observe the procedures described in these operating instructions.
Claims of any kind due to damage resulting from improper use shall be excluded. The risk shall be borne solely by the user.
LIMITATION OF LIABILITY
All technical information, data and instructions for installation, operation and maintenance contained in these operating instructions correspond to the latest status at the time of printing and are based on our previous experience and knowledge to the best of our knowledge. No claims may be derived from the particulars, illustrations and descriptions in these instructions. The manufacturer shall not assume any liability for damage caused by
• non-observation of the instructions
- unintended use
- incorrect repairs
• technical modifications
• use of unapproved spare parts.
Translations shall be carried out to the best of knowledge. We shall not assume any liability for translation mistakes. The original German text alone shall remain legally binding.
WARNING NOTES AND SYMBOLS
In these operating instructions, the following warning notes, signal words and symbols are used:
!WARNING!
This signal symbol/word indicates a hazard with a high degree of risk which, if not prevented, could result in death or serious injury.
CAUTION!
This signal symbol / word indicates a hazard with low risk level which, if not prevented, may results in slight to moderate injury.
NOTE!
This signal word alerts you to possible material damage.

This symbol provides additional information on operation.
SAFETY
GENERAL SAFETY INSTRUCTIONS
This unit is in compliance with the relevant safety regulations. For safe handling of this unit, please observe the following safety instructions:
- Improper use can lead to personal injury and damage to property.
- Before using this unit for the first time, check it for visible outer damage on the housing, connection cable and plug.
- Do not operate a damaged unit.
-
If the connection cable is damaged, it must be replaced by the manufacturer, the after-sales service or a similarly qualified person in order to prevent danger.
-
Repairs must be carried out by an expert or by GRAEF after-sales service only. In-correct repairs may cause considerable hazards for the user. In addition, any claim under guarantee is forfeited.
- Defective parts must be replaced by original spare parts only. It is only with these parts that the safety requirements are met.
- This unit must not be used by children. Keep the unit and its connection cable away from children.
- Children should be supervised in order to make sure that they do not play with this unit.
- This unit can also be used by persons with reduced physical, sensory or mental capabilities or lack of experience and/or knowledge if they have been given supervision or instruction concerning use of the unit in a safe way and understand the hazards involved.
- The unit is not intended to be used with an external timer or a separate remove control.
- Always disconnect the connection cable by using the plug; do not pull the connecting cable.
- Make sure that the power cable does not get caught anywhere, as this could cause the unit to drop.
- Packaging materials must not be used for playing. There is a danger of suffocation.
- Always switch off the unit and disconnect it from the power supply when you are not using it or when the unit is unattended. The same applies before cleaning and maintaining the unit or when replacing accessories. This is particularly important to ensure that the blade does not start up unintentionally.
• After a continuous operation of 5 minutes, let the motor cool down for an hour. - This appliance must be used with the slide and the end-piece holder in the operating position, unless the size and shape of the food to be sliced do not permit their use.
- Clean the unit, the end-piece holder, the slide and any accessories with a damp cloth or a mild detergent.
- Clean the blade with a damp cloth. Caution: risk of injury!
- KEEP THE OPERATING INSTRUCTIONS.
DANGER CAUSED BY ELECTRIC CURRENT
WARNING!
Contact with live cables or components can be fatal!
Please observe the following safety instructions in order to prevent an exposure to electric current:
- Do not use the unit if the mains cable or plug are damaged.
- In this case, have a new connection cable installed by GRAEF Customer Service or an authorised specialist before continuing to use the unit.
- By no means open the housing of the unit. There is a risk of electric shock if live connections are touched or if the electrical or mechanical structure is changed.
- Never touch live parts. This can cause an electric shock and even death.
SAFETY INSTRUCTIONS FOR THE ELECTRICAL CONNECTIONS
For safe and fault-free operation of the unit, the following requirements have to be met during the electrical connection:
- Before connecting the unit, compare the connecting data (voltage and frequency) on the type plate with those of your energy network. This data must match to prevent damage to the unit. If in doubt, consult a qualified electrician.
- The socket outlet must be protected by at least a 10A circuit breaker.
- Make sure that the power cable is not damaged and is not laid across hot surfaces or sharp edges.
• The connecting cable must not be stretched tightly. - The electrical safety of the unit is guaranteed only if it is operated on a properly installed power supply. If in doubt, have the in-house installation checked by a qualified electrician. The manufacturer shall not assume responsibility for damage which has been caused by absent or interrupted protective conductor.
UNPACKING THE UNIT
When unpacking the unit, proceed as follows:
- Remove the unit from the box.
- Remove the packaging parts.
CAUTION!
Danger of injury!
The very sharp blade can cause injuries.
- Remove any stickers on the unit (do not remove the type plate).
REQUIREMENTS ON THE INSTALLATION LOCATION
For safe and fault free operation of the unit, the following requirements of the installation location have to be met:
- The unit has to be placed on a solid, flat, horizontal, and non-slipping surface with a sufficient weight-carrying capacity.
• Make sure that the unit cannot topple over. - Choose the location in such a way that children cannot reach the blade of the unit or the supply lines.
- Never use the unit outdoors, and always keep it in a dry place.
- The unit is not designed for installation in a wall or a built-in cupboard.
- Do not set up the unit in a hot, wet or moist environment.
- The socket has to be easily accessible so that the power cable can be removed easily in case of emergency.
- If the connecting cable is too long, you can adjust it to the required length using the cable winder.
PRIOR TO FIRST USE
CAUTION!
Danger of injury!
The very sharp blade can cause injuries.
• Proceed with caution when wiping the blade.
BASIC CLEANING
The unit, but especially the blade, must be wiped with a damp cloth before first use to remove any production residues. Also refer to the chapter on "Cleaning and maintenance".
INITIAL OPERATION
WARNING!
Danger of injury!
The very sharp blade can cut off body parts. Especially your fingers and thumbs are at risk.
- For this reason, do not reach into the space between the stop plate and the blade as long as the stop plate is not closed completely, i.e. set to "0".
- Do not touch the blade with your fingers.
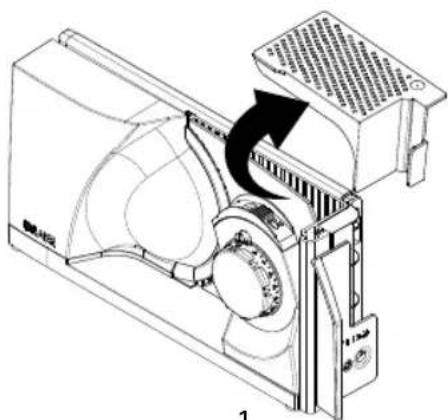
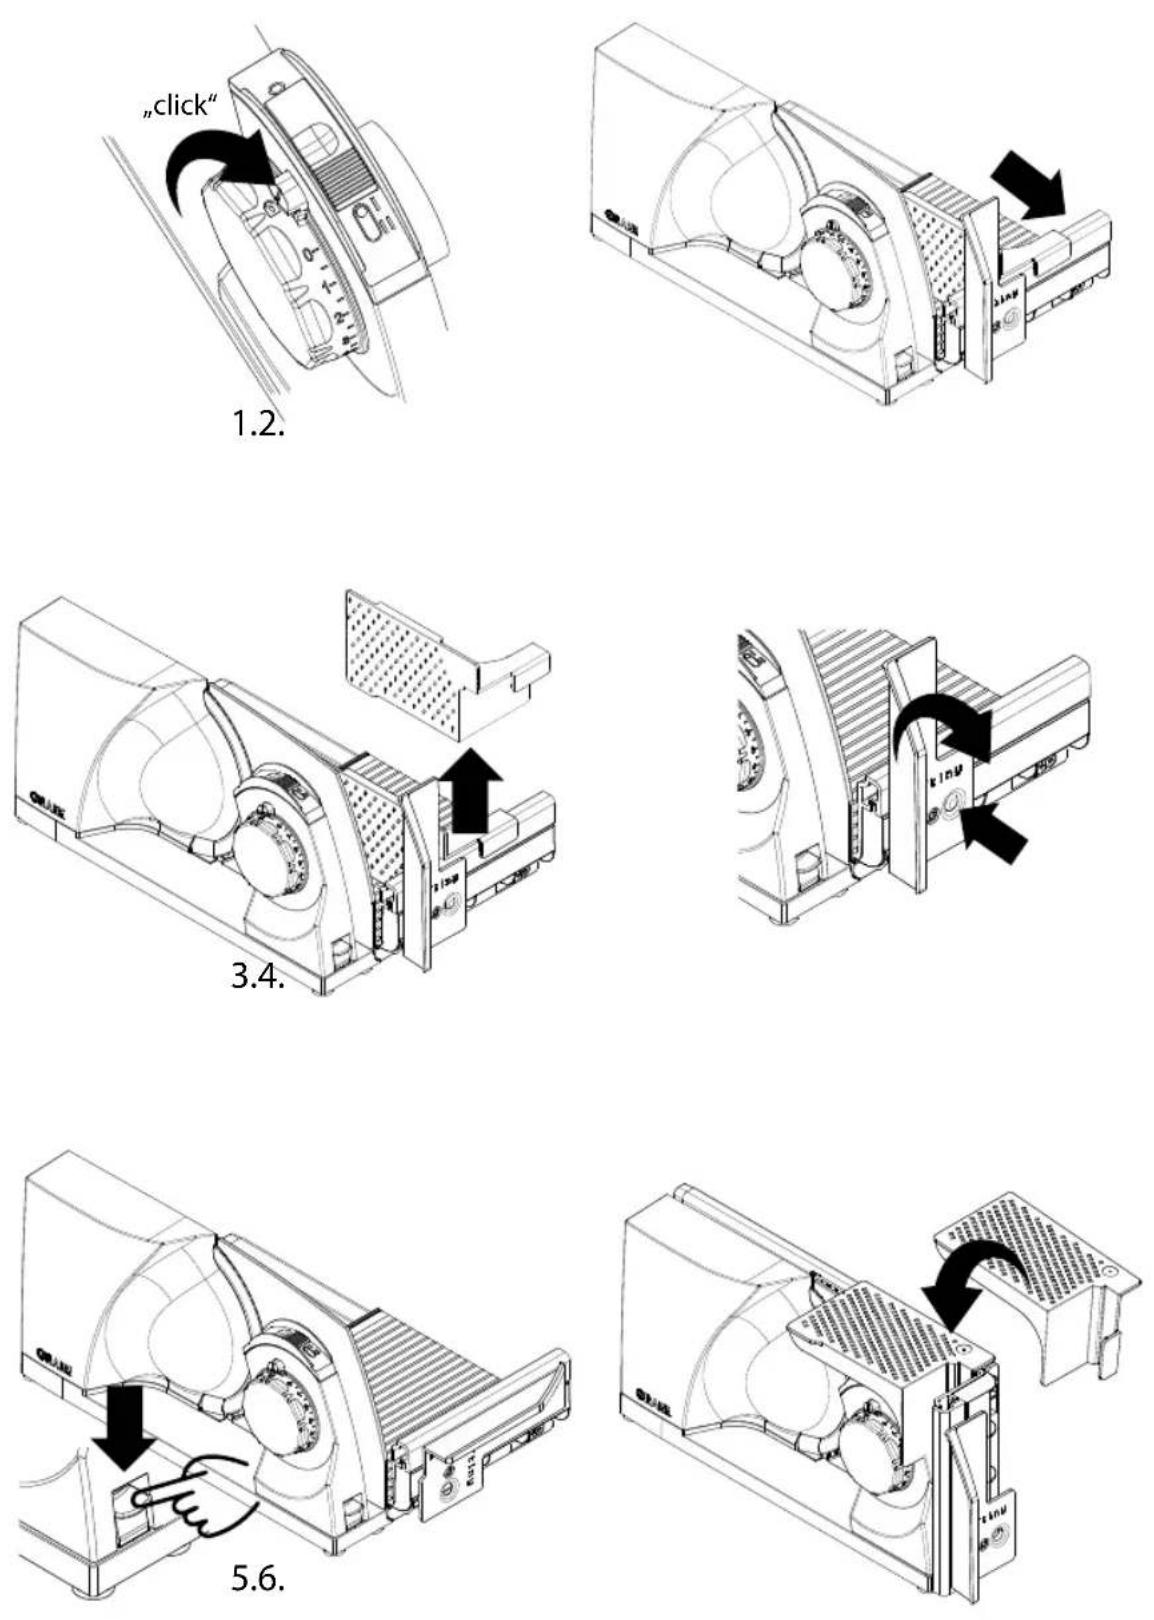
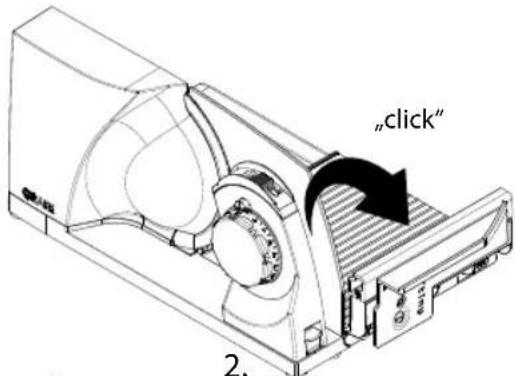
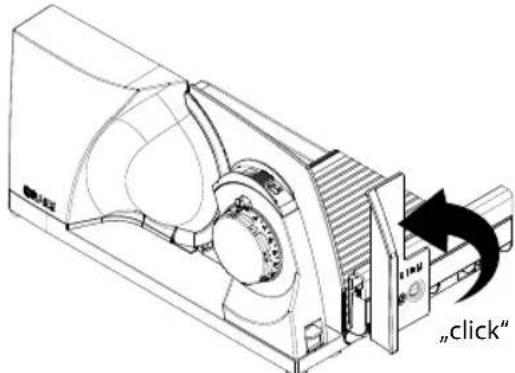
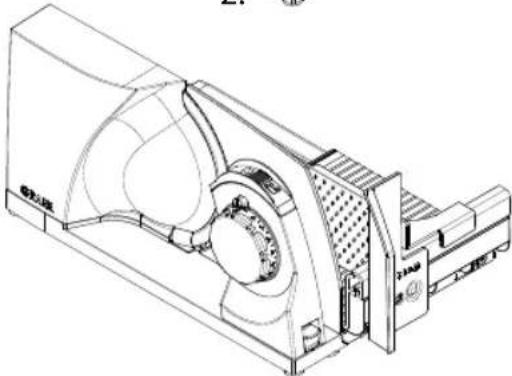
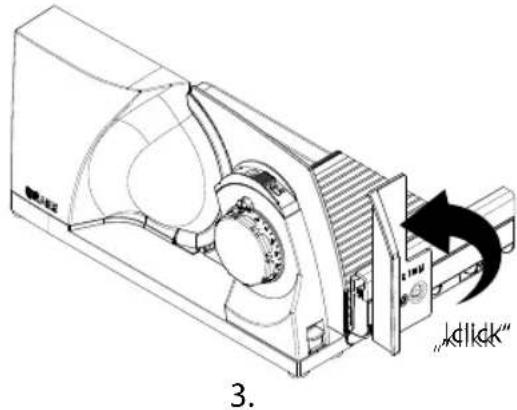
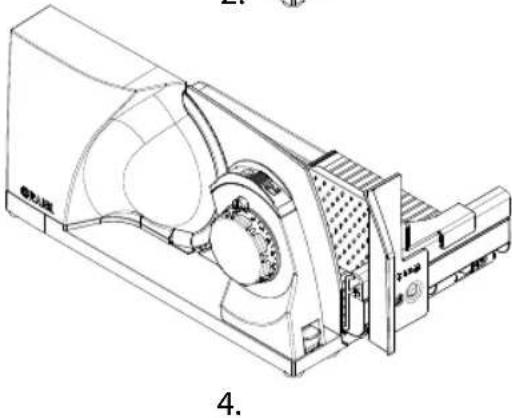
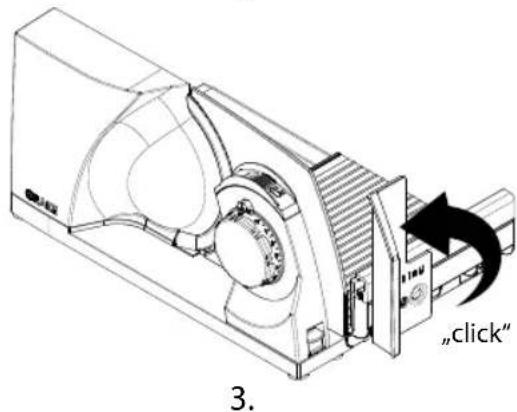
SWINGING THE UNIT OPEN
- Remove the end-piece holder if it is still attached to the unit.
- Fold down the cutting table until it clicks into place.
- Turn the thumb guard to the vertical position until it clicks into place.
- Place the end-piece holder on the slide.

If the thumb guard is not in the vertical position, the slide cannot be moved. For safety reasons, cutting is therefore not possible.
1.


3.
natural_image
Technical line drawing of a mechanical device with no visible text or symbols4.
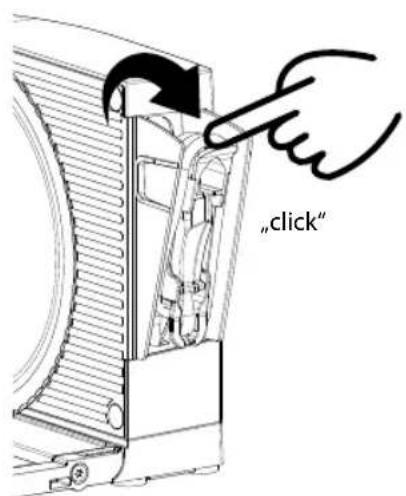
CONNECTING THE UNIT
- Swivel the cable winder out of the motor body. Do this by pulling on the slightly protruding tab at the top.
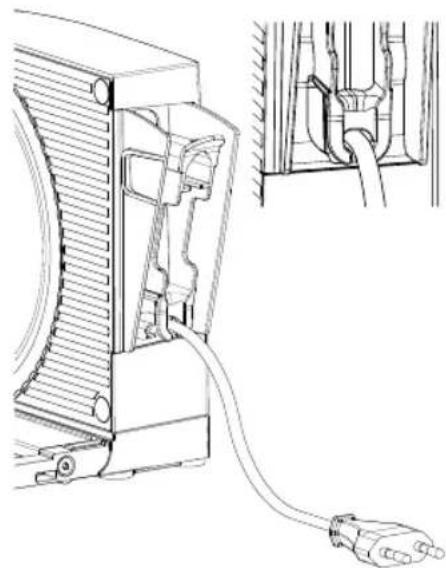
- Remove the plug from the holder and unwind the cable to the desired length. You can secure the cable in a recess provided for this purpose.
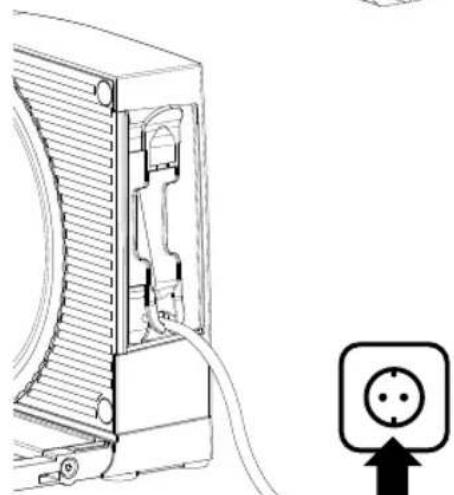
- Press the two outer walls together slightly and swivel the cable winder back into the motor body.
- Insert the plug into the socket.
1.2.
natural_image
Technical line drawing of a device with a cable inserted, showing internal components and wiring (no text or symbols)
natural_image
Technical diagram of a device's internal structure with arrows indicating motion or flow (no text or symbols)3.4.
natural_image
Line drawing of a server rack with a cable and an electrical outlet symbol (no text or labels)
CUTTING OPERATION
WARNING!
Danger of injury!
The very sharp blade can cut off body parts. Especially your fingers and thumbs are at risk.
- Do not reach into the space between the stop plate and blade as long as the stop plate has not been completely closed.
• Do not touch the blade with your fingers. - During cutting operation, the slide is moved. There is a risk of fingers being jammed if handled incorrectly.
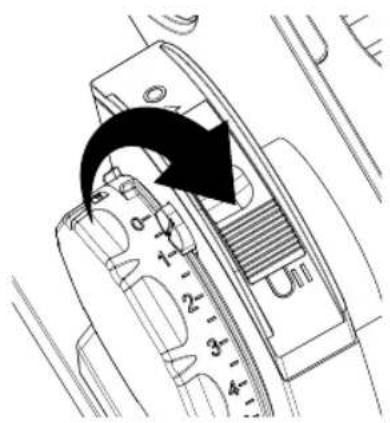
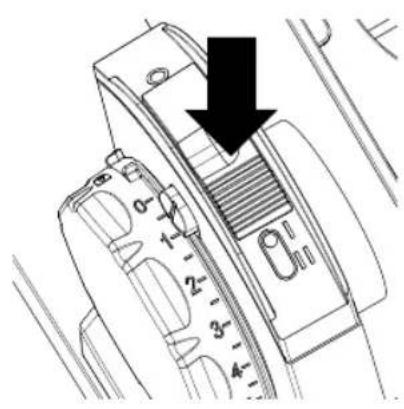
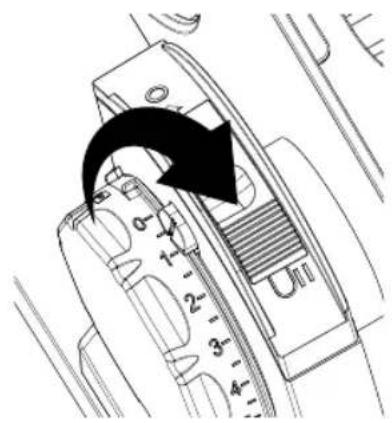
The unit is equipped with a switch-on safety device to prevent unauthorised use. This is located above the adjustment of the cutting thickness in the form of a small safety button. When the limit stop is closed, indicated by the lock symbol, the switch-on safety device is automatically activated. For deactivation:
- Press the safety button.
- Turn the adjustment of the cutting thickness at the same time.
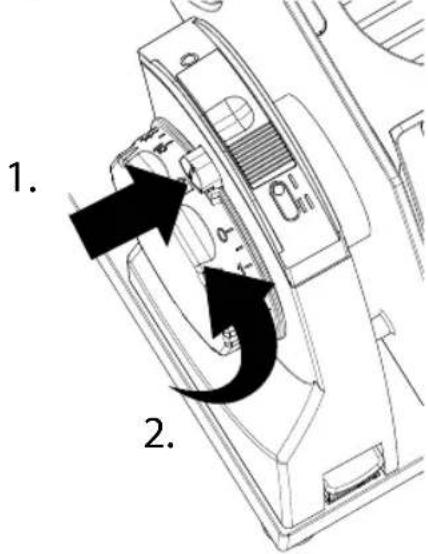

When the switch-on safety device is activated, the adjustment of the cutting thickness is blocked and the ON/OFF switch has no function. The safety button is also the marker for the set cutting thickness.
- Place the slicing material on to the slide.
• Always use the end-piece holder when possible. - Set the desired cutting thickness by turning the adjustment of the cutting thickness.
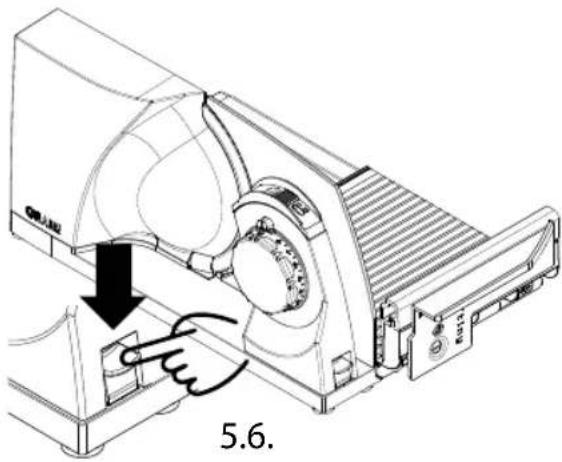
- Press the ON/OFF switch for intermittent operation or slide the ON/OFF switch forwards to position II for continuous operation.
Intermittent
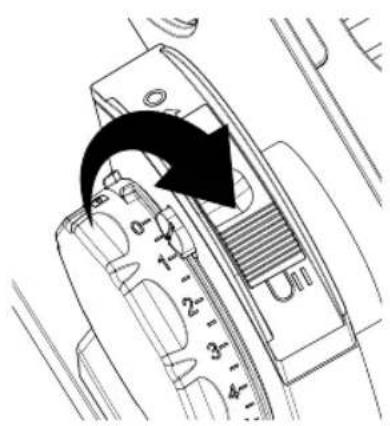
Continuous
• Guide the slide against the blade evenly.
- After the cutting process has been completed, either release the ON/OFF switch or push it back to its original position O.
- Close the limit stop.
SHUTDOWN AND STORAGE
WARNING!
Danger of injury!
The very sharp blade can cut off body parts. Especially your fingers and thumbs are at risk.
- For this reason, do not reach into the space between the stop plate and the blade as long as the stop plate is not closed completely, i.e. set to "0".
- Do not touch the blade with your fingers.

The unit has been equipped with a safety device to prevent unintentional folding. This ensures that the unit can only be folded when the limit stop is completely closed. If the limit stop is open, the release button is blocked.
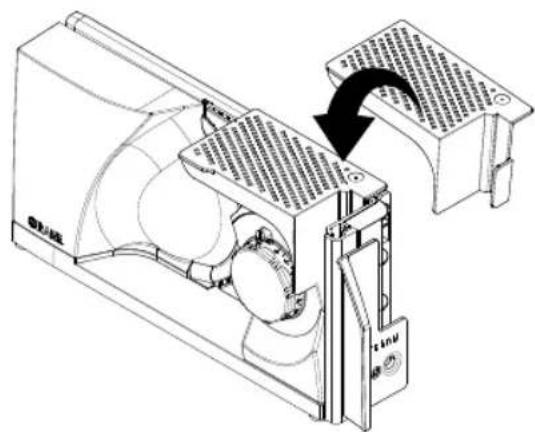
FOLDING UP THE UNIT
- Close the limit stop completely until the safety button engages.
- Pull the slide forwards until the hand rest is in front of the unit.
- Remove the end piece holder.
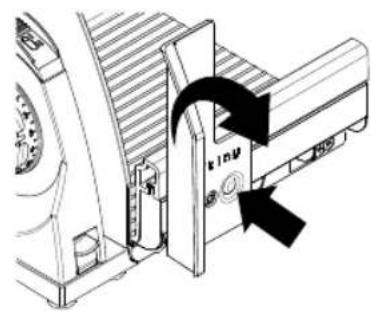
- Press the release button for the thumb guard and swivel the thumb guard into the horizontal position.
- Press the release button for the folding mechanism downwards and at the same time swivel the cutting table upwards.
- When necessary, stow the end-piece holder on the unit.
STORAGE
CAUTION!
Danger of injury!
There is a risk of being caught if the unit tips or falls over in an uncontrolled manner.
- The unit can be stored in an upright position. Always place the unit in such a way that it is stable and cannot tip over, e.g. against a wall, in a niche or on a shelf.
- The unit can also be stored lying flat, e.g. in a drawer.
CLEANING AND MAINTENANCE
WARNING!
Danger of injury!
• Inexpert cleaning may lead to injuries.
- Switch the unit off before cleaning and pull the power cord from the electric socket.
- Let the unit cool down before cleaning.
- Check whether the stop has been closed (the blade edge must be covered).
• Proceed with caution when wiping the blade.
CLEANING THE UNIT ON THE OUTSIDE
- Use a soft and moist cloth to clean the outer surfaces of the unit. Use a mild detergent in case of heavy soiling.
- Keep the guides in the cutting table clean so that the slide can always be moved smoothly. Crumbs can be easily removed from the guides towards the rear. If necessary, use a cloth or brush.
- For areas that are difficult to reach, we recommend cleaning with a brush.
NOTE!
Risk of damage!
Improper handling of the unit can result in damage to the unit.
- Do not use any aggressive or scouring detergent and no solvents.
- Do not scape off any persistent dirt with a hard object.
- Do not immerse the unit in water.
- Do not put the unit in the dishwasher and do not use it under running water.
- Never put the slide into the dishwasher.
- Never put the blade into the dishwasher which may affect the sharpness and the corrosion resistance (salt attacks the blade). Handling the blade when loading and unloading from the dishwasher is another point of danger.
REMOVAL AND CLEANING THE SLIDE
The carriage can be removed from the unit to make it easier to clean.
- Push the slide release outwards.
- Remove the slide.
- Clean the slide with a damp cloth or under running water. Use a mild detergent in case of heavy soiling.
- Once a month, add some drops of resin-free oil or petroleum jelly to the slideway.
- Remove excess oil or petroleum jelly with a soft cotton cloth.

natural_image
Hand cursor pointing at a mechanical component with an arrow indicating direction (no text or symbols)- Once the cleaning process is completed, place the slide back on the slideway.
- Push the slide release inwards again.
REMOVING, CLEANING AND GREASING THE BLADE
CAUTION!
Sharp blade!
Proceed with caution when wiping the blade.
• Pull the slide towards yourself.
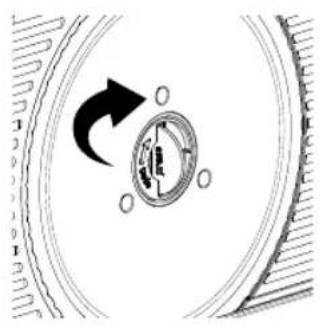
- Press lightly on the centre of the blade screw to raise the integrated folding handle slightly. Open the folding handle completely.
- Use the folding handle to loosen the blade by turning the blade screw clockwise and carefully removing the blade.
natural_image
Diagram of a mechanical component with a rotating arrow and circular features, no text or symbols present.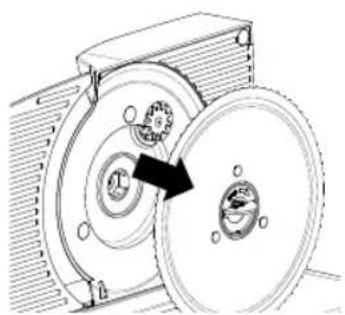
natural_image
Mechanical diagram showing a pulley system with a rotating wheel and housing (no text or symbols)1.2.
• 2. Clean the knife carefully with a damp cloth.
- Clean the inside of the unit using a damp cloth.
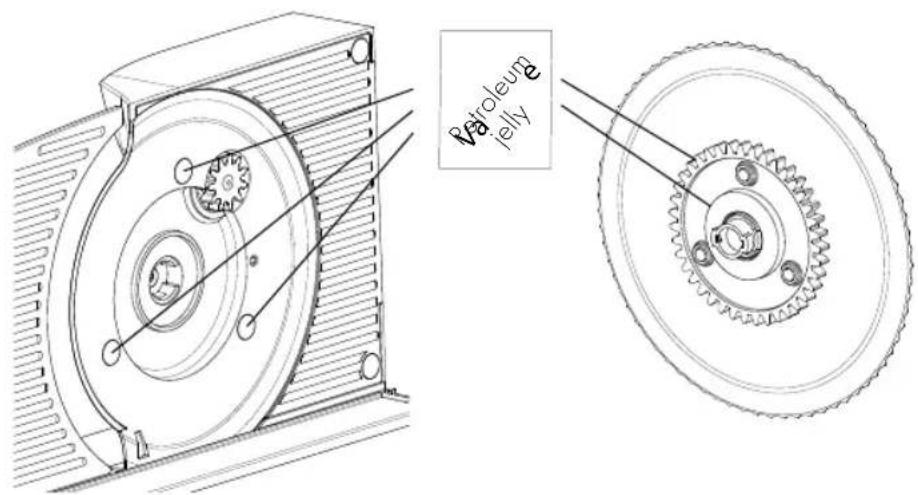
- Regular greasing will increase the service life of your unit. Apply petroleum jelly suitable for use with foodstuffs. Suitable petroleum jelly is available in our online shop at www.graef.de under item No. 141852.

Grease the unit to in regular intervals:
• In case of frequent use, every two to three days.
- When the machine runs for 10 minutes every day, every fortnight.
• Grease the gear wheel on the blade.
- Grease the three sliding cams on the inside of the unit.
- Insert the blade back again in reverse order.
VALUE PRESERVATION OF THE BLADES
We recommend that you clean your GRAEF knife regularly, especially after slicing cured meat or ham, to ensure that it stays sharp for a long time and retains its value. These foodstuffs contain salts, when they stay on the surface of the blade for a longer period of time, may even form a rust film (even on "stainless" steel). When cutting up slicing material which contains a lot of water, such as tomatoes or cucumbers, lacking or wrong (too "wet") cleaning may also lead to a rust film on the blade surface. For this reason we recommend to use a moist cloth, and if necessary some washing-up liquid, to clean the blade directly after use. Remove the blade from time to time and clean the unit inside, especially, when "juicy" slicing material (vegetables, fruit, roasts, et cetera) have been cut. Treat the blade with the utmost of care.
AFTER-SALES SERVICE
If your GRAEF unit is defective, please contact your specialist dealer or the GRAEF customer service on +49 (2932) 9703-677 or write an E-mail to service@graef.deservice@graef.de.
DISPOSAL
DISPOSAL OF THE PACKAGING

The packaging protects the unit against transport damage. The packaging materials are selected according to the environmental compatibility and disposal-related aspects and can therefore be recycled. Returning the packaging to the material cycle saves raw materials and reduces the amount of waste. Dispose of the packaging material no longer needed at collection points for the "Green Dot" recycling system (in Germany).

If possible, keep the original packaging during the guarantee period of the unit in order to be able to pack the unit correctly in case of guarantee.
DISPOSAL OF THE UNIT

At the end of its service life, this product cannot be disposed of in normal domestic waste. The symbol on the product and in the operating instructions point out to this fact. Reuse the materials according to their marking. With the reuse, recycling or other forms of recycling of old equipment, you make an important contribution to the protection of our environment. Please ask your municipal administration for the disposal point.
WARRANTY
This product is subject to a statutory warranty period of 24 months from the date of sale in accordance with Section 439 ff. of the German Civil Code (BGB-E). This warranty does not cover damage caused by improper handling or improper use, or defects that only slightly affect the function or value of the unit.
Furthermore, transport damage for which we are not responsible shall be excluded from the warranty claim. No warranty claims can be made for damage caused by a repair not carried out by us or one of our representatives. In the event of justified complaints, we will repair the defective product or replace it with an intact product.
TROUBLESHOOTING
| Problem Cause Solution | ||
| Adjustment of the cutting thickness cannot be turned. | The switch-on safety device is active. | Press the safety button and turn the adjustment of the cutting thickness. |
| Unit cannot be switched on. | The switch-on safety device is active. | Press the safety button and turn the adjustment of the cutting thickness. |
| The slide is blocked and cannot be moved all the way. | For safety reasons, the thumb guard must be in the vertical position during operation. | Turn the thumb guard to the vertical position until it clicks into place. |
| The slide is stiff. The slideway is dirty. Clean and grease the slideway. | ||
| The slide squeaks when moving. | The thumb guard rubs against the lower edge of the cutting table. | Turn the thumb guard to the vertical position until it clicks into place. |
| The cutting table cannot be snapped shut. | For safety reasons, it is only possible to snap shut the cutting table when the limit stop is completely closed. | Close the limit stop completely until the safety button engages. |
| The slide is not pulled out far enough; the hand rest hits the limit stop. | Pull the slide forwards until the hand rest is in front of the unit. | |
| Grinding noises on the blade. | Food residues on the blade. | Remove the blade and clean it thoroughly. Subsequently grease according to the instructions. |
| The blade is stiff or the speed of the blade is greatly reduced. | The blade gear wheel not sufficiently greased or dirty. | Remove the blade and clean the blade gear wheel thoroughly. Subsequently grease according to the instructions. |
| The unit is overloaded. Interrupt the cutting process and cautiously remove the slicing material. Make sure to use only suitable goods to be cut and adjust the cutting width accordingly, if necessary. | ||
| The cable winder cannot be swivelled in or out. | If the cable is wound up too loosely, it forms loops that hit the housing. | Try to unwind the cable carefully. This is usually possible even if the cable winder is still in the unit. |
| The unit slips on the work top while cutting. | The installation surface or the rubber feet of the unit are soiled. | The installation surface and the rubber feet of the machine must be clean and free of grease. |
| The blade does not cut well any more. | The blade is blunt and needs to be sharpened. | |
| The cut slicing material is pulled behind the blade. | The slicing material is not correctly scraped off. The distance between the blade and the housing is too large. | Make sure that the blade is fitted correctly and that there is no dirt on the inside of the blade. If necessary, clean the blade and the inside of the unit according to the instructions. |
| Operating noises increase with use. | The gear is not greased sufficiently. | Remove the blade and clean the blade gear wheel thoroughly. Then grease the gear wheel and sliding cams according to the instructions. |
| The blade is loose. The blade screw not locked. Make sure that the blade is correctly fitted and the blade screw is firmly locked = turn anti-clockwise to the left. | ||
| The sliding cams have come loose. | On the inside of the unit under the blade there are three sliding cams. Make sure that these are in place. Contact GRAEF Service if the sliding cams are missing. | |
| The unit continues to run even though the limit stop is closed. | The ON/OFF switch was still in position II for continuous operation when the limit stop was closed. | Slide the ON/OFF switch back to position 0. Make sure to switch off the unit first before closing the limit stop. |
SOMMAIRE
DESCRIPTION DU PRODUIT
natural_image
Technical line drawing of a mechanical device with internal components and a tray (no text or symbols)natural_image
Technical line drawing of an air conditioner unit with cooling fan and ventilation duct (no text or symbols)


natural_image
Technical line drawing of a mechanical device with no visible text or symbolsBRANCHEMENT DE L'APPAREIL
natural_image
Technical line drawing of a device with a cable inserted, showing internal components and a separate view (no text or symbols)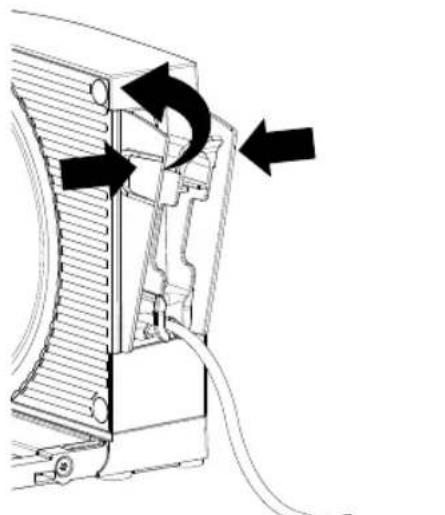
natural_image
Diagram of a device's internal structure with arrows indicating motion or flow, no text or symbols present3.4.

natural_image
Diagram of a computer power adapter connected to an electrical outlet, showing internal components and wiring (no text or symbols)TRANCHAGE
⚠ AVERTISSEMENT!
Mode instantané Mode continu

- Retirez le chariot.
natural_image
Hand pointing at a mechanical component with an arrow indicating upward motion (no text or symbols)natural_image
Diagram of a mechanical component with a rotating arrow and circular features (no text or symbols)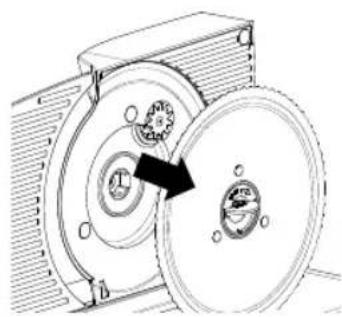
natural_image
Mechanical diagram showing a gear assembly with rotating components and a central rotating disk (no text or labels)1.2.
PRODUCTBESCHRIJVING
natural_image
Technical line drawing of a mechanical device with no visible text or symbolsnatural_image
Technical line drawing of an air conditioner unit with cooling fan and fan assembly (no text or symbols)1.
3.
natural_image
Technical line drawing of a mechanical device with internal components and no visible text or symbols4.
APPARAAT AANSLUITEN
natural_image
Technical line drawing of a device with a cable inserted, showing internal components and a separate view (no text or symbols)
natural_image
Technical diagram of a mechanical device with arrows indicating motion or assembly (no text or symbols)3.4.

natural_image
Diagram of a device with a cable and an electrical outlet, showing no text or symbolsHET SNIJDEN
⚠ WAARSCHUWING!
Gevaar voor letsel!
natural_image
Technical line drawing of a mechanical component with a black arrow indicating direction (no text or symbols present)Momentwerking

Continue
natural_image
Hand cursor pointing at a mechanical component with an arrow indicating direction (no text or symbols)natural_image
Diagram of a mechanical component with a rotating arrow and circular features (no text or symbols)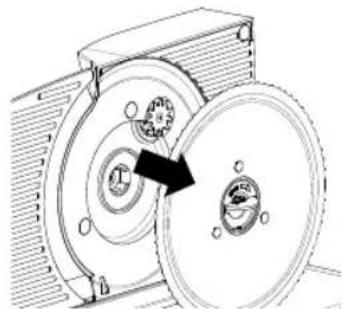
natural_image
Mechanical diagram showing a gear assembly with rotating components and a central rotating disk (no text or symbols)1.2.
natural_image
Technical line drawing of a mechanical device with no visible text or symbols


natural_image
Technical line drawing of a mechanical device with internal components and mounting bracket (no text or symbols)CONNETTERE IL DISPOSITIVO
natural_image
Technical line drawing of a device with a cable inserted, showing internal components and a separate view (no text or symbols)

natural_image
Diagram showing a cable inserted into a device housing with an outlet plug, no text or symbols presentTAGLIO
AVVERTENZA!

natural_image
Hand cursor pointing at a button on a mechanical component with an arrow indicating upward motion (no text or symbols)natural_image
Diagram of a mechanical component with a rotating arrow and circular features (no text or symbols)
natural_image
Mechanical diagram showing a rotating mechanical component with a highlighted arrow indicating rotation direction (no text or symbols present)1.2.
natural_image
Technical line drawing of a mechanical device with housing and mounting bracket (no text or symbols)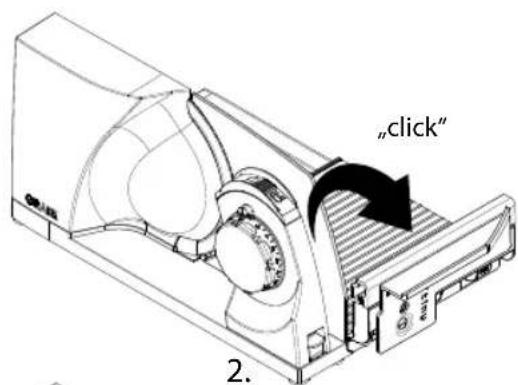


natural_image
Technical line drawing of a mechanical device with fan and housing (no text or symbols)natural_image
Technical line drawing of a device with a cable inserted, showing internal components and a separate view (no text or symbols)

natural_image
Diagram of a device with a cable inserted into a housing, showing an electrical outlet symbol (no text or labels present)CORTAR
¡ADVERTENCI!

natural_image
Hand cursor pointing at a mechanical component with an arrow indicating direction (no text or symbols)natural_image
Diagram of a mechanical component with a rotating arrow and circular features (no text or symbols)
natural_image
Mechanical diagram showing a gear meshing operation between two circular components (no text or symbols)1.2.
PRODUKTBESKRIVELSE
natural_image
Technical line drawing of a mechanical assembly with no visible text or symbolsnatural_image
Technical line drawing of an air conditioner unit with cooling fan and ventilation duct (no text or symbols)


natural_image
Technical line drawing of a mechanical device with internal components and mounting bracket (no text or symbols)TILSLUT MASKINEN
natural_image
Technical line drawing of a device with a cable inserted, showing internal components and a separate view (no text or symbols)
natural_image
Technical diagram of a mechanical device with arrows indicating motion or force direction (no text or symbols present)3.4.

natural_image
Diagram of a computer power adapter connected to a plug, showing internal components and a close-up of the plug (no text or symbols present)SKÆRING
ADVARSEL!
Kortvarig brug Kontinuerlig drift

natural_image
Hand pointing at a mechanical component with an arrow indicating direction (no text or symbols)FJERN KNIVEN, RENG∅R OG SM∅R
A FORSIGTIG!
Skarp kniv!
natural_image
Diagram of a mechanical component with a rotating arrow and circular features (no text or symbols)
natural_image
Mechanical diagram showing a rotating disk and housing with a directional arrow (no text or symbols)1.2.
OPIS PRODUKTU
natural_image
Technical line drawing of a mechanical device with no visible text or symbolsnatural_image
Technical line drawing of an air conditioner unit with airflow direction indicated (no text or symbols)


natural_image
Technical line drawing of a mechanical device with internal components and mounting bracket (no text or symbols)natural_image
Technical line drawing of a device with a cable inserted, showing internal components and a separate view (no text or symbols)
natural_image
Diagram of a device's internal structure with arrows indicating rotation or movement (no text or symbols present)3.4.

natural_image
Diagram of a computer power adapter connected to an electrical outlet, showing cable and socket (no text or symbols)CIECIE
OSTRZEŻENIE!
natural_image
Hand cursor pointing at a mechanical component with an arrow indicating upward motion (no text or symbols)natural_image
Diagram of a mechanical component with a rotating arrow and circular features (no text or symbols)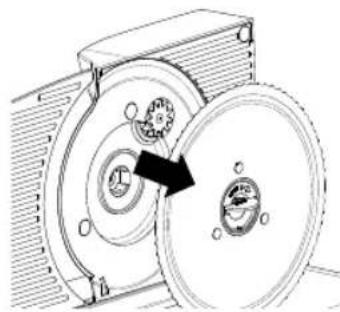
natural_image
Mechanical diagram showing a rotating mechanical component with gears and a housing (no text or symbols)1.2.
ZACHOWANIE WARTOŚCI TNĄCYCH NOŻA
TERMÉKLEÍRÁS
natural_image
Technical line drawing of a mechanical device with no visible text or symbols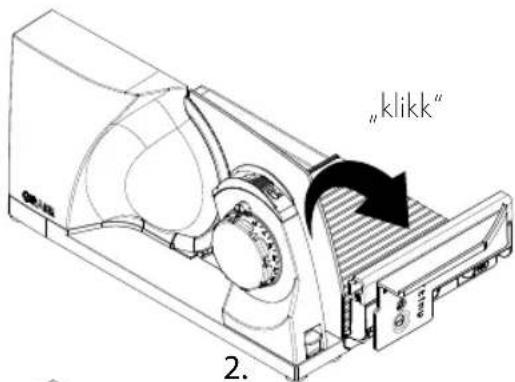
natural_image
Technical line drawing of a mechanical device with fan and housing (no text or symbols)A GÉP CSATLAKOZTATÁSA
natural_image
Technical line drawing of a device with a cable inserted, showing internal components and a separate view (no text or symbols)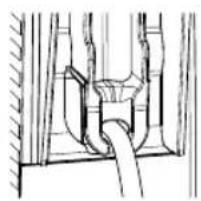
natural_image
Pure mechanical diagram showing a pipe passing through a container with a handle (no text or symbols)
natural_image
Technical diagram of a device with arrows indicating directional movement, labeled '3.4.' (no text or symbols on the diagram itself)
natural_image
Diagram of a computer power adapter connected to an electrical outlet, showing internal components and wiring (no text or symbols)
VÁGÁS
FIGYELMEZTETÉS!
Sérülésveszély!
natural_image
Hand cursor pointing at a mechanical component with an arrow indicating direction (no text or symbols)natural_image
Diagram of a mechanical component with a rotating arrow and circular base (no text or symbols)
natural_image
Mechanical diagram showing a gear assembly inside a housing, with no visible text or symbols1.2.
INNEHÅLLSFÖRTECKNING
Produktöversikt 201
PRODUKTBESKRIVNING
natural_image
Technical line drawing of a mechanical device with no visible text or symbols

natural_image
Technical line drawing of a mechanical device with internal components and labeled parts (no readable text or symbols)ANSLUTA PRODUKTEN
natural_image
Technical line drawing of a device with a cable inserted, showing internal components and a separate view (no text or symbols)

natural_image
Diagram of a computer power adapter with a cable and plug, showing internal components and a pull-up icon (no text or symbols)SKÄRNING
! WARNING!
natural_image
Technical line drawing of a mechanical component with a black arrow indicating direction (no text or symbols present)Korttidsdrift

Kontinuerlig
drift
FÄLLA IHOP PRODUKTEN
natural_image
Line drawing of a hand pressing a button on a mechanical component with an arrow indicating upward motion (no text or symbols)TA AV, RENGÖRA OCH SMÖRJA KNIVEN
A OBSERVERA!
Vass kniv!
natural_image
Diagram of a mechanical component with a rotating arrow and circular features (no text or symbols)
natural_image
Mechanical diagram showing a rotating disc and housing assembly (no text or symbols)1.2.
PRODUKTBESKRIVELSE
1 Motordel
2 Anslagsplate
3 Tommelbeskyttelse
4 PÅ/AV - bryter
5 Sikringsknapp
6 Snittykkelsesinnstilling
7 Sleideopplåsing
8 Opplåsningstast for tommelbeskyttelse
9 Opplåsningstast for foldemekanisme
10 Kniver
11 Integrert kabelvikling
12 Knivskrue
13 Resteholder
14 Sleide
15 Skjærebord
TEKNISK SPESIFIKASJONER
Dimensjoner (B x H x D): 80 x 182 x 402 mm (foldet sammen)
natural_image
Technical line drawing of a mechanical device with no visible text or symbolsYtterligere tilbehør kan du bestille i nettbutikken vår under www.graef.de eller hos en fagforhandler.
GENERELT
Kjære kunde,
natural_image
Technical line drawing of an air conditioner unit with cooling fan and ventilation duct (no text or symbols)


natural_image
Technical line drawing of a mechanical device with no visible text or symbolsKOBLE TIL ENHETEN
natural_image
Technical line drawing of a device with a cable inserted, showing internal components and a separate view (no text or symbols)

natural_image
Diagram of a computer power adapter connected to a plug, showing internal components and a pull-up symbol (no text or labels)SKJÆRE
ADVARSEL!
Fare for personskader!
natural_image
Hand pointing at a mechanical component with an arrow indicating direction (no text or symbols)natural_image
Diagram of a mechanical component with a rotating arrow and circular base (no text or symbols)
natural_image
Mechanical diagram showing a rotating disk connected to a housing, with no visible text or symbols.1.2.
ОПИСАНИЕ УСТРОЙСТВА
natural_image
Technical line drawing of a mechanical device with no visible text or symbolsnatural_image
Technical line drawing of a device with a cable inserted, showing internal components and a separate view (no text or symbols)

natural_image
Diagram of a device with a plug and socket connected to a wall-mounted cable (no text or symbols)PE3KA
⚠️ ПРЕДУПРЕЖДЕНИЕ!
natural_image
Technical line drawing of a mechanical component with a downward arrow indicating a feature (no text or symbols present)
natural_image
Technical line drawing of a mechanical device with internal components and an arrow indicating direction (no text or symbols)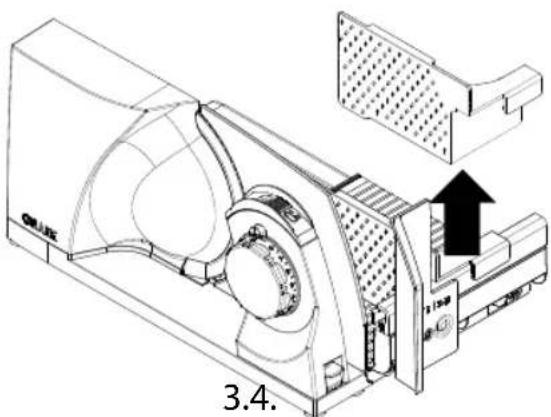


ХРАНЕНИЕ
ВНИМАНИЕ!
natural_image
Hand pointing at a mechanical component with an arrow indicating direction (no text or symbols)natural_image
Diagram of a mechanical component with rotating arrow and circular features (no text or symbols)
natural_image
Mechanical diagram showing a rotating device with a central hub and surrounding components (no text or symbols)1.2.
ОПИС ПРОДУКТУ
natural_image
Technical line drawing of a mechanical device with no visible text or symbols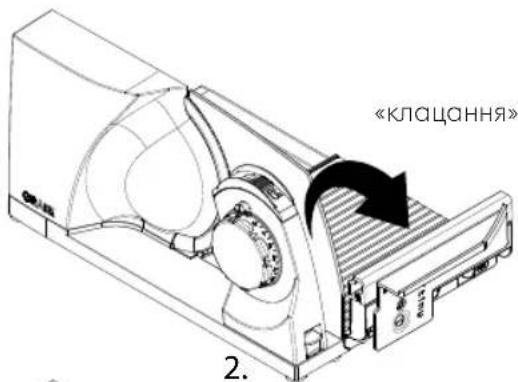
natural_image
Technical line drawing of a mechanical device with internal components and no visible text or symbolsПРИЄДНАННЯ ПРИСТРОЮ
natural_image
Technical line drawing of a device with a cable inserted, showing internal components and wiring (no text or symbols)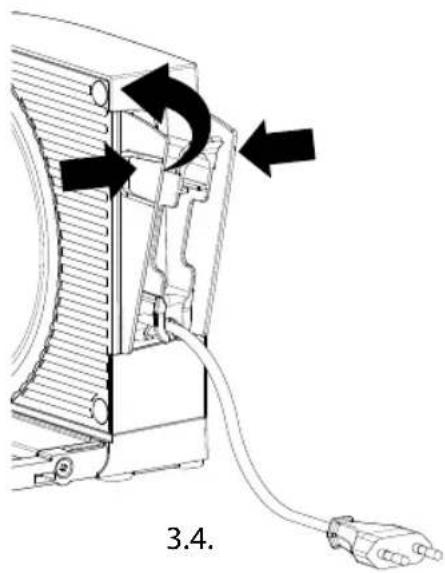
natural_image
Technical diagram of a device with arrows indicating directional movement, labeled '3.4.' (no text or symbols on the diagram itself)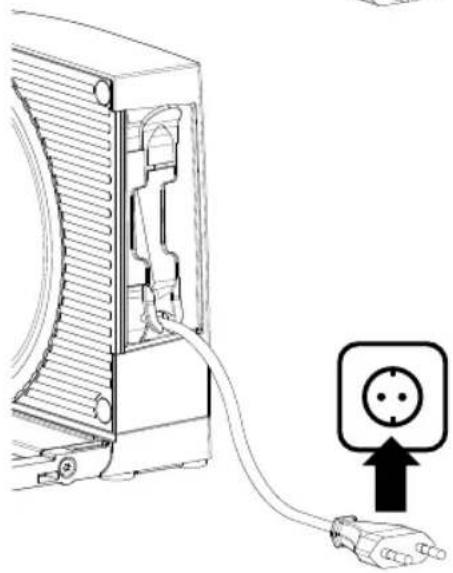
natural_image
Diagram of a device with a plug inserted into a housing, showing an electrical outlet symbol (no text or labels present)РІЗАННЯ
! УВАГА!
Небезпека травми!
natural_image
Technical line drawing of a mechanical component with a downward arrow indicating a feature (no text or symbols present)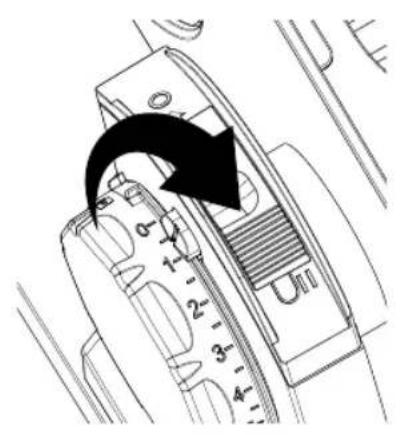
natural_image
Technical line drawing of a mechanical device with internal components and an arrow indicating direction (no text or symbols)

ЗБЕРІГАННЯ
ОБЕРЕЖНО!
Небезпека травми!
natural_image
Hand cursor pointing at a mechanical component with an arrow indicating upward motion (no text or symbols)natural_image
Diagram of a mechanical component with a rotating arrow and circular features (no text or symbols)
natural_image
Mechanical diagram showing a gear assembly with rotating components (no text or labels)1.2.