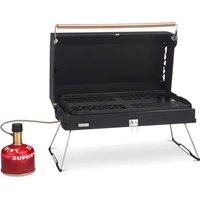
Kuchoma - Barbecue Primus - Free user manual and instructions
Find the device manual for free Kuchoma Primus in PDF.


| Product Type | Portable Gas Barbecue |
| Brand | Primus |
| Model | Kuchoma |
| Power Source | Gas: Primus isobutane/propane/butane cartridges 100 g, 230 g or 450 g (ref. 2202xx, 2206xx, 2207xx) |
| Gas Consumption | 145 g/h (2.0 kW) on butane, 5,700 BTU/h on propane, pressure 1 bar |
| Burner Nozzle Diameter | 0.37 mm |
| Ignition | Built-in Piezo (ignition button) |
| Regulator | Built-in, adaptable to different cartridges |
| Dimensions (approx.) | Not specified in the manual; compact portable model |
| Weight (approx.) | Approximately 1.5 kg (without cartridge) |
| Materials | Steel, wood (handle), plastic |
| Usage | Outdoor only, in a well-ventilated area |
| Safety Distance | 1250 mm from ceiling, 500 mm from walls |
| Maintenance | Clean the drip tray in the dishwasher or by hand; wipe the exterior with a soft cloth and mild detergent; oil wooden parts if necessary |
| Spare Parts Available | Grill (741140), burner (741150), piezo igniter (741160), hose and regulator (741120), adapters, carry bag (741100) |
| Warranty | Not specified; manufacturer: Primus AB Sweden |
| Repairability | Spare parts available, do not repair threads or valves yourself – contact Primus |
| Safety | Do not use indoors (risk of carbon monoxide poisoning); check for leaks with soapy water; extinguish any flame if gas odor is detected |
| Compatible Accessories | Primus Red Power, Green Summer, Brown Winter cartridges; adapters for LPG bottles (sold separately) |
Frequently Asked Questions - Kuchoma Primus
User questions about Kuchoma Primus
0 question about this device. Answer the ones you know or ask your own.
Ask a new question about this device
Download the instructions for your Barbecue in PDF format for free! Find your manual Kuchoma - Primus and take your electronic device back in hand. On this page are published all the documents necessary for the use of your device. Kuchoma by Primus.
USER MANUAL Kuchoma Primus

PRODUCT OVERVIEW: PRODUCT DESCHRE DU/AD/PRODUKTORES/KTUOTE ESITELY/VISIGN DE DESCRIPTION: 1900-2000-2001 (EXTRA-DE) PRODUKTORES/KTUOTE ESITELY/VISIGN DE PRODUCT/VERIZO O-TYRDO-TOVET/SEK TURGAL ENGLA / PFEHLAD PRODUKTUPPE-LED TURGAL ENGLA / WAKAT/ENGLA / 50% CNT: CITOK/ANAVI YOLTRADTEZ/ESIK/ASZ
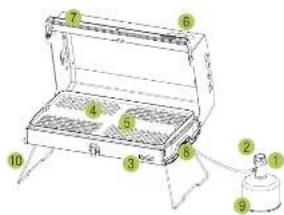
PRODUCT DETAILS/PRODUCT DETAILS/PRODUCT/DETAILIER/LOTETEIC/CETICLE DEL PRODUCT IN PART OF PROCESSED FOR THE PROCESSED FOR THE PRODUCTION/VEGETABLE DETAILER/LEMONS/POOCENOSTO/PRODUCTS/POOCENOSTO/PRODUKT/LITERMEK 11.2021.12.19
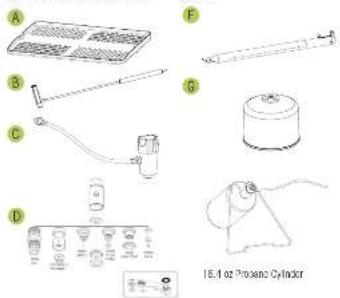
SPARE PARTS: ELEAVES DE LA LEAVES DE LA LEAVES DE LA LEAVES DE LA LEAVES DE LA LEAVES DE LA LEAVES DE LA LEAVES DE LA LEAVES DE LA LEAVES DE LA LEAVES DE LA LEAVES DE LA LEAVES DE LA LEAVES DE LA LEAVES DE LA LEAVES DE LA LEAVES DE LA LEAVES DE LA LEAVES DE LA LEAVES DE LA LEAVES DE LA
ACCESSORIES/ZIGATZ/TLENT/LEENCR/ NAT/ACCR/ACCESS/TOCK/ACCR/TOCK/TOCK/TOCK/ LEENCR/ACCESS/TOCK/ACCESS/TOCK/LEENCR/ MOTOMAT/TOCK/MAK/MAK/MAK/MAK/MAK KIBBSZ TOK/DOCATI/PRBOR/ACCESSOR/A
natural_image
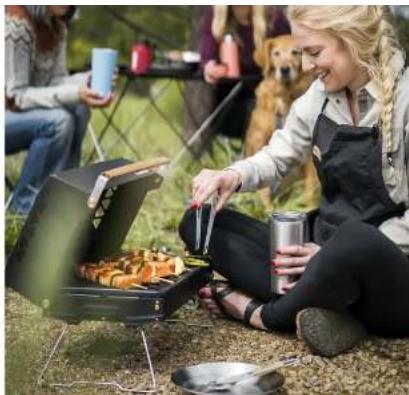
People enjoying outdoor camping with a portable grill and cooking equipment (no visible text or symbols)| ENGLISH |
| DEUTSCH |
| FRANÇAIS |
| SVENSKA |
| SUOMI |
| NORSK |
| DANSK |
| NEDERLANDS |
| ESPAÑOL |
| ITALIANO |
| HRVATSKI |
| ČESKÝ |
| MAGYAR |
| POLSKI |
| SLOVENSKÝ |
| РУССКИЙ |
| قَيْبَرْعُلَا |
FREEDOM TO EXPLORE
Ever since the establishment of Primus in 1892, our Swedish engineers have been internationally recognised for designing stoves for explorers and adventurers. It is our genuine passion for adventure and technical solutions that has been the reason for the success of Primus innovations for more than 125 years. It is a passion and a calling that we are still on fire about.
No matter what level of adventure you want to embark on, we want to equip you with a functional and reliable stove that will be your valued companion for life. That is why we test every stove, individually, by hand before it leaves our high-tech factory in Europe. In this way, we can maintain the high level of quality and functionality that we demand from our products. So, read this manual carefully and make sure your cooking is as safe, fun and tasty as it should to be. Enjoy your food – enjoy life in the outdoors!
A FEW WORDS ABOUT SAFETY.
Because you're dealing with highly fl ammable substances, we'd like to bring a few important points to your attention before you begin.
Important: Read these instructions for use carefully so as to familiarize yourself with the appliance before connecting it to its gas container. Keep these instructions for future reference.
▶ Use only in a well ventilated area.
Check the seals and connections every time you use the grill. (see the section, "Prepare the grill"). Do not use the appliance if it has damaged or worn seals.
Change the gas container outside and away from people. Checking the gas flows through the regulator and burners must be done outdoors and away from any naked flame.
▶ Ensure that the grill is not used in the proximity of any combustible material, gas or fluids.
When being used, the distance from any roof must be at least 1250 mm and 500 mm from any wall.
Never leave a lit grill unattended and always ensure that infl ammable material is kept away from the grill when it is in use.
Do not modify the appliance. Carefully follow the instructions for fitting spare parts that may be ordered in, if you are going to replace them yourself.
When the grill is going to be stored away, ensure that all its components are clean and dry. The gas cartridge should never be attached to the grill when in storage. Store the gas cartridge in a dry and safe place, and out of direct sunlight or temperatures in excess of 50°C.
Save this instruction book so that you can return to it when you need it.
IMAGE REFERENCE
PRODUCT OVERVIEW & PRODUCT DETAILS
(SEE ILLUSTRATION ON THE FLAP TO THE LEFT)
1 Regulator
2 Gas knob
3 Ignition (piezo)
4 Drip tray
5 Grill grate
6 Lid
7 Handle
8 Burner
9 Gas cartridge
10 Legs
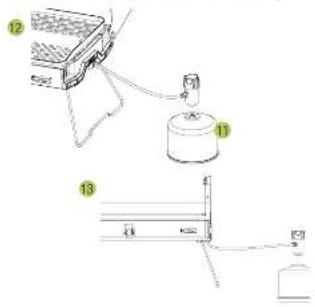
11 Threads on gas cartridge
12 Gas coupling – detailed view
13 Igniter
SPARE PARTS & ACCESSORIES
(SEE ILLUSTRATIONS ON THE FLAP TO THE LEFT)
A Grill Grate, part no. 741140
B Piezo Igniter, part no. 741160
C Hose incl. Regulator, part no. 741120
D Adapters
E Storage and transport bag (not shown), part no. 741100
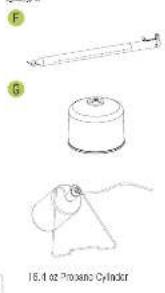
F Burner, part no. 741150
G Gas Cartridge 100 g, part no. 220661.
230 g, part no. 220761, 450 g, part no.
220261.
Seasonal gas variants – summer and winter – are also available as accessories.
GAS UTILISATION KUCHOMA 440050
EN
This grill is intended for use with Primus gas Propane/Isobutane/Butane in cartridges with designation 2202xx, 2206xx, 2207xx. (Red Power Gas, green Summer Gas or brown Winter Gas). Alternatively, an LPG cylinder that fi is adapters attached to the grill (in certain countries), or sold separately as an accessory.
Gas consumption is 145 g/h (2.0 kW) butane under pressure of 1 bar. 5700 BTU/h propane
The diameter of the bore in the nozzle of the grill's burner is 0.37 mm.
CHECKING THE GRILL. IMPORTANT: If there
is a leak on your appliance (smell of gas), take it outside immediately into a well ventilated flame free location where the leak may be detected and stopped. If you wish to check for leaks on your appliance, do it outside. Do not try to detect leaks using a flame, use soapy water. Contact Primus or your local dealership for replacement parts. You will find contact information on the back page of this instruction booklet.
-
Smell or listen for gas leaks from the gas cartridge. ⑨ If you are not certain, you can check by putting some soapy water on the connection to the gas cartridge. If you see any bubbles, there is a gas leak - DO NOT LIGHT the grill!
-
The gas control ② knob on the grill must be closed (turn clockwise to close) before connecting the gas cartridge.
- Check the seals before connecting a new gas container to the appliance. 12 Do not use the appliance if it has damaged or worn seals.
- The threads on both the gas cartridge and the regulator. 11 must be intact if they are damaged in any way or awny, replace the gas cartridge; or if the regulator is damaged, DO NOT USE the grill. Order a new hose and regulator – see Accessories on the side flap.
- Inspect the hose (so that it is neither kinked nor squashed. Avoid twisting the flexible hose) as well as the connection to the burner that it is not damaged. Lift the grill grate ⑤ and drip tray ⑥ ensure that the hose and connector are properly adjusted.
PREPARE THE GRILL. IMPORTANT: Take care
to ensure that the grill is standing with its legs fully folded out on a stable, fl at surface with no combustible material nearby. Check its stability! If you tip the grill while there is food on it, you risk being scalded by hot liquids.
- Stand the grill on its side with the handle 7 uppermost. Remove the regulator and hose from the slot on the underside.
- Unfold the support legs 10 to their outermost extent. Place the grill with its support legs downwards on a fl at surface.
-
Open the lid on the grill 6 by angling the handle 90°. Lift the lid as far as it will go.
-
Attach the gas cartridge to the regulator by screwing with a definite continuous motion as far as it will go. Do this manually - DO NOT USE a pair of pliers, or similar. 12
- Make sure that the gas cartridge is level with the regulator upwards. Check that no gas is leaking from the connection between the regulator and the gas cartridge. Use soapy water as discussed in the section "Before ignition" if you are unsure.
LIGHTING THE GRILL. IMPORTANT: Under no
circumstances move the grill when it is lit, either with or without pots. If, due to the wind, the flames are forced down under the burner, turn the grill off and move it to a more sheltered location.
- Rotate the gas supply knob 2 for the burner 8 you want to light, about one turn anti-clockwise and press the ignition button 3 to ignite the gas. 13
- If the burner does not ignite after five attempts with the ignition button, turn off the supply (clockwise as far as it will go) and wait ten seconds for the unignited gas to dissipate. Turn on the gas supply and try again.
- Once the gas has been lit, you can adjust the flame and the supply of heat with the supply knob. The gas should burn directly upwards with a steady flame.
- Put the food on the grill after the gas has been lit.
TURN OFF THE GRILL. IMPORTANT: Do not pack up the grill before the burner has cooled down. Check that the burner is extinguished before disconnecting the gas container.
- Tum the grill off by twisting the gas supply knobs clockwise to the stop position. The valve is closed and the gas flow is stopped when the flame goes out. Do not use excessive force in turning off the supply; you may risk having problems when you try to turn on the supply next time.
- When you have completely finished with the grill, and the burner 8 has been turned off, unscrew the gas cartridge 9 from the regulator and place the regulator in the slot on the underside of the grill.
- Close the lid, 6 fold the legs in lid tilt the handle back into position.
IMPORTANT: Regular cleaning and overhaul will extend the life of your grill. Do not try to repair screw threads or valves on the gas cartridges or the regulator yourself. If the grill needs to be repaired, please contact Primus. You will find contact information on the back page of this instruction booklet.
-
Remove the grill grate. 5 Lift off the drip tray. 4 The drip tray may be cleaned in a dish-washer as well as manually.
-
The remainder of the grill should be wiped clean with a cloth and a mild cleanser, e.g. dish-washing liquid.
- Examine the wooden parts. If they have been wet and have now dried, give them a lightly application of oil.
- Reassemble the grill completely when fully dry. The deepest part of the drlp tray should be closest to the lid.
IMPORTANT INFORMATION CONCERNING GAS CARTRIDGES.
This appliance shall only be used with either Primus 100 g, 230 g or 450 g single-use cartridges (marked 2202xx, 2206xx and 2207xx respectively)
Different adapters are used for varying types of refillable cartridges. You can obtain other adapters, and exchange regulator components yourself if you carefully follow the instructions that go with them. Attempting to attach gas cartridges that are not designed for the grill can be dangerous.


AE44
CE-0048-17
ID: 2531CS-0133
DANGER
CARBON MONOXIDE HAZARD

This appliance can produce carbon monoxide which has no odor. Using it in an enclose space can kill you. Never use this appliance in an enclosed space such as a camper, tent, car or home.

Design and Quality Primus AB Sweden P.O. Box 6041 SE-171 06 Solna, Sweden Tel: +46 8 564 842 30 www.primus.eu
FOR YOUR SAFETY
If you smell gas
- Do not attempt to light appliance.
- Extinguish any open flame.
- Disconnect from fuel supply.
FOR YOUR SAFETY
Do not store or use gasoline or other liquids with flammable vapours in the vicinity of this or any other appliance.
natural_image
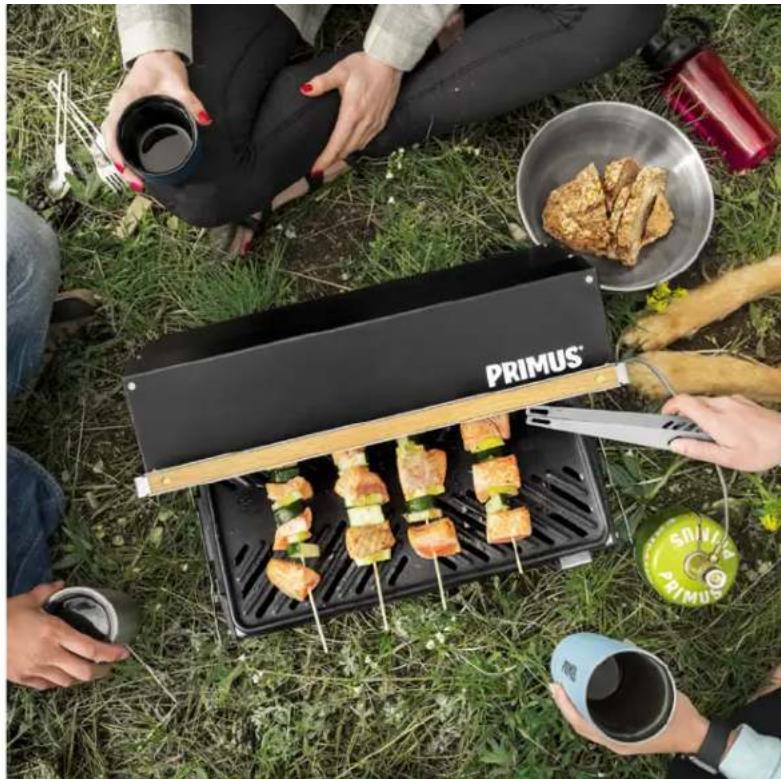
Top-down view of a PRIMUS grill setup with skewers, cutlery, and cooking utensils on grass (no text or symbols visible)natural_image
Top-down view of a PRIMUS grill setup with customers and food items on grass (no text or symbols visible)FRIHET ATT UPPTÄCKA
PRODUKTÖVERSIKT & PRODUKTDETALJER
(SE ILLUSTRATIONEN PÅ UTVIKET TILL VÄNSTER)
1 Regulator
2 Gasvred
3 Tändare (piezo)
4 Dropp-plåt
5 Grillgaller
PRODUKTOVERSIKT & PRODUKTDETALJER
(SE ILLUSTRASJON PÅ KLAFFEN TIL VENSTRE)
1 Regulator
6 Lokk
10 Ben
2 Gassknott
7 Håndtak
11 Gjenger på gasspatron
3 Antenning (Piezo)
8 Brenner
VEDLIKEHOLD AV OVNEN. VIKTIG:
PRODUKTOVERBLIK & PRODUKTDETALJER
(SE ILLUSTRATIONEN PÅ VENSTRE FLAP)
1 Regulator
2 Gasknap
3 Tænding (piezo)
4 Drypbakke
5 Grillrist
PŘEHLED PRODUKTU A PODROBNOSTI O PRODUKTU
(VIZ ILUSTRACE NA ZÁLOŽCE VLEVO)
PREHLAD PRODUKTU A PODROBNOSTI O PRODUKTE
(POZRITE SI ILUSTRÁCIU NA ZÁKLOPKE V'LAVO)
- FREEDOM TO EXPLORE
- A FEW WORDS ABOUT SAFETY.
- IMAGE REFERENCE
- PRODUCT OVERVIEW & PRODUCT DETAILS
- SPARE PARTS & ACCESSORIES
- GAS UTILISATION KUCHOMA 440050
- CHECKING THE GRILL. IMPORTANT: If there
- PREPARE THE GRILL. IMPORTANT: Take care
- LIGHTING THE GRILL. IMPORTANT: Under no
- TURN OFF THE GRILL. IMPORTANT: Do not pack up the grill before the burner has cooled down. Check that the burner is extinguished before disconnecting the gas container.
- IMPORTANT INFORMATION CONCERNING GAS CARTRIDGES.
- DANGER
- CARBON MONOXIDE HAZARD
- FOR YOUR SAFETY
- FRIHET ATT UPPTÄCKA
- PRODUKTÖVERSIKT & PRODUKTDETALJER
- PRODUKTOVERSIKT & PRODUKTDETALJER
- VEDLIKEHOLD AV OVNEN. VIKTIG:
- PRODUKTOVERBLIK & PRODUKTDETALJER
- PŘEHLED PRODUKTU A PODROBNOSTI O PRODUKTU
- PREHLAD PRODUKTU A PODROBNOSTI O PRODUKTE
Brand : Primus
Model : Kuchoma
Category : Barbecue