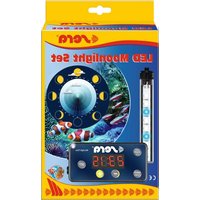
LED Moonlight Set - Controller sera - Free user manual and instructions
Find the device manual for free LED Moonlight Set sera in PDF.


User questions about LED Moonlight Set sera
0 question about this device. Answer the ones you know or ask your own.
Ask a new question about this device
Download the instructions for your Controller in PDF format for free! Find your manual LED Moonlight Set - sera and take your electronic device back in hand. On this page are published all the documents necessary for the use of your device. LED Moonlight Set by sera.
USER MANUAL LED Moonlight Set sera
• Moon phase simulation for all aquariums and terrariums
- Individually programmable moonrises and moonsets
• Nocturnal cloud scenarios

natural_image
Black and white illustration of a fish inside a circular frame, with no visible text or symbols.JED Moonlight Set
US Moonlight controller with LED light 10
radar
| Day | Br 1 | Br 2 | Br 3 | Br 4 | |-----|------|------|------|------| | 1 | 0 | 0 | 0 | 0 | | 2 | 0 | 0 | 0 | 0 | | 3 | 0 | 0 | 0 | 0 | | 4 | 0 | 0 | 0 | 0 | | 5 | 0 | 0 | 0 | 0 | | 6 | 0 | 0 | 0 | 0 | | 7 | 0 | 0 | 0 | 0 | | 8 | 0 | 0 | 0 | 0 | | 9 | 0 | 0 | 0 | 0 | | 10 | 0 | 0 | 0 | 0 | | 11 | 0 | 0 | 0 | 0 | | 12 | 0 | 0 | 0 | 0 | | 13 | 0 | 0 | 0 | 0 | | 14 | 0 | 0 | 0 | 0 | | 15 | 0 | 0 | 0 | 0 | | 16 | 0 | 0 | 0 | 0 | | 17 | 0 | 0 | 0 | 0 | | 18 | 0 | 0 | 0 | 0 | | 19 | 0 | 0 | 0 | 0 | | 20 | 0 | 0 | 0 | 0 | | 21 | 0 | 0 | 0 | 0 | | 22 | 0 | 0 | 0 | 0 | | 23 | 0 | 0 | 0 | 0 | | 24 | 0 | 0 | 0 | 0 | | 25 | 0 | 0 | 0 | 0 | | 26 | 0 | 0 | 0 | 0 | | 27 | 0 | 0 | 0 | 0 | | Day1| -29.5| -29.5| -29.5| -29.5| | Helligkeit Brightness Luminosité F₃ 100% Vollmond Full moon Pleine lune Br4 Br3 Br3 Br2 Br1 Neumond New moon Nouvelle lune1
text_image
1.7 1.2 1 1.1 sera® Moonlight Timer 23:06 SET MINUTE 4x 1.4 1.5 1.3 1.6 1.8 4x2
text_image
2 2.2 2.1 2x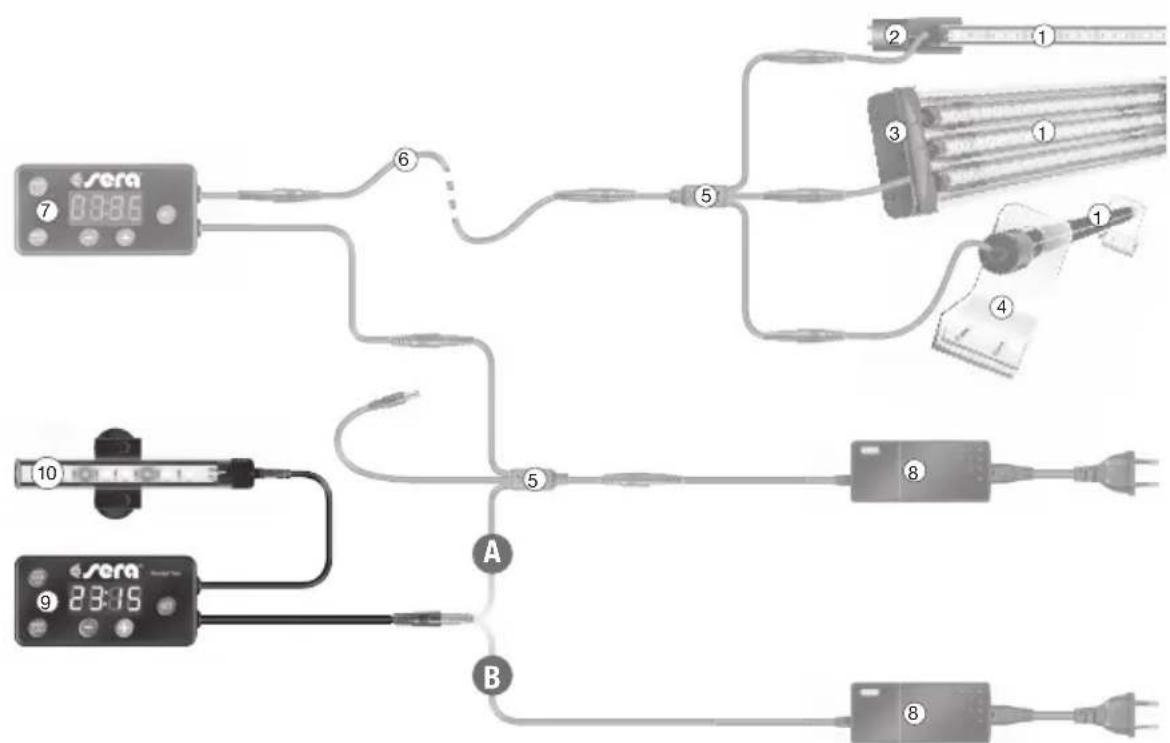
flowchart
graph TD
    A["Digital Display 08:86"] --> B["Component 6"]
    C["Sensor 23:15"] --> D["Component 9"]
    E["Electrical Connector 4"] --> F["Component 8"]
    G["Component 5"] --> H["Component 8"]
    I["Component 3"] --> J["Component 1"]
    K["Component 7"] --> L["Component 1"]
    M["Component 5"] --> N["Component 8"]
nicht enthalten / not included / non compris
① X-Change Tube
② T5 short / T5 / T8 Adapter
③ fiXture
④ Tube Holder Clear
⑤ Triple Cable
⑥ Extension Cable
⑦ DigitalDimmer
⑧ Vorschaltgerät / Ballast /
Ballast électronique
⑨ LED Digital Moonlight Timer
⑩ LED moonlight
product may not be exactly as illustrated Subject to technical alterations and errors
energy efficiency class A+
Please read these instructions carefully and keep for future use. When forwarding this unit to third parties, this information for use is also to be handed over.
Congratulations for purchasing our LED Moonlight Set. You purchased an innovative product developed for allowing an interesting nocturnal observation of your aquarium or terrarium, and to meet the requirements of your animals to life according to the rhythm of nature.
The sera LED Moonlight Set is a nocturnal lighting system that imitates moonlight conditions during lunation. Lunation lasts 29 days from new moon via waxing moon until the brightest phase at full moon, followed by waning moon until the next new moon. Light variations of the different moon phases are simulated by the brightness program, as shown in the image. It is therefore possible to design the aquarium or terrarium even more similar to nature.
Please read this information for use carefully and follow the following advice as to ensure lasting joy in your new product.
SAFETY PRECAUTION
Use the sera LED Digital Moonlight Timer only within its application range as described in the following in this information for use. It is a low voltage moonlight timer with an application range of 10 – 20 V DC input voltage and not exceeding 3 A input current. The maximum output voltage cannot exceed the input voltage.
Application and application range
The sera LED Digital Moonlight Timer allows dimming one or several sera LED X-Change Tubes (also in different lengths) up to a total wattage of 60 W. The “moonlight” sera LED X-Change Tube is already included in the set.
Unlike the sera LED Digital Dimmer, which was designed for dimming daylight, the sera LED Digital Moonlight Timer does not cause a reddish dimming process even with sera sunrise Tubes.
Make sure the wattage is not exceeded and the lamps in question are really dimmable at voltages ranging from 10 – 20 V in case the sera LED Digital Moonlight Timer is being used with other LED lamps. Several LED lamps can be operated via one LED ballast/driver.
Operating the sera LED Moonlight Sets requires a 20 V DC LED ballast. The sera LED Moonlight Set can be additionally connected to an existing ballast such as the sera LED Driver using the Triple Cable, provided the wattage is sufficient (3 A).
Otherwise we recommend the sera LED Driver 20 V DC 1 A (3 B).
Please be aware that ballasts for personal computers are not permitted for operating LED lamps.
Kit includes
- sera LED Digital Moonlight Timer with cable and 5.5 mm barrel plugs
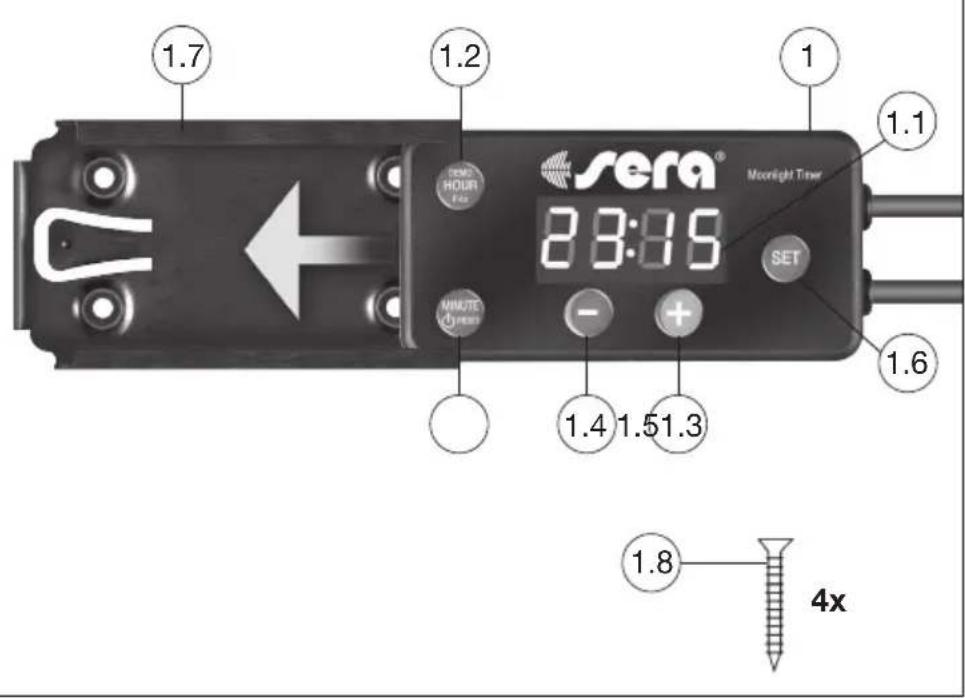
1.1 Display
1.2 HOUR, F·br, DEMO key
1.3 MINUTE, ⏻ (ON/OFF), RESET key
1.4 MINUS key
1.5 PLUS key
1.6 SET key
1.7 Holder
1.8 Screws (4 pcs)
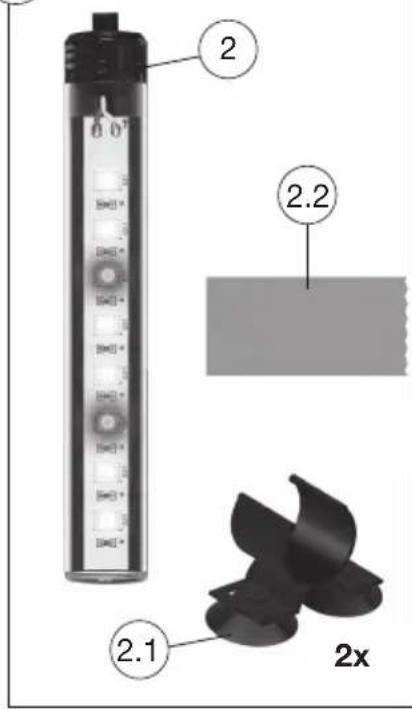
- sera LED moonlight, X-Change Tube, 180 mm (7 in.)
2.1 2 pcs double suction cup holder
2.2 “Silver moon foil” – adhesive foil for creating diffuse light
Assembly instruction
The sera LED Digital Moonlight Timer is connected between LED driver/ballast and the sera LED moonlight (LED lamp) as a consumer. If you wish to control several consumers, connect the sera LED Triple Cable to the output of the moonlight timer as a distributor. This allows you connecting up to three consumers. You can even increase the number of possible consumers with further distributors. The cables cannot be connected falsely as the used barrel connectors provide protection against polarity reversal.
Location
The sera LED Digital Moonlight Timer should be installed in an easily accessible place. Make sure it is installed in a dry area. Use the included holder (1.7) to do so. It can be easily mounted to/in a cabinet or such by using 4 screws (1.8).
sera LED moonlight
The LED lamp can be attached to the aquarium glass or any other smooth surface by means of the two included double suction cup holders. The lamp should be installed above the water surface. The sera LED moonlight can also be integrated into an overtank luminaire such as the sera LED fiXture. The clips required to do so are available in pairs as accessories. A special silver moon foil is also included. It can be attached to the glass tube for making the light appear more diffuse. This is suitable for very small tanks or to further lower the light intensity.
Operation
Connect the mains plug to the mains supply only after all components have been connected appropriately and everything is firmly installed.
1. ON/OFF
Press the "MINUTE/⏻" key to switch the light on or off.
Press the “SET” key for approximately 3 seconds. The display will then start to flicker. Then press the “HOUR” key (for adjusting the hours) and “MINUTE” (for adjusting the minutes) to set the actual time. Single clicks on these keys will increase the displayed digit by 1 every time. If keys are held down, the numbers in the display start to run upwards quickly. Confirm these settings by pressing the “SET” key, and you will proceed to the next setup step – Programming the moonrise (see item 3, please).
3. Programming the moonrise
Press the “SET” key for approximately 3 seconds. The display will then start to flicker. Then briefly press the “SET” key once. Now the display will show “ON” for the moonrise. The display will then immediately switch into input mode. You can set the begin of the moonrise as desired by pressing the “HOUR” and “MINUTE” keys (please see item 2, Adjusting the actual time). Confirm these settings by pressing the “SET” key, and you will proceed to the next setup step – Programming the moonset (please see item 4).
4. Programming the moonset
Press the “SET” key for approximately 3 seconds. The display will then start to flicker. Then briefly press the “SET” key twice (ON » OFF). Now the display will show “OFF” for the moonset. The display will then immediately switch into input mode. You can set the begin of the moonset as desired by pressing the “HOUR” and “MINUTE” keys (please see item 2, Adjusting the actual time). Confirm these settings by pressing the “SET” key, and you will proceed to the next setup step – Adjusting the switch mode (please see item 5).
5. Adjusting the switch mode
Press the “SET” key for approximately 3 seconds. The display will then start to flicker. Then briefly press the “SET” key three times until the display shows “F-” in the order (ON »OFF » F). You can now select the switching mode (F1 – F3). You can switch the programs in the order F1, F2, F3, F1, F2 ... by repeatedly pressing the “HOUR” key. Confirm these settings by pressing the “SET” key, and you will proceed to the next setup step – Setting the moon phase (please see item 6).
You can choose between the following programs:
Description of the programs F1 – F3
| Program Function Description | ||
| F1 Moonrise and moonset with clear sky according to luation | Dimming up and down from 0 – 100% – 0%, each lasting 30* minutes at the maximum | |
| F2 On/Off Switching on and off | automatically without dimming | |
| F3 like F1, plus Cumulus cloud simulation | Smooth reduction to 10% of the adjusted brightness (every 20 minutes for 90 seconds) | |
(* The dimming phase may be shorter in programs with low brightness.)
In program F3, the lighting is reduced to 10% of the adjusted light brightness every 20 minutes for slightly more than a minute. However, this cloud scenario begins only one hour after moonrise.
6. Setting the moon phase – selecting the day
The programmed moon calendar begins with full moon, unless you select another day in the moon calendar.
You must select the day in the programmed syn- odical calendar if you wish to operate the sera LED Digital Moonlight Timer according to the actual moon phases. Day 1 represents "full moon", and day 15 is "new moon". The time between full moon and new moon is called waning moon (chart symbol: ↗), after new moon it is called waxing moon (chart symbol: ↗). The current moon phase is easy to find on the Internet using "moon calendar" as a keyword.
Description of the programmed calendar
| Day (d) Brightness (br) Tendency | |
| 1 100% | |
| 2 96% | |
| 3 92% | |
| 4 88% | |
| 5 80% | |
| 6 72% | |
| 7 64% | |
| 8 56% | |
| 9 48% | |
| 10 40% | |
| 11 32% | |
| 12 24% | |
| 13 16% | |
| 14 8% | |
| 15 0% | |
| 16 8% | |
| 17 16% | |
| 18 24% | |
| 19 32% | |
| 20 40% | |
| 21 48% | |
| 22 56% | |
| 23 64% | |
| 24 72% | |
| 25 80% | |
| 26 88% | |
| 27 92% | |
| 28 96% | |
| 29 98% |
Press the “SET” key for approximately 3 seconds. The display will then start to flicker. Then briefly press the “SET” key four times (ON »OFF » F » d) until the display shows “d --”. Press the “+” or “-” keys for selecting the desired day. Confirm the settings by pressing the “SET” key, and you will proceed to the next setup step – Adjusting the brightness by selecting the “br adjustment” program (please see item 7.1).
Advice
a. Thesera LED moonlight is not lit during new moon.
b. Maximum brightness is already reached before the end during the low light moon phases.
c. We recommend selecting the day once per year as to keep the programmed moon cycles in time with natural moon phases.
7. Adjusting brightness
7.1 Adjusting the brightness by selecting the program (br adjustment)
Press the “SET” key for approximately 3 seconds. The display will then start to flicker. Then briefly press the “SET” key five times (ON »OFF » F » d » br) until the display shows “br --”. Press the “HOUR/br” key for selecting the desired overall brightness.
$$ \text {br} 01 = \text {approx.} 40 \% \text {br} 03 = \text {approx.} 80 \% $$
$$ \text { br } 02 = \text { approx. } 60 \% \text { br } 04 = 100 \% $$
Confirm the settings by pressing the "SET" key, and you will return to the operation mode.
7.2 Manual adjustment
You can adjust the brightness individually as desired. Set the maximum brightness by pressing the “+” and “-” keys. The automatic dimming process will also end at the brightness adjusted here. You can adjust different brightness levels by pressing the “+” key for a long time, and you can also reach other positions stored with 100% brightness. These depend on the system. In case you stored one of these positions and later on wish to reduce the brightness, you may need to press the “-” key for a longer time to reduce the brightness in visible steps.
Attention!
Check whether the maximum brightness of the moonlight timers is set correctly and possibly correct it before applying it on the aquarium, or in case of apparently insufficient brightness in the aquarium in spite of sufficient LED equipment.
8. Reset function
Press the "MINUTE/RESET" key for 5 seconds, until the display shows "-- --". This will restore the default settings.
The default settings are as follows:
ON: 7:00 (7 a.m.) Switching mode: F1
OFF: 19:00 (7 p.m.) Day: 01 (full moon)
9. Demo Mode
Press the “HOUR/F-br/DEMO” key for approximately 3 seconds: Now moonrise and moonset as well as one cloud simulation phase are being simulated within 75 seconds, independently of any programming. The unit will then return to the previous operation mode.
Power supply
The stored settings will be lost and need to be entered again in case the power supply of the sera LED Digital Moonlight Timer is interrupted for several minutes or longer.
Advice
It is impossible to influence the brightness by manual adjustments while dimming processes are running. Manual dimming procedure adjustments can be done only after moonrise or moonset are finished.
Cleaning
Surfaces can be cleaned carefully with a moist cloth and some neutral detergent. Make sure no detergent gets into the aquarium. Please unplug the power cord before cleaning.
Maintenance
The sera LED Digital Moonlight Timer and the other components included with this set cannot and do not need to be serviced.
Safety Precautions
- Do not pull the cable of the sera LED Digital Moonlight Timer and do not expose the unit to humidity or wet conditions. Use the unit only indoors. Do not operate with AC voltage!
- The sera LED moonlight is made of glass and must be handled accordingly carefully.
- The sera LED moonlight is water proof. However, the power plug as well as any other current conducting connections must be protected against moisture.
- The unit must immediately be put out of service in case of damaged plugs or cables.
- The sera LED moonlight is not suited for general room lighting.
Technical Data
sera LED Digital Moonlight Timer:
Input 10 - 20 V DC max. 3 A
Max. Output ≤ Input

sera LED moonlight
Input 20 V DC 3 W

text_image
CE IP68 1 m 40 in. ◇ □ □energy efficiency class A+
Possible errors and solution
| Error Possible cause Solution | ||
| Display is on, lamp is not lit 1. Is your timer connected to the correct LED tube? Yes, check following items. | ||
| Moonlight too dark | Basic brightness set to 100%? | Press “+” key until brightness is OK (see 7.2). |
| Brightness level (br) set too low? Raise brightness level (br) (see 7.1). | ||
| Moonlight too bright | Brightness level (br) set too high? | Press “-” key until brightness is OK (see 7.2). |
| Lower brightness level (br) (see 7.1). | ||
| Moonlight too intense Attach silver moon foil to the tube. | ||
| Program deleted | Power supply interrupted | Maintain safe power supply. |
| Clock time deviates strongly after some operation time | Is an external timer or another dimmer connected in the circuit? | Yes, remove timer or other dimmer from the circuit. |
| No, contact retailer. | ||
| No cloud simulation in spite of F3 mode | Is the difference between set moonrise and moonset less than 2 hours? | Yes. Change moonrise and moonset time. Ensure moonlight for at least 2 hours. |
| No, contact retailer. | ||
| Brightness cannot be changed with the “+” and “-” keys | Is the program currently in an automatic dimming process (Demo Mode, e.g. moonrise and moonset)? | Yes, wait for the automatic dimming process to end. |
| No, contact retailer. | ||
Warning
- Children should be supervised to ensure that they do not play with the appliance.
- This appliance is not intended for use by persons (including children) with reduced physical, sensory or mental capacities, or lack of experience and knowledge, unless they have been given supervision or instruction concerning use of the appliance by a person responsible for their safety.
- In case the cable or the plug are damaged, the sera LED Moonlight Set must not be used any longer, but must be disposed of.
Disposal of the unit:
Waste electrical and electronic equipment (WEEE) must not get into domestic waste!
If ever the unit cannot be used anymore, the consumer is legally obliged to hand in waste electrical and electronic equipment (WEEE) separately from domestic waste, e.g. at a collection point of his community/his district. This ensures that waste electrical and electronic equipment (WEEE) is expertly processed and that negative effects to the environment are avoided.
Therefore electrical and electronic equipment bears the following symbol:

Manufacturer warranty:
When following the directions for use, the sera LED Digital Moonlight Timer will perform reliably. We are liable for the freedom from faults of our products for 2 years beginning with the purchase date.
We are liable for the freedom from faults of our products for 2 years beginning with the purchase date. We are liable for complete flawlessness at delivery. Should usual wear and tear occur by use as intended by us, this is not considered a defect. Warranty claims are also excluded in this case. This particularly refers to the plugs and cables. Legal claims are of course not reduced or limited by this warranty. Please note the additional warranty information (*).
Recommendation:
In every case of a defect, please first consult the specialized retailer where you purchased the unit. He will be able to judge whether it is actually a warranty case. In case of sending the unit to us we will unnecessarily have to charge you for occurring costs. Any liability because of contract breach is limited to intent or gross negligence. sera will be liable in case of slight negligence only in case of injuries to life, body and health, in case of essential contractual obligations and with binding liability according to the product liability code. In that case, the extent of liability is limited to the replacement of contractually typically foreseeable damages.
The moonlight timer may only be operated with suitable products in the low voltage range between 10 – 20 V DC and not exceeding 3 A. Nonobservance will void all warranty claims.
Important warranty addendum (\*):
- Damage to power/mains cord will not be repaired by the manufacturer due to safety reasons. (Reason: Moisture that has gotten into the cable often leads to corrosion and short-circuits.) Replacing the complete cable is not possible. The device must be discarded.
- Any damages of this cable are excluded from warranty.
- Glass damages of the sera LED moonlight are not covered by warranty.
energy efficiency class A+
text_image
CE IP68 1 m ◇ | | | |energy efficiency class A+
energy efficiency class A+
energy efficiency class A+
energy efficiency class A+
energy efficiency class A+
1.3 MINUTE, ⏻ (ON/OFF), RESET -painike
1.4 MINUS -painike
1.5 PLUS -painike
1.6 SET -painike
1.7 Pidike
1.8 Ruuvit (4 kpl)
- sera LED moonlight, X-Change Tube, 180 mm
text_image
CE IPX4 III 6sera LED moonlight
Input 20 V DC 3 W

text_image
CE IP68 1 m ◇ □ □energy efficiency class A+
energy efficiency class A+
energy efficiency class A+
| Den (d) Jas (br) Tendence | |
| 1 100% | |
| 2 96% | |
| 3 92% | |
| 4 88% | |
| 5 80% | |
| 6 72% | |
| 7 64% | |
| 8 56% | |
| 9 48% | |
| 10 40% | |
| 11 32% | |
| 12 24% | |
| 13 16% | |
| 14 8% | |
| 15 0% | |
| 16 8% | |
| 17 16% | |
| 18 24% | |
| 19 32% | |
| 20 40% | |
| 21 48% | |
| 22 56% | |
| 23 64% | |
| 24 72% | |
| 25 80% | |
| 26 88% | |
| 27 92% | |
| 28 96% | |
| 29 98% |
energy efficiency class A+
energy efficiency class A+
energy efficiency class A+