Party Rocker One Plus - Speaker HISENSE - Free user manual and instructions
Find the device manual for free Party Rocker One Plus HISENSE in PDF.

| Product Type | Portable Party Speaker |
| Brand | Hisense |
| Model | Party Rocker One Plus |
| Dimensions (W × H × D) | 295 × 550 × 258 mm |
| Mains Power | AC 100-240 V ~ 50/60 Hz |
| Built-in Battery Power | Li-ion 7.2 V, 7650 mAh |
| Battery Life | Up to 15 hours |
| Battery Charging Time | Approx. 4.5 hours |
| Power Consumption (AC) | 80 W |
| Maximum Audio Power | 300 W |
| Bluetooth Version | 5.0 |
| Bluetooth Range | Up to 8 meters |
| Supported USB Audio Formats | MP3, WMA, WAV (USB 2.0, up to 32 GB) |
| FM Band | 87.5 - 108 MHz |
| Main Functions | Bluetooth playback, AUX input, AUX output, FM radio, USB port, wireless microphones (×2), guitar input, wireless charging, DJ effects, LED lighting, equalizer (ROCK/JAZZ/SAMBA/POP/BALANCE), bass mode, vocal balancer, TWS function |
| Inputs/Outputs | AUX IN (3.5 mm), AUX OUT (3.5 mm), MIC (6.35 mm), GUITAR (6.35 mm), USB (Type A, charge 5V/1A), DC IN (12V/2A), AC input socket |
| Wireless Microphone | 2 microphones included, AA batteries (1.5 V × 2), range ≤ 20 m |
| Water Resistance Rating (top panel) | IPX4 |
| Care and Cleaning | Clean with a soft, dry cloth. Do not use abrasive products. |
| Safety | Read all safety instructions before use. Do not open the device. Use only the supplied mains adapter. |
| Spare Parts and Repairability | Wireless microphones and AA batteries replaceable. For any repairs, contact customer service. |
| Operating Temperature | 0 °C to +45 °C |
Frequently Asked Questions - Party Rocker One Plus HISENSE
User questions about Party Rocker One Plus HISENSE
0 question about this device. Answer the ones you know or ask your own.
Ask a new question about this device
Download the instructions for your Speaker in PDF format for free! Find your manual Party Rocker One Plus - HISENSE and take your electronic device back in hand. On this page are published all the documents necessary for the use of your device. Party Rocker One Plus by HISENSE.
USER MANUAL Party Rocker One Plus HISENSE
Read all the safety instructions carefully before use and keep this instruction manual for future reference.
Features
Thanks for your purchase of our product. Please read through this manual before making connections and operating this product. Retain this manual for future reference.
- Bluetooth playback
- AUX IN
- FM tuner
- USB SLOT
- Microphone function
- Guitar function
● Multiple EQ sound effect mode
*If the Modes is different, the actual situation prevails.
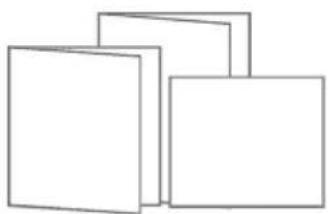
Package Contents

Main Unit
natural_image
Three overlapping squares with no text or symbolsUser Manual Quick Start Guide Warranty Card
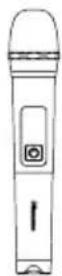
Wireless Microphone ×2 (Only for Party Rocker One Plus)
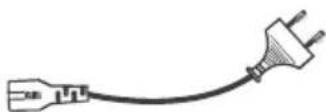
* AC power cord
AA battery (1.5V) × 4
(Only for Party Rocker One Plus)
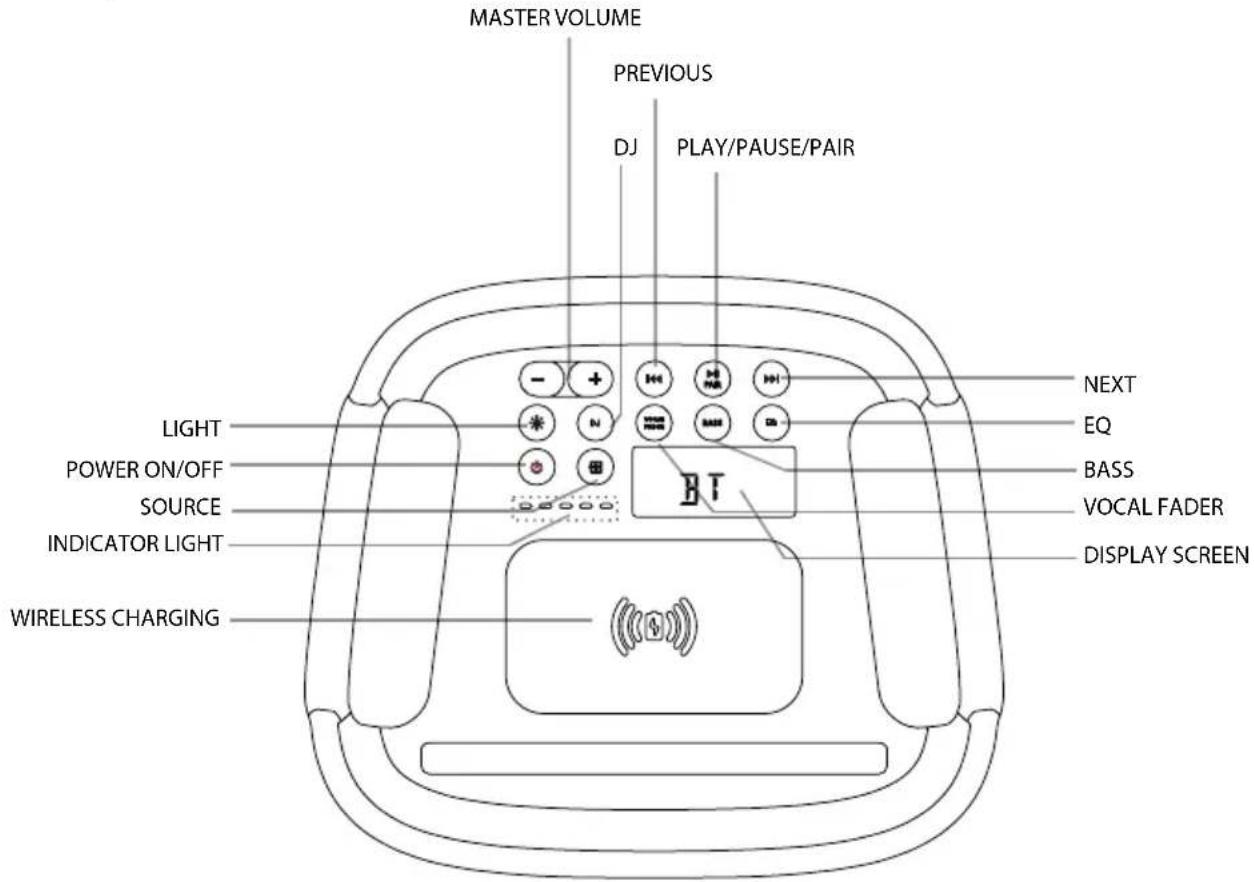
Product Diagram
Top View
Party Rocker One Port
| LIGHT | Select the different lighting mode of LED Indicator |
| POWER ON/OFF | Power on/off |
| SOURCE | Select a play function |
| INDICATOR LIGHT Built-in battery charging Indicator | |
| WIRELESS CHARGING Wireless charging | |
| MASTER VOLUME | Increase/Decrease the volume level |
| DJ DJ effect | |
| PREVIOUS |◀◀ | Press to the previous track |
| PLAY/PAUSE/PAIR | Play/Pause/Pair playback |
| NEXT ▶▶I | Press to the next track |
| EQ Equalizer manual mode | |
| BASS ON/OFF the BASS mode | |
| VOCAL FADER Switch between vocal | fader on and vocal fader off |
| DISPLAY SCREEN Display screen | |
Product Diagram
Rear View

Party Rocker One Port
| DC IN DC input socket (Only available for vehicle DC power adapter) | |
| ECHO Increase/decrease the mic echo volume level | |
| MIC VOLUME ADJUST Increase/decrease the mic volume level | |
| GUITAR VOLUME ADJUST Increase/decrease the guitar volume level | |
| USB SLOT USB slot | |
| AUX IN AUX input socket | |
| AUX OUT AUX output socket | |
| MIC MIC socket | |
| TWS Press to enter TWS pairing mode | |
| GUITAR Guitar socket | |
| AC INPUT SOCKET AC power socket | |
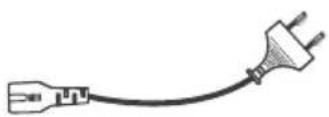
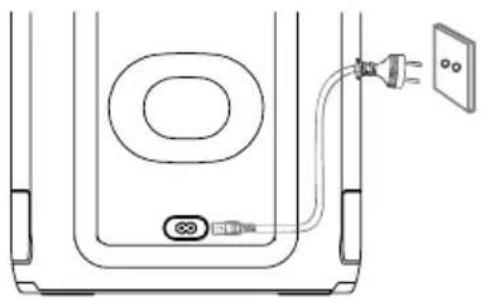
Connections
Connect Power
Rear panel of the main unit
natural_image
Line drawing of a device rear panel with a power outlet and cable, no text or symbols presentRisk of product damage!
Ensure that the power supply voltage corresponds to the voltage printed on the back or the underside of the unit.
- Insert the AC power cord into a mains socket.
AUX IN Socket
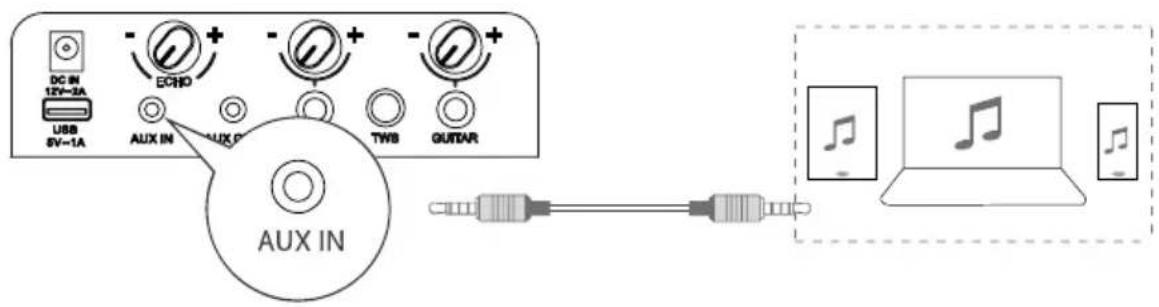
This unit has an audio input terminal. You can input the analogue stereo audio signals from extra devices such as VCD, CD, VCR, MP3 player, etc.
Use the audio cable with a 3.5 mm(not supplied) connector to connect the input terminal AUX IN on the rear panel of the unit, press ➞ button to select AUX IN mode.
AUX OUT Socket
Rear View of the Main Unit
Rear View of another Main Unit (not included)

flowchart
graph LR
    A["USB 6V=1A"] -->|DO IN 12V=2A| B["AUX OUT"]
    B --> C["AUX OUT"]
    C --> D["AUX OUT"]
    D --> E["AUX OUT"]
    E --> F["AUX OUT"]
    F --> G["AUX OUT"]
    G --> H["AUX OUT"]
    H --> I["AUX OUT"]
    I --> J["AUX OUT"]
    J --> K["AUX OUT"]
    K --> L["AUX OUT"]
    L --> M["AUX OUT"]
    M --> N["AUX OUT"]
    N --> O["AUX OUT"]
    O --> P["AUX OUT"]
    P --> Q["AUX OUT"]
    Q --> R["AUX OUT"]
    R --> S["AUX OUT"]
    S --> T["AUX OUT"]
    T --> U["AUX OUT"]
    U --> V["AUX OUT"]
    V --> W["AUX OUT"]
    W --> X["AUX OUT"]
    X --> Y["AUX OUT"]
    Y --> Z["AUX OUT"]
This unit has an AUX OUT jack. You can output the analog stereo audio signals to external devices such as an active speaker.
Connect an audio cable (not supplied) to the AUX OUT jack on the rear panel of the unit and the AUX IN jack of the external device, and the unit will output audio automatically to the external device.
Connections
MIC Socket
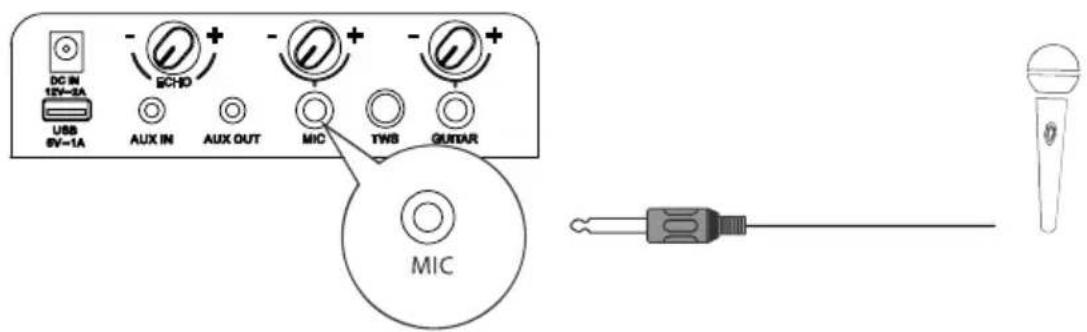
Insert the microphone into the microphone socket on the rear panel and adjust to a low level using the microphone volume knob on the rear panel.
Adjust the microphone volume level to your desired level using the microphone volume knob on the rear panel.
Now, enjoy the karaoke singing!
GUITAR Socket
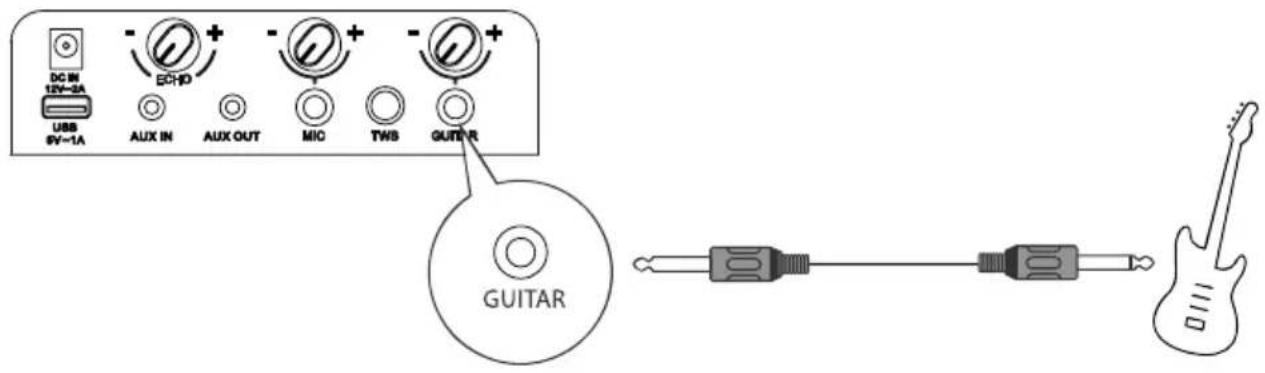
Insert the guitar cable into the guitar socket on the rear panel.
Now, enjoy yourself!
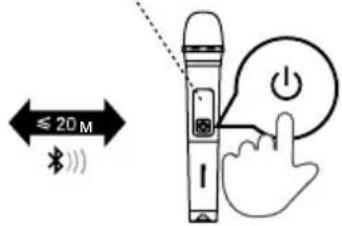
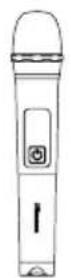
WIRELESS MICROPHONE CONNECTION (Only for Party Rocker One Plus)
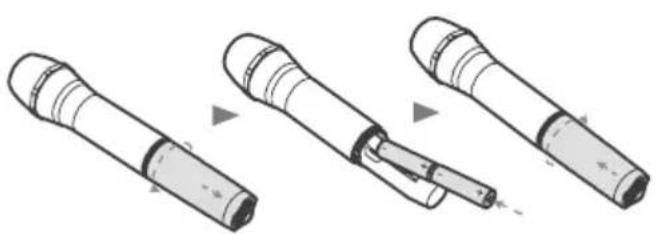
Connecting Microphone
To connect the supplied wireless microphone By default, the wireless microphone comes pre-paired with the speaker at factory.
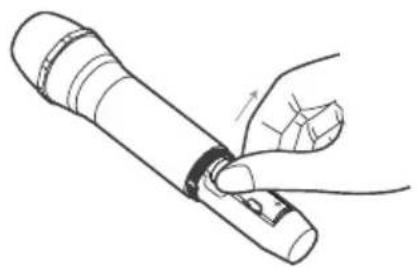
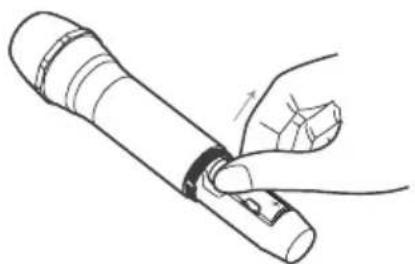
- Load the two Alkaline AA batteries with correct polarity.
natural_image
Diagram showing three stages of a mechanical component or tool, with no visible text or symbols.- Turn on the speaker and supplied wireless microphone successively.
- Wireless connection will be set up automatically.
Notes:
-The microphone powers off automatically after 20 minutes of inactivity.
- A maximum of two wireless microphones are supported.
To replace wireless microphone batteries
Cautions:
- Do not mix batteries (old and new or carbon and alkaline, etc.).
- Remove batteries if they are exhausted or if the microphone is not to be used for a long time.
- Batteries contain chemical substances, they should be disposed of properly.
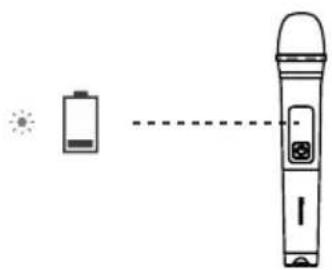
1.Low battery prompt.
natural_image
Diagram showing a battery connected to a handheld device with a light bulb, illustrating the concept of lighting (no text or symbols present)Indicator blinking red
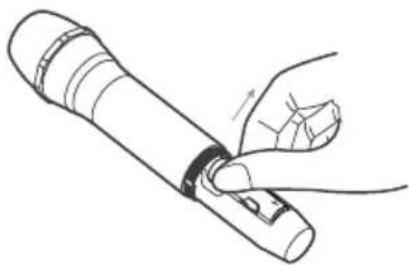
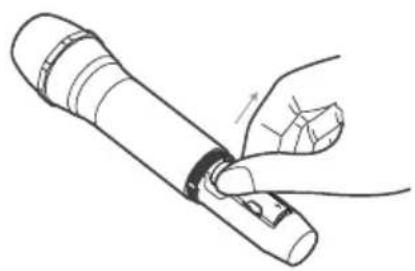
2. If the battery level is low, replace the old batteries with new ones.
natural_image
Line drawing of a hand holding a cylindrical object with a knob, no text or symbols present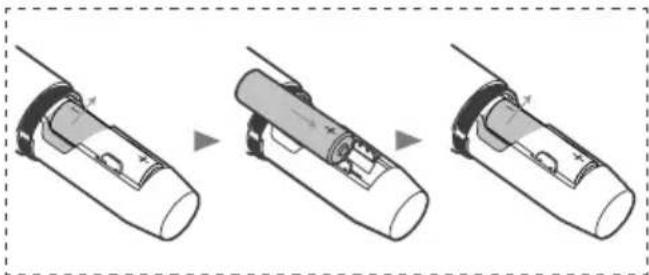
natural_image
Three-step diagram showing a device being processed, with no visible text or symbolsConnecting
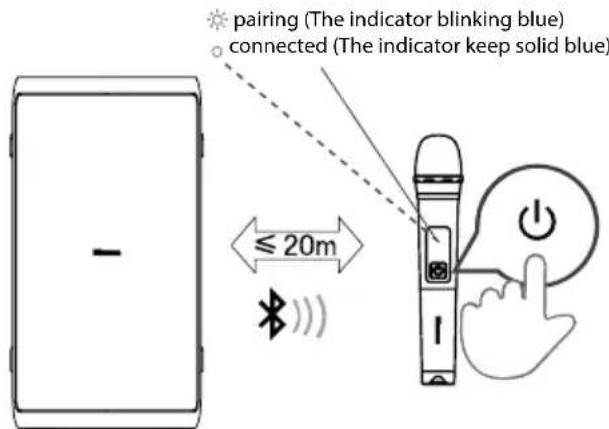
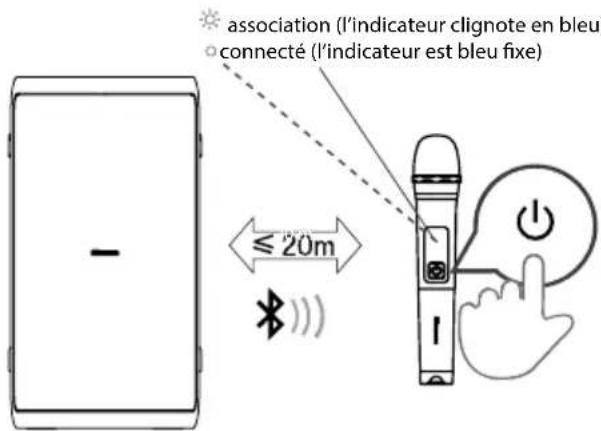
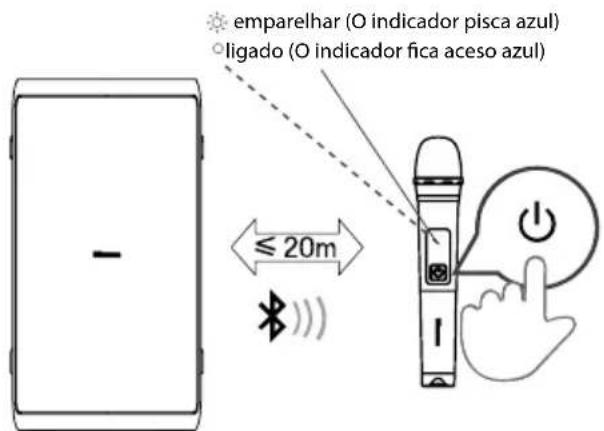
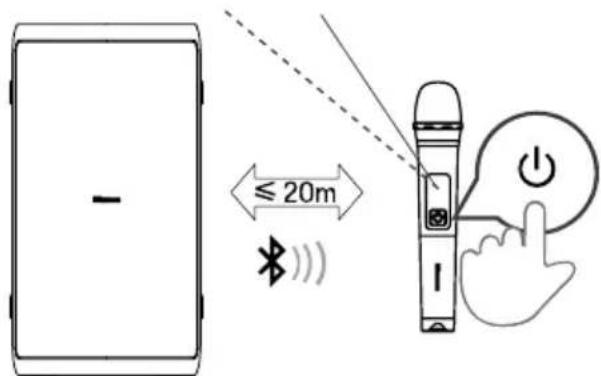
Press the button on the top panel of the unit to switch on the unit.
Press the ⏻ button on the wireless microphone to switch on the wireless microphone, the indicator on the wireless microphone will blink blue and the wireless microphone pair with the unit automatically, once paired successfully, the indicator on the wireless microphone will keep solid blue.
Adjust the microphone volume level to your desired level using the microphone volume knob on the rear panel.
Note: when the battery of the wireless microphone is in low battery state, the indicator on the wireless microphone blinks red and need to replace the old batteries in wireless microphone battery compartment with new ones.
Basic Operation
Standby/ON
- Press the ⏻ button on the unit to switch the main unit ON. Press and hold for 2 seconds to OFF.
- Disconnect the main plug from the main socket if you want to switch the unit off completely.
- When there is no input signal from the unit more than 15 minutes, it will switch to Standby mode automatically.
DJ Effect
- Press the DJ button to the select different DJ effect.
- Press the DJ key once to play the current DJ. When you press the DJ continuously within 1 second, cycle to select different DJ sound effects. Press the DJ key for 1 second to start playing the current DJ sound effects after no operation;
- DJ sound effect types: DJ1 cheering sound, DJ2 drum sound, DJ3 alarm sound, DJ4 horn sound, DJ5 disc playing sound.
Select Modes *If the Modes is different, the actual situation prevails.
- Press the ➕ button on the unit to select the play function BT USB AUX IN FM mode.
Adjust the Volume
- Press the VOL+/VOL- button on the unit to adjust the volume.
Preset Equalizer
- During play, press the EQ button repeatedly to select: ROCK-JAZZ-SAMBA-POP-BALANCE.
Bass settings
- Press BASS button to select BASS ON / BASS OFF.
Adjust the LED light
- Press the ⚙ button repeatedly to select the LED effect: LED OFF, LED1, LED2, LED3, LED4, LED5.
- Press and hold ⚙️ to switch ON/OFF the strobe light.
AUX IN Operation
1 Ensure that the unit is connected to the TV or the other audio devices.
2 Press the ➕ button on the unit to select the AUX IN mode.
3 Operate your audio device directly for playback features.
4 Press the VOL+/VOL- button to adjust the volume to your desired level.
WIRELESS CHARGING
The party speaker can charge wireless charging compatible phones by placing your phone on top of the wireless charging logo of the party speaker.
Note:
1 The wireless charging can be used for charging compatible smart phone when the unit is in power on state for AC mode.
2 In order to prolong the service life of the battery, direct wireless charging is not allowed in the battery mode.
Bluetooth Operation
Pair Bluetooth-enabled Devices
The first time you connect your Bluetooth device to this player, you need to pair your device to this player.
Note:
- The operational range between this player and a Bluetooth device is approximately 8 meters (without any object between the Bluetooth device and the unit).
- Before you connect a Bluetooth device to this unit, ensure you know the device's capabilities.
- Compatibility with all Bluetooth devices is not guaranteed.
- Any obstacle between this unit and a Bluetooth device can reduce the operational range.
- If the signal strength is weak, your Bluetooth receiver may disconnect, but it will re-enter pairing mode automatically.
1 Press the ➞ on the unit to select Bluetooth mode.
2 The word "PAIRING" will be shown on the display screen, the system has entered pairing mode.
3 Activate your Bluetooth device and select the search mode. "Hisense Party Rocker One" or "Hisense Party Rocker One Plus" will appear on your Bluetooth device.
4 Select "Hisense Party Rocker One" or "Hisense Party Rocker One Plus" in the pairing list, the system is successfully connected and the word "CONNECTED" will scroll show on the display screen.
5 Begin playing music from the connected Bluetooth device.
To disconnect the Bluetooth function, you can:
- Switch to another function on the unit.
- Disable the Bluetooth function on your device.
- Press and hold the "▶II" button on the unit.
Tips:
- Enter "0000" for the password if necessary.
- The player will also be disconnected when your device is moved beyond the operational range.
- If you want to reconnect your device to this player, place it within the operational range.
- If the device is moved beyond the operational range, when it is brought back, please check if the device is still connected to the player.
• If the connection is lost, follow the instructions above to pair your device to the player again.
Listen to Music from Bluetooth Device
If your Bluetooth device supports A2DP, play music via your device.
- To pause/resume playback, press ▶II.
- To skip to a track, press ◀◀◀ or ▶▶◀
- Press the VOL+/- button to increase or decrease the volume.
TWS Connection
• This TWS(TRUE WIRELESS STEREO) Bluetooth connection only use between the same two speakers.
- Power on both speakers, press ➕ button on the both speakers to switch to Bluetooth mode, press TWS button on the one of both speakers, the display screen of the speaker scroll display TWS ON, and then scroll display TWS PAIRING, the both speakers enter the pairing state automatically, once paired successfully, one scrolls display MASTER on the display of the speaker is configured as the master, the other displays SLAVE on the display of the speaker is configured as the slave.
- Enable your Bluetooth device and make sure it is in searching mode.
- Select "Hisense Party Rocker One" or "Hisense Party Rocker One Plus" from the list of discovered devices and connect to it.
- The master speaker will act as the left channel during TWS and will receive the Bluetooth signal, the other speaker will act as the right channel to play music.
- Press and hold TWS button to disconnect the MASTER and the SLAVE speaker connection in TWS connection mode, the display screen of the both speakers scroll display TWS OFF.
USB Operation
USB Operation
1 Insert the USB device and press → button to select USB mode.
2 Play starts automatically. If play does not start automatically, press ▶ button.
- To skip to the previous/next track, press the buttons on the unit.
- To skip to the previous/next folder, press and hold <</▶▶ buttons on the unit.
3 In PLAY/PAUSE state, press and hold ▶ II button for 3 seconds to switch among in REPEAT 1/REPEAT ALL/RANDOM/NORMAL.
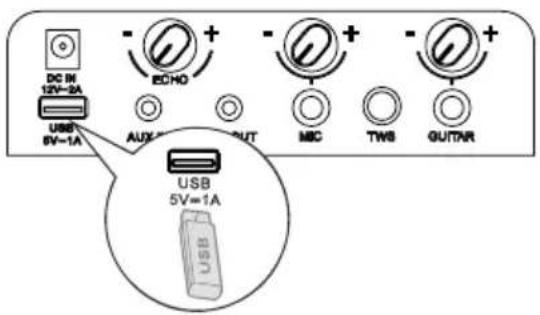
Charging from the USB Port
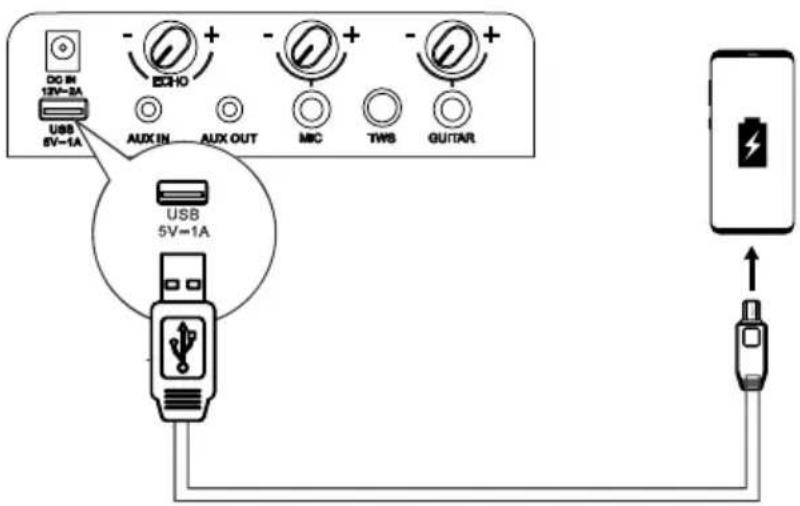
The Charging 5 V = 1 A socket is designed for charging mobile devices (e.g. Mp3 player, mobile phone etc). It supplies 5V DC at a charging current up to 1000 mA (1 A).
In power on mode, use a USB cable (not included) to connect mobile device to Charging 5 V A Socket of the unit and the mobile device will start charging.
FM Radio Operation \*If the Modes is different, the actual situation prevails.
Press button repeatedly to select the TUNER source. The display will show "TUNER".
TUNING in a Station
Auto Tuning
1 Press and hold ▶■ button to start auto tuning. Press ▶button again to stop the auto tuning.
2 The searched radio stations will be stored as preset stations.
Note: The search may not stop at a station with a very weak signal.
Manual Tuning
Press and hold or button to start the forward or reverse scanning. The display will show the frequency being searched. Once a station has been found, the scanning will stop automatically to change the frequency until you find the station you want.
Searching for a radio station manually
1 Briefly press the buttons ▪◀◀ or ▶▶▶ ▪ until the optimal reception frequency is reached.
2 Each time the buttons | ◀◀◀ or ▶▶▶ are pressed, the frequency decreases/increases by 0.05 MHz.
Recalling a preset station
1 Press ▶ II button to switch between preset station and frequency.
2 Press ▪◀◀/▶▶▶ button to select your desired preset station.
Battery Charging For Party Speaker
Built-in Battery Charging
Use the AC power cord(included) to connect AC power input socket on the unit to AC power outlet, the current charging-indicator light on the unit will flash during charging, when five charging-indicator light on the unit keep solid light that the battery has been fully charged.
Alternatively, connect one terminal of the vehicle DC power adapter (not included) to the DC input socket on the unit and connect the other terminal of the vehicle DC power adapter to the power socket on the vehicle.
5 LED white light up = approx. 100 % full
4 LED white light up = approx. 80 % full
3 LED white light up = approx. 60 % full
2 LED white light up = approx. 40 % full
1 LED white light up = approx. 20 % full
(indicating charging is needed)
Note: when the battery is low, the unit will emit a prompt beep.
When DC in is connected for charging, the unit can only be charged and cannot be played.
Troubleshooting
To keep the warranty valid, never try to repair the system yourself. If you encounter problems when using this unit, review the following before requesting service.
No power
- Ensure that the AC cord is properly connected.
- Ensure that there is power at the AC outlet.
- Press ⏻ button on the speaker.
I hear buzzing or humming
- Ensure all cables and wires are securely connected.
- Connect a different source device (Blu-ray player, etc) to see if the buzzing persists. If it does not, the problem may be with the original device.
- Connect your device to a different input on the speaker.
I can't find the Bluetooth name of this unit on my Bluetooth device
- Ensure the Bluetooth function is activated on your Bluetooth device.
- Re-pair the unit with your Bluetooth device.
SPECIFICATIONS
| Model name | Party Rocker One |
| Model name | Party Rocker One Plus |
Power supply
| Voltage AC 100-240 V ~ 50/60 Hz; DC IN 12 V 2 A | |
| Power consumption(AC) 80 W | |
| Dimensions(W × H × D) 295 × 550 × 258 mm |
Amplifier(Max Audio Power)
| Amplifier Maximum Audio Power Total 300 W |
Ambient conditions
| In operation min. 0°C - max. +45°C / 60% relative humidity | |
| Not in operation min. -10°C - max. +60°C / 65% relative humidity | |
| Built-in battery | Li-ion 7650 mAh, 7.2 V |
| Battery charge time | 4,5 hours |
| Battery playtime 15 hours* | |
Radio *If the Modes is different, the actual situation prevails.
| FM band FM 87.5-108 MHz. | |
| FM antenna Permanently installed wire aerial |
System
| Frequency range 20 Hz to 20 KHz | |
| Signal-to-noise > 80 dB | |
| USB port USB 2.0 to 32GB WAV \WMA \ MP3 | |
| USB output Output: 5 V 1 A max. |
Bluetooth®
| Bluetooth Version 5.0 | |
| Bluetooth Transmitter Power | <10 dBm |
| Frequency Range | 2.4 GHz-2.4835 GHz |
Proof-water
| Top-Panel | IPX4 |
Wireless microphone (Only for Party Rocker One Plus)
| Battery type | AA battery (1.5 V × 2) |
| Transmission power | 9 dBm |
| Distance between transmitter and receives | ≤ 20 m |
natural_image
Two overlapping squares with no text or symbolsPort Party Rocker One
Port Party Rocker One
natural_image
Line drawing of a device rear panel with an electrical outlet connected to a power plug (no text or symbols)natural_image
Three-step diagram showing a mechanical component being processed, with no visible text or symbols.natural_image
Diagram showing a battery connected to a handheld device with a light source, no text or symbols presentnatural_image
Line drawing of a hand holding a pen or stylus with a small object inserted, no text or symbols present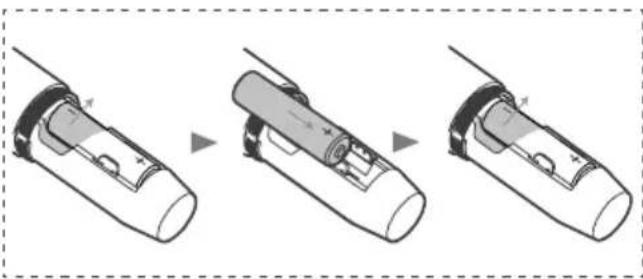
natural_image
Three-step diagram showing a device being processed into a cylindrical component, with no visible text or symbols.Connexion...
natural_image
Three overlapping squares with no text or symbolsnatural_image
Line drawing of a device with a power outlet connected to a wall socket (no text or symbols)natural_image
Line drawing of a hand holding a pen or stylus with a small object inserted, no text or symbols present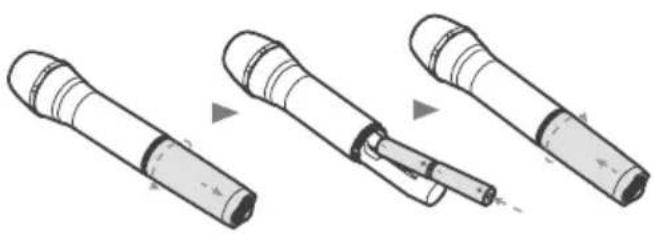
natural_image
Diagram showing three stages of a mechanical component or tool, with no visible text or symbols.
natural_image
Three-step diagram showing a device being processed, with no visible text or symbolsnatural_image
Diagram showing a battery connected to a handheld device with a light source, no text or symbols presentnatural_image
Three overlapping squares with no text or symbolsnatural_image
Line drawing of a device with a power outlet connected to a wall socket (no text or symbols)flowchart
graph LR
    A["DC IN 12V-2A"] --> B["AUX OUT"]
    C["USB 6V-1A"] --> B
    D["EOCHO"] --> E["AUX OUT"]
    F["AUX IN"] --> G["AUX OUT"]
    H["DC IN 12V-2A"] --> I["AUX IN"]
    J["ECHO"] --> K["AUX OUT"]
    L["MIC"] --> M["TWS"]
    N["GUTBAR"] --> O["AUX OUT"]
natural_image
Three-step diagram showing a cylindrical device being processed into a segmented tool, with no visible text or symbols.natural_image
Diagram showing a battery connected to a handheld device with a light source, no text or symbols presentnatural_image
Line drawing of a hand holding a pen or stylus with a small object inserted, no text or symbols present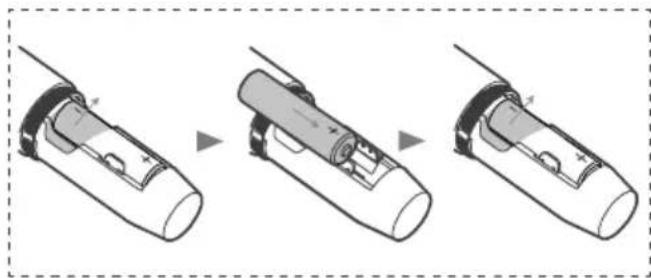
natural_image
Three-step diagram showing a device being processed into a cylindrical housing, with no visible text or symbols.Ligar
natural_image
Three overlapping squares with no text or symbolsnatural_image
Diagram showing three stages of a mechanical component or tool, with no visible text or symbols.natural_image
Diagram showing a battery connected to a handheld device with a light bulb, illustrating charging or discharging process (no text or symbols)Anzeige blinkt rot
BS
B

natural_image
Line drawing of a hand holding a cylindrical device with a knob, showing a press or adjustment mechanism (no text or symbols)
natural_image
Three-step diagram showing a device being processed into a cylindrical component, with no visible text or symbols.natural_image
Three overlapping squares with no text or symbolsnatural_image
Diagram of a device with an outlet cable and two outlets, no text or symbols presentnatural_image
Diagram showing three stages of a mechanical component or tool, with no visible text or symbols.natural_image
Diagram showing a battery connected to a handheld device with a light source, no text or symbols presentnatural_image
Line drawing of a hand holding a pen or stylus with a small object inserted, no text or symbols present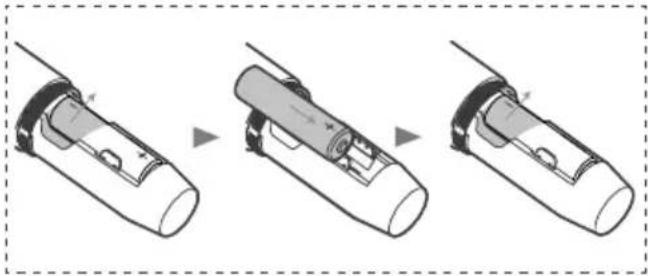
natural_image
Three-step diagram showing a device being processed into a cylindrical component, with no visible text or symbols.In collegamento
natural_image
Three overlapping squares with no text or symbolsnatural_image
Simple line drawing of a plug with a terminal connector (no text or symbols)natural_image
Line drawing of a device with an electrical outlet connected to a wall socket (no text or symbols)R
natural_image
Diagram showing three stages of a mechanical component or tool, with no visible text or symbols.natural_image
Diagram showing a battery connected to a handheld device with a light bulb (no text or symbols)natural_image
Line drawing of a hand holding a cylindrical device with a knob, showing the grip and adjustment mechanism (no text or symbols)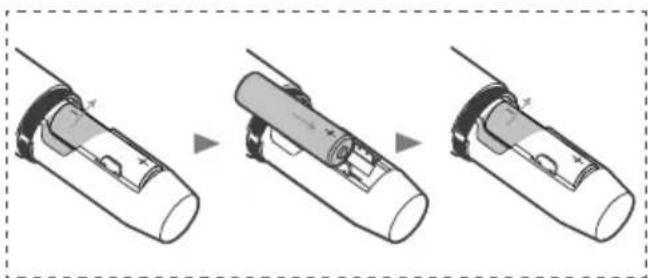
natural_image
Three-step diagram showing a device being processed into a cylindrical component, with no visible text or symbols.natural_image
Three overlapping squares with no text or symbolsParty Rocker One Port
Party Rocker One Port
natural_image
Line drawing of a device rear panel with an outlet and power outlet, showing internal components and wiring (no text or symbols)Risc de deteriorare a produsului!
natural_image
Diagram showing three stages of a mechanical component or tool, with no visible text or symbols.natural_image
Line drawing of a hand holding a cylindrical device with a knob, showing the grip and handle (no text or symbols)
natural_image
Three-step diagram showing a device being processed into a cylindrical device, with no visible text or symbols.Conectare
natural_image
Three overlapping squares with no text or symbolsnatural_image
Line drawing of a device with an electrical outlet connected to a wall socket (no text or symbols)natural_image
Three-step diagram showing a cylindrical device being processed, with no visible text or symbols.natural_image
Diagram showing a battery connected to a handheld device with a light bulb, no text or symbols presentnatural_image
Line drawing of a hand holding a cylindrical object with a knob, no text or symbols present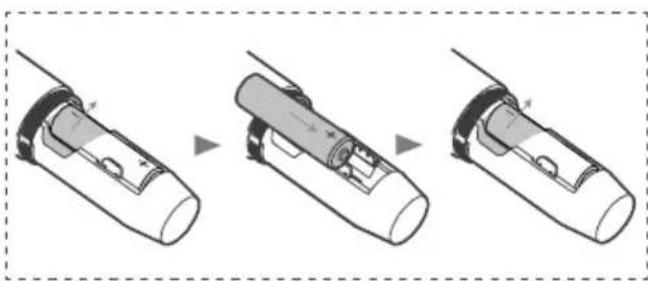
natural_image
Three-step diagram showing a device being processed into a cylindrical housing, with no visible text or symbols.Připojování
natural_image
Three overlapping squares with no text or symbolsnatural_image
Diagram of a device with an outlet cable and power outlet, showing no text or symbolsflowchart
graph LR
    A["DC IN 12V-2A"] --> B["AUX OUT"]
    C["USB SV=1A"] --> B
    D["EQH0"] --> B
    E["AUX IN"] --> F["AUX OUT"]
    G["EQH0"] --> H["AUX OUT"]
    I["TWS"] --> J["AUX OUT"]
    K["GUTAR"] --> L["AUX OUT"]
    B --> M["IN"]
    F --> N["IN"]
    H --> O["IN"]
    I --> P["IN"]
    J --> Q["IN"]
    L --> R["IN"]
    M --> S["AUX OUT"]
    N --> T["AUX OUT"]
    O --> U["AUX OUT"]
    P --> V["AUX OUT"]
    Q --> W["AUX OUT"]
    R --> X["AUX OUT"]
    S --> Y["AUX OUT"]
    T --> Z["AUX OUT"]
    U --> AA["AUX OUT"]
    V --> AB["AUX OUT"]
    W --> AC["AUX OUT"]
    X --> AD["AUX OUT"]
    Y --> AE["AUX OUT"]
    Z --> AF["AUX OUT"]
natural_image
Diagram showing three stages of a mechanical component or tool, with no visible text or symbols.natural_image
Simple line drawing of a battery connected to a handheld device (no text or symbols)natural_image
Line drawing of a hand holding a pen or stylus with a small object inserted, no text or symbols present
natural_image
Three-step diagram showing a device being processed into a cylindrical component, with no visible text or symbols.Verbinden
4 LED's branden wit = ongeveer 80% vol
3 LED's branden wit = ongeveer 60% vol
2 LED's branden wit = ongeveer 40% vol
natural_image
Three overlapping squares with no text or symbolsParty Rocker One – panel
Party Rocker One – panel
natural_image
Diagram of a device with a power outlet connected to a wall-mounted socket (no text or symbols present)natural_image
Diagram showing three stages of a mechanical component or tool, with no visible text or symbols.natural_image
Line drawing of a hand holding a pen or tool with a small inset showing the tip (no text or symbols)
natural_image
Three-step diagram showing a device being processed, with no visible text or symbolsPripojenie
Stlačením tlačidla čna hornom paneli zariadenia zapnite zariadenie.
natural_image
Three overlapping squares with no text or symbolsVrata Party Rocker One
Vrata Party Rocker One
natural_image
Line drawing of a device with an outlet cable and power outlet, no text or symbols presentnatural_image
Diagram showing three stages of a mechanical component or tool, with no visible text or symbols.- Vklopite zvočnik in nato dobavljen brezžični mikrofon.
natural_image
Simple line drawing of a battery connected to a handheld device with a light bulb (no text or symbols)natural_image
Line drawing of a hand holding a cylindrical object with a knob, no text or symbols present
natural_image
Three-step diagram showing a device being processed into a cylindrical housing, with no visible text or symbols.5 bela dioda LED sveti = pribl. 100% polno
4 bela dioda LED sveti = pribl. 80% polno
3 bela dioda LED sveti = pribl. 60% polno
2 bela dioda LED sveti = pribl. 40% polno
1 bela dioda LED sveti = pribl. 20% polno
natural_image
Three overlapping squares with no text or symbolsKorisnički priručnik Vodič za brzo pokretanje Jamstvena kartica
Bežični mikrofon × 2
(Samo za model Party Rocker One Plus)
izmjeničnom strujom
AA baterija (1,5 V) × 4
(Samo za model Party Rocker One Plus)
* Količina kabela za napajanje i vrsta utikača razlikuju se po regijama.
natural_image
Diagram of a device with a power outlet connected to a wall socket (no text or symbols present)natural_image
Diagram showing three stages of a mechanical component or tool, with no visible text or symbols.- Zvučnik i isporučeni bežični mikrofon uključite jedan za drugim.
- Bežična se veza automatski uspostavlja.
Napomene:
- Mikrofon se automatski isključuje nakon 20 minuta mirovanja.
- Podržana su najviše dva bežična mikrofona.
Zamjena baterija bežičnog mikrofona Mjere opreza:
natural_image
Diagram showing a battery connected to a handheld device with a light bulb, illustrating wireless signal transmission (no text or symbols present)Pokazivač treperi crveno
2. Ako je razina baterije niska, stare baterije zamijenite novim baterijama.
natural_image
Line drawing of a hand holding a pen or stylus with a small object inserted, no text or symbols present
natural_image
Three-step diagram showing a device being processed, with no visible text or symbols.Povezivanje
natural_image
Three overlapping squares with no text or symbolsnatural_image
Line drawing of a device with an outlet, plug, and power outlet (no text or symbols)natural_image
Diagram showing three stages of a mechanical or electrical component being inserted, with no visible text or symbols.natural_image
Diagram showing a battery connected to a handheld device with a light bulb, illustrating wireless signal transmission (no text or symbols present)natural_image
Line drawing of a hand holding a pen or stylus with a small object inserted, no text or symbols present
natural_image
Three-step diagram showing a device being processed into a cylindrical housing, with no visible text or symbols.Csatlakoztatás
natural_image
Three overlapping squares with no text or symbolsnatural_image
Line drawing of a device with an outlet, power plug, and socket (no text or symbols)Ürün hasarı riski!
natural_image
Diagram showing three stages of a cylindrical device with internal components, no text or symbols presentnatural_image
Diagram showing a battery connected to a handheld device with a dotted line indicating alignment (no text or symbols)natural_image
Line drawing of a hand holding a cylindrical device with a knob, no text or symbols present
natural_image
Three-step diagram showing a device being processed into a cylindrical device, with no visible text or symbols.Bağlantı
natural_image
Three overlapping squares with no text or symbolsnatural_image
Line drawing of a device with an outlet, plug, and power outlet (no text or symbols)natural_image
Diagram showing three stages of a mechanical component or tool, with no visible text or symbols.natural_image
Line drawing of a hand holding a cylindrical device with a knob, showing a press or adjustment mechanism (no text or symbols)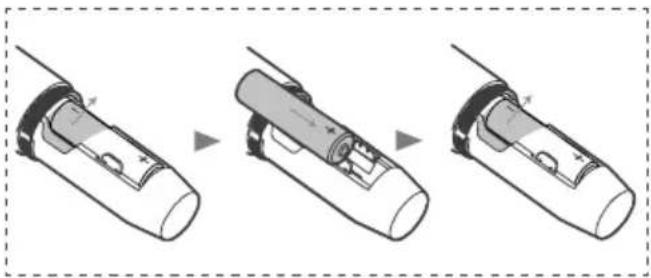
natural_image
Three-step diagram showing a device being processed, with no visible text or symbolsИдет соединение
natural_image
Three overlapping squares with no text or symbolsnatural_image
Line drawing of a device rear panel with a power outlet and cable, no text or symbols presentnatural_image
Three-step diagram showing a cylindrical device being processed into a plug, with no visible text or symbols.- Uključite zvučnik i isporučeni bežični mikrofon redom.
Indikator treperi crveno
2. Ako je nivo baterije nizak, zamijenite stare baterije novima.
natural_image
Line drawing of a hand holding a cylindrical object with a knob, no text or symbols present
natural_image
Three-step diagram showing a device being processed into a cylindrical device, with no visible text or symbols.Povezivanje
Pritisnite dugme na gornjem panelu jedinice da uključite jedinicu.
Pritisnite dugme 📍 na bežičnom mikrofonu kako biste uključili bežični mikrofon, indikator na bežičnom mikrofonu će treperiti plavo, a bežični mikrofon će se automatski upariti sa jedinicom, kada se uspješno upari, indikator na bežičnom mikrofonu će ostati plav. Podesite jačinu zvuka mikrofona na željeni nivo pomoću dugmeta za jačinu zvuka mikrofona na stražnjem panelu.
Napomena: kada je baterija bežičnog mikrofona na niskom nivou, indikator na bežičnom mikrofonu treperi crveno i potrebno je zamijeniti stare baterije u odjeljku za baterije bežičnog mikrofona novima.
Osnovne radnje
natural_image
Three overlapping empty square outlines with no text or symbolsnatural_image
Line drawing of a device rear panel with an outlet, power plug, and socket (no text or symbols)natural_image
Three-step diagram showing a cylindrical device being processed into a plug, with no visible text or symbols.- Uključite zvučnik, a zatim i priloženi bežični mikrofon.
natural_image
Simple line drawing of a battery connected to a handheld device with a light bulb (no text or symbols)Indikator treperi u crvenoj boji
2. Ako je nivo napunjenosti baterije nizak, zamenite stare baterije novim.
natural_image
Line drawing of a hand holding a pen or tool with a small object inserted (no text or symbols)
natural_image
Three-step diagram showing a device being processed into a cylindrical housing, with no visible text or symbols.Povezivanje
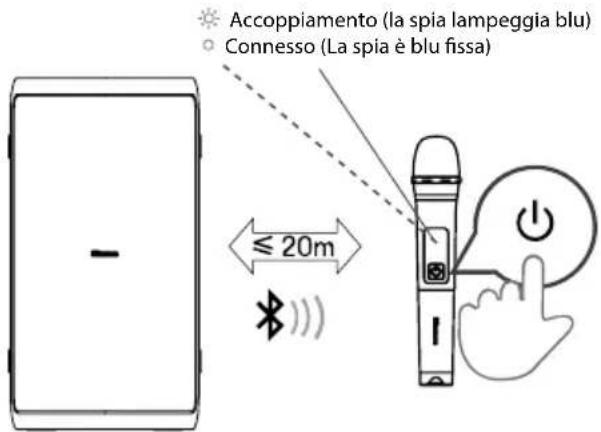
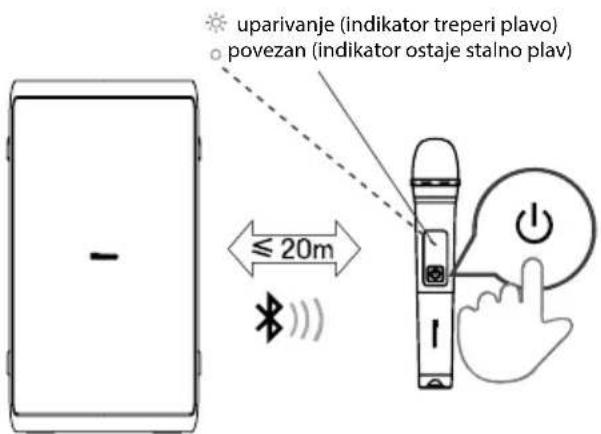
uparivanje (Indikator treperi u plavoj boji)
o povezano (Indikator neprekidno svetli u plavoj boji)
Pritisnite dugme na gornjem panelu jedinice da biste uključili jedinicu.
Pritisnite dugme 📍 na bežičnom mikrofonu da biste uključili bežični mikrofon, indikator na bežičnom mikrofonu će treperiti u plavoj boji, a bežični mikrofon se automatski uparuje sa jedinicom; nakon uspešnog uparivanja, indikator na bežičnom mikrofonu neprekidno svetli u plavoj boji. Podesite nivo jačine zvuka mikrofona na željeni nivo pomoću dugmeta za jačinu zvuka mikrofona na zadnjem panelu.
Napomena: kada je baterija bežičnog mikrofona na niskom nivou napunjenosti, indikator na bežičnom mikrofonu treperi u crvenoj boji i stare baterije iz odeljka za baterije na bežičnom mikrofonu treba zameniti novim.
Osnovno rukovanje
Mirovanje/Uključeno
- Pritisnite dugme na jedinici da biste UKLJUČILI glavnu jedinicu. Pritisnite i držite 2 sekunde za ISKLJUČIVANJE.
- Isključite strujni utikač iz strujne utičnice ako želite da u potpunosti isključite jedinicu.
- Kada nema ulaznog signala iz jedinice duže od 15 minuta, automatski se prebacuje u režim Mirovanje.
DJ efekat
- Pritisnite dugme DJ da biste izabrali drugačiji DJ efekat.
- Pritisnite taster DJ jednom da biste reprodukovali aktuelni DJ. Kada pritisnite funkciju DJ i zadržite 1 sekundu, prelistajte da biste pronašli različite DJ zvučne efekte. Pritisnite taster DJ i zadržite 1 sekundu da biste pokrenuli reprodukciju aktuelnog DJ zvučnog efekta nakon nekorišćenja.
- Tipovi DJ zvučnog efekta: DJ1 zvuk navijanja, DJ2 zvuk bubnja, DJ3 zvuk alarma, DJ4 zvuk sirene, DJ5 zvuk reprodukcije diska.
natural_image
Three overlapping squares with no text or symbolsnatural_image
Diagram of a device rear panel with an outlet, showing connections to a wall socket and power plug (no text or symbols)natural_image
Three-step diagram showing a cylindrical device being processed into a mechanical component (no text or symbols present)natural_image
Simple line drawing of a battery connected to a handheld device (no text or symbols)natural_image
Line drawing of a hand holding a cylindrical object with a knob, no text or symbols present
natural_image
Three-step diagram showing a device being processed, with no visible text or symbolsLidhja
natural_image
Three overlapping squares with no text or symbolsКорисничко упатство Кратко упатство Гаранциска картичка
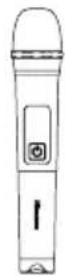
Безжичен микрофон × 2
(Само за Party Rocker One Plus)
natural_image
Diagram of a device with an electrical outlet connected to a wall socket (no text or symbols present)natural_image
Diagram showing three stages of a mechanical component or tool, with no visible text or symbols.natural_image
Diagram showing a battery connected to a handheld device with a light bulb, illustrating the concept of wireless communication (no text or symbols present)Индикаторот трепка црвено
natural_image
Line drawing of a hand holding a pen or stylus with a curved handle, no text or symbols present
natural_image
Three-step diagram showing a device being processed into a cylindrical device, with no visible text or symbols.Поврзување
natural_image
Close-up of a cylindrical electronic device with hexagonal patterned cover and circular cutouts (no visible text or symbols)ΕΓΧΕΙΡΪΔΙΟ ΧΡΗΣΗΣ

natural_image
Close-up of a textured metallic object with abstract circular patterns and dot textures (no visible text or symbols)Κύρια μονάδα
natural_image
Three overlapping square panels with no text or symbolsnatural_image
Technical line drawing of a device rear panel with electrical connectors and a wall socket (no text or symbols)natural_image
Three-step diagram showing a cylindrical device being processed into a plug, with no visible text or symbols.natural_image
Line drawing of a hand holding a pen or stylus with a scroll, no text or symbols present
natural_image
Three-step diagram showing a device being processed into a cylindrical device, with no visible text or symbols.Σύνδεση
natural_image
Technical line drawing of a rectangular device with internal components and mounting brackets (no text or symbols)
natural_image
Close-up of a mechanical device with circular cutouts and mesh pattern (no visible text or symbols)РЪКОВОДСТВО НА ПОТРЕБИТЕЛЯ

natural_image
Close-up of a metallic electronic device with abstract circular patterns on its surface (no visible text or symbols)Основен модул
natural_image
Three overlapping squares with no text or symbolsnatural_image
Technical line drawing of a device rear panel with mounting holes and a wall socket (no text or symbols)natural_image
Diagram showing three stages of a mechanical component or tool, with no visible text or symbols.natural_image
Diagram showing a battery connected to a handheld device with a light source, no text or symbols presentnatural_image
Line drawing of a hand holding a pen or stylus with a curved handle, no text or symbols present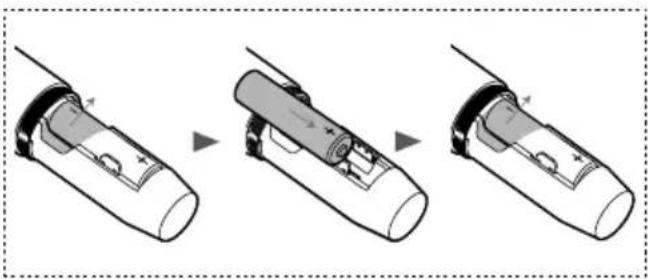
natural_image
Three-step diagram showing a device being processed, with no visible text or symbols.Свързване
natural_image
Technical line drawing of a rectangular device with internal components and mounting holes (no text or symbols)