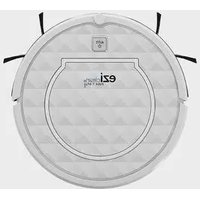
iMap A100 - Vacuum Cleaner EZICLEAN - Free user manual and instructions
Find the device manual for free iMap A100 EZICLEAN in PDF.


User questions about iMap A100 EZICLEAN
0 question about this device. Answer the ones you know or ask your own.
Ask a new question about this device
Download the instructions for your Vacuum Cleaner in PDF format for free! Find your manual iMap A100 - EZICLEAN and take your electronic device back in hand. On this page are published all the documents necessary for the use of your device. iMap A100 by EZICLEAN.
USER MANUAL iMap A100 EZICLEAN
ezi clean® make it easy
MANUEL D'UTILISATION DE VOTRE ROBOT ASPIRATEUR
eziclean® iMap A100 & Aqua iMap A150
*user manual for your connected robot vacuum cleaner / Bedienungsanleitung für Ihren vernetzten Saugroboter / manual de usuario de su robot aspirador conectado / manuale utente per il tuo robot aspirapolvere connesso / gebruikershandleiding voor uw aangesloten robotstofzuiger

text_image
ezi clean® make it easy
text_image
QR code image containing encoded data, no visible human-readable textTélécharger votre application sur Apple Store Upload your application to the Apple Store Laden Sie Ihre App im Apple Store herunter Sube tu solicitud al Apple Store Carica la tua applicazione su Apple Store Upload uw aanvraag naar de Apple Store

text_image
QR code image containing encoded data, no visible human-readable textTélécharger votre application sur Google Play Upload your application to the Google Play Laden Sie Ihre App im Google Play herunter Sube tu solicitud al Google Play Carica la tua applicazione su Google Play Upload uw aanvraag naar de Google Play

text_image
QR code image containing encoded data, no visible human-readable textTo use your application, scan this code or go to
https://eziclean.com/application-eziclean/
https://eziclean.com/application-eziclean/
https://eziclean.com/application-eziclean/
https://eziclean.com/application-eziclean/
https://eziclean.com/application-eziclean/
natural_image
Technical line drawing of a circular mechanical component with mounting holes and a central bracket (no text or symbols)natural_image
Technical diagram of a circular mechanical or electrical component with labeled parts (L, R) and internal structure (no readable text or symbols)Roue avant
text_image
Technical diagram of a vacuum cleaner with labeled components and partsnatural_image
Technical line drawing of a mechanical device with open and closed views, showing internal components (no text or symbols)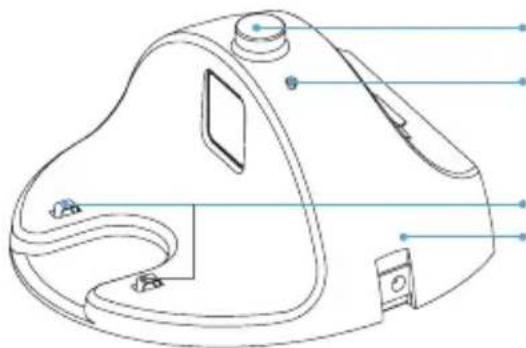
text_image
Technical diagram of a device with labeled components, likely for assembly or manufacturing documentation.Récepteur de signal
Voyant LED
natural_image
Technical line drawings of three views of a vacuum cleaner device, showing internal components and mounting features (no text or symbols)natural_image
Illustration of a hand using a power tool to connect a mounted device with cable, no text or symbols presentA
natural_image
Technical line drawing of a mechanical device with a labeled component B (no text or symbols present)natural_image
Technical diagram showing a spiral component and a circular housing with directional arrows (no text or symbols)Automatique Bouton «Auto»
natural_image
Pure spiral diagram with arrows indicating direction, no text or symbols presentNettoyage en profondeur Bouton «Powerful»
natural_image
Diagram of a circular mechanical component with directional arrows indicating rotation or force (no text or symbols)Le long des plinthes Bouton «Edge»
natural_image
Illustration of a hand opening a vacuum cleaner into a circular device (no text or symbols)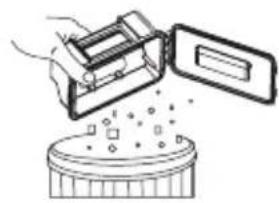
natural_image
Illustration of a hand placing a plastic bag into a container with scattered items (no text or symbols)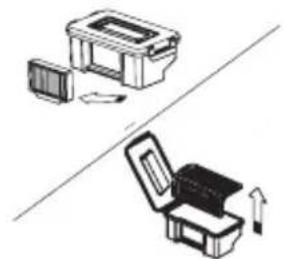
natural_image
Two technical illustrations of a mechanical device with open and closed parts, showing internal components and directional arrows (no text or symbols)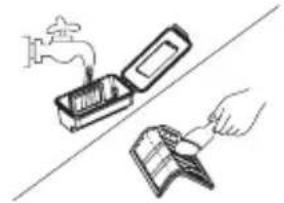
natural_image
Illustration of a hand using a tool to clean or paint the surface, with a faucet and brush nearby (no text or symbols)- Only authorized technicians may disassemble this product. It is not recommended that users disassemble this product themselves.
- Use only the original power adapter provided. Other adapters may damage this product.
- Do not touch wires, plugs or power adapters with wet hands.
- Keep curtains away from the robot so that it does not suck them up.
- Clean the product when not under load.
- Do not bend wires or place heavy and/or sharp objects on the machine.
- This product is an indoor household product. Do not use outdoors.
- Do not sit on the product.
- Do not use this product in a wet environment (e.g. bathroom).
- Before using the product, remove any fragile items (e.g. glasses, lamps, etc.) that may become entangled in the side brushes, wheels and main brush.
- Do not place this product where it can easily fall (e.g. desk or chairs).
-
Turn off the power switch on the side of the machine during transport or if you are not going to use it for a long time.
-
Make sure the AC adapter is plugged in securely before use.
- To avoid tripping, inform other members of the household when this product is in use.
- If full, empty the dust pan before using the product.
- Keep the product between 0 and 40°C.
- Do not use the product in an environment above 40^ C.
- Remove the battery from the robot before recycling it.
- Make sure that the product is not under power when removing the battery.
- Recycle the battery.
- Use only the original rechargeable battery and the charging base provided by the manufacturer.
- Non-rechargeable batteries are strictly prohibited.
- Do not use the product in environments near flames or fragile objects.
- Keep hair, clothing, fingers and other body parts away from the robot's openings, as they may be absorbed.
- Do not use the product on wet or stagnant ground.
- Make sure that the robot does not absorb stones and/or old paper that
could obstruct it.
- Do not expose the robot to flammable substances such as gasoline, toner and toner for printers or photocopiers.
- Do not expose the robot to burning items such as cigarettes, matches, ashes and other items that can cause a fire.
- Do not place items near the suction nozzles.
- Do not use the product when the suction nozzle is blocked.
- Clean dust, cotton, hair, etc. from the suction nozzle to ensure proper air flow.
- Use the power cord with care to avoid damage.
- Do not use the power cord to slide or pull the robot and charging station.
- Do not trap the power cord in doors.
- Do not pull on the power cord.
- Keep the power cord away from heat sources.
- Do not use the charging station if it is damaged.
- Even if the product has been severely damaged, burning the product is prohibited, as this may cause the product's battery to explode.
Please read the following information carefully before using your vacuum cleaner or its accessories. Do not disassemble the unit or attempt to repair it yourself. In case of malfunction, please contact your dealer for professional advice. Stairs: The unit uses sensors to prevent falling down steps, stairs or over the edge. In some situations, the sensors may not function properly. This unit cannot detect steps that are less than 8 cm high. Steps less than 8 cm high may cause the robot to fall. Highly reflective or dark surfaces on some steps or stairs, such as glass or polished ceramic, may cause the device to fall. If available, use the virtual wall or place a mat on the bottom step to prevent your robot from falling. Avoid using your vacuum cleaner on mezzanines, landings or unbounded high surfaces.
The symbol on this device indicates that it cannot be disposed of with household waste. You must dispose of it at an electrical and electronic waste recycling center. Disposal must be made in accordance with local waste regulations. For further information on the treatment, recovery and recycling of this device, please contact your municipality, local waste disposal service or the dealer of the device.
Your product
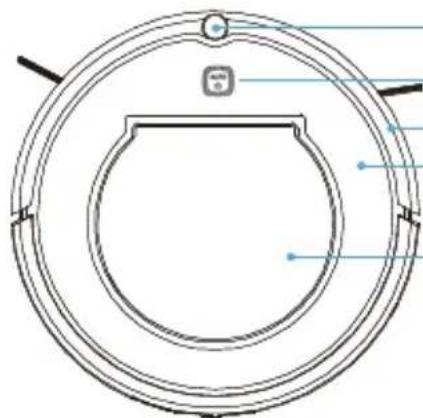
natural_image
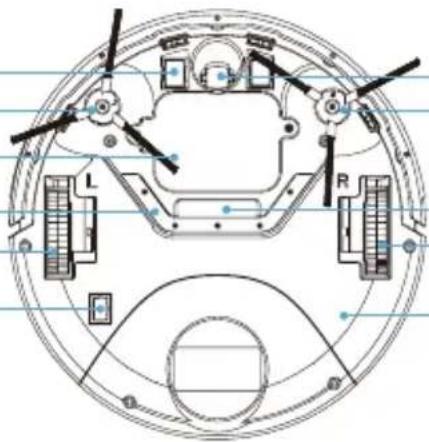
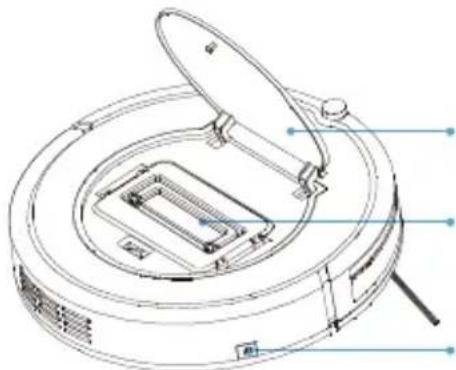
Technical diagram of a circular mechanical component with internal structure and mounting points (no text or symbols)Infrared signal receiver
ON/OFF button
Bumper
Top shell
Dust tank cover
Charging connector
Left side brush
Battery cover
Rubber slats
Left wheel
Switch
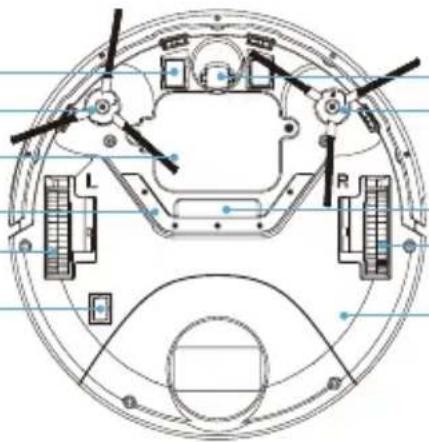
natural_image
Technical diagram of a circular mechanical or electrical component with labeled parts (L, R) and internal structure (no readable text or symbols)Front wheel
Right side brush
Suction nozzle
Right wheel
Back shell
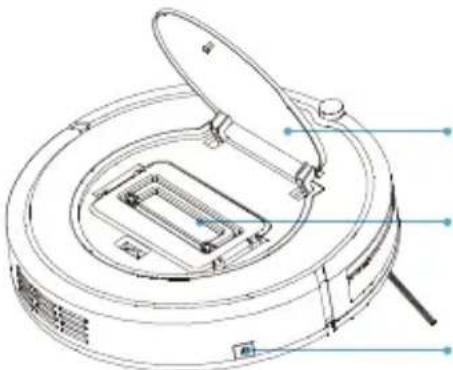
text_image
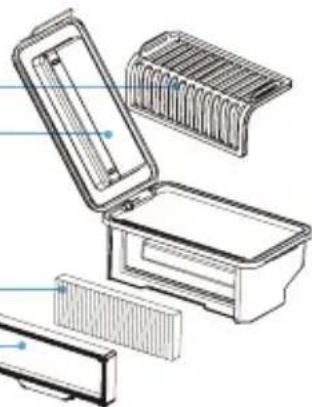
Technical diagram of a vacuum cleaner with labeled components and partsDust tank cover
Dust tank
Manual charging socket
Pre-filter
Dust tank cover
HEPA filter
Filter holding grid
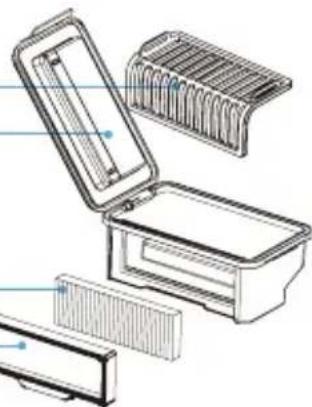
natural_image
Technical line drawing of an open storage or cleaning device with internal components (no text or symbols)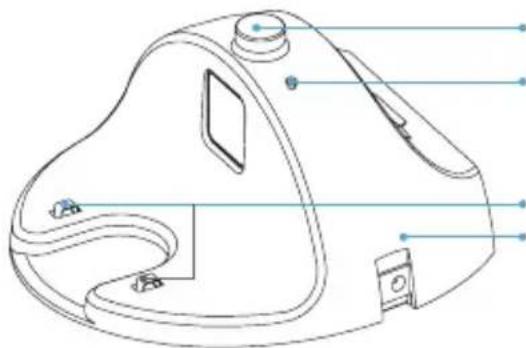
text_image
Technical diagram of a device with labeled components, likely for assembly or manufacturing documentation.Signal receiver
LED indicator
Charging connector
Manual charging socket
Remote control
1. Start / pause» button
A. In standby mode, press this button to have your appliance automatically start its cleaning cycle. its cleaning cycle.
B. When the appliance is in sleep mode, press this button to exit sleep mode.
C. In operation, press this button to stop the cleaning cycle.
2. Direction buttons
A. Forward ▲
In standby or operation, press this button to move the unit forward.
B. Backward ▼
In standby or operation, press this button to move the unit backward.
C. Left
In standby or operation, press this button to make the unit turn left.
D. Right ▶
In standby or operation, press this button to make the unit turn left.
3. Auto button
Press this button to start the automatic cleaning cycle.

4. Power Button
Press this button to start cleaning the desired area. The suction power is more intense than in automatic mode.
5. Edge button
Press this button to start cleaning along the skirting boards.
6. Return button
Press this button to instruct the robot to return to its charging base.
NOTE :
- 2 AAA (LR03) 1.5V batteries are required
- If the remote control will not be used for a long time, remove the batteries.
Starting up the product
- Place the loading base against the wall with 1 metre clearance from any obstacle. Leave 2 metres of space at the front. Then connect the power cable and make sure the LED light is on.
- Switch on the appliance by pressing the switch. The robot emits a sound and goes into standby mode.
Warning: Before recharging the device, make sure that the switch is set to «I». If the switch is on «O», the robot will not be able to recharge.
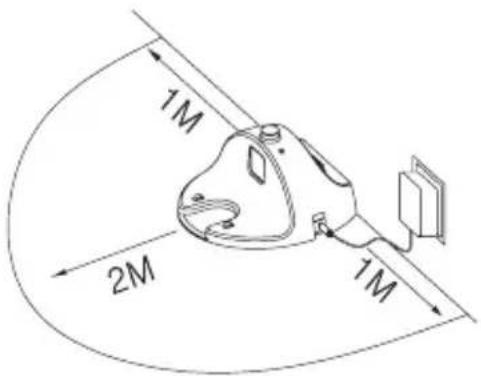
text_image
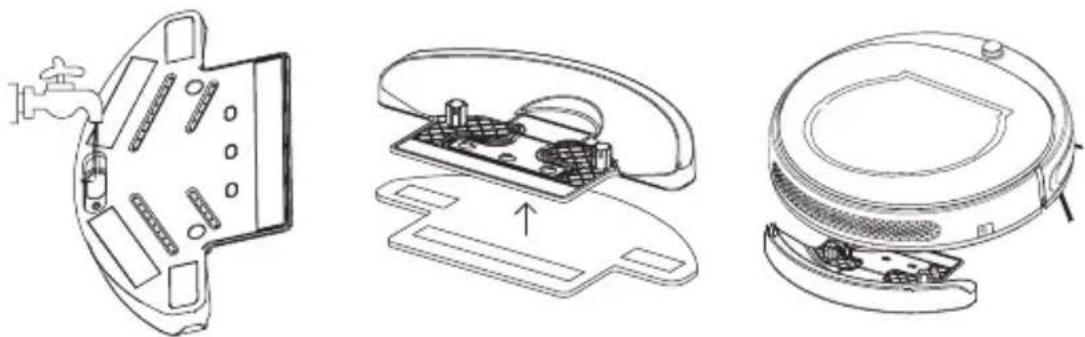
1M 2M 1M3. Place the water tank on the robot (only for the EZIclean® Aqua iMap version)
Fill the tank with cleaning solution diluted in water. Hang the microfiber on the velcro on the water tank and clip the tank under the robot.
Caution: Do not fill the water tank if you are not using the robot immediately, as the tank will empty on the spot.
natural_image
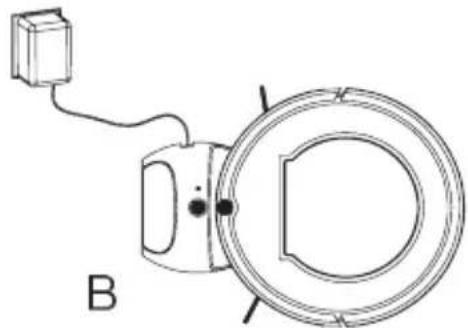
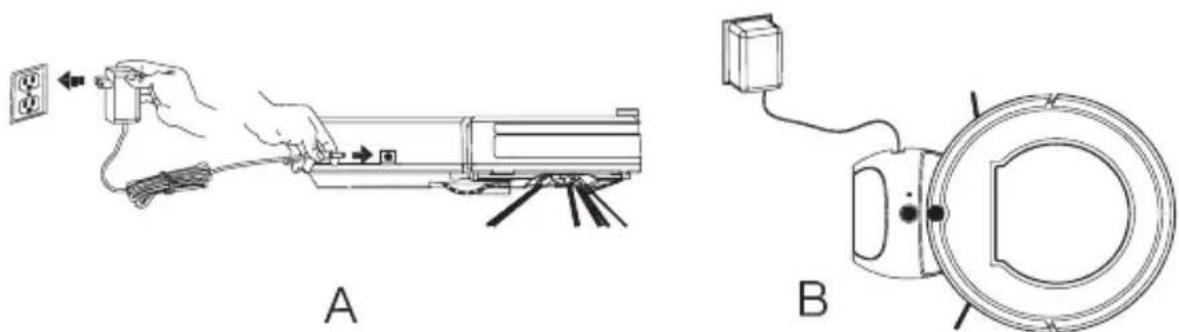
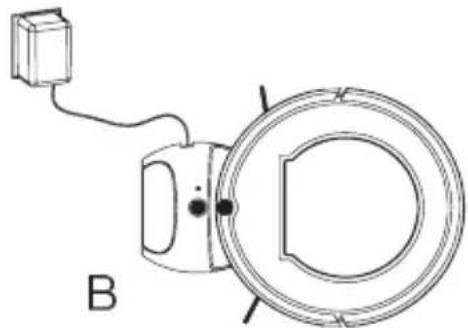
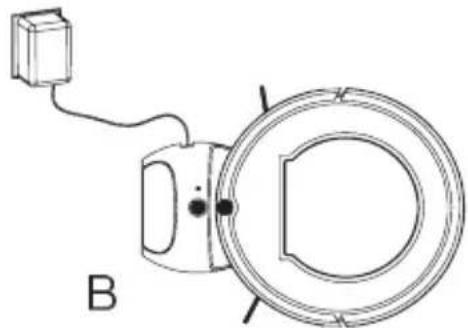
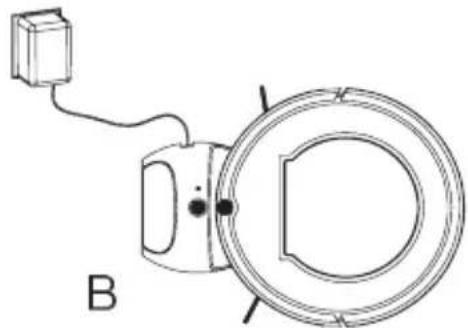
Technical line drawings of three views of a vacuum cleaner's internal structure (no text or symbols)4. Charging your device can be done in 2 ways.
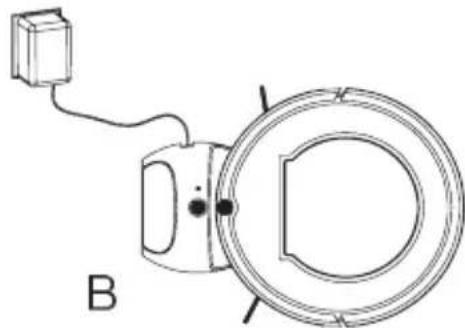
A. Insert the adapter directly into the unit and plug the other end of the power supply into the socket, as shown in figure A below. B. Press the «Return» button on the remote control or directly on the button of the robot, so that it automatically returns to its charging base, as shown in figure B below.
natural_image
Technical line drawings of two electrical components: a handheld device and a circular device with wiring (no text or symbols)5. Automatic reloading.
A. When the battery level of the device is too low, the robot automatically returns to its charging base.
B. Make sure that the charging base is powered on and remove any surrounding obstacles so that the robot does not get lost while searching for it.
C. In order to find its most suitable position, the robot can test the charging base 3-4 times before settling down for charging.
6. The different modes of your robot.
A. Active mode
All lights and buttons are lit and the appliance is in operation. Make sure that the switch is set to «I». Start the robot by pressing the «start / pause» button on the remote control or directly on the robot button.
B. Sleep mode
The LED on the charging base is lit, the robot button is lit, the appliance is only in standby mode.
Press the «start / pause» button on the remote control once or directly on the robot button to start it.
C. Sleep mode
If the robot is not used for more than 25 seconds, it will automatically go into sleep mode.
Note:
To switch from sleep mode to standby mode, press the «start / pause» button on the remote control or directly on the button on the device. Press a second time to start cleaning.
7. The 3 cleaning modes.
natural_image
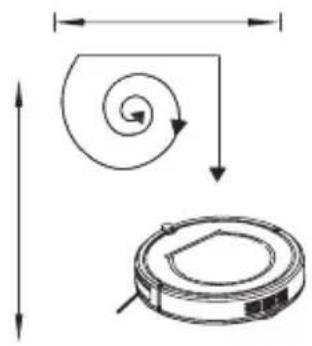
Technical diagram showing a spiral component and a circular housing with directional arrows (no text or symbols)Automatic Auto» button
The cleaning is adapted to your room and your floor types automatically.
natural_image
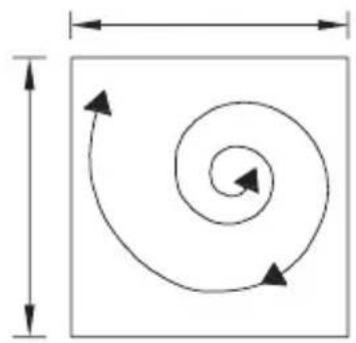
Pure spiral diagram with arrows indicating direction, no text or symbols presentDeep cleaning Powerful» button
Place the robot on the area to be cleaned and it will increase the area to be cleaned.
natural_image
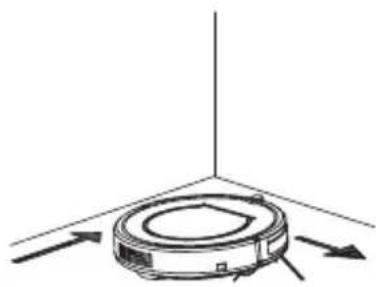
Diagram of a circular mechanical component with directional arrows indicating rotation or force (no text or symbols)Along the skirting boards Edge» button
The robot will perform its cleaning cycle starting along the baseboards.
Note :
A. Once the deep cleaning or skirting board cleaning has been completed, the robot will return to automatic mode to finish its work. B. Regardless of the mode it is in, the robot will stop cleaning if you press the «start / pause» button on the remote control or directly on the button on the appliance.
Maintenance of your appliance
1. Cleaning the side brushes
If the side brushes are dirty, remove them and wash them in clean water. Then make sure they are dry before reinstalling them on the machine. If they are damaged, replace them with new ones.
Note : When changing the side brushes, match the «L» and «R» signs on the side brushes with the «L» and «R» signs on the robot.
Note : To ensure that your machine works properly, it is recommended that you change your consumables every 6 months.
2. Cleaning the dust pan and filter
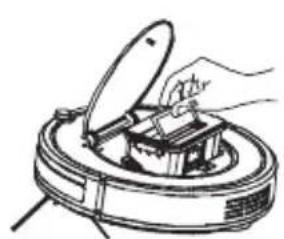
- Open the dust container compartment and remove the container.
- Check that the robot's suction pipe is not blocked and clean it with a cloth.
- Open the dust container and empty it, then run it under water if necessary. Wait until it is completely dry before reinstalling it.
- Remove the filters by blowing on them and tapping them lightly. Do not wash them with water.
- Re-assemble the filter and pre-filter before inserting them into the dust container to avoid any malfunction.
Note : It is recommended to clean the dust pan at least once a week and the filters every 15 days. Do not wash them with water. Make sure that they are reassembled afterwards to avoid damaging the robot.
natural_image
Line drawing of a robotic vacuum cleaner with open lid and handle (no text or symbols)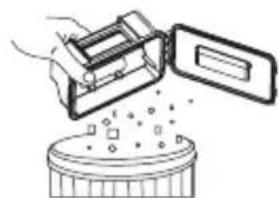
natural_image
Illustration of a hand placing a small electronic device into a circular tray with scattered particles (no text or symbols)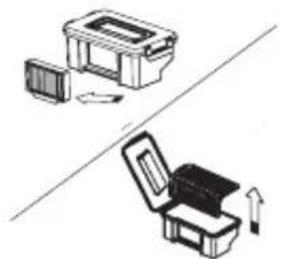
natural_image
Two technical illustrations of open and closed storage compartments, showing internal movement (no text or symbols)
natural_image
Illustration of a hand cleaning a surface with a faucet and a paintbrush (no text or symbols)3. Cleaning the water tank
- Remove the water tray from the robot and rinse it with clean water.
- Wait until it is completely dry before placing it on the robot.
4. Microfiber cleaning
- Remove the microfibres and wash them in water or in the washing machine.
- Dry them flat.
Note :
Do not use microfibres that are too wet to prevent them from flooding the floor. The robot could then slip during the cleaning cycle and not work properly.
Use the water tank only on hard floors (parquet, tiles, marble and painted hard floors, etc.).
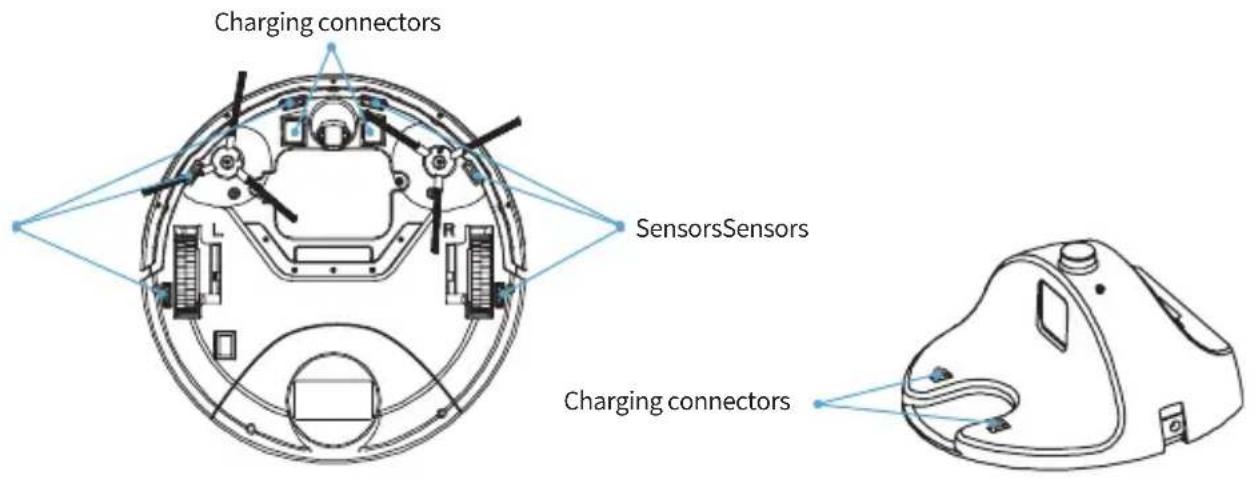
5. Cleaning of sensors and connectors
Use a clean, dry cloth to lightly wipe the sensors and connectors. Here is their position below:
text_image
Charging connectors SensorsSensors Charging connectorsTechnical characteristics
Dimensions (mm): 320 x 85
Weight (kg) : 2,800
Max. surface area : 120m2
Navigation technology : Navig+TM - Mapped
Max. decibels 60dB
Battery : Lithium-ion
Autonomy: 90 min
Charging time : 4/6 hours
Automatic return to base : Yes
Corner Detection Technology : CornerTM Technology
Obstacle Detection: Yes
Water tank: Yes
Surfaces : Tile, Linen, Carpet, Rug
Capacity: 330mL
Anti-Allergen : HEPA filter
Remote control : Yes
Mode of use : Targeted, Baseboard, Manual, Zigzag, Automatic
Frequently asked questions
If you have any doubts about the behaviour of your robot, first refer to the table below.
| Alerts Reason / Cause Solution | ||
| The blue light is always on Normal operation | ||
| The blue light flashes Charging phase | ||
| The red light is always on and the buzzer rings once | Floor detection error Put the robot back on the floor | |
| The red light flashes slowly and the buzzer rings once | Side brush overload | Check and clean the side brush.Remove any hair and dust. |
| The red light is always on and the buzzer rings twice | Fan error Check the fan | |
| The red light flashes quickly and the buzzer rings three times | Driving wheel over-load | Check the driving wheelRemove any hair and dust |
| The red light is always on and the buzzer rings three times | Collision switch error | Check the sensitivity of the bumper if any foreign objects |
Precauciones de uso
natural_image
Technical diagram of a circular mechanical component with labeled parts (no text or symbols present)natural_image
Technical diagram of a circular mechanical or electrical component with labeled parts (L, R) and internal structure (no readable text or symbols)Rueda delantera
Cepillo lateral derecho
text_image
Technical diagram of a vacuum cleaner with labeled components and partsnatural_image
Technical line drawing of a mechanical device with open and closed compartments (no text or symbols)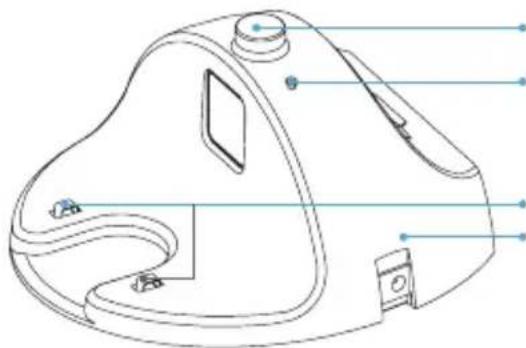
text_image
Technical diagram of a device with labeled components, likely for assembly or manufacturing documentation.Receptor de señales
Indicador LED
Conector de carga
natural_image
Illustration of hands connecting a mounted device to a power outlet (no text or symbols present)A
natural_image
Technical line drawing of a mechanical device with a labeled component B (no text or symbols present)natural_image
Technical diagram showing a spiral component and a circular housing with arrows indicating motion (no text or symbols)natural_image
Diagram of a spiral arrow with directional arrows, enclosed in a square frame with vertical dimension lines (no text or symbols)natural_image
Diagram of a circular mechanical component with directional arrows indicating rotation or movement (no text or symbols)natural_image
Illustration of a hand opening a vacuum cleaner into a circular device (no text or symbols)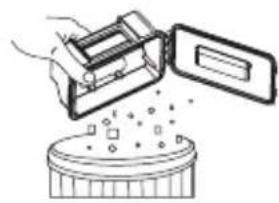
natural_image
Illustration of a hand placing a small object into a container with scattered items (no text or symbols)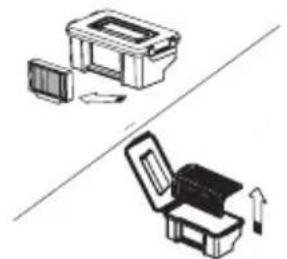
natural_image
Two technical illustrations of a mechanical device with open and closed parts, showing internal components and directional arrows (no text or symbols)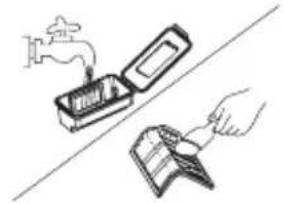
natural_image
Illustration of a hand using a tool to clean or store items, with a faucet and paper nearby (no text or symbols)natural_image
Technical diagram of a circular mechanical component with internal features and mounting points (no text or symbols)natural_image
Technical diagram of a circular mechanical or electrical component with labeled parts (L, R) and internal components, no readable text or symbols present.text_image
Technical diagram of a vacuum cleaner with labeled components and partsnatural_image
Exploded view diagram of a mechanical device showing internal components (no text or labels)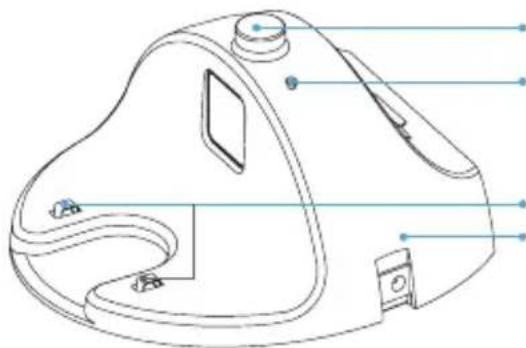
text_image
Technical diagram of a device with labeled components, likely for assembly or manufacturing documentation.Signalempfänger
LED-Anzeige
natural_image
Illustration of a hand using a power adapter to install a mounted device with a cable, no text or symbols presentA
natural_image
Technical line drawing of a mechanical device with a labeled component B (no text or symbols present)natural_image
Technical diagram showing a spiral component and a circular housing with internal components, both without any text or symbols.natural_image
Pure spiral diagram with arrows indicating direction, no text or symbols presentnatural_image
Diagram of a circular mechanical component with directional arrows indicating rotation or force (no text or symbols)text_image
Ladeanschlüsse SensorenSensoren LadeanschlüsseTechnische Daten
Abmessungen (mm): 320 x 85
Gewicht (kg): 2,800
Fläche Max.: 120m2
natural_image
Technical diagram of a circular mechanical component with internal features and mounting points (no text or symbols)natural_image
Technical diagram of a circular mechanical or electrical component with labeled parts (L, R) and internal structure, no readable text or symbols present.text_image
Technical diagram of a vacuum cleaner with labeled components and partsnatural_image
Exploded view diagram of a mechanical device showing internal components (no text or labels)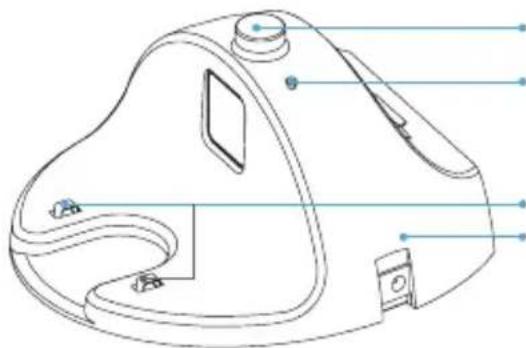
text_image
Technical diagram of a device with labeled components, likely for assembly or manufacturing documentation.natural_image
Illustration of a hand using a power adapter to install a mounted device with a cable, no text or symbols presentA
natural_image
Technical line drawing of a mechanical device with a labeled component B (no text or symbols present)5. Ricarica automatica.
natural_image
Technical diagram showing a spiral component and a circular housing with directional arrows (no text or symbols)Automatico Pulsante «Auto»
natural_image
Diagram of a spiral arrow with directional arrows, enclosed in a square frame with vertical dimension lines (no text or symbols)Pulizia profonda Pulsante «Potente»
natural_image
Diagram of a circular mechanical component with directional arrows indicating rotation or force (no text or symbols)Lungo i battiscopa Pulsante «Bordo»
natural_image
Line drawing of a robotic vacuum cleaner with open lid and handle (no text or symbols)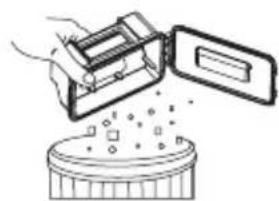
natural_image
Illustration of a hand placing a device into a container with scattered items (no text or symbols)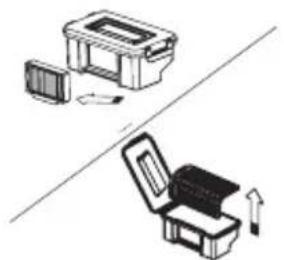
natural_image
Two technical illustrations of a mechanical device with open and closed parts, showing internal components and directional arrows (no text or symbols)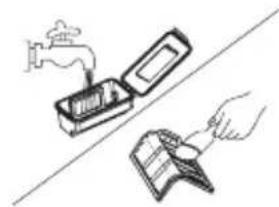
natural_image
Illustration of a hand using a tool to clean or store items on a surface, with a faucet and cleaning device nearby (no text or symbols)4. Pulizia in microfibra
natural_image
Technical diagram of a circular mechanical component with mounting holes and internal features (no text or symbols)Infrarood signaalontvanger
ON/OFF knop
Bumper
Top shell
Stofbakdeksel
Oplaadconnector
Linker zijborstel
Batterijdeksel
Rubber lamellen
Linker wiel
Schakelaar
natural_image
Technical diagram of a circular mechanical or electrical component with labeled parts (L, R) and internal structure (no readable text or symbols)Voorwiel
Rechterkant borstel
Zuigmondstuk
Rechterwiel
Onderste schaal
text_image
Technical diagram of a vacuum cleaner with labeled components and partsStofbakdeksel
Stofblik
Voorfilter
Stofbakdeksel
Manueel laadcontactdoos
HEPA filter
Filterbevestigingsrooster
natural_image
Technical line drawing of a mechanical device with open and closed views, showing internal components (no text or symbols)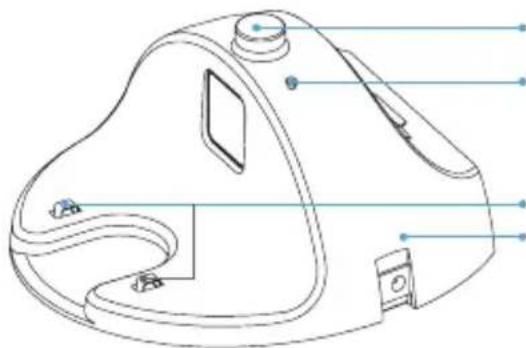
text_image
Technical diagram of a device with labeled components, likely for assembly or manufacturing documentation.Signaalontvanger
LED-indicator
Oplaadconnector
Manueel laadcontactdoos
Afstandsbediening
1. Start / pauze» knop
natural_image
Illustration of a hand using a power adapter to install a mounted device with a tripod (no text or symbols present)A
natural_image
Diagram of a camera with a mounted sensor and circular lens, labeled B (no text or symbols present)natural_image
Technical diagram showing a spiral component and a circular housing with directional arrows (no text or symbols)Automatisch «Auto» knop
natural_image
Pure spiral diagram with arrows indicating direction, no text or symbols presentDiepe reiniging «Powerful» knop
natural_image
Diagram of a circular mechanical component with directional arrows indicating rotation or force (no text or symbols)Langs de plinten «Edge» Knop
natural_image
Line drawing of a hand opening a circular device with a lid, no text or symbols present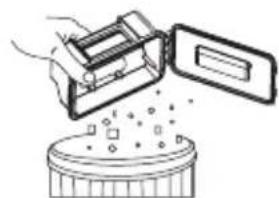
natural_image
Illustration of a hand placing a plastic bag into a container with scattered particles (no text or symbols)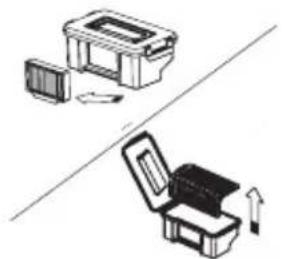
natural_image
Two 3D illustrations of a computer case with open and closed cases, showing internal components and directional arrows (no text or symbols)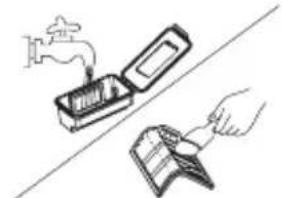
natural_image
Illustration of a hand cleaning a surface with a faucet and a tool (no text or symbols)EZIclean® is an E.ZICOM® company brand
46/48, rue Gay Lussac
94430 Chennevières-sur-Marne
www.eziclean.com