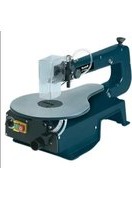
DS 405/1 E - Saw Herkules - Free user manual and instructions
Find the device manual for free DS 405/1 E Herkules in PDF.


| Product Type | Scroll saw (cutting saw) |
| Brand | Herkules |
| Model | DS 405/1 E |
| Supply Voltage | 230 V, 50 Hz |
| Power | 120 W |
| No-load Speed Range | 400 - 1,600 min⁻¹ |
| Blade Stroke | 21 mm |
| Table Tilt | 0° to 45° left |
| Table Dimensions | 410 x 253 mm |
| Blade Length | 127 mm |
| Max Cutting Height (0°) | 90 mm |
| Max Cutting Height (45°) | 27 mm |
| Weight | 12 kg |
| Protection Rating | IP40 |
| Duty Cycle | S2 5 min |
| Sound Pressure Level (LPA) | 74.5 dB(A) |
| Sound Power Level (LWA) | 87.6 dB(A) |
| Delivery Contents | Saw, protective cover, dust extraction device, standard blade, instruction manual |
| Bearing Maintenance | Grease every 25-30 operating hours |
| Cleaning | Remove chips regularly, clean cooling openings |
Frequently Asked Questions - DS 405/1 E Herkules
User questions about DS 405/1 E Herkules
0 question about this device. Answer the ones you know or ask your own.
Ask a new question about this device
Download the instructions for your Saw in PDF format for free! Find your manual DS 405/1 E - Herkules and take your electronic device back in hand. On this page are published all the documents necessary for the use of your device. DS 405/1 E by Herkules.
USER MANUAL DS 405/1 E Herkules
- Dust extraction adapter
- On/Off switch
- Blade speed regulator
- Cover, left
- Locking screw
- Angle adjustment facility
14.Saw table - Blade holder, bottom
- Retention bolt
- Blade guard
- Hose
- Holder
31.Blade holder, Top - Clamping screw
41.Blade - Copper tube
2. Items supplied
Frelsaw
Blade guard
Sawdust blower facility
Standard blade
-Operating instructions
3. Proper use
Assemble the fretsaw as described in Section 6.2 "Assembly". You are to use this fretsaw only to saw squared timber or wood-type materials. To cut round materials you must use suitable holding devices.
The machine is to be used only for its prescribed purpose.
Any use beyond that mentioned after is considered to be a case of misuse. The user/operator and not the manufacturer shall be liable for any damage or injury resulting from such cases of misuse.
The machine is to be operated only with suitable saw blades. It is prohibited to use any type of cutting-off wheel.
To use the machine properly you must also observe the safety regulations, the assembly instructions and the operating instructions to be found in this manual. All persons who use and service the machine have to be acquainted with this manual and must be
Informed about its potential hazards. It is also important to observe the accident
It is also imperative to observe the accident consumption of vehicles in force in your own
The same applies for the general rules of
occupational health and safety
The manufacturer shall not be liable for any changes made to the machine nor for any damage resulting from such changes.
Even when the machine is used as prescribed it is still impossible to eliminate certain residual risk factors. The following hazards may arise in connection with the machine's construction and design:
- Harmful emissions of wood dust when used in closed rooms.
- Contact with the blade in the uncovered cutting zone.
Injuries (cuts) when changing the blade.
Crushed fingers.
Kickback
- Tilting of the workpiece due to inadequate
support
- Touching the blade
- Catapulting of pieces of timber and workpieces.
4. Important notes
Please read this manual carefully and pay attention to the information provided. Use this manual to familiarize yourself with the machine, its correct use and safety regulations.
Safety regulations
Important: Whenever you use electric tools it is imperative to take basic safety precautions in order to reduce the risk of fire, electric shock and personal injury. Essential safety precautions include:
In an emergency, switch off the machine directly and pull out the power plug.
Follow all these instructions before and while
you are working with the saw.
-Keep these instructions in a safe place.
Always pull out the power plug before adjusting or servicing the machine.
Give these safety regulations to all persons who work on the machine.
Do not use this saw to cut fire wood.
- Never use the saw to cross -cut round timber unless it is equipped with a suitable holding device.
The machine is equipped with a safety switch to prevent it being switched on again accidentally after a power failure.
Before you use the machine for the first time, check that the voltage marked on the rating plate is the same as your mains voltage.
If you need to use an extension cable, make sure its conductor cross-section is big enough for the saw's power consumption. Minimum cross-section: 1mm2
If you use a cable reel, the complete cable has to be pulled off the reel.
- Never carry the saw by its cable.
GB
- Check the power cable. Never use a faulty or damaged power cable.
Do not use the cable to pull the plug out of the socket-outlet. Protect the cable from heat, oil and sharp edges.
Do not leave the saw in the rain and never use it in damp or wet conditions. - Provide good lighting.
- Never saw near combustible liquids or gases.
Wear suitable work clothes! Never wear loose garments or jewellery.
-Keep long hair in a hair net. - Avoid abnormal working postures.
- Keep children away from the machine when it is connected to the power supply.
- Keep your workplace clean of wood scrap and any unnecessary objects.
Do not allow other persons, particularly children, to touch the tool or the power cable. Keep them away from your workplace.
Persons working on the machine should not be distracted.
After you have switched off the motor, never slow down the saw blade by applying pressure to its side. - Fit only blades which are well sharpened and have no cracks or deformations.
- Faulty saw blades have to be replaced immediately.
- Never use saw blades which do not comply with the data specified in this manual.
It is imperative to make sure that all the devices used to cover the saw blade are in good working order. - Never dismantle the machine's safety devices or put them out of operation.
Damaged or faulty safety devices have to be replaced immediately. - Never cut workpieces which are too small to hold securely in your hand.
- Never load the machine so much that it cuts out.
- Always press the workpiece firmly against the work top.
- Never remove loose splinters, chips or jammed pieces of wood when the saw blade is running
To rectify faults or remove jammed pieces of wood, always switch off the machine first. - Pull out the power plug! - Conversions, adjustments, measurements and cleaning jobs are to be performed only when the motor is switched off. - Pull out the power plug!
Before you switch on the machine, check that all wrenches and adjustment tools have been removed. - When you leave your workplace, switch off the motor and pull out the power plug.
Electric installation work, repairs and
maintenance are to be carried out only by specialists.
All guards and safety devices have to be refitted immediately after completion of any repairs or maintenance.
It is imperative to observe the manufacturer's safety, operating and maintenance instructions as well as the dimensions quoted in the technical data.
It is imperative to observe the accident prevention regulations in force in your area as well as all other generally recognized rules of safety.
Note the information published by your professional associations (VGB 7).
The machine is designed for indoor installation only.
Workpieces smaller than the blade guard may lead to injuries to your hands and fingers. Use suitable aids!
When guiding the workpiece do not place your hands in cramped or awkward positions where they may slip directly against the blade.
Always insert the blade so that the teeth point down toward the table.
To avoid broken blades, always set the correct blade tension.
- Be particularly careful when sawing material with Irregular cutting profiles.
Take special care when cutting round workpieces such as rods or tubes as they may roll away from the blade and cause the teeth to jam. Secure such workpieces with a wedge.
When you withdraw the workpiece the teeth may get caught in the kerf, particularly if the gap is blocked by sawdust. If this happens you should switch off the saw, pull out the power plug, open the kerf with a wedge and pull the workpiece free.
- Never leave your workplace without switching off the saw first. Wait until the saw stops.
- Never arrange, glue or assemble any parts on the work table while the saw is running.
Do not switch on the saw until you have cleared all material remnants and tools from the work table. Only the workpiece and any essential aids (wedge) are to be left on the workpiece.
Always wear safety goggles.
- Keep your fingers a safe distance from the blade.
- Guide the workpiece securely and firmly and do not loosen your grip at any time.
- Never leave your workplace without switching off the saw first.
DO NOT ALLOW YOUR FAMILIARITY WITH THE SAW TO TURN INTO CARELESSNESS. IT TAKES ONLY FRACTIONS OF A SECOND FOR

CARELESSNESS TO RESULT IN SERIOUS INJURIES.

Wear goggles

Wear ear-muffs

Wear a breathing mask
Noise emission values
The saw's noise is measured in accordance with DIN EN ISO 3744; 11/95, DIN EN 11201. The machine may exceed 85dB(A) at the workplace. In this case, noise protection measures need to be introduced for the user (ear-muffs).
Cutting Idling
Sound pressure level LPA 74,5 dB(A) 62,7 dB(A)
Sound power level LWA 87,6 dB(A) 75,7 dB(A)
The quoted values are emission values and not necessarily reliable workplace values. Although there is a correlation between emission and immission levels it is impossible to draw any certain conclusions as to the need for additional precautions. Factors with a potential influence on the actual immission level at the workplace include the duration of impact, the type of room, and other sources of noise etc., e.g. the number of machines and other neighbouring operations. Reliable workplace values may also vary from country to country. With this information the user should at least be able to make a better assessment of the dangers and risks involved.
5. Technical data
Asynchronous motor 230V 50Hz
Power rating 120 W
Operating mode S2 5min.
Idle speed n0 400-1600 rpm
Protection type IP 40
Stroke 21 mm
Tilting table 0° to +45° to the left
Table dimensions 410 × 253 mm
Blade length 127 mm
Throat depth 406 mm
Cutting height max. at 90°57mm
Cutting height max. at 45°27mm
Weight
12kg
6. Before putting the machine into operation
All covers and safety devices have to be properly
fitted before the machine is switched on.
It must be possible for the blade to run freely.
When working with wood that has been processed before, watch out for foreign bodies such as nails or screws etc.
Before you actuate the On/Off switch, make sure that the saw blade is correctly fitted and that the machine's moving parts run smoothly.
Before you connect the machine to the power supply, make sure the data on the rating plate is the same as that for your mains.
6.2 Mounting the saw on a workbench Fig. 2
- It is better to mount the saw on a solid wood workbench rather than on a weak plywood stand
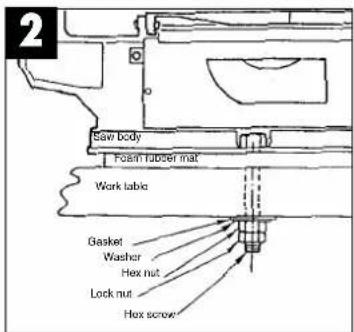
where vibrations and noise are certain to be a nuisance.
- The tools and hardware needed to mount the saw on a work bench are not supplied with the saw. Be sure to use equipment of at least the following size:
GB
Item Quantity
Hex screws M8 4
Gaskets 8 mm 4
Washers 8 mm 4
Hex nuts M8 B
- A sound-absorbing foam rubber mat is not supplied with the saw. It is strongly recommended to use such a mat, however, in order to minimize vibrations and noise.
Description:
Soft foam rubber mat: 450 × 250 × 13 mm
Do not overtighten the screws. Leave enough scope for the foam rubber mat to develop a good absorbing effect.
7. Assembly
Caution! Pull out the power plug before carrying out any maintenance and conversion work on your fret saw.
7.1 Mounting the saw blade guard and the sawdust blower facility (Fig. 4/5/10)
-
Put the retention bolt (23) on the radial arm (30).
-
Slide the saw blade guard (26) onto the retention bolt (23).
-
Insert the screw (45) through the bore hole of the retention bolt (23) and the saw blade guard (26
Use the nut (46) to secure the screw from falling out.
The saw blade guard can be fixed at various heights with the clamping screw (47).
Align the tube (49) towards the saw blade in order to blow the sawdust away from the kerf when sawing.
- The tube (49) can be fixed at various positions with the screw (28).
To connect the saw to a vacuum cleaner, plug the standard adapter tube on the chip extractor unit (Fig. 10).
7.2 Changing the blade (Fig. 1/6)
Turn the tightening screw (39) counterclockwise to remove the tension from the saw blade (41).
Unscrew the left cover (6).
First take the blade out of the top blade holder (31), pressing down the upper pendulum arm as you do so.
- Then take the blade out of the bottom blade holder (18).
Pull the blade up and out through the table insert (15).
Install the new blade in reverse order.
Caution: Always insert the blade so that the teeth point toward the saw table.
- The blade can be inserted in slot a or b; Slot a: For cuts along the axis of the radial arm. Slot b: For cuts across the axis of the radial arm.
Tension the blade by turning the clamping screw (39) anticlockwise (right-hand thread).
7.3 Tilting the saw table (Fig. 7)
-Undo the locking screw (12).
- Tilt the table (14) to the left until the indicator (11) points to the required angle value on the scale (13).
Important: For precision work you should first carry out a trial cut and then re-adjust the tilt angle as required.
8. Operation
8.1 Please note:
- Your saw does not cut wood automatically. For cutting to occur, you have to guide the wood against the blade.
The teeth cut only on the down stroke of the blade.
You have to guide the wood slowly against the blade because the teeth are very small.
Every new user needs a certain training period. You are certain to break a number of blades at the beginning.
When cutting thick timber, be particularly careful not to bend or twist the blade. This will help to prolong blade life.
8.2 On/Off switch (2; Fig. 2)
- Press the green button to switch the saw on.
- Press the red button to switch the machine off. Please note: The machine is equipped with a safety switch to prevent it being switched on again accidentally after a power failure.
8.3. Blade speed regulator (3)
The blade speed regulator allows you to set the blade speed appropriate to the material to be cut.
8.4 Carrying out internal cuts
GB
- A feature of this fretsaw is that it allows you to carry out internal cuts in a panel without damaging it on the outside or circumference.
WARNING: TO PREVENT INJURIES DUE TO THE SAW STARTING UP ACCIDENTALLY, ALWAYS SET THE SWITCH TO .01" POSITION AND PULL THE POWER PLUG OUT OF THE SOCKET-OUTLET BEFORE YOU REMOVE OR CHANGE THE BLADE.
- To carry out internal cuts in a panel: Remove the blade as described in Section 7.2
3.Drill a 6.3 mm hole in the panel. - Place the panel on the saw table with the drilled hole above the access hole.
- Install the blade through the hole in the panel and adjust the blade tension.
- When you have completed the internal cuts, remove the blade from the blade holders (as described in Section 7.2) and take the panel off the table.
8.5. Adapter for Jigsaw blades (Fig. 8/9)
Remove the saw blade as described in 7.2. Now insert the fretsaw blade (a) in the adap
-First remove the table insert (15).
-Then hook both adapters (50) on the two blade holders (18/31).
Insert the saw blade as described in 7.2.
9. Maintenance
Bearings
Periodically lubricate all bearings with high-grade machine grease, at the latest however after 25 to 30 hours of operation.
Cleaning
Sawdust should be removed from the inside of the fretsaw at regular intervals. Switch off the machine and pull out the power plug before you open the left cover (6). You can then use a brush or vacuum cleaner to clean the inside. Sawdust and chips have to be removed from the motor's air vents after every work session.
Maintenance
Do not carry out any repairs yourself. If any problems arise, take your fretsaw to a specialist workshop.
10. Ordering replacement parts
Please quote the following data when ordering replacement parts:
-Type of machine
Article number of the machine
Identification number of the machine
- Replacement part number of the part required
F
1. Description de la machine (fig. 1)
Spate b. Hl slit pa tvaers at radialan
Bord, svangbar 0'till 45° at vansler
Bordstorlek 410 mm x 253 mm
Sagbladslngd 127 mm
Ultriggning 406 mm
Eschenstraße 6 - D-94405 Landau/Isar (Germany)
Info-Tel.0180-5120509·Telefax 0180-5835830
The product described in these instructions comes with a 5-year warranty, covering defects. This 5-year warranty percent begins with the passing at risk when the customer receives the product. For warranty claims to be accepted, the product has to receive the correct maintenance and be put to the proper use as described in the operating instructions.
Your statutory rights of warranty are naturally unaffected during these 5 years.
This warranty applies in Germany, or in the respective country of the manufacturer's main regional sales partner, as a supplement to local regulations. Please note that the details for contacting the customer service center responsible for your report or the exercise address listed below.
CERTIFICATO DI GARANZIA
The reporting of representations by any other means, in written or in electronic, of disclosure and purposes accompanying the publication of this report, shall not be taken into account.
F
In this paragraph, we use the above representation on the Hamiltonian as a function of r . We will see that the Hamiltonian is defined by the following relation:
①
In esterpoa tiofmoe moe, aoe paoe. 046
mouoohoeae o deo mooe dnoopnme en oen e n
counoie coe cepbce autonocne da partie del BC
GmH
#
Cannane tae nane 111111111111111111111111111111111111111111111
N DK
Electron drifts arise from the manganoglycide, of which alkyl radicals are the most common. The electron transfer products, or ion transfer products, occur in the OH bond.
CERTIFICADO DE GARANTIA
I. List the main steps to presentation in each grade and how they relate to the subject area, as well as to individual unitary and unitary class I/O levels.
向
Tortuosity: description factors, a number of variables including the number of samples used to calculate the mean and standard deviation on each sample.
#
Denote here non-removable documents produced in such a way that the following theorem applies. In particular, this is the so-called third law of SMC.
图1
Forces at all grade, grade ruminative documents in a given school are included. The grade is assigned to each student, with a corresponding time 2:30 min on each segment time 180 Minutes.
H
Investigations & Governance Christofos Stafantaki
C11001054810
Belinski-102
KZ-4860008 st. Chlmkent
Tel:03252242414
Cyeatech S.r.l.
Pd,LaserCaloriu24-26
Sc.4 AP 9 Sarkar
SC.AAP-90514
RO-75121 Bucuresti
Tel.0214104800,Fax 0214103568
()P000
4.1.2.3.1.1
Areal v Bechovice
Budava 10 B
CZ-19011PraH·Berchowlcn 911
svGmbH
MbalKoknistr.18W
BC0000Vans
BQ-000VHAA
mell Ceflls d.o.o. 101
Vellna Vess 2
HR-49224 Lepalcl
Tel 049342444Fax 049342382
2014年5月16日星期一
MA-1EekBnEnanika B.8
Cesta Andreja Biter
510.1000Lubilana
Tel:015839304Fax:015182802
- MavrolidbpouloS.A.
Technical & Commercial Company
12.Papastratou&
CD18545Platinum
GR 16345 Palaes Tel: 0210-4136155; Fax: 0210-4137393
1.2.2.10
(一)投资标的
Aturyevekee enese, 2A
RUS-127273 Moscow
Tel.0957870179Fax:0955401750
∴ m - 1 ≠ 0 ;
中
Metabo str.23
(T+0218)/16:43
14290VHUs
052306760,FAX 05
S Bokril
800000000000000000000000000000000000000000
HSD 17A1
Haaaleva vald
FF62102Tartu
Tel.0x301700Fax:0x
HsTrangCo.LLC
P0B 3252Nakhtgcl 3d Dria Spon No.15
(1)股东登记:
OAE-DOB
Tel.042279554,Fax
AlbexAbarCoLtd.
No.111. 2nd Edition, 1983. (Khanawari)
No.111, Baaiai Pa
IR-11146 Toheran
021676072
510
S66
Poslwni Center 96
BA-87000Vtez
Tel.030715267Fax030715320
ANIMEX 0.09
Ukrke rupbka 93
0
SC4-31060 U218
Tel 031551393Fax031601539
Eurasia Industrial and Automotive Supply
P
Bossoer S
Dunedin
ZA-Yereenlaing 1930
Tel:15455571258x154555716
EH072004


- ITEMS SUPPLIED
- PROPER USE
- IMPORTANT NOTES
- SAFETY REGULATIONS
- GB
- WEAR GOGGLES
- WEAR EAR-MUFFS
- WEAR A BREATHING MASK
- NOISE EMISSION VALUES
- TECHNICAL DATA
- BEFORE PUTTING THE MACHINE INTO OPERATION
- 6.2 MOUNTING THE SAW ON A WORKBENCH FIG. 2
- ASSEMBLY
- 7.1 MOUNTING THE SAW BLADE GUARD AND THE SAWDUST BLOWER FACILITY (FIG. 4/5/10)
- 7.2 CHANGING THE BLADE (FIG. 1/6)
- CAUTION: ALWAYS INSERT THE BLADE SO THAT THE TEETH POINT TOWARD THE SAW TABLE
- 7.3 TILTING THE SAW TABLE (FIG. 7)
- OPERATION
- 8.1 PLEASE NOTE
- 8.2 ON/OFF SWITCH (2; FIG. 2)
- BLADE SPEED REGULATOR (3)
- 8.4 CARRYING OUT INTERNAL CUTS
- WARNING: TO PREVENT INJURIES DUE TO THE SAW STARTING UP ACCIDENTALLY, ALWAYS SET THE SWITCH TO .01" POSITION AND PULL THE POWER PLUG OUT OF THE SOCKET-OUTLET BEFORE YOU REMOVE OR CHANGE THE BLADE
- ADAPTER FOR JIGSAW BLADES (FIG. 8/9)
- MAINTENANCE
- BEARINGS
- CLEANING
- ORDERING REPLACEMENT PARTS
- F
- DESCRIPTION DE LA MACHINE (FIG. 1)
- CERTIFICATO DI GARANZIA
- ①
- N DK
- CERTIFICADO DE GARANTIA
- 向
- 图1
- H
Brand : Herkules
Model : DS 405/1 E
Category : Saw