TV 280 - Inspection camera Testboy - Free user manual and instructions
Find the device manual for free TV 280 Testboy in PDF.
User questions about TV 280 Testboy
0 question about this device. Answer the ones you know or ask your own.
Ask a new question about this device
Download the instructions for your Inspection camera in PDF format for free! Find your manual TV 280 - Testboy and take your electronic device back in hand. On this page are published all the documents necessary for the use of your device. TV 280 by Testboy.
USER MANUAL TV 280 Testboy
natural_image
Line drawing of a handheld electronic device connected to a coiled cable (no text or symbols visible)Testboy® TV 280
Version 1.4

Testboy® TV 280 Operating instructions 13

text_image
Technical diagram of a device with numbered components and exploded view, likely for assembly or labeling purposes.Laden des Akkus
General safety information 14
Introduction 17
Operation 18
Features 18
Camera design 18
Charging the battery 18
Basic functions 19
Taking a photo/video 19
Display and management of the saved images 19
Settings 20
Resolution 20
Language 20
Brightness 20
Rotate 20
Time Setting 21
Format 21
Reset System 21
Space 21
Technical data 22
Safety information

WARNING
Sources of danger include, for example, mechanical parts that can cause serious injuries.
Objects are also at risk (e.g. damage to the instrument).

WARNING
An electric shock can result in death or serious injury and jeopardise the function of objects (e.g. damage to the instrument).

WARNING
Never point the laser beam at eyes, either directly or indirectly via a reflective surface. Laser radiation can cause irreparable damage to eyes. The laser beam must be deactivated when conducting measurements close to people.
General safety information

WARNING
Unauthorised modification and/or changes to the instrument are not permitted for reasons of safety and approval (CE). In order to ensure safe and reliable operation of the instrument, you must always comply with the safety information, warnings and the information contained in the section "Intended use".

WARNING
Observe the following information before using the instrument:
Avoid operating the instrument near to electric welding equipment, induction heaters or other electromagnetic fields.
The instrument must be allowed to adjust to the new ambient temperature for approx. 30 minutes before use after abrupt temperature fluctuations, in order to stabilise the IR sensor.
Do not expose the instrument to high temperatures for a long period of time.
Avoid dusty and humid environments.
Measuring instruments and their accessories are not toys, and must be kept out of the reach of children!
When working in industrial facilities, comply at all times with the accident prevention regulations for electrical systems and equipment as established by the employers' liability insurance association.

Please observe the five safety rules:
Disconnect
Secure against reactivation
Ensure isolation from the power supply (check that there is no voltage on both poles)
Earth and short-circuit
Cover adjacent live parts
Intended use
The instrument is only intended for use in the applications described in the operating instructions. Any other usage is forbidden and can result in accidents or destruction of the instrument. Any such usage will immediately void all guarantee and warranty claims on the part of the operator against the manufacturer.

Remove the batteries if the instrument is not in use for a long period of time; this will protect the instrument against damage.

We shall not accept any liability for damage to property or injury to persons resulting from improper handling or non-compliance with the safety information. Any warranty claim will be voided in such cases. An exclamation mark in a triangle indicates safety information in the operating instructions. Read all instructions through before commissioning. This instrument is CE-approved and thus fulfils the required directives.
We reserve the right to change specifications without prior notice
© 2021 Testboy GmbH, Germany.
Disclaimer

The warranty claim is voided in cases of damage caused by failure to observe the instructions! We shall not accept any liability for the resulting damage!
Testboy is not responsible for damage resulting from
Failure to observe the operating instructions
Changes to the product that have not been approved by Testboy
The use of spare parts that have not been manufactured or approved by Testboy
The consumption of alcohol, narcotics and medicine
Correctness of the operating instructions
These operating instructions have been compiled with considerable care and attention. No guarantee is given that the data, figures and drawings are complete or correct. Subject to changes, printing mistakes and errors.
Disposal
Dear Testboy customer, in purchasing our product, you have the option of returning the instrument to suitable collection points for waste electrical equipment at the end of its lifespan.

The WEEE directive regulates the return and recycling of electrical appliances. Manufacturers of electrical appliances are obliged to take back and recycle all electrical appliances free of charge. Electrical appliances may then no longer be disposed of through "conventional" waste disposal channels. Electrical appliances must be recycled and disposed of separately. All equipment subject to this directive is marked with this logo.
Disposal of used batteries

As an end user, you are legally obliged (battery law) to return all used batteries; disposal in the domestic waste is prohibited!
Batteries containing contaminant material are marked with this symbol indicating that they must not be disposed of in domestic waste.
The abbreviations used for the respective heavy metals are:
Cd = cadmium, Hg = mercury, Pb = lead.
You can return your used batteries free of charge to municipal collection points or anywhere where batteries are sold!
Certificate of quality
All quality-relevant activities and processes carried out within Testboy GmbH are subject to ongoing monitoring within the framework of a quality management system. Furthermore, Testboy GmbH confirms that the testing equipment and instruments used during the calibration process are subject to an ongoing inspection process.
Declaration of conformity
The product conforms to the most recent directives. For further information, go to www.testboy.de
Introduction
The product is an endoscope camera, which enables areas that are difficult to access to be viewed clearly.
Via the cable, the endoscope camera can be manoeuvred easily at narrow points that cannot otherwise be examined in detail. This enables, for example, cable ducts, motor cylinder walls, drywalls, suspended plasterboard ceilings, etc. to be investigated. The instrument not only transmits a live image, but also allows photos and videos to be taken of the conditions being viewed. The display can be rotated in any direction and/or mirrored to make manoeuvring easier.
The instrument is supplied with a selection of gripper tools, which are used, for example, to reach/retrieve small parts. On the camera head is a light to illuminate narrow points without difficulty. The camera is also equipped with an integrated torch to also illuminate the user's surroundings.
Saved images can subsequently be viewed via computer or even on the instrument itself.
Downloading of data is, of course, also part of the functionality. As the data is saved on a micro SD card, there are various ways to download and store it externally. The instrument has an integrated battery, which can be charged via the micro USB interface using any conventional USB charger or USB port.
To avoid damaging it, the camera cable can be unscrewed from the instrument and stored separately.
Operation
Features
- Colour LCD
- Adjustable lighting
- Video and photo option
- Image rotation and mirroring
- Integrated torch
- Gripper tools
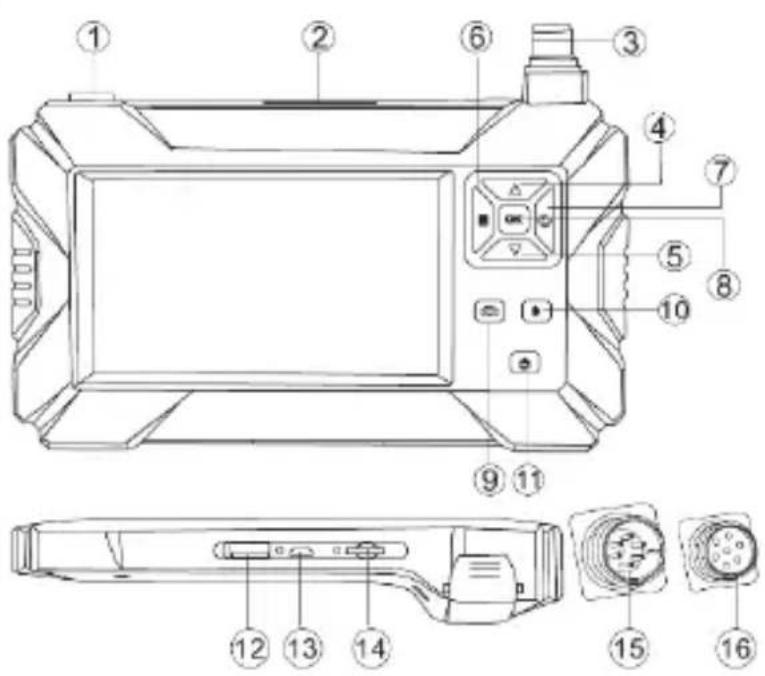
Camera design
1 Torch on/off
2 Torch
3 Connection for camera
4 Up button
5 Down button
6 Menu button
7 Back button
8 OK button
9 Camera button
10 Light on/off
11 On/off button
12 USB connection
13 Micro USB connection
14 Micro SD card slot
15 Camera connection, male (instrument side)
16 Camera connection, female (camera side)
text_image
Technical diagram of a device with numbered components and exploded view, likely for assembly or labeling purposes.Charging the battery
The instrument contains an integrated lithium-ion battery. When the battery status is low, an empty battery symbol is displayed at the top left on the edge of the display. When this status is displayed, the instrument should be recharged. The instrument is charged via the micro USB port. When the instrument is fully charged, the charging cable should be removed.
To achieve the best possible battery performance, the instrument should not be connected to a charger for more than 24 hours. The longest battery service life can be guaranteed if the instrument is charged at least every 3 months for 2 hours. The battery should not be charged in extremely cold environments.
Basic functions
To switch the measuring instrument on or off, press the on/off button (11) and keep it pressed for 3 seconds.
Once the instrument is switched on, press the menu button (6) to call up the display that sets up the basic functions. The screen shows the options "Photo", "Video", "Resolution", "Language", "Brightness", "Rotate", "Time Setting", "Format", "Reset System", "Space" and "Version". Press "back" (7) to return to normal measuring mode.
After pressing the menu button in basic function mode, press "OK" (8) to set the basic functions. Using the arrow buttons (4 and 5), select the preferred value for the relevant setting. Once the preferred settings have been made, they can be applied by pressing "OK" (8) again. Press the "back" button to exit setting mode again.
The torch button (1) can be used to switch the torch on the instrument on and off. The "light on/off" button (10) can switch the lighting rings around the camera lens on and off again in three stages.
Taking a photo/video
To take a photo, press the camera button (9) briefly once. If the button is held down, the instrument takes a video until the button is pressed again. A photo/video can only be taken if the instrument has a micro SD card inserted.
Display and management of the saved images
In the "Photo" menu option, you will find all previously taken photos and you can manage them here. Press the "menu" button (6) to access the main menu. Now select the first menu option "Photo" and then press OK (8). The image last taken is displayed. Use the "up" and "down" arrow buttons (4 and 5) to scroll through the photos. Use the "menu" button (6) to display further options and information. You now have the option to delete the most recent image or all images. You will also receive information about the name, size of the file and resolution. To delete one or all files, select the relevant menu option using the "up" and "down" arrow buttons (4 and 5) and confirm your selection with "OK" (8). You will receive the prompt "Delete this file?". Select "OK" and confirm again with the "OK" button (8) to delete the file(s). To exit the photo view, press the "back" button (7).
In the "Video" menu option, you will find all previously taken videos and you can manage them here. Press the "menu" button (6) to access the main menu. Now select the second menu option "Video" and then press OK (8). The video last taken is displayed. Use the "up" and "down" arrow buttons (4 and 5) to scroll through the videos. Pressing the "OK" button (8) plays the video. Use
Operation
the "menu" button (6) to display further options and information. You now have the option to delete the most recent video or all videos.
You will also receive information about the name, size of the file and resolution. To delete one or all files, select the relevant menu option using the "up" and "down" arrow buttons (4 and 5) and confirm your selection with "OK" (8). You will receive the prompt "Delete this file?". Select "OK" and confirm again with the "OK" button (8) to delete the file(s). To exit the video view, press the "back" button (7).
Settings
Resolution
In this menu, you can select option 3 "Resolution" with the OK button (8) and set the preferred resolution. To do this, select the relevant option with the "up" and "down" buttons (4 and 5) and confirm with the "OK" button (8). Resolutions 640x480, 1280x720 and 1920x1080 are available.
Language
In this menu, you can select option 4 "Language" with the OK button (8) and set the preferred language. To do this, select the relevant option with the "up" and "down" buttons (4 and 5) and confirm with the "OK" button (8).
Brightness
In this menu, you can select option 5 "Brightness" with the OK button (8) and set the preferred screen brightness. To do this, select the relevant option with the "up" and "down" buttons (4 and 5) and confirm with the "OK" button (8).
Rotate
In this menu, you can select option 6 "Rotate" with the OK button (8) and set the preferred display. A red "F" appears in the centre of the bottom edge of the screen. Select the preferred option with the "up" and "down" buttons (4 and 5).
The red "F" is then rotated or mirrored accordingly. Once the screen has been rotated/mirrored as required, confirm the setting with the "OK" button (8).
Time Setting
In this menu, you can select option 7 "Time Setting" with the OK button (8) and set the date and time. Start in the first field to set the year. Use the "up" and "down" buttons (4 and 5) to select the number. The OK button takes you to the next field "Month", followed by the field "Day". In the second line, start with the hours, followed by minutes and seconds.
Once the last field has been filled accordingly, press the "OK" button (8) again and the instrument skips to the selection options "OK" and "Cancel". To apply the settings, press the OK button (8) again, and if you want to cancel the action, use the "up" and "down" buttons (4 and 5) to select the "Cancel" option and then confirm it with the OK button (8).
Format
In this menu, you can select option 9 "Format" with the OK button (8) and format the storage medium.

CAUTION! This will delete all previous photos/videos taken and all other data on the storage medium!
Use the "up" and "down" buttons (4 and 5) to select the "OK" option and confirm the selection with the "OK" button (8) to complete formatting.
Reset System
In this menu, you can select option 10 "Reset System" with the OK button (8) and reset the system settings.

CAUTION! This will reset all previous instrument settings!
Use the "up" and "down" buttons (4 and 5) to select the "OK" option and confirm the selection with the "OK" button (8) to complete formatting.
Space
Menu option 11 "Space" indicates how much storage space is available on the relevant medium.
Example: "14.8 | 16 G" means that 14.8 GB of a possible 16 GB are free.
Technical data
| Display | 4.3" colour LCD |
| Image resolution | 1920x1080 pixels |
| Horizontal field of view | 70° |
| Focal length | 4 cm – 500 cm |
| Focus | Non-adjustable |
| File format | .jpg |
| Image storage | Micro SD card |
| Display of saved content | Photos/videos, which can be displayed on the screen |
| Power supply | Integrated battery |
| IP rating | IP67 |
| Lens diameter | 8 mm |
| Size | 175 × 100 × 30 mm |
Table des matières
Cd = Cadmium, Hg = mercure, Pb = plomb.
text_image
Technical diagram of a device with numbered components and exploded view, likely for assembly or labeling purposes.text_image
Technical diagram of a device with numbered components and exploded view, likely for assembly or labeling purposes.Cargar la batería
text_image
Technical diagram of a device with numbered components and labeled parts in ChineseCd = cadmium, Hg = kwik, Pb = lood.
text_image
Technical diagram of a device with numbered components and exploded view, likely for assembly or labeling purposes.De accu's laden
text_image
Technical diagram of a device with numbered components and exploded view, likely for assembly or labeling purposes.Cd = kadmium, Hg = kvicksilver, Pb = bly.
text_image
Technical diagram of a device with numbered components and exploded view, likely for assembly or labeling purposes.Germany info@testboy.de