
18310009 - Vacuum sealer Gastronoma - Free user manual and instructions
Find the device manual for free 18310009 Gastronoma in PDF.

| Product Type | Sous-vide immersion circulator |
| Brand | Gastronoma |
| Model | 18310009 |
| Power supply | 230 V, 50 Hz |
| Temperature range | From ambient to 90 °C |
| Recommended container capacity | 6 to 15 liters |
| Display | Digital screen (temperature and time) |
| Timer | Yes, adjustable in hours and minutes |
| Connectivity | WiFi 2.4 GHz via "CTO sous vide" app |
| Circulation tube material | Stainless steel |
| Main functions | Sous-vide cooking with precise temperature control, time programming, predefined recipes via app |
| Cleaning | Wipe with a damp cloth; monthly descaling with diluted vinegar (1:2) |
| Safety | Do not immerse the appliance, low water level protection (code EE1), automatic shut-off at end of cooking |
| Usage | Household use only, do not use outdoors |
| Weight | Approximately 1.2 kg (estimate) |
| Dimensions (approximate) | Height 35 cm, diameter 8 cm (estimate) |
Frequently Asked Questions - 18310009 Gastronoma
User questions about 18310009 Gastronoma
0 question about this device. Answer the ones you know or ask your own.
Ask a new question about this device
Download the instructions for your Vacuum sealer in PDF format for free! Find your manual 18310009 - Gastronoma and take your electronic device back in hand. On this page are published all the documents necessary for the use of your device. 18310009 by Gastronoma.
USER MANUAL 18310009 Gastronoma
text_image
Diagram showing two hands holding test tubes with liquid levels labeled in mL/min, illustrating a physical or chemical process.BRUG
natural_image
Technical line drawing of a mechanical clamp or bracket assembly (no text or symbols)text_image
QR code with embedded logo and text 'CTO' in the centerDK
RENG∅RING
text_image
Diagram showing two hands holding test tubes with liquid levels and a submerged object, labeled in Chinese.BRUK
- Velg et egnet kokekar. Det må romme 6-15 liter vann.
- Fyll kokekaret med lunkent eller varmt vann. Vannet må ikke være varmere enn tilberedningstemperaturen.
- Åpne klemmen (3) og fest apparatet på siden av kokekaret.

natural_image
Line drawing of a mechanical clamp or bracket with no visible text or symbolstext_image
QR code with embedded logo and text 'CTO' in the centertext_image
Diagram showing two hands holding test tubes with liquid levels and a submerged object, labeled in Chinese.ANVÄNDNING
natural_image
Line drawing of a mechanical clamp or tool with no visible text or symbolstext_image
QR code with embedded CTO logo in the center, likely linking to a website or appRENGÖRING
SOUS VIDE -KYPSENNYS VAIHE VAIHEELTA
1. Maustaminen
text_image
Diagram showing two hands holding test tubes with liquid levels and a submerged object, labeled in Chinese.KÄYTTÖ
natural_image
Line drawing of a mechanical clamp or clip assembly (no text or symbols)text_image
QR code with embedded logo and text 'CTO' in the centerPUHDISTUS
To get the best out of your new sous vide circulator, please read through these instructions carefully before using it for the first time. Take particular note of the safety precautions. We also recommend that you keep the instructions for future reference.
GENERAL SAFETY INSTRUCTIONS
- This appliance may only be used by children aged from 8 years and above and persons with reduced physical, sensory or mental capabilities or lack of experience and knowledge if they are supervised or have been given instructions concerning use of the appliance in a safe way and understand the hazards involved. Children must not play with the appliance. Cleaning and user maintenance must not be performed by children without supervision.
- Never leave unattended when in use. Keep an eye on any children in the vicinity of the appliance when it is in use. The appliance is not a toy.
- Incorrect use of this appliance may cause personal injury or damage the appliance.
- Use for the intended purpose only. The manufacturer is not responsible for any injury or damage resulting from incorrect use or handling (see also Warranty Terms).
- For domestic use only. Not for outdoor or commercial use.
- Remove all packaging and transport materials from the inside and outside of the appliance.
- Check that the appliance has no visible damage and that no parts are missing.
-
Do not use with any cords other than that supplied.
-
Check that it is not possible to pull or trip over the cord or any extension cord.
- The appliance must not be used together with a timer switch or a separate remote control system.
- Turn off the appliance and remove the plug from the socket when cleaning or when not in use.
- Avoid pulling the cord when removing the plug from the socket. Instead, hold the plug.
- Keep the cord and appliance away from heat sources, hot objects and naked flames.
- Ensure that the cord is fully extended.
- The cord must not be twisted or wound around the appliance.
- Check regularly that neither the cord nor plug is damaged and do not use the appliance if there is any damage, or if it has been dropped on the floor, dropped in water or damaged in any other way.
- If the appliance, cord or plug have been damaged, have the appliance inspected and if necessary repaired by an authorised repairer.
- Connect to 230 V, 50 Hz only. The warranty is not valid if the appliance is connected to incorrect voltage.
- Never try to repair the appliance yourself. Please contact the store where you bought the appliance for repairs under warranty.
- Unauthorised repairs or modifications will invalidate the warranty.
- Caution! Some parts of this appliance can become very hot and cause burns. Particular attention should be paid where children and vulnerable people are present.
- Keep the appliance and its cord out of reach of children aged less than 8 years.
UK
SPECIAL SAFETY INSTRUCTIONS
- The pan used with the appliance must be placed on a dry, level, firm and heat-resistant surface well away from any edges. It must not be placed on a hotplate.
• Always place the appliance at a safe distance from flammable objects such as curtains, tablecloths or similar. - The appliance must not be placed or stored near other sources of heat.
- Do not cover.
- The surfaces become very hot during use. Do not touch the hot surfaces due to the danger of burns.
- Do not move the appliance when in use.
- Please note that the appliance will remain hot for a while after you switch it off. Always allow the appliance to cool down completely before storage.
- Only place vacuum-packed foods in the water in the pan. Do not try to cook unwrapped food! This also applies for cooking or heating soups and other liquid dishes!
- Only the appliance's stainless steel nozzle and circulation pipe may be placed in the water. Do not expose the rest of the appliance to water or splashes.
- The water level must always be between the MIN and MAX marks on the circulation pipe.
- The appliance must not be turned on unless the pipe is in the water!
NB! If the appliance accidentally falls into the pan of water, unplug it before removing it from the water!
ABOUT SOUS VIDE COOKING
Sous vide has long been a popular cooking method with professional chefs.
"Sous vide" is French for "under vacuum". It describes a cooking method in which food is placed in sealed vacuum bags and cooked in a water bath. The food is cooked at a constant low temperature over a long time to make it moist and flavoursome. As the vacuum bag is sealed, the food cooks in its own juices together with the marinades or spices you added. Vitamins, minerals and juices are retained and the flavour of the food is enhanced. It makes the food healthier, juicier and more flavoursome. As meat cooked sous vide is more tender, it is possible to use cheaper cuts, such as neck fillet, shank and shoulder, which are often tastier than the more expensive cuts.
As sous vide cooking requires that foods be vacuum packed individually, several items can be cooked at the same time, as long as their cooking temperature is the same.
It is difficult to overcook food with sous vide, but the structure of the food can change slightly during cooking. The food can be prepared in plenty of time before serving, making sous vide perfect when you have guests.
Temperatures
The appliance can be set to a maximum temperature 90 °C. Different temperatures are required for different foods and different degrees of doneness. You can see sous vide temperatures and times in the table later on in these instructions.
Cooking time
The cooking time does not depend on the weight of the food, but its thickness. You can see sous vide temperatures and times in the table later on in these instructions.
UK
Foods for sous vide cooking
Meat is particularly suited to sous vide cooking, as it makes it more tender, juicy and flavour-some, but vegetables and fish can also be cooked in this way.
We recommend sous vide cooking for the following foods:
- Beef, veal, lamb, pork and game
- Chicken, turkey and duck
- Lean and oily fish, lobster tails and scallops
- Root vegetables such as potatoes, carrots, parsnips, beetroot and turnips
- Crisp vegetables such as peas, asparagus, corn, broccoli, cauliflower, aubergines, onions and squash
- Hard fruits such as apples and pears
- Soft fruits such as mango, plums, apricots, peaches, nectarines, papaya and strawberries
SOUS VIDE COOKING STEP BY STEP
1. Seasoning
You can marinate the food or add spices, herbs, butter or oil before you seal the vacuum bag.
2. Vacuum sealing
The food must be vacuum sealed in a bag to remove air and moisture. This ensures the foods retain their natural flavour and nutritional content. Vacuum sealing also helps to open the pores of meat, poultry, fish and shellfish, so that the marinade and spices are absorbed better and the food is more flavoursome.
Oxygen and moisture in the ambient air reduces the flavour, nutritional content and structure of food, and it is therefore important to use a high-quality vacuum sealer to remove air and moisture before the bag is sealed to ensure the food is optimally vacuum packed.
3. Cooking
Once the water in the pan has reached the required temperature, the vacuum bags containing the food should be placed gently in the water. Make sure the bags are completely under water, and that the water can circulate around the bags, so the food cooks evenly.
4. Browning
When foods are cooked sous vide, it may be necessary to brown meat in particular in a frying pan or grill in order to enhance its appearance and flavour. Remove the food from the bag and brown it quickly on a very hot frying pan or grill rack. This causes the fat and proteins to caramelise and enhances the flavour.
PREPARING FOODS
- Foods for sous vide cooking must be absolutely fresh.
- Check that meat, poultry, fish and shellfish have been stored correctly below 5 °C before cooking.
- Only use brand new and clean vacuum bags.
- Keep fresh and cooked foods apart.
- Wash your hands and work area thoroughly before handling food.
- The thickness of the food must be as described in the table of sous vide temperatures and times.
UK
text_image
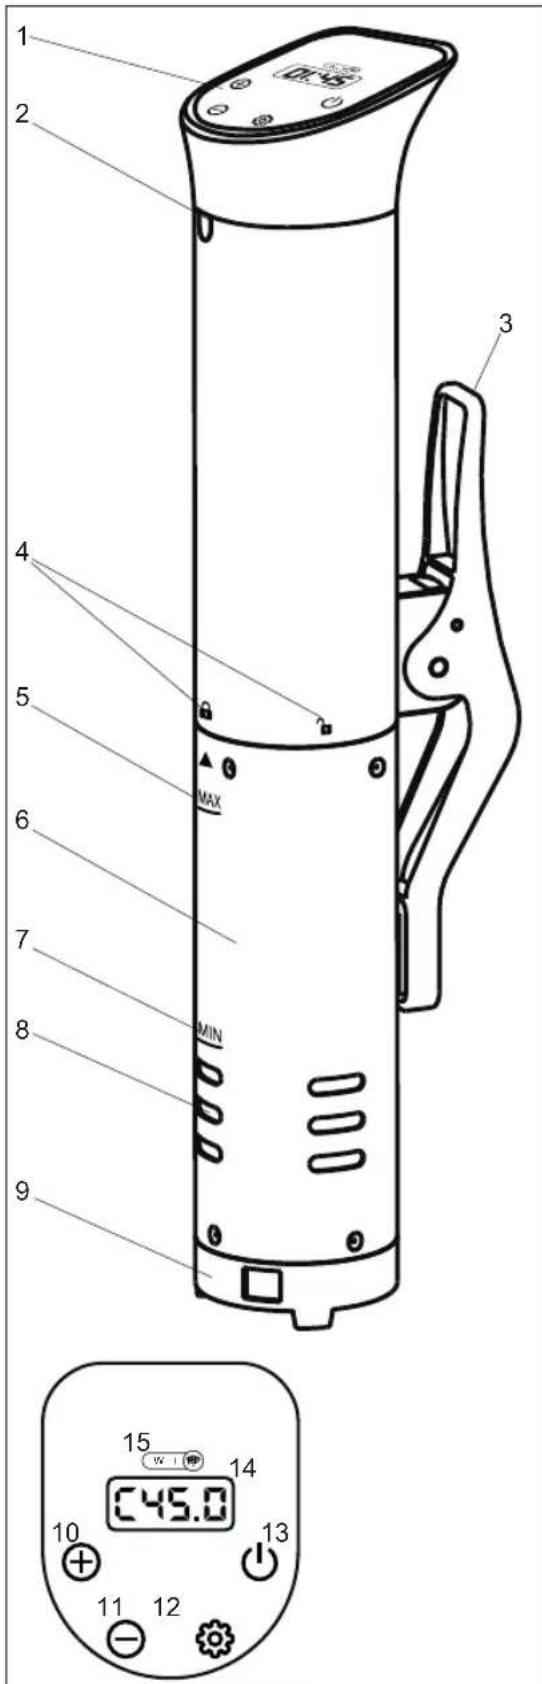
1 2 3 4 5 MAX 6 7 8 MIN 9 10 11 12 15 w i 电 14 C45.0 13 12MAIN COMPONENTS
- Control panel
- Indicator light
- Clip
- Symbols (locked/unlocked)
- MAX mark
- Circulation pipe
- MIN mark
- Water intake holes
- Base
- "+" button
- "-" button
- SET button
- POWER (on/off) button
- Display (temperature/time)
- WiFi indicator light
UK
text_image
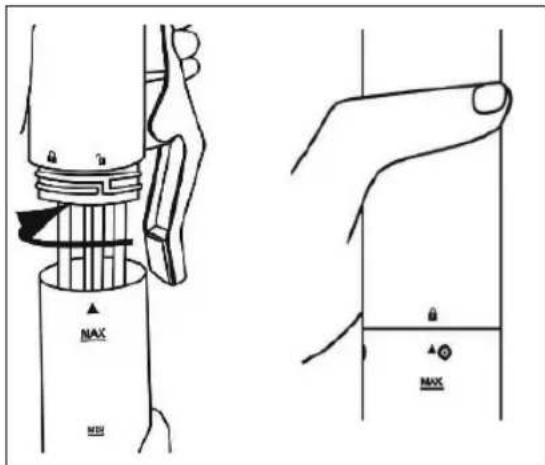
MAX MAXPREPARATION
-
Hold the top of the appliance with one hand.
-
Insert the circulation pipe (6) over the heating element with the MAX mark first. The arrow on the circulation pipe must be lined up with the symbol of the unlocked padlock (4).
Make sure that the circulation pipe is not touching the propeller on the appliance, as this may cause it to bend.
-
Turn the circulation pipe so that the arrow on it is lined up with the symbol of the locked padlock (4).
-
The circulation pipe can be removed by following the above procedure in the reverse order.

text_image
Diagram showing two hands holding test tubes with liquid levels labeled 'A' and 'B', illustrating a physical or chemical process.USE
- Choose a suitable pan for the task. It must be able to hold 6-15 litres of water.
- Fill the pan with lukewarm or hot water. The water must not be hotter than the cooking temperature.
- Open the clip (3) and attach the appliance to the side of the pan.

natural_image
Line drawing of a mechanical clamp or tool with no visible text or symbols- The water level must be between the MIN (7) and MAX (5) marks on the circulation pipe. Remember that the water level rises when you add food to the pan.
- Carefully lay the vacuum-packed food in the pan using tongs. The water must be able to circulate around the vacuum bags.
- Plug the appliance in. The indicator light (2) and the light in the POWER button (13) will come on and the appliance will go into standby.
- Press the POWER button (13) to switch on the appliance. A beep will sound each time you press a button.
UK
- Press the "+" button (10) or "-" button (11) to select the temperature unit between C and F.
- Press the "Set" button (12) the first time to set the temperature unit.
- Press the "Set" button (12) twice to set the cooking temperature.
- Press the "+" button (10) or "-" button (11) to set the temperature which can be seen on the display (14).
- Press the "Set" button (12) the third time and the fourth time consecutively to set the cooking time.
- Press the "+" button (10) or "-" button (11) to set respectively for the hour digit and the minute digit of cooking time.
- Press the "Power" button (13), the appliance begins to heat and circulate the water in the pan. The display (14) displays the current temperature.
- Once the set temperature has been reached, two beeps will sound, the indicator light (2) flashes and the countdown of the set cooking time starts.
The display shifts between displaying the temperature and the remaining cooking time every 5 seconds.
- Once the set cooking time has elapsed, 3 beeps will be heard and the display will show the message "End". The appliance automatically goes into standby.
- Remove the vacuum bags from the water using tongs.
- Allow the appliance to cool down.
Note
You can always stop the cooking process by pressing and holding the power button (13) for 3 seconds.
Make sure the bags are completely sealed before cooking begins.
Make sure the bags are still completely sealed once cooking is finished.
If the food is to be consumed within a few hours, it can be kept in the pan for a short time without ruining the structure.
If the food is to be stored in the fridge for later use, immediately place the bags in ice water to quickly reduce the temperature of the food.
Error warning code
If the error code EE1 appears on the display, the water level in the pan is too low. Add more water.
UK
WIFI FUNCTION
WIFI Connection
Tips:
-
if you use dual-frequency router, please set separate SSID and password for 2.4 GHz frequency channel.
-
As sous vide's WIFI module is designed for 2.4 GHz frequency channel only, the mobile phone's WIFI need to connect the SSID of 2.4 GHz frequency channel on router
WIFI mode set-up :
-
Download WIFI app to your mobile phone.
-
Press the icon of App on your mobile phone to enter into the login screen page. Following the prompt to input the mobile phone number/user name and press the "Register" button to register a user account. According to the prompt popping up on your mobile phone, input your mobile phone number and set the password to complete the registration for your user account.
-
Login your user account. On the main screen page, click "Start" icon to start coupling your mobile phone with your sous vide circulator.
-
On the coming screen page on your mobile phone, click "+" on right upper corner, the connecting configuration dialogue box pops up. According to the prompt, input the SSID name of WIFI 2.4 GHz frequency channel and the password of WIFI.
-
Plug in the sous vide, and press and hold the "Set" button (12) on the sous vide to activate the WIFI mode of appliance. You will hear 3 sounds of beep, and the WIFI indication light will be quick-flashing. Then click app "Next step" button on your mobile phone to start connecting the sous vide circulator with the mobile phone.
Note: Please do not press any other button except the "Setting button" when activating the WIFI mode of your sous vide circulator. And the configuration would not succeed if App's SSID does not display the current connected WIFI name of 2.4 GHz frequency channel.
- Once the configuration succeed to connect the sous vide circulator with the mobile phone, the prompt of "configuration completed" will display on your mobile phone. The WIFI indication light on the sous vide circulator will turn to lighting stable.
Note: If the configuration fails to connect the sous vide circulator with the mobile phone, the prompt of "configuration failed" will display on your mobile phone. Then click app "Cancel" button and repeat the operation step 4 and 5 above.
- After configuration succeeds to connect the sous vide circulator with your mobile phone, you could then use the app and operate on your mobile phone to cook. In the app, there are many programmed cooking recipes for some common cuisines. You could choose "Auto cook" to use these programmed cooking recipes for your cook, or you could choose "DIY" to set the cooking temperature and the cooking time on mobile phone for your cook.
UK
APP
You can download the app by scanning the QR code below or by searching for "CTO sous vide" in Google Play or Appstore.

text_image
QR code with embedded logo and text 'CTO' in the centerCLEANING
When cleaning the appliance, you should pay attention to the following:
- Unplug the appliance and allow it to cool before cleaning it and putting it away.
- Pour the water out of the pan. Wipe the pan with a tea towel.
- Do not immerse the appliance, cord or plug in water and make sure no water enters the appliance.
- Wipe the outside of the appliance with a well-wrung cloth and dry with a dry soft cloth.
DESCALING
Depending on the hardness of the water and how often the appliance is used, it may need descaling once a month or more often. Fit the appliance on the pan as for ordinary cooking.
- Make a solution of 1 part ordinary vinegar and 2 parts water. The solution must come almost up to the MAX mark (5) on the circulation pipe (6).
- Set the temperature to 80^ .
- Once the set temperature has been reached, the appliance will remain on for one hour. Switch off the appliance and allow it to cool.
- Rinse the circulation pipe under running water and dry thoroughly before putting the appliance away.
UK
INFORMATION ON DISPOSAL AND RECYCLING OF THIS PRODUCT
Please note that this Adexi product is marked with this symbol:
This means that this product must not be disposed of along with ordinary household waste, as electrical and electronic waste must be disposed of separately.
According to the WEEE directive, every member state must ensure correct collection, recovery, handling and recycling of electrical and electronic waste. Private households in the EU can take used equipment to special recycling stations free of charge. In certain member states, used appliances can be returned to the retailer where they were bought on the condition you buy new products. Contact your retailer, distributor or the municipal authorities for further information on what to do with electrical and electronic waste.
WARRANTY TERMS
The warranty does not apply:
- if the above instructions have not been followed
- if the appliance has been interfered with
- if the appliance has been mishandled, subjected to rough treatment, or has suffered any other form of damage
- if the appliance is faulty due to faults in the electricity supply.
Due to the constant development of our products in terms of function and design, we reserve the right to make changes to the product without prior warning.
FREQUENTLY ASKED QUESTIONS
If you have any questions regarding the use of the appliance and cannot find the answer in this user guide, please try our website at www.adexi.eu.
You can also see contact details on our website if you need to contact us for technical questions, repairs, accessories or spare parts.
IMPORTER
Adexi A/S
Grenåvej 635A
DK-8541 Skødstrup
Denmark
www.adexi.eu
We cannot be held responsible for any printing errors
UK
TABLE OF COOKING TEMPERATURES AND TIMES
| Food item Thickness* Temp. (°C) | Time Standing time** | |||
| Beef, veal, lamb, game | ||||
| Fillets, chops, ribeye, T-bone,sirloin, porterhouse (tender cuts) | 1-2 cm 49- | 1 hour Up to 6 hours | ||
| 2-5 cm 49- | 2 hours Up to 8 hours | |||
| Flank, neck, thigh, shoulder, shank | 4-6 cm 49+ 8 hours Up to 10 hours | |||
| Pork | ||||
| Pork breast 3-6 cm 82 10 hours Up to 12 hours | ||||
| Spareribs 2-3 cm 59 10 hours Up to 12 hours | ||||
| Cutlets 2-4 cm 56+ 4 hours Up to 6 hours | ||||
| Pork loin | 5-7 cm 56- | 10 hours Up to 12 hours | ||
| Poultry | ||||
| Chicken breast with bone | 3-5 cm 82 | 2 hours Up to 3 hours | ||
| Boneless chicken breast | 3-5 cm 64 | 1 hour Up to 2 hours | ||
| KyChicken thigh with bone | 3-5 cm | 82 | 1.5 hours | Up to 3 hours |
| Boneless chicken thigh | 3-5 cm 64 | 1 hour Up to 2 hours | ||
| Chicken drumstick | 5-7 cm 82 | 2 hours Up to 3 hours | ||
| Duck breast | 3-5 cm 64 | 2 hours Up to 2 hours | ||
| Fish | ||||
| Lean and oily fish | 3-5 cm 47- | 1 hour | Up to 1 hour | |
| Shellfish | ||||
| Prawns | 2-4 cm 60 | 1 hour Up to 1 hour | ||
| Lobster tail | 4-6 cm | 60 | 1 hour | Up to 1 hour |
| Scallops | 2-4 cm 60 | 1 hour Up to 1 hour | ||
| Vegetables | ||||
| Root vegetables | 1-5 cm 83- | 1 hour Up to 2 hours | ||
| Crisp vegetables | 1-5 cm 83- | 1 hour Up to 2 hours | ||
* If the meat is thinner than specified, it will cook faster.
** The standing time is the longest time the food can remain in the water after cooking without the structure changing.
UK
TABLE OF DONENESS AND TEMPERATURES
| Food item Doneness Temperature (°C) | ||
| Beef, veal, lamb, pork and game Rare 49 | ||
| Medium-rare 56 | ||
| Medium 60 | ||
| Medium-well done 65 | ||
| Well done | 71+ | |
| Poultry, boneless Well done | 64 | |
| Poultry, with bone Well done | 82 | |
| Fish Rare 47 | ||
| Medium-rare 56 | ||
| Medium 60 | ||
| Vegetables | General 83-87 |