Plancha Flame LX - Barbecue CAMPINGAZ - Free user manual and instructions
Find the device manual for free Plancha Flame LX CAMPINGAZ in PDF.

| Product type | Gas barbecue (plancha) |
| Brand | Campingaz |
| Model | Plancha Flame LX |
| Power supply | Butane or propane gas, 5 to 15 kg cylinder with appropriate regulator |
| Gas type | Butane 28-50 mbar / Propane 30-50 mbar depending on country |
| Number of burners | 2 |
| Ignition | Integrated piezo (automatic) and manual ignition possible |
| Plate material | Enamelled plate (sheet steel or cast iron depending on version) |
| Lid | Removable, vertical position at the back |
| Grease tray | Yes, removable at the back |
| Dimensions (approx.) | Approximately 60 x 40 x 25 cm (excluding cylinder) |
| Weight (approx.) | Approximately 8 kg |
| Usage | Outdoor only, on a stable and non-flammable surface |
| Safety distance | 1 meter around the appliance without combustible materials |
| Maintenance | Regular cleaning of burners, plate, grease tray; do not use abrasive products |
| Recommended accessories | Campingaz® (spatula, cover, etc.) |
| Spare parts | Available at Campingaz after-sales service |
| Manual | 108 pages, multilingual (FR, EN, DE, ES, IT, etc.) |
| Warranty | Consult the retailer |
Frequently Asked Questions - Plancha Flame LX CAMPINGAZ
User questions about Plancha Flame LX CAMPINGAZ
0 question about this device. Answer the ones you know or ask your own.
Ask a new question about this device
Download the instructions for your Barbecue in PDF format for free! Find your manual Plancha Flame LX - CAMPINGAZ and take your electronic device back in hand. On this page are published all the documents necessary for the use of your device. Plancha Flame LX by CAMPINGAZ.
USER MANUAL Plancha Flame LX CAMPINGAZ
natural_image
Technical illustration of a mechanical assembly before and after assembly, showing internal components and a close-up inset (no text or symbols)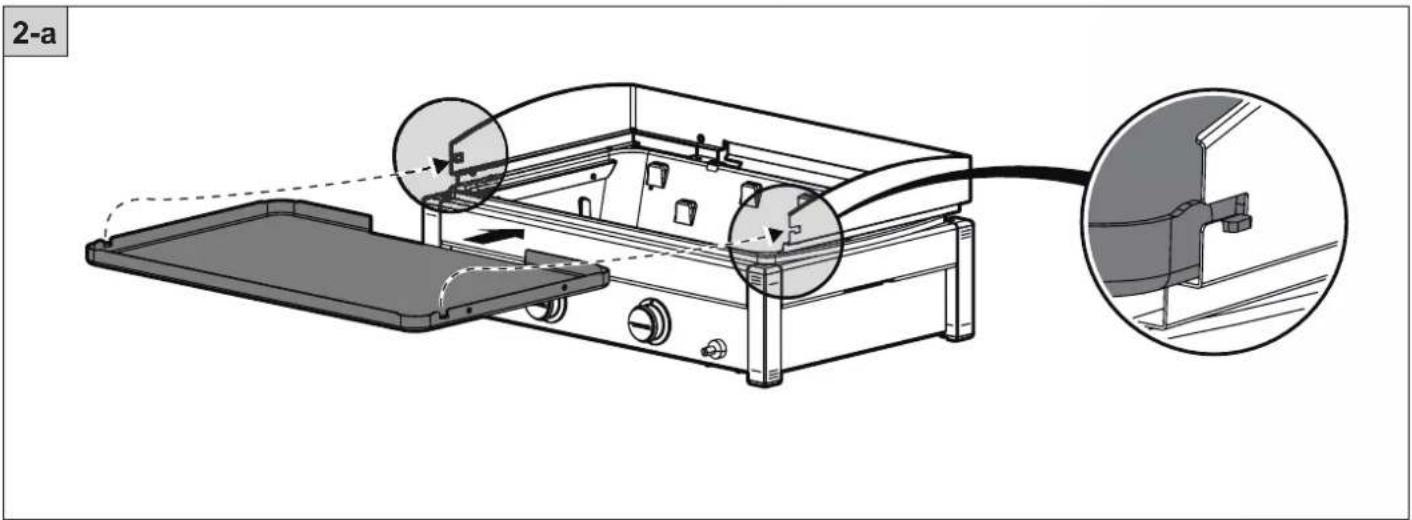
natural_image
Technical line drawing of a portable electric stove with internal components and a close-up inset showing the cable connection (no text or symbols)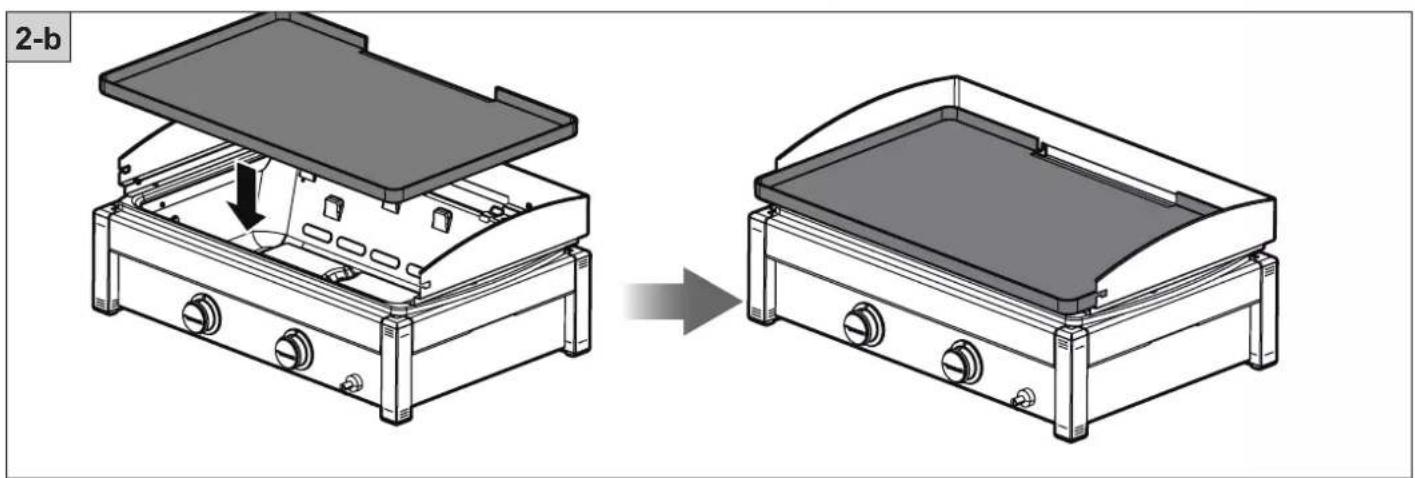
natural_image
Technical line drawing of a portable flatbed box with a close-up inset showing internal components (no text or symbols)e) TUYAU
natural_image
Two mechanical components with arrows indicating motion, no visible text or symbolsnatural_image
Diagram of a mechanical device emitting flares and heat, with no visible text or symbolsModèles
- Plancha L
- Plancha LX

natural_image
Illustration of a gas cylinder connected to a portable stove with a smiling emoji, no text or symbols presentnatural_image
Line drawing of a portable electric stove with control knobs and a handle (no text or symbols)m) NETTOYAGE ET ENTRETIEN
Operation and maintenance
NOTE: Unless otherwise specified, following generic terms “appliance / unit / product / equipment / device” appeared in this instruction manual all refer to the product “Plancha L / Plancha LX / Plancha EX / Plancha EXB”.

- Please read the instructions carefully before using.
- Use outdoors only
- It is best to wear gloves to assemble the product.
- Do not use charcoal.
- Do not use an adjustable low pressure regulator. Use fixed regulators that comply with the European standard concerning them.
- Regularly clean the parts at the frame bottom to avoid risk of inflammation from fat drippings.
Follow these instructions carefully to avoid seriously damaging your barbecue.
GB
a) FOR YOUR SAFETY
- Do not store or use petrol and other flammable liquids or vapours in the vicinity of this barbecue. This device must be kept away from inflammable materials when it is in use.
If you smell gas:
1) Close the valve of the cylinder
2) Extinguish all naked flames
3) Open the lid
4) If the smell continues, see "f Checking for gas leaks" or immediately seek advice from your local retailer.
- Parts which are protected by the manufacturer or the manufacturer's representative must not be manipulated by the user.
- Do not leave your appliance unattended while it is working.
- Close the gas container after use.
b) LOCATION
- This barbecue must only be used outdoors.
- CAUTION: accessible parts may get very hot. Keep young children away.
- There should be no combustible materials within a radius of approximately 1 m around the barbecue
- Do not move the barbecue when the burners are operating.
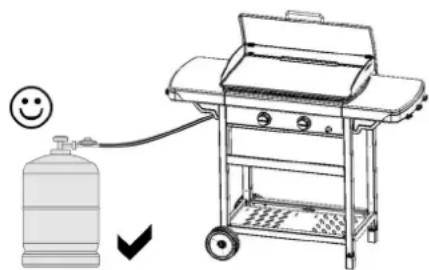
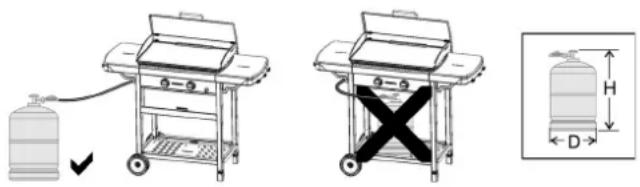
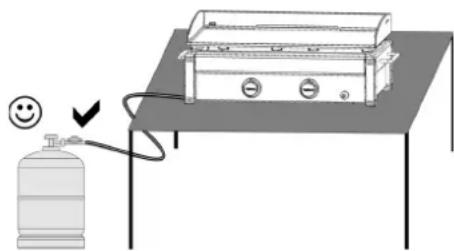
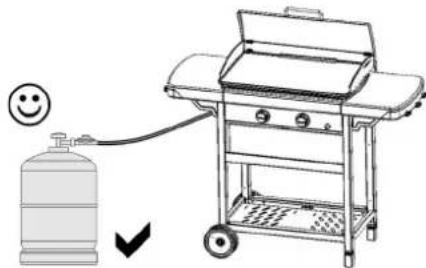
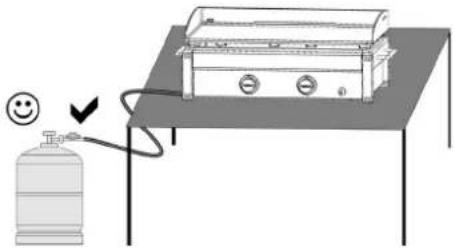
- Place your device and the gas cylinder on a flat, stable and non-inflammable surface. If you use your device on grass, make sure that the grass is not too high and that it is not in contact with the burner flame to avoid the risk of fire.
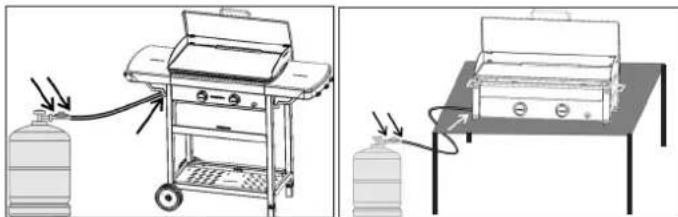
- Models Plancha EX and Plancha EXB: Use the unit on horizontal ground.
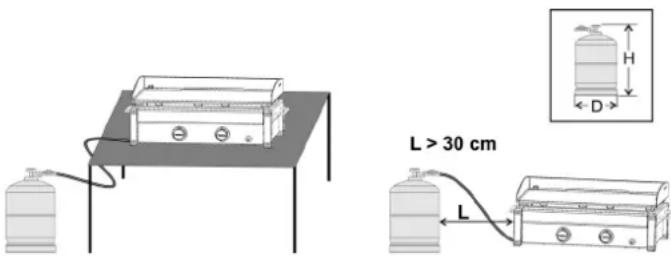
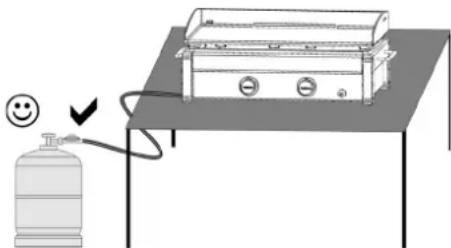
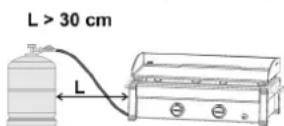
- Models Plancha L and Plancha LX: Use the unit on a structure that is stable and sufficiently rigid to handle the weight of the unit (table). Place the gas tank on the ground.
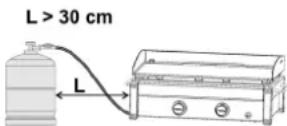
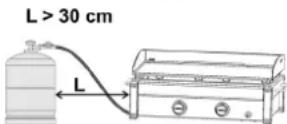
- The gas tank has to be placed at least 12 in. (30 cm) away from the unit.
- Estimated air offtake 2 m ^3 /kW/h.
c) ELEMENT ASSEMBLY (depending on the model)
- Install the grease collection tray at the back of the unit (Fig. 1, Page 4)
- Put the cooking plate on the unit making sure that the tabs of the plate are aligned with the windshield.
■ Model with metal plate: See Fig. 2-a, Page 4.
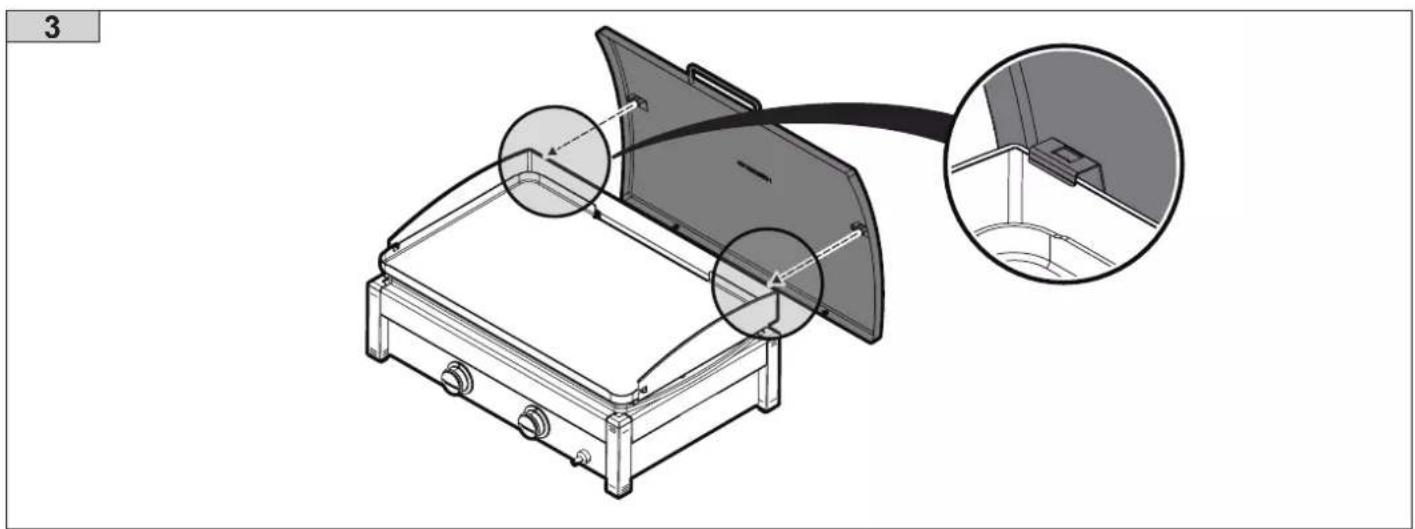
■ Model with griddle: See Fig. 2-a, Page 4. - Arrange the cover vertically at the rear of the unit (Fig. 3)
d) GAS CYLINDER
This barbecue has been adjusted to operate off 5 to 15 kg butane/propane cylinders with an appropriate low pressure regulator:
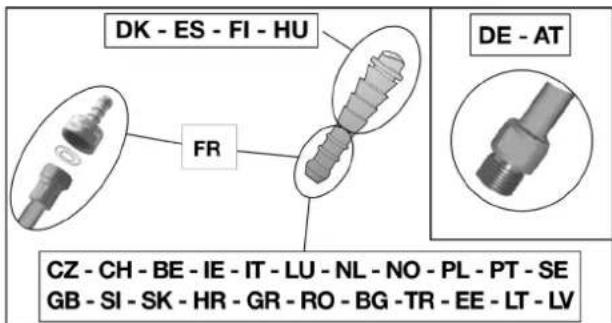
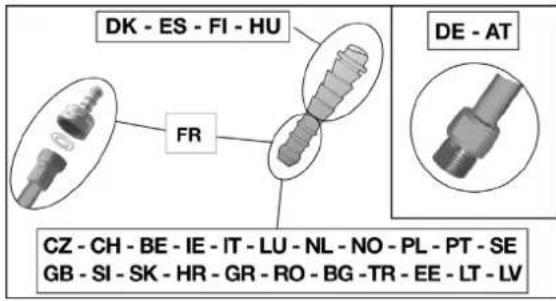
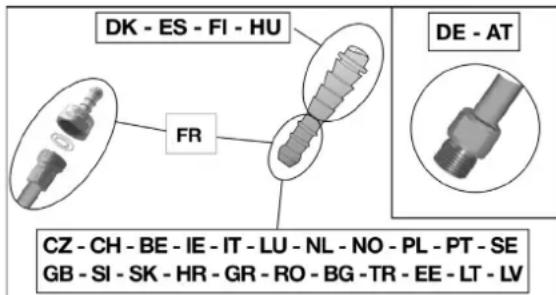
■ France, Belgium, Luxembourg, United Kingdom, Ireland, Portugal, Spain, Italy, Greece : butane 28 mbar / propane 37 mbar.
■ Netherlands, Czech Republic, Slovakia, Hungary, Slovenia, Norway, Sweden, Denmark, Finland, Bulgaria, Turkey, Romania, Estonia, Croatia, Switzerland: butane 30 mbar / propane 30 mbar
■ Poland: propane 37 mbar.
■ Germany, Austria: butane 50 mbar / propane 50 mbar.
Always connect or replace the cylinder in a well-ventilated area, never in the presence of a flame, spark or heat source.
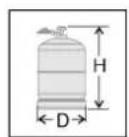
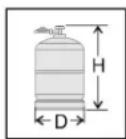
Models Plancha EX and Plancha EXB: The height H of the cylinder must be less than 27.5 in. (70 cm), regardless of the cylinder's width or diameter D.
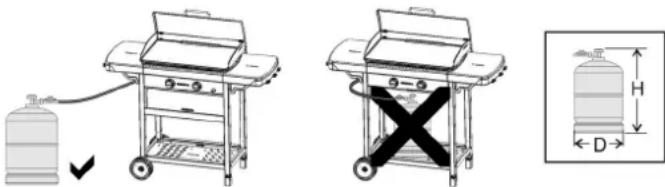
Models Plancha L and Plancha LX: Regardless of the height H, the width or the diameter D of the cylinder.
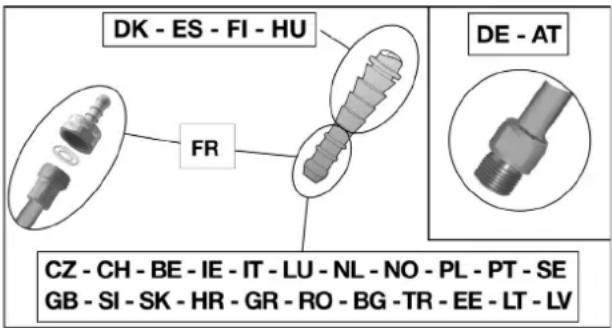
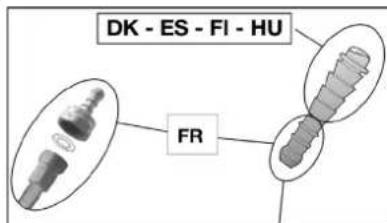
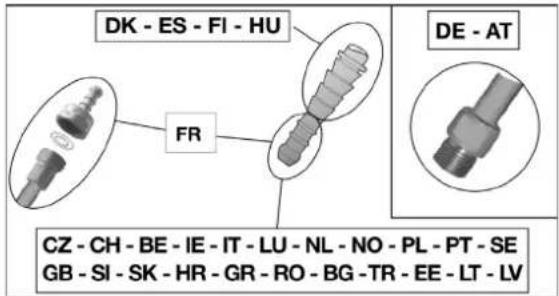
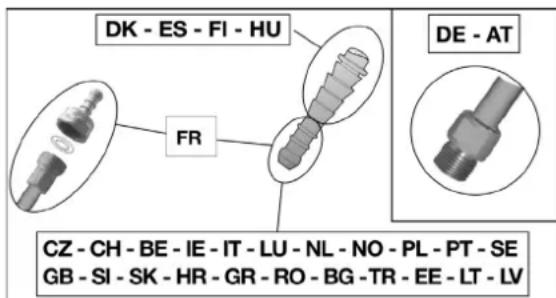
e) HOSE

■ France (depending on model)
The equipment may be used with two types of flexible hose:
a) flexible hose designed to be joined onto ringed tailpieces on both the barbecue and regulator sides, held firm with collars (in accordance with standard XP D 36-110). Recommended length 1.25 metre.

b) flexible hose (according to standard XP D 36-112) fitted with a G 1/2 threaded nut for fixing to the barbecue and a M 20x1.5 threaded nut for fixing to the regulator, recommended length 1.25 metre.

The barbecue has a G 1/2 threaded gas inlet connector supplied with pre-fitted NF ringed tailpiece and seal.
1) To use the equipment with the flexible hose XP D 36-110: (solution d) a))
- slide the flexible hose onto the ringed tailpiece on both the barbecue and regulator as far as it will go.
- slide the collars behind the two first bosses on the tailpieces and tighten them until the tightening head breaks.

-check for leaks following the instructions in paragraph f).
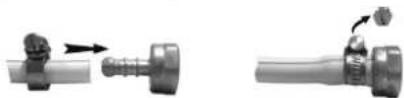
2) To use the equipment with the flexible hose XP D 36-112, G 1/2 and M 20x1.5 nuts: (solution d) b))
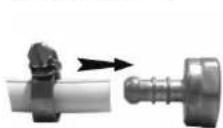
- loosen and remove the NF ringed tailpiece to release the G 1/2 inlet connector.
- remove the seal.
- tighten the G 1/2 threaded nut on the hose onto the barbecue inlet connector and the M20x1.5 threaded nut onto the regulator output connector following the instructions supplied with the flexible hose.
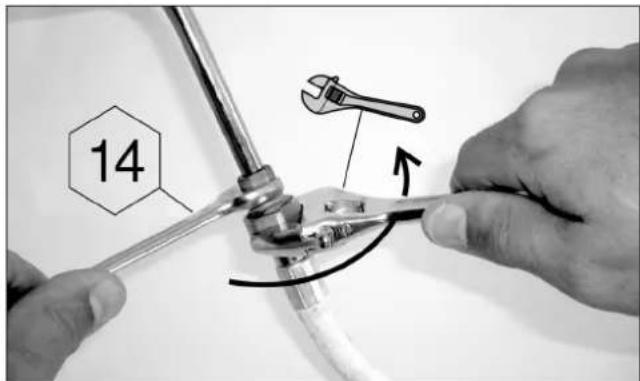
- Use two wrenches to tighten the flexible hose on the gas end piece:
▶ a number 14 wrench to immobilize the device input connection,
▶ an adjustable wrench to tighten the flexible hose nut.
- check for leaks following the instructions in paragraph f).
Check that the flexible hose stretches out normally without twisting or pulling and does not come into contact with the hot sides of the barbecue. It should be replaced
when the expiry date on the hose is passed or whenever it is damaged or develops surface cracks.
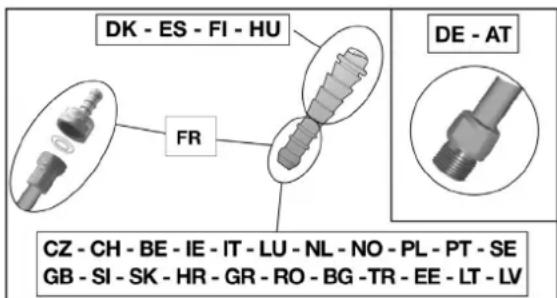
■ Belgium, Luxembourg, United Kingdom, Ireland, Portugal, Spain, Italy, Croatia, Greece, Netherlands, Czech Republic, Slovakia, Hungary, Slovenia, Norway, Sweden, Denmark, Finland, Bulgaria, Turkey, Romania, Poland, Estonia:
The barbecue is equipped with a circular connector. It should be used with flexible hose that is suitable for use with butane and propane gas. Hose length should not exceed 1.20 metre. It should be replaced if it is damaged or cracked, when required by national regulations or at the end of the part lifecycle. Do not pull or pierce the hose. Keep hose away from any parts of the barbecue that get hot. Check that the flexible hose stretches out normally, without twisting or pulling.
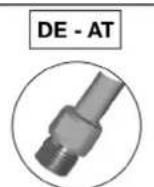
■ Germany, Austria, Switzerland:
The barbecue should be used with flexible tubing that is suitable for use with butane and propane gas. Hose length should not exceed 1.50 metre. It should be replaced if it is damaged or cracked, when required by national regulations or at the end of the part lifecycle. Do not pull or pierce the tubing. Keep away from any parts of the barbecue that get hot. Check that the flexible hose stretches out normally, without twisting or pulling.
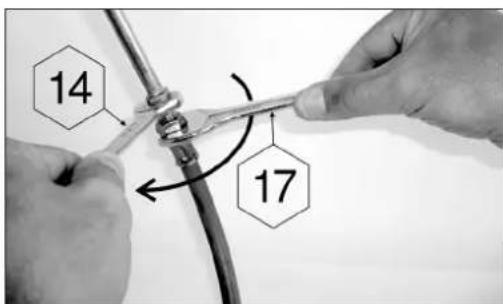
Flexible tubing connection: to connect the tubing to the connector on the barbecue, tighten the nut on the tubing firmly but without excess force using the two wrenches provided:
▶ no. 14 wrench to tighten the connector.
▶ no. 17 wrench to tighten the nut on the tubing
f) CHECKING FOR GAS LEAKS
1) Work outside, away from all sources of ignition. Do not smoke.
2) Make sure the control knobs are in the "off" (O) position.
3) Connect the flexible tubing to the connector and barbecue as described in part e).
4) Fit the regulator onto the gas cylinder in accordance with its instructions.
5) Use a gas leak solution to test for leaks. Important: never use a naked flame to check for gas leaks.
6) Apply the solution to the connections cylinder/regulator/hose/apparatus (the control knobs should remain closed: off position (O)). Open the gas cylinder valve.
7) Bubbles in the gas leak solution indicate that there are gas leaks.
8) The leak can be stopped by tightening any hose connection or replacing any faulty component. The barbecue must not be used until the leak is stopped.
9) Close the valve on the gas cylinder.
Important :
Check for leaks at least once per year and each time the gas cylinder is replaced.
g) PRIOR TO USE
Never use the barbecue until the instructions have been read carefully and understood. Also, make certain that:
- there are no leaks
- the venturi tubes are not blocked (example: spider webs)
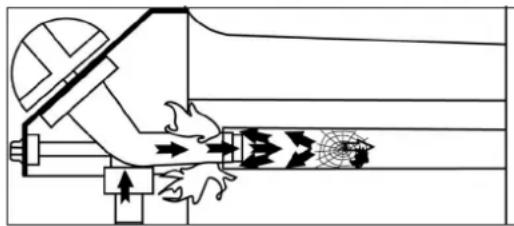
natural_image
Technical diagram of a mechanical or fluidic device with directional arrows and flow indicators (no text or symbols)- the hose does not touch any components which may get hot.
Models
- Plancha EX
- Plancha EXB
Models
- Plancha L
- Plancha LX
- That the cover is not in the closed position (depending on the model)
- This device has a large number of vents to optimize the device use. Be sure that these vents are not blocked.
Read steps 1 to 6 before beginning with step 1.
1) Make sure that the control knobs are in the "OFF" position (O).
2) Open the gas cylinder valve.
3) Push the adjustment lever down and turn it anticlockwise until it is in the full flow position ( ) when immediately press the ignition button ( ) down until you hear a click. Repeat 3 or 4 times if necessary.
4) If the burner does not ignite after 4 or 5 attempts, wait 5 minutes and then repeat the operation.
5) If the device still does not light, place the control knob in the "OFF" (O) position and wait 5 minutes before starting the operation again.
6) When the first burner has been lighted, repeat the operation for the second burner.
Important :
If the burner fails to light after the second attempt, turn the control knob to the "off" position (O) and check that the burner outlets and the venturi tube are not blocked.
If automatic ignition does not work, turn the control knob to "OFF" (O). Remove the cooking plate. Hold a lighted match next to the burner, then push in the control knob and turn it to the "HI" position (4). But the cooking plate back in place with protective gloves, being sure to correctly position the drippings evacuation hole.
Return the control knobs to the "OFF" position (O), then close the cylinder valve.
k) REPLACING THE GAS CYLINDER
- Always work in a well ventilated area and never in the presence of a flame, spark or heat source.
- Return the control knobs in the "off" position (O) then close the cylinder valve.
- Remove the regulator, check that the sealing joint is in good condition.
- Put the full cylinder in place, refit the regulator, taking care not to apply stress to the hose. Check for gas leaks.
I) OPERATION
PLANCHA L AND PLANCHA LX
When operating the grill, the temperature of the substrate on which the device is placed can be significant. The appliance must not be installed on a combustible surface (plastic, cloth, etc ...). It is recommended to place it on a surface that resists heat (concrete, stone, brick, directly on the ground) or to position a good thermal/fireproof insulation between the device and its supporting material.
When used for the first time, heat up the barbecue (depending on model: remove the lid) with its burners in full on position (☐) or approximately 15 minutes in order to eliminate any odors resulting from the paint on the new parts.
We recommend using protective gloves for handling elements that are particularly hot. Use long-handled utensils to manipulate food on the cooking plate.
Before cooking, preheat the device for a few minutes in the "HI" position ( ).
Cooking speed can be regulated via the adjustment buttons: between the full flow position ( ) and medium flow position ( ).
Important: If one or several burners go out whilst you are using the barbecue, move the adjustment buttons to "OFF" immediately (O). Wait five minutes to allow the unburned gas to escape. Only carry out the lighting steps after this time.
Important : Allow the unit to cool off completely before handling the cover (depending on the model).
Spatula : A spatula may be supplied with the unit (depending on the model). When using the unit, the spatula should be placed in the slot on the right hand side of the unit.

natural_image
Line drawing of a portable electric stove with control knobs and a mounted power tool (no text or symbols)Never modify the barbecue: any modification may prove dangerous.
- In order to maintain your barbecue in perfect operating condition, it is recommended to clean it periodically (after 4 or 5 uses).
- Wait until the barbecue has cooled down before cleaning
- Close the gas cylinder.
- The grill burner must be cleaned and checked every 3 months. Remove the entire burner and check that no dirt or spider webs block the venturi tube openings, which may cause the burner to be less efficient or cause a dangerous gas fire outside the burner.
- Clean the top of the burner, as well as the sides and base, using a moist sponge (water with washing up liquid). If necessary, use a damp steel brush.
- Check that all burner outlets are clear and let dry before using again. If necessary, use a wire brush to unclog the burner outlets.
- Refit the grill burner correctly.
- Clean the orifices on the Venturi jet (see diagram below) or the burner if necessary.
N.B.: Frequent cleaning of the burner maintains it in good condition for many uses and prevents premature oxidation, notably due to acid residue from cooking. Oxidation of the grill burner is, however, normal.
Base walls, control panel, grease recipient
Clean these elements from time to time using a sponge with washing up liquid. Do not use abrasive products.
Cooking surface
The cooking surface is covered with enamel. To clean it, we recommend first removing all cooking residues with a sponge. Next, remove grease with a dishwashing detergent.
Be careful to avoid hitting the cooking surface against a hard surface since this could chip the enamel.
Enamelled steel cooking surface
(depending on the model):
Do not use cold water or ice on the cooking surface when still hot, as this could lead to damage (deformation).
n) STORAGE
- Close the gas cylinder valve after use.
- If you store your barbecue indoors, disconnect the gas cylinder and store the cylinder outdoors.
- If you store your barbecue outdoors, it is recommended that a protective cover be used.
- When not used for a long period of time, it is recommended that the barbecue be stored in a dry, sheltered place (eg: garage).
- Environment conducive to corrosion: particular care must be taken with the product if used by the sea; it must not be stored outside without protection, and must be kept sheltered in a dry environment.
Transport (models L and LX)
To transport the appliance, always carry it in a horizontal position using the two side handles; never carry it vertically.
o) ACCESSORIES
ADG ('Application Des gaz') advises that its gas barbecues should systematically be used with accessories and replacement parts from Campingaz®. ADG accepts no responsibility for any damage or malfunction due to the use of accessories and/or replacement parts from other brands.
p) PROTECTING THE ENVIRONMENT
Think about protecting the environment! Your equipment contains materials which can be recovered or recycled. Hand them in to the waste collection service in your municipality and sort the packing materials.
TROUBLE SHOOTING: you can expect years of useful service from your barbecue once it is properly assembled, adjusted and you have learned to operate it. Should you experience any difficulty, you might find solutions below.
| Problems | Probable causes / remedies |
| The burner does not light up | - Poor gas supply- regulator not operating properly- Pipe, valve, venturi tube or burner holes obstructed |
| The burner does not burn smoothly or goes out | - Check that gas is present- Check the pipe connection- Contact your servicing agent |
| Unstable blowing flames | - New cylinder may contain air. Allow the stove to operate and the fault will clear itself- Residual water, following the washing of the burner caps- Contact your servicing agent |
| Large plume of flame on the burner surface | - The venturi is obstructed (possibly cobwebs)- Contact your servicing agent |
| Burning leak around a union | - Shut off the gas supply immediately- Leaking union: tighten nuts or change pipe- Contact your servicing agent |
| Insufficient heat | - Injector or venturi tube obstructed- Contact your servicing agent |
| Burning leak behind the adjustment knob | - Defective valve- Shut down the stove- Contact your servicing agent |
| Excessive flare-up | - Grease drain system is clogged: clean- Grill temperature too high: lower flame |
Uso e manutenzione
natural_image
Simple line drawing of a gas cylinder connected to a portable stove on a table (no text or symbols)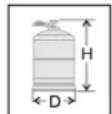
e) IL TUBO
natural_image
Two mechanical components with arrows indicating assembly or motion, no visible text or symbolsnatural_image
Technical diagram of a welding torch mechanism with motion arrows and no visible text or symbolsModelli
- Plancha L
- Plancha LX

natural_image
Line drawing of a portable electric stove with control knobs and a power cord (no text or symbols)Models Plancha L and Plancha LX: Regardless of the height H, the width or the diameter D of the bottle.
natural_image
Two mechanical pipe fittings with arrows indicating assembly or movement (no text or symbols visible)natural_image
Technical diagram of a mechanical device with internal components and directional arrows (no text or labels)Modellen
- Plancha L
- Plancha LX

natural_image
Line drawing of a portable electric stove with control knobs and a mounted dish (no text or symbols)m) SCHOONMAKEN EN ONDERHOUD
NOTE: Unless otherwise specified, following generic terms “appliance / unit / product / equipment / device” appeared in this instruction manual all refer to the product “Plancha L / Plancha LX / Plancha EX / Plancha EXB”.

natural_image
Illustration of a gas cylinder connected to a portable grill with a fuel tube (no text or symbols)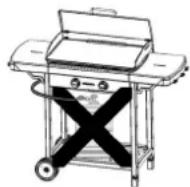

natural_image
Two mechanical components with arrows indicating assembly or motion, no visible text or symbolsnatural_image
Diagram of a gas stove with a gas cylinder and pipe, showing internal components (no text or symbols)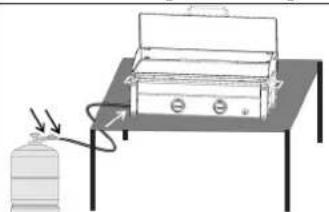
natural_image
Simple line drawing of a gas stove setup with a cylinder and an attached box, no text or symbols present.natural_image
Pure technical diagram of a mechanical assembly with no visible text, numbers, or symbolsModelos
- Plancha L
- Plancha LX

natural_image
Line drawing of a portable electric stove with control knobs and a connecting rod (no text or symbols)e) SCHLAUCH

natural_image
Two mechanical components with arrows indicating assembly or motion, no visible text or symbolsnatural_image
Technical diagram of a mechanical device emitting flares and heat, with no visible text or symbolsModelle
- Plancha L
- Plancha LX

natural_image
Line drawing of a portable grating with control knobs and a power cord (no text or symbols)natural_image
Illustration of a gas stove next to an open grill, with a gas cylinder nearby (no text or symbols)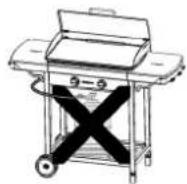
natural_image
Simple line drawing of a gas cylinder connected to a portable stove on a table (no text or symbols)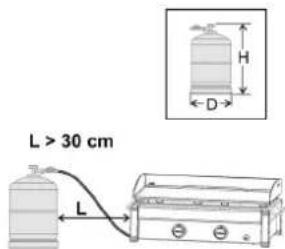
e) SLANGE
CZ - CH - BE - IE - IT - LU - NL - NO - PL - PT - SE GB - SI - SK - HR - GR - RO - BG - TR - EE - LT - LV
natural_image
Technical illustration of mechanical components including a threaded fastener and cylindrical shafts (no text or symbols)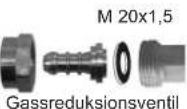
Apparatet
natural_image
Two mechanical components with arrows indicating motion, one showing a valve and the other a handle (no text or symbols visible)natural_image
Technical diagram of a mechanical device with internal flow arrows and a grid pattern (no text or symbols)Modeller
- Plancha L
- Plancha LX

natural_image
Line drawing of a portable electric stove with control knobs and a connecting rod (no text or symbols)m) RENGJ∅RING OG SKJ∅TSEL
e) SLANG

natural_image
Two mechanical components with arrows indicating motion, no visible text or symbolsnatural_image
Technical diagram of a mechanical device emitting flares and heat, with no visible text or symbolsModeller - Plancha L - Plancha LX

natural_image
Simple line drawing of a gas cylinder connected to a portable stove on a table, with a smiling face and cable (no text or symbols)natural_image
Line drawing of a portable electric stove with control buttons and a power cord (no text or symbols)natural_image
Two mechanical components with arrows indicating motion, one showing a pipe fitting and the other a handle (no text or symbols visible)natural_image
Technical diagram of a mechanical device with directional arrows and a grid pattern, no readable text or symbols present.- Plancha L - Plancha LX

natural_image
Line drawing of a portable electric stove with control knobs and a connecting rod (no text or symbols)m) ČIŠTĚNÍ A ÚDRŽBA
Transport (modely L a LX)
e) TUBO
natural_image
Technical diagram of a mechanical device emitting flares and heat, with no visible text or symbolsModelos
- Plancha L
- Plancha LX
natural_image
Line drawing of a portable electric stove with control knobs and a mounted dish (no text or symbols)natural_image
Diagram of a welding torch with arrows indicating flow direction and a spiderweb symbol (no text or labels)Modeller
- Plancha L
- Plancha LX

natural_image
Line drawing of a portable electric stove with control knobs and a mounted power outlet (no text or symbols)m) RENG∅RING OG VEDLIGEHOLDELSE
ILDSTEDETS SIDE, BEHOLDERENS BUND, FEDTBAKKE:
natural_image
Technical diagram of a mechanical device emitting flares and heat, with no visible text or symbolsMallit
- Plancha L
- Plancha LX

natural_image
Line drawing of a portable grating with control knobs and a hose (no text or symbols)m) PUHDISTUS JA HUOLTO
natural_image
Simple line drawing of a gas stove setup with a gas cylinder connected to a box on a table (no text or symbols)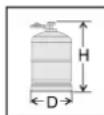
e) CEV
natural_image
Mechanical assembly diagram showing two stages of a pipe fitting with arrows indicating motion (no text or symbols)natural_image
Technical diagram of a mechanical device with internal components and airflow indicators (no text or labels)Plancha L
Plancha LX

natural_image
Illustration of a gas cylinder connected to a portable stove with a smiling face, no text or symbols present- Da pokrov ni v zaprtem položaju (odvisno od modela).
- Naprava razpolaga s prezračevalnim sistemom, ki je pomemben za optimizacijo pečenja. Prepričajte se, da prezračevani deli niso zamašeni.
h) PRIŽIGANJE GORILNIKOV ZA ŽAR
natural_image
Line drawing of a portable electric stove with control knobs and a mounted power outlet (no text or symbols)m) ČIŠČENJE IN VZDRŽEVANJE
Transport (modela L in LX)
e) RÚRKA

natural_image
Mechanical assembly diagram showing two connected pipe fittings with arrows indicating movement (no text or symbols)natural_image
Diagram showing a gas cylinder connected to a portable grill with an arrow indicating fuel flow (no text or symbols present)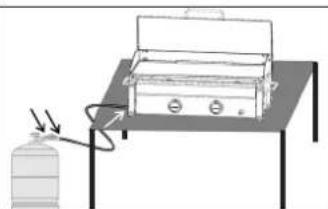
natural_image
Simple line drawing of a gas cylinder connected to a box on a table, with an arrow indicating airflow direction (no text or symbols)natural_image
Diagram of a welding torch mechanism with motion arrows indicating flow or force (no text or labels)Plancha L
Plancha LX

- Aby povrch nebol v zatvorenej polohe (v závislosti od modelu).
natural_image
Line drawing of a portable electric stove with control buttons and a power cord (no text or symbols)Preprava (modely L a LX)
e) Crijevo

Francuska (ovisno o modelu)
Aparat možete koristiti s 2 vrste fleksibilnih crijeva:
a) Fleksibilno crijevo namijenjeno za spajanje na prstenaste završetke na aparatu i redukcijskom ventilu, te učvršćena obujmicama (u skladu sa standardom XP D 36-110). Predviđena duljina 1,25 m.

b) Fleksibilno crijevo (u skladu sa standardom XP D 36-112) opremljena navojnom maticom G 1/2 za pričvršćivanje na aparat i navojnom maticom M 20x1,5 za priključivanje na redukcijski ventil, predviđene duljine 1,25 m.

Aparat je opremljeno s navojnim priključkom G 1/2 za dovod plina s crijevnim spojem NF i zglobom.
1) Za uporabu s aparatom s fleksibilnim crijevom XP D 36-110: (rješenje d) a))
- Navucite fleksibilnu crijev na prstenasti završetak aparata i redukcijskog ventila.
- Navucite obujmicu iza 2 prva ispupčenja završetka i pritegnite ju uz pomoć vijka.
natural_image
Two mechanical components with arrows indicating motion, one showing a knob and the other a handle (no text or symbols visible)natural_image
Pure mechanical diagram showing a lever mechanism with arrows indicating motion, no text or symbols present- da cijev ne dodiruje dijelove koji bi se mogli zagrijati.
Plancha EX Plancha EXB
Plancha L Plancha LX

- Osigurati da poklopac nije u zatvorenom položaju (ovisno o modelu)
- Ova jedinica ima veliki ventilaciju da usavrše korištenje uređaja. Uvjerite se da je slomljena dijelovi nisu zaustavljeni.
h) Paljenje plamenika roštilja
natural_image
Line drawing of a portable electric stove with control knobs and a connecting rod (no text or symbols)natural_image
Technical diagram of a mechanical device with internal airflow and heat dissipation (no text or labels)natural_image
Illustration of a gas stove with a smiling gas cylinder connected to a grater, showing a right-hand rule for heating (no text or symbols present)Plancha L
Plancha LX

natural_image
Line drawing of a portable electric stove with control buttons and a power cord (no text or symbols)natural_image
Simple line drawing of a gas cylinder connected to a box on a table (no text or symbols)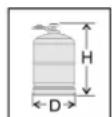
e) Тръба
natural_image
Two mechanical components with arrows indicating assembly or movement, no visible text or symbolsnatural_image
Illustration of a gas stove setup with two gas cylinders connected to a grater, showing heating and cooling process (no text or symbols)natural_image
Diagram of a welding torch mechanism with arrows indicating motion and components (no text or labels)natural_image
Line drawing of a portable electric stove with control knobs and a power outlet (no text or symbols)e) Boru

natural_image
Technical diagram of a mechanical device with internal components and motion arrows (no text or labels)Plancha L Plancha LX
natural_image
Line drawing of a portable electric grill with control knobs and a power cord (no text or symbols)E) ΣΩΛΗΝΑΣ

natural_image
Illustration of a gas stove setup with two gas cylinders connected to a grater, showing heating and cooling process (no text or symbols)natural_image
Diagram of a welding torch with arrows indicating force or movement, no text or symbols presentPlancha L
Plancha LX

Θ) XEIPOKINHTO ANAMMA THΣ ΨΗΣΤΑΡΙΑΣ
natural_image
Line drawing of a portable electric stove with control knobs and a connecting rod (no text or symbols)e)Przewód
natural_image
Two mechanical components with arrows indicating motion, one showing a cylindrical component and the other a flanged tool (no text or symbols visible)natural_image
Technical diagram of a welding machine with internal flow arrows and gear mechanism (no text or labels)Plancha L Plancha LX

natural_image
Line drawing of a portable electric grill with a power cord and control panel (no text or symbols)Transport (modele L i LX)
natural_image
Illustration of a gas cylinder connected to a portable grill with a fuel tube (no text or symbols)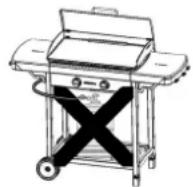
natural_image
Simple line drawing of a gas cylinder connected to a portable stove on a table (no text or symbols)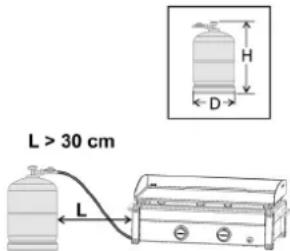
e) Cső
natural_image
Exploded view diagram of a mechanical assembly showing bolt, nut, and housing components (no text or labels)Nyomásszabályozó
natural_image
Four views of a metallic mechanical connector with threaded ends, shown from different angles (no text or symbols visible)natural_image
Two mechanical components with arrows indicating motion, one showing a valve and the other a handle (no text or symbols visible)natural_image
Diagram of a gas stove with a gas cylinder and attached grill (no text or symbols)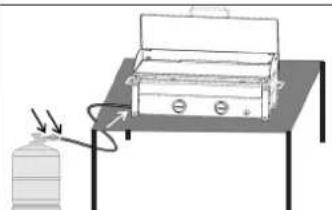
natural_image
Diagram of a fire extinguisher on a table with a gas cylinder nearby (no text or symbols)natural_image
Technical diagram of a mechanical device emitting flares and heat, with no visible text or symbolsPlancha L Plancha LX