
NII84B10AB - Cooker AEG - Free user manual and instructions
Find the device manual for free NII84B10AB AEG in PDF.
| Product type | Built-in induction hob |
| Brand | AEG |
| Model | NII84B10AB |
| Number of cooking zones | 4 induction zones |
| Zone dimensions | Left front: Ø 21.0 cm; Left rear: Ø 21.0 cm; Centre front: Ø 14.5 cm; Right rear: Ø 24.0 cm |
| Electrical supply | 220-240 V / 400 V 2N, 50 Hz |
| Maximum total power | 7.35 kW (7350 W) |
| PowerBoost per zone | Left front: 3200 W; Left rear: 3200 W; Centre front: 2500 W; Right rear: 3600 W |
| Main functions | PowerBoost, SenseBoil®, Bridge, Hob²Hood, Timer, Pause, Lock, Automatic shut-off |
| Type of control | Touch controls with slider |
| Display | Digital display for timer and levels |
| Residual heat indicator | OptiHeat Control (3 levels: cooking, keep warm, residual) |
| Pan detection | Yes, automatic with shut-off if absent |
| Child safety | Yes, control panel lock |
| Surface material | Vitroceramic |
| Care and cleaning | Clean after each use with soft cloth and mild detergent; scraper for stubborn dirt |
| Spare parts | Original spare parts available via after-sales service |
| Repairability | Authorized AEG after-sales service |
| General information | User manual included; made in Germany |
Frequently Asked Questions - NII84B10AB AEG
User questions about NII84B10AB AEG
0 question about this device. Answer the ones you know or ask your own.
Ask a new question about this device
Download the instructions for your Cooker in PDF format for free! Find your manual NII84B10AB - AEG and take your electronic device back in hand. On this page are published all the documents necessary for the use of your device. NII84B10AB by AEG.
USER MANUAL NII84B10AB AEG
OBCJNYXBAHE HA KJINEHTN
BnHaHn n3noJ3BaIte opnHnAJIHn pe3epBn qactn.
Korato ce cBbP3BaTe c Haunn OToPn3npan OToJeN „ObcnyXbaHe“, Tp6Ba Da nMaTe noD pka cIeHaTaNHOpmaunr: Moden, PNC, cepneH Homep.
HΦopMaunTa MoKe Da 6bJe OTKpNaHa Ta6eJaKaTa C OCHOBn DaHHN
IpeDynpexJeHne/BnMaHne-Opmaun3a6e30nacnoct
① Ośza uHΦopMaζη n CbBETn
HΦopMaζηa 3a OKoJHaTa cpea
3ana3BaMe cn npaBOTO Ha n3MeHeHn.
CbDbPjKAHNE
- INHOPMALI 3A BE3OJACHOCT
- INHCTPYKUIN 3A BE3OPIACHOCT 5
3.MOHtAK. 8
4.ОПИСАНЕHA UРЕДA 10 - INPEENIbPBA YNOTPEBA 11
6.BCEKnDHEBHA YNOTPEBA. 12
7.ДОПьIHHTENHФYHKUIN 15 - INEPINOPbKN IN CbBETN 18
9.ΓPINA I NOUICTBAHE 21 - OTCTPAHRAHE HA HEN3INPABHOCTN 21
11.TEXHINUECKI DAHHN 24
12.EHEPNIHA EΦEKTINBHOCT 24 - ONA3BAHE HA OKOJIHATA CPEDA 25
1. UNHΦOPMAÇNЯ 3A BE3OÑACHOCT
Преши монтура themselves Ha ypeDA BHNMaTeJIHNO поче te пeoDocTaBeHnte uHCTpyKcIi. ПрOn3BoДnteJIaT He e OTROBOpEN 3a HapAHЯВанЯ Илп NOВpeDI B pe3yЛТaT Ha HepRaBnHa INHCTaJaCaNЯ Илп yNoTpe6a. BInHarN ДрьЖTe INHCTpyKcIuTE Ha 6e3OpaCHO И ЛecHO DoCTbПНО МЯСTO 3a cnPabKa B 6bDeSe.
1.1 BezonaachocT 3a Deca N Iuca B HepaBHOCTOHOIPOJOxHne
To3n ypei moke da 6bde n3noJ3BaH ot deca na 8- roDnSHA Bb3pact, KaKTO I OT IINa C HamaJIeHN fN3nueckn, CETNBn I yMCTBeHn Bb3MOXHOCTN IIN OT IINa 6e3 OINT I N03HaHnA, cAmO aKO Te ca IOD Ha6JIHODeHne IIN 6bDaT INHCTpykTnpaHn OTHOCHO 6e3OpacHaTa yNoTpe6a Ha ypea n pa3bnpaT Bb3MOxHnte pncKOBe. Deza IOD 8-roDnSHA Bb3pact n Xopa C TeJKN IIN KOMPJIeKCHn YBpeJdaHn Tp86Ba Da ce Dbpjat daJeU OT ypeDa, OCBEN aKO He ca IOD NOCToAHNO Ha6JIIODeHne.
- DeçaTa TpЯБВa Да Быдат пон habлюдене, 3a Дa ce rapaHTnpa, Ye He cn nrgaTc ypeDa.
- ДрьжтЕ BCичКи ONaKOBКДаJIeue OT Deça и ИЗXBырЛeTe ONaKOBКITE NO MecTHHTE пapВILA.
- ПРЕДУПЕЖДЕHINE: Урети нееговпес достьни частсе наgropeцяват по врeme на уnotpe6a. Пазete Deцарази домашнITE Лобимци далец OT урета, korato ce n3noJ3Ba n korato ce oxлajda.
- Ako ypeiT nMa yctpoiCTBO 3a DeTcKa 6e30nacHOCT, To Tp8Ba Da ce aKTHBnpa.
- Deça He TpЯБВа Дa ИЗВьршВаТ почистваHe Или РODдръЖka Ha урEDA, KOraTO ca 6e3 Надзор.
1.2 Ośza 6e3o nanopocT
To3n ypeD e npedHa3NaueH cMo 3a rotBeHe.
To3n ypeE npedHa3NaueH 3a domaunHa ynoTppe6a B 3aTbOpEn nOmeuHnA.
To3n ypei MoKe Da Ce n3NoJ3Ba B Oocn, CTan B XOTeI, CTan B MOTeI, KbIu 3a RoCTn I dpyrN IOo6Hn MeCTa 3a HactaHЯBaHe, KbDeTo TOBa n3NoJ3BaHe He HaDbNtAba (cpeiHO) HNBOTO Ha DomaShHa ynotpe6a.
- ПЕДУПЕЖДЕHINE: Урети和他的 Виши частп се наюсяват по врeme на уnotpe6a. Тразва на се вима вда се п3бягва дOKOCBAнe на наразвашиte се щемен.
- Доступные р�дз
- Роставая р�дз
- Роставая р�дз
- Роставая р�дз
- Роставая р�дз
- Роставая р�дз
- Роставая р�дз
- Роставая р�дз
- Роставая р�дз
- Рostavа р�дз
- Рostavа р�дз
- Рostavа р�дз
- Рostavа р�дз
- Рostavа р�дз
- Рostavа р�дз
- Рostavа р�дз
- Рostavа р�дз
- Рostavа р�дз
- Рostavа р�дз
- Рostavс
- Рostу
- Рostу
- Рostу
- Рostу
- Рostу
- Рostу
- Рostу
- Рostу
- Рostу
- Рostу
- Рostу
- Рostу
- Рostу
- Рostу
- Рostу
- Рostу
- Рostу
- Рostу
- Рostу
- Рostу
- Рostо
- Рostу
- Рostу
- Рostу
- Рostу
- Рostу
- Рostу
- Рostу
- Рostу
- Рostу
- Рostу
- Рostу
- Рostу
- Рostу
- Рostу
- Рostу
- Рostу
- Рostу
- Рostу
- Рostу
- Рostи
- Сых;
- Сых;
- Сых;
- Сых;
- Сых;
- Сых;
- Сых;
- Сых;
- Сых;
- Сых;
- Сых;
- Сых;
- Сых;
- Сых;
- Сых;
- Сых;
- Сых;
- Сых;
- Сых;
- Сых;
- Сых;
- Сых;
- Сых;
- Сых;
- Сых;
- Сых;
- Сых;
- Сых;
- Сых;
- Сых;
- Сых;
- Сых;
- Сых;
- Сых;
- Сых;
- Сых;
- Сых;
- Сых;
- Сых;
- Сых;
- Сых;
- ПЕДУПЕЖДЕHINE: ГOTBEHETO C JKNBOTINHCKA Или pactителна мa3нина 6e3 HaДЗОМожеда e onаCHO И за преДИЗВИКА пожар.
-ДиmbTe npn3нak 3a nperepЯBaHe.нкORA He n3noJ3BaIte BODa 3a NOTu7aBaHe Ha OgbHЯ npi rOTBeHe.ИЗКЛюЧeTe ypeDa n pOKpyIte ПлambцIte C OdeяПО ИП KanaK.
- ПРЕДУПЕЖДЕНЕ: Урет He ТразБа Да e 3axpaHВан Урет Вьншно празВКЛЮЧВащо устюCTBO KaTO TaIMeР Или Дa e CBьр3ан КьМ eЛeКТрчесka Берига, KОТTO NOCTОЯНо Се ВКЛЮЧВа ИИЗКЛЮЧВа OT устюCTBO.
BHIMAHNE! Прочьт на Гове He Тябва дa ce KOHTPOJInpa (Дори n aВТOMaTиHnTe Функци 3a Гове). KpaTKIy Tпоцec Ha Гове He Tябва дa 6bde Na6ЛюдaВан NOCTOЯнHO.
- ПЕДУПЕЖДЕHINE: Onacnoct OT noxap: He cbyxaHЯBaIte npedmetn Bbpxy NOBbpxHOCTnte 3a rotbeHe.
- MeTaJIHn npEdmEtN KaTo HOxOBe, BnIuIe, IbJxUeI N KanaIe He Tp8Ba Da ce NoCTaBAt Bbpy Rot. PLOT, TbN KaTO MoRat Da Ce 3aRpeT.
He n3noI3BaIte ypeDa, npeDn da ro IHCTaInpaTe BbB BrpaDeHaTa KOHcTpyKzna.
He nouchte ypea c napounctauka.
Cnei ynoTpe6a, n3KnHoyete pIoTa NocpeDCTBOM KInOua 3a ynpabIeHne i He pa3uHTaIte Ha cyHKcIyra 3a IOKaIIIN3IpaHe Ha rOTB. CbIOBe.
- Ako cTbKIOKepaMnHaTa / cTbKJIeHaTa NOBbpxHocTe e HanykaHa, n3KIIoYe Te ypeDa n rO n3KIIoYeTe OT eJeKTPnueckaTa MpeJa. B cIyaua Ye ypeDbT e CBbP3aH dIpeKTHO KbM eJeKTPnueckaTa MpeJa C NOMOuTa Ha CbeDINHTeJHa KUTna, npemaxHeTe ppeDnA3NTEJra, 3a Da n3KIIoYHe Te ypeDa OT eJeKTPnueckaTa MpeJa. BbB BCEkn edInh cIyaua Ce CBbPxKeTe C OToPi3nPaHnA cepBn3eH ceHTbp.
- Ako 3axpaHbAaT Ka6eI e NobpeDeH, Toi Tp8Ba Da ce 3aMeHN OT npOu3BOdnteJIa, OT yIbJHOMoUeHnCePbN3eH ZeHTbp IIN OT IInca Cbc CXoDHa KBaIIuΦnKauzn, 3a Da Ce n36erHe onaCHOCT.
- ПРЕДУПЕЖДEHNE: Използваite само праздпа3nteи 3a кOTлони pa3pa6oteи OT npOn3ВODnteя Или уnomеати OT Hero В Инструкцinte 3a уnotpe6a, Или праздпа3nteи 3a кOTлони BrpaDeHn B ypeDA. Използваhtо на HeNoDxOДЯшп праздпа3nteи можеда doBveDEdo 3ЛОПОЛуКИ.
2. INHCTPYKUN 3A BE3OJACHOCT
2.1Инстация

BHIMAHNE!
Cama KBaIINΦnIupaH O IuCe MoKe da H3BbPm MOHTaxHa ypeDa.

BHIMAHNE!
OnachocT OT HapaHЯBaHe NII NOBpeDa Ha ypeDa.
MaxheTe BCnUKN ONaKOBKn.
He moHTnpaIte n He n3noJ3BaIte NOBpeDen ypeI.
CneIbainTe nHCTpyKunnte 3a IHCTaIInpaHe, npInIOKeHN KbM ypeJa.
- Tp6Ba Da cna3BaTe MInHMaJIHOTo pa3CTOaHne Do dpyrN ypeDN uCTpoiCTBa.
BnHaBn BnHmBaIe, KOraTo MeCTnte ypeDa, Tb' KaTo e TeXbK. BnHaRn n3NoJ3BaIe IpeDna3Hn pKaBnCn n 3aTBopeHn O6yBKn.
- YnIbTHeTe cpa3aHHTe NOBbpxHOCTHa OTbopa C yIbTHNTeJ, 3a Da npedOTbPaTHe N3dYBaHe nopadN BnaRa.
- ПразаЗвайт долнота част на урда опара и влara.
He montpaTe ypea 6n3o do Bpata nn npd np03opeu. Taka ue npedotbpaTne naDaHTo Ha ropeun rotBapckn CbdoBe OT ypea, KOraTO ce OTbOpn BpTaTa nn np03opeuT.
Bcekn ypei nMa oxJaauu BHTnlaTOPn Ha DbHOTo. - Ako ypeTbTe MOHTnpaH NaJYeKMeJxETo: -He cKnadnpaIte MaKNn napuenca nnXaptnkN, KOHTo MOrat Da 6bDaT BCMyKaHN n Da HapaHrT OXnaXdaUNTe BeHTnlaTOPn INn da NOBpejT OxJaXdaUaTa CnCTema. -Pa3eTe DnCTaHcNr OT MNHmym 2 cm MeJy DbHOTo Ha ypeHa n CKlaDnpaHnTE Yactn B YeKMeJxETo.
-OTCTpaHeTe BcKaKbN pa3dEJIaI naHeJI,MOHTnpaHnB WkaΦa NOJ ypeJa.
2.2 EneKtpnuecko CBbp3BaHe

BHIMAHNE!
Pnck OT noxap nIu TOKOB yIap.
- BcnuK eNeKtpnueckn Bp3Kn Tp6Ba da ce n3BbPWBaT OT KBaJIuΦnUpaH eNeKtpOTexHnK
- YpeT Tp8Ba Da ce 3a3eMn.
-Ппсдзаи3ВьршITEДeИСТВИЕ,ce yВереTe,уpeДыт eи3КЛюЧЕН OT eLEKТр03axpaHBAHeTO. - YBepete ce, Ye napametpnte Ha TaBeJkata C TexHnueckn DaHHn ca CbBMecTMM C eJeKTPnueCKNte DaHHn Ha 3axpaHbauata Mpeka.
- YBepete ce, ye ypeT e MOHTnpaH npabnlo. Xna6abn HnepabunHn eNeKtpueckn 3axpaHbau n Ka6eN nnu nIeNCen (ako ca HanuH) MoraT da DOBeDaT Do npeHaarpBaHe.
- IV3noI3BaIte noIxOJaI 3axpaHbAa Ka6eJ.
He no3BOJBAaIte 3axpaHbauT Ka6eJa ce npennTa. - Ybepete ce, che e nHctaInpaHa 3aunTa OT TOKOB ydap.
- 3akpenete ka6ena c npitraa cko6a npOTnB ONBaHe.
- Ybepete ce, ye Ka6eIbT 3a eNeKtpo3axpaHbAHeTo NnI uenCeIbT (ako e HauNueH) He dOKOCBaT HaropeueneYpeD nII rOpeuCbdoBe 3a roTBeHe, KOrato BKnIOUHTe ypeDa B KOHTaKT.
He n3noJ3BaIte pa3KNOHTeJIu nn aDaANTepn C MHORo BXOIOBe.
He nobpejdaIte 3axpaHbau nceIe (ako e haIueH) IIN 3axpaHbau nja Ka6eI. CbpxTe ce c hau n oToPn3npaH cepBn3eH ueHTbp IIN eNeKtpoTeXnK 3a cmHaHata Ha NobpeJeH 3axpaHbau Ka6eI.
3aunata OTOKOB ynap Ha ropeuinte n H30nnpaHn Yactn Tp8Ba da 6bde 3aTeHaTa NO TaBb HauHH, Ye Da He MOKe Da ce OTCTpaHn 6e3 INHCTpyMeHTN.
CbpxkeTe Ka6eNa 3a 3axpaHbaHeTo KbM KOHTaKta eINHCTBeHO B Kpar Ha INCTaIauIra. YBepTe ce, ye IeNceJIbT 3a 3axpaHbaHe e DOCTbpeH CJeI INCTaIIpaHeto.
Ako KOHTaKbTe pa3Xna6eH, He CBbP3BaIte 3axpaHbAunu uenCeI.
He n3dbpnaBae 3axpaHbaua Kabei, 3a da n3knouHTe ypea. BnHaI n3dbpNaBae uencela Ha 3axpaHbAheTo.
- Ⅰзползвайтесамо праьлну устpoичтва
3а ИЗОlaця: пpeДпа3нп пркьсвачи На
Мржата, пpeДпа3nteПи
(пpeДпа3NTeЛNTe OT BИNTOB TИП ТрЯБВ
Да ce ИЗВадгТ OT Фасунгатa),
ИЗКПЮЧВATEЛN И KOHTAKTOPи 3a yTeчka Ha
3a3EMЯBAHETO.
- EneKtpnueckaTaNHcTaJauZna Tp6Ba da HMa n3OInpaUo yCTpoNcTBo, KoTo Bn N03BOJRA Da n3KIOUHTe ypeDa ot en. MpeXkata npn BCNUKN NOIUCN. N3OInpaUto yCTpoNcTBo Tp6Ba da e c. WnpHa Ha OTBapRHe Ha KOHTa MNHMym 3 MM.
Ako KoDbT E3 ce noaHa ekpaHa, He3a6abHo n3KnIOyTe pIoTa n npOBepTe daJIn eNeKtpnueckTo CBbp3BaHe n MpeXOBOTO HAnpeXeHne ca npaBnHN.
2.3 V3noJ3BaHe

BHIMAHNE!
PnCK OT HapaHbAHe, n3rapHnI N TOKOB yap.
He npomehnyTe npedHa3NaueHneTo Ha ypeda.
OTcTpaHeTe BCnUKN ONaKOBKn, eTNKeTu 3aunTHo fOJnO (aKO e Heo6xOdmo) npedn PbBOHaauHnHaTa yNoTppe6a.
- YBepete ce, Ye BEHTnlaCIOHHNTE OTBOPHe ca 6nOKupaHn.
He octabry Te ypea 6e3 nA30p no BpeMe Ha pa6Ota.
- N3KJIIOUyBaIte 3OHaTa 3a roTBeHe cJeD BcRA Ka yNtpe6a.
He nocTaBraIte npnbOpn 3a xpaHene nn TeHNxKePN Bbpxy 30HnTe 3a roTBeHe. Te MOrat Da ce HaropeuT.
He pa6oTeTc ypeDa c MOKpn Pbue nIIN KOraTO mA KOHTaKT C BODa.
He n3noJ3BaIte ypeDa KaTo pa6oTHa IOBbpxHOCT IIN NOBbpxHOCT 3a cbXpaHeHne.
Ako nobbpxHOCTTa Ha ypea e HanykaHa, He3a6abHo n3KnHoyete ypea ot 3axpaHbaHeto. Toba ce npaBn c qen npedOTbpaTBAhe Ha TOKOB yap.
- Iotpe6nteJn C neJcMeKbP Tp8Ba da cna3BAt dncTaHun HaN-MaIKo 30 cm OT INdYkCIOHHTe 3OHn 3a RotBeHe, KOraTo ypeDbT pa6OTn.
Korato nocTaBTe xpaHa B ropeuO MacNo, TЯ MoKe Da npbcka Ma3HnHa.
He n3noI3BaIte aIyMnHneBO φoJIoNo IJIu DpyrMaTePnaIIMeJMy NOBbpxHOCTTa 3a rOTBeHe N rO TBapCKnRcBd,OCBeH aKO He e NocOueHo dpyro OT pON3BOIDNTeJHa To3N ypeD. - I3noI3BaIte cAmO npHaIeXHocTn, npenopbUaHn OT npOn3BOInteJra 3a To3uypeI.

BHIMAHNE!
OnachocOT noxapn EKcnno3na.
- HaropeeHte Ma3HHn nIi MacNo MOrat Da IOBeDat DO OTDeJne Ha Bb3PiameHmN nap. He Do6JInxKaBaIte PnAmbK IIN HAropeeHn IpEaMeT N O Ma3HHaTa IIN MaCNOTO, KOraTO rOTBNTc C TaKnBa.
- Napite, KONTO OTdJIЯ MHOrO HArOpEuIeHOTo MaCNo, MoaT Da DOBeMaT Do BHe3aHNO Bb3nJaMeHЯBaHe.
- I3no3BaHOTo MacNo, KOeTo MoKe Da CbDbPxa OCTaTbCn OT XpaHa, MoKe Da npuHn NoXap npn NO-HnCKa TempePaTypa B cpaBHeHne C MacNoTO, H3NOJ3BaHO 3a NbpBn NbT.
He nocTaBnTe 3anaIIM npOdykTn nn npEmdTe, KOITo ca HAMOKpeHn CbC 3anaIIM npOdykTn, B 6bn3ocT do ypea nn Bbpxy Hero.

BHIMAHNE!
Pnck ot noBpeHa Ha ypeJa.
- He Дрьжне ripeши roТВарсКи CBДОБЕ Вьрху tabLoTo 3a упразВленье.
He noctabraIte ropeu kanak Ha TnraH Bbpx Cy tBkneHaTa NOBbpxHOCT Ha Nnota.
He octabray Te TeyHOCTTa B rOTbapcknte CboBE Da n3BpHnblNO.
BHHMaBaIe Da He n3TbPBe TpeMeTn nn rOtBapcKn CbdoBe Bbpxy ypea. NOBbpxHOCTTa MoKe da ce NOBpeiN.
He BkIIOuBaIte 3OHTe 3a rotBeHe, KOraTo Ha TEx NMa Ipa3Hr RotBapCKn CbDOBe, INN KOraTO HMa TaKINBa. - TOTBAPCKNTe CbIOBE OT ChyHy NH Nn TaKNaC NOBpeDeHO DbHO MoRat Da HaIpaKaT
CTbKlOTo/CTbKIOkepaMkKaTa.BnHaRn NOBdIraTe Te3n IpeDMeTn, KOraTO Tp6Ba Da rN IpemeCTnte Bbpxy IOBbPxHOCTTa 3a rotBeHe.
2.4 Frpka n nouchTbaHe
-Почистваимпе рedingно урда,за да п dedOTВразнтЕ уврждане на NOBьрхНСТИМATEРДАЛ.
- N3KJIIOUeTe ypeDa n rO octaBeTe da ce OXlaI, npeDN Da rO NOuNCTnTe.
He n3noJI3BaIte BoDHa cTpy Inn npa, 3a Da noUcTnTe ypeDa.
- Nounctete ypea c MOKpa, Meka Kbpna. I3no3BaTe cmo HeytpaHn npenapatn. He n3no3BaTe a6pa3NBn npoyn, a6pa3NBn noCtBAu npIoKk, pa3TBOpHTeIN nn MeTaN npedMeTn, ocBeH aKO He e NocOeHO dpyro.
2.5 O6cnyXbaHe
3a nonpaBka Ha ypeDa ce CBbpxKeTe c OTOpn3npaHnCePBn3eH ueHTbp. 3non3BaIte camo opuRHaHn pe3epBn qactn.
- OTHOCHO JAMnata(HTe) BbTpE B TO3n npOdyKT n pe3epBnTe JAMn, npOdaBaHn OTdEJHo: Te3n JAMn ca npedHa3HaueHn Da n3DbPkAt Ha ekCTpeMHn fN3NuYeCKn ycNoBnB DOMaKInHcN ypeDn, KaTO TempePaTypa, B6paun, BlaXHoCT nIi Ca npedHa3HaueHn Da CnRHaJIu3npaT HΦopMaζra 3a pa60THoTo cBCToHnHe Ha ypeDa. Te He ca npedHa3HaueHn 3a N3NoJ3BaHe B dpyr n pNiIoJxHn I He ca NODxOJaU 3a OCBeTBAHe Ha NOMeUeHn B DOMaKInHCTBOTO.
2.6 IV3xBbPJIaHe

BHIMAHNE!
PnCK OT HapaHbAHe NJIIN 3aDywaBaHe.
CbpxKeTe ce C MeCTHnTE Bnactn 3a HOpMaun KaK Da N3XBpNtE ypeJa.
- N3KJIIOUeTe ypeDa oTeJekTpo3aXpaHbaHeTo.
- ɪəBaʌdTe 3axpaɪnBaʌŋeɪn. Ka6eɪn B
- 6ɪnɪzOCT Ṁɒ ypeə n Iʊ nɪxBʌpɒnTe.
3. MOHTAK

BHIMAHNE!
Bx. rnaBa "Be3onacHocT".
3.1 Празд монтжа
IpeHnHa HnCTaJInpaTe NIOyata, NO-DOJy 3aNNWeTe INHOpMaunra OTo Ta6eNkata C daHH. Ta6eNkata C OCHOBHTe DaHH e pa3noJoxHe B DOHATA Yact Ha NIOyata.
CepneHHomep
3.2 Brpaedn ployn
Brrpaennte nnoH moarTa ce n3noJ3BaT cAmO cneK aTo ca MOHTnpaH N PNOxOJaU Brpaedn eHNu npabOTn nnOTobe, KOUTO OTROBaprHa CTAHdApTnte.
3.3 Cbbp3Baau ka6eI
- IIOyata ce doCTaBc cBc Cbbp3BaU Ka6eJ.
3a da noDMeHnte NOBpeDeH 3axpaHBaU Ka6en, n3noJ3BaIte Ka6en Tn: H05V2V2-F KOITo N3DbpxHa TaMnepaTpya OT 90^ nIINo-BnCoka. EINH npOBODNk Tp86Ba Da mMa MInHMaJIHO HanpeHcceHne B CbOTBeTCTBHe c TabNIcaTa No-DOly. CBpbXeTe ce C BaUNa MeCTeH cepBn3eH ueHTbp.Cbbp3Baunr Ka6en MoKe da ce noDMeHra camO OT KBaJIuΦnUpaH eNEKTPOTExHnK.

BHIMAHNE!
BcnuKn en. Bp3kn Tpr6Ba da ce HnpaBt OT KBaJIncuPah EneKTpoTeXnK.

PENEYNPEXKDEHNE!
Bpb3knte ype3 KOHTaKTHnTe 9eIcEJI n ca 3a6paHeH.

PPEyPPEKDEHNE!
He npobuBaTe nnn 3anOBaTe kpaunata Ha xncaTa. Toba e 3a6paHEno.

ПЕДУПЕЖДEHNE!
He cBbP3BaIte Ka6eNa 6e3 nokpNbauu Shayx 3a HaKpaHnka.
Eduo0a3OBA Bp3Ka
- PpemaxHeTe KpaHata Mypa 3a npoBOnHK OT YepHn, KaFyBn I CInHn npoBOnHK.
- PpeMaxheTe yact OT n30launra ot KaFBA, YepHnN u CnHn HaKpaHHK.
- CbpxKeTe Kpaunata Ha cepHnTe n KaBnTe Ka6eJn.
- Cnoxete HOBA KpaHata Mya 3a npoBODnK Ha BCEKN CNoDeJeH KpaN Ha npoBODnK (Heo6XoDm e cneuaJen HnCTpyMeHT).
- CbpxeTe kpanaTa Ha Dba cHn Ka6ena.
- Cnoxete HOBa KpaHata Mya 3a npoBODnK Ha BCEKN CNoJeHn KpaN Ha npoBODnK (Heo6XoDmE cneuaJen HnCTpyMeHT).
Дуфа3ОВCBbр3BaHe
- PpemaxheTe OT HaKpaHnKa pBkAB CnHnA npoBOdHnK.
- PpemaxheTe YacT OT n30JaunTa OT CnHnTe HApaiHnHa npoBOnHnKa.
- CbpxeTe KpauncaTa Ha Dba cHn Ka6ena.
- Cnoxete HOB Iayx Ha BCEKN CnoJeH KpaH npoBOnHa (Heo6xoIm e CneuaJen HNCTpyMeHT).

TbpcTe BndeO ypoka, Ka d a MoHTnpaTe Baunu HnyKUnoH nnot AEG - moTax Ha pa60TeH nnot", KATO HAnuWeTe NbJHOTo Ime, POKa3aHO Ha rpaΦnkata No-dOJy.

YouTube
www.youtube.com/electrolux
www.youtube.com/aeg

4.ОПИСАНЕHA YPЕДА
4.1 Pa3noJoxHeHa NOBbpxHocTta 3a rotBeHe
1 INHnykuznoHHa 3OHa 3a rotBeHe
2 KoHTpoJIeH nAHeI

3a noDpo6Ha HOpMaun 3a pa3MepnTe Ha 3OHnTe 3a rOtBeHe, BIXTe "TexHnueckn DaHHn".
4.2 OΦopMJIeHne Ha KOHTpOJIHnI NaHeJI

I3non3BaIte cEH3OpHnte noneta, 3a da pa6oHTe cypeia. Ioka3aHnraTa ha dinCnnei, INdikatopnte n 3ByKOBIne cnHaJI NOKa3BAt KOI φyHKuIN pa6O7rT.
6.6 OptiHeat Control (3-cTbNKOB INHdNKaTOP 3a OcTaTbUHa TOnJIHa)

BHIMAHNE!
/7KATO INHINKATopbT CBETN, CbIeCTByBa pNCK OT n3rapaHn OT OCTaTBuHa TOnnHa.
NHyKNoHHTe 30Hn 3a RotBeHe npOn3BExJaT TOnnHa, Heo6xOma 3a npoueca Ha rotBeHe, HnpaBO Ha IbHOTo Ha rotBapckn CbI. CtbknokepamKaTa ce 3aRpaBa OT TOnnHaTa Ha CbdoBeTe 3a RotBeHe.
INHdkatopnte ce noBBA, KOrato 30Ha 3a rotBeHe e ropeu. Te noka3Bat HnBOTo Ha OCTaTbUHaTa TOnnHa 3a 3OHnTe 3a rotBeHe, KOINTO N3NON3BaTe B MOMeHTa:
- npoIbJkaBaHe Ha rOTBeHrTo,
- noДьржаHe Ha TOnJIInHa
-ocTaTbUHa TOnJIiHa.
INHdkaTopbT MoKe cBso Da ce NOABN:
- 3a CbceDnHTe 3OHn 3a rotBeHe, DOpn aKO He Tn N3PON3BaTe,
Korato ropeu CbIOBE 3a rotBeHe ca NOCTaBeHn Ha CTyDeHa 3OHa 3a rotBeHe,
Korato NIOyata e N3KNIOyeHa, HO 3OHATA 3a rotBeHe e BCE OSe Iopeua.
INHnKaTOpbT n3Ye3Ba, KOraTo 3oHaTa 3a rotBeHe ce OXlaI.
6.7 Taumep
Taimep 3a ot6poBahe
N3noJ3BaIe Ta3n 0yHKu, 3a Da nocOHTe KOJIKO DbIro NCKaTe 3OHITe 3a RotBeHe da pa6OTrT NO BpeMe Ha eHa rotBapcka cecna.
3aatae hactpoikata 3a HapraBaHe Ha 36paHaTa 30Ha 3a rOtBeHe n CneT TOBa n cyHKnraTa.
- Hatnchete 00 ce noRBA Ha dncnpe Ha TaMepa.
- HATnCHeTe nn, 3a Da 3aJaTe BpeMeTo (00-99 MInHyTu).
- HatncheTe 3a da cTaptnpate TaMepa nnn n3yaKaaiTe 3 cekyHn. TaMepbT 3anoyBa da ot6poRa.
3a Da npomehnte BpeMeTo: n36epeTe 3OHata 3a rotBeHe C HATNCHETe
3a DeakTNBnpaHe Ha yHKunraTa:
H36epTe 30HaTa 3a rotBeHe C HATnCHete .OCTaBaIooTo BpeMe ce OT6pOraBa o6paTHo Do 00.
TaimepbT 3aBbpBa o6paTHoTo 6poeHe, np03ByuBa cunHa n 00 mura. 3oHaTa 3a rotBeHe ce n3KnUcb. HaTnchete npOn3BOJeH CmBoJ, 3a da cnpeTe cunHaHa n MmraHETO.
Taimep
Moxete da n3noJ3BaTe Ta3n Функця, KOrato NnotbTe eakTbNupaH, Ho 3OHnte 3a rotBeHe pa60T. HAcTpOuKaTa 3a HarpaBaHe noka3Ba 00.
- HatncheTe:
- HataChTe 3a3aDaBaHe Ha BpeMeTo.
TaimepbT 3aBbPbBa o6paTHoTo 6poeHe, np03Byuaba CnHan n 00 mHa. HatncheTe npO3BOJeH CNMBOJ, 3a Da cnpTe CnHana n MuraHTo.
3a DeakTNBupaHe Ha yHKnraTa:
HaTnuchete n .OcTaBaUTo BpeMe ce OTbpoRa o6paTHo do 00.
6.8 YnpaBJIeHne Ha MoUcHocTTa
Ako ca aKTHBHN HAKOKO 3OH N KOHCymipaHaTa MOUHOCT HaDbuBaBA IIMNTa Ha eNEKTPnueCKOTO 3axpaHbaHe, Ta3N FyHKqna pa3dEJa HAINuHaTa MOUHOCT MExdy BCNUKN 3OHn 3a rOTBeHe. JIOTbT KOHTPOJnPa HAcTPOiKIne Ha TOnnHaTa, 3a Da npedn3n npedn3nteJIte Ha IHCTanaQyTA Ha DOMa.
- Ako Пnotа Достигне Гранисту на Мakсимална Та НИЧА моцноct (ВИЖТЕ Табелката с дани), моцноctта на 3OHITe 3a ROTBEHe Ie ce HAMJI N aBTOMATUHNO.
- Hactpoikata 3a HarpaBHe Ha n36paHaTa IIpbBa 30Ha 3a RotBeHe BnHaN e C npOpntet. OctaHajata MoUHOCT ue 6bJe pa3delena Mekdy DpyrTe 30HN 3a RotBeHe cNopei peDa Ha n36op.
-Призohan3a rotBeHe, KOnTO mMaT HAmaleHa MoUHocT, KOHTpoJHaTa JeHTa npMnRbA N NOKa3Ba MaKcImaJIHo Bb3MOxHInTe HaCTpOuIKN 3a HarpaBaHe. - 3a KaTe DOKaTo EKpaHbT Cnpe Da MIna HAMaJIeTe HAcTpOuKaTa 3a HArpBaHe Ha N36paHaTa 3oHaTa 3a RotBeHe, KOrTO e N36paHa NocneJa. 3oHnte 3a RotBeHe ige npOdbJxat Da pa6OTc HAMaJeHaTa HAcTpOuKa Ha HArpBaHe. PpomeHete PbUHO HAcTpOuKnTe 3a HarpBaHe Ha 3OHNTe 3a RotBeHe, aKO e Heo6XoDIMO.
6.9 SenseBoil®
ФункцятабТOMATNUHOpereyлпа TemнepaTpataHaBoDAtA,TakaYeTЯДaHe 3aBpN,СпeД KaTo DoCTnIrHe TOnKaTaHa KINPeHe.

Ako mma ocTaTbUHa TOnnHa


B 3OHaTa 3a RotBeHe, KOrTo NCKaTe Da n3NoI3BaTe, ce n3DaBA 3ByKOB CnHAp I yHKuIra Ta He Ce CTapTnpa. FyHKUra Ta He pa60Tu c He3aIeNBAuI ROTBapCkCbDoBe.

PNEyPPEKDEHNE!
He n3noJ3BaIte yHKuJraTc npa3Hn cboBe. He octabryte nnota 6e3 HaD3Op, DOKaTO yHKuJraTa pa6OTn.
1.ПocTaBeTe TeHxepnTe,пьнс 1-5л CTуДeHa BOda,BbpxHaJIuHnTe 3OHN 3a rotBeHe,3a KOnTO nCKaTe Da CTapTnpaTe ΦyHKnIraTa.
Ako noctabite eINH rotBapcN CbD BCAMO eHa 3oHa 3a rotBeHe, yHKnraCTapTnpa aBTOMATNUHO.
2. HatncheTe ,da aKTnBnpate nnota.
3.ДOKOCHete ,3a da aKTbnpaTe yHKnIyTa.
3a BcKa 3oHa 3a rotBeHe, B KOrTo B MOMeHTa MoKeTe Da N3NoJ3BaTe yHKuIraTa, ce NoBRABa MrraU INHnKATOp HaP
4.ДOKOCHETe KbIeTo I da e no nIb3raHa Ha n36paHaT a 30Ha 3a rotBeHe.
Функцятcaстура.
Clek KaTo FyHKnraTa cTApTnpa, INdkaTopTe HaI Nb3raCa ce NoRBAt n aHIMaunrTa 3anOuBa da pa6OTn.

Ako He NOCTaBnTe CbD Bbpxy HNKoR OT 3OHnTe 3a rOTBeHe B pAMKnTe Ha 5 CEkyHn, FyHKnTa Ce DeaKTbNpa ABTOMaTHUHO.
KoratoФункцяТаДOCTHURHe TOUkataHa KINNEHe,ПNotbTИЗдАВa 3ByKOB CnHaN HNBOTO Ha HarpBaHe ABTomatuHc Ce npOMeHЯ KbKpeHe NO NOpda36bnpaHc.
3a da deaktnbnpate yHKnraTa npedIOCTnraHe Ha TOkata Ha KNneHe, DOKOCHTe

3a da DeakTbBpate fynKuYTa Cnei DOCTnraHe Ha TOnKaTa Ha KIneHe, DOKoCHTe PJIb3raU n peryInpaTe HAcTpOuKaTa 3a HarpBaHe pBUHO.
Ako aKTHBnpaTe Pay3a nI npemaxheTe roTbapcknra CbD, yHKuYTa ce deakTNbnpa.
Ako 3aJaTe TaMep 3a OTbpoBaHe Ha eHa OT 3OHnTe 3a RotBeHe N 3aJaDeHOT BpeMe n3Teue, PpeN Da Ce DoCTnRhe ToKkata Ha KIneHe, FyHKnraTa ce DeakTINBIPA ABTomATNUHO.
POne3HN CbBcTeN:
-ФункцяТа e Han-Noхдаиza 3a BapeHe Ha BOda n IOTBeH e Ha KapToΦn.
-ФункцяТа може да He paBOTи пapBUNHO 3a YaHnCи N CbdoBe 3a ecnpco.
HaBHeMeJyNoOBnHaTu TpN YeTbPTN OT rOeBapckn CbD CbC CTydeHa YeUMaHa BOda, KaTO OCTaBnTe 4 CM OT Pb6a Ha rOeBapckn CbD npa3eH. He N3NoJ3BaIte NO-MaIKo OT 1 J NII NIOBeYe ot 5 J BOda. YBepTe ce, ye o6uTo TerIHO H BODATA (HIN HA BOdAra n
kapToΦnTe)Bapupa MeJdy 1-5 Kr.
3a da noctnHete Na-Do6pnepeyIaTH, roTBete cmo uei, HeoBeIeHN, cpeHOr oIemn KapToOpN. YBepTe ce, ye He cTe HapeuNn KapToOpnte TBbpnde NtBTHO.
- Ito Bpeme Ha 0a3ata Ha HarpBaHe n36raBaiTe eHepnUHOTo pa36bPKBaHe Ha dpYrN TeHdxKePN uCnpOeHN npOceCN Ha rotBeHe (kato pPxKeHne nn BapeHe) BbpxDpyrN 3OH N 3a RotBeHe.
- IV36aBaiTe BbHnH Bn6paun (Ha np. ot H3noJ3BaHe Ha 6JeHep nn NoCTabRe He Ma Mo6uIeH TeNefoH Do nIoTa), KOrato fYHKUra Ta pa6oTn.
B 3aBcIMoCT OT BnDa Ha xpaHaTa n roTBapckn CaD, MoKeTe Da peryInpaTe CTeNEHTa Ha HarpBaHe CneI DoCTnRaHe Ha Toykata Ha KIneHe.
-Добавete coI, спд kaTo DoCTnHHeTe Toykata Ha KIneHe.
-Изпогьайткадak,3aда песпerte eнергия.
6.10 CtpyKTypa Ha MeHIOTo
Ta6JIucaTa noka3Ba oCHOBHaTa cTpkykTypa Ha MEHHTO.
Notpe6nteJcKn HacTpoiKn
Korato DeakTbnpate nnoyata, cyHKnraTa BCE Oue e aKTNBHa. INdkaTopbT HaBkJIIOyeH.
3a da DeakTNBnpaTe yHKnraTa:
HaTnCHete 1He 3aJaBaIte HacTpOka 3a HaRpaBaHe. HaTnCHete n 3aDpBkTe 3a 3 CeKHyDN, DOKaTO INHdNKAToPbT NaD CmBOJa N3Ye3He. DeakTNBupaTe pIoouata c
TOrBeHe cakTNBnpaHa yHKunr:
HaTnCHeTe ①CneI TOBa HaTnCHeTe 3a3 CeKyHdN, DOKaTO INDnKaTOPbT HAd CNMBOJa n3Ye3He. MoKeTe Da pa6OTnte C nIOuata. Korato DeakTNBnPaTe NIOUaTa C ① cyHKnraTa 3anOuBa da pa6OTn OTHOBO.
7.5 Bridge

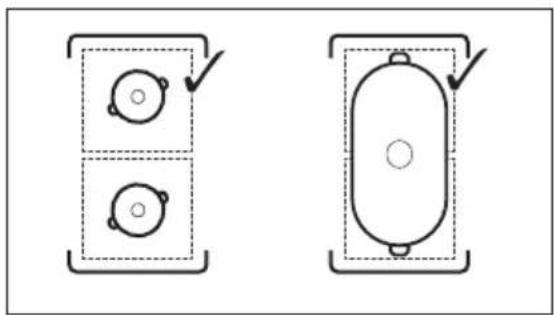
ФункиятабOTN, KORATo TEHДжepaT a NOKPnBa ueHTbpa Ha DBete 30H. 3a NOBue He HOpMaun OTHOCHO npAunHOTo NoCTaBHe Ha rotBapcKn CbIOBe BIXTe "I3NoJ3BaHe Ha 3OHITe 3a rotBeHe".
Функцят ha Me MoKe da 6bIe BkJIIOUeHa,doKaTo SenseBoil@ pa60tN.
Ta3nФyHKUЯ CBbP3BaДBE 3OHN 3a rOTBeHe OT JЯBaT a CtpaHa n Te pa6oTJ kATO eHa.
PbBO 3aJaIte CTeIeHTa Ha HarpBaHe 3a eHa OT CTpaHnHInTe 3OHN 3a rotBeHe.
3a da aKTbBnpaTe yHKunraTa: DOKOCHeTe
- 3a da 3aadaTe nIIN npomehnte
HaCTpOInKaTa Ha HargPraBaHe, DOKoCHeTe HAKOIT KOHTPOJHnTE CEN3OpN.
3a da deakTNBnpaTe yHKnraTa:
DOKOCHete 3OHTe 3a rotBeHe pa6OTr He3aBnMo eHa OT dpyra.
7.6 Hob²Hood
ToBa e ycBbPWeHCTBaHa aBTOMaTnUHa
fYHKu, Cbbp3BaUa nIOTa cbc cneuaen
acnpaTop. IIOta u acnpaTopbT
pa3noIarat c KOMyHnKaTOp c INΦpauepeBc
cnrHa. CkopocTt Ha BeHTnlaTopa ce
OnpeJeIy aBTOMaTuHO Ha OCHOBaTa Ha
HaCTpOiKaTa Ha peXIMa H TempePaTypaTa
Ha Hau-ropeuNTe RotBapCKn CbDOBe Bbpxy
IIoTa. CbIo TaKa MoKeTe Da ynpabJBAte
BEHTnlaTopa N PbUHO, OT IILOTA.

Пи NOBEyeTo acnnpaTopu
DInCTaHcNoHHaTa CnCTeMa e N3KlNoYeHa
IIO NoJpa3bUpaHe. BKnUoyTeЯ npEi Da
N3NoJ3BaTeФyHKuYra. 3a NOBce
INΦOpMaqry BnKTe pBkoBOdCTBOTO 3a
yNoTpe6a Ha acnnpaTopa.
ABTomatnua pa6oTa c yHKunraTa
3a da pa6OTnte c cyHKnIyTa aBTOMaTnUHO, 3aIaIte aBTOMaTnUHnpeXm Ha H1-H6. IIObTe e npBoHaJauHNo hAcTpoEh Ha H5. AcnpaTopbT pearupa, KOrato pa6OTnte c nnota. IIOta aBTOMaTnUHO pa3no3HaBa
TemnepaTypaHa rotBapcknte cboBe nperylnpa ckopocTt Ha BeHTnlaTopa.
ABTOMATNUHIN pEXIMN
11. TEXHnueCKn DAHHN
11.1 Ta6eIka c daHnn
MoIeN NII84B10AB IpoDyKTOB KOI (PNC) 949 598 032 00
TIn 62 D4A 01 AA 220 - 240 V / 400 V 2N, 50 Hz
Индукшя 7.35 kW IpoIa3VeIeHOb BbB: Германя
Серен № ......... 7.35 kW
AEG
11.2 CneunphiKaunHa 3oHnTe 3a rotBeHe
8.2 Lyden under drift
Hvis du kan hore:
8.3 Öko Timer (Eco-timer)
Thank you for choosing this AEG product. We have created it to give you impeccable performance for many years, with innovative technologies that help make life simpler – features you might not find on ordinary appliances. Please spend a few minutes reading to get the very best from it.
Visit our website to:

Get usage advice, brochures, trouble shooter, service and repair information: www.aeg.com/support

Register your product for better service: www.registeraeg.com

Buy Accessories, Consumables and Original spare parts for your appliance: www.aeg.com/shop
CUSTOMER CARE AND SERVICE
Always use original spare parts.
When contacting our Authorised Service Centre, ensure that you have the following data available: Model, PNC, Serial Number.
The information can be found on the rating plate.
Warning / Caution-Safety information
i General information and tips
Environmental information
Subject to change without notice.
CONTENTS
1.SAFETY INFORMATION. 70
2.SAFETYINSTRUCTIONS 73
3. INSTALLATION 75
4.PRODUCT DESCRIPTION 77
5.BEFORE FIRSTUSE 78
6.DAILYUSE 78
7. ADDITIONAL FUNCTIONS 82
8.HINTS AND TIPS 84
9.CARE AND CLEANING 86
10.TROUBLESHOOTING 87
11. TECHNICAL DATA 89
12. ENERGY EFFICIENCY 90
13. ENVIRONMENTAL CONCERNS 90
1. SAFETY INFORMATION
Before the installation and use of the appliance, carefully read the supplied instructions. The manufacturer is not responsible
for any injuries or damage that are the result of incorrect installation or usage. Always keep the instructions in a safe and accessible location for future reference.
1.1 Children and vulnerable people safety
- This appliance can be used by children aged from 8 years and above and persons with reduced physical, sensory or mental capabilities or lack of experience and knowledge if they have been given supervision or instruction concerning the use of the appliance in a safe way and understand the hazards involved. Children of less than 8 years of age and persons with very extensive and complex disabilities shall be kept away from the appliance unless continuously supervised.
- Children should be supervised to ensure that they do not play with the appliance.
- Keep all packaging away from children and dispose of it appropriately.
- WARNING: The appliance and its accessible parts become hot during use. Keep children and pets away from the appliance when in use and when cooling down.
- If the appliance has a child safety device, it should be activated.
- Children shall not carry out cleaning and user maintenance of the appliance without supervision.
1.2 General Safety
- This appliance is for cooking purposes only.
- This appliance is designed for single household domestic use in an indoor environment.
-
This appliance may be used in, offices, hotel guest rooms, bed & breakfast guest rooms, farm guest houses and other similar accommodation where such use does not exceed (average) domestic usage levels.
-
WARNING: The appliance and its accessible parts become hot during use. Care should be taken to avoid touching heating elements.
- WARNING: Unattended cooking on a hob with fat or oil can be dangerous and may result in fire.
- Smoke is an indication of overheating. Never use water to extinguish the cooking fire. Switch off the appliance and cover flames with e.g. a fire blanket or lid.
- WARNING: The appliance must not be supplied through an external switching device, such as a timer, or connected to a circuit that is regularly switched on and off by a utility.
- CAUTION: The cooking process has to be supervised (even the automatic cooking functions). A short term cooking process has to be supervised continuously.
- WARNING: Danger of fire: Do not store items on the cooking surfaces.
- Metallic objects such as knives, forks, spoons and lids should not be placed on the hob surface since they can get hot.
- Do not use the appliance before installing it in the built-in structure.
- Do not use a steam cleaner to clean the appliance.
- After use, switch off the hob element by its control and do not rely on the pan detector.
- If the glass ceramic surface / glass surface is cracked, switch off the appliance and unplug it from the mains. In case the appliance is connected to the mains directly using junction box, remove the fuse to disconnect the appliance from power supply. In either case contact the Authorised Service Centre.
- If the supply cord is damaged, it must be replaced by the manufacturer, an authorized Service or similarly qualified persons in order to avoid a hazard.
- WARNING: Use only hob guards designed by the manufacturer of the cooking appliance or indicated by the manufacturer of the appliance in the instructions for use as
suitable or hob guards incorporated in the appliance. The use of inappropriate guards can cause accidents.
2. SAFETY INSTRUCTIONS
2.1 Installation

WARNING!
Only a qualified person must install this appliance.

WARNING!
Risk of injury or damage to the appliance.
- Remove all the packaging.
- Do not install or use a damaged appliance.
- Follow the installation instructions supplied with the appliance.
- Keep the minimum distance from other appliances and units.
Always take care when moving the appliance as it is heavy. Always use safety gloves and enclosed footwear. - Seal the cut surfaces of the cabinet with a sealant to prevent moisture from causing swelling.
- Protect the bottom of the appliance from steam and moisture.
- Do not install the appliance next to a door or under a window. This prevents hot cookware from falling from the appliance when the door or the window is opened.
Each appliance has cooling fans on the bottom. -
If the appliance is installed above a drawer:
-
Do not store any small pieces or sheets of paper that could be pulled in, as they can damage the cooling fans or impair the cooling system.
-
Keep a distance of minimum 2 cm between the bottom of the appliance and parts stored in the drawer.
-
Remove any separator panels installed in the cabinet below the appliance.
2.2 Electrical Connection

WARNING!
Risk of fire and electric shock.
- All electrical connections should be made by a qualified electrician.
The appliance must be earthed. - Before carrying out any operation makesure that the appliance is disconnectedfrom the power supply.
- Make sure that the parameters on the rating plate are compatible with the electrical ratings of the mains power supply.
- Make sure the appliance is installed correctly. Loose and incorrect electricity mains cable or plug (if applicable) can make the terminal become too hot.
- Use the correct electricity mains cable.
- Do not let the electricity mains cable tangle.
Make sure that a shock protection is installed. - Use the strain relief clamp on the cable.
- Make sure the mains cable or plug (if applicable) does not touch the hot appliance or hot cookware, when you connect the appliance to a socket.
- Do not use multi-plug adapters and extension cables.
- Make sure not to cause damage to the mains plug (if applicable) or to the mains cable. Contact our Authorised Service Centre or an electrician to change a damaged mains cable.
- The shock protection of live and insulated parts must be fastened in such a way that it cannot be removed without tools.
- Connect the mains plug to the mains socket only at the end of the installation. Make sure that there is access to the mains plug after the installation.
-
If the mains socket is loose, do not connect the mains plug.
-
Do not pull the mains cable to disconnect the appliance. Always pull the mains plug.
- Use only correct isolation devices: line protecting cut-outs, fuses (screw type fuses removed from the holder), earth leakage trips and contactors.
- The electrical installation must have an isolation device which lets you disconnect the appliance from the mains at all poles. The isolation device must have a contact opening width of minimum 3 mm.
- If the E3 code appears on the screen, immediately disconnect the hob and check if the electrical connection and the mains voltage are correct.
2.3 Use

WARNING!
Risk of injury, burns and electric shock.
- Do not change the specification of this appliance.
- Remove all the packaging, labelling and protective film (if applicable) before first use.
Make sure that the ventilation openings are not blocked. - Do not let the appliance stay unattended during operation.
- Set the cooking zone to "off" after each use.
- Do not put cutlery or saucepan lids on the cooking zones. They can become hot.
- Do not operate the appliance with wet hands or when it has contact with water.
- Do not use the appliance as a work surface or as a storage surface.
- If the surface of the appliance is cracked, disconnect immediately the appliance from the power supply. This to prevent an electrical shock.
- Users with a pacemaker must keep a distance of minimum 30cm from the induction cooking zones when the appliance is in operation.
- When you place food into hot oil, it may splash.
-
Do not use aluminum foil or other materials between the cooking surface and the cookware, unless otherwise specified by the manufacturer of this appliance.
-
Use only accessories recommended for this appliance by the manufacturer.

WARNING!
Risk of fire and explosion.
- Fats and oil when heated can release flammable vapours. Keep flames or heated objects away from fats and oils when you cook with them.
- The vapours that very hot oil releases can cause spontaneous combustion.
Used oil, that can contain food remnants, can cause fire at a lower temperature than oil used for the first time. - Do not put flammable products or items that are wet with flammable products in, near or on the appliance.

WARNING!
Risk of damage to the appliance.
- Do not keep hot cookware on the control panel.
- Do not put a hot pan cover on the glass surface of the hob.
- Do not let cookware boil dry.
- Be careful not to let objects or cookware fall on the appliance. The surface can be damaged.
- Do not activate the cooking zones with empty cookware or without cookware.
- Cookware made of cast iron or with a damaged bottom can cause scratches on the glass / glass ceramic. Always lift these objects up when you have to move them on the cooking surface.
2.4 Care and cleaning
- Clean the appliance regularly to prevent the deterioration of the surface material.
- Switch off the appliance and let it cool down before cleaning.
- Do not use water spray and steam to clean the appliance.
- Clean the appliance with a moist soft cloth. Use only neutral detergents. Do not use abrasive products, abrasive cleaning pads, solvents or metal objects, unless otherwise specified.
2.5 Service
To repair the appliance contact the Authorised Service Centre. Use original spare parts only.
- Concerning the lamp(s) inside this product and spare part lamps sold separately: These lamps are intended to withstand extreme physical conditions in household appliances, such as temperature, vibration, humidity, or are intended to signal information about the operational status of the appliance. They are not intended to be used in other applications and are not suitable for household room illumination.
2.6 Disposal

WARNING!
Risk of injury or suffocation.
- Contact your local authority for information on how to dispose of the appliance.
- Disconnect the appliance from the mains supply.
- Cut off the mains electrical cable close to the appliance and dispose of it.
3. INSTALLATION

WARNING!
Refer to Safety chapters.
3.1 Before the installation
Before you install the hob, write down the information below from the rating plate. The rating plate is on the bottom of the hob.
Serial number
3.2 Built-in hobs
Only use the built-in hobs after you assemble the hob into correct built-in units and work surfaces that align to the standards.
3.3 Connection cable
- The hob is supplied with a connection cable.
- To replace the damaged mains cable, use the cable type: H05V2V2-F which withstands a temperature of 90^ or higher. A single wire must have a minimal cross section in accordance with the table below. Speak to your local Service Centre. The connection cable may only be replaced by a qualified electrician.

WARNING!
All electrical connections must be made by a qualified electrician.

CAUTION!
Connections via contact plugs are forbidden.

CAUTION!
Do not drill or solder the wire ends. It is forbidden.

CAUTION!
Do not connect the cable without cable end sleeve.
One-phase connection
- Remove the cable end sleeve from black, brown and blue wires.
- Remove a part of the insulation of the brown, black and blue cable ends.
- Connect the ends of black and brown cables.
- Apply a new wire end sleeve on the shared wire's end (special tool required).
- Connect the ends of two blue cables.
- Apply a new wire end sleeve on the shared wire's end (special tool required).
Two-phase connection
- Remove the cable end sleeve from blue wires.
- Remove a part of the insulation of the blue cable ends.
- Connect the ends of two blue cables.
- Apply a new end wire sleeve on the shared wire's end (special tool required).
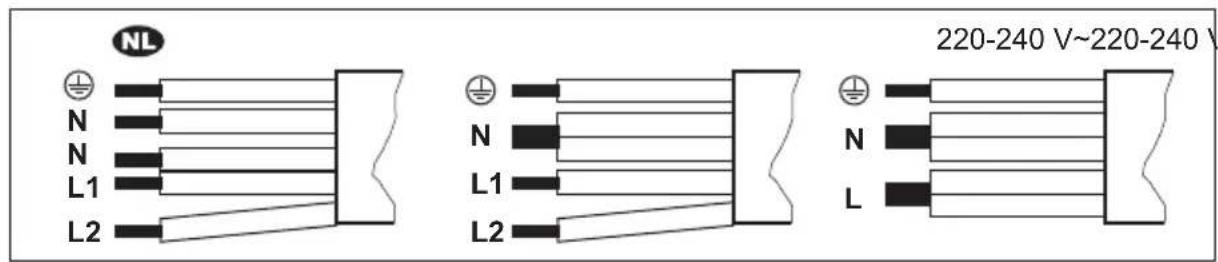
| NL 220 - 240 V~ | Two-phase connection: 400 V2N~ One-phase connection: 220 - 240 V~ |
| 5x1,5 mm² 5x1,5 mm² or 4x2,5 mm² 5x1,5 mm² or 3x4 mm² | |
| Green - yellow Green - yellow Green - yellow | |
| N Blue and blue N Blue and blue N Blue and blue | |
| L1 Black L1 Black L Black and brown | |
| L2 Brown L2 Brown | |
3.4 Assembly
If you install the hob under a hood, please see the installation instructions of the hood for the minimum distance between the appliances.
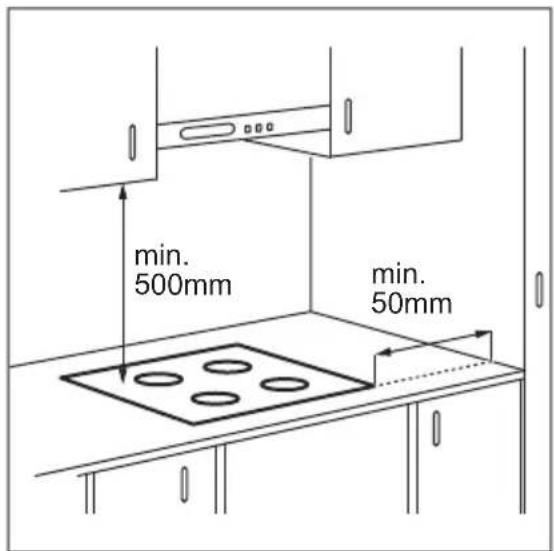
If the appliance is installed above a drawer, the hob ventilation can warm up the items stored in the drawer during the cooking process.
Find the video tutorial "How to install your AEG Induction Hob - Worktop installation" by typing out the full name indicated in the graphic below.

YouTube
www.youtube.com/electrolux
www.youtube.com/aeg

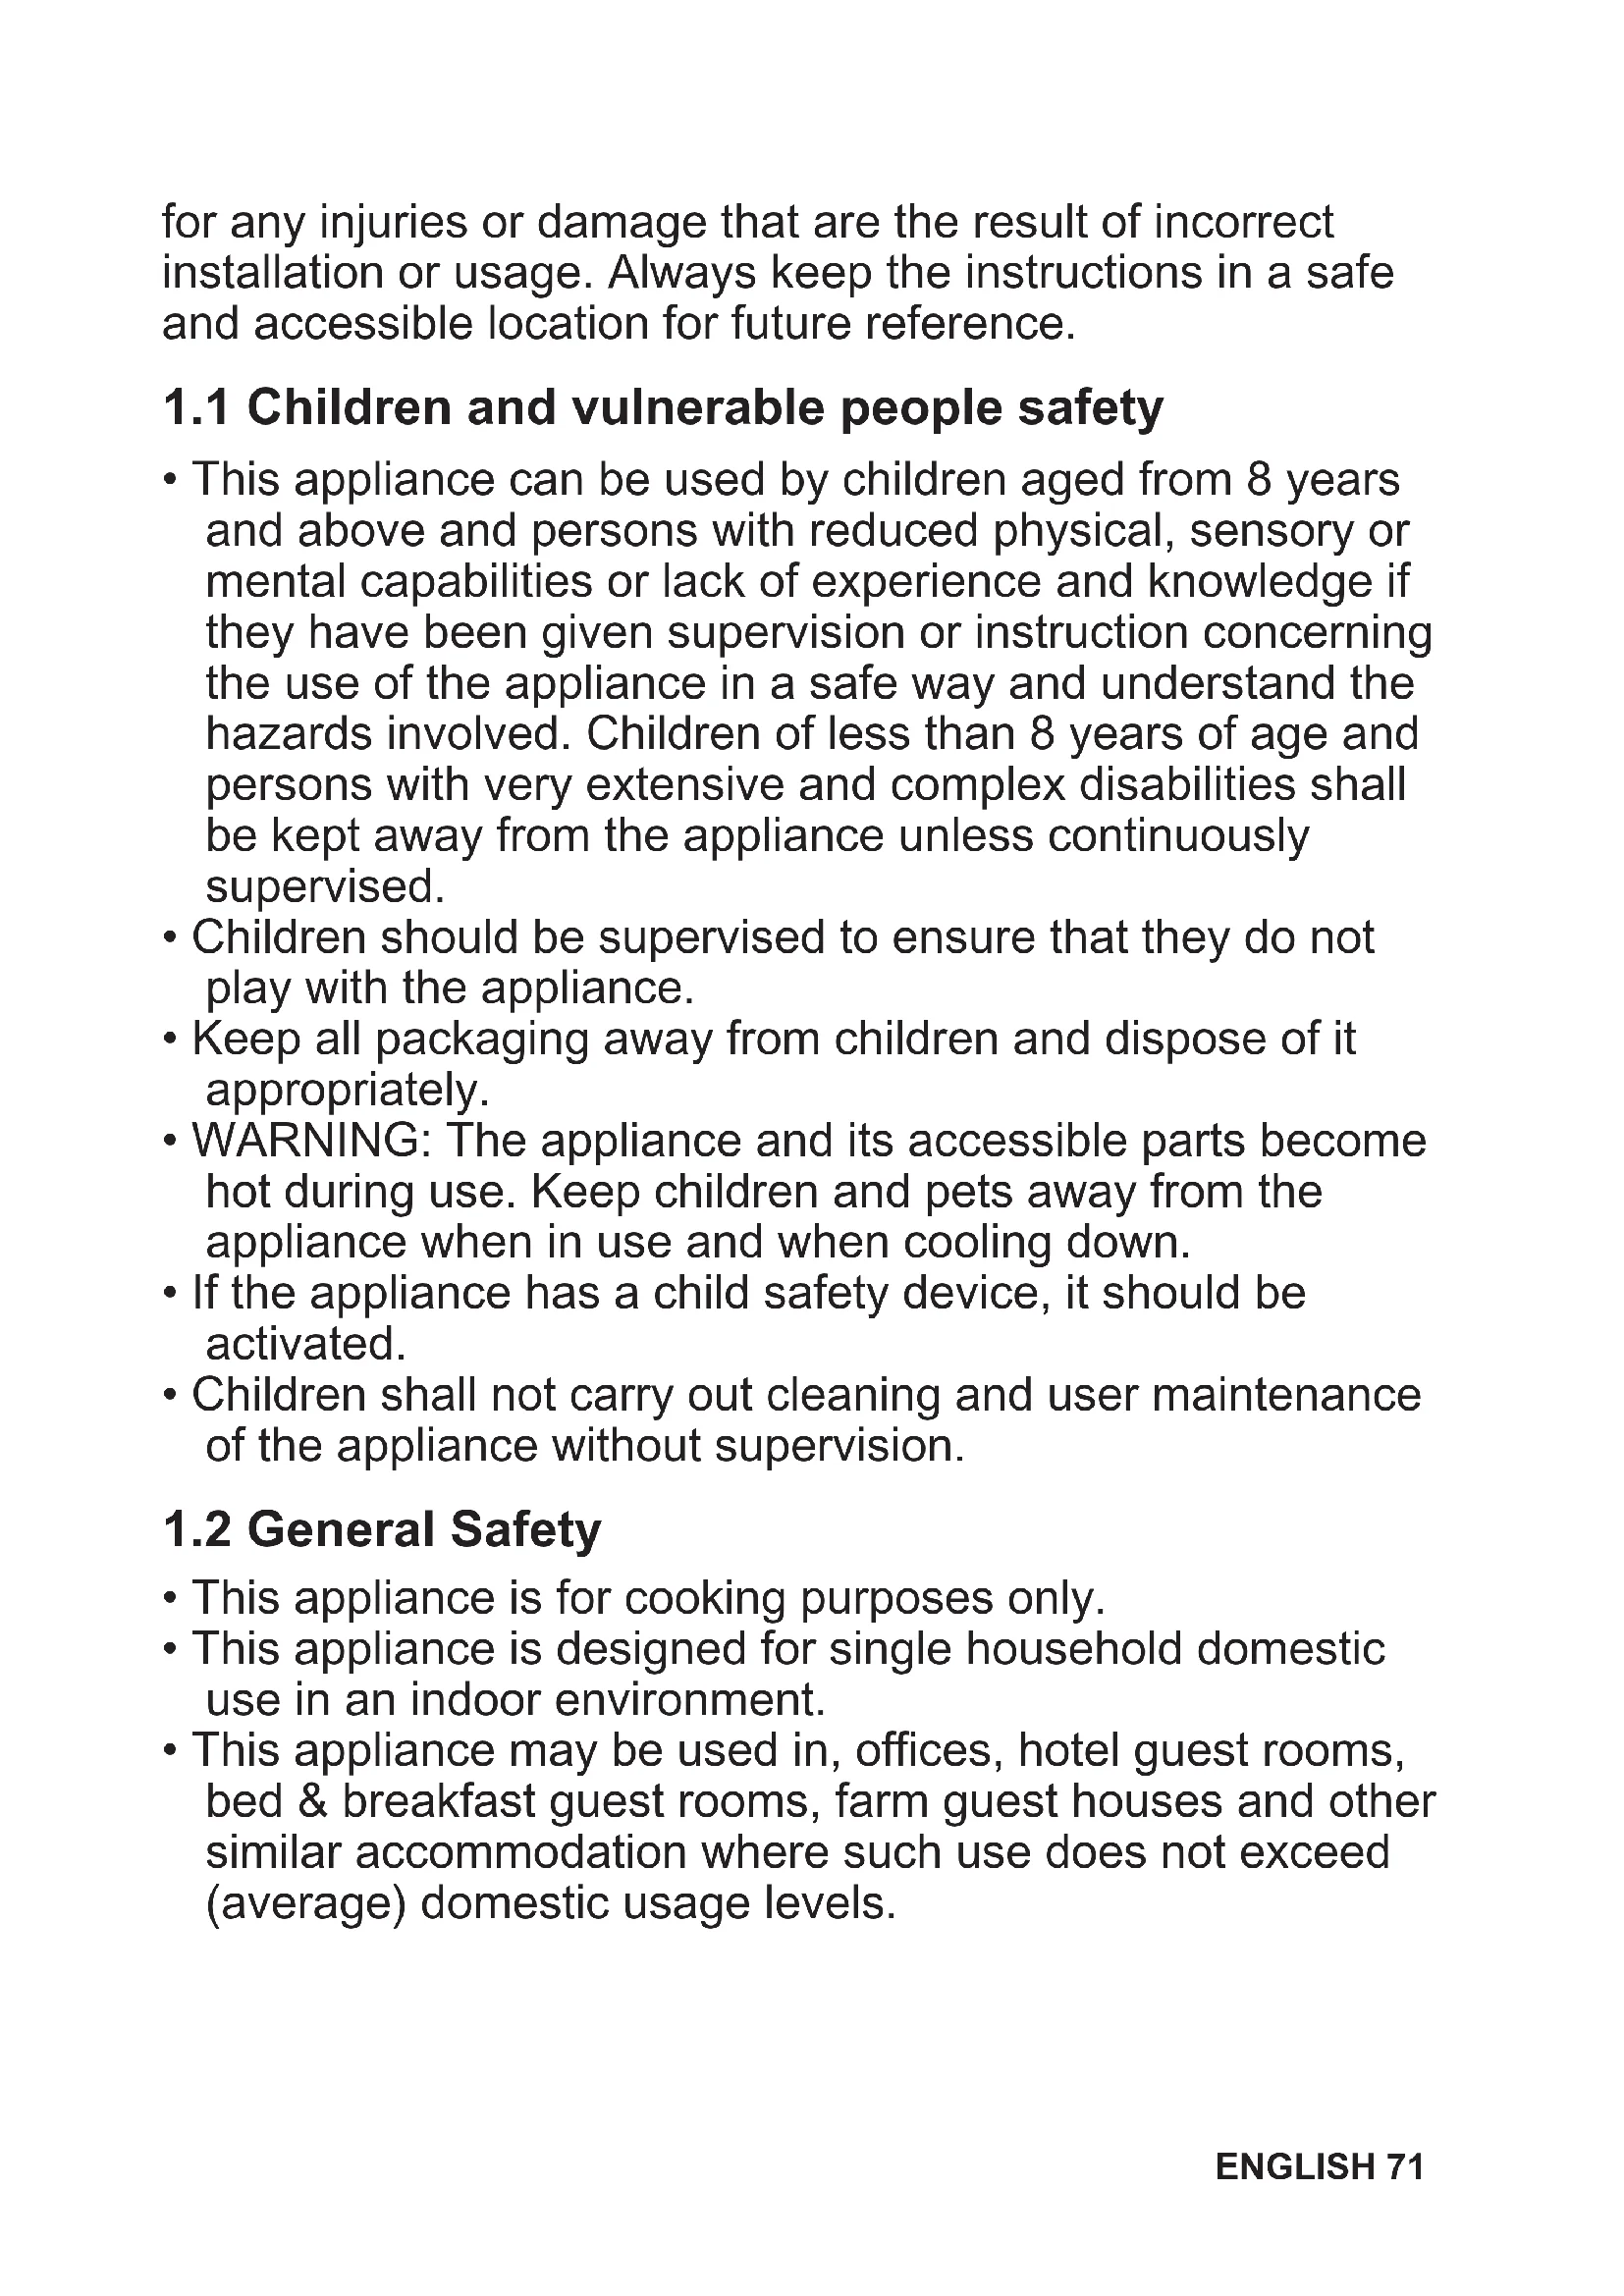
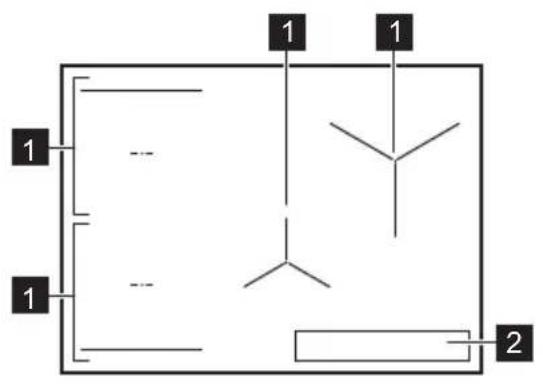
4. PRODUCT DESCRIPTION
4.1 Cooking surface layout
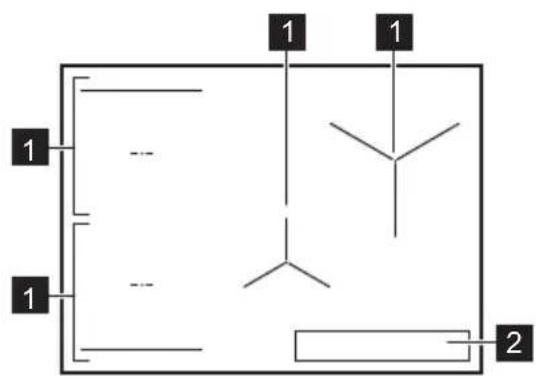
1 Induction cooking zone
2 Control panel

For detailed information on the sizes of the cooking zones refer to "Technical data".
4.2 Control panel layout
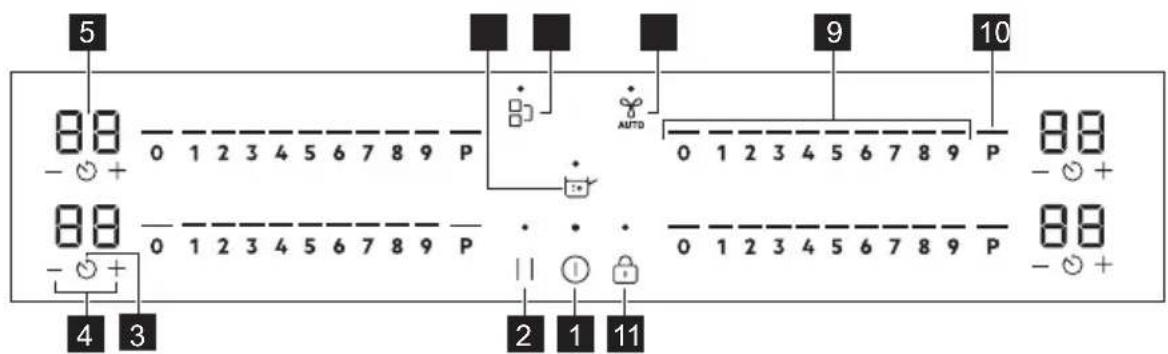
Use the sensor fields to operate the appliance. The displays, indicators and sounds tell which functions operate.
| Sensor field | Function Description | |
| 1 | ① | On / Off To activate and deactivate the appliance. |
| 2 | || | Pause To activate and deactivate the function. |
| 3 | ○ | Timer To set the function. |
| 4 | +/- | - To increase or decrease the time. |
| 5 | - Timer display To show the time in minutes. | |
| 6 | ○ | SenseBoil® SenseBoil®. To automatically adjust the temperature of water so that it does not boil over once it reaches the boiling point. |
| 7 | || | Bridge To activate and deactivate the function. |
| 8 | AUTO | Hob2Hood To activate and deactivate the manual mode of the function. |
| 9 | - Control bar To set a heat setting. | |
| 10 | P | PowerBoost To activate the function. |
| 11 | Lock / Child Safety Device To lock / unlock the control panel. | |
4.3 Display indicators
| Indicator Description | |
| E + digit | There is a malfunction. |
| E/7 | OptiHeat Control (3 step Residual heat indicator): continue cooking / keep warm / resid-ual heat. |
5. BEFORE FIRST USE
WARNING! Refer to Safety chapters.
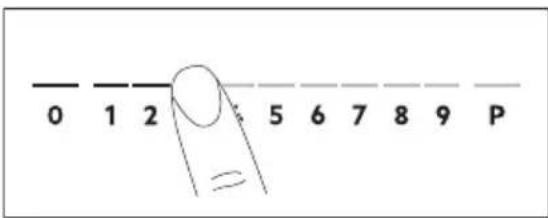
5.1 Power limitation
Power limitation defines how much power is used by the hob in total, within the limits of the house installation fuses.
The hob is set to its highest possible power level by default.
To decrease or increase the power level:
- Enter the menu: press and hold for 3 seconds. Then, press and hold
- Press on the front timer until P appears.
- Press on the front timer to set the power level.
6. DAILY USE
WARNING! Refer to Safety chapters.
- Press to exit. Power levels
Refer to "Technical data" chapter.
CAUTION!
Make sure that the selected power fits the house installation fuses.
P73—7350W
P15—1500W
P20—2000W
P25—2500W
P30—3000W
P35—3500W
P40—4000W
P45—4500W
P50—5000W
P60—6000W
6.1 Activating and deactivating
Press and hold to activate or deactivate the hob.
6.2 Pot detection
This feature indicates the presence of cookware on the hob and deactivates the cooking zones if no cookware is detected during a cooking session.
If you put cookware on a cooking zone before you select a heat setting, the indicator above 0 on the control bar appears.
If you remove cookware from an activated cooking zone and set it aside temporarily, the indicators above the corresponding control bar will start blinking. If you do not place the cookware back on the activated cooking zone within 120 seconds, the cooking zone will automatically deactivate.
To resume cooking, make sure to put the cookware back on the cooking zones within the indicated timeout.
6.3 Using the cooking zones
Place the cookware in the centre of the selected zone. Induction cooking zones adapt to the dimension of the bottom of the cookware automatically.
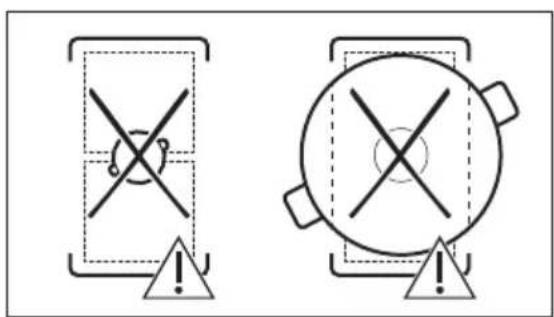
You can cook with large cookware placed on two cooking zones at the same time using Bridge function. The cookware must cover the centres of both zones but not go beyond the area marking. If the cookware is located between the two centres, Bridge function will not be activated.
6.4 Heat setting
- Press the desired heat setting on the control bar.
The indicators above the control bar appear up to the selected heat setting level.
- To deactivate a cooking zone, press 0.
6.5 PowerBoost
This function makes more power available to the induction cooking zones. The function can be activated for the induction cooking zone only for a limited period of time. After this time the induction cooking zone automatically sets back to the highest heat setting.
i
Refer to "Technical data" chapter.
To activate the function for a cooking zone: touch P
To deactivate the function: change the heat setting.
6.6 OptiHeat Control (3 step Residual heat indicator)
WARNING!
E /7 As long as the indicator is on, there is a risk of burns from residual heat.
The induction cooking zones produce the heat necessary for the cooking process directly in the bottom of the cookware. The glass ceramic is heated by the heat of the cookware.
The indicators appear when a cooking zone is hot. They show the level of the residual heat for the cooking zones you are currently using:
-
continue cooking,
-keepwarm, -
residual heat.
The indicator may also appear:
for the neighbouring cooking zones even if you are not using them,
- when hot cookware is placed on cold cooking zone,
- when the hob is deactivated but the cooking zone is still hot.
The indicator disappears when the cooking zone has cooled down.
6.7 Timer
Count Down Timer
Use this function to specify how long a cooking zone should operate during a single cooking session.
Set the heat setting for the selected cooking zone and then set the function.
- Press . 00 appears on the timer display.
- Press or to set the time (00-99 minutes).
- Press to start the timer or wait 3 seconds. The timer begins to count down.
To change the time: select the cooking zone with and press on.
To deactivate the function: select the cooking zone with and press. The remaining time counts back to 00.
The timer finishes counting down, a signal sounds and 00 blinks. The cooking zone deactivates. Press any symbol to stop the signal and blinking.
Minute Minder
You can use this function when the hob is activated but the cooking zones do not operate. The heat setting shows 00.
- Press
- Press + or to set the time.
The timer finishes counting down, a signal sounds and 00 blinks. Press any symbol to stop the signal and blinking.
To deactivate the function: press and
The remaining time counts back to 00.
6.8 Power management
If multiple zones are active and the consumed power exceeds the limitation of the power supply, this function divides the available power between all cooking zones. The hob controls heat settings to protect the fuses of the house installation.
- If the hob reaches the limit of maximum available power (refer to the rating plate), the power of the cooking zones will be automatically reduced.
The heat setting of the cooking zone selected first is always prioritised. The remaining power will be divided between the other cooking zones according to the order of selection. - For cooking zones that have a reduced power, the control bar blinks and shows the maximum possible heat settings.
- Wait until the display stops flashing or reduce the heat setting of the cooking zone selected last. The cooking zones will continue operating with the reduced heat setting. Change the heat settings of the cooking zones manually, if necessary.
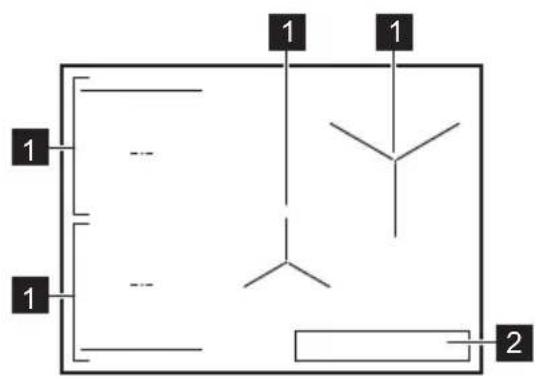
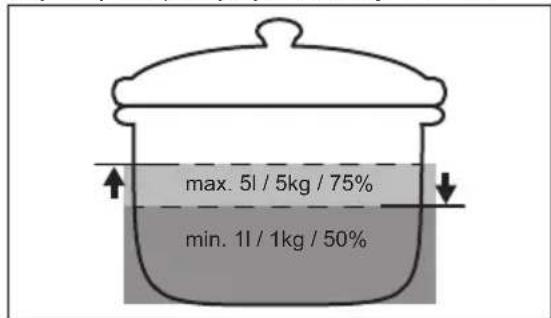
6.9 SenseBoil®
The function automatically adjusts the temperature of water so that it does not boil over once it reaches the boiling point.
i
If there is any residual heat on the cooking zone you want to use, an acoustic signal sounds and the function does not start.
The function does not work with non-stick cookware.
A
CAUTION!
Do not use the function with empty cookware.
Do not leave the hob unattended while the function is operating.
- Place pots filled with 1 - 5 l of cold water on the available cooking zones for which you want to start the function.
If you place one pot on only one cooking zone the function starts automatically.
- Touch to activate the hob.
- Touch to activate the function.
A blinking indicator above Pappears for each cooking zone on which you can presently use the function.
- Touch anywhere on the slider of the chosen cooking zone.
The function starts.
Once the function starts the indicators above the slider appear and the animation starts running.

If you do not place a pot on any of the cooking zones within 5 seconds, the function deactivates automatically.
When the function reaches the boiling point the hob emits an acoustic signal and the heat setting automatically changes to a default simmering level.
To deactivate the function before the boiling point has been reached, touch 0.
To deactivate the function after the boiling point has been reached, touch the slider and adjust the heat setting manually.
If you activate Pause or remove the pot the function deactivates.
If you set a Count Down Timer on one of the cooking zones and the set time runs out before the boiling point is reached the function deactivates automatically.
Hints and tips:
- The function is best suited for boiling water and cooking potatoes.
- The function may not work properly for kettles and stovetop espresso pots.
- Fill between half to three quarters of the pot with cold tap water leaving 4cm from the rim of the pot empty. Do not use less than 1 l or more than 5 l of water. Make sure the total weight of the water (or the water and potatoes) ranges between 1-5
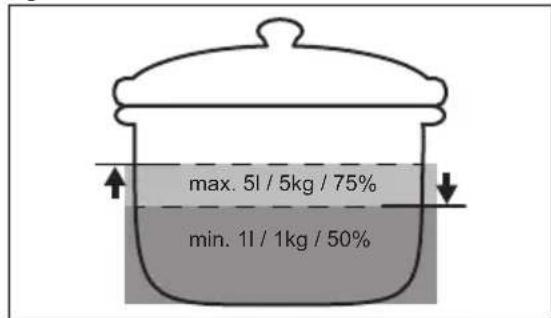
kg.
To achieve the best results cook only whole, unpeeled, medium-sized potatoes. Make sure you do not pack potatoes too tightly.
- During the heat up phase avoid energetic stirring of other pots and parallel cooking processes (such as frying or boiling) on other cooking zones.
- Avoid producing external vibrations (e.g. from using a blender or placing a mobile phone next to the hob) when the function is running.
Depending on the type of food and cookware you can adjust the heat setting after the boiling point has been reached.
- Add salt once the boiling point has been reached.
- Use a lid to save energy.
6.10 Menu structure
The table shows the basic menu structure.
User settings
| Symbol | Setting Possible options |
| b Sound On / Off (-) | |
| P Power limitation 15 - 73 | |
| H Hood mode 0 - 6 | |
| E Alarm / error history | The list of recent alarms / errors. |
To enter user settings: press and hold ① for 3 seconds. Then, press and hold ② The settings appear on the timer of the left cooking zones.
Navigating the menu: the menu consists of the setting symbol and a value. The symbol appears on the rear timer and the value appears on the front timer. To navigate
between the settings press on the front timer. To change the setting value press + or on the front timer.
To exit the menu: press ①
OffSound Control
You can activate / deactivate the sounds in the Menu > User settings.
i
Refer to "Menu structure".
When the sounds are off you can still hear the sound when:
·you touch ,①
the timer comes down,
- you press an inactive symbol.
7. ADDITIONAL FUNCTIONS
7.1 Automatic Switch Off
The function deactivates the hob automatically if:
- all of the cooking zones are deactivated,
- you do not set any heat setting or fan speed setting after the activation of the hob,
- you spill something or put something on the control panel for more than 10 seconds (a pan, a cloth, etc.). A signal sounds and the hob deactivates. Remove the object or clean the control panel.
- the appliance gets too hot (e.g. when a saucepan boils dry). Let the cooking zone cool down before you use the hob again.
- you do not deactivate a cooking zone or change the heat setting. After some time, the hob deactivates.
The relation between the heat setting and the time after which the appliance deactivates:
Heat setting The hob deactivates after
1-26 hours
3-45 hours
54 hours
6-91.5 hours
7.2 Pause
This function sets all cooking zones that operate to the lowest heat setting.
When the function operates, and can be used. All other symbols on the control panels are locked.
The function does not stop the timer functions.
-
To activate the function: press II. The heat setting is lowered to 1.
-
To deactivate the function: press . The previous heat setting comes on.
7.3 Lock
You can lock the control panel while the hob operates. It prevents an accidental change of the heat setting.
Set the heat setting first.
To activate the function: press.
To deactivate the function: press again.
i
The function deactivates as you deactivate the hob.
7.4 Child Safety Device
This function prevents an accidental operation of the hob.
To activate the function: press Do not set any heat setting. Press and hold for 3 seconds, until the indicator above the symbol appears. Deactivate the hob with
i
The function stays active when you deactivate the hob. The indicator above
is on.
To deactivate the function: press ① do not set any heat setting. Press and hold ② for 3 seconds, until the indicator above the symbol disappears. Deactivate the hob with ①.
Cooking with the function activated: press ① , then press for 3 seconds, until the indicator above the symbol disappears. You can operate the hob. When you deactivate the hob with the function operates again.
7.5 Bridge
i
The function operates when the pot covers the centres of the two zones. For more information on the correct placement of cookware refer to "Using the cooking zones".
The function does not work while SenseBoil® operates.
This function connects two left side cooking zones and they operate as one.
First set the heat setting for one of the left side cooking zones.
To activate the function: touch To set or change the heat setting touch one of the control sensors.
To deactivate the function: touch The cooking zones operate independently.
7.6 Hob²Hood
It is an advanced automatic function which connects the hob to a special hood. Both the hob and the hood have an infrared signal communicator. Speed of the fan is defined automatically on basis of mode setting and temperature of the hottest cookware on the hob. You can also operate the fan from the hob manually.
i
For most of the hoods the remote system is originally deactivated. Activate it before you use the function. For more information refer to hood user manual.
Operating the function automatically
To operate the function automatically set the automatic mode to H1-H6. The hob is originally set to H5. The hood reacts whenever you operate the hob. The hob recognizes temperature of the cookware automatically and adjusts the speed of the fan.
Automatic modes
| Automat- ic light | Boiling1) | Frying2) |
| H0 Off Off Off | ||
| H1 On Off Off | ||
| H23) On Fan speed 1 | Fan speed 1 | |
| H3 On Off Fan speed | 1 | |
| H4 On Fan speed 1 | Fan speed 1 | |
| H5 On Fan speed 1 | Fan speed 2 | |
| H6 On Fan speed 2 | Fan speed 3 | |
1) The hob detects the boiling process and activates fan speed in accordance with automatic mode.
2) The hob detects the frying process and activates fan speed in accordance with automatic mode.
3) This mode activates the fan and the light and does not rely on the temperature.
Changing the automatic mode
- Deactivate the hob.
- Press for 3 seconds. The display comes on and goes off.
- Press for 3 seconds.
- Press a few times until H comes on.
- Press + of the timer to select an automatic mode.
i
To operate the hood directly on the hood panel deactivate the automatic mode of the function.
i
When you finish cooking and deactivate the hob, the hood fan may still operate for a certain period of time. After that time the system deactivates the fan automatically and prevents you from accidental activation of the fan for the next 30 seconds.
Operating the fan speed manually
You can also operate the function manually. To do that press when the hob is active. This deactivates automatic operation of the function and allows you to change the fan speed manually. When you press you
raise the fan speed by one. When you reach an intensive level and press AGain you will set fan speed to 0 which deactivates the hood fan. To start the fan again with fan speed 1 press
i
To activate automatic operation of the function, deactivate the hob and activate it again.
Activating the light
You can set the hob to activate the light automatically whenever you activate the hob. To do so set the automatic mode to H1-H6.
i
The light on the hood deactivates 2 minutes after deactivating the hob.
8. HINTS AND TIPS

WARNING!
Refer to Safety chapters.
8.1 Cookware
i
For induction cooking zones a strong electro-magnetic field creates the heat in the cookware very quickly.
Use the induction cooking zones with suitable cookware.
- To prevent overheating and improve the performance of the zones, the cookware must be as thick and flat as possible.
- Ensure cookware bases are clean and dry before placing on the hob surface.
Always be careful no to slide or rub the cookware on the edges and corners of the glass or the side trim as it may chip or damage the glass surface.
Cookware material
- correct: cast iron, steel, enamelled steel, stainless steel, multi-layer bottom (with a correct marking from a manufacturer).
not correct: aluminium, copper, brass, glass, ceramic, porcelain.
Cookware is suitable for an induction hob if:
water boils very quickly on a zone set to the highest heat setting.
- a magnet pulls on to the bottom of the cookware.
Cookware dimensions
- Induction cooking zones adapt to the dimension of the bottom of the cookware automatically.
- The cooking zone efficiency is related to the diameter of the cookware. The cookware with a diameter smaller than the minimum receives only a part of the power generated by the cooking zone.
- For both safety reasons and optimal cooking results, do not use cookware larger than indicated in "Cooking zones specification". Avoid keeping cookware close to the control panel during the cooking session. This might impact the functioning of the control panel or accidentally activate hob functions.

Refer to "Technical data".
8.2 The noises during operation
If you can hear:
- crack noise: cookware is made of different materials (a sandwich construction).
whistle sound: you use a cooking zone with a high power level and the cookware is made of different materials (a sandwich construction). - humming: you use a high power level.
- clicking: electric switching occurs.
- hissing, buzzing: the fan operates.
The noises are normal and do not indicate any malfunction.
8.3 Öko Timer (Eco Timer)
To save energy, the heater of the cooking zone deactivates before the count down timer
sounds. The difference in the operation time depends on the heat setting level and the length of the cooking operation.
8.4 Simplified cooking guide
The correlation between the heat setting of a zone and its consumption of power is not linear. When you increase the heat setting, it is not proportional to the increase of the consumption of power. It means that a cooking zone with the medium heat setting uses less than a half of its power.

The data in the table is for guidance only.
| Heat setting Use to: Time | Hints (min) |
| 1 Keep cooked food warm. as neces- | Put a lid on the cookware. |
| sary | |
| 1 - 2 Hollandaise sauce; melt: butter, choco- late, gelatine. | 5 - 25 Mix from time to time. |
| 2 Solidify: fluffy omelettes, baked eggs. 10 - 40 Cook with a lid on. | |
| 2 - 3 Simmer rice and milk-based dishes, heat up ready-cooked meals. | 25 - 50 Add at least twice as much liquid as rice, mix milk dishes halfway through the procedure. |
| 3 - 4 Stew vegetables, fish, meat. 20 - 45 Add a few tablespoons of water. | Check the water amount during the process. |
| 4 - 5 Steam potatoes and other vegetables. 20 - 60 Cover the bottom of the pot with 1-2 cm of water. Check the water level during the process. Keep the lid on the pot. | |
| 4 - 5 Cook larger quantities of food, stews and soups. | 60 - 150 Up to 3 l of liquid plus ingredients. |
| 6 - 7 Gentle fry: escalope, veal cordon bleu, cutlets, rissoles, sausages, liver, roux, eggs, pancakes, doughnuts. | as neces- sary Turn over when needed. |
| 7 - 8 Heavy fry, hash browns, loin steaks, steaks. | 5 - 15 Turn over when needed. |
9 Boil water, cook pasta, sear meat (goulash, pot roast), deep-fry chips.

Boil large quantities of water. PowerBoost is activated.
8.5 Hints and Tips for Hob²Hood
When you operate the hob with the function:
- Protect the hood panel from direct sunlight.
- Do not spot halogen light on the hood panel.
- Do not cover the hob control panel.
- Do not interrupt the signal between the hob and the hood (e.g. with the hand, a cookware handle or a tall pot). See the picture.
The hood pictured below is for illustration purpose only.

Other remotely controlled appliances may block the signal. Do not use any such appliances near to the hob while Hob²Hood is on.
Cooker hoods with the Hob²Hood function
To find the full range of cooker hoods which work with this function refer to our consumer website. The AEG cooker hoods that work with this function must have the symbol AUTO.
9. CARE AND CLEANING

WARNING!
Refer to Safety chapters.
9.1 General information
- Clean the hob after each use.
Always use cookware with a clean base. - Scratches or dark stains on the surface have no effect on how the hob operates.
-
Use a special cleaning agent suitable for the surface of the hob.
-
Always use a scraper recommended for hobs with a glass surface. Use the scraper only as an additional tool for cleaning the glass after the standard cleaning procedure.

WARNING!
Do not use knives or any other sharp, metal tools to clean the glass surface.
- For the metal side trim, use only a dishwashing detergent with warm water. Use a cloth to clean and wipe the trim.

WARNING!
Do not use the mildly abrasive cleaning milk, any polishing detergents, scrapers, or the hard layer of a sponge to clean the side trim.
- The gap between the glass surface and the side trim may gather dirt and small particles of food. Use a wooden toothpick to clean the gap between the glass surface and the side trim.

WARNING!
Do not use any sharp metal tools to clean the gap as they may widen the gap and damage the side trim or the glass surface.
9.2 Cleaning the hob
- Remove immediately: melted plastic, plastic foil, salt, sugar and food with sugar, otherwise, the dirt can cause damage to the hob. Take care to avoid burns. Use a special hob scraper on the glass surface at an acute angle and move the blade on the surface.
- Remove when the hob is sufficiently cool: limescale rings, water rings, fat stains, shiny metallic discoloration. Clean the hob with a moist cloth and a non-abrasive detergent. After cleaning, wipe the hob dry with a soft cloth.
- Remove shiny metallic discoloration: use a solution of water with vinegar and clean the glass surface with a cloth.
10. TROUBLESHOOTING

WARNING!
Refer to Safety chapters.
10.1 What to do if...
| Problem Possible cause Remedy | ||
| You cannot activate or operate the hob. | The hob is not connected to an elec- trical supply or it is connected incor- rectly. | Check if the hob is correctly connected to the electrical supply. |
| The fuse is blown. Make sure that the fuse is the cause of | the malfunction. If the fuse is blown again and again, contact a qualified electrician. | |
| You did not set the heat setting for 60 seconds. | Activate the hob again and set the heat setting in less than 60 seconds. | |
| You touched 2 or more sensor fields at the same time. | Touch only one sensor field. | |
| Pause operates. Refer to "Pause". | ||
| There is water or fat stains on the control panel. | Clean the control panel. | |
| You can hear a constant beep noise. | The electrical connection is incor- rect. | Disconnect the hob from the electrical supply. Ask a qualified electrician to check the installation. |
| You cannot select the maximum heat setting for one of the cooking zones. | The other zones consume the maximum available power. Your hob works properly. | Reduce the heat setting of the other cooking zones connected to the same phase. Refer to "Power management". |
| An acoustic signal sounds and the hob deactivates. An acoustic signal sounds when the hob is deactivated. | You put something on one or more sensor fields. | Remove the object from the sensor fields. |
| The hob deactivates. You put something on the sensor field ① | Remove the object from the sensor field. | |
| Residual heat indicator does not come on. | The zone is not hot because it operated only for a short time or the sensor is damaged. | If the zone operated sufficiently long to be hot, speak to an Authorised Service Centre. |
| You use a very tall pot which blocks the signal. | Use a smaller pot, change the cooking zone or operate the hood manually. | |
| The control panel becomes hot to the touch. | The cookware is too large or you put it too close to the control panel. | Put large cookware on the rear zones, if possible. |
| There is no sound when you touch the panel sensor fields. | The sounds are deactivated. Activate the sounds. Refer to "Daily use". | |
| The indicator above the symbol comes on. | Child Safety Device or Lock operates. | Refer to "Child Safety Device" and "Lock". |
| The control bar blinks. There is no cookware on the zone or the zone is not fully covered. | Put cookware on the zone so that it fully covers the cooking zone. | |
| The cookware is unsuitable. Use cookware suitable for induction | hobs. Refer to "Hints and tips". | |
| The diameter of the bottom of the cookware is too small for the zone. | Use cookware with correct dimensions. Refer to "Technical data". | |
| F and appear simultaneously. | The power is too low due to unsuitable cookware or an empty pot. | Use the appropriate type of cookware. Refer to "Hints and Tips" and "Technical Data". Do not activate any zone with an empty pot on it. |
| F and appear simultaneously. | The pot is empty or contains some liquid other than water, e.g. oil. | Avoid using the function with liquids other than water. |
| F and appear simultaneously. | There is too much or too little water in the pot. You boiled some food other than water and potatoes. The boiling point was moved in time and SenseBoil® could not work properly. | Only boil water and potatoes with the use of SenseBoil®. Refer to "Hints and Tips". |
| You hear a beep sound, the indicators above link and SenseBoil® does not start. | None of the cooking zones is ready to be used with SenseBoil®. There is some residual heat on the cooking zones you want to choose or they are still in use. | Finish your previous cooking activities and choose a free cooking zone without any residual heat. |
Problem Possible cause Remedy

and a number come on.
There is an error in the hob. Deactivate the hob and activate it
again after 30 seconds. If comes on again, disconnect the hob from the electrical supply. After 30 seconds, connect the hob again. If the problem continues, speak to an Authorised Service Centre.
10.2 If you cannot find a solution...
If you cannot find a solution to the problem yourself, contact your dealer or an Authorised Service Centre. Give the data from the rating plate. Make sure, you operated the hob correctly. If not the servicing by a service
technician or dealer will not be free of charge, also during the warranty period. The information about guarantee period and Authorised Service Centres are in the guarantee booklet.
11. TECHNICAL DATA
11.1 Rating plate
Model NII84B10AB PNC 949 598 032 00
Typ 62 D4A 01 AA 220 - 240 V / 400 V 2N, 50 Hz
Induction 7.35 kW Made in: Germany
Ser.Nr. 7.35 kW
AEG
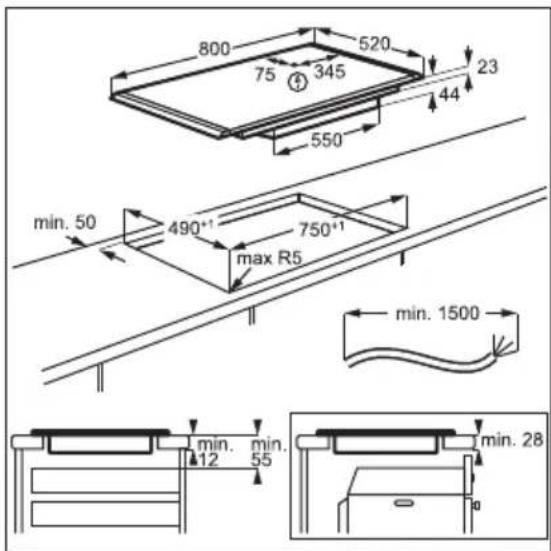
11.2 Cooking zones specification
| Cooking zone Nominal power (maximum heat setting) [W] | PowerBoost [W] PowerBoost maximum dura- tion [min] | Cookware diamie- ter [mm] |
| Left front 2300 3200 10 125 - 210 | ||
| Left rear 2300 3200 10 125 - 210 | ||
| Middle front 1400 2500 4 125 - 145 | ||
| Right rear | 2300 3600 10 205 - 240 | |
The power of the cooking zones can be different in some small range from the data in the table. It changes with the material and dimensions of the cookware.
For optimal cooking results use cookware no larger than the diameter in the table.
12. ENERGY EFFICIENCY
12.1 Product Information
| Model identification NII84B10AB | ||
| Type of hob Built-In Hob | ||
| Number of cooking zones 4 | ||
| Heating technology Induction | ||
| Diameter of circular cooking zones (Ø) Left front | 21.0 cm | |
| Left rear | 21.0 cm | |
| Middle front | 14.5 cm | |
| Right rear | 24.0 cm | |
| Energy consumption per cooking zone (EC electric cooking) | Left front | 179.6 Wh/kg |
| Left rear | 189.1 Wh/kg | |
| Middle front | 180.2 Wh/kg | |
| Right rear | 185.2 Wh/kg | |
| Energy consumption of the hob (EC electric hob) 183.5 Wh/kg | ||
IEC / EN 60350-2 - Household electric cooking appliances - Part 2: Hobs - Methods for measuring performance.
The energy measurements referring to the cooking area are identified by the markings of the respective cooking zones.
12.2 Energy saving
You can save energy during everyday cooking if you follow the hints below.
- When you heat up water, use only the amount you need.
- If it is possible, always put the lids on the cookware.
- Put the cookware directly in the centre of the cooking zone.
- Use the residual heat to keep the food warm or to melt it.
13. ENVIRONMENTAL CONCERNS
Recycle materials with the symbol Put the packaging in relevant containers to recycle it. Help protect the environment and human health by recycling waste of electrical and electronic appliances. Do not dispose of
appliances marked with the symbol with the household waste. Return the product to your local recycling facility or contact your municipal office.
PARIMATE TULEMUSTE SAAVUTAMISEKS
How to install your AEG Induction Hob - Worktop installation
4. TOOTE KIRJELDUS
4.1 Keeduala paigutus

How to install your AEG Induction Hob - Worktop installation
4. TUOTEKUVAUS
Veillez always has a great appetite for the fish. He's also fond of the sea bass, which he can catch in his free time.
How to install your AEG Induction Hob - Worktop installation

4. TERMÉKLEÍRÁS
FYRIR FULLKOMINN ÁRANGUR
Serial number (raonumber)
How to install your AEG Induction Hob - Worktop installation

4. VÖRULYSING
4.1 Uppsetning eldunarhellu
How to install your AEG Induction Hob - Worktop installation
4. IZSTRÄDÄJUMA APRAKSTS
varities, pieskarieties 0.
How to install your AEG Induction Hob - Worktop installation
4. GAMINIO APRASYMAS
4.1 Kaitinimo paviršiç planas
1 Indukciné kaitvieté
2 Valdymo skydelis

How to install your AEG Induction Hob - Worktop installation

4. PRODUKTBESKRIVELSE
How to install your AEG Induction Hob - Worktop installation

6.3 Utilizar as zonas de cozedura
How to install your AEG Induction Hob - Worktop installation
4. POPIS VYROBKAU
4.1 Rozlozenie varnej plochy
1 Indukcná varná zona
2 Ovladaci panel

How to install your AEG Induction Hob - Worktop installation