PRO-VS MINI - Synthesizer BEHRINGER - Free user manual and instructions
Find the device manual for free PRO-VS MINI BEHRINGER in PDF.

| Product type | Vector synthesizer |
| Brand | Behringer |
| Model | PRO-VS MINI |
| Power supply | USB-C (5 V, 500 mA) |
| Number of oscillators | 4 (A, B, C, D) |
| Synthesis | Vector with joystick and mix envelope |
| Filter | Low-pass 24 dB/octave with resonance |
| LFO | 2 LFOs with waveforms: triangle, square, sawtooth, ramp, S&H |
| Envelopes | ADSR for mix, filter and amplitude |
| Sequencer | Built-in, up to 16 steps, real-time or step recording |
| Arpeggiator | Modes Up, Down, Up/Down |
| Inputs/Outputs | USB-C (MIDI), MIDI IN (DIN), Sync (minijack), Headphone output (stereo minijack) |
| Keyboard | Built-in (number of keys not specified) |
| Display | OLED |
| Memory | Internal programs and sequences |
| MIDI connectivity | USB MIDI class-compliant, DIN MIDI In, SysEx receive/transmit |
| Operating temperature | 5°C to 45°C |
| Maintenance and cleaning | Clean with a dry cloth only |
| Safety | Do not expose to water, heat sources or open flames. Disconnect before cleaning. |
| Repairability | Fuse replaceable with an identical model. Contact Music Tribe for repair under warranty. |
Frequently Asked Questions - PRO-VS MINI BEHRINGER
User questions about PRO-VS MINI BEHRINGER
0 question about this device. Answer the ones you know or ask your own.
Ask a new question about this device
Download the instructions for your Synthesizer in PDF format for free! Find your manual PRO-VS MINI - BEHRINGER and take your electronic device back in hand. On this page are published all the documents necessary for the use of your device. PRO-VS MINI by BEHRINGER.
USER MANUAL PRO-VS MINI BEHRINGER
Portable 4-Voice Hybrid Synthesizer with 4 Vector Morphing Oscillators Per Voice, Analog Low-Pass Filter, 16-Step Sequencer and Arpeggiator
23CHCKST#Guide

EN Safety Instruction
- Please read and follow all instructions.

- Keep the apparatus away from water, except for outdoor products.

-
Clean only with a dry cloth.
-
Do not block any ventilation openings. Install in accordance with the manufacturer's instructions.
- Do not install near any heat sources such as radiators, heat registers, stoves or other apparatus (including amplifiers) that produce heat.
- Use only attachments/accessories specified by the manufacturer.

- Use only specified carts, stands, tripods, brackets,
or tables. Use caution to prevent tip-over when moving the cart/ apparatus combination.
- Avoid installing in confined spaces like bookcases.
-
Do not place near naked flame sources, such as lighted candles.
-
Operating temperature range 5° to 45°C (41° to 113°F).
LEGAL DISCLAIMER
Music Tribe accepts no liability for any loss which may be suffered by any person who relies either wholly or in part upon any description, photograph, or statement contained herein. Technical specifications, appearances and other information are subject to change without notice. All trademarks are the property of their respective owners. Midas, Klark Teknik, Lab Gruppen, Lake, Tannoy, Turbosound, TC Electronic, TC Helicon, Behringer, Bugera, Aston Microphones and Coolaudio are trademarks or registered trademarks of Music Tribe Global Brands Ltd. © Music Tribe Global Brands Ltd. 2024 All rights reserved.
LIMITED WARRANTY
For the applicable warranty terms and conditions and additional information regarding Music Tribe's
Limited Warranty, please see complete details online at community. musictribe.com/support.
BESCHRÄNKTE GARANTIE
detalhes na íntegra através do website community. musictribe.com/support
text_image
ProUS Pro VS Power Adapter Headphones12 1BB0164 5MBt Guide
FN How Vector Synthesis works
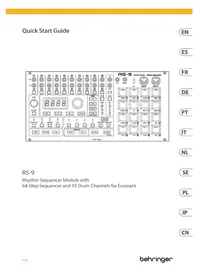
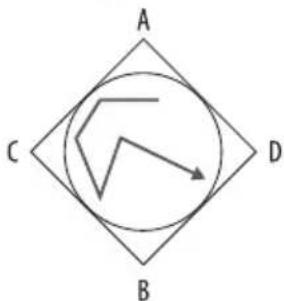
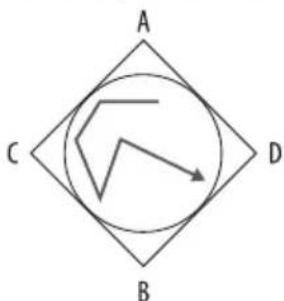
Unlike conventional synthesis, where oscillators are blended together to produce the basis for a sound, Vector Synthesis allows the balance of four oscillators to be continuously adjusted by both the joystick and using the mix envelope. The timbre of the sound can thus be changed subtly or dramatically as you play, depending on the waveforms you pick for each oscillator and how much mix automation you use.
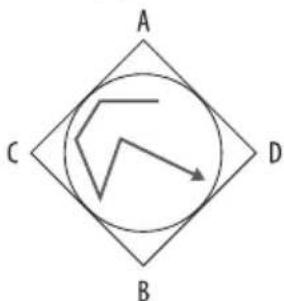
When the waveform mix joystick is in its central position all four oscillators have equal precedence. Moving the joystick upwards will increase the level of oscillator B while decreasing that of oscillator D; A and C remain the same. Equally moving it to the left increases the level of oscillator A against C while not affecting B and D. Therefore, for example, placing the joystick between A and B (North West) would give an equal amount of each of these oscillators while C and D will not contribute. Moving laterally to South East decreases A and B while increasing C and D proportionally, until A and B are not heard.
The result is a sound that morphs within a 2D plane with the joystick movement, mixed with the automation of the mix envelope.
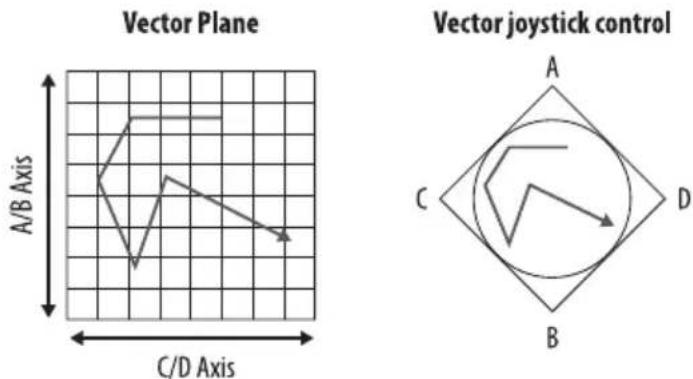
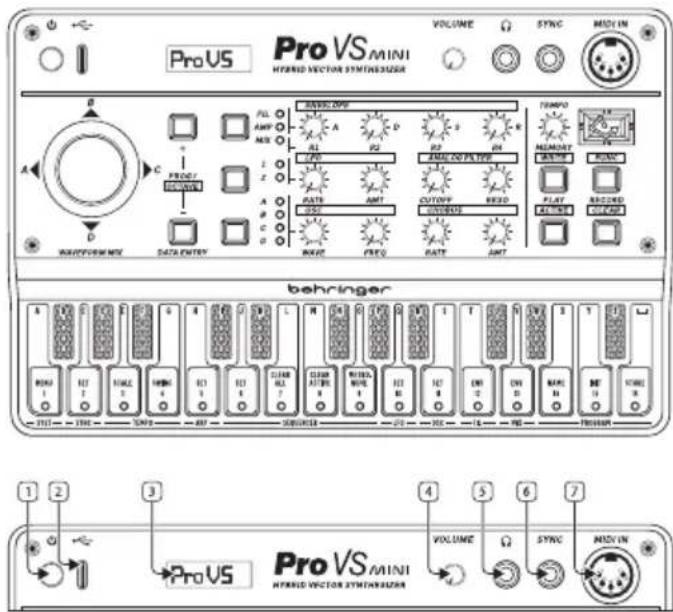
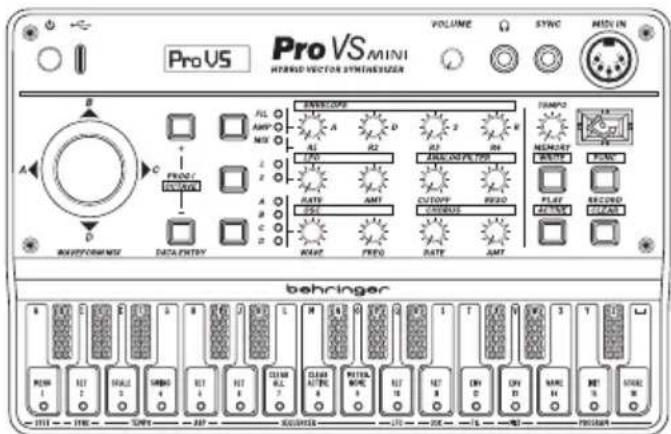
PRO VS MINI Controls
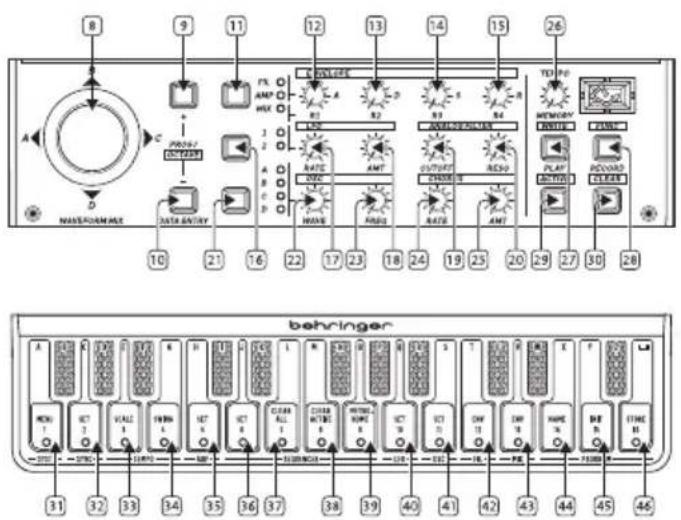
EN Step 2: Controls
EN
text_image
ProVS MINI HYBRID VECTOR SYMBOLS32AER VOLUME SYNC MIDIN PUL AMT MES BASEL P2 AL P3 ANALDO PLTF R C FATE AMT OUTFRY READ BALNT FREQ DATE AMT TEMP0 MEMORY RUNX PLAT RECEIVED OF CASH N/A behringer RUM1 RUT1 RUM2 RUM3 RUT4 RUT5 RUT6 RUT7 RUT8 RUT9 RUT10 RUT11 RUT12 RUT13 RUT14 RUT15 RUT16 RUT17 RUT18 RUT19 RUT20 RUT21 RUT22 RUT23 RUT24 RUT25 RUT26 RUT27 RUT28 RUT29 RUT30 RUT31 RUT32 RUT33 RUT34 RUT35 RUT36 RUT37 RUT38 RUT39 RUT40 RUT41 RUT42 RUT43 RUT44 RUT45 RUT46 RUT47 RUT48 RUT49 RUT50 RUT51 RUT52 RUT53 RUT54 RUT55 RUT56 RUT57 RUT58 RUT59 RUT60 RUT61 RUT62 RUT63 RUT64 RUT65 RUT66 RUT67 RUT68 RUT69 RUT70 RUT71 RUT72 RUT73 RUT74 RUT75 RUT76 RUT77 RUT78 RUT79 RUT80 RUT81 RUT82 RUT83 RUT84 RUT85 RUT86 RUT87 RUT88 RUT89 RUT90 RUT91 RUT92 RUT93 RUT94 RUT95 RUT96 RUT97 RUT98 RUT99 RUT10014 1580165 34bit Guice

text_image
8 9 11 12 13 14 15 26 A C PROS/ MAX DATA BATTERY 10 21 16 22 17 23 18 24 19 25 20 29 27 30 28 TEN P0 MEMORY INJNK ATM PLNT POLD POLD/LOAD/LEADER TEN P0 behringer A B C D E F G H I J K L M N O P Q R S T U V W X Y Z AB AC AD BE BF GC HC IB IBN IBN1 IBN2 IBN3 IBN4 IBN5 IBN6 IBN7 IBN8 IBN9 IBN10 IBN11 IBN12 IBN13 IBN14 IBN15 IBN16 IBN17 IBN18 IBN19 IBN20 IBN21 IBN22 IBN23 IBN24 IBN25 IBN26 IBN27 IBN28 IBN29 IBN30 IBN31 IBN32 IBN33 IBN34 IBN35 IBN36 IBN37 IBN38 IBN39 IBN40 IBN41 IBN42 IBN43 IBN44 IBN45 IBN46PRO VS MINI Controls
EN Step 2: Controls
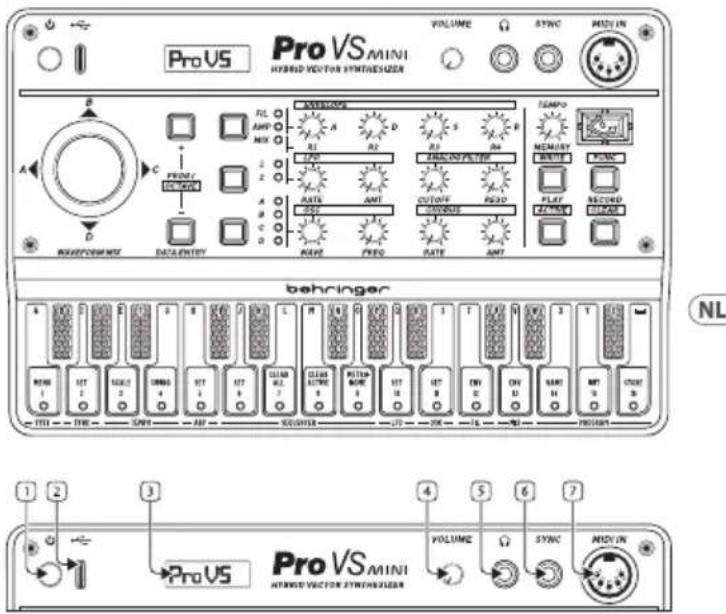
- POWER – On/Off button. Hold for 3 seconds to turn the PRO VS MINI on and off.
- USB-C—Used for power and to connect to a computer for USB MIDI control.
- LCDDISPLAY-OLED information display.
- VOLUME— Adjust the output level from the headphones output. Make sure the volume is turned down before putting on headphones.
- PHONES—Connect your headphones to this 3.5 mm TRS output. Make sure the volume is turned down before putting on headphones.
- SYNC—This input allows the use of an external clock and start/stop signal on 3.5 mm TRS jack.
- MIDIIN—Input MIDI from an external MIDI device such as a sequencer or DAW.
- WAVEFORMMIX—Mix the signals from the 4 sound sources.
-
- PROG/OCTAVE – Increase the program number or raise the octave up of the selected sound.
-
-PROG/OCTAVE— Decrease the program number or raise the octave up of the selected sound.
- ENVELOPE SELECT – Allows the controls to be used by the MIX, FILTER or AMPLITUDE sections.
- R1/ATTACK—Controls the attack time of the selected envelope.
- R2/DECAY—Controls the decay time of the selected envelope.
- R3/SUSTAIN—Controls the sustain level of the selected envelope.
- R4/RELEASE – Controls the release time of the selected envelope.
- LFOSELECT—Edit LFO 1 or 2.
- RATE—Sets the speed of the LFO.
- AMT—Controls the depth or amount of modulation.
- CUTOFF – Adjust the 24 dB low-pass filter's cutoff frequency.
- RESO—Adjusts the resonance of the filter. This emphasizes the frequencies around the cutoff point.
- WAVEFORM SELECT – Select which one of the 4 voice waveforms, A,B,C or D is active for voice control or editing.
EN
-
WAVE—Choose which waveform is used for the currently selected voice.
-
FREQ— Change the pitch or frequency of the waveform.
-
RATE—Adjust the speed of the chorus.
-
AMOUNT—Adjust the chorus depth.
-
TEMPO—Sets the speed of the ARP or sequencer in BPM.
-
MEMORY/WRITE—Calls up a new sequence memory or, with Function, writes a sequence to internal memory.
-
FUNC— Used to engage shift mode or for second functions.
-
PLAY/ACTIVE—Plays the arpeggiator or selected sequencer pattern. Function press to make active, which allows selected steps to be removed from the sequence.
-
RECORD/CLEAR—Press to enter record or function press to clear notes or a full pattern.
-
MENU – Repeated key press gives the following menus:
a. Seq/Arp – Switches between normal keyboard and sequencer operation and arpeggiator.
b. Filt Env Trig – Select either Single or Multi trigger. Single triggers the envelope with the first note played and will not re-trigger until all notes are released; Multi will re-trigger with each new note played.
c. MIDI Tx – Selects MIDI output channel 1 – 16 or off.
d. MIDI Rx – Selects MIDI input channel 1 – 16 or off.
e. MIDI Velocity – Switch velocity On or OFF.
f. MIDI CC — Selects whether MIDI continuous controller messages are received or off.
g. Prog Bulk SysEx Send — Outputs program memory contents as SysEx using the USB socket.
h. Prog Sing SysEx Send — Outputs current program as SysEx using the USB socket.
i. Patt Bulk SysEx Send – Outputs sequencer memory contents as SysEx using the USB socket.
j. Patt Sing SysEx Send – Outputs current sequence as SysEx using the USB socket.
k. SysEx Receive Listening - Allows the PRO VS MINI to receive SysEx from an external source using the USB socket.
-
Factory Reset – Resets all programs and sequences to factory default. Also displays firmware version. Press the + button (9) or - button (10) to initiate reset.
-
SYNC – Repeated key press gives the following menus:
a. Sync Source – Switch between Internal, MIDI, USB or Trigger.
b. Sync Type – Switch between 1ppq, 2ppq, 4ppq, 24ppq, 48ppq.
-
SCALE - Select 18 , 18 T, 116 , 116 T, 132 (global).
-
SWING—Select 50 (no swing), 55, 60, 65, 70, 75 (global).
-
ARPSET—Select up, down, up and down.
-
SEQUENCER SET — Switch between step fixed (note lengths defined by step) or record (notes as recorded).
-
CLEAR ALL – Wipes all sequencer memories.
-
CLEAR ACTIVE – Clears the action of Active Steps (button 29) and makes all steps active.
-
METRONOME – Switches the metronome on or off.
-
LFOSET— Selects the waveform for the LFO between triangle, square, sawtooth, ramp or S&H.
-
OSC SET – Selects coarse or fine tuning for the oscillators using control 23.
-
FIL ENV - Adjusts the amount of envelope modulation of the filter from 0 - 99.
-
MIXENV—Repeated key press gives the following menus:
a. Mix Env Loop – Select between off, 0->3, 1->3, 2->3, 0<->3, 1<->3, 2<->3 (if off is selected then no other menu options are available).
b. Mix Env Repeat – Select between 1 – 7 and continuous.
c. Mix Env Points: 0-4 — Use the waveform mix control 8 to set the balance between a, b, c and d at each point. Move from point to point with buttons 9 and 10.
-
NAME—Allows patch name to be set using keyboard.
-
PROGRAMINIT—Initialises the selected program.
-
STORE—Stores the current program.
Using the sequencer
- Press the Function button (28) then Menu (31) and select Seq.
- Select fixed steps or Record using key 36.
- Switch metronome on or off as required with key 39.
- Press the Function button again to exit Function mode.
- Put the sequencer into Play using button 29.
- Select the sequence that you want to write to using button 27 and the keyboard (white notes select patterns 1 – 16).
- Use Function and Clear buttons to remove notes from the sequence. Repeatedly pressing clear will clear all notes.
• Notes can then be recorded using the keyboard in time with the metronome (if used). -
The program can be changed at any time during recording using buttons 9 and 10.
-
When you are happy with your sequence press Function and Write. Select the pattern number you wish to write to using the keyboard, if you are not writing to the same pattern. Pressing Write again stores your sequence including the program used.
- Press Play to take sequencer out of Record mode. It is advisable to use Function and key 39 to switch off the metronome before playing back.
- Press the Function button (28) then Menu (31) and select Arp.
- Press Arp Set (key 35) and use buttons 9 and 10 to select Up, Down or Up and Down.
- Press the Function button again to return to normal use.
- Press Play (29).
- Hold down the keys that you want to use for your arpeggio.
PRO-VS MINI Getting Started
EN Step 3: Getting Started
OVERVIEW
This 'getting started' guide will help you set up your PRO VS MINI and briefly introduce its capabilities.
CONNECTION

To connect the PRO VS MINI to your system, please consult the connection guide earlier in this document.
SOFTWARE SETUP
The PRO VS MINI is a USB Class Compliant MIDI device, and so no driver installation is required. The PRO VS MINI does not require any additional drivers to work with Windows and MacOS.
HARDWARE SETUP
Make all the connections in your system. Keep the PRO VS MINI power turned off when making any connections.
Ensure your sound system is turned down.
Turn on the PRO VS MINI before turning on any power amplifiers and turn it off last. This will help prevent any turn on or turn off "pops or thumps" in your speakers.
WARM UP TIME
We recommend leaving 15 minutes or more time for the PRO VS MINI to warm up before recording or live performance. (Longer if it has been brought in from the cold). This will allow the precision analog circuits time to reach their normal operating temperature and tuned performance.
FIRMWARE UPDATE
Please check the behringer.com website regularly for any updates to the Behringer SYNTHTRIBE app. The app looks for the latest firmware file which can then be downloaded and used to update the PRO VS MINI.
The PRO VS MINI has 128 waveforms available for each voice
| Number Name | ||
| 0 | Twang |  |
| 1 | Clav |  |
| 2 | Xylophone |  |
| 3 | Slippery Slope |  |
| 4 | Enharmonic Square |  |
| 5 | Xylophone 2 |  |
| 6 | Mellow Square |  |
| 7 | Chaos 1 |  |
| 8 | Chaos 2 |  |
| 9 | Chaos 3 |  |
| 10 | Chaos 4 |  |
| 11 | Bright Square |  |
| Number Name | ||
| 12 | Hollow |  |
| 13 | BP Square |  |
| 14 | Ski Slope 1 |  |
| 15 | Rasp |  |
| 16 | Peal |  |
| 17 | Fuzz |  |
| 18 | Floss |  |
| 19 | Excite |  |
| 20 | Awaken |  |
| 21 | Energize |  |
| 22 | BP Twang |  |
| 23 | Complex Pulse |  |
| 24 | Mellow Square 2 |  |
22 23 QUVxMrt Guice
| Number | Name | |
| 25 | Harmonic Square |  |
| 26 | Thin Ramp |  |
| 27 | Xylophone 3 |  |
| 28 | Thin Square | [BYHT] |
| 29 | Harmonic Ramp |  |
| 30 | Rouse |  |
| 31 | Waken |  |
| 32 | Sine |  |
| 33 | Sawtooth |  |
| 34 | Square |  |
| 35 | Dome 1 |  |
| 36 | Dome 2 |  |
| 37 | Mellow Dome |  |
| Number | Name | |
| 38 | Dome 3 | |
| 39 | Dome 4 | |
| 40 | Rasp 1 | |
| 41 | Rasp 2 | |
| 42 | Rasp 3 | |
| 43 | Rasp 4 | |
| 44 | Dome 5 | |
| 45 | HP Saw | |
| 46 | High BP Saw | |
| 47 | High BP Square | |
| 48 | Vocal | |
| 49 | Squeeze box | |
| 50 | Pulse |
EN
51 Limp Saw
52 Spark Wave 1
53 Spark Wave 2
54 Spark Wave 3
55 Mid Wave 1
56 Cacophnous Buzz 1
57 Mid Buzz 1
58 Dome 6
59 Soft Dome 3
60 Dome 7
61 Spark Wave 4
62 Spark Wave 5
63 Soft Dome 4
64 Dome 8
65 Organ
66 Spark Wave 5
67 Soft Wave 1
68 Soft Wave 2
69 Spark Wave 7
70 Reed
71 Soft Wave 3
72 Soft Wave 4
73 Saxophone
74 Soft Wave 5
75 Trashy Wave 1
76 Trashy Wave 2
| Number Name | ||
| 77 | Trashy Wave 3 |  |
| 78 Trashy Wave 4 |  | |
| 79 Trashy Wave 5 |  | |
| 80 Trashy Wave 6 |  | |
| 81 | Jaw Harp 1 |  |
| 82 Jaw Harp 2 |  | |
| 83 Soft Wave 6 |  | |
| 84 Thin 1 |  | |
| 85 Thin 2 |  | |
| 86 Spark Wave 8 |  | |
| 87 Spark Wave 9 |  | |
| 88 Spark Wave 10 |  | |
| 89 Soft Dome 5 | [BY57] | |
| Number Name | ||
| 90 Soft Dome 6 | ~~~ | |
| 91 Cacophonous Buzz 2 | ~~~ | |
| 92 Thin 3 | ~~~ | |
| 93 Spark Wave 11 | ~~~ | |
| 94 Soft Dome 7 | ~~~ | |
| 95 Soft Wave 7 | ~~~ | |
| 96 Sine 2 | ~~~ | |
| 97 Syncd Sine | ~~~ | |
| 98 Trashy Wave 7 | ~~~ | |
| 99 Twingle Pad | ~~~ | |
| 100 | Dome 9 | ~~~ |
| 101 | Thin 4 | —— |
| 102 | Thin 5 | —— |
28 290015X9143 Guice
| Number Name | |
| 103 Trashy Wave 8 | |
| 104 Trashy Wave 9 | |
| 105 Trashy Wave 10 | |
| 106 Trashy Wave 11 | |
| 107 Trashy Wave 12 | |
| 108 Trashy Wave 13 | |
| 109 Spark Wave 12 | |
| 110 Spark Wave 13 | |
| 111 Trashy Wave 14 | |
| 112 Trashy Wave 15 | |
| 113 Rainbow | |
| 114 Soft Dome 8 | |
| 115 Trashy Wave 15 |
| Number Name | ||
| 116 | Soothing 1 | |
| 117 | Soothing 2 | |
| 118 | Space Wave | |
| 119 | 5th Rasp | |
| 120 | Octave Wave | |
| 121 | Triangle + Overtones | |
| 122 | Pulse + Overtones | |
| 123 | Rising Square | |
| 124 | Soft Wave 8 | |
| 125 | Cacophonous Buzz 3 | |
| 126 | Silence | |
| 127 | White Noise | |
EN
30 34 Quick Shift Guide
Vector joystick control
flowchart
graph TD
    A["A"] --> D["D"]
    B["B"] --> C["C"]
    C --> D
    D --> A
    style A fill:#fff,stroke:#000
    style B fill:#fff,stroke:#000
    style C fill:#fff,stroke:#000
    style D fill:#fff,stroke:#000
PRO-VS MINI Controles
ES Paso 2: Controles
text_image
ProVS MINI HYBRID VECTOR SYNTHESISER VOLUME SYNC MINI IN B A C D FL AMP MS R1 L20 R3 R4 R5 R6 R7 R8 R9 R10 R11 R12 R13 R14 R15 R16 R17 R18 R19 R20 R21 R22 R23 R24 R25 R26 R27 R28 R29 R30 R31 R32 R33 R34 R35 R36 R37 R38 R39 R40 R41 R42 R43 R44 R45 R46 R47 R48 R49 R50 R51 R52 R53 R54 R55 R56 R57 R58 R59 R60 R61 R62 R63 R64 R65 R66 R67 R68 R69 R70 R71 R72 R73 R74 R75 R76 R77 R78 R79 R80 REVERFORUM/REF. DATA ENTRY BEHRINGER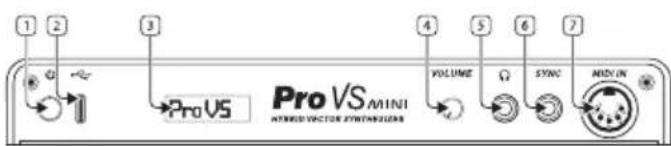
text_image
ProVS MINI AT least efficient vehicle VOLUME Ω SYNC MODUN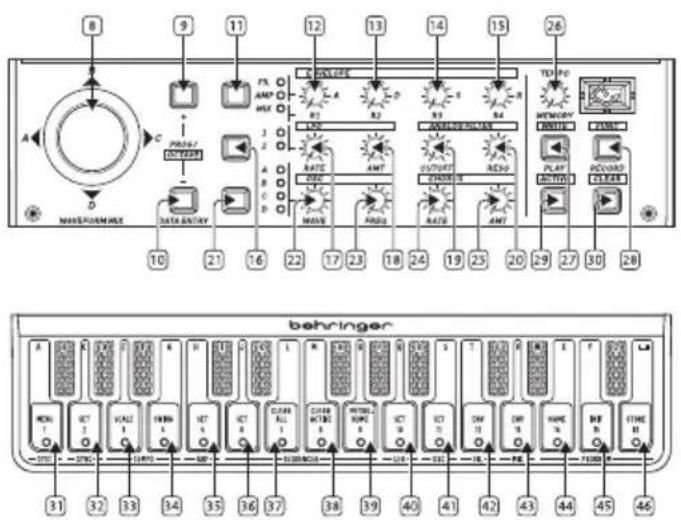
text_image
8 9 11 12 13 14 15 16 17 18 19 20 21 22 23 24 25 26 TEN P0 MEMORY INTUSTRY PLA PLA PLA PLA PLA PLA PLA PLA PLA PLA PLA PLA PLA PLA PLA PLA PLA PLA PLA PLA PLA PLA PLA PLA PLA PLA PLA PLA PLA PLA PLA PLA PLA PLA 10 21 16 22 17 23 18 24 19 25 20 29 27 30 28 behringer 31 32 33 34 35 36 37 38 39 40 41 42 43 44 45 46PRO-VS MINI Controles

Paso 2: Controles
Vector joystick control

flowchart
graph TD
    A["A"] --> C["C"]
    C --> D["D"]
    D --> B["B"]
    B --> A
    style A fill:#fff,stroke:#000
    style B fill:#fff,stroke:#000
    style C fill:#fff,stroke:#000
    style D fill:#fff,stroke:#000
PRO-VS MINI Réglages
text_image
ProVS MINI HYBRID VECTOR SYNTHESIZER VOLUME SYNC MINI IN B A C D E F G H I J K L M N O P Q R S T U V W X Y Z AB AC AD AV B C D E F G H I J K L M N O P Q R S T U V W X Y Z ABRICOPE A B C D E F G H I J K L M N O P Q R S T U V W X Y Z ABRICOPE TPO AMT CUTOFF CONVATE AVT0000000000000000000000000000000000000000000000000000000000000000000000000000000000000000000000000000 BEHRINGER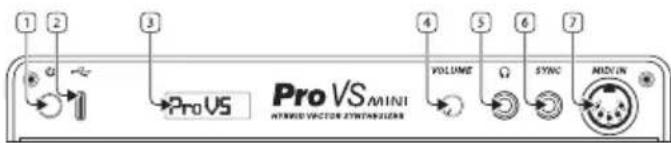
text_image
ProVS MINI HYPEDID VACTER SYNTHESIS VOLUME SYNC MINI
text_image
8 9 11 12 13 14 15 26 A C PROXY MACHINE DATA BATTERY 10 21 16 22 17 23 18 24 19 25 20 29 27 30 28 TAX P0 MEMORY PLUMB PLAY REWARD ORDER 10000000000000000000000000000000000000000000000000000000000000000000000000000000000000000000000000000 behringer A B C D E F G H I J K L M N O P Q R S T U V W X Y Z AB AC ADBE ADBELE ADBELELE ADBELELELE ADBELELELELE ADBELELELELELELELELELELELELELELELELELELELELELELELELELELELELELELELELELELELELELELELELELELELELELELELELELELELELELELELELELELELELELELELELELELELELELELElelelelelelelelelelelelelelelelelelelelelelelelelelelelelelelelelelelelelelelelelelelelelelelelelelelelelelelelelelelelelelelelelelelelelelelelelelelelelelelelelelelelelelelelelelelelelece 31 32 33 34 35 36 37 38 39 40 41 42 43 44 45 46PRO-VS MINI Controles
PRO-VS MINI Controles
PT Passo 2: Controles

text_image
ProVS MINI HYPERD VECTOR SYNTHESISER VOLUME SYNC MINI IN B A C D FL AMP MSS ADD ADD ADD ADD ADD ADD ADD ADD ADD ADD ADD ADD ADD ADD ADD ADD ADD ADD ADD ADD ADD ADD ADD ADD ADD ADD ADD ADD ADD ADD ADD ADD ADD ADD ADD ADD ADD ADD ADD ADD ADD ADD ADD ADD ADD ADD ADD ADD ADD ADD A1 L10 R2 R3 R4 R5 R6 R7 R8 R9 R10 R11 R12 R13 R14 R15 R16 R17 R18 R19 R20 R21 R22 R23 R24 R25 R26 R27 R28 R29 R30 R31 R32 R33 R34 R35 R36 R37 R38 R39 R40 R41 R42 R43 R44 R45 R46 R47 R48 R49 R50 R51 R52 R53 R54 R55 R56 R57 R58 R59 R60 R61 R62 R63 R64 R65 R66 R67 R68 R69 R70 R71 R72 R73 R74 R75 R76 R77 R78 R79 R80 R81 R82 R83 R84 R85 R86 R87 R88 R89 R90 R91 R92 R93 R94 R95 R96 R97 R98 R99 ADD/RESET/RESET/RESET/RESET/RESET/RESET/RESET/RESET/RESET/RESET/RESET/RESET/RESET/RESET/RESET/RESET/RESET/RESET/RESET/RESET/RESET/RESET/RESET/RESET/RESET/RESET/RESET/RESET/RESET/RESET/RESET/RESET/RESET/RESET/RESET/RESET/RESET/RESET/RESET/RESET/RESET/RESET/RESET/RESET/RESET/RESET/RESET/RESET/RESET/RESET/REDAIR/ WREFORMANCE DATA ENTRY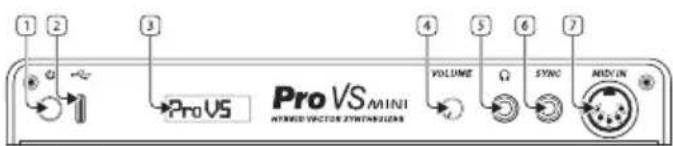
text_image
ProVS MINI MINI+O-VECTOR SYNTHESIS VOLUME Ω STOCK MIDLY-IN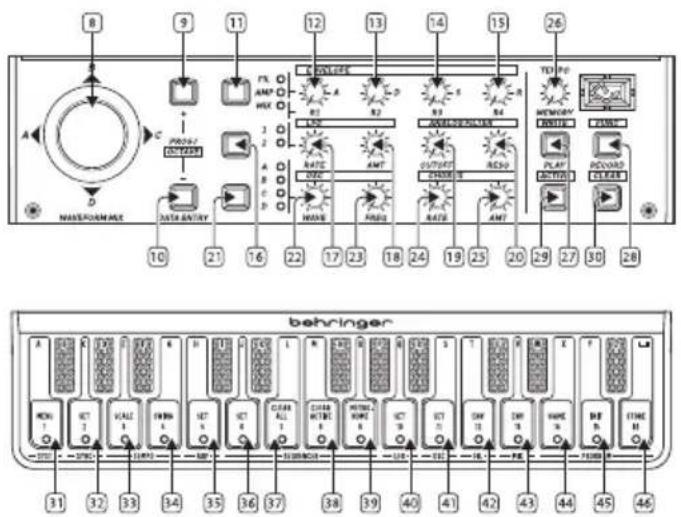
text_image
8 9 11 12 13 14 15 26 A C PROXY POWER DATA BATTERY 10 21 16 22 17 23 18 24 19 25 20 29 27 30 28 TEN.PG MEMORY PLANT PONDER ORDER behringer A B C D E F G H I J K L M N O P Q R S T U V W X Y Z AB AC ADBE AVCC AVCC AVCC AVCC AVCC AVCC AVCC AVCC AVCC AVCC AVCC AVCC AVCC AVCC AVCC AVCC AVCC AVCC AVCC AVCC AVCC AVCC AVCC AVCC AVCC AVCC AVCC AVCC AVCC AVCC AVCC AVCC AVCC AVCCPRO-VS MINI Controles

Passo 2: Controles
PRO-VS MINI Controlli
text_image
ProVS MINI HYPERD VECTOR SYNTHESIZER VOLUME SYNC MINI IN B A C D E F G H I J K L M N O P Q R S T U V W X Y Z AB AC AD AV AV AV AV AV AV AV AV AV AV AV AV AV AV AV AV AV AV AV AV AV AV AV AV AV AV AV AV AV AV AV AV AV AV AV AV AV AV AV AV AV AV AV AV AV AV AV AV AV AV RVMS/VRMS/VRMS/VRMS/VRMS/VRMS/VRMS/VRMS/VRMS/VRMS/VRMS/VRMS/VRMS/VRMS/VRMS/VRMS/VRMS/VRMS/VRMS/VRMS/VRMS/VRMS/VRMS/VRMS/VRMS/VRMS/VRMS/VRMS/VRMS/VRMS/VRMS/VRMS/VRMS/VRMS/VRms/VRms/VRms/VRms/VRms/VRms/VRms/VRms/VRms/VRms/VRms/VRms/VRms/VRms/VRms/VRms/VRms/VRms/VRms/VRms/VRms/VRms/VRms/VRms/VRms/VRms/VRms/VRms/VRms/VRms/VRms/VRms/VRms/VRms/ BEHRINGER
text_image
1 2 3 Pro VS MINI AT least efficient transient sensors 4 VOLUME Ω STING MODY IN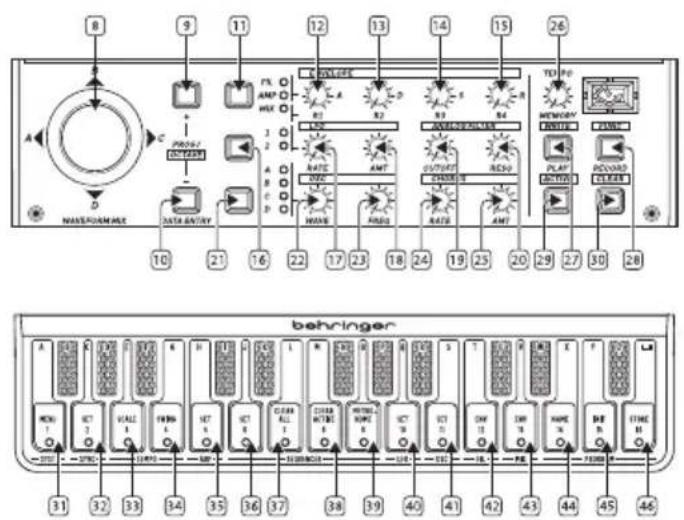
text_image
8 9 11 12 13 14 15 26 C PRELISE A B C D E F G H I J K L M N O P Q R S T U V W X Y Z A B C D E F G H I J K L M N O P Q R S T U V W X Y Z A B C D E F G H I J K L M N O P Q R S T U V W Z A B C D E F G H I J K L M N O P Q R S T U V W X Y Z A B C D E F G H I J K L M N O P Q R S T U V O P Q R S T U V O P QPRO-VS MINI Controles
Step 2: Controlli
PRO-VS MINI Bediening
NL Stap 2: Bediening
text_image
ProVS MINI HYBRID VECTOR SYNTHESIZER VOLUME SYNC MED IN A B C D PREM/ DATA/ENTRY R1 R2 R3 R4 R5 R6 R7 R8 R9 R10 R11 R12 R13 R14 R15 R16 R17 R18 R19 R20 R21 R22 R23 R24 R25 R26 R27 R28 R29 R30 R31 R32 R33 R34 R35 R36 R37 R38 R39 R40 R41 R42 R43 R44 R45 R46 R47 R48 R49 R50 R51 R52 R53 R54 R55 R56 R57 R58 R59 R60 R61 R62 R63 R64 R65 R66 R67 R68 R69 R70 R71 R72 R73 R74 R75 R76 R77 R78 R79 R80 RBREFORMICE BEACH/ENTRY AVINGSCOPE A1 A2 D S B T E M P O N M N N N N N N N N N N N N N N N N N N N N N N N N N N N N N N N N N N N N N N N N N N N N N N N N N N N N N N N N N N N N N N N N N N N N N N N N N N N N N N N N N N N N N N N N N N N N N N N N N N N N-NL BEACH/ENTRY AVINGSCOPE A1 A2 D S B T E M P O N M N M N M N M N M N M N M N M N M N M N M N M N M N M N M N M N M N M N M N M N M N M N M N M N M N M N M N M N M N M N M N M N M N M N M N M N M N M N M N M N M N M N M N M N M N M N M N M N M N M N FLOWING / 1 2 3 4 5 6 7 ProVS MINI HYBRID VECTOR SYNTHESIZER VOLUME SYNC MED IN82 83 QuickMail Guide

text_image
B 9 11 12 13 14 15 26 A C PROSY MAX D DATA BATTERY 10 21 16 22 17 23 18 24 18 25 20 29 27 30 28 TEN P0 MEMORY INVERTS PLINK PONDER EXTRUST TEN P0 TEN P0 TEN P0 TEN P0 TEN P0 TEN P0 TEN P0 TEN P0 TEN P0 TEN P0 TEN P0 TEN P0 TEN P0 TEN P0 TEN P0 TEN P0 TEN P0 TEN P0 TEN P0 TEN P0 TEN P1 TEN P1 TEN P1 TEN P1 TEN P1 TEN P1 TEN P1 TEN P1 TEN P1 TEN P1 TEN P1 TEN P1 TEN P1 TEN P1 TEN P1 TEN P1 TEN P1 TEN P1 TEN P1 TEN P1 TEN P2 TEN P2 TEN P2 TEN P2 TEN P2 TEN P2 TEN P2 TEN P2 TEN P2 TEN P2 TEN P2 TEN P2 TEN P2 TEN P2 TEN P2 TEN P2 TEN P2 TEN P2 TEN P2 TEN P2 TEN P3 TEN P3 TEN P3 TEN P3 TEN P3 TEN P3 TEN P3 TEN P3 TEN P3 TEN P3 TEN P3 TEN P3 TEN P3 TEN P3 TEN P3 TEN P3 TEN P3 TEN P3 TEN P3 TEN P3 TEN P4 TEN P4 TEN P4 TEN P4 TEN P4 TEN P4 TEN P4 TEN P4 TEN P4 TEN P4 TEN P4 TEN P4 TEN P4 TEN P4 TEN P4 TEN P4 TEN P4 TEN P4 TEN P4 TEN P4PRO-VS MINI Bediening
NL Stap 2: Bediening
b. Sync Type – Omschakelen tussen 1ppq, 2ppq, 4ppq, 24ppq of 48ppq.
text_image
ProVS MINI HYPERD VECTOR SYNTHESISER VOLUME SYNC MINI IN B A C D ENSCOPE FL AMP MSS A1 LFP R2 R3 RN AMULANCE FWD SOUTOFF CONNERS TOMPO MEMBERY RANT PLAN RACKED CLEAR WREFORMATE DATA ENTRY BEHRINGER R U1 U2 U3 U4 U5 U6 U7 U8 U9 U10 U11 U12 U13 U14 U15 U16 U17 U18 U19 U20 U21 U22 U23 U24 U25 U26 U27 U28 U29 U30 U31 U32 U33 U34 U35 U36 U37 U38 U39 U40 U41 U42 U43 U44 U45 U46 U47 U48 U49 U50 U51 U52 U53 U54 U55 U56 U57 U58 U59 U60 U61 U62 U63 U64 U65 U66 U67 U68 U69 U70 U71 U72 U73 U74 U75 U76 U77 U78 U79 U80 U81 U82 U83 U84 U85 U86 U87 U88 U89 U90 U91 U92 U93 U94 U95 U96 U97 U98 U99 U100
text_image
ProVS MINI MINDIVATOR SYNTHESIS VOLUME STWC MID/LINSE

text_image
B 9 11 12 13 14 15 26 A C PROSY DATA BATTERY 10 21 16 22 17 23 18 24 18 25 20 29 27 30 28 TEN P0 MEMORY INTUSTRY PLA PLOAD DRINK EXTRUST TEN P0 TEN P0 TEN P0 TEN P0 TEN P0 TEN P0 TEN P0 TEN P0 TEN P0 TEN P0 TEN P0 TEN P0 TEN P0 TEN P0 TEN P0 TEN P0 TEN P0 TEN P0 TEN P0 TEN P0 TEN P1 TEN P1 TEN P1 TEN P1 TEN P1 TEN P1 TEN P1 TEN P1 TEN P1 TEN P1 TEN P1 TEN P1 TEN P1 TEN P1 TEN P1 TEN P1 TEN P1 TEN P1 TEN P1 TEN P1 TEN P2 TEN P2 TEN P2 TEN P2 TEN P2 TEN P2 TEN P2 TEN P2 TEN P2 TEN P2 TEN P2 TEN P2 TEN P2 TEN P2 TEN P2 TEN P2 TEN P2 TEN P2 TEN P2 TEN P2 TEN P3 TEN P3 TEN P3 TEN P3 TEN P3 TEN P3 TEN P3 TEN P3 TEN P3 TEN P3 TEN P3 TEN P3 TEN P3 TEN P3 TEN P3 TEN P3 TEN P3 TEN P3 TEN P3 TEN P3 TEN P4 TEN P4 TEN P4 TEN P4 TEN P4 TEN P4 TEN P4 TEN P4 TEN P4 TEN P4 TEN P4 TEN P4 TEN P4 TEN P4 TEN P4 TEN P4 TEN P4 TEN P4 TEN P4PRO-VS MINI Kontroller
SE Steg 2: Kontroller
Vector joystick control
flowchart
graph TD
    A["A"] --> C["C"]
    C --> D["D"]
    D --> B["B"]
    B --> A
text_image
1 2 3 ProVS MINI PROVS MINI HYPERID VACTER SYNTHESIS 4 VOLUME 5 Ω 6 SYNC 7 MIND INPL
100 NOT Start Guide
text_image
B 9 11 12 13 14 15 26 A C PROSY MAX D DATA BATTERY 10 21 16 22 17 23 18 24 18 25 20 29 27 30 28 TEN P0 MEMORY INVERTS PLINK POLDERS EXTRUST BEVER TERRER RATI AMT RASSO RACE AMT RACE RACE RACE RACE RACE RACE RACE RACE RACE RACE RACE RACE RACE RACE RACE RACE RACE RACE RACE RACE RACE RACE RACE RACE RACE RACE RACE RACE RACE RACE RACE RACE RACE RACEPRO-VS MINI Sterowanica
Vector joystick control
flowchart
graph TD
    A["A"] --> D["D"]
    B["B"] --> C["C"]
    C --> D
    D --> A
    style A fill:#fff,stroke:#000
    style B fill:#fff,stroke:#000
    style C fill:#fff,stroke:#000
    style D fill:#fff,stroke:#000
text_image
ProVS MINI HYPED VACTER SYNTHESIS VOLUME SYNC MINI IN132 1990 Quick Start Guide

text_image
B 9 11 12 13 14 15 26 A C PROSY DATA BATTERY 10 21 16 22 17 23 18 24 18 25 20 29 27 30 28 TEN P0 MEMORY INTUSTRY PLAT PONDER EXTRUST TEN P0 TEN P0 TEN P0 TEN P0 TEN P0 TEN P0 TEN P0 TEN P0 TEN P0 TEN P0 TEN P0 TEN P0 TEN P0 TEN P0 TEN P0 TEN P0 TEN P0 TEN P0 TEN P0 TEN P0 TEN P1 TEN P1 TEN P1 TEN P1 TEN P1 TEN P1 TEN P1 TEN P1 TEN P1 TEN P1 TEN P1 TEN P1 TEN P1 TEN P1 TEN P1 TEN P1 TEN P1 TEN P1 TEN P1 TEN P1 TEN P2 TEN P2 TEN P2 TEN P2 TEN P2 TEN P2 TEN P2 TEN P2 TEN P2 TEN P2 TEN P2 TEN P2 TEN P2 TEN P2 TEN P2 TEN P2 TEN P2 TEN P2 TEN P2 TEN P2 TEN P3 TEN P3 TEN P3 TEN P3 TEN P3 TEN P3 TEN P3 TEN P3 TEN P3 TEN P3 TEN P3 TEN P3 TEN P3 TEN P3 TEN P3 TEN P3 TEN P3 TEN P3 TEN P3 TEN P3 TEN P4 TEN P4 TEN P4 TEN P4 TEN P4 TEN P4 TEN P4 TEN P4 TEN P4 TEN P4 TEN P4 TEN P4 TEN P4 TEN P4 TEN P4 TEN P4 TEN P4 TEN P4 TEN P4 TEN P4PRO-VS MINI 控制
第二步: 控制
The PRO VS MINI is capable of extensive control by means of MIDI continuous controllers:
| CC # Affects Range | |
| 1 Modulation 0 – 127 | |
| 24 Voice A Wave 0 – 127 | |
| 25 Voice B Wave 0 – 127 | |
| 26 Voice C Wave 0 – 127 | |
| 27 Voice D Wave 0 – 127 | |
| 28 LFO 2 Amount 0 – 99 | |
| 47 Filter Env Amount | 0 – 127 |
| 54 LFO 1 waveform (triangle, square, saw) | 0 – 127 |
| 55 LFO 2 waveform (triangle, square, saw) | 0 – 127 |
| 56 LFO1 Destination (VCF OSC) | 0 – 127 |
| 70 LFO 1 Amount 0 – 99 | |
| 71 Filter Resonance 0 – 99 | |
| 72 LFO 1 Rate 0 – 99 | |
| 73 LFO 2 Rate 0 – 99 | |
| 74 Filter Cutoff 0 – 99 | |
| 81 Amplitude Envelope Attack 0 – 99 |
| CC # | Affects | Range |
| 82 Amplitude Envelope Decay | 0 – 99 | |
| 83 | Amplitude Envelope Sustain | 0 – 99 |
| 84 | Amplitude Envelope Release | 0 – 99 |
| 85 Filter Envelope Attack | 0 – 99 | |
| 86 Filter Envelope Decay | 0 – 99 | |
| 87 Filter Envelope Sustain | 0 – 99 | |
| 88 Filter Envelope Release | 0 – 99 | |
| 91 Chorus Depth | 0 – 99 | |
| 92 Chorus Rate | 0 – 99 | |
| 111 | Voice A Fine Tuning | 0 – 99 |
| 112 | Voice B Fine Tuning | 0 – 99 |
| 113 | Voice C Fine Tuning | 0 – 99 |
| 114 | Voice D Fine Tuning | 0 – 99 |
| 115 | Voice A Coarse Tuning | 0 – 99 |
| 116 | Voice B Coarse Tuning | 0 – 99 |
| 117 | Voice C Coarse Tuning | 0 – 99 |
| 118 | Voice C Coarse Tuning | 0 – 99 |
150150068d Start Guide
Specifications
| Synthesizer Architecture | |
| Number of voices 4 Voice | |
| Type Hybrid architecture | |
| Oscillators 16 Vector oscillators | |
| LFO 2 | |
| VCF Analog Low-Pass Filter | |
| Envelopes 3 | |
| Connectivity | |
| Power switch Push button on/off | |
| MIDI In 5-pin DIN / 16 channels | |
| USB (MIDI) USB-C | |
| Headphones | 3.5 mm TRS, stereo,max. 5 mW 32 Ω |
| Sync Input and Output | |
| USB | |
| Type USB-C | |
| Supported Operating Systems | Windows 7 or higher |
| Mac OS X 10.10 or higher | |
| Volume | |
| Control Volume: 0 to 10 | |
| Control Section | |
| Switches Prog ±/ / octave ± | |
| Arpeggiator | |
| Capacity 3 patterns | |
| Switch Func | |
| LFO Section | |
| Controls | LFO Rate |
| Amount | |
| Switches LFO 1 / 2 | |
| Oscillator Section | |
| Controls | Waveform select |
| Detune | |
| Switches Waveform select | |
| Chorus Section | |
| Controls Rate | |
| Depth | |
| Sequencer Section | |
| Capacity | 16 steps, 16 patterns |
| Control | Tempo |
| Switches | Memory write |
| Function | |
| Play/active | |
| Record/erase | |
| Analog Filter Section | |
| Controls | Cutoff |
| Resonance | |
EN
152 153 2014 Start Guide
EN
| Envelope Section | |
| Controls | R1/Attack (filter, amplifier, oscillator) |
| R2/Decay (filter, amplifier, oscillator) | |
| R3/Sustain (filter, amplifier, oscillator) | |
| R4/Release (filter, amplifier, oscillator) | |
| Keyboard and Controls | |
| Joystick Waveform mix | |
| Keyboard 27, capacitive touch | |
| Power Requirements | |
| Mains connector Micro USB | |
| Indicator Power LED | |
| Physical | |
| Standard operating temperature range | 5°C - 45°C (41°F - 113°F) |
| Dimensions (H x W x D) | 39 x 193 x 124 mm (1.55 x 7.60 x 4.88") |
| Weight 0.40 kg (0.88 lbs) | |
技术参数
Other important information

Important information

Please register your new Music Tribe equipment right after you purchase it by visiting musictribe.com. Registering your purchase using our simple online form helps us to process your repair claims more quickly and efficiently. Also, read the terms and conditions of our warranty, if applicable.
- Malfunction. Should your Music Tribe Authorized Reseller not be located in your vicinity, you may contact the Music Tribe Authorized Fulfiller for your country listed under "Support" at musictribe.com. Should your country not be listed, please check if your problem can be dealt with by our "Online Support" which may also be found under "Support" at musictribe.com. Alternatively, please submit an online warranty claim at musictribe.com BEFORE returning the product.
3. Power Connections
Before plugging the unit into a power socket, please make sure you are using the correct mains voltage for your particular model. Faulty fuses must be replaced with fuses of the same type and rating without exception.
1. Registro online.
Other important information

Responsible Party Name:
Music Tribe Commercial NV Inc.
Address:
122 E. 42nd St.1, 8th Floor NY, NY 10168, United States
Email Address:
legal@musictribe.com
PRO VS MINI
This equipment has been tested and found to comply with the limits for a Class B digital device, pursuant to part 15 of the FCC Rules. These limits are designed to provide reasonable protection against harmful interference in a residential installation. This equipment generates, uses and can radiate radio frequency energy and, if not installed and used in accordance with the instructions, may cause harmful interference to radio communications. However, there is no guarantee that interference will not occur in a particular installation. If this equipment does cause harmful interference to radio or television reception, which can be determined by turning the equipment off and on, the user is encouraged to try to correct the interference by one or more of the following measures:
- Reorient or relocate the receiving antenna.
- Increase the separation between the equipment and receiver.
- Connect the equipment into an outlet on a circuit different from that to which the receiver is connected.
- Consult the dealer or an experienced radio/TV technician for help.
This equipment complies with Part 15 of the FCC rules. Operation is subject to the following two conditions:
(1) this device may not cause harmful interference, and (2) this device must accept any interference received, including interference that may cause undesired operation.
Important information:
Changes or modifications to the equipment not expressly approved by Music Tribe can void the user's authority to use the equipment.
CE
Hereby, Music Tribe declares that this product is in compliance with Directive 2014/30/EU, Directive 2011/65/EU and Amendment 2015/863/EU, Directive 2012/19/EU, Regulation 519/2012 REACH SVHC and Directive 1907/2006/EC.
Full text of EU DoC is available at https://community.musictribe.com/
EU Representative: Music Tribe Brands DK A/S Address: Gammel Strand 44, DK-1202 København K, Denmark
UK Representative: Music Tribe Brands UK Ltd. Address: 8th Floor, 20 Farringdon Street London EC4A 4AB, United Kingdom

Correct disposal of this product: This symbol indicates that this product must not be disposed of with household waste, according to the WEEE Directive (2012/19/EU) and your
national law.
This product should be taken to a collection center licensed for the recycling of waste electrical and electronic equipment (EEE). The mishandling of this type of waste could have a possible negative impact on the environment and human health due to potentially hazardous substances that are generally associated with EEE. At the same time, your cooperation in the correct disposal of this product will contribute to the efficient use of natural resources. For more information about where you can take your waste equipment for recycling, please contact your local city office, or your household waste collection service.
We Hear You