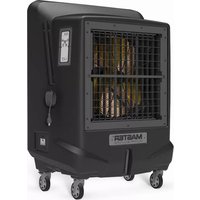
BC 121 - Air Conditioning Master - Free user manual and instructions
Find the device manual for free BC 121 Master in PDF.



| Product Type | Evaporative air cooler |
| Brand | Master |
| Model | BC 121 |
| Power Supply | 220-240 V / 50 Hz (check rating plate) |
| Power | Not specified |
| Water Tank Capacity | Not specified |
| Air Flow Rate | Not specified |
| Dimensions (approx.) | Not specified |
| Weight (approx.) | Not specified |
| Main Functions | On/Off, ventilation (3 speeds), evaporative cooling (COOL), timer (delayed start/stop), vertical oscillation (SWING) |
| Control Type | Control panel + remote control |
| Water Supply | Manual filling or connection to water mains (1/2", max pressure 3 bar) |
| Operating Temperature | Air: 18°C to 45°C; Water: <45°C |
| Daily Maintenance | Drain and rinse the tank, clean the evaporative pads and air filter (if present) |
| Monthly Maintenance | Deep cleaning: disassemble and clean the tank, evaporative pads, and pump filter |
| Spare Parts | Evaporative pads, water pump, pump filter, air filter, remote control |
| Repairability | Interventions only by an authorized service center |
| Safety | Unplug before maintenance, do not cover, minimum distance 0.5 m from walls, use clean potable water |
| Protection Rating | Not specified |
| Included Accessories | Remote control, user manual |
Frequently Asked Questions - BC 121 Master
User questions about BC 121 Master
0 question about this device. Answer the ones you know or ask your own.
Ask a new question about this device
Download the instructions for your Air Conditioning in PDF format for free! Find your manual BC 121 - Master and take your electronic device back in hand. On this page are published all the documents necessary for the use of your device. BC 121 by Master.
USER MANUAL BC 121 Master
natural_image
Icon of an open book with an exclamation mark inside a diamond shape, set against a yellow and gray background (no text or symbols)USER AND MAINTENANCE MANUAL
BC 121 - BC 221 - BC 341 - BC 451
| en | it | de | es | fr | nl | pt | da | pl | ru | cs | hu | tr | lt |
| lv | et | ro | sk | bg | el |
NOTE:
TECHNICAL DATA - DATI TECNICI - TECHNISCHE DATEN - DATOS TÉCNICOS - DONNÉES TECHNIQUES - TECHNISCHE GEGEVENS - DADOS TÉCNICOS - TEKNISKE DATA - TEKNISET TIEDOT - TEKNISKE DATA - TEKNISKA DATA - DANE TECHNICZNE - ТЕХНИЧЕСКИЕ ДАННЫЕ - TECHNICKÉ ÚDAJE - MŰSZAKI ADATOK - TEHNIČNI PODATKI - TEKNÍK VERÍLER - TEHNIČKI PODACI - TECHNINIAI DUOMENYS - TEHNISKIE DATI - TEHNILISED ANDMED - DATE TEHNICE - TECHNICKÉ ÚDAJE - ТЕХНИЧЕСКИ ДАННИ - ТЕХНІЧНІ ДАНІ - TEHNIČKI PODACI - ТЕХNIKA ĐΕДОМENA - 技术参数 - ТЕХНИКАЛЫК КОРСЕТКІШТЕР
| BC 121 BC 221 | ||
| Model 1 Model 2 | ||
 | 12.000 m^3/h-m^3/ч 22.000 m^3/h-м^3/ч | |
 | 60 l-л 120 l-л | |
 | ~220-240 V-B50 Hz-Гц2,3 A500 W-Вт | ~220-240 V-B50 Hz-Гц3,7 A800 W-Вт |
 | 50 kg-кг 64 kg-кг | |
| IP20 IP20 |

IMPORTANT: In order to have a correct function you must use an electrical generator in class G3 or more (frequency variation ±1%, tension variation ±2%). The maximum power of electrical generator must be three time the nominal power of device that you must connect.
TECHNICAL DATA - DATI TECNICI - TECHNISCHE DATEN - DATOS TÉCNICOS - DONNÉES TECHNIQUES - TECHNISCHE GEGEVENS - DADOS TÉCNICOS - TEKNISKE DATA - TEKNISET TIEDOT - TEKNISKE DATA - TEKNISKA DATA - DANE TECHNICZNE - ТЕХНИЧЕСКИЕ ДАННЫЕ - TECHNICKÉ ÚDAJE - MŰSZAKI ADATOK - TEHNIČNI PODATKI - TEKNÍK VERİLER - TEHNIČKI PODACI - TECHNINIAI DUOMENYS - TEHNISKIE DATI - TEHNILISED ANDMED - DATE TEHNICE - TECHNICKÉ ÚDAJE - ТЕХНИЧЕСКИ ДАННИ - ТЕХНІЧНІ ДАНІ - TEHNIČKI PODACI - ТЕХNIKA ДЕДОМENA - 技术参数 - ТЕХНИКАЛЫК КОРСЕТКІШТЕР
| BC 341 BC 451 | ||
| Model 3 Model 4 | ||
 | 30.000 m^3/h-m^3/ч 38.000 m^3/h-m^3/ч | |
 | 200 I-л 300 I-л | |
 | ~220-240 V-B50 Hz-Гц4,9 A1.050 W-Вт | ~220-240 V-B50 Hz-Гц6,5 A1.500 W-Вт |
 | 130 kg-кг 185 kg-кг | |
| IP20 IP20 |

IMPORTANT: In order to have a correct function you must use an electrical generator in class G3 or more (frequency variation ±1%,
tension variation ± 2% . The maximum power of electrical generator must be three time the nominal power of device that you must connect.
FIGURES - FIGURE - ABBILDUNGEN - FIGURAS - FIGURES - FIGUREN - FIGURAS - FIGURER - KUVAT - FIGURER - FIGURER - ILUSTRACJE - ИЛЛЮСТРАЦИИ - OBRÁZKY - ÁBRÁK - SLIKE - ŠEKİLLER - SLIKE - ILIUSTRACIJOS - AT-TËLI - JOONISED - IMAGINI - OBRÁZKY - CXEMI - ДАHI - EIKONEΣ - 图示 - СУРЕТТЕМЕЛЕР
MODEL 1-2
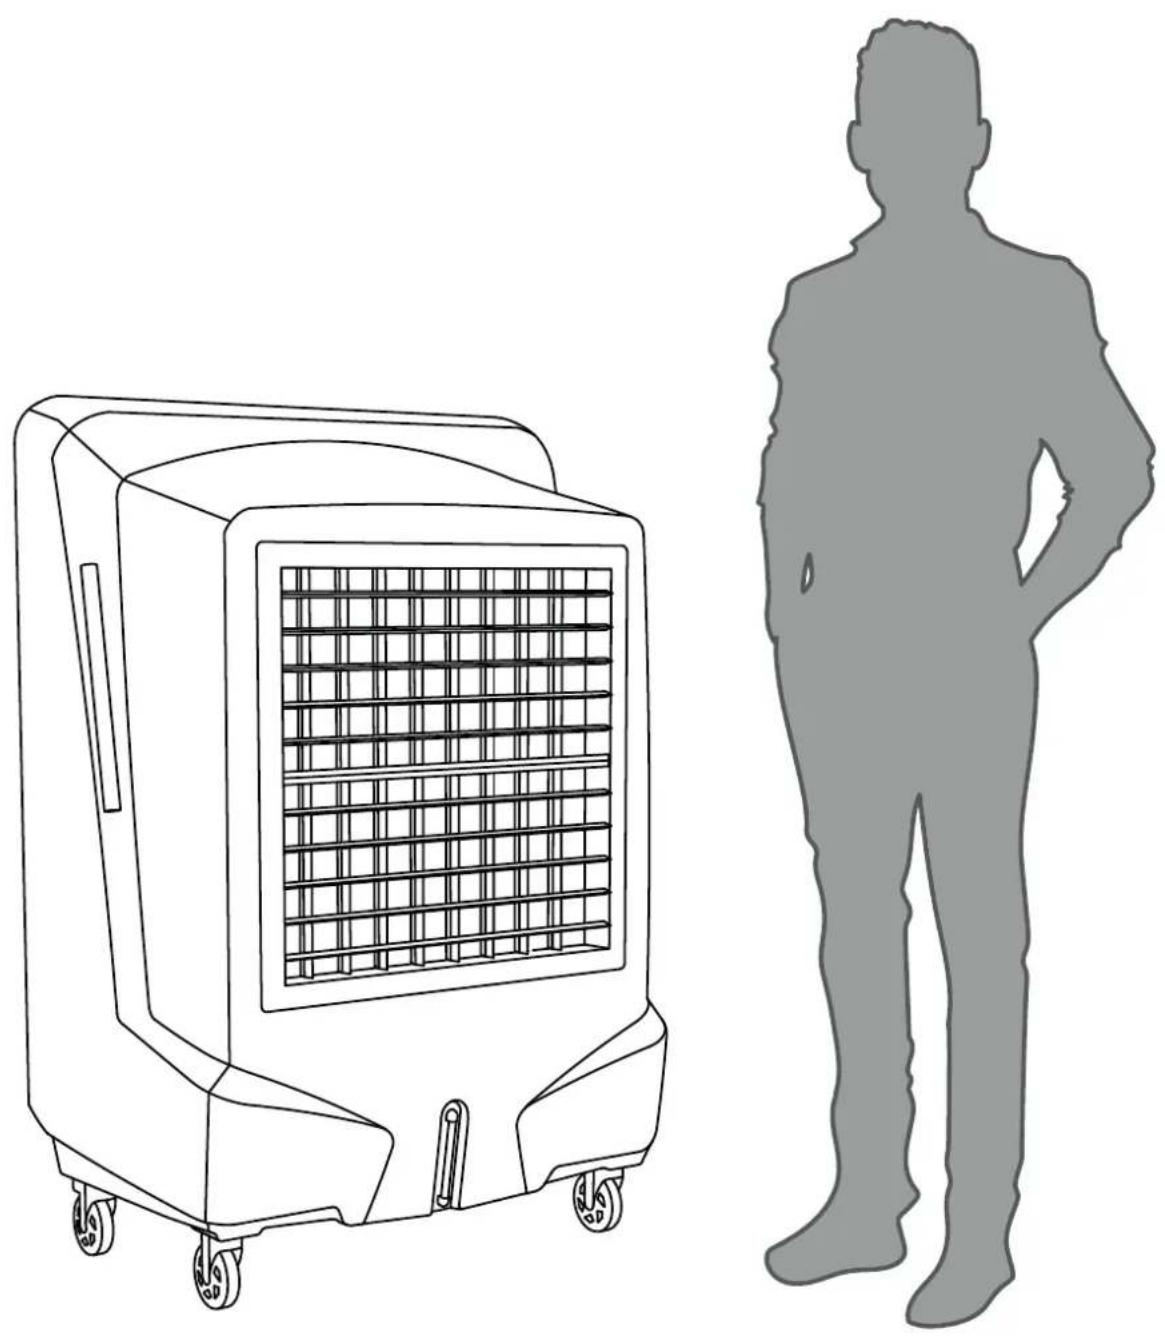
natural_image
Line drawing of a portable air purifier next to a human silhouette (no text or symbols)FIGURES - FIGURE - ABBILDUNGEN - FIGURAS - FIGURES - FIGUREN - FIGURAS - FIGURER - KUVAT - FIGURER - FIGURER - ILUSTRACJE - ИЛЛЮСТРАЦИИ - OBRÁZKY - ÁBRÁK - SLIKE - ŠEKİLLER - SLIKE - ILIUSTRACIJOS - AT-TËLI - JOONISED - IMAGINI - OBRÁZKY - CXEMI - ДАHI - EIKONEΣ - 图示 - СУРЕТТЕМЕЛЕР
MODEL 3

natural_image
Line drawing of a person standing beside a large industrial machine with concentric circular targeting pattern (no text or symbols)FIGURES - FIGURE - ABBILDUNGEN - FIGURAS - FIGURES - FIGUREN - FIGU- RAS - FIGURER - KUVAT - FIGURER - FIGURER - ILUSTRACJE - ИЛЛЮСТРА- ЦИИ - ОВРАЗКУ - АВРАК - SLIKE - ŞEKİLLER - SLIKE - ILIUSTRACIJOS - AT- ТЕЛИ - JOONISED - IMAGINI - ОВРАЗКУ - СХЕМИ - ДАНИ - EIKONEΣ - 图示 - СУРЕТТЕМЕЛЕР
FIGURES - FIGURE - ABBILDUNGEN - FIGURAS - FIGURES - FIGUREN - FIGURAS - FIGURER - KUVAT - FIGURER - FIGURER - ILUSTRACJE - ИЛЛЮСТРАЦИИ - OBRÁZKY - ÁBRÁK - SLIKE - ŠEKİLLER - SLIKE - ILIUSTRACIJOS - AT-TËLI - JOONISED - IMAGINI - OBRÁZKY - CXEMI - ДАHI - EIKONEΣ - 图示 - СУРЕТТЕМЕЛЕР
flowchart
graph TD
    A["Hot Air"] --> B["Valve"]
    C["Chilled Air"] --> B
    B --> D["Heat Exchanger"]
    D --> E["Reactor"]
    style A fill:#f9f,stroke:#333
    style C fill:#f9f,stroke:#333
    style B fill:#ccf,stroke:#333
    style D fill:#cff,stroke:#333
FIGURES - FIGURE - ABBILDUNGEN - FIGURAS - FIGURES - FIGUREN - FIGURAS - FIGURER - KUVAT - FIGURER - FIGURER - ILUSTRACJE - ИЛЛЮСТРАЦИИ - OBRÁZKY - ÁBRÁK - SLIKE - ŠEKİLLER - SLIKE - ILIUSTRACIJOS - AT-TËLI - JOONISED - IMAGINI - OBRÁZKY - CXEMI - ДАHI - EIKONEΣ - 图示 - СУРЕТТЕМЕЛЕР

FIGURES - FIGURE - ABBILDUNGEN - FIGURAS - FIGURES - FIGUREN - FIGURAS - FIGURER - KUVAT - FIGURER - FIGURER - ILUSTRACJE - ИЛЛЮСТРАЦИИ - OBRÁZKY - ÁBRÁK - SLIKE - ŠEKİLLER - SLIKE - ILIUSTRACIJOS - AT-TËLI - JOONISED - IMAGINI - OBRÁZKY - CXEMI - ДАHI - EIKONEΣ - 图示 - СУРЕТТЕМЕЛЕР

FIGURES - FIGURE - ABBILDUNGEN - FIGURAS - FIGURES - FIGUREN - FIGU-
RAS - FIGURER - KUVAT - FIGURER - FIGURER - ILUSTRACJE - ИЛЛЮСТРА-
ЦИИ - OBRÁZKY - ÁBRÁK - SLIKE - ŞEKİLLER - SLIKE - ILIUSTRACIJOS - AT-
TĚLI - JOONISED - IMAGINI - OBRÁZKY - СХЕМИ - ДАНИ - EIKONEΣ - 图示
- СУРЕТТЕМЕЛЕР
FIGURES - FIGURE - ABBILDUNGEN - FIGURAS - FIGURES - FIGUREN - FIGU-
RAS - FIGURER - KUVAT - FIGURER - FIGURER - ILUSTRACJE - ИЛЛЮСТРА-
ЦИИ - OBRÁZKY - ÁBRÁK - SLIKE - ŞEKİLLER - SLIKE - ILIUSTRACIJOS - AT-
TĚLI - JOONISED - IMAGINI - OBRÁZKY - СХЕМИ - ДАНИ - EIKONEΣ - 图示
- СУРЕТТЕМЕЛЕР

natural_image
Diagram showing a pipe fitting with a hexagonal nut and a curved arrow indicating rotation (no text or symbols)
natural_image
Hand pressing a button on a circular device with snowflake patterns (no text or symbols)FIGURES - FIGURE - ABBILDUNGEN - FIGURAS - FIGURES - FIGUREN - FIGU-
RAS - FIGURER - KUVAT - FIGURER - FIGURER - ILUSTRACJE - ИЛЛЮСТРА-
ЦИИ - OBRÁZKY - ÁBRÁK - SLIKE - ŞEKİLLER - SLIKE - ILIUSTRACIJOS - AT-
TĚLI - JOONISED - IMAGINI - OBRÁZKY - СХЕМИ - ДАНИ - EIKONEΣ - 图示
- СУРЕТТЕМЕЛЕР
MODEL 1-2

MODEL 3

MODEL 4

FIGURES - FIGURE - ABBILDUNGEN - FIGURAS - FIGURES - FIGUREN - FIGURAS - FIGURER - KUVAT - FIGURER - FIGURER - ILUSTRACJE - ИЛЛЮСТРАЦИИ - OBRÁZKY - ÁBRÁK - SLIKE - ŠEKİLLER - SLIKE - ILIUSTRACIJOS - AT-TËLI - JOONISED - IMAGINI - OBRÁZKY - CXEMI - ДАHI - EIKONEΣ - 图示 - СУРЕТТЕМЕЛЕР
natural_image
Diagram showing a pipe being poured into a container with a rotating knob, indicating fluid flow or mechanical process (no text or symbols)
natural_image
Illustration showing a 3D panel structure and a forklift with grid-patterned equipment (no text or symbols)FIGURES - FIGURE - ABBILDUNGEN - FIGURAS - FIGURES - FIGUREN - FIGURAS - FIGURER - KUVAT - FIGURER - FIGURER - ILUSTRACJE - ИЛЛЮСТРАЦИИ - OBRÁZKY - ÁBRÁK - SLIKE - ŠEKİLLER - SLIKE - ILIUSTRACIJOS - AT-TËLI - JOONISED - IMAGINI - OBRÁZKY - CXEMI - ДАHI - EIKONEΣ - 图示 - СУРЕТТЕМЕЛЕР
MODEL 1-2
FIGURES - FIGURE - ABBILDUNGEN - FIGURAS - FIGURES - FIGUREN - FIGURAS - FIGURER - KUVAT - FIGURER - FIGURER - ILUSTRACJE - ИЛЛЮСТРАЦИИ - OBRÁZKY - ÁBRÁK - SLIKE - ŠEKİLLER - SLIKE - ILIUSTRACIJOS - AT-TËLI - JOONISED - IMAGINI - OBRÁZKY - CXEMI - ДАHI - EIKONEΣ - 图示 - СУРЕТТЕМЕЛЕР

FIGURES - FIGURE - ABBILDUNGEN - FIGURAS - FIGURES - FIGUREN - FIGU-
RAS - FIGURER - KUVAT - FIGURER - FIGURER - ILUSTRACJE - ИЛЛЮСТРА-
ЦИИ - OBRÁZKY - ÁBRÁK - SLIKE - ŠEKİLLER - SLIKE - ILIUSTRACIJOS - AT-
TĚLI - JOONISED - IMAGINI - OBRÁZKY - CXEMI - ДАHI - EIKONEŠ - 图示
- СУРЕТТЕМЕЛЕР
FIGURES - FIGURE - ABBILDUNGEN - FIGURAS - FIGURES - FIGUREN - FIGU-
RAS - FIGURER - KUVAT - FIGURER - FIGURER - ILUSTRACJE - ИЛЛЮСТРА-
ЦИИ - OBRÁZKY - ÁBRÁK - SLIKE - ŞEKİLLER - SLIKE - ILIUSTRACIJOS - AT-
TĚLI - JOONISED - IMAGINI - OBRÁZKY - СХЕМИ - ДАНИ - EIKONEΣ - 图示
- СУРЕТТЕМЕЛЕР

natural_image
Diagram of a car interior showing hand cleaning the engine compartment with arrows indicating flow direction (no text or symbols)
IMPORTANT: READ AND UNDERSTAND THIS OPERATIONAL MANUAL PRIOR TO ASSEMBLING, STARTING UP OR CONDUCTING MAINTENANCE ON THIS COOLER. USING THE COOLER INCORRECTLY CAN CAUSE SERIOUS OR FATAL INJURIES. KEEP THIS MANUAL FOR FURTHER REFERENCE.
▶▶1. SAFETY INFORMATION (PIC. 1)
IMPORTANT: READ AND UNDERSTAND THIS OPERATIONAL MANUAL BEFORE ASSEMBLING, COMMISSIONING OR PERFORMING MAINTENANCE ON THIS APPLIANCE. INCORRECT USE OF THE APPLIANCE CAN CAUSE SERIOUS INJURY. KEEP THIS MANUAL FOR FURTHER REFERENCE.
IMPORTANT: This appliance is not suitable for use by persons (including children) with reduced physical, sensory or mental capacities or who lack experience or knowledge unless supervised by a person responsible for their safety. Children must be supervised to make sure they do not play with the appliance.
▶1.1. Only fill the cooler tank only with clean water.
▶1.2. Before carrying out any operation, make sure the cooler, including the power supply cable and the control panel are perfectly dry, in order to avoid any risk.
▶1.3. After filling the tank, handle the cooler carefully.
▶1.4. Comply with all local legislation and current regulations when using the cooler.
▶1.5. Keep the cooler dry, in order to avoid electric shocks. Hands must always be dry.
▶1.6. Use only in ventilated and dry areas.
▶1.7. For indoor use only.
▶1.8. Only power the cooler with the voltage and frequency as specified on the nameplate.
▶1.9. Do not cover the cooler with paper, cardboard, plastic, metal sheets or any other inflammable material during use, in order to prevent any risk.
▶1.10. The cooler must be used on a stable and levelled surface, in order to prevent any risk.
▶1.11. Disconnect the cooler from the mains power supply when not in use.
▶1.12. Never block the cooler's air vents or the air outlet.
▶1.13. The minimum safety distance recommended between the cooler and walls or other items is 0.5 m.
▶1.14. Never move, handle, refuel or conduct maintenance on the cooler when it is connected to the mains or in operation.
▶1.15. The cooler (power cable included) must be kept at a suitable safety distance from heat sources.
▶1.16. In any case, the cooler must be opened and/or repaired by authorised after-sales centre.
▶1.17. If the power supply cable is damaged, it must be replaced by a technical support centre to prevent any risk.
▶1.18. In the event of incorrect cooler operation, immediately disconnect the electrical power supply and contact the support centre.
▶1.19. Protect the power cable from potential damage caused by the movement of vehicles or pedestrians. Improper connection to electrical voltage or improper installation may result in electric shocks.
▶1.20. Conditions of use:
A) Temperature of the air: 18°C - 45°C; Temperature of the water: <45°C.
B) The air must be free of dust and pollutants, otherwise cleaning must be carried out more frequently.
▶1.21. The water used to fill the cooler tank must come from an aqueduct. If it is not possible to draw from an aqueduct, the water introduced must be subjected to a sanitation treatment, according to European Directive 98/83/EC.
-We recommend using water with a hardness of less than 15^ f.
-The cooler tank must be emptied and sanitised periodically depending on the use.
-The evaporative panel surfaces must be periodically inspected and sanitised depending on the use.
-For sanitation operations, biocidal products that comply with European regulation no. 582/2012 must be used.
▶▶2. UNPACKING
▶2.1. Remove all packaging material used to pack and deliver the cooler and dispose of it in compliance with current standards.
▶2.2. Check for any damage incurred during transport. If the cooler appears damaged, immediately inform the dealer from whom it was purchased.
▶▶3. DESCRIPTION
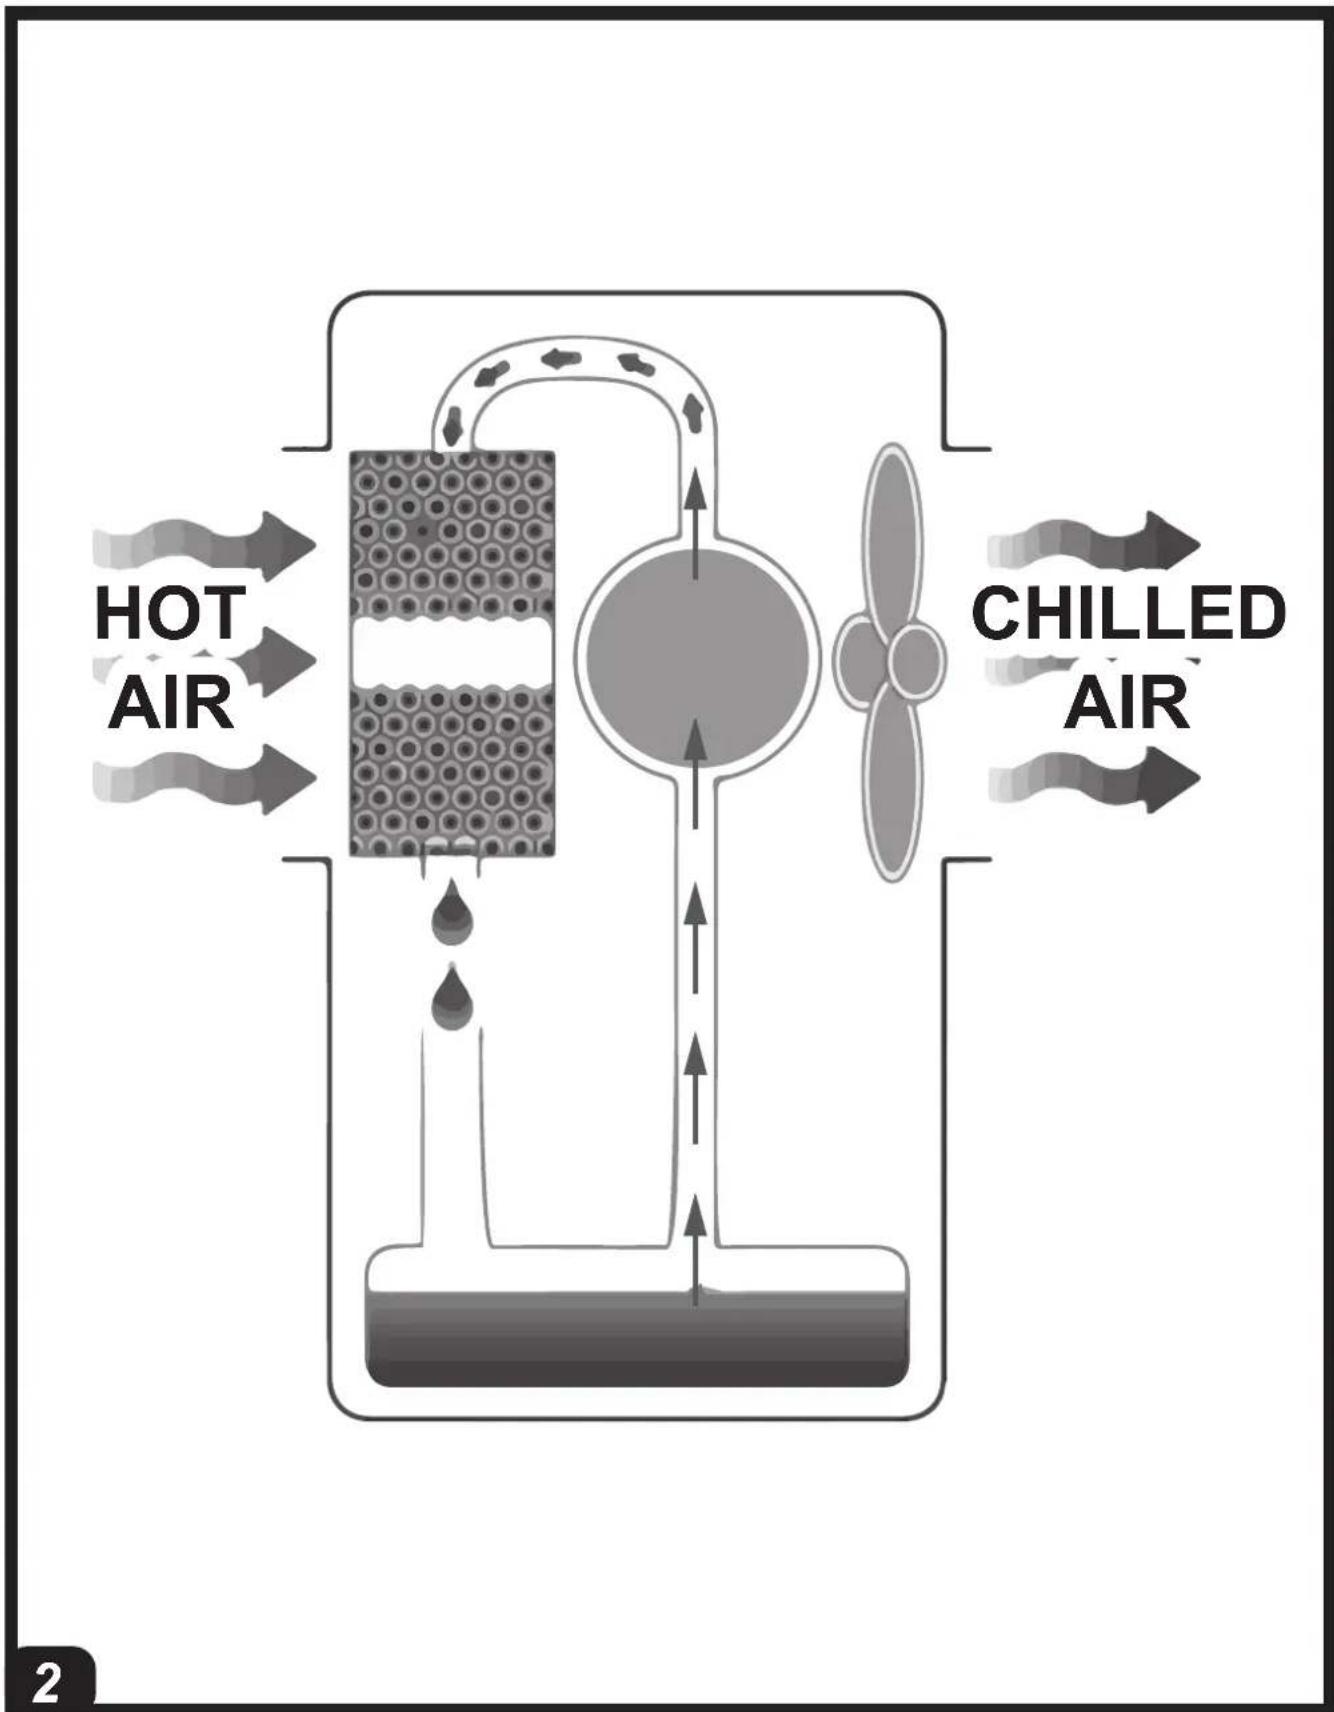
(PIC. 2)
The evaporation coolers cool the air by using the natural process of water evaporation. Operation of these air coolers is based on evaporative cooling that uses the energy exchange between the water and air.
The coolers consist of an evaporative panel, a fan and a cascade water distribution system. The fan draws air from outside and passes it through the evaporative panel, which is made entirely of cellulose and is constantly wet by a special system that pumps water.
▶▶4. OPERATION
WARNING: Carefully read the "SAFETY INFORMATION" before switching on the cooler.
WARNING: Only use clean water to prevent failures or other anomalies.
WARNING: Verify if your wiring system is earthed correctly. Connection to the mains must be made in compliance with the National Standards in force. Only power the cooler with the voltage and frequency as specified on the nameplate.
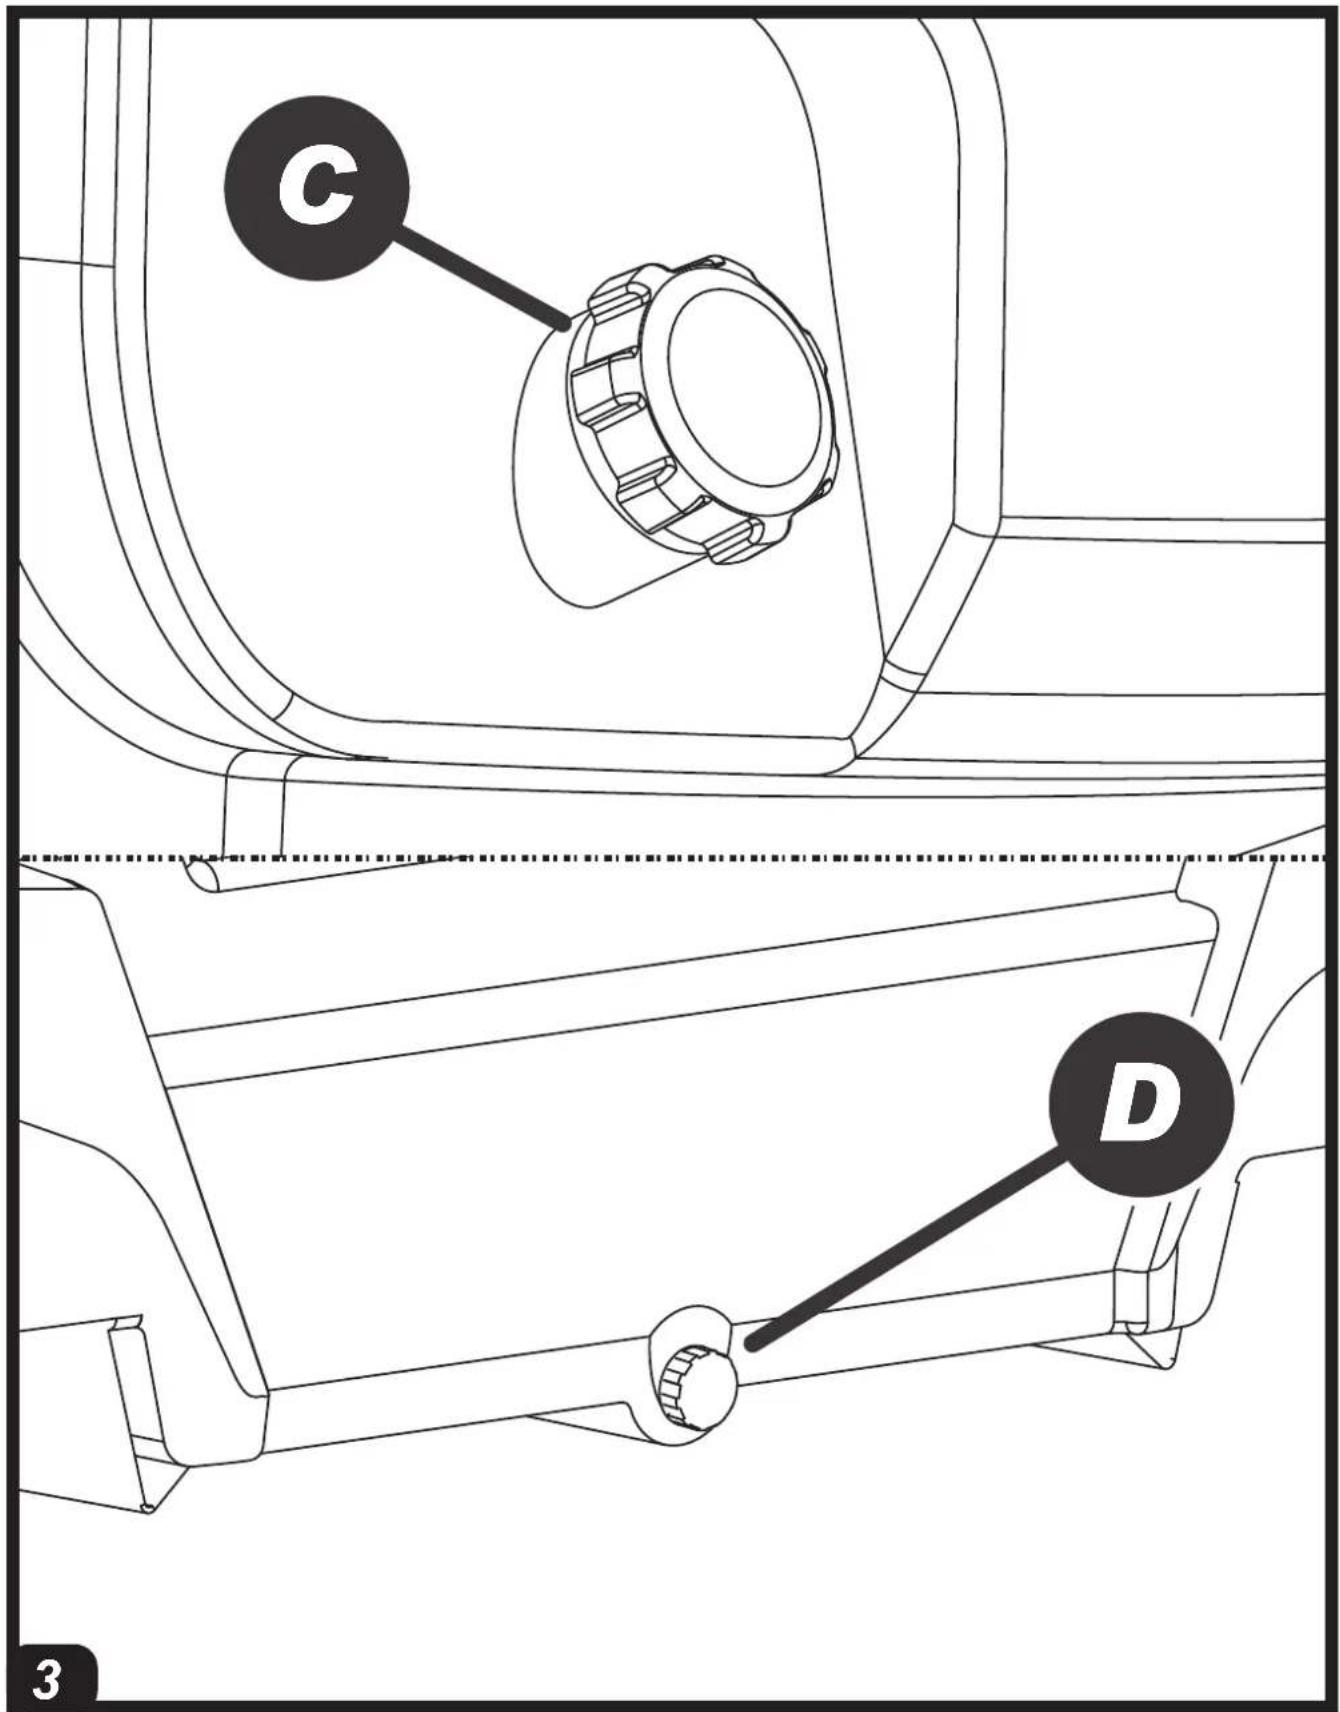
Depending on the model, a number of fittings and valves are found on the cooler (PIC. 3):
▶WATER PARTIALISATION VALVE (applicable depending on the model) (A PIC. 3):
Used to adjust the water supply to the cooler panel. A maximum water flow rate is obtained with the cock completely open (anticlockwise rotation of the knob).
▶WATER SUPPLY FITTING (B PIC. 3):
This is used for the continuous and automatic supply of water to the cooler (1/2" fitting and maximum inlet water pressure of 3 bar). After filling, it can also be moved, always with the utmost care.
▶MANUAL WATER SUPPLY COCK (C PIC. 3):
A water cock/hatch is present, which allows the tank to be filled manually.
NOTE: Take note of the maximum capacity of the tank in order to avoid overflows.
▶ DRAIN COCK (D PIC. 3):
The base of the cooler has a drain cock, which is used to drain water from the tank.
▶▶4.1. SWITCH-ON:
▶4.1.1. Connect the cooler to the water mains using the threaded fitting (PIC. 4) and refill the water tank. When water in the tank reaches the maximum level, a float will automatically block the flow (it is possible to operate the cooler while being
continuously connected and fed from water mains supply).
In case of manual refilling from the cock/hatch, pay attention to the tank's capacity in order to avoid overflows.
▶4.1.2. Check that there were no leaks during refuelling.
▶4.1.3. Connect the supply plug to the power mains.
▶4.1.4. Press ON/OFF / POWER to turn on the cooler (PIC. 5).
NOTE: When the cooler emits an acoustic beep, it means that the tank is empty and the device is operating in fan mode. To deactivate the acoustic beep, press the "COOL" button.
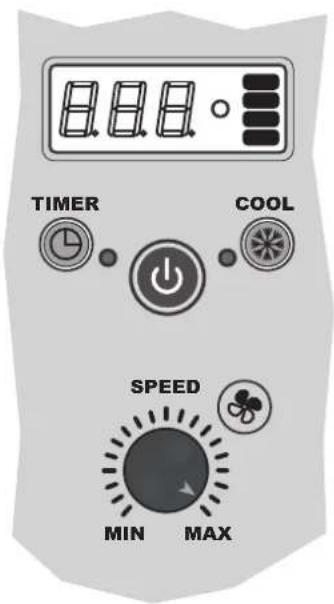
▶▶4.2. FUNCTIONS OF THE CONTROL PANEL AND REMOTE CONTROL (PIC. 6):
▶ ON/OFF / POWER: Is used to turn the cooler on or off.
▶SPEED: Increases or decreases the ventilation speed of the cooler.
▶COOL: Enables or disables the cooling mode.
▶ TIMER: Enables to activate or deactivate the delayed switch-on or switch-off mode.
-Delayed switch-on: When the cooler is on, press the "TIMER" button repeatedly until the desired time is displayed (the number flashes), then switch off the equipment.
-Delayed switch-off: When the cooler is on, press the "TIMER" button repeatedly until the desired time is displayed, then the switch-off time is set.
▶ SWING (applicable depending on the model): Enables or disables the automatic swing of the fins to direct the air flow.
▶▶4.3. SWITCH-OFF:
▶4.3.1. Press ON/OFF / POWER to turn off the cooler (PIC. 5).
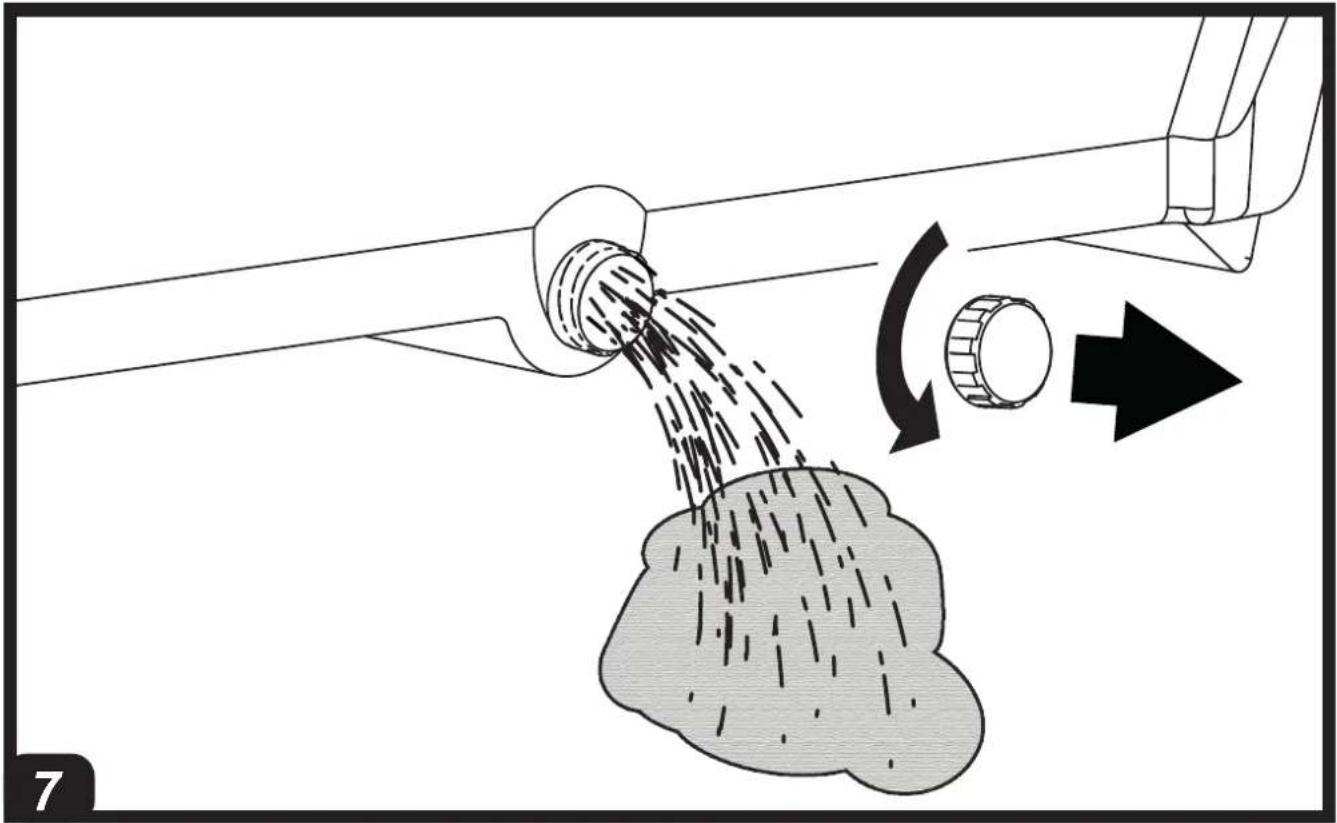
▶4.3.2. Drain the tank through the specific drain cock (PIC. 7).
▶5. CLEANING AND MAINTENANCE
WARNING: BEFORE PROCEEDING WITH ANY CLEANING AND/OR MAINTENANCE, BE SURE TO READ AND UNDERSTAND THIS MANUAL. FOR ANY OTHER INFORMATION CONTACT THE SUPPORT CENTRE.
WARNING: BEFORE PROCEEDING WITH ANY CLEANING AND/OR MAINTENANCE, DISCONNECT THE POWER CABLE FROM THE MAINS.
IN ORDER TO KEEP THE COOLER IN TOP FUNCTIONAL CONDITION, SCHEDULED MAINTENANCE IS NECESSARY.
en
The components requiring maintenance are as follows:
- Water tank.
- Evaporative panels.
- Water pump filter.
- Air filter (where fitted).
The required maintenance is:
▶ ROUTINE MAINTENANCE (General cleaning).
▶ SCHEDULED INTERNAL MAINTENANCE (Deep cleaning).
▶ 5.1. ROUTINE MAINTENANCE (General cleaning):
IT IS RECOMMENDED TO HAVE THIS MAINTENANCE BE CARRIED OUT ON A DAILY BASIS.
▶5.1.1. WATER TANK:
▶5.1.1.1. Turn off the cooler (PIC. 5) and disconnect the plug from the power mains.
▶5.1.1.2. Empty the water from the tank using the drain plug (PIC. 7). Rinse the water tank several times in order to remove deposits from inside the tank.
IMPORTANT: IT IS RECOMMENDED TO EMPTY THE WATER TANK IF THE COOLER WILL NOT BE USED FOR A FEW DAYS.
▶5.1.2. EVAPORATIVE PANELS:
It is recommended to visually check the condition and correct position of the evaporative panels on a regular basis (PIC. 8). If there are any obstructions on the evaporative panels, restore proper airflow by using a brush with soft bristles.
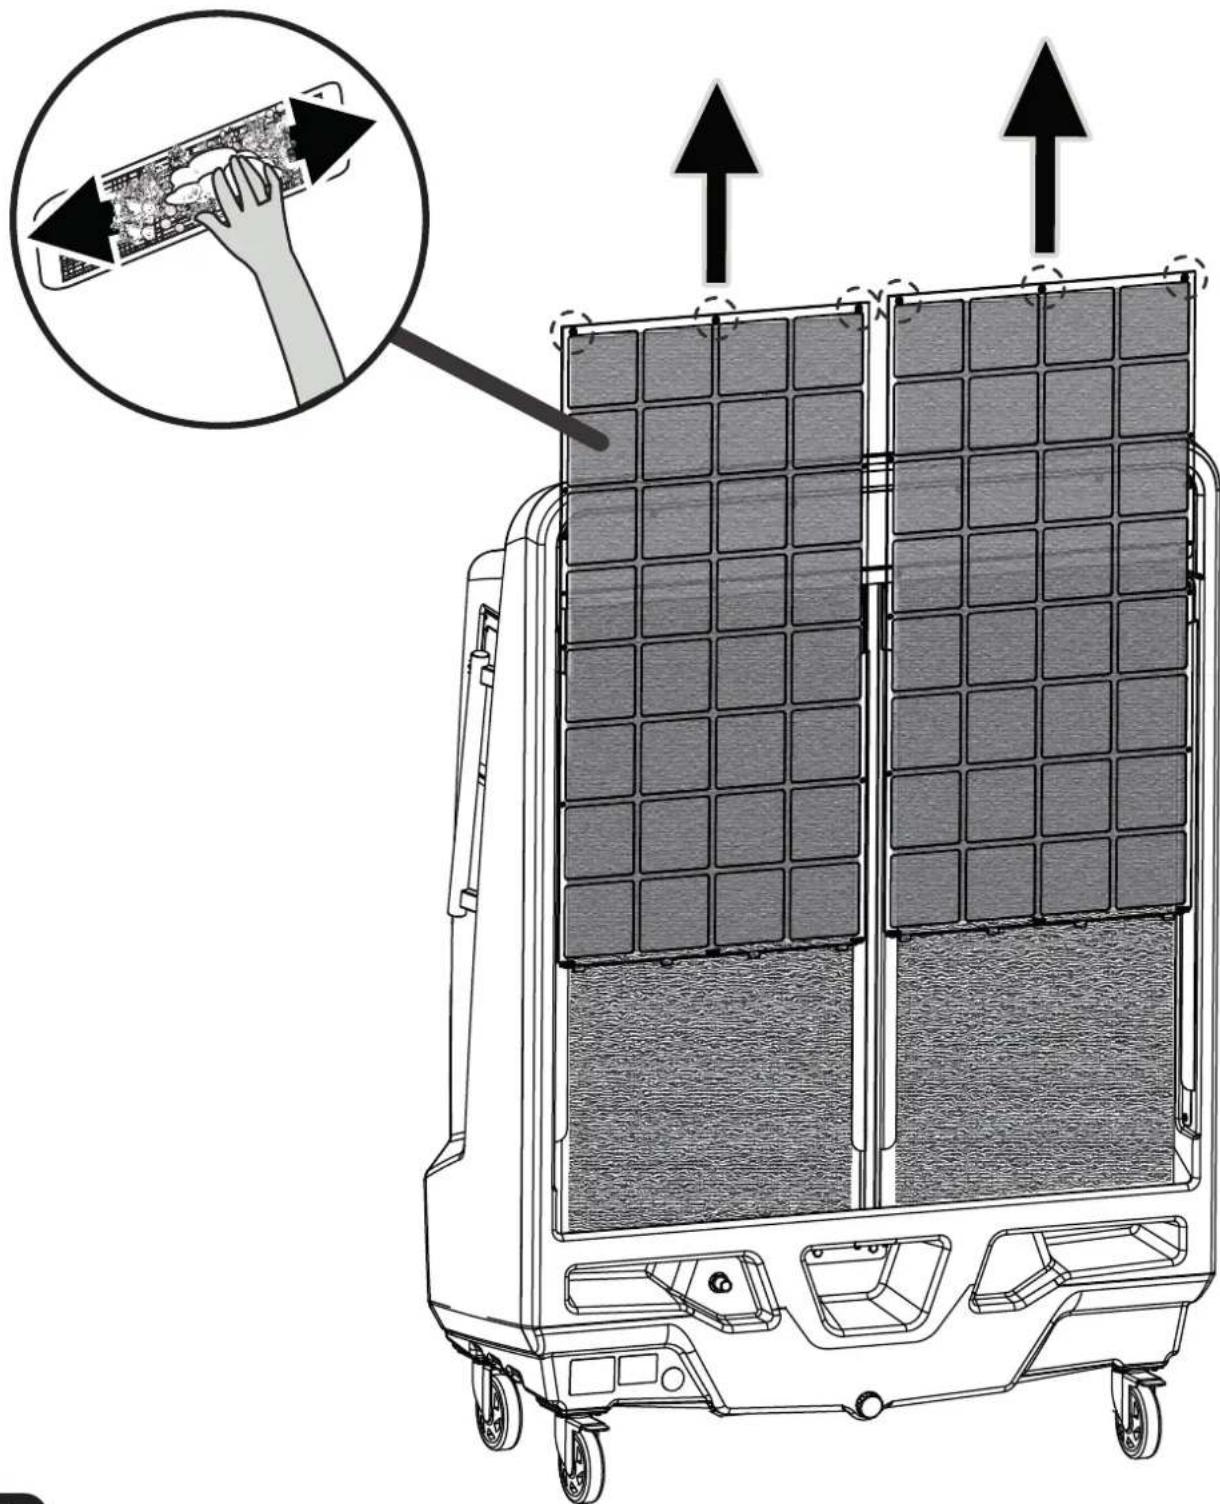
▶▶5.1.3. AIR FILTER (applicable depending on the model) (PIC. 9):
▶5.1.3.1. Turn off the cooler (PIC. 5) and disconnect the plug from the power mains.
▶5.1.3.2. Remove the fixing screws (if any) and remove the filter (PIC. 9).
▶5.1.3.3. Clean the filter using a mild detergent and a soft cloth. Make sure that the filter is perfectly dry.
▶5.1.3.4. Refit the filter and secure it with the screws (if any).
▶ 5.2. SCHEDULED INTERNAL MAINTENANCE (Deep cleaning):
IT IS RECOMMENDED TO CARRY OUT THIS MAINTENANCE ON A MONTHLY BASIS (however, depending on many factors such as operating hours, the environment in which the cooler is used, the degree of water hardness and other variables, it may be necessary to increase the frequency of maintenance).
CAUTION: IN ORDER TO CARRY OUT THIS TYPE OF INTERVENTION, IT IS NECESSARY TO REMOVE CERTAIN COMPONENTS OF THE COOLER WITH THE USE OF TOOLS. REMOVING THESE COMPONENTS, ALLOWS ACCESS TO POTENTIALLY DANGEROUS PARTS OF THE COOLER.
Maintenance procedure:
▶5.2.1. Switch off the cooler (PIC. 5) and disconnect the power cable from the mains.
▶5.2.2. Empty the water from the tank using the drain plug (PIC. 7).
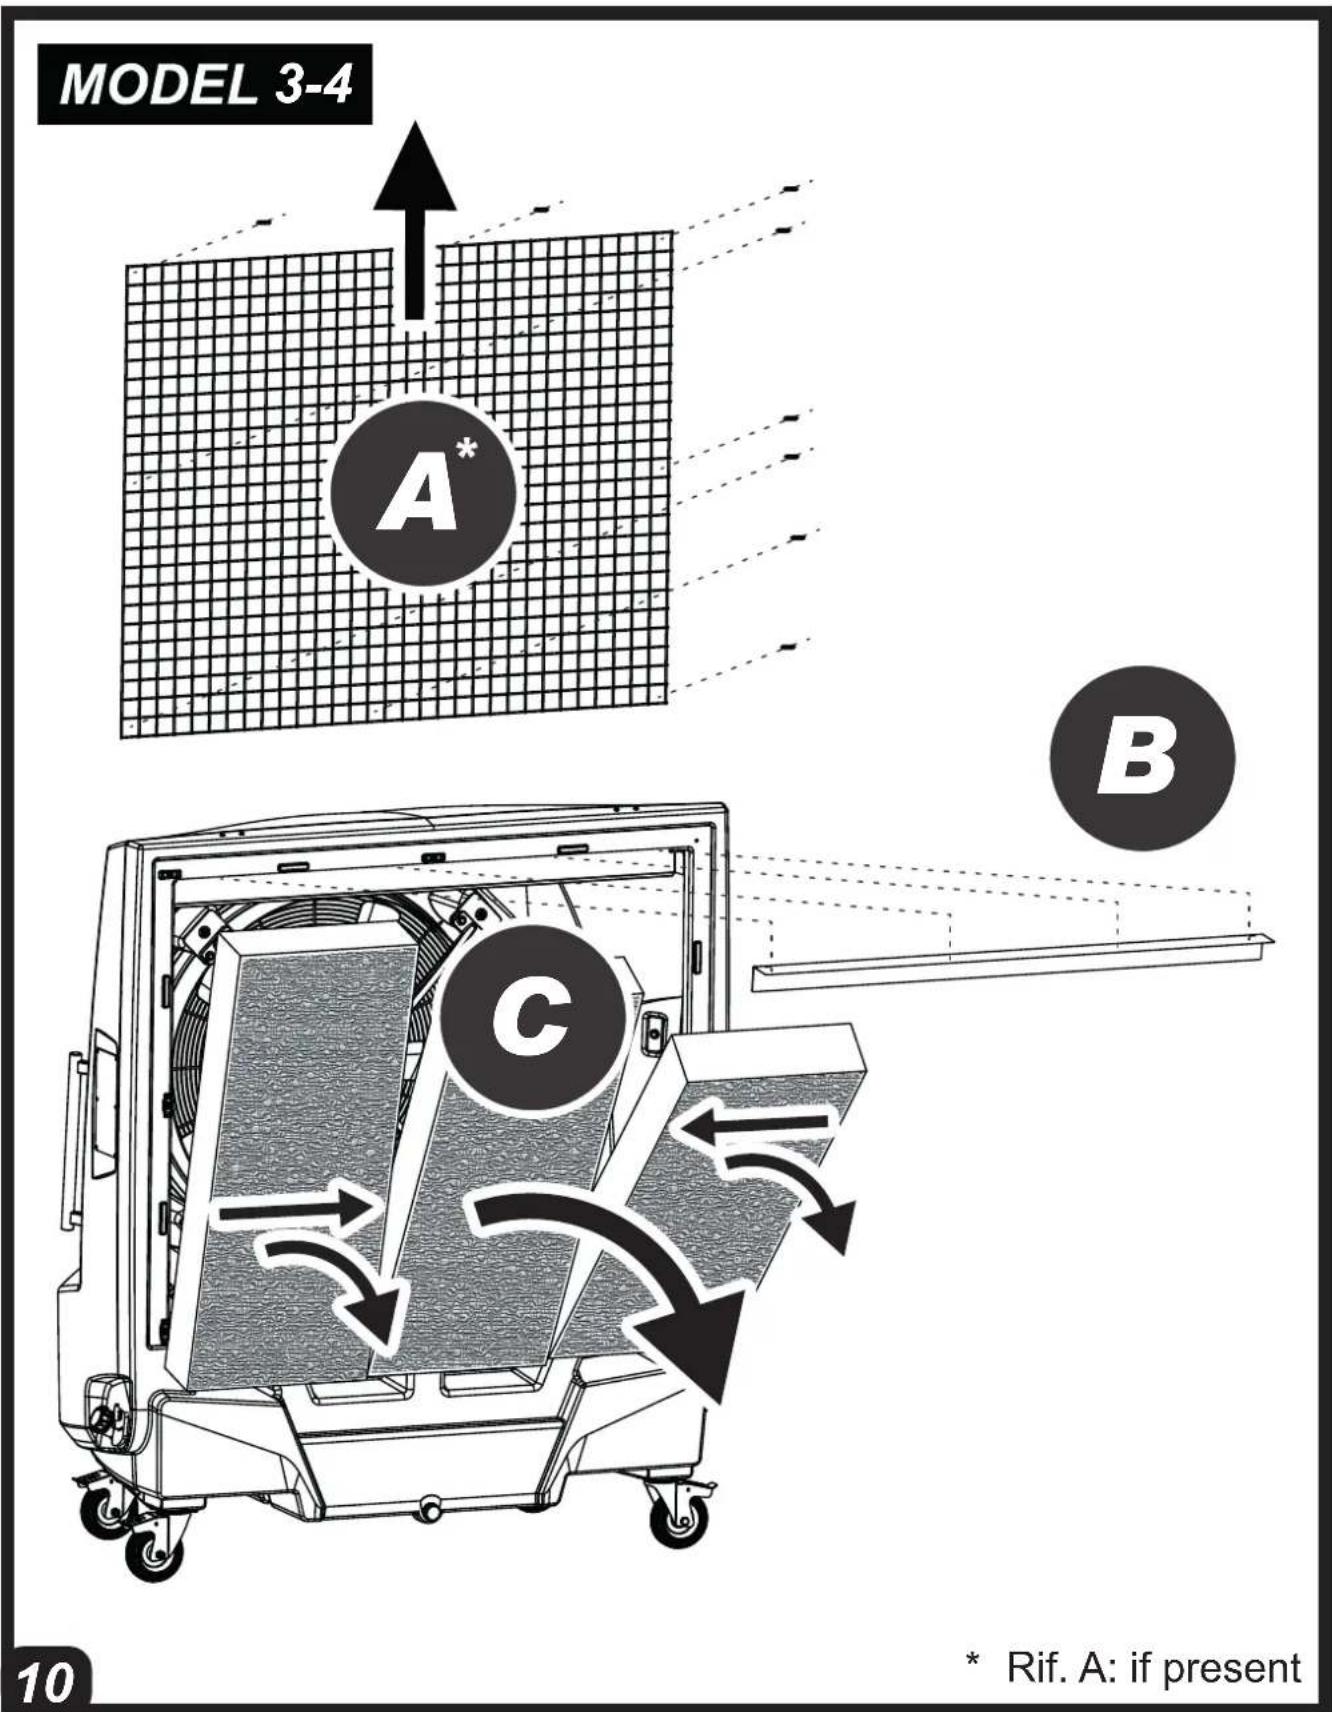
▶5.2.3. Remove the grille, brackets and air filters (where fitted) (A-B PIC. 10).
▶5.2.4. Carefully remove the evaporative panels (C PIC. 10) and proceed with cleaning. For proper cleaning of evaporative panels, spray water at low pressure on the surface of the panels, removing dirt and encrustations(do not use chemicals or sharp objects for cleaning). If the evaporative panels are damaged, they must be replaced with original spare parts.
▶5.2.5. Clean residues and encrustations from the tank, taking care not to damage the internal components (float and sensor) of the cooler (PIC. 11). Use only soft brushes and sponges for cleaning(do not use chemicals). When the tank is perfectly clean, dry the surfaces to complete maintenance.
▶5.2.6. Remove the filter from the water pump by loosening the screws on the bracket (PIC. 12). Wash the filter thoroughly under clean running water. If the filter is damaged, it must be replaced with an original spare part.
▶5.2.7. Restore all components with their nuts and bolts in the correct position (when restoring the water pump, secure it by making sure it sits correctly on the bottom of the water tank).
▶▶6. REMOTE HUMIDISTAT CONNECTION (optional)
A remote humidistat can be connected in series to the power supply plug, to manage automatic switch-on or switch-off of the cooler.
After the humidistat has been activated, during normal operation, the cooler switches off. The re-ignition is automatic and the operating configuration is restored keeping the settings prior to switch-off.
CAUTION: THE ONLY SETTING THAT IS NOT RESTORED IS THE "TIMER" FUNCTION, IN THIS CASE IN FACE THE COOLER WILL GO IN STAND-BY CONDITION.
▶▶7. TROUBLESHOOTING
en
| FAULT CAUSE SOLUTION | ||
| The display does not work | 1. No power supply2. Defective equipment | 1a. Make sure that the cooler is connected to the power supply1b. Contact a support centre2. Contact a support centre |
| There is no air flow or it is very low | 1. Rear side air vent clogged2. Defective equipment | 1a. Keep the rear part of the cooler away from walls that may obstruct the airflow1b. Remove any objects from the air vent1c. Contact a support centre2. Contact a support centre |
| The cooler does not respond to the commands | 1. Defective equipment 1. Contact a support centre | |
| The cooler leaks water | 1. The drainage plug is loose2. The drain is dirty and the drainage plug does not fully close3. The tank leaks4. The panel is dripping | 1. Close the plug2. Clean the drain and close the plug3. Contact a support centre4. Contact a support centre |
IMPORTANTE: LEGGERE E COMPRENDERE QUESTO MANUALE OPERATIVO PRIMA DI EFFETTUARE L'ASSEMBLAGGIO, LA MESSA IN FUNZIONE O LA MANUTENZIONE DI QUESTO RAFFRESCATORE. L'USO ERRATO DEL RAFFRESCATORE PUÒ CAUSARE LESIONI GRAVI O FATALI. CONSERVARE QUESTO MANUALE A TITOLO DI FUTURO RIFERIMENTO.
▶▶4.1. INBETRIEBNAHME:
▶▶1. INFORMATIONS SUR LA SÉCURITÉ (FIG. 1)
IMPORTANT : LIRE ET COMPRENDRE CE MANUEL D'UTILISATION AVANT DE PROCÉDER À L'ASSEMBLAGE, À LA MISE EN SERVICE OU À L'ENTRETIEN DE CET APPAREIL. L'UTILISATION INCORRECTE DE L'APPAREIL PEUT CAUSER DE GRAVES BLESSURES. CONSERVER CE MANUEL POUR TOUTE CONSULTATION FUTURE.
▶BOUCHON DE FOURNITURE MANUELLE EN EAU (C FIG. 3):
▶BOUCHON D'ÉVACUATION (D FIG. 3) :
▶ AFVOERDOP (D FIG. 3):
WAARSCHUWING: HAAL DE STEKKER UIT HET STOPCONTACT VOORDAT U OVERGAAT TOT REINIGING EN/OF ONDERHOUD.
OM DE OPTIMALE BEDRIJFSCONDITIES VAN DE KOELER TE HANDHAVEN, MOET REGELMATIG ONDERHOUD GEPLAND WORDEN.
▶▶1. SIKKERHEDSOPLYSNINGER (FIG. 1)
⚠ VIGTIGT: INDEN APPARATET SAMLES, TAGES I BRUG ELLER VEDLIGEHOLDES, SKAL BRUGERMANUALEN LÆSES OG FORSTÅS. FORKERT BRUG AF APPARATET KAN FORÅRSAGE ALVORLIGE KVÆSTELSER. GEM VEJLEDNINGEN FOR FREMTIDIG REFERENCE.
▶MANUEL PROP TIL VANDFORSYNING (C FIG. 3):
▶ UDT∅MNINGSPROP (D FIG. 3):
▶KOREK REÇZNEGO WLEWU WODY (C RYS. 3):
▶KOREK SPUSTOWY (D RYS. 3):
▶MANUĀLĀS ŪDENS APGĀDES VĀCINŠ (C ATT. 3):
natural_image
Abstract blue line drawing with no text or symbolsPastrengo, 2024
▶ en - DISPOSAL OF THE PRODUCT
-This product has been designed and manufactured with top-quality materials and components, which can be re-cycled and re-used. -When a crossed-wheely bin symbol is attached to the product, it means that the product is protected by the, 2012/19/UE European Directive.
-Please obtain information regarding the local differentiated collection system for electrical and electronic products.
-Respect local Standards in force and do not dispose of old products as normal domestic waste. Correct disposal of the product helps to prevent possible negative consequences for health, the environment and mankind.
▶pl - UTYLIZACJA PRODUKTU
▶ Iv - PRODUKTA IZNÍCINÁŠANA
natural_image
Abstract geometric composition with yellow and black blocks (no text or symbols)Dantherm Group S.p.A.
Via Gardesana 11
37010 Pastrengo (VR)
Italy
t.: +39 045 6770533
e.: info.it@danthermgroup.com

DOWNLOAD CATALOGUE

SEND US YOUR FEEDBACK

REGISTER FOR 3-YEAR WARRANTEE


- USER AND MAINTENANCE MANUAL
- NOTE:
- MODEL 3
- IMPORTANT: READ AND UNDERSTAND THIS OPERATIONAL MANUAL PRIOR TO ASSEMBLING, STARTING UP OR CONDUCTING MAINTENANCE ON THIS COOLER. USING THE COOLER INCORRECTLY CAN CAUSE SERIOUS OR FATAL INJURIES. KEEP THIS MANUAL FOR FURTHER REFERENCE.
- ▶▶1. SAFETY INFORMATION (PIC. 1)
- ▶▶2. UNPACKING
- ▶▶3. DESCRIPTION
- ▶▶4. OPERATION
- ▶WATER PARTIALISATION VALVE (applicable depending on the model) (A PIC. 3):
- ▶WATER SUPPLY FITTING (B PIC. 3):
- ▶MANUAL WATER SUPPLY COCK (C PIC. 3):
- ▶ DRAIN COCK (D PIC. 3):
- ▶▶4.1. SWITCH-ON:
- ▶▶4.2. FUNCTIONS OF THE CONTROL PANEL AND REMOTE CONTROL (PIC. 6):
- ▶▶4.3. SWITCH-OFF:
- ▶5. CLEANING AND MAINTENANCE
- en
- ▶ 5.1. ROUTINE MAINTENANCE (General cleaning):
- ▶5.1.1. WATER TANK:
- ▶5.1.2. EVAPORATIVE PANELS:
- ▶▶5.1.3. AIR FILTER (applicable depending on the model) (PIC. 9):
- ▶ 5.2. SCHEDULED INTERNAL MAINTENANCE (Deep cleaning):
- ▶▶6. REMOTE HUMIDISTAT CONNECTION (optional)
- IMPORTANTE: LEGGERE E COMPRENDERE QUESTO MANUALE OPERATIVO PRIMA DI EFFETTUARE L'ASSEMBLAGGIO, LA MESSA IN FUNZIONE O LA MANUTENZIONE DI QUESTO RAFFRESCATORE. L'USO ERRATO DEL RAFFRESCATORE PUÒ CAUSARE LESIONI GRAVI O FATALI. CONSERVARE QUESTO MANUALE A TITOLO DI FUTURO RIFERIMENTO.
- ▶▶4.1. INBETRIEBNAHME:
- ▶▶1. INFORMATIONS SUR LA SÉCURITÉ (FIG. 1)
- WAARSCHUWING: HAAL DE STEKKER UIT HET STOPCONTACT VOORDAT U OVERGAAT TOT REINIGING EN/OF ONDERHOUD.
- ▶▶1. SIKKERHEDSOPLYSNINGER (FIG. 1)
- ▶ en - DISPOSAL OF THE PRODUCT
- ▶pl - UTYLIZACJA PRODUKTU
- ▶ Iv - PRODUKTA IZNÍCINÁŠANA
Brand : Master
Model : BC 121
Category : Air Conditioning