
AD4010 - Water flosser SOLAC - Free user manual and instructions
Find the device manual for free AD4010 SOLAC in PDF.

User questions about AD4010 SOLAC
0 question about this device. Answer the ones you know or ask your own.
Ask a new question about this device
Download the instructions for your Water flosser in PDF format for free! Find your manual AD4010 - SOLAC and take your electronic device back in hand. On this page are published all the documents necessary for the use of your device. AD4010 by SOLAC.
USER MANUAL AD4010 SOLAC
natural_image
White sOlaC electric toothbrush with charging port and base mount (no text or symbols visible on body)WATER FLOSSER INSTRUCTIONS FOR USE
HYDROPULSEUR MODE D'EMPLOI
FIG. 1

natural_image
Diagram of a mechanical device with a downward arrow indicating motion or force (no text or symbols)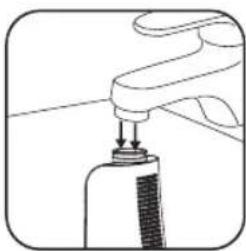
natural_image
Simple line drawing of a hand holding a small object with a pointed tip (no text or symbols)
natural_image
Diagram of a medical or laboratory procedure showing a tool inserted into a device with arrows indicating direction (no text or symbols present)FIG. 2 FIG. 3
natural_image
Diagram showing a tool inserted into a container with an arrow indicating downward motion (no text or symbols present)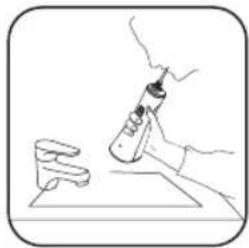
natural_image
Simple line drawing of a hand pouring liquid into a bottle over a surface, with another small container nearby (no text or symbols)FIG. 4

FIG. 5
natural_image
Diagram of a mechanical tool interacting with a base component, showing upward and downward arrows (no text or symbols)FIG. 6

natural_image
Simple line drawing of a mechanical device with arrows pointing to three circular components (no text or symbols)FIG. 7
natural_image
Pure mechanical diagram showing a lever and pivot with arrows indicating direction (no text or symbols)ESPAÑOL ES
Many thanks for choosing to purchase a SOLAC brand product.
Thanks to its technology, design and operation and the fact that it exceeds the strictest quality standards, a fully satisfactory use and long product life can be assured.
- Read these instructions carefully before switching on the appliance and keep them for future reference. Failure to follow and observe these instructions could lead to an accident.
SAFETY ADVICE AND WAR- NINGS
- This appliance can be used by children aged from 8 years and above and persons with reduced physical, sensory or mental capabilities or lack of experience and knowledge if they have been given supervision or instruction concerning use of the appliance in a safe way and understand the hazards involved.
- This appliance is not a toy. Children should be supervised to ensure that they do not play with the appliance.
- Cleaning and user maintenance shall not be made by children unless they are supervised.
- Only use the appliance with the specific power supply unit, provided with the appliance.
- The product can only be used with water at a temperature not exceeding 40^ .
- The battery must be removed from the appliance before it is scrapped.
- The appliance must be disconnected from the supply mains when removing the battery.
- The battery is to be disposed of safely.
- If the connection to the mains has been damaged, it must be replaced, take the appliance to an authorised technical support service. Do not attempt to disassemble or repair the appliance by yourself in order to avoid a hazard.
- This appliance is for household use only, not professional, industrial use.
- Ensure that the voltage indicated on the charger rating label matches the mains voltage before plugging in the charger.
- Connect the appliance to a socket that can supply a minimum of 10 amperes.
- The charger's plug must fit correctly into the mains socket. Do not alter the plug. Do not use plug adaptors.
- Do not force the power cord. Never use the power cord to lift up, carry or unplug the battery charger.
- Do not wrap the power cord around the appliance.
- Do not clip or crease the power cord.
- Check the state of the power cord. Damaged or tangled cables increase the risk of electric shock.
- Do not touch the plug with wet hands.
- Do not use the appliance if the cable or plug is damaged.
- If any of the appliance casings breaks, immediately disconnect the appliance from the mains to
prevent the possibility of an electric shock.
- Do not use the appliance if it has fallen on the floor, if there are visible signs of damage or if it has a leak.
- Avoid all contact with the liquid that could be released from the battery. In case of contact with eyes, wash them thoroughly and seek medical advice. The liquid spilled from the battery may cause irritation or burns.
USE AND CARE:
- Fully unroll the appliance's power cable before each use.
- Do not use the appliance if its accessories are not properly fitted.
- Do not use the appliance if the accessories or consumables attached to it are defective. Replace them immediately.
- Do not use the appliance if the on/off switch does not work.
- Disconnect the battery charger from the mains when not in use and before undertaking any cleaning task
- Store this appliance out of reach of children and/or persons with physical, sensory or reduced mental or lack of experience and knowledge.
- Keep the appliance in a dry, dust-free place, out of direct sunlight.
- Keep the appliance in good condition. Check that the moving parts are not misaligned or jammed and make sure there are no broken parts or anomalies that may prevent the appliance from operating correctly.
- Use the appliance and its accessories and tools in accordance with these instructions, taking into account the working conditions and the work to be performed. Use the appliance for operations different from those intended could result in a hazardous situation.
- Do not open the battery/ies under any circumstances whatsoever.
- Recharge the battery/ies only with the charger supplied by the manufacturer. A charger that is suitable for one type of battery may cause explosion or fire hazard when used with other battery/ies.
SERVICE:
- Any misuse or failure to follow the instructions for use renders the guarantee and the manufacturer's liability null and void.
DESCRIPTION
A Nozzle
B Nozzle release button
C On/Off button
D Mode button
E Mode indicator
F Charging Indicator
G Wireless charger
H Water tank
Water inlet lid
J Suction Tube
K Filter
CHARGING THE BATTERY
- Caution: A new battery is not fully charged and must therefore be charged before the appliance is used for the first time.
- Charge the battery at an atmospheric temperature of between 4 and 40°C.
- Plug the charger of the water flosser into the mains.
- Approximately 16 hours are needed for a complete charge of the battery. Never attempt to over charge the battery
- The red pilot light will blink to indicate that the charger is charging the battery.
- The blue pilot will come on when the battery is charged,
- If the device is not charging and the red pilot is blinking this means that the battery needs to be recharged.
INSTRUCTIONS FOR USE
BEFORE USE:
- Make sure that all the product's packaging has been removed.
- Before using this product for the first time, it is important to make a full charge of batteries.
FILLING WITH WATER:
- Detach the deposit from the appliance or open the water inlet lid (I) (Fig.1).
- Fill the compartment with water which temperature does not exceed 40^ C (Fig.1).
- Put the deposit back into its housing, ensuring that it is inserted properly or close water inlet lid (I).
- Wipe the water flosser with dry cloth
- Put the container back onto its place.
USE:
- Before the first use, or after an unused period of time, fill the water tank with a little water and clean it.
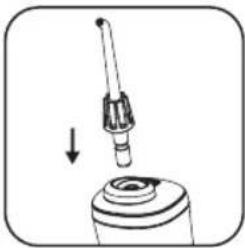
- Instert the nozzle into the unit (Fig. 2). Replace the nozzle every 6 months for optimal results
- Press the "Mode" button (E) to select the working mode.
* — For normal cleaning
* _ For gente cleaning of sensitive gums or for users who use the product for the first time.
* --- For cleaning, massaging and strengthen the gums.
- If you use this water flosser for the first time, choose the soft mode ( ) for a week, when you adapt to it, you can use the mode you want.
- Lean over washbasin, hold the unit in an upright position with nozzle tip point toward your teeth and close slightly your lips to prevent splashing (Fig 3).
- Turn the appliance on, by using the on/off button.
- Direct the water jet flow along the gum line and the teeth with the nozzle tip at a 90^ degree (Fig. 4).
- Clean between the teeth and around any braces, crowns or bridgework thoroughly.
- Remove the water from the water tank.
- Press "On/Off" button to turn on the unit, and drain the water off completely.
- Press "On/Off" key again to turn off the unit.
- Clean the appliance.
- In order to save energy, the appliance passes to stand-by after 2 minutes.
- To turn it on again, you simply have to press the on/off button.
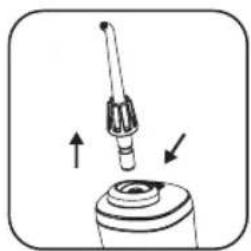
NOZZLES
- Press the nozzle release button (B) to remove or to replace the nozzles (Fig. 5).
TROUBLESHOOTING
| Problem Causes Solution | ||
| It does not work | You've just purchased the product or it has been left unused for more than 3 months. | Charge the unit for at least 16 hours |
| It only works for a few minutes even after charging | The filter is blocked Clean the filter | |
| The battery has reached the end of its lift cycle. | Contact service center for support. | |
| Charging time was insufficient | Charge the unit for at least 16 hours | |
| Water pressure is very low | There is dirt stuck in the nozzle | Replace the nozzle |
| The nozzle is deformed | ||
| The charging indicator does not illuminate when charging. | The power plug has not been connected well. | Please connect the power source well. |
| Circuit malfunction | Contact service center for support. | |
| Water does not come out | The tank is empty Fill up tank | |
| The irrigator is tilted too much while in use | Use with the appliance in a vertical state | |
| Pump malfunction | Contact service center for support. | |
CLEANING
- Clean the equipment with a damp cloth with a few drops of washing-up liquid and then dry.
- Do not use solvents, or products with an acid or base pH such as bleach, or abrasive products, for cleaning the appliance.
- Never submerge the appliance in water or any other liquid or place it under running water.
ANOMALIES AND REPAIR
- Take the appliance to an authorised technical support service if product is damaged or other problems arise. Do not attempt to disassemble or repair the appliance yourself as this may be dangerous.
FOR EU PRODUCT VERSIONS AND/OR IN CASE THAT IT IS REQUESTED IN YOUR COUNTRY:
ECOLOGY AND RECYCLABILITY OF THE PRODUCT
- The materials of which the packaging of this appliance consists are included in a collection, classification and recycling system. Should you wish to dispose of them, use the appropriate public recycling bins for each type of material.
- The product does not contain concentrations of substances that could be considered harmful to the environment.
This symbol means that in case you wish to dispose of the product once its working life has ended, take it to an authorised waste agent for the selective collection of Waste from Electric and Electronic Equipment (WEEE).

This symbol means that product may include a battery or batteries; user must to remove them before disposing of the product. Remember that batteries must be disposed of in duly authorised containers. Do not dispose of them in fire.
- How to remove the batteries from the interior of the device:
- CAUTION: It is important that the batteries are fully discharged prior to its withdrawal from the apparatus.
- To remove the batteries, once the life of the appliance, proceed as follows:
- Remove the water tank (H).
- Remove the fixing screws on the bottom part of the appliance with a screwdriver (Fig. 6).
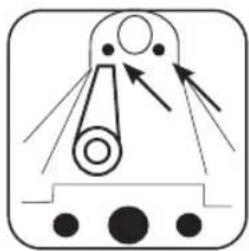
- Remove the fixing screws on the upper part of the appliance with a screwdriver (Fig. 7).
- Remove the lower cover and push on the inner body to extract it from the upper part of the appliance.
- Remove the housing that protects the battery and motor with a screwdriver.
- Identify the battery wires and cut their (Red and Black). To avoid risks of a short circuit with a possible residual battery load, first cut the Red wire and protect it by using insulating tape, then proceed to cut the Black wire proceeding in the same way.
- Safely remove the battery from its housing.
This appliance complies with Directive 2014/35/EU on Low Voltage, Directive 2014/30/EU on Electromagnetic Compatibility, Directive 2011/65/EU on the restrictions of the use of certain hazardous substances in electrical and electronic equipment and Directive 2009/125/EC on the ecodesign requirements for energy-related products.
FRANÇAIS FR
Cher Client,
SOLUTIONS EN CAS DE DYSFONCTIONNEMENT
This product enjoys the recognition and protection of the legal guarantee in accordance with current legislation. To enforce your rights or interests you must go to any of our official technical assistance services.
You can find the closest one by accessing the following web link: http://solac.com
You can also request related information by contacting us by phone.
You can download this instruction manual and its updates at http://solac.com
DE) GARANTIE UND TECHNIS- CHER SERVICE
Unit 25 & 26, San Croy Office Park, Die Agora
Road, Croydon, Kempton Park, 1619
Johannesburg
(+27) 011 392 5652
_
| _
一
1
sOlac
what we do, we do well
Español / ES
English / EN
Français / FR
Deutsch / DE
Português / PT
Italiano / IT
Nederlands / NL
Česky / CS
Polski / PL
Slovenský / SK
Magyar / HU
българск / BG
Română / RO
العربيya / AR