
ET8932 - Heating SOLAC - Free user manual and instructions
Find the device manual for free ET8932 SOLAC in PDF.


| Product type | Fan heater |
| Brand | Solac |
| Model | ET8932 |
| Power | 2000 W |
| Power supply | 220-240 V ~ 50/60 Hz |
| Dimensions (L x D x H) | 25 x 20 x 30 cm |
| Weight | 2 kg |
| Heating modes | 2 levels: 1000 W and 2000 W |
| Thermostat | Adjustable thermostat |
| Ventilation | Ventilation without heat (cold air) |
| Material | Heat-resistant plastic |
| Color | White |
| Overheat protection | Yes, automatic shut-off |
| Tip-over protection | Yes, circuit breaker if tipped over |
| Protection rating | IP21 |
| Cable length | 1.5 m |
| Maintenance and cleaning | Dust regularly with a soft cloth |
| Spare parts | Available through Solac after-sales service |
| Repairability | Repairable by a qualified professional |
Frequently Asked Questions - ET8932 SOLAC
User questions about ET8932 SOLAC
0 question about this device. Answer the ones you know or ask your own.
Ask a new question about this device
Download the instructions for your Heating in PDF format for free! Find your manual ET8932 - SOLAC and take your electronic device back in hand. On this page are published all the documents necessary for the use of your device. ET8932 by SOLAC.
USER MANUAL ET8932 SOLAC
natural_image
Exterior view of a modern electric heater with a digital display and control panel (no visible text or symbols)Solac is a registered Trade Mark
06/07
5-10 • ESPAÑOL
11-16 • ENGLISH
17-22 • FRANÇAIS
23-28 • DEUTSCH
29-34 • PORTUGUÊS
en
fr
de
pt

ELECTRODOMESTICOS SOLAC S.A Artapadura,11 - 01013 VITORIA (SPAIN)



natural_image
Line drawing of a rectangular electronic device with a digital display and control panel (no text or symbols)






natural_image
Technical line drawing of a mechanical clamp or bracket assembly (no text or symbols)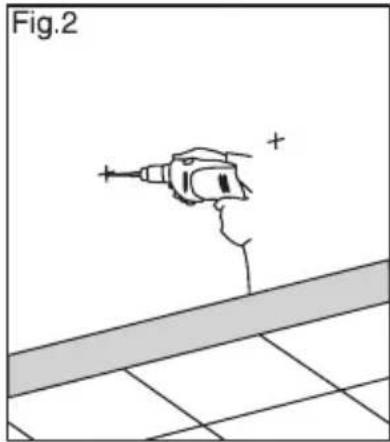

natural_image
Diagram of hands using a tool to install a mechanical component, labeled Fig.3 (no text or symbols on the diagram itself)
natural_image
Diagram showing hands installing or adjusting a structural component with a horizontal bar and base, labeled Fig.4 (no text or symbols on the diagram itself)
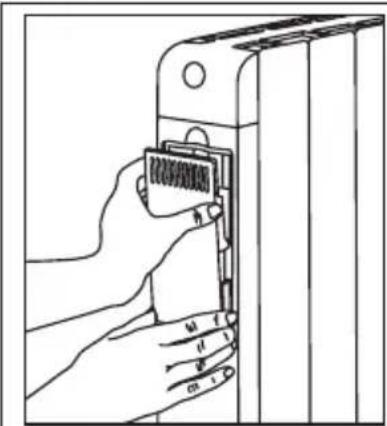
natural_image
Line drawing of a hand inserting a spring into a door panel (no text or symbols)
natural_image
Line drawing of hands using a power tool to cut or adjust a component (no text or symbols visible)Fig.A




ESPAÑOL es
1 Atención
- The appliance should never be covered with clothes, containers or any other objects, nor should it be placed under a wardrobe or anything else that could be an obstacle to the circulation of hot air.
- The appliance must be kept away from inflammable objects and unsupervised children should not be allowed near the emitter.
- Do not use the heat emitter to dry clothes.
- The place where the heat emitter is installed must be chosen carefully according to the instructions and in compliance with the standards.
- Do not install the appliance under a mains socket.
- The appliance should not be installed in places where there is a risk of it being splashed with water, such as from bathtubs, sinks, showers, swimming pools, etc.
- Do not operate the appliance with the cable wound up.
- If the power cable is damaged, do not switch on the appliance. This cable should only be replaced by the Technical Assistance Service in order to prevent any risks.
- The appliance must be installed so that the switches, thermostat and mobile power socket cannot be touched directly or indirectly by a person in the bath or shower.
• To avoid the new smell of the appliance when using it for the first time, switch on the emitter and leave it working for 2 hours at the highest temperature.

Caution! When you wish to dispose of the appliance, NEVER throw it in the rubbish. Instead, take it to your nearest clean point or waste collection point, where it will receive subsequent treatment. You will thus be helping to take care of the environment.

Do not cover the heating appliance in order to prevent it from overheating.
2 Installation instructions

When possible, install the emitter on a wall under a window, but never in a ventilation area. Respect the installation safety distances.
Important




Wall mounting
1 Place the wall support on the floor in the position shown in the figure (fig. 1) and mark the top screw holes on either side of the support on the wall (fig. 1).
2 Drill the marked holes and insert the plug (fig. 2).
3 Install the support, aligning the bottom screw holes with the matching screws, and tighten the screws (fig. 3).
4 Holding the support from below, repeat the process in step 2 (fig. 3).
5 Lastly, tighten the screws to securely attach the support (fig. 4).
6 Check that the support is anchored in such a way that it can withstand twice the weight of the appliance.
If the support is damaged, do not reuse it.
For installation on a plastered brick wall, use the following: 4.2 x 25 DIN 7981 screws and 6 76 NY wall plugs. For other surfaces, consult the expert salesperson.
Safety distances
• The radiator must be installed at 150 mm from any obstacles, walls, etc.
- The distance from the appliance to the floor should be 220 mm. It may be less in certain cases, but never less than 150 mm.
Installing the feet (not included accessory)
- Insert the edges of the bottom of the radiator into the feet as shown in figure 5. You will hear a click to indicate that the installation was a success.
3 Operating mode (models: ET8924, ET8926, ET8928, ET8930, ET8932. Digital thermostat)
Components
1 Keypad
1.1 Reduce selection key
1.2 Increase selection key
1.3 Mode/OK key
1.4 ON/OFF/PROG switch key
A Humidifier
1 Once the appliance is installed and correctly connected, press the ON/OFF/PROG key to switch on the heat emitter.
12 Operating mode (models: ET8924, ET8926, ET8928, ET8930,




2 When the heat emitter is switched on, the microprocessor reads the internal memory of the appliance and loads the last mode selected by the user. On connection for the first time, the memory is empty. Therefore, the screen will blink on and off until one of the keys is pressed.
3 While the appliance is working, the screen shows the temperature and the operating mode selected: comfort, saving, anti-frost, off and programming.
COMFORT SAVING ANTI-FROST OFF PROGRAMMING
| PROG |
- The symbol remains on while the element is working.
en
Comfort temperature adjustment
1 By pressing the (+) and (-) keys you can select the desired room temperature. The temperature changes by 1^ C every time you press a key. If you hold the key pressed, the temperature changes automatically by 1^ C every 0.25 seconds.
2 Once the temperature is assigned and after a certain period without pressing any keys, the appliance memorises the selected temperature.
Selecting the mode
1 Press the (M/OK) key to select the operating mode. Every time this key is pressed for more than 0.1 sec., the thermostat changes from one mode to the next: Comfort – Saving – Comfort, etc.
2 To access the "anti-frost" mode, press the (M/OK) key until the ✝ icon appears on the screen.
MODE TEMPERATURE
| COMFORT Selected with the (+), (-) keys | |
| SAVING Comfort temperature minus 3 °C | |
| ANTI-FROST 7 °C | |
| OFF | Off |


Possible errors of the thermostat
- If the probe is at less than -15^ , the screen will display the message OC.
- If the probe is at more than 50^ C , the screen will display the message SC.
4 Programming
1 Make sure that the thermostat is in the OFF position or press the ON/OFF/PROG button to go to the off position.
2 Press the ON/OFF/PROG button for at least 5 seconds to go to Manual Programming.
3 Select the hour-by-hour operating mode by pressing the "+" button and then "Mode/OK".
- Top segment: Comfort
- Low segment: Save
- Nothing: Anti-frost.
4 Repeat the operation for each hour of each day of the week.
- When you finish programming day No. 7 on the thermostat, the parameters are saved automatically and the program changes to the hour adjustment mode in order to ensure that the time is correct. Modify the time if necessary or validate to return to the OFF position.
5 Use the "-" button to move through the program schedule. This button moves through the time zones without modifying the program. Press continuously to accelerate the process.
5 Setting the clock time
1 Make sure that the thermostat is in the OFF position or press the ON/OFF/PROG button to go to the OFF position.
2 Press the ON/OFF/PROG button for at least 5 seconds to go to Manual Programming.
3 Press the ON/OFF/PROG button once.
4 Select the day by pressing the "+" and "-" buttons and then the "Mode/OK" button to validate.
5 Select the time by pressing the "+" and "-" buttons and then the "Mode/OK" button to validate.
14 Programming


- Once validated, the program will return to the OFF position.
6 Compensation technique
Due to the characteristics of this appliance, temperature is measured at the bottom of the appliance and adjusts perfectly to the temperature selected by the user. However, this value can be adjusted manually using "Heat Compensation".
1 Press the ON/OFF/PROG key to turn off the thermostat.
2 Press the M/OK key (long press) to access the menu showing 0.0 on the screen.
3 Press the +/- buttons to adjust the temperature by 0.1°C.
4 Press the M/OK button (short press) to return to the OFF position.
5 Switch the emitter on again.
Example:
We measure 22^ C with a thermostat in a room when the comfort temperature selected on the thermostat is 20^ C.
• The compensation value is 22 - 20 = +2°C.
- The user should enter +2^ in the compensation menu.
7 Blocking the keypad
The user can ensure that nobody modifies the set program by blocking the control keypad. This function is very useful in public buildings or to limit access by children. To block the keypad, press the "+" and "-" buttons simultaneously for at least 5 seconds. Do the same to unblock the keypad.
8 Use of the humidifier (valid for all the models)
- If you want to use the humidifier – an air-freshening system that keeps a steady humidity rate during the operation of the emitter – open the tank and fill it with water (Fig. A). If you also want to use it to freshen or perfume the air, add a few drops of your favourite essence (flower, eucalypt, etc.) to the water. Close the tank.





9 Cleaning and maintenance
• Make sure the emitter is not connected to the mains, and let its surface cool if you were using it previously.
- Use a damp, soft cloth to clean the emitter. Do not use solvents or abrasive detergents. When necessary, use a vacuum cleaner to remove the dust from the emitter.

FRANÇAIS fr
1 Attention
ET8924.book Page 35 Friday, June 22, 2007 11:18 AM






ET8924.book Page 36 Friday, June 22, 2007 11:18 AM




ET8924.book Page 37 Friday, June 22, 2007 11:18 AM





natural_image
Solid red rectangular background with no text, symbols, or patterns


- ESPAÑOL es
- Atención
- Installation instructions
- Important
- Wall mounting
- Safety distances
- Installing the feet (not included accessory)
- Operating mode (models: ET8924, ET8926, ET8928, ET8930, ET8932. Digital thermostat)
- Components
- Comfort temperature adjustment
- Selecting the mode
- Possible errors of the thermostat
- Programming
- Setting the clock time
- Programming
- Compensation technique
- Example:
- Blocking the keypad
- Use of the humidifier (valid for all the models)
- Cleaning and maintenance
- FRANÇAIS fr
- Attention
Brand : SOLAC
Model : ET8932
Category : Heating