Ion Elite - Sports Watch BUSHNELL - Free user manual and instructions
Find the device manual for free Ion Elite BUSHNELL in PDF.

User questions about Ion Elite BUSHNELL
0 question about this device. Answer the ones you know or ask your own.
Ask a new question about this device
Download the instructions for your Sports Watch in PDF format for free! Find your manual Ion Elite - BUSHNELL and take your electronic device back in hand. On this page are published all the documents necessary for the use of your device. Ion Elite by BUSHNELL.
USER MANUAL Ion Elite BUSHNELL
natural_image
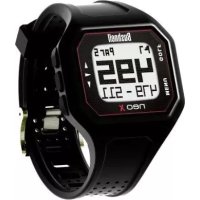
Black smartwatch with digital display showing time, speed, and control buttons (no readable text or symbols beyond basic clock)ION ELITE™
GPS RANGEFINDER WATCH
DISTANCE MADE SIMPLE™
User Manual
Scan the code to download the Bushnell Golf Mobile app and register your lon Elite Rangefinder Watch.


Android and Google Play are registered trademarks of Google Inc. in the United States and other countries. iPhone and Apple Store are trademarks of Apple Inc., registered in the U.S. and other countries. Other names may be trademarks of their respective owners.
TABLE OF CONTENTS
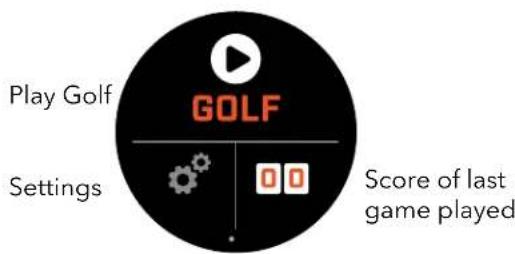
CONTROLS, HOME, & PLAY GOLF SCREENS 3
PLAY GOLF SCREEN DETAILS 3
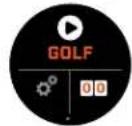
- POWER/MENU BUTTON - Press and hold to turn device on/off. Swipe right or left to cycle through Time Screen, Play Golf Screen, Bluetooth Connection, & Scorecard List.
PLAY GOLF SCREEN DETAILS
- CENTER DISTANCE - Distance to center of the green (or pin if you moved it).
- BACK DISTANCE - Distance to back of the green or pin, if selected.
- FRONT DISTANCE - Distance to front of the green.
- HOLE/PAR/QUICK HOLE CHANGE - Current hole number and par. Tap for Quick Hole Change.
- SCORE - User's current score relative to par. Tap to go to score entry.
- HOLEVIEW - Tap to access Holeview and Shot Planning.
- GREENVIEW - Tap to access Greenview to change pin placement.
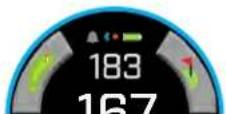
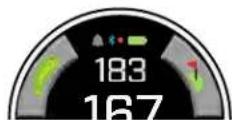
- SLOPE INDICATOR - (Blue Outer Ring) Illustrates distance mode and calibration status for Slope feature. (see page 6 for further explanation
- HAZARDS - Tap to access Hazard distances
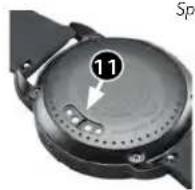
- Charging Pins
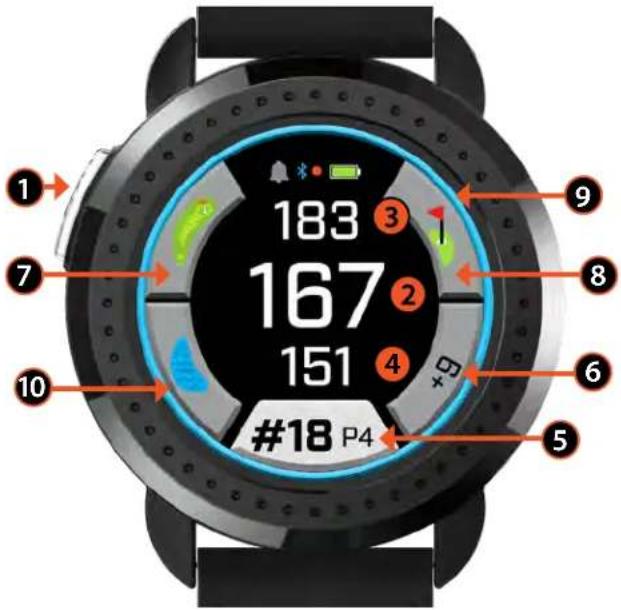
Play Golf Front/Center/Back Screen
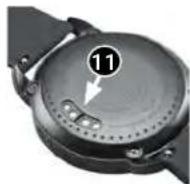
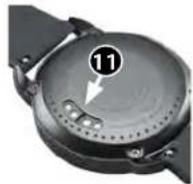
- Charge the ION Elite's internal battery, by connecting the charger to the back of the device and plug the USB Side into computer or wall.
- Press and hold the Power button (1) to turn on the device. Time Screen will be displayed.
- To Play Golf, swipe left to the Play Golf screen and tap the Screen on the Play Golf icon. The Ion Elite will connect to the satellites faster while being outside with a clear view of the sky.
- Choose your course, swiping up/down and tapping on your selected course. The Play Golf (Front/Center/Back) screen is displayed.
- The ION Elite has an Auto Hole advance feature, however, to change holes manually, Swipe Up/Down on touchscreen. To change holes, tap on the hole number to access the Quick Hole Change screen.
- To cycle through mode/menu screens for Play Golf Mode (Front/Center/Back > Shot Distance, Score Card, Setting > Time/Home > Front/Center/Back), swipe Left/Right.
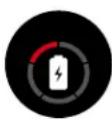
Alarm Indicator Bluetooth Status Notification Indicator Battery Indicator
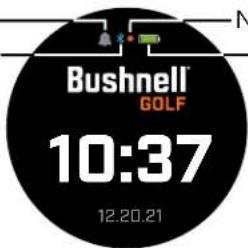
Time/Home Screen Play Golf Screen
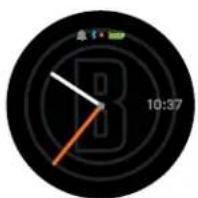
Alternate Time/Home Screens: Press and hold the Home Screen for three seconds. Swipe up or down to change the watch face.
Click to Return to the Table of Contents
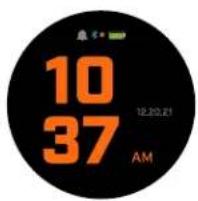
TIME/HOME SCREEN
Cycle through Home Screen Options, Time > Play Golf, swipe Left/Right.
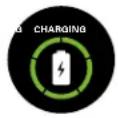
CHARGING THE BATTERY
The rechargeable battery of the Ion Elite is long lasting and provides up to 12+ hrs (3+ rounds of golf typically) on a charge. However, battery life may be reduced due to a variety of factors (external temperature, etc.). All rechargeable batteries lose their effective charge length over time.
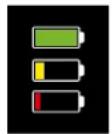
To recharge the battery, plug the (standard) USB plug to your computer or other charging port. Set the Ion Elite on top of the magnetic charging pins. If the battery is charging successfully, you will see the sections of circle around the battery symbol blink. The Ion Elite is compatible with all USB ports, including iPhone/other smartphone USB chargers. The unit is fully charged (about 3.5 hrs from totally discharged state, less if partial charge remains) and ready to use when a full green circle is displayed around the battery icon.

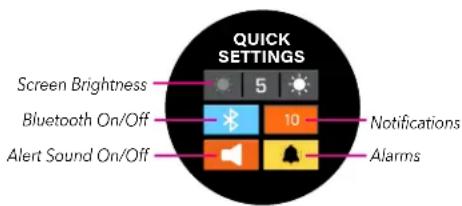
QUICK SETTINGS & NOTIFICATIONS MENU
- From the Time/Home Screen, swipe up to access Quick Settings.
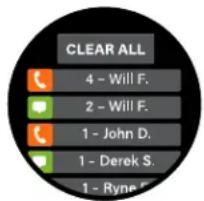
- From the Time/Home Screen, swipe down to access the Notifications.
*The notifications screen allows the user to be aware there is a call coming in or a message is received. The Ion Elite cannot send or receive communication.
Notifications Screen
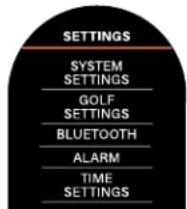
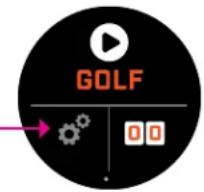
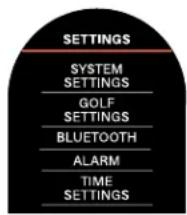
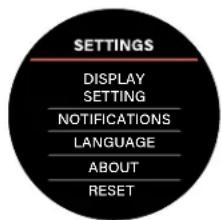
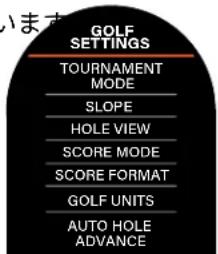
THE SETTINGS MENU
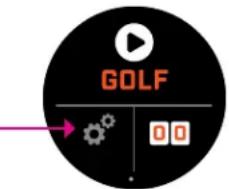
- From the Play Golf Home Screen, press the Gears on the bottom left to access the Settings Menu.
- Select item from menu by swiping Up and Down on the list.
- Press Power/Menu button to return to previous menu screen.
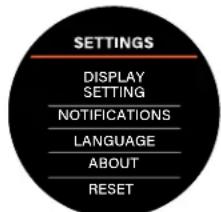
SYSTEM SETTINGS MENU ITEMS
SYSTEM SETTINGS:
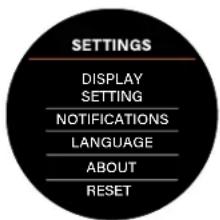
A. DISPLAY SETTING:
a. Brightness: adjust screen brightness from 1 - 5
b. Back light timeout: adjust back light timeout from 5 seconds - 60 seconds
B. NOTIFICATIONS:
a. Pop Up: On or Off
b. Call sound: On or Off
c. Text Sound: On or Off
C. LANGUAGE: Choose language preference.
D. ABOUT: SKU number
E. RESET: Restore the unit to all of its original factory settings, select Yes or No.
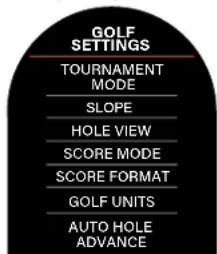
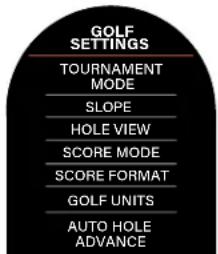
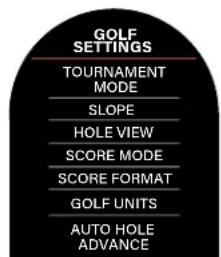
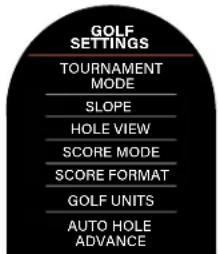
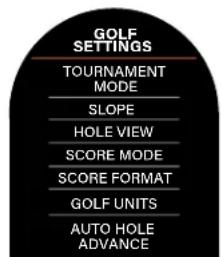
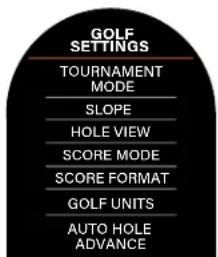
GOLF SETTINGS: Use Golf Settings to set, adjust and customize game play.
F. TOURNAMENT MODE: On or Off. *Disables Slope compensated distances, which meets USGA's device policy.
G. SLOPE: On or Off
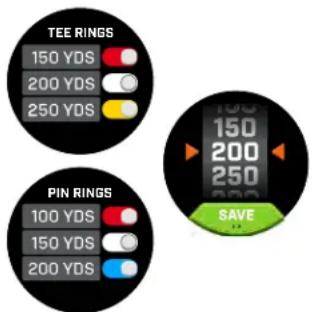
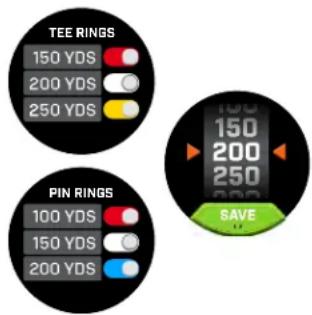
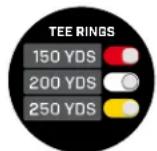
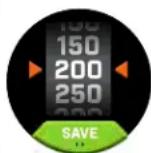
H. HOLE VIEW:
a. Shot Planning: On or Off
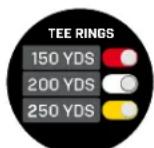
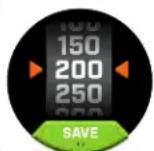
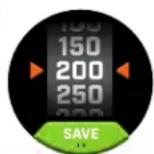
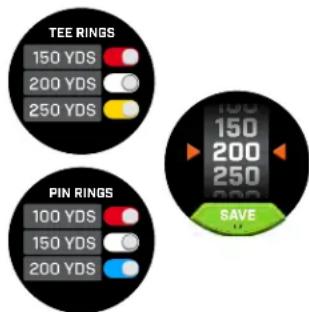
b. Tee Rings: Tap on the number and scroll to set the distance for the marker and Save. Turn marker on or off.
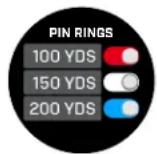
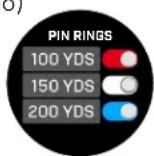
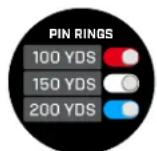
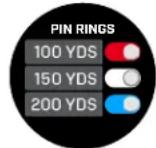
c. Pin Rings: Tap on the number and scroll to set the distance for the marker and Save. Turn marker on or off.
I. SCORE MODE: Choose Off, Basic or Advance
J. SCORE FORMAT: Stroke, Stableford or Modified Stableford.
K. GOLF UNITS: Yards or Meters
L. AUTO HOLE ADVANCE: On or Off
Click to Return to the Table of Contents
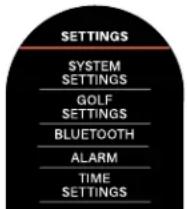
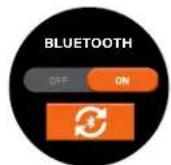
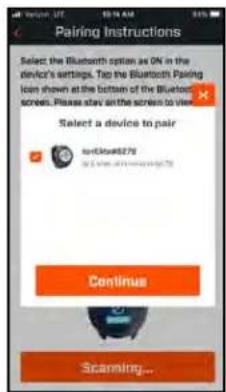
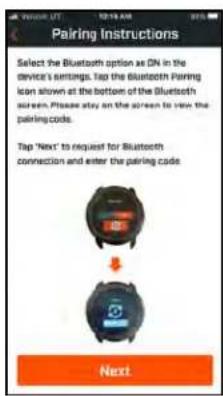
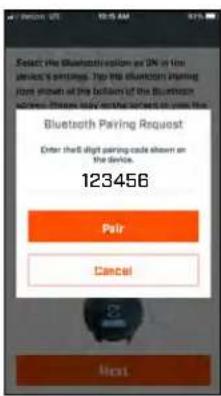
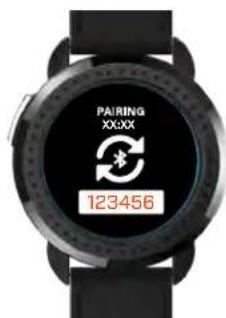
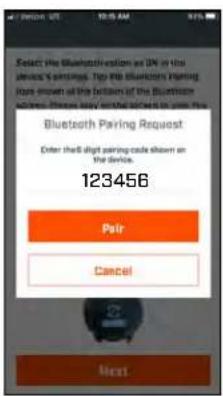
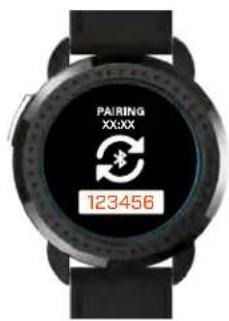
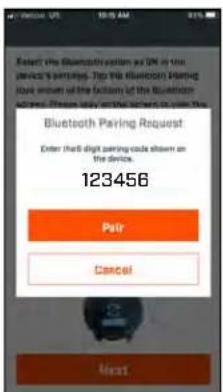
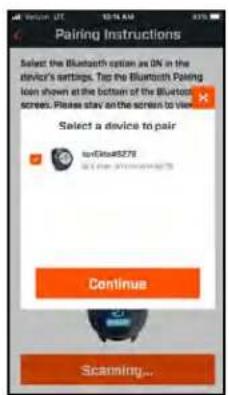
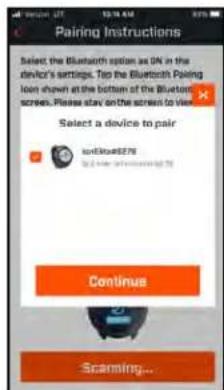
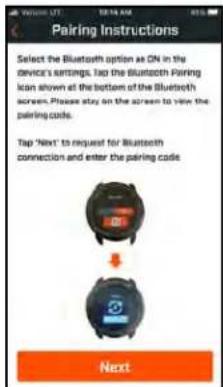
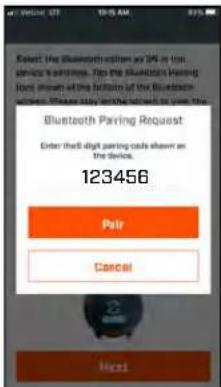
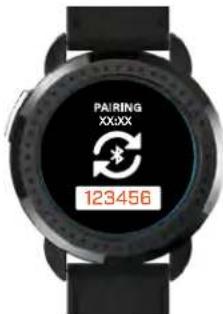
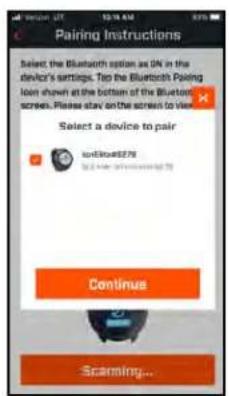
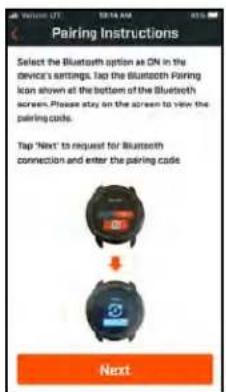
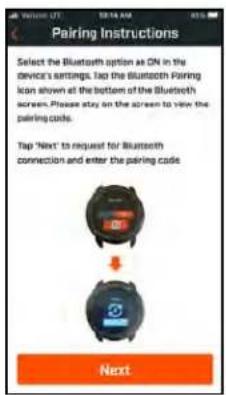
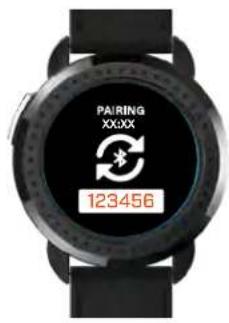
BLUETOOTH: Select On to turn on Bluetooth Mode. Press the Paring icon to connect the Ion Elite to your Bluetooth enables device. Follow the directions in "Connecting Bushnell Golf Mobile App" to see full Bluetooth connection instructions.
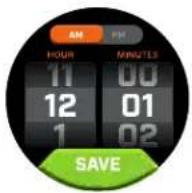
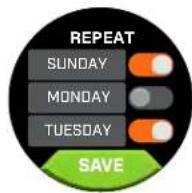
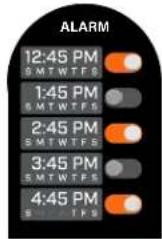
ALARM: Use the Alarm to remind you about Tee Times or other important reminders. Turn an alarm on and press the time to set the Hour, Minutes and AM/PM, press Save. Select the Days to set when the alarm will sound.
TIME SETTINGS:
A. Time Format: 12 hour or 24 hour
B. Set Time: Auto or Manual. For Auto, user will need to connect to the GPS through Play Golf to acquire to satellite signal to auto set the time.
C. Set Date: Choose Month, Day, Year and press Save
PLAY GOLF MODE
Play Golf Button Acquiring Signal
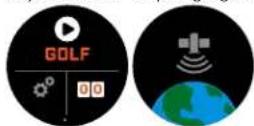
- Make sure you are outdoors, with an unobstructed view of the sky. Tap PLAY GOLF to start or continue the round of golf. Display will show the GPS Search Screen as the lon Elite looks for multiple available GPS satellite signals and locks onto them. This can take several minutes the first time you use the lon Elite but will be faster when used in the same general area in the future.
- You will be asked if you wish to continue a game that is active. Make your choice. If you are continuing a game, you will be sent to the Front/Center/Back (FCB) screen. If you select no, the device will connect to GPS and a list of nearest courses will appear.
-
Swipe Up and Down to select the course you want to play from the list of nearby courses (closest course is at the top of list).
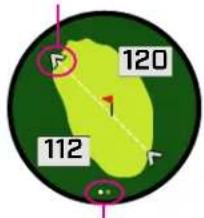
• The display then shows Front/Center/Back Distance Screen: -
Current hole #, Par and tap for Quick Hole Change
- Game score
- Distance to the center of green/pin
- Distance to the front of the green
- Distance to the back of green
- Hazards
- HoleView*
- GreenView*
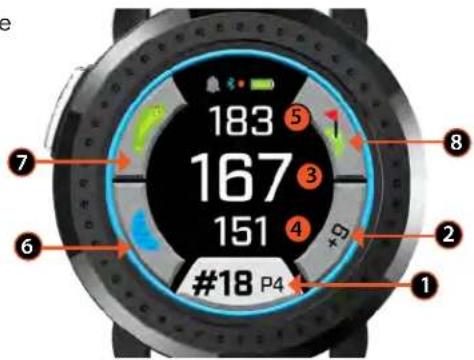

*Black pin indicates the pin is in the center of the green. Red pin indicated the pin has been moved.
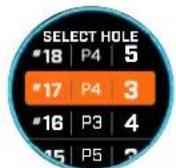
Quick Hole Change Screen
HOLEVIEW
The HoleView Screen allows you to view the hole layout.
SHOT PLANNING
The Shot Planning Screen allows the player to see distance to and from a reticle. Tap the distances to toggle between straight line distance and shot planning.

Straight Line Distance
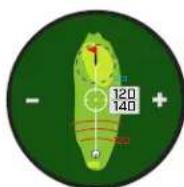
Shot Planning
Example:
120 from reticle to pin
140 from ball to reticle
GREENVIEW
The GreenView Screen will allow you to select the pin placement on the green to provide you with distance to the pin instead of the center of green distance. Do this by tapping anywhere on the green that best represents the location of the pin/hole. When done, hit the Power/Menu button to save pin location, or the page will timeout after one minute and return to the FCB screen.
DUAL GREEN
In cases when a hole has two greens, "<" and ">" will replace the hashtag/number sign next to the hole number. If the incorrect green is selected, click on GreenView and swipe to choose the correct green.
pie
| Category | Value | |---|---| | Red Circle | 120 | | Green Segment | 112 | The label '120' is in red, and the label '112' is in black. The arrow indicates direction from the center to the left side of the pie.
If a hole has a dual green, screen page dots will appear on the screen. Swipe to go to alternate green.
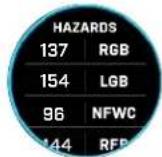
HAZARD & LAYUP POINTS
Tap to view Hazard call outs per hole, variable depending on the most significant hazards located near a specific hole on the current course. Hazard screen will time out after one minute and return to the FCB screen. If there are no Hazards, "No Hazard Data" will be on screen. See "Hazard Glossary" on page 9 for a list of all abbreviations used to designate various hazards.
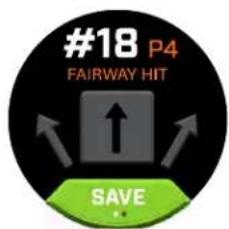
SCORE ENTRY
To enter your score, in Play Golf Mode, tap the Score button (Fig. 2 on the FCB Screen). Swipe Up or Down to select the number of Strokes and Putts (See below). Swipe Left to enter the Fairway Hit direction (See below). After entering information on each screen, press save. Your score will be saved and will move to the next hole and the Front/Center/Back screen. *Note: to enter Putts and Fairways Hit, the device needs to be in Advanced Score mode.
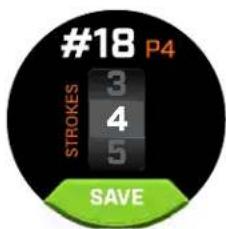
Basic Score Mode
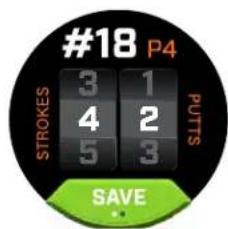
Advanced Score Mode
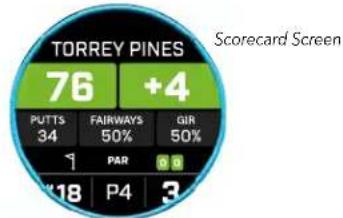
SCORECARD
To go to the Scorecard, swipe Left on the FCB Screen. Tap the score icon in the bottom right of the screen. Once in the Scorecard, tap on your score, putts, fairways and GIR to populate the selected stat in the right hand column.
*You can edit each hole's score and stats while the round is active. Once the round is closed, you will not be able to edit the score for that round.
other
TORREY PINES | Scorecard Screen | Value | | :--- | :--- | | 76 | +4 | | PUTTS | 34 | | FAIRWAYS | 50% | | GIR | 50% | | PAR | 1 | | P4 | 3 | | P18 | 18 |SHOT DISTANCE
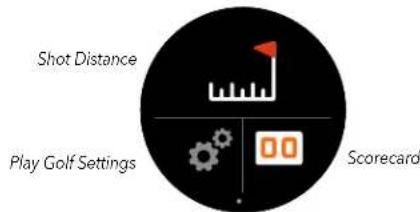
To go to the Shot Distance, swipe Left on the FCB Screen. Tap the Shot Distance icon on the top of the screen. Once in the Shot Distance, tap Reset to save the current location. Distance will be measured from the point of Reset and save the last location until Reset again.

SLOPE
- Solid Blue Slope Ring - Indicates unit is calibrated and displaying Slope compensated distances.
- Flashing Blue Ring - Still receiving compensated distances but need to update calibration for more accurate distances. *Calibrate unit by taking it to a Teebox or Green.
- BlinkingOrangeRing-indicates unit is not calibrated and is displaying non Slope compensated distances. *Calibrate unit by taking it to a Teebox or Green.
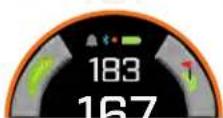
TOURNAMENT MODE
- Solid White Tournament Mode Ring - Indicates unit is in Tournament Mode and meets USGA's device policy.
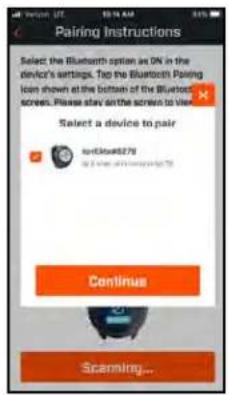
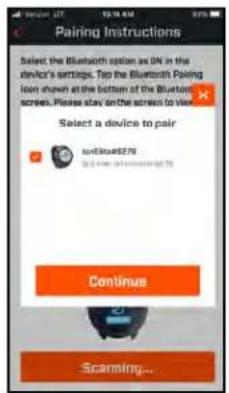
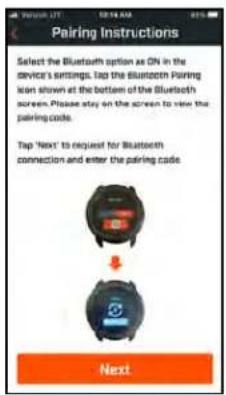
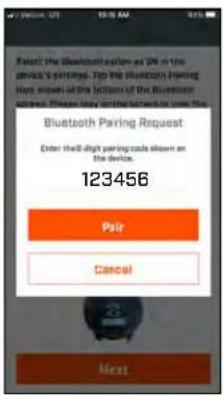
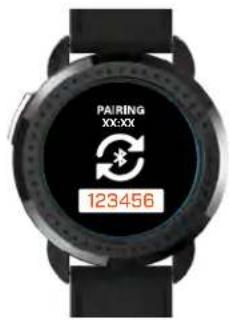
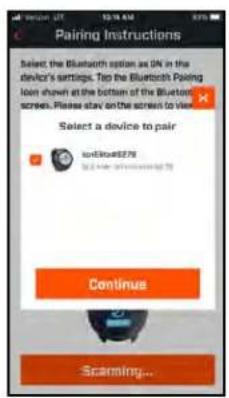
CONNECTING TO THE BUSHNELL GOLF MOBILE APP
Connecting your Ion Elite with the app allows you to:
• Control Ion Elite's Settings from the app.
- Wireless single course updates.
- Scorecard syncing with tons of round data for your game improvement.
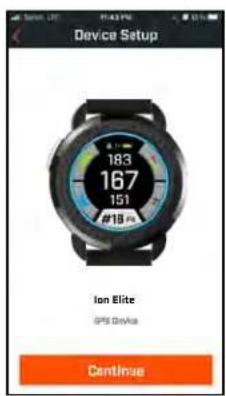
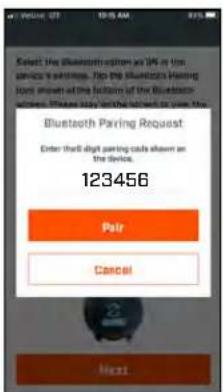
To connect your lon Elite to your phone and the Bushnell Golf Mobile app:
-
Download the Bushnell Golf Mobile app at app.bushnellgolf.com/install or scan the QR code.
-
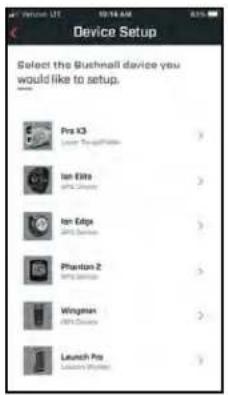
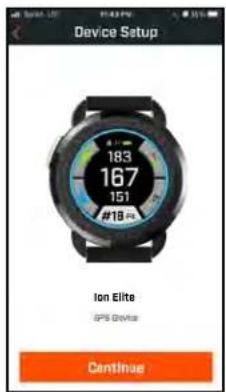
If you are new to the app you will be asked to setup a device after registration, select lon Elite. If you are a returning user to the app, select "See All" from the "My Devices Section", click "Add Device", and select lon Elite.
-
Follow the on screen instructions in the app to pair and connect your lon Elite.
Scan the code to download & install the Bushnell Golf app.


UPDATE GOLF COURSE DATA
Your Ion Elite is pre-loaded with data for over 38,000 courses located worldwide. It is ready to use right out of the box, with no need to download software or pay any membership fees.
Automatic Course Update: To Update a single course file automatically, connect the Device to the Bushnell Golf Mobile via Bluetooth, press Play Golf to start a round. Once the course is selected, the Ion Elite will automatically update the course, if a new version is available.
Manual Course Update: To Update a single course file. Connect the Device to the Bushnell Golf Mobile via Bluetooth. Select Ion Elite from your device List. Select Course Update. Follow the instructions on the Bushnell Golf Mobile App to search for your course and update your device.
To Update multiple courses. Please visit the Bushnell Golf Update Manager at https://appsupport.bushnellgolf.com and follow the instructions.
UPDATING FIRMWARE
To update the Bushnell Ion Elite firmware, click on Device Update on the Device Function screen in the Bushnell Golf Mobile app. If there is an update available, it will automatically be downloaded and installed.
Click to Return to the Table of Contents
GLOSSARY
Auto Course Recognition: This is a feature that GPS rangefinders tend to have. By using GPS technology, the rangefinder can automatically identify what course you're at and provide the appropriate course detail.
Auto Hole Advance: This is a feature that GPS rangefinders have that typically goes hand in hand with the Auto Course Recognition feature. By using GPS technology, the rangefinder can automatically identify what hole you're on and it will provide the appropriate distance. When you've made the hole, it will automatically move to the next hole and repeat the process.
Distant Target Priority Mode: This mode uses a far-sighted or background targeting technology to acquire the straight-line distance of your target. When ranging, it will ignore objects in the foreground and will provide the distance of the furthest target.
Dual Display Technology: Bushnell takes it to the next level by allowing the user to switch between using the LED/Red display or the LCD/Black display at the user's discretion.
Dynamic Green Mapping: Front and back distances from the golfer's line of play.
First Target Priority Mode: This is the main mode that golf rangefinders are built with. It uses a near-sighted or foreground targeting technology to acquire the straight-line distance of your target. When ranging, it will ignore objects that are in the background and will provide the distance of the closest target.
Flag/Pin Seeking Mode: Each manufacturer brand has their own name for this feature. It's a mode that specifically seeks out and zeros in on the distance to the pin. Sometimes this is just the standard First Target Priority Mode, so you need to carefully read what the manufacturer is advertising.
GPS Rangefinders: Global Positioning System (GPS) rangefinders are exactly what you would expect if a map and a measuring device had a baby. A basic rangefinder uses GPS technology to provide golf course detail such as distances to the flag, hazards, and other targets if it has a customizable pin placement feature.
GreenView: The GreenView Screen allows the user to select the pin placement on the green to provide the distance to the pin instead of the center of green distance.
HoleView: The HoleView Screen allows the user to see the front and back distances on the green to more accurately measure the distance to the hole.
PinSeeker Mode: This is Bushnell's name for the primary targeting mode their rangefinder uses. (See also First Target Priority Mode).
Rainguard HD: Bushnell treats their optics with a special and patented coating to protect them from fogging up. The lens also easily reject snow, sleet, and rain drops by causing them to break up and scatter when they contact the lens.
Rain Mode: Bushnell Golf is one of few manufacturers that has a specific mode that compensates for weather such as rain and snow. The laser rangefinder can reject reflections off rain drops or snowflakes and still get distances with successful target acquisition.
Scan Mode: This mode allows you to scan or pan the course and receive updated distances to targets and objects that come into view while looking through the rangefinder.
Slope Compensation: Slope technology calculates the angle and the compensated range to provide an adjusted distance because of elevation changes. Its purpose is to ensure you are properly informed of the distance ahead so you can select the right club to get the proper trajectory to make it to the hole.
Straight Line Distance: This is the horizontal distance from you, or rather the device, to the target you're seeking a distance from. It's the primary form of distance that's acquired with all tournament legal laser and GPS golf rangefinders.
USGA Rule 14-3: You'll see this term a lot while in the market for golf rangefinders. It stands for United States Golf Association. To be able to legally use rangefinders in tournaments, the device must comply with the USGA's measuring device policy found in Rule 14-3.
Vivid Display Technology: This new technology is saved for Bushnell's premium rangefinders where light transmission, contrast, and clarity are all better than before. The readouts are brighter, and the display can be read in any light condition.
HAZARD GLOSSARY
L To Layup point (i.e. 75L= To 75yd Layup point,
100L = To 100 yard Layup point)
M To Marker (i.e. 250M = To 250 Marker
Bnk To # Bunker (i.e. T1Bk = To 1st Bunker)
CBK To # Center Bunker (i.e. 2CBk = To 2nd Center Bunker)
Fwy To #Fairway
GBk To # Grass Bunker
LBk To # Left Bunker
RBK To # Right Bunker
Wtr To # Water Hazard
Bnkr To Bunker
C#Bk Carry to # Bunker (i.e.C1BK = Carry 1st Bunker)
C#LB Carry to # Left Bunker (i.e. C2LB = Carry 2nd Left Bunker)
C#RB Carry to # Right Bunker (i.e. C3RB = Carry 3rd Right Bunker
C#Wt Carry # Water Hazard (i.e. C2Wt = Carry 2nd Water Hazard)
CBnk To Center Bunker
CCBK Carry Center Bunker
CDch To Center Ditch
CFwy To Center Fairway
Frwy To Fairway
CFyB Carry Fairway Bunker
CHzd Carry Hazard
CLBk Carry Left Bunker
CLHz Carry Left Hazard
Clif To Cliff
CLWs Carry Left Waste Area
CLWt Carry Left Water Hazard
CPth Carry Path
CRBk Carry Right Bunker
CRHz Carry Right Hazard
Crst To Crest
CRWt Carry Right Water Hazard
CWst Carry Waste Area
CWtr Carry Water Hazard
Dtch To Ditch
EFwy To End of Fairway
ELFy To End of Left Fairway
ELoF To End of Lower Fairway
ERFy To End of Right Fairway
EWst To End of Waste Area
GBnk To Grass Bunker
Gorg To Gorge
Hzrd To Hazard
LBnk To Left Bunker
LDth To Left Ditch
LFwy To Left Fairway
LGBk To Left Grass Bunker
LndA To Landing Area
LWst To Left Waste Area
LWtr To Left Water
Path To Path
PotB To Pot Bunker
RBnk To Right Bunker
Rdge To Ridge
RDch To Right Ditch
RFwy To Right Fairway
RGBk To Right Grass Bunker
RHzd To Right Hazard
Road To Road
RWst To Right Waste Area
RWtr To Right Water
ThFy Through Fairway
ThRF Through Right Fairway
Wter To Water Hazard
WstA To Waste Area
WstB To Waste Bunker
WstE Waste Area End
CGrg Carry Gorge
RvrB To River Bed
Wall To Wall
Care and Maintenance
To help ensure reliable operation, the following care and maintenance guidelines are recommended:
- Avoid exposing the unit to extreme environmental conditions for a prolonged period of time. The unit is IPX7 rated; it is water resistant, but not waterproof. Unit should not be submerged in any liquids.
- Avoid severe impacts on the unit.
- You may clean the unit occasionally with a soft, damp cloth.
- DO NOT expose the unit to strong chemicals such as gasoline and alcohol, as they will damage the unit.
- Store the unit in a dry place when it is not in use.
WARNING
- Do not attempt to open the lon Elite.
- Unit contains a lithium ion battery.
- Do not attempt to open, disassemble or service the internal battery. The battery is not replaceable.
- Do not crush, puncture or short the battery's external contacts.
- Do not expose to temperatures above 140^ F ( 60^ C). Do not charge battery when temperature is over 113^ F ( 45^ C). Do not store unit in temperatures above 113^ F ( 45^ C) or below 32^ F ( 0^ C).
• Properly recycle or dispose of the battery. Do not dispose in fire or water.
Legal Disclaimer
By using this product, you agree that Bushnell Outdoor Products will not be held legally responsible for any injury or damage to you or any person or property caused by the user's improper operation and/or poor judgment while using this product.
Note: See Limited Warranty for other limitations to our liability.
Additional Information
The Global Positioning System (GPS), a network of 32 satellites orbiting Earth, is operated and maintained by the U.S. government. This GPS device requires at least 3 satellites to be acquired to accurately determine your position. Any change made to the system by the government could affect the accuracy and performance of this product.
Bushnell Golf Website
www.bushnellgolf.com is the best online resource for all Bushnell Golf product owners, including product support, FAQs, etc.

WARNING: AS WITH ANY LASER DEVICE, IT IS NOT RECOMMENDED TO DIRECTLY VIEW THE EMISSIONS FOR LONG PERIODS OF TIME WITH A MAGNIFIED LENS.
FCC Statement
This device complies with part 15 of the FCC Rules. Operation is subject to the following two conditions: (1) This device may not cause harmful interference, and (2) this device must accept any interference received, including interference that may cause undesired operation.
This equipment has been tested and found to comply with the limits for a Class B digital device, pursuant to Part 15 of the FCC Rules. These limits are designed to provide reasonable protection against harmful interference in a residential installation. This equipment generates, uses and can radiate radio frequency energy and, if not installed and used in accordance with the instructions, may cause harmful interference to radio communications. However, there is no guarantee that interference will not occur in a particular installation. If this equipment does cause harmful interference to radio or television reception, which can be determined by turning the equipment off and on, the user is encouraged to try to correct the interference by one or more of the following measures:
- Reorient or relocate the receiving antenna.
- Increase the separation between the equipment and receiver.
- Connect the equipment into an outlet on a circuit different from that to which the receiver is connected.
- Consult the dealer or an experienced radio/TV technician for help.
The device does not contain any user-serviceable parts. Repairs should only be made by an Authorized Bushnell Repair center. Unauthorized repairs or modifications could result in permanent damage to the equipment, and will void warranty and your authority to operate the device under Part 15 regulations.
Specifications and design are subject to change without any notice or obligation on the part of the manufacturer.
Caution: There are no user controls, adjustments or procedures. Performance of procedures other than those specified herein may result in access to invisible laser light.
This product contains no user serviceable controls.
This product must not be opened or modified by the consumer.
This product must be returned to the manufacturer for service.
Device specifications and design are subject to change without notice or obligation on the part of the manufacturer.
Warning: Changes or modifications not expressly approved by the party responsible for compliance could void the user's authority to operate the equipment.


80950/SDPPI/2022 13902
FCC ID: 2ASQI-36216 IC: 24886-36116
Industry Canada Statement/Déclaration d'Industrie Canada :
This device complies with ISED's license-exempt RSSs. Operation is subject to the following two conditions: (1) This device may not cause harmful interference, and (2) this device must accept any interference received, including interference that may cause undesired operation.
This device complies with the Industry Canada portable RF exposure limit set forth for an uncontrolled environment and is safe for the intended operation as described in this manual. Further RF exposure reduction can be achieved if the product can be kept as far as possible from the user's body or if the device is set to a lower output power if such function is available.
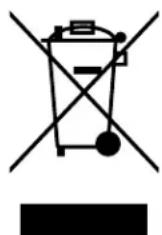
Disposal of Electric and Electronic Equipment
(Applicable in the EU and other European countries with separate collection systems)
This equipment contains electric and/or electronic parts and must therefore not be disposed of as normal household waste. Instead, it should be disposed at the respective collection points for recycling provided by the communities. For you, this is free of charge.
If the equipment contains exchangeable (rechargeable) batteries, these too must be removed before and, if necessary, in turn be disposed of according to the relevant regulations (see also the respective comments in this unit's instructions).
Further information about the subject is available at your community administration, your local waste collection company, or in the store where you purchased this equipment.
This device contains license-exempt transmitter(s)/receiver(s) that comply with Innovation, Science and Economic Development Canada's license-exempt RSS(s). Operation is subject to the following two conditions:
(1) This device may not cause interference.
(2) This device must accept any interference, including interference that may cause undesired operation of the device.
Windows is a registered trademark of Microsoft Corporation in the United States and other countries. Mac and Mac OS are trademarks of Apple Inc., registered in the U.S. and other countries. Other names may be trademarks of their respective owners.
Click to read Bushnell Golf product warranty and repair information.
Bushnell®
GOLF
©2022 Bushnell Outdoor Products
Bushnell, ^™ , ^® , denote trademarks of Bushnell Outdoor Products www.bushnell.com
9200 Cody, Overland Park, KS 66214
http://patents.vistaoutdoor.com
ÉCRANS CONTROLS (COMMANDES), HOME (ACCUEIL) ET PLAY GOLF (JOUER AU GOLF)
pie
| Metric | Value | | --- | --- | | TORREY PINES | 76 | | Écan Feuille des Scores | 18 | | PUTTS | 34 | | FAIRWAYS | 50% | | GIR | 50% | | PAR | 0 | | P4 | 3 |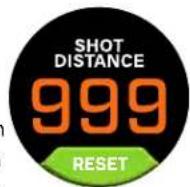
SHOT DISTANCE (DISTANCE DE TIR)
TOURNAMENT MODE (MODE TOURNOI)


MISE À JOUR DES DONNÉES DE PARCOURS DE GOLF
©2022 Bushnell Outdoor Products
pie
| Category | Value | |---|---| | Red Circle | 120 | | Green Segment | 112 | The label '120' is in red, and the label '112' is in green. The label '120' is also in red with a downward arrow pointing to it.


CBnk Al bunker central
©2022 Bushnell Outdoor Products


GOLFPLATZDATEN AKTUALISIEREN
CFyB Carry Fairwaybunker
CHzd Carry Hindernis
CLBk Carry Bunker links
CLHz Carry Hindernis links
Clif Zur Klippe
CLWs Carry Waste Area links
CLWt Carry Wasserhindernis links
CPth Carry-Weg
CRBk Carry Bunker rechts
CWst Carry Waste Area
CWtr Carry Wasserhindernis
Dtch Zum Graben
LBnk Zum Bunker links
LFwy Zum Fairway links
LGBk Zum Grasbunker links
LndA Zur Landezone
LWst Zur Waste Area links
©2022 Bushnell Outdoor Products


©2022 Bushnell Outdoor Products
Bushnell, ^™ , ^® , denote trademarks of Bushnell Outdoor Products www.bushnell.com
9200 Cody, Overland Park, KS 66214
http://patents.vistaoutdoor.com
CONTROLOS, ECRÃ INICIAL E ECRÃ PLAY GOLF
DETALHES DO ECRÃ DE GOLFE
MENU DE DEFINIÇÕES

O visor mostrará o Ecrã Front/Center/Back (Frente/Centro/Fundo):

BnkC Para bunker central
CCBK Carregar bunker central
CV Para centro da vala
FwyC Para fairway central
Frwy Para fairway
CBFy Carregar bunker fairway
CR Carregar risco
CBkE Carregar bunker à esquerda
©2022 Bushnell Outdoor Products
Bushnell, ^TM , ^ , denote trademarks of Bushnell Outdoor Products www.bushnell.com
9200 Cody, Overland Park, KS 66214
http://patents.vistaoutdoor.com
KONTROLELEMENTER, STARTSKÆRM OG SPIL GOLF-SKÆRME
Spil Golf-tilstand Front/Center/Bagkant
VEJLEDNING TIL HURTIG START
INDSTILLINGSMENUEN

TIDSINDSTILLINGER :

Scan koden for at downloade og installere Bushnell Golf-appen.

OPDATERING AF GOLFBANEDATA
Windows is a registered trademark of Microsoft Corporation in the United States and other countries.
Mac and Mac OS are trademarks of Apple Inc., registered in the U.S. and other countries. Other names may be trademarks of their respective owners.

80950/SDPPI/2022
13902


FCC ID: 2ASQI-36216
IC: 24886-36116
Disposal of Electric and Electronic Equipment
(Applicable in the EU and other European countries with separate collection systems)
This equipment contains electric and/or electronic parts and must therefore not be disposed of as normal household waste. Instead, it should be disposed at the respective collection points for recycling provided by the communities. For you, this is free of charge.
If the equipment contains exchangeable (rechargeable) batteries, these too must be removed before and, if necessary, in turn be disposed of according to the relevant regulations (see also the respective comments in this unit's instructions).
Further information about the subject is available at your community administration, your local waste collection company, or in the store where you purchased this equipment.
©2022 Bushnell Outdoor Products
Bushnell, ^TM , ^ , denote trademarks of Bushnell Outdoor Products
www.bushnell.com
9200 Cody, Overland Park, KS 66214
http://patents.vistaoutdoor.com
KONTROLLER, START- OCH SPELA GOLF-SKÄRMEN


UPPDATERA GOLFBANEINFORMATION
©2022 Bushnell Outdoor Products
Bushnell, ^™ , ^® , denote trademarks of Bushnell Outdoor Products www.bushnell.com
9200 Cody, Overland Park, KS 66214
http://patents.vistaoutdoor.com
控制,首页,和打高尔夫屏幕
设置菜单


更新高尔夫球场数据
©2022 Bushnell Outdoor Products
设置菜单
B. Notifications (通知):


©2022 Bushnell Outdoor Products
설정 메뉴
pie
| Metric | Value | |--------|-------| | PUTTS | 34 | | FAIRWAYS | 50% | | GIR | 50% | | PAR | 18 | | P4 | 3 | The chart includes labels for the top section (e.g., '76' and '+4') and the bottom section (e.g., '18'). The text '스코어카드 화면' appears in the top right corner.샷 거리


골프 코스 데이터 업데이트
©2022 Bushnell Outdoor Products
DETAIL LAYAR MAIN GOLF
Spil Golf-tilstand Front/Center/Bagkant
PANDUAN CEPAT
MENU SETELAN

Tombol Main Golf Menerima Sinyal

MODE MAIN GOLF
pie
| Category | Value | |---|---| | Red Circle | 120 | | Green Segment | 112 | The label '120' appears in the center of the pie chart, but its value is not explicitly labeled on the chart itself.

L Ke titik Layup (misal 75L= Ke 75 yard titik Layup, 100L= Ke 100 yard titik Layup)
M Ke Marker (misal 250M = Ke 250 Marker)
BnK Ke # Bunker (misal T1Bk = Ke Bunker pertama)
LFwy Ke Kiri Fairway
LGBk Ke Kiri Bunker Rumput
LndA Ke Area Pendaratan
LWst Ke Kiri Waste Area
LWtr Ke Kiri Air
Path Ke Path
PotB Ke Pot Bunker
RBnk Ke Kanan Bunker
Rdge Ke Punggung Bukit
RDch Ke Kanan Parit
RFwy Ke Kanan Fairway
RGBk Ke Kanan Bunker Rumput
RHzd Ke Kanan Rintangan
Road Ke Road
RWst Ke Kanan Waste Area
RWtr Ke Kanan Air
ThFy Melalui Fairway
ThRF Melalui Kanan Fairway
Wter Ke Rintangan Air
WstA Ke Waste Area
WstB Ke Waste Bunker
CGrg Pindah ke Tebing
RvrB Ke Dasar Sungai
Wall Ke Dinding
©2022 Bushnell Outdoor Products
©2022 Bushnell Outdoor Products